
Where is AirDrop in Finder Preferences? How to restore items in the Finder sidebar? Or AirDrop Missing from Finder Sidebar? This article will show you how to fix AirDrop not showing in the Finder sidebar on Mac. There are many reasons why this is happening, and we all know how hard it is to share files between Apple devices without AirDrop when you don’t usually go for other applications. Apple has provided customizations that make it easy for us to decide what we want to see and whatnot, including AirDrop.
When you can’t locate AirDrop in the Finder sidebar, make sure to check it is added to the favorites section. If AirDrop is deselected to show under the Favorites menu in Finder, it won’t appear. First, we’ll ensure this setting, and if everything is alright, but still AirDrop is not showing, try some further solutions to fix it.
Fix Airdrop disappeared on Mac Finder Sidebar
Also Read: Full guide on how to bring back the Finder Sidebar on Your Mac Computer
Solution #1. How to Add AirDrop to Finder Sidebar in Finder on Mac
here’s How do I open AirDrop in Finder on iPhone? Easy and Traditional methods to access Airdrop on Mac. – Now, Airdrop is available on the Mac control center, explained last in a tutorial
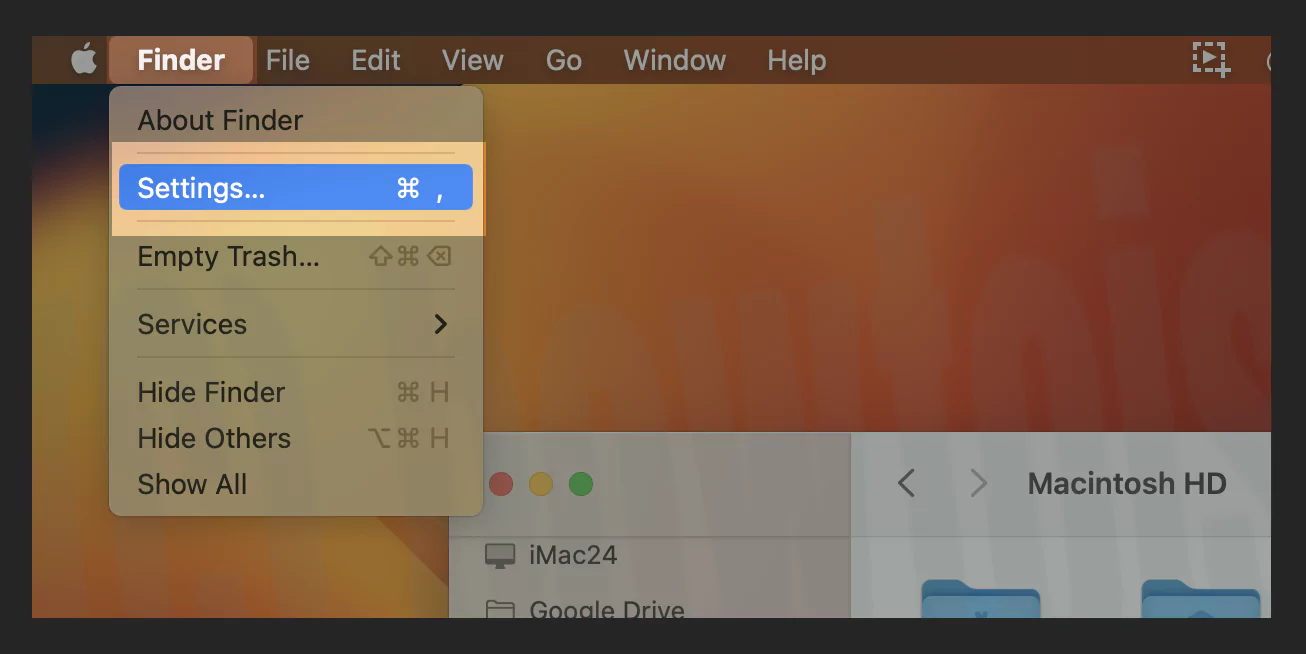
1→ Open Finder on your Mac. Click on the Finder option in the top menu bar.
2→ Select Settings..
3→ Click on the Sidebar tab.
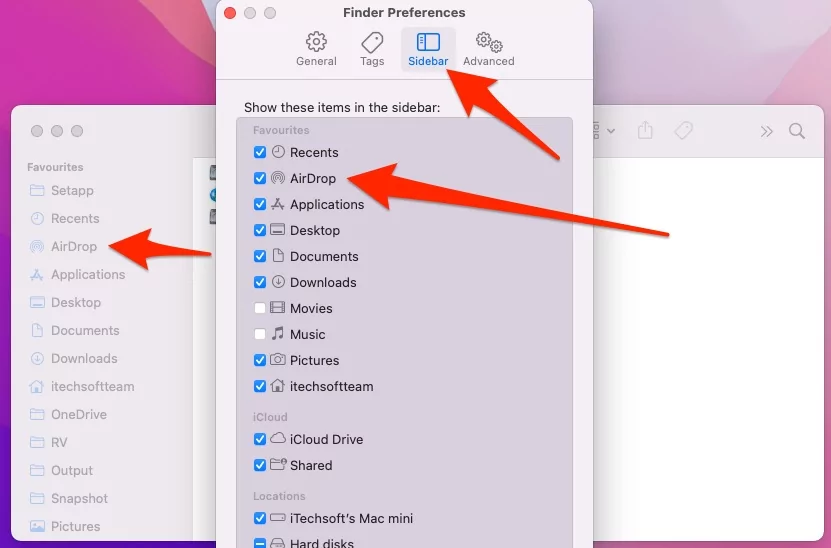
4→ Check the box of AirDrop under Favorites.

5→ Now, AirDrop is Accessible on Finder’s Sidebar. and Quickly Transfer files with another nearby Apple Device via AIrDrop. here’s Airdrop not working for many reasons.
Still, your Airdrop is not in finder preferences then follow the other troubleshooting.
🗣Useful: Add Shared Folder on Finder Sidebar [icloud collaboration folder] to quickly access shared documents and folders.
Solution #2. Make Sure Finder Favorites is not minimized
This is a helpful tidbit; maybe you are not realized that your Mac computer Finder Favorites minimized. This is hard to see unless you’re aware that Favorites items (Airdrop) can be minimized.
Let’s Check; by holding your cursor over the Favorites text; you will see a “Hide”/”Show” option. This will help if you wonder why your shortcuts aren’t available.

Solution #3. Use Terminal to Fix
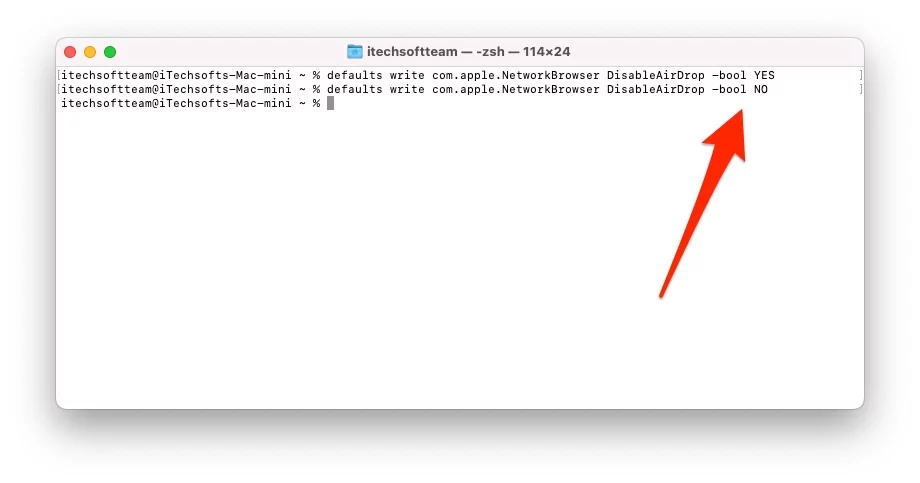
Despite the fact that the AirDrop is added to the Finder sidebar, you can’t see it time to take the help of Terminal and its commands to bring it to action. Make sure to enter the command correctly in Terminal.
- Launch Terminal App. Press the command+spacebar and search Terminal App.
- The following command will deactivate the AirDrop:
- defaults write com.apple.NetworkBrowser DisableAirDrop -bool YES
- Once the command is executed correctly, enter the next command to enable AirDrop:
- defaults write com.apple.NetworkBrowser DisableAirDrop -bool NO

- defaults write com.apple.NetworkBrowser DisableAirDrop -bool NO
- Close the Terminal App.
- Look for AirDrop in the Finder sidebar.
Solution #4. Tweak Finder Settings
Try this too,
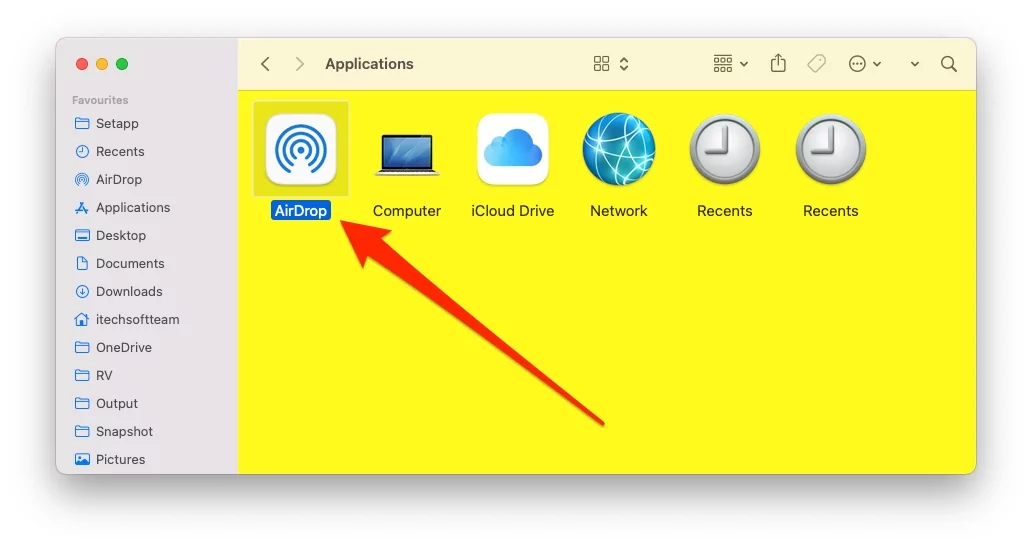
- Open Finder on your Mac.
- Click on the Go option in the menu bar.
- Choose Go to folder…
- Enter the following path:
- /System/Library/CoreServices/Finder.app/Contents/Applications

- /System/Library/CoreServices/Finder.app/Contents/Applications
- Find the AirDrop icon, and click on it to open.
- And if the AirDrop icon isn’t showing there, switch the Mac user or create a new user account in Mac.

- If the AirDrop shows up correctly in the new user account, there’s likely to be an issue with a user account.

Solution #5. Force Stop Finder
What if Finder is dealing with some severe issues and can’t load AirDrop in the sidebar? We can force quit the Finder and resolve the issue.
Apps on Mac can be force stopped in two ways. The first is to press Command + Shift + Esc, which will display a Task Manager; select Finder and then Force Quit.
However, doing this by Terminal is more effective. Hence, I’d recommend force quite Finder using Terminal Commands.
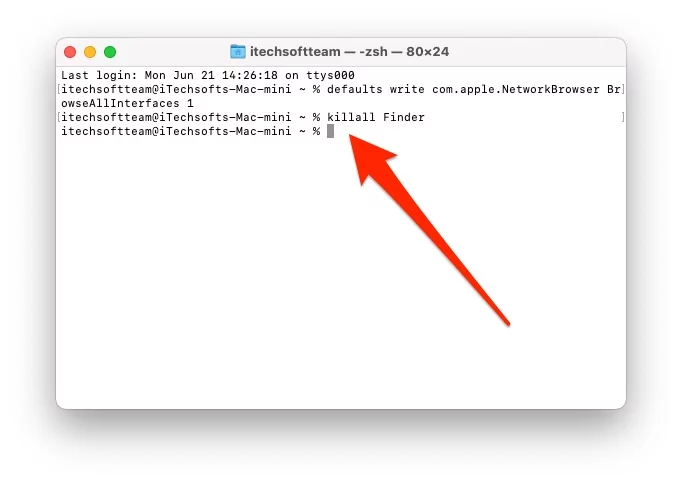
- Launch the Terminal app on your Mac.
- Enter the below command and press enter:
- defaults write com.apple.NetworkBrowser BrowseAllInterfaces 1

- defaults write com.apple.NetworkBrowser BrowseAllInterfaces 1
- Now, enter the following command: killall Finder and press Enter.
- Return to Finder and verify whether the Finder is back again.
Solution #6. Remove Finder’s Plist File
Delete the old Finder’s plist file from the record; if they are corrupted, Finder could face more such issues. Don’t worry; the plist files will automatically develop once you restart Finder.
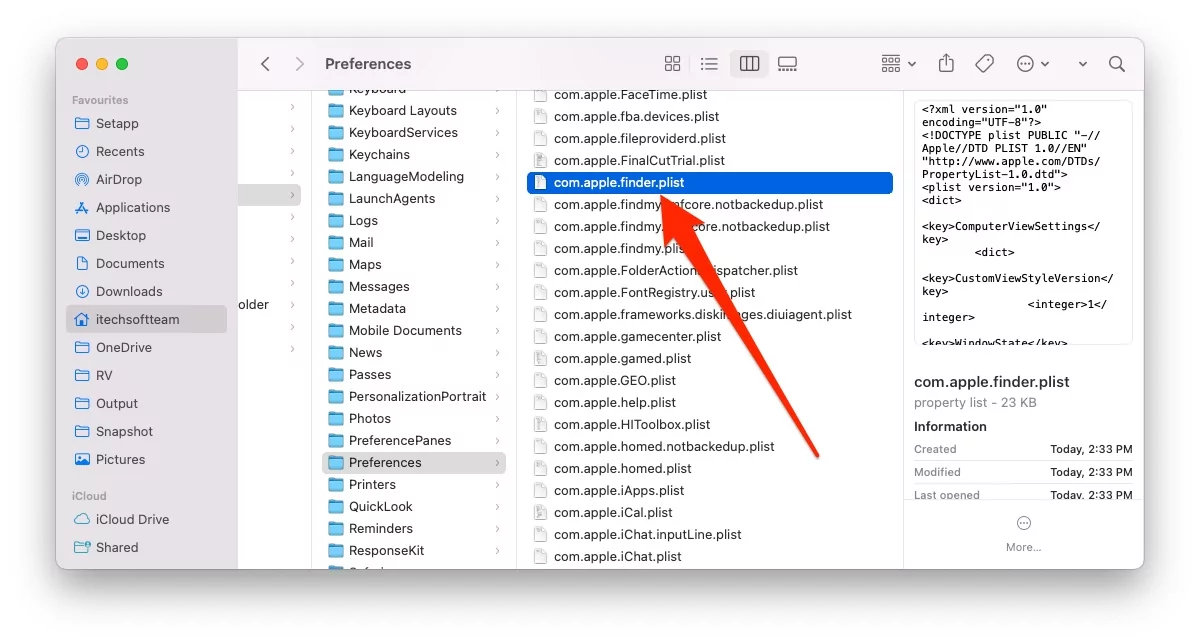
- Open Finder.
- Click “Go” in the top menu bar.
- Click on Go to folder…
- Type the following path:
- ~/Library/Preferences
- Finder the com.apple.finder.plist file.

- Move that file to Trash.
- Reboot Mac.
Check if AirDrop is working or not.
Solution #7. Update Your Mac Operating System
In the end, all you can do is update the Mac to the latest available software for your device. The new updates bring bug fixes and further system improvements; if you’re still having trouble catching AirDrop from Mac Control Center, updating the macOS is the right solution.
- Connect the Mac to the Wi-Fi.
- Click on the Apple logo menu.
- Select System Settings…
- Now, click on General setting.
- Select Software Update.
- Download and install any available software updates.
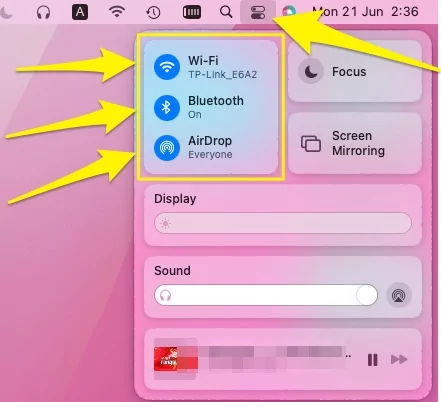
Solution #8. How to Enable AirDrop from Mac Control Center?
With the latest macOS Big Sur/Monterey or later, Apple has added the Control Center to the Mac, similar to iOS. By default, AirDrop is added to the Control Center; however, if you don’t see it, go ahead and re-add AirDrop to the Control Center on your Mac.
To add AirDrop to Mac Control Center:
- Click on the Apple menu.
- Select System Preferences.
- Go to Dock & Menu Bar.
- Click on AirDrop.
- You’ll see a preview of that item in Control Center.
- Then check the box of Show in Control Center.
- Close the window.
Once you do this, AirDrop will be available in the Mac Control Center. Click the Control Center button, then select AirDrop to enable it.


