
Being a Mac user, you might have encountered a situation where while sharing networks or other things between MacBooks, you could not recognize the name of your MacBook due to the similar or identical default Mac names. This problem causes your MacBook machine to connect or interact with another Mac with the same name, putting your privacy at stake. It is best to change and set a unique Hostname for your MacBook so that it becomes easier for people using sharing to identify your device to avoid such problems.
We will cover the methods for changing the computer name or hostname in sharing for both macOS Monterey and macOS Ventura operating systems. Therefore, stay with us through the end of this article to figure out quick, straightforward, and effective ways to change the hostname of your Mac.
On MacOS Ventura, Sonoma→
Hence, stick to the process described in detail here to change the local hostname of your MacBook.
Steps to Change Mac Local Hostname On Mac, .local
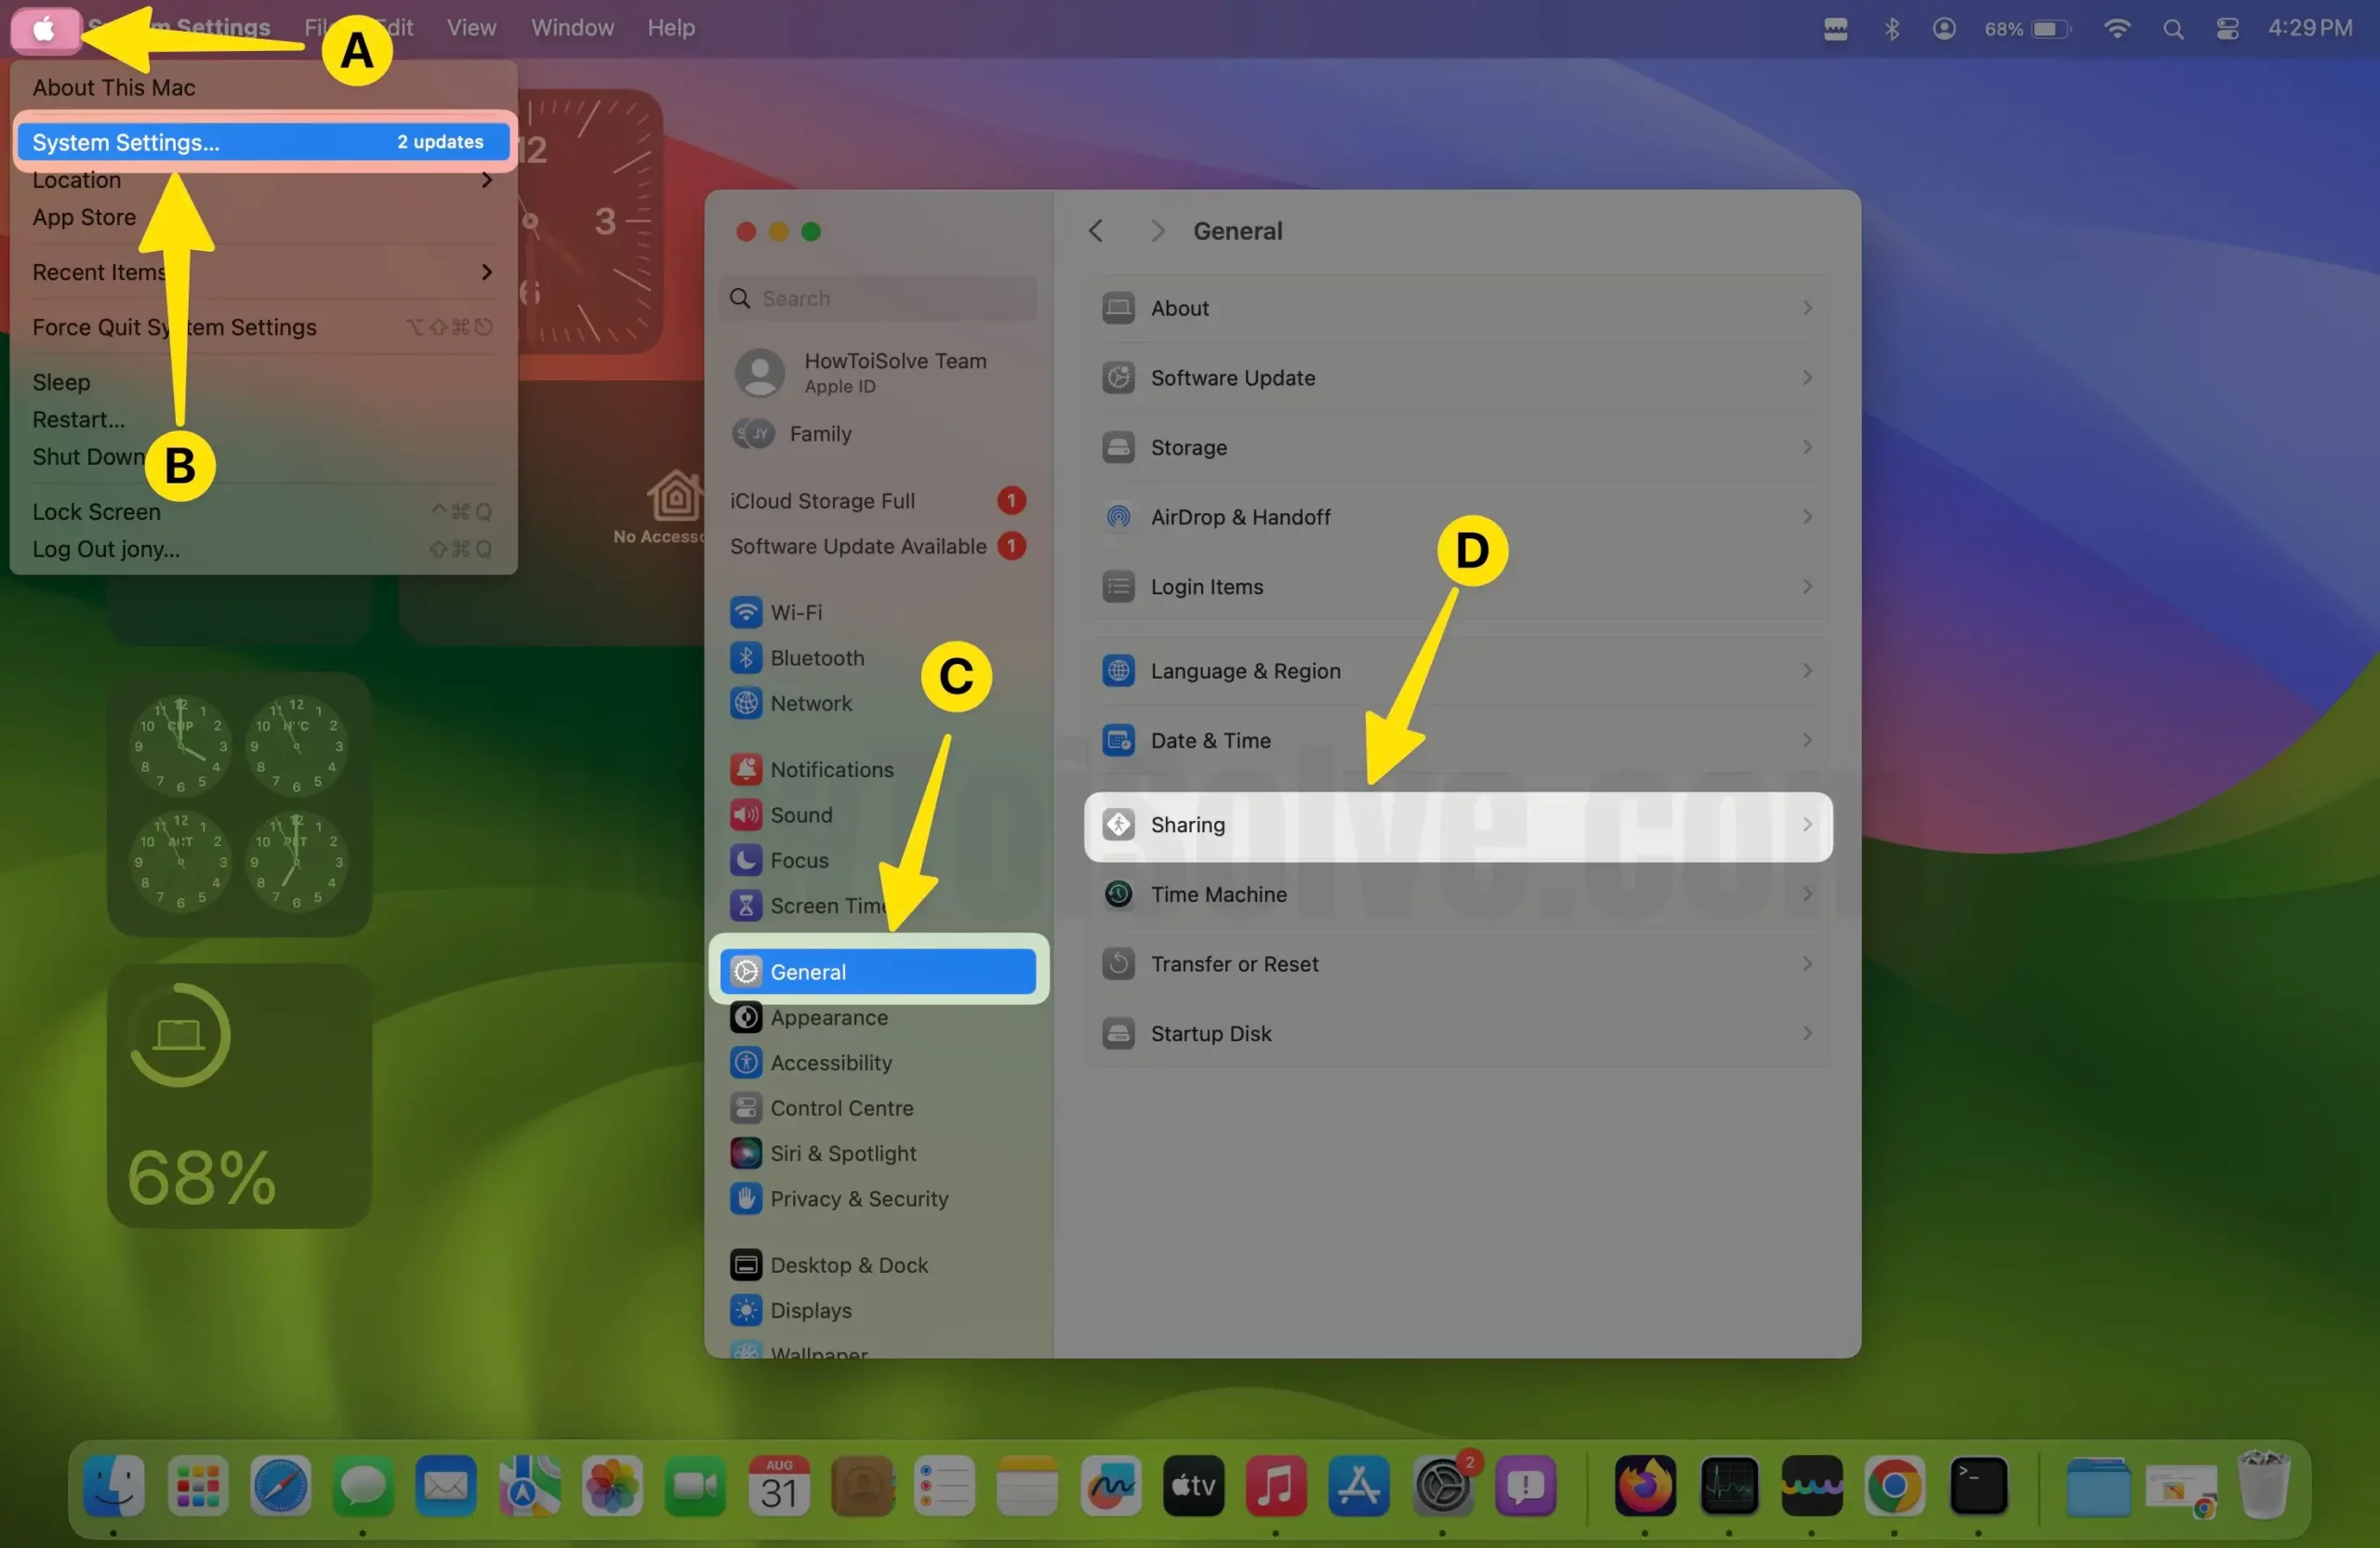
Step. 1→ The initial stage of this process involves you clicking on the Apple Logo > System Settings menu.
Step. 2→ Selecting the “General” option in the left-hand sidebar of the window. Now, Go with the “Sharing” action to open the sharing settings window of your MacBook.
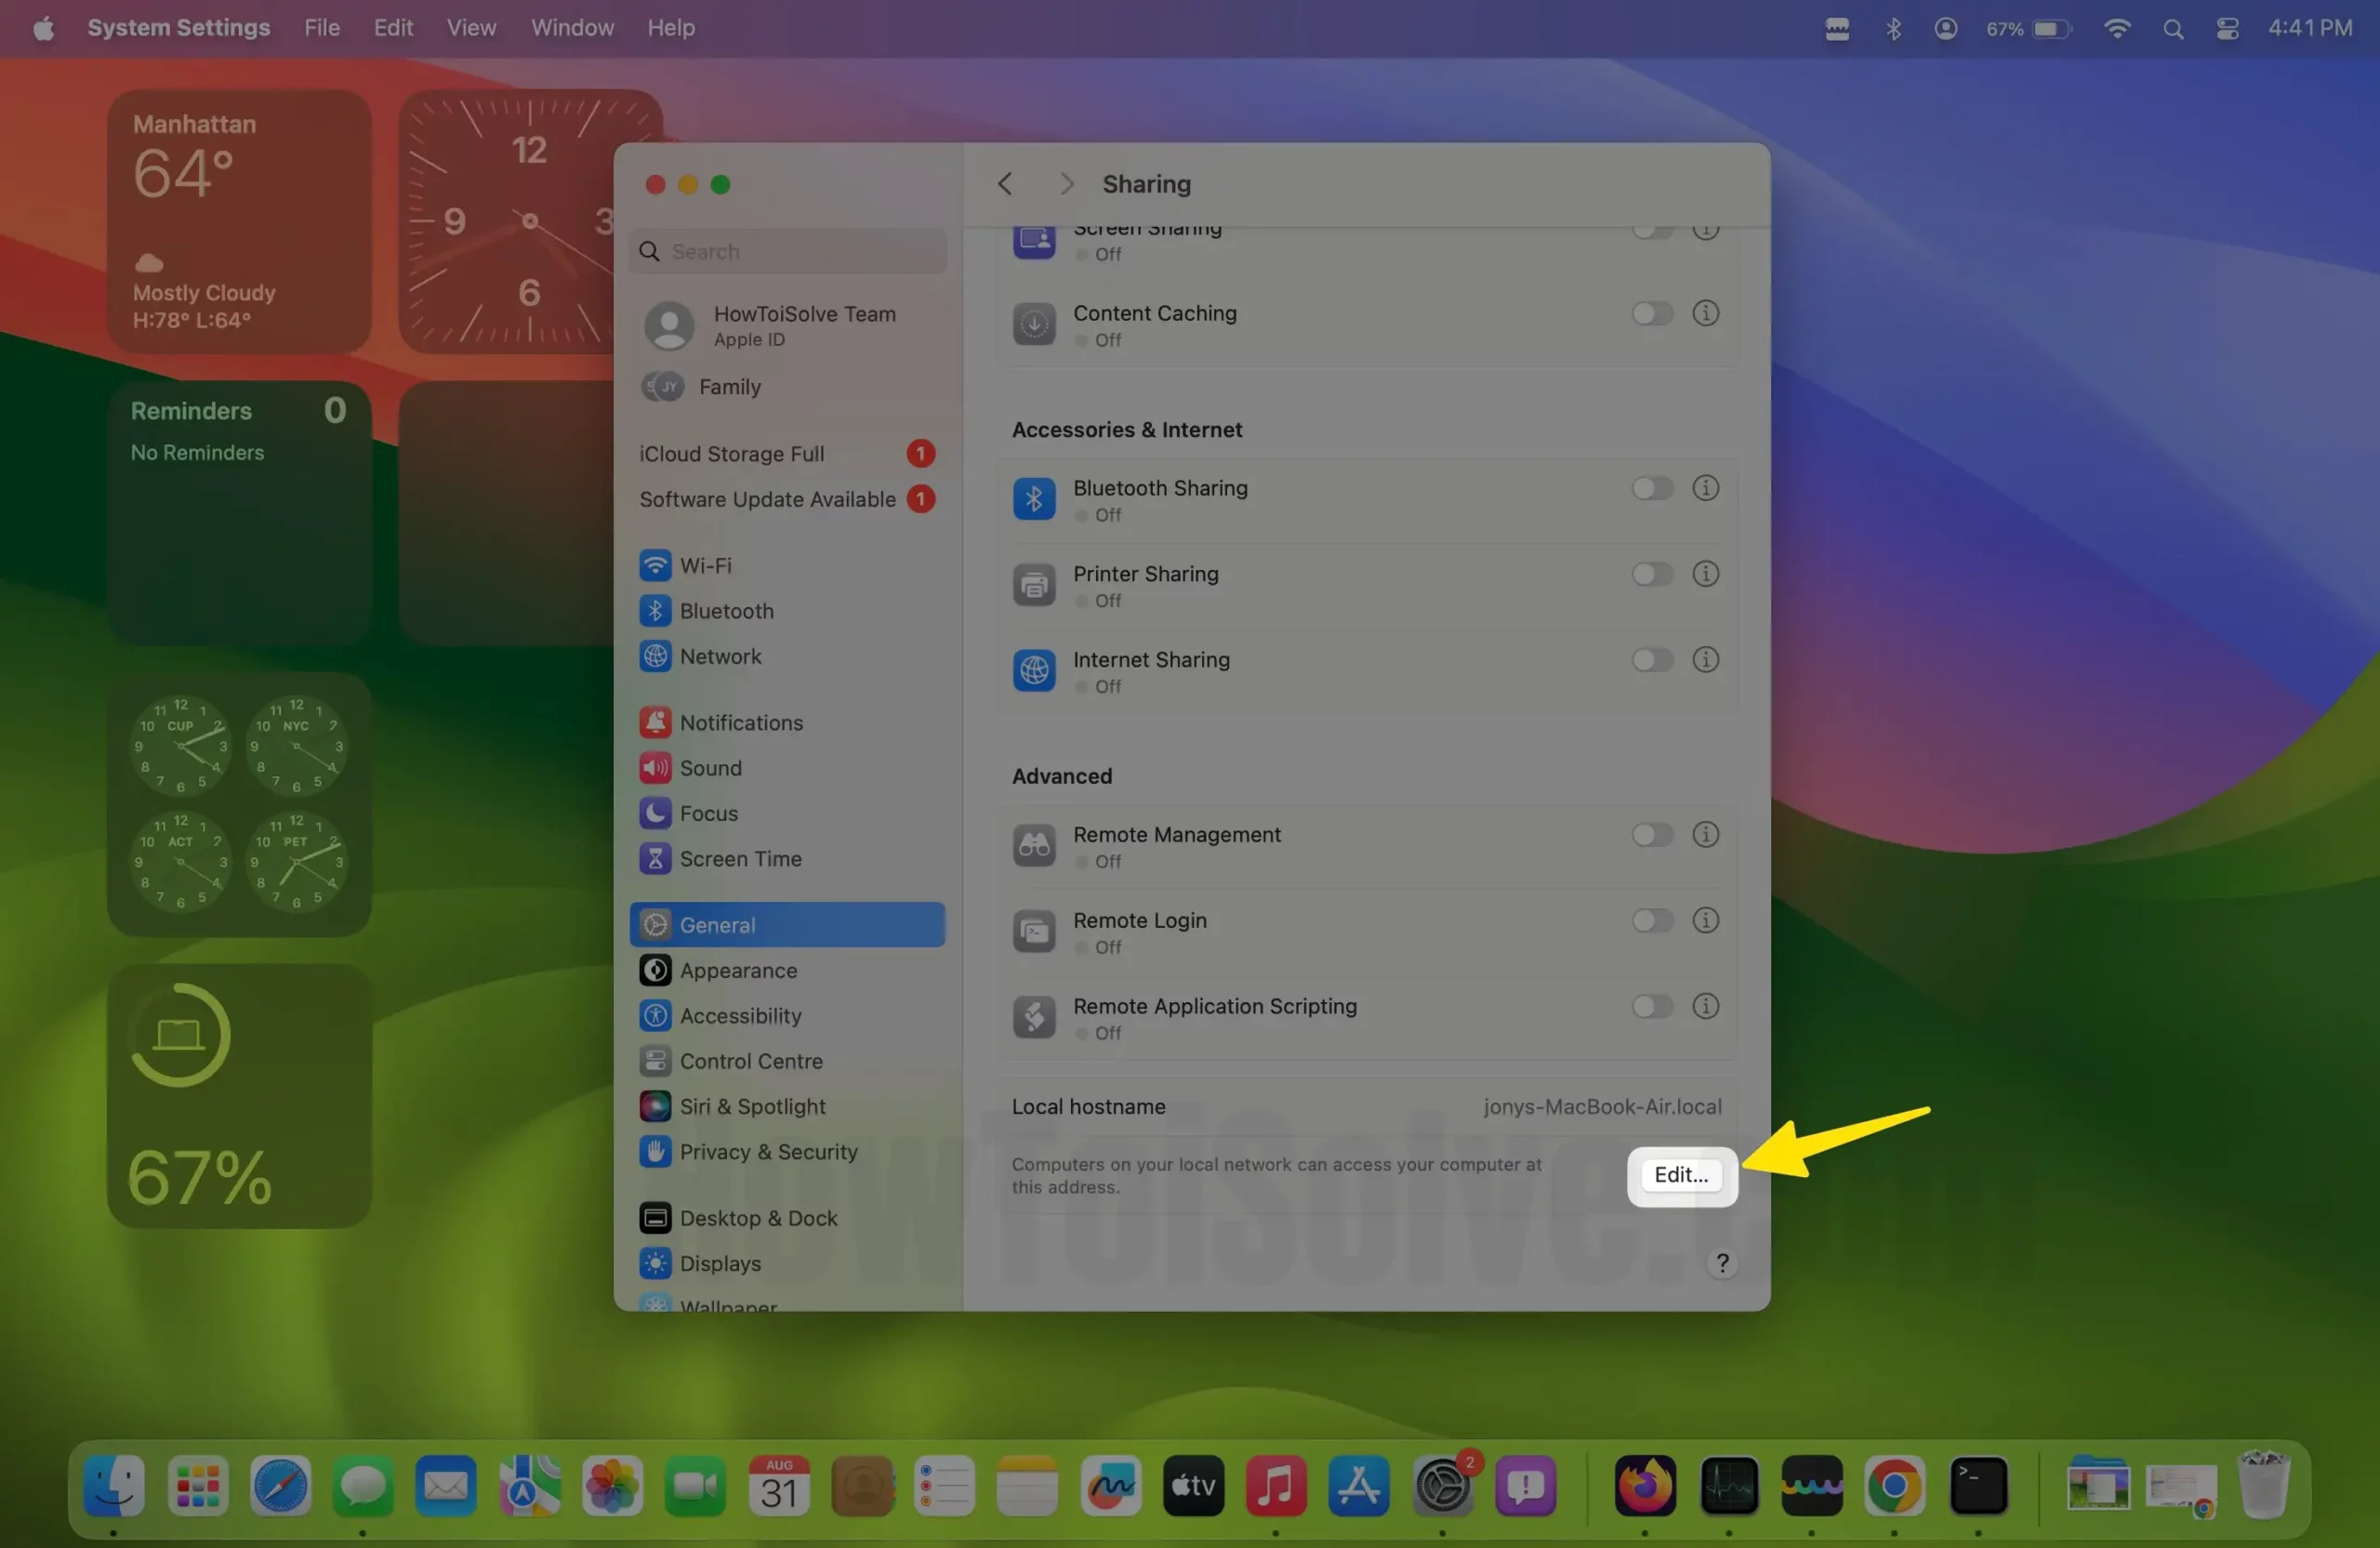
Step. 3→ Then, Just below the Computer name, See “Computers on your local network can access your computer at: Computer_name.local“.
Step. 4→ At last, click on “Edit”.
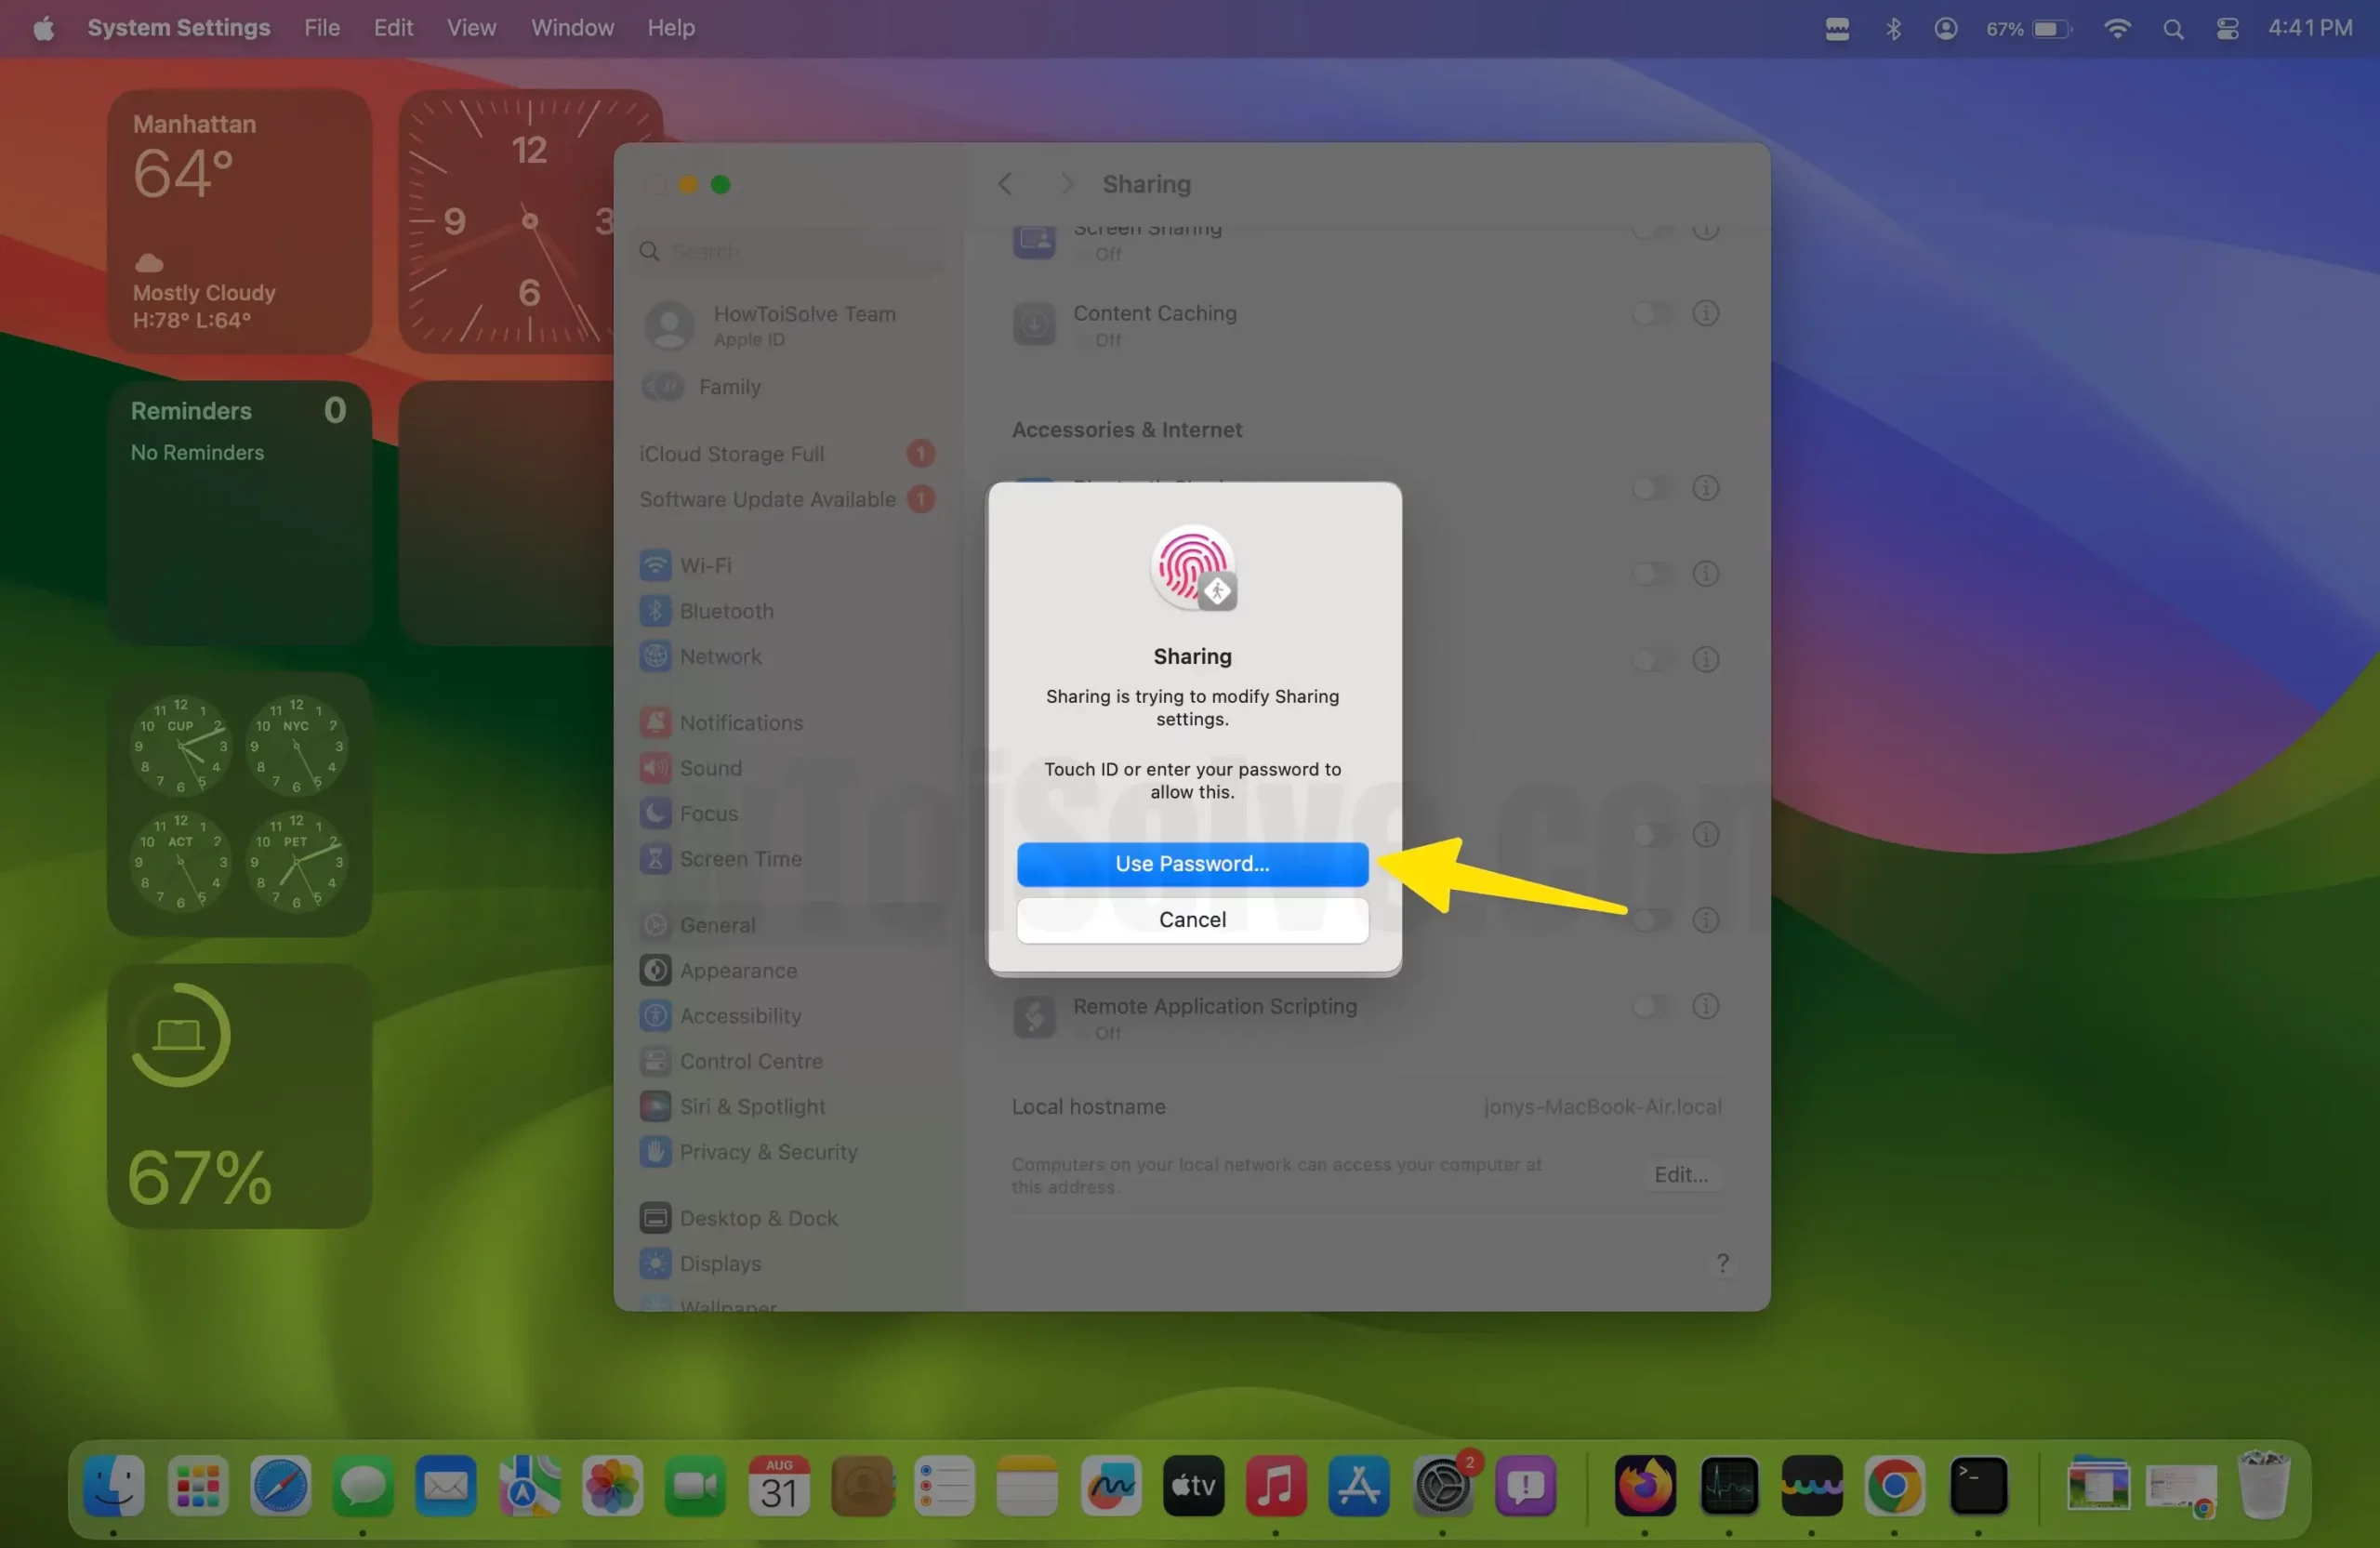
Verify with your Tuch ID and Password.
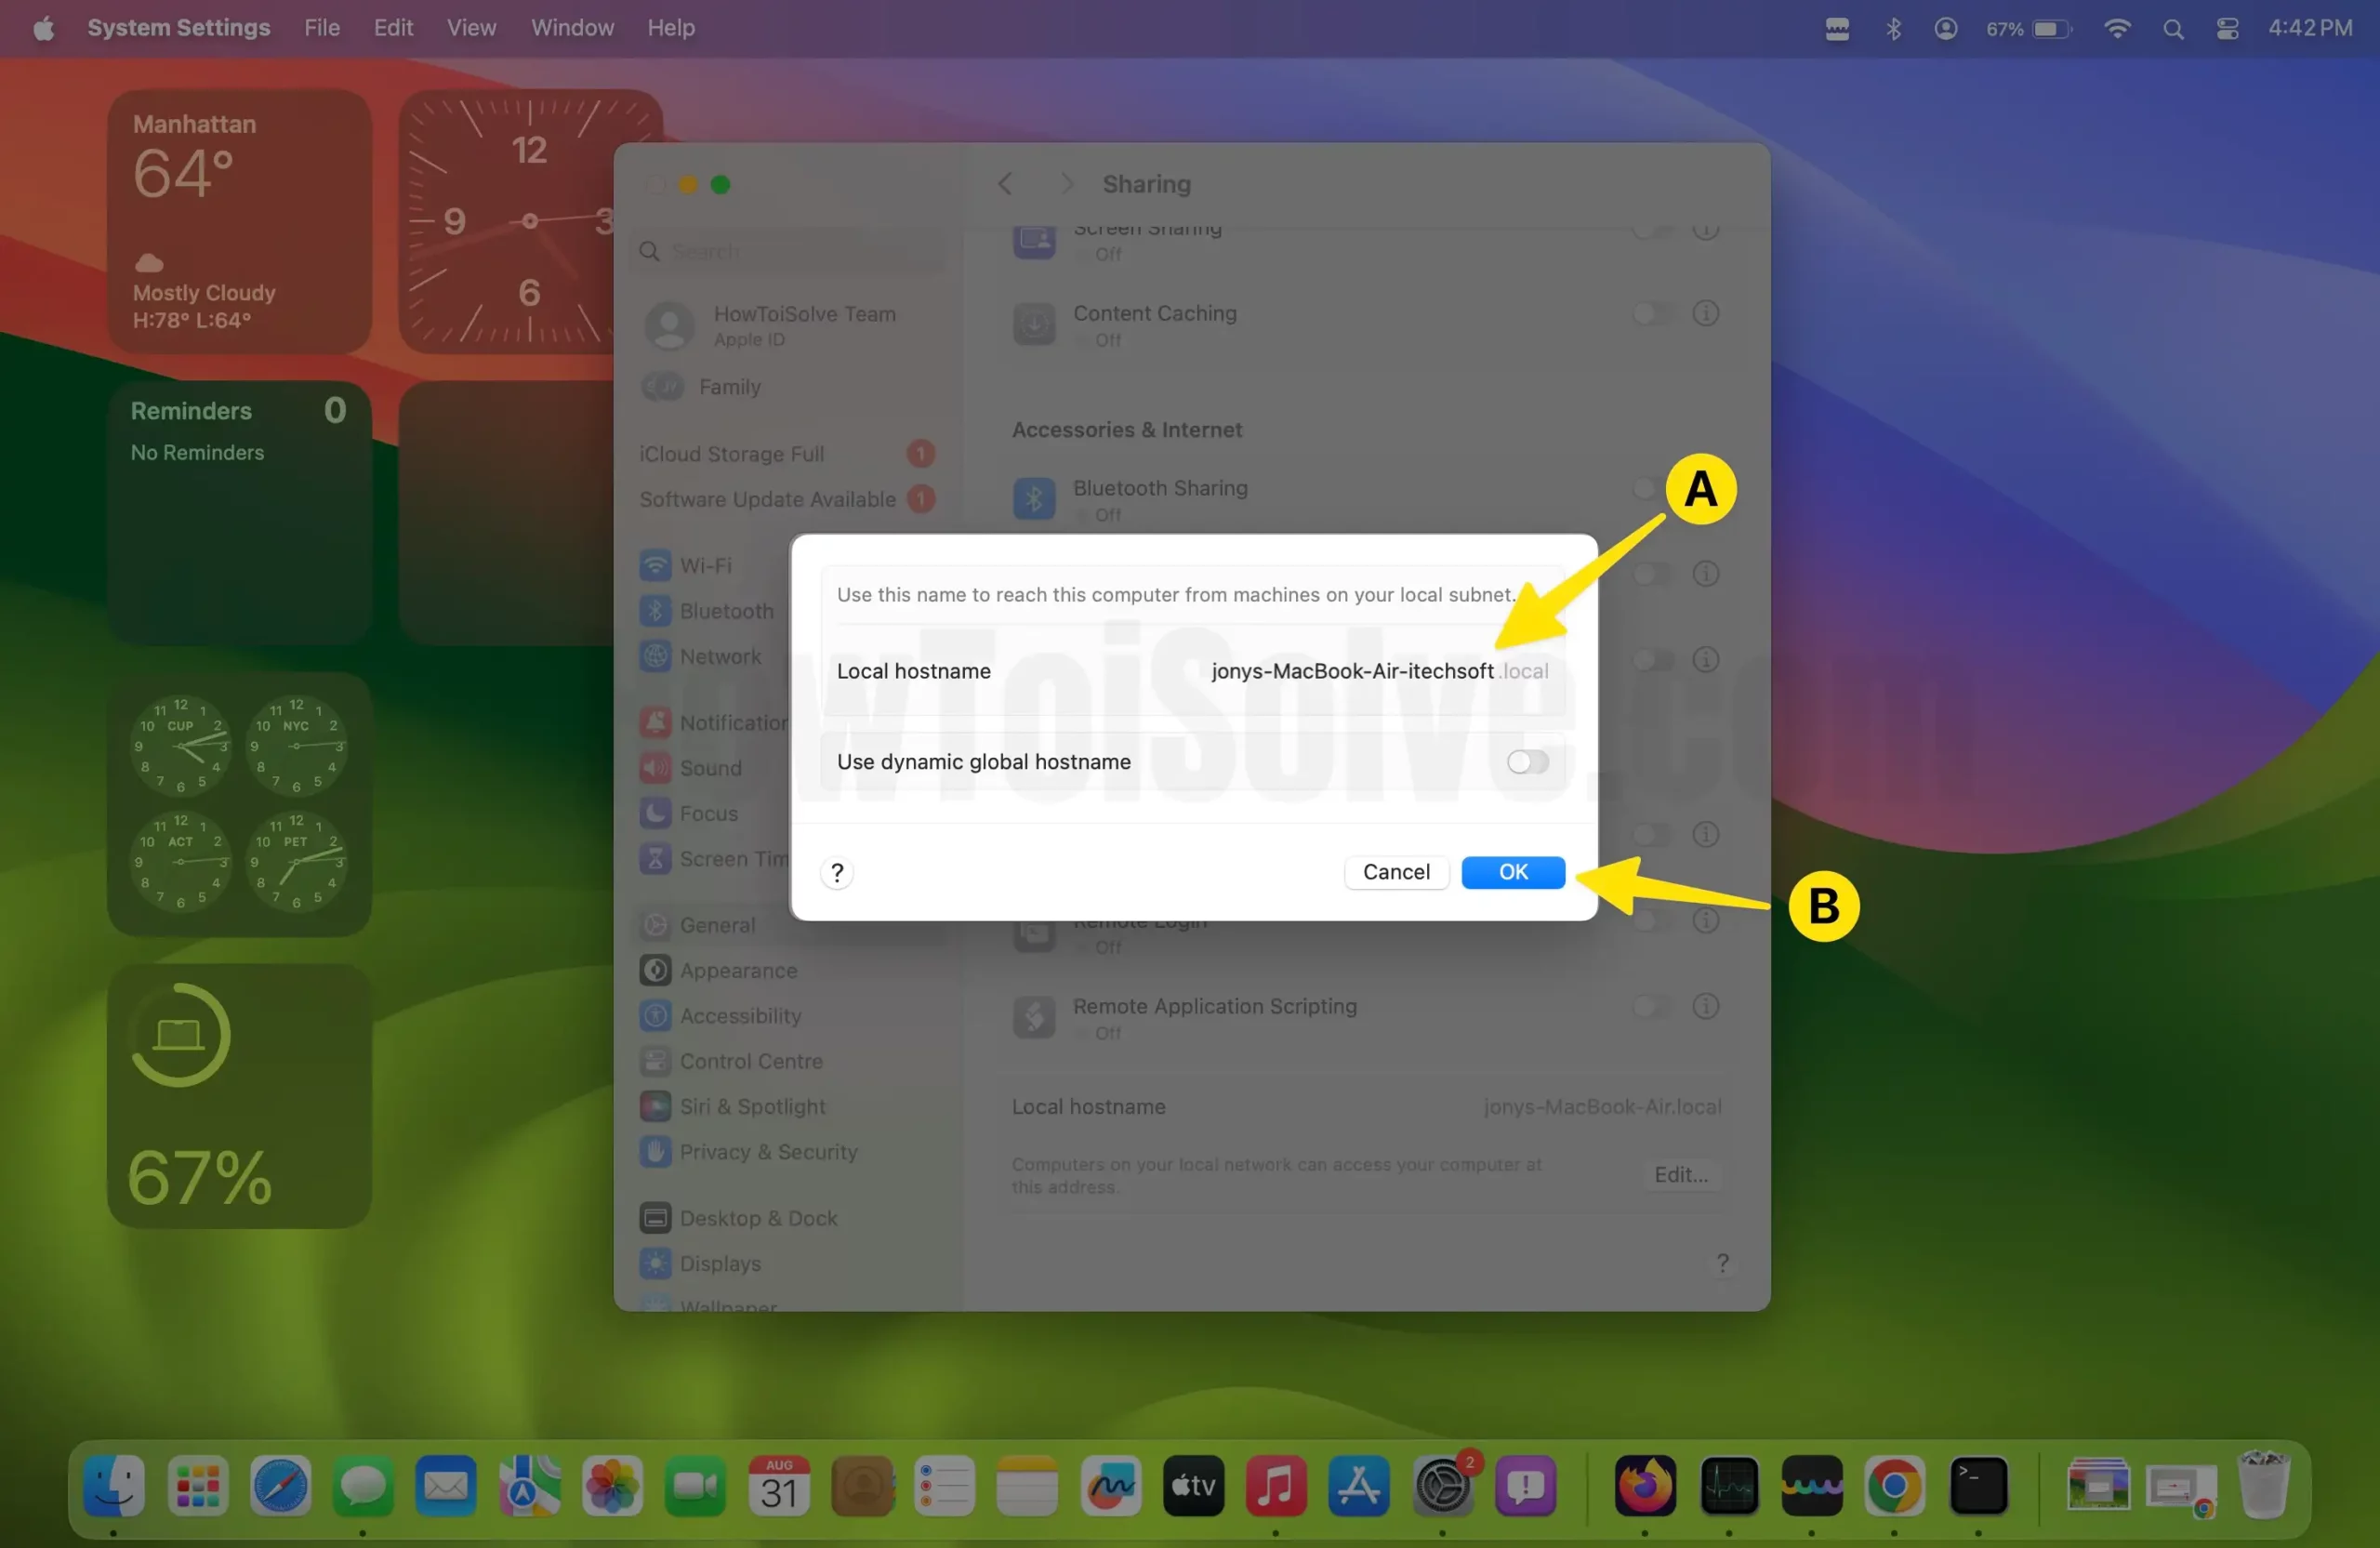
Step. 5→ Type the new local hostname of your MacBook before the “.local” extension in the typing field. Click on OK.
Changing your computer’s name and the local hostname of your computer is essential for everyone so that your MacBook can easily be recognized by other Macs while sharing. Hence, don’t compromise your safety and privacy of your data by mistakenly connecting to someone else’s Mac with a similar default name and imply the methods described in this post to change your Mac’s name and local hostname.
On macOS Monterey→
The macOS Monterey, since its release, has been praised by critics, users, and even the developers for its smooth, fast and simple user interface. In addition, the innovative and unique features added to this operating system make it one of the most remarkable operating systems to date. So, to change your computer’s name and the local hostname of your Mac, refer to the process demonstrated below.
How to Change Your Mac’s Local Hostname
MacBook’s local hostname or local network name is the one that is present under your Mac’s name in the Sharing Preferences tab. The local hostname has “.local” as the extension, with the spaces between Mac’s name, changed to hyphens. Suppose the name of our Mac is John’s Computer, then the local hostname of your MacBook will be “John’s-Computer.local.”
Step. 1→ Head over to the sharing tab by tapping the Apple Logo menu and selecting system preferences.
Step. 2→ Then, unlock the preferences setting by tapping on the lock icon at the bottom left portion of the screen if it is locked. Now, look for the “Edit” option and click on it.

Step. 3→ Change your Hostname just before .local
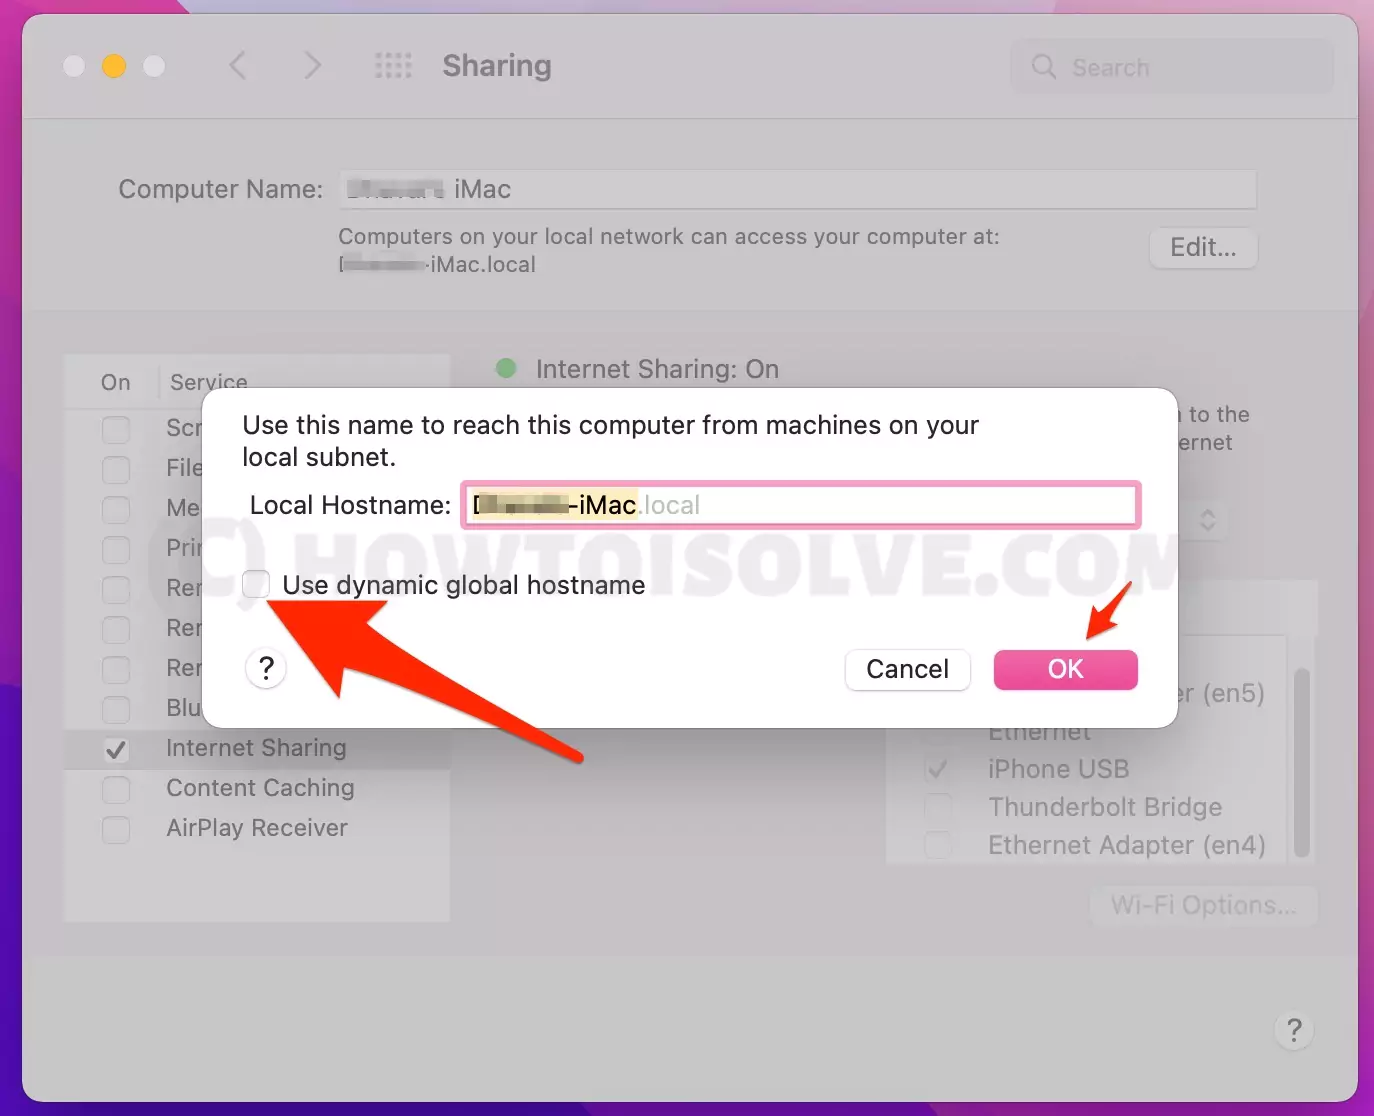
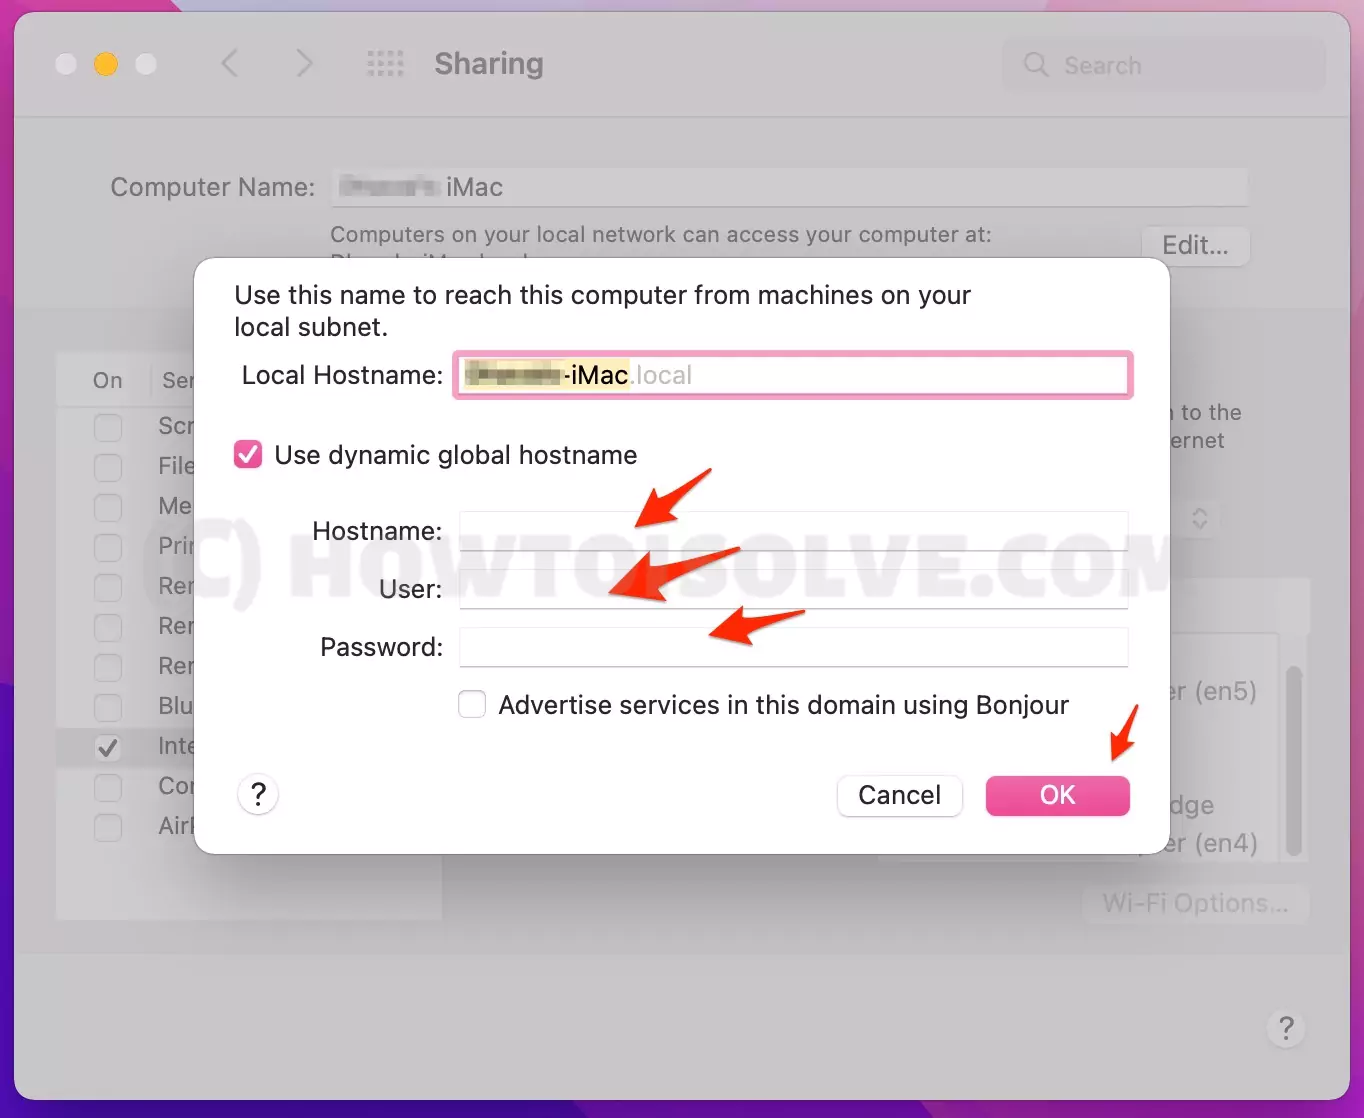
Step. 4→ Finally, hit the OK button. if you want to use Dynamic Hostname then Select “Use dynamic global hostname“. and Fill in the details – Hostname, username, and Password.
Mac Change Hostname Terminal
Also, we can change your Mac hostname using the Terminal command Like Local Hostname, Primary Hostname, and Computer Name. Follow the below command, on Any MacOS [macOS Ventura, MacOS Monterey & Earlier]
To change your Mac Local Hostname Using Terminal
This local network name we can use for your Mac. For Example: myMac.local
Step 1:- Open the Terminal App and type the below command to run on your Mac.
Step 2:- Hit the Return to run the command, and Your Terminal window might be asked to Enter your Mac login password. [Two dashes without any space between them.]
sudo scutil - -set LocalHostName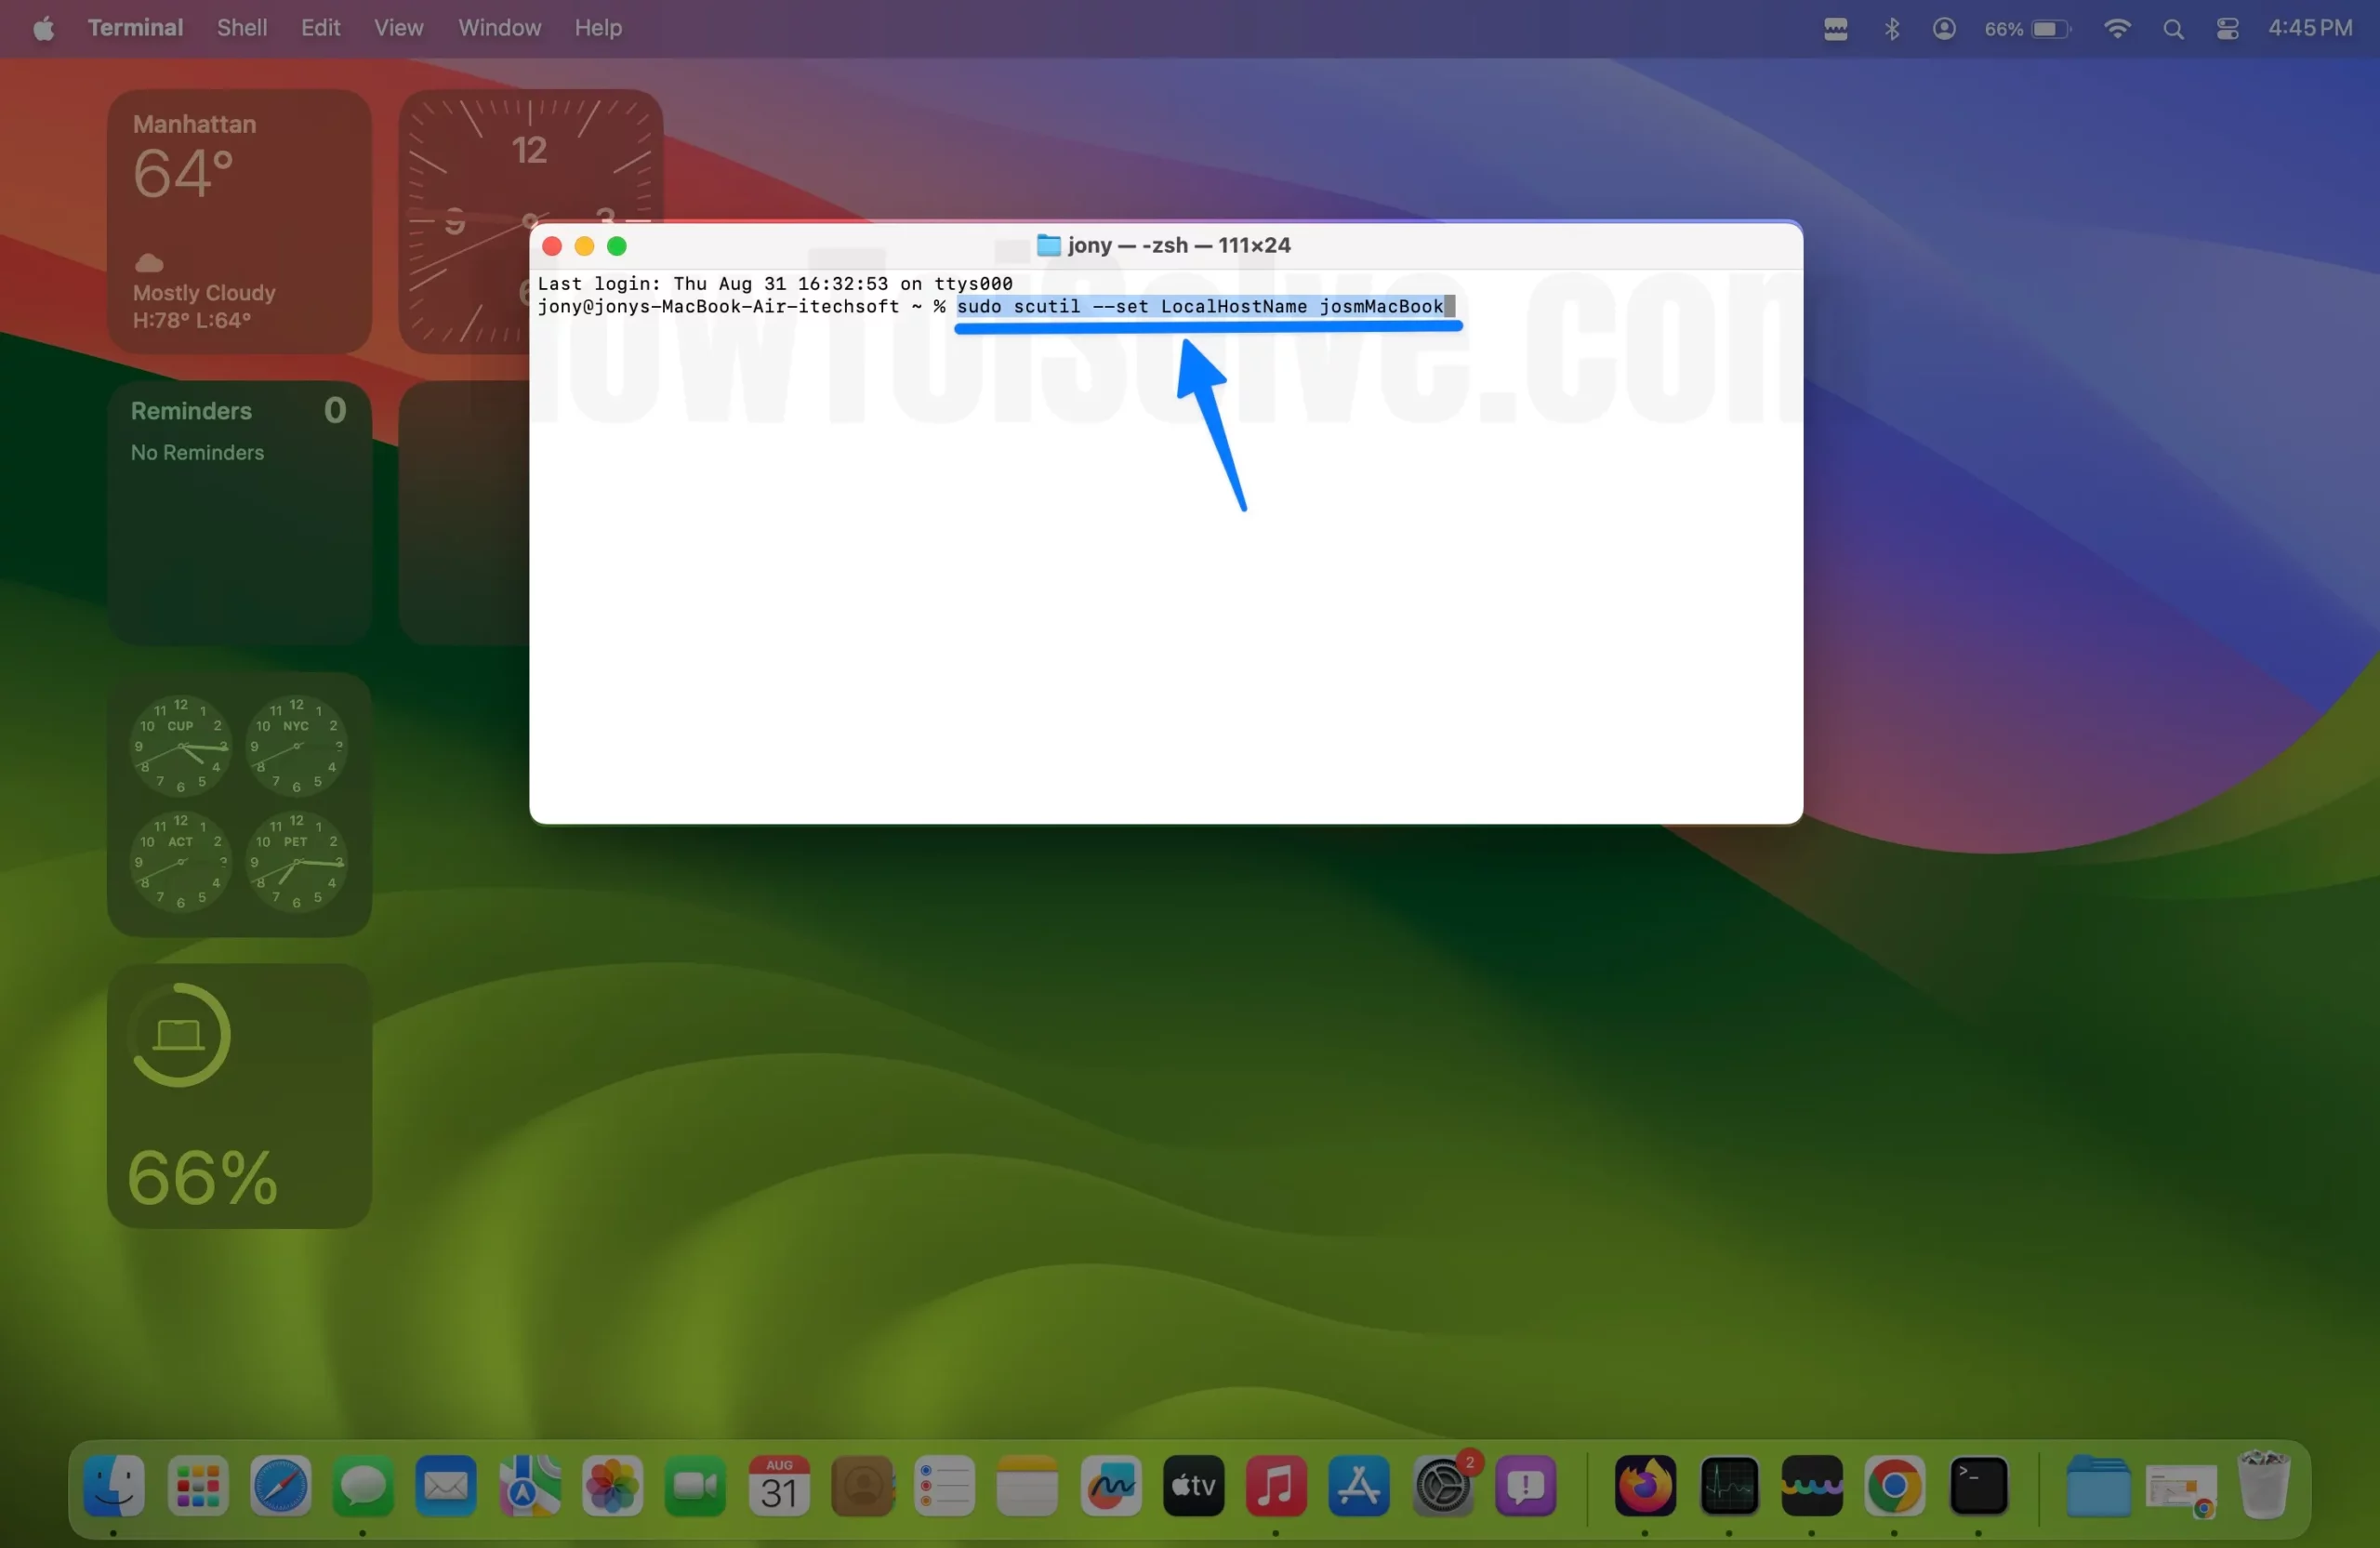
In My Example, if I want to set My Local Hostname for My iMac24 like that, So the command will be, → Verify Space, then Double Dash before set in the below command… Two dashes without any space between them.
sudo scutil - -set LocalHostName josmMacBook
To change your Mac Primary Hostname Using Terminal
To change the Primary Hostname, That’s a fully qualified hostname, For Example:- myMac.domain.com
Step 1:- Open the Terminal app on Mac. and Run the below command. Two dashes without any space between them.
sudo scutil - -set HostName
For Example:- If I want to set Mac Primary Hostname for my iMac24 like That, Command will be, Two dashes without any space between them.
sudo scutil - -set HostName iMac24To change your Mac Computer Name using Terminal
Set a user-friendly Mac name or change it any time using the below command that appears on your Mac’s Finder window or on the Login screen.
Do it using the Below Terminal command,
Step 1:- Open Terminal App on Mac and type the below command.
Step 2:- Enter your Mac login password to Verify and Run. Two dashes without any space between them.
sudo scutil - -set ComputerName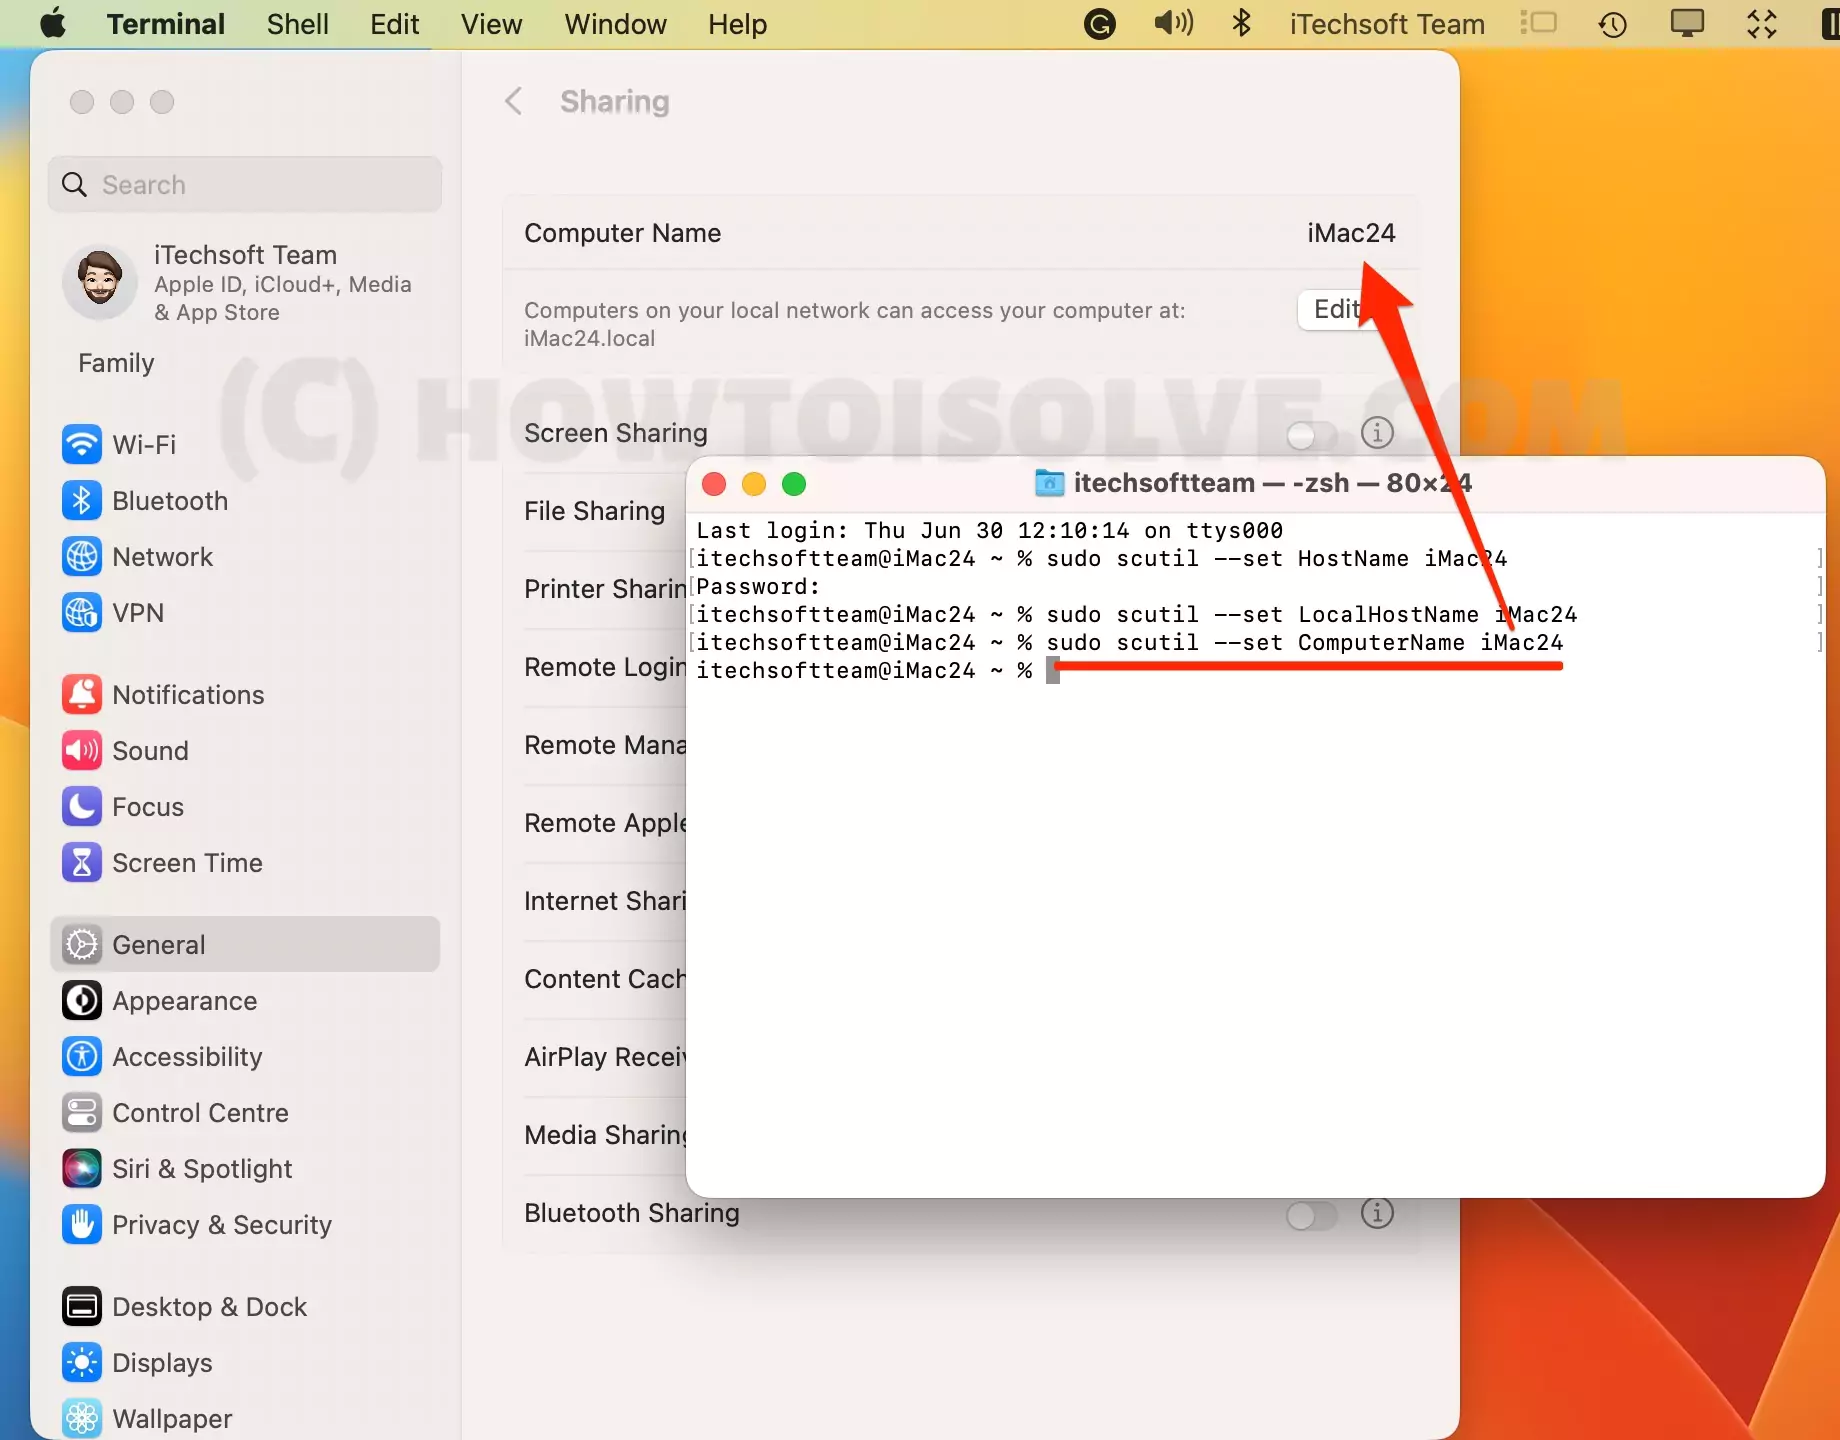
In My Example, Suppose I want to Give a name to my computer, iMac24, [Two dashes without any space between them.]
sudo scutil - -set ComputerName iMac24That’s it now, The New Mac computer name will appear on the Finder window.
How to Change Your Mac’s Name on Ventura, Monterey & Earlier
You can see your computer’s or MacBook’s name in the sharing preferences window at the top of the screen. And also Helpful in changing MacBook, iMac, and Mac Mini names for Airdrop.
on MacOS Monterey and Earlier
Step. 1→ First, go to Apple logo > system preferences. And click on the sharing pane by navigating to.
Step. 2→ You will see a lock icon at the bottom of the window. Unlock the preferences tab by clicking on the lock symbol at the bottom left corner of the window.
Step. 3→ In Computer name:- Enter the new computer name of your choice in the name field section Using keyboard.
Now, Restart is required to affect that change on other devices like Airdrop.
On MacOS Ventura & Later: Change the Computer Name for AirDrop on Mac
Step. 1→ First, go to Apple logo > system preferences. And click on the sharing pane by navigating to.
Step. 2→ Click on the Name of the Computer to change it to the Computer Name.
Restart your Mac to Apple a change for like Airdrop.
Or
Alternatively, we can use Terminal to change the computer name using the command, Explained earlier.
FAQs→
Q. Why does my iMAC local hostname keep changing?
Ans.→ The problem of the “iMac local hostname keeps changing” results when you use two network connections, such as ethernet and Wi-Fi, associated with the same network while having the sharing services enabled on your device. In this case, the iMac recognizes having connected to two networks having the same name and tries to rename the local hostname accordingly.
Q. How do I find my local hostname Mac?
Ans → You can find out the local hostname of your Mac by going to the Apple menu > system preferences > sharing. The name displayed under your Mac’s name and ending with the “.local” extension is the local hostname of your MacBook.
Q. Is hostname the same as IP address?
Ans → The primary difference between IP address and a hostname is that an IP address is a numerical label designated to every device that uses the Internet Protocol for communication and is connected to the computer’s network. On the other hand, a hostname is a label assigned to a network that directs the user to a particular webpage or website.
Q. Where do I change the computer name?
Ans → You can change the computer’s name by going through the section “How to change your Mac’s name” in this article.
Q. How to change MacBook name for airdrop
Ans → Yes, that’s very easy, Just change the Mac computer name from system preferences/System settings on Mac and Restart to Update live on other nearby Apple devices under the Airdrop devices list. On MacOS Ventura:– Apple Logo > System Settings > Sharing > Computer name, click on Name and change with a new name. on MacOS Monterey & Earlier:- Apple logo > System Preferences > Sharing > Computer name and Update with new name. After that restart your Mac, Apple Logo > Restart.
Q. How to change name on MacBook lock screen
Ans → Yes, we can change the name on the Mac login screen by changing the Apple ID account. On Mac, go to the Apple Logo > System Settings/Preferences > Apple ID > Name, Phone, Email > Change the name. That’s it. Restart your Mac and check your Login screen.
To change the name on the MacBook lock screen On MacOS Ventura, Go to the Apple Logo > System Settings > Name, Phone, Email > Click on Edit for name, and Give a new name to Show on the login screen.


