
macOS Ventura is installed on your Mac. Enjoy the macOS update, except for any bugs. One bug can disrupt your work, like Wi-Fi not working on macOS or other Wi-Fi issues on macOS tahoe, Sequoia, Sonoma, or Ventura. When I update macOS to the latest, my MacBook drops Wi-Fi connections when I put it to sleep and wake it up.
Though Wi-Fi speed dropped suddenly, macOS users commonly report connectivity issues. If you’re experiencing these issues, read this article to troubleshoot Wi-Fi problems on macOS Ventura or later.
One of our readers, “Bernd,” noticed and gave positive feedback. After implementing [Fix 2] and changing the DNS to Google’s, he experienced significant improvements in stability and speed.
Fix Mac Won’t Connect to Wi-Fi Problems: Free Tips and Tricks
Quick Tips
- Connect your Mac with different Wi-Fi connections, and Mac works perfectly, then there might be an issue with your router. or Try after Reset Network Settings on Mac.
- Check your Router is turned on, Try powering off Router and turn it on again.
- Wi-Fi drops during sleep/wake? As I said before some of them reported mac is dropping Wi-Fi during sleep or wake and sometimes it takes more time to re-join Wi-Fi. Try these steps.
- Step 1: From the “Wi-Fi” menu, turn off Wi-Fi.
- Step 2: After a few minutes, turn on the Wi-Fi and connect to your Mac computer.
- Try to connect another device to your Wi-Fi.
- Turn off VPN if installed and Turn it on on your Mac.
- Switch the Wi-Fi channel from 5GHz to 2.4GHz or vice versa.
Solution 1: Stay Close to the Wi-Fi Router
When Mac Wi-Fi is not working but is connected and showing a poor signal, ensure you are close to the Wi-Fi router or modem. For better speed and performance, we need to keep the Mac as close as possible.
A long distance between the device and router can also result in frequent network connection/disconnection.
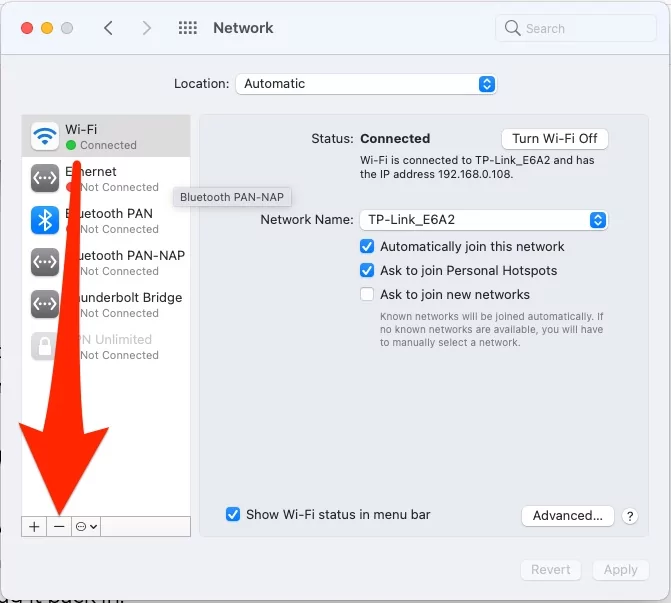
Solution 2: Reset Network Settings on Mac
Wi-Fi won’t connect on your Mac if your Mac is battling with two same-name connections. For say, I’m connecting my Mac to my home’s Wi-Fi network named, ‘Private Network’, and on the other note I’ve renamed my office’s Wi-Fi network, ‘Private Network’, under such cases, you’ll definitely face issues.
Even though the network names differ, you should Forget the Wi-Fi Network and reconnect by entering the password.
On MacOS Ventura
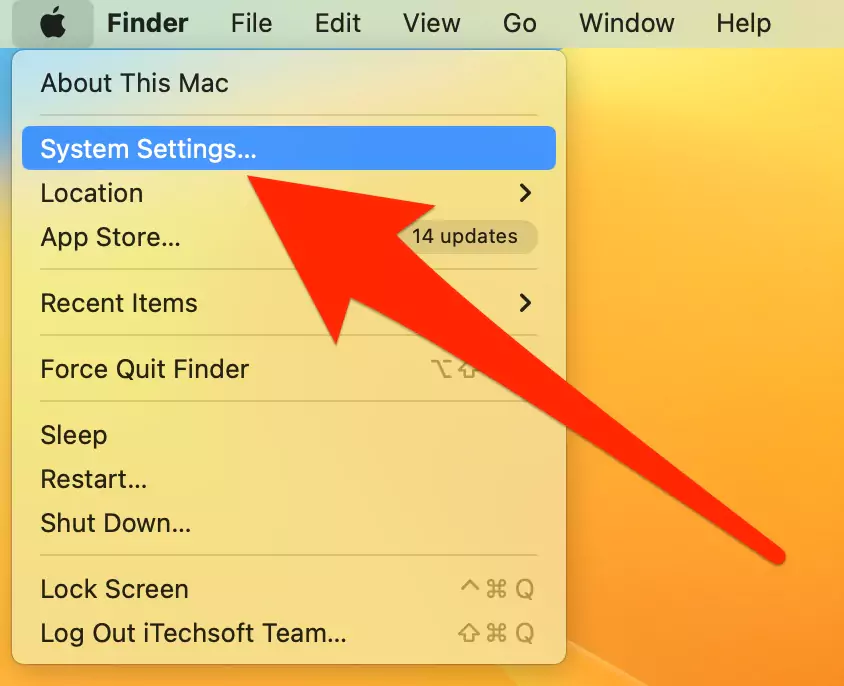
1→ Go to the Apple Logo from the top menu > System Settings.
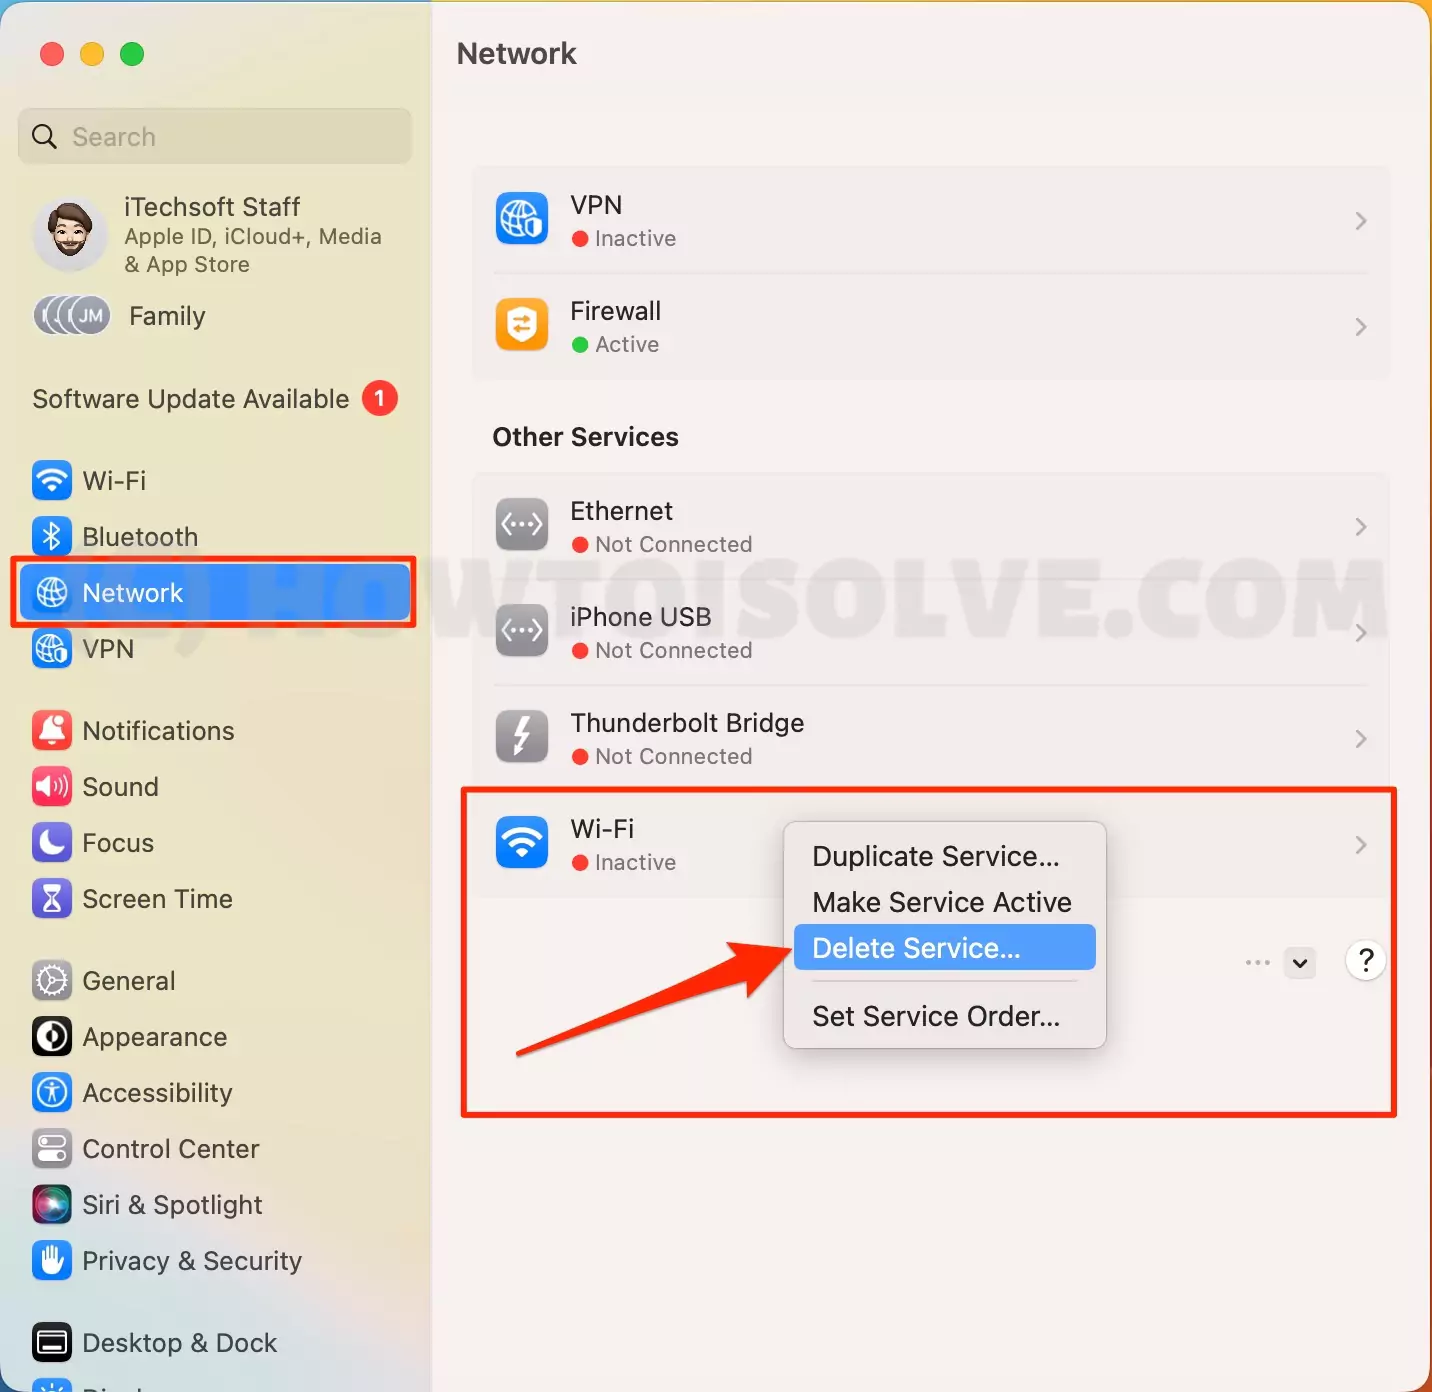
2→ Next, Select Network > Right click on WiFi Profile > Delete Service.
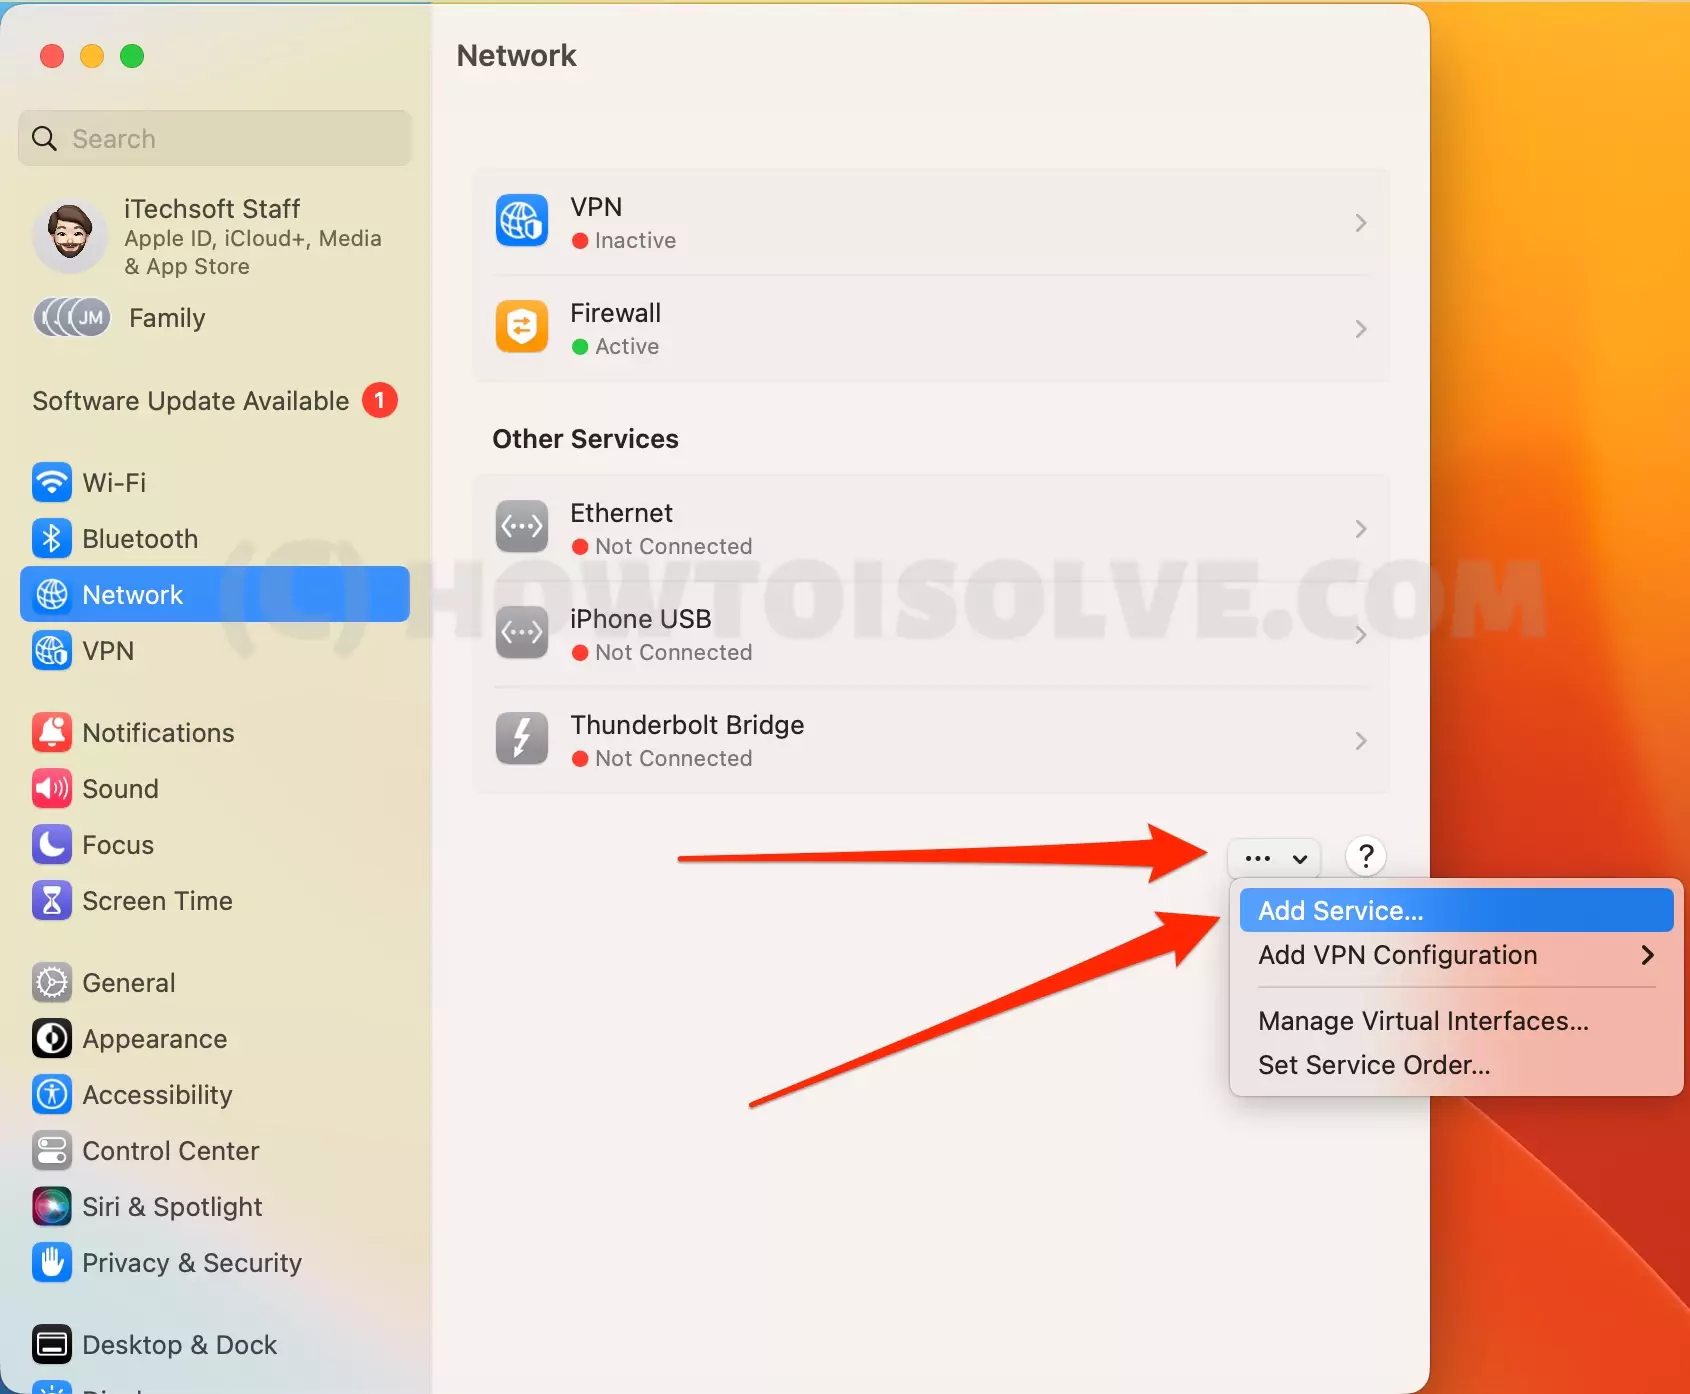
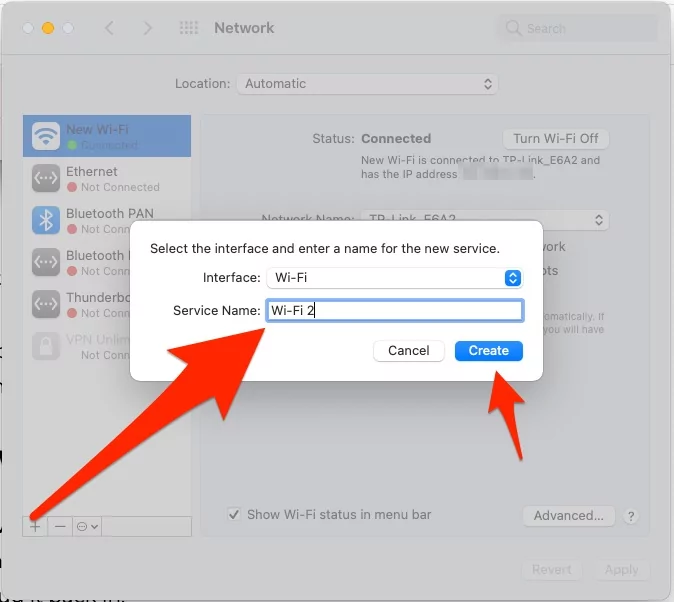
3→ Then, Re-Add a New WiFi Profile, Click on the More option at the bottom of the Window > Add Service.
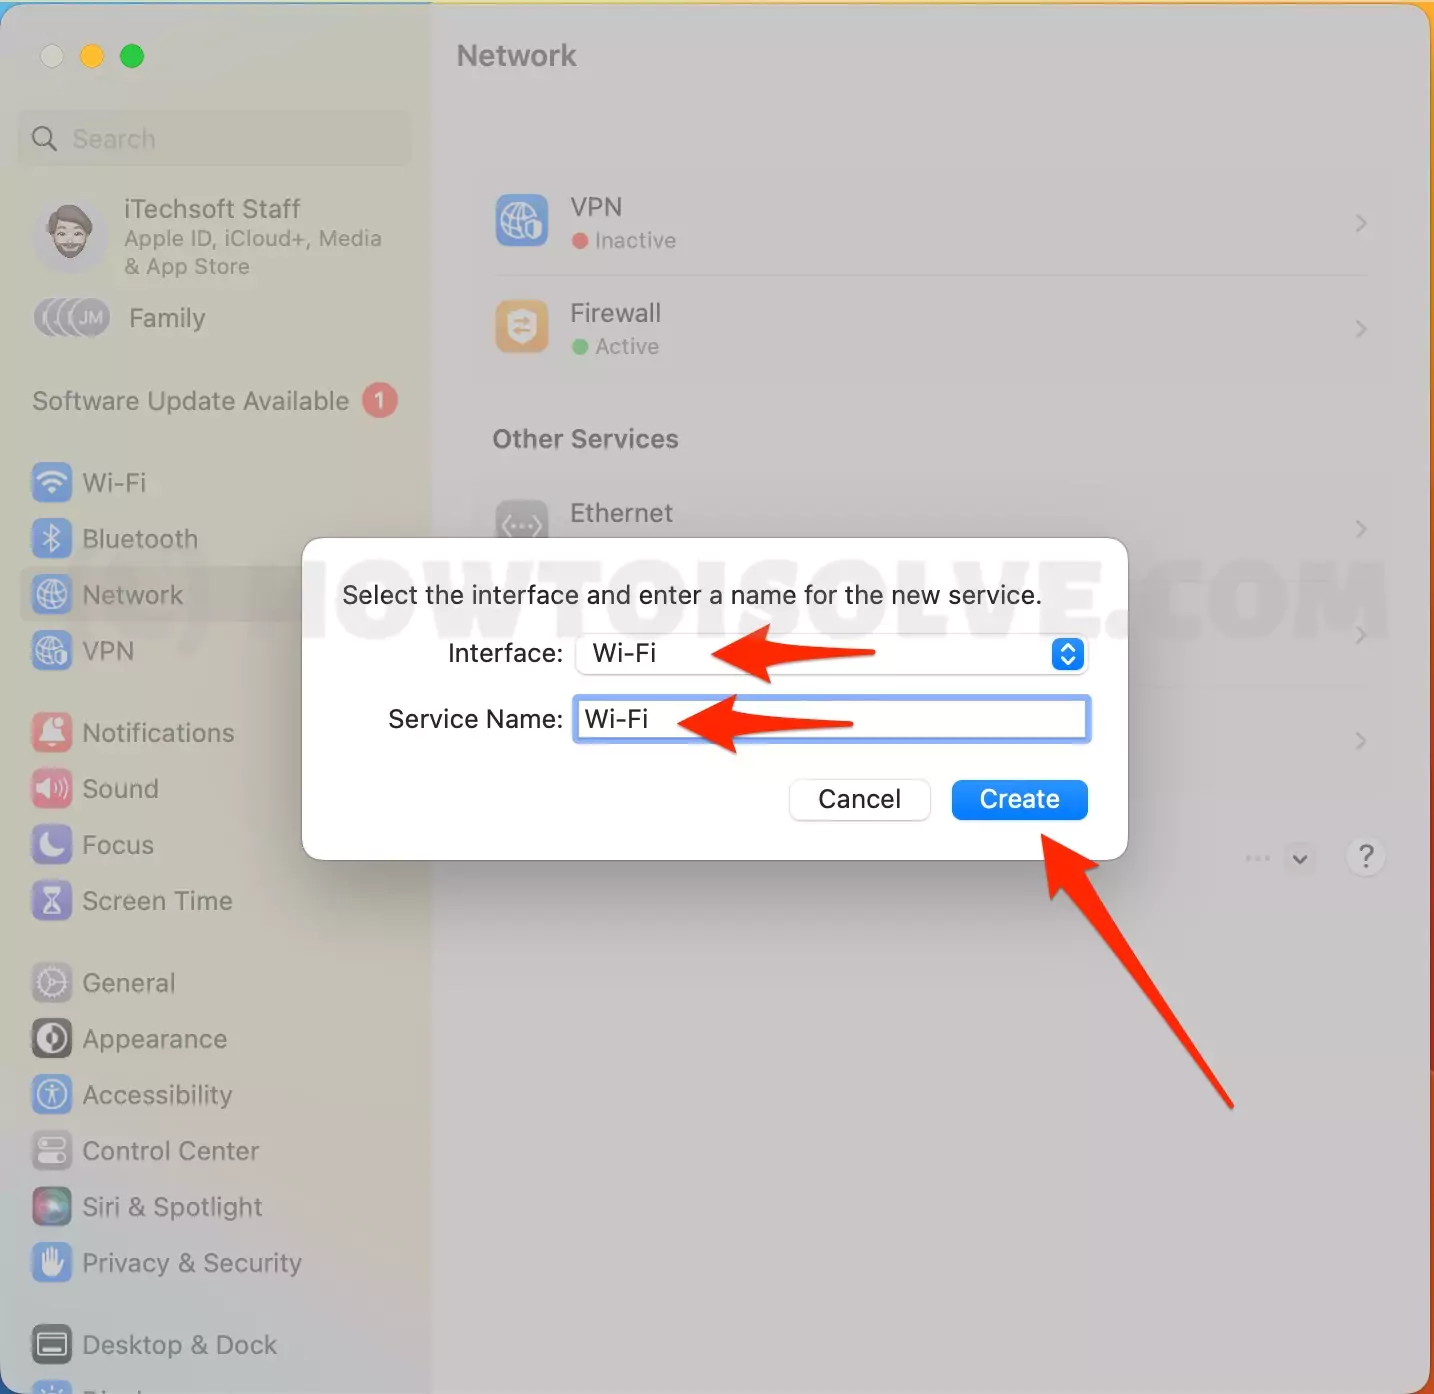
4→ Select WiFi under the interface option and your WiFi name. And Create.
5→ Now, Click on Profile and Turn on WiFi.

That’s it. Suppose your Mac is running on macOS Monterey or earlier. Follow the steps below.
On macOS Monterey & Earlier
1→ Click on the Apple logo on the top menu bar. > Select System Preferences.
2→ Find Network and open it.
3→ Choose Wi-Fi from the sidebar.
4→ Click Advanced and then select the Wi-Fi network.
5→ Lastly, click on (-) to remove it.
6→ After doing this, I’d recommend you to restart the Mac before reconnecting to the Wi-Fi network. Jump to the next section.
Solution 3: Restart the Mac and the Wi-Fi Modem
Up next is to reboot the Mac and Wi-Fi router to rule out the problems that lie between them. Press the power button on the Mac and, after a while, boot it. Similarly, unplug the power adapter of the Wi-Fi router and plug it back in.
If the problem persists, again and again, follow the next solution.
Solution 4: Update your macOS
Before implementing any hard solution to fix Wi-Fi macOS Ventura issues, check if any update is available for macOS, and if you find an update, then update your macOS Ventura to the newest version. Please take a backup if you are updating your Mac Computer.
Mac Ventura or Later: Go to Apple Logo on your Mac > System Settings > General > Software Update > Download and Install Pending Software Update.

MacOS Mojave or Earlier:
Step 1: Launch the “App Store”.
Step 2: In the “Update” section, check for updates and download and install.
If the same problem happens with other devices, then you have to contact your service provider. This is explained in the next solution.
Solution 5: Contact Network Service Provider
Did you contact the network service provider? If not, it should be your first step toward troubleshooting the Mac Wi-Fi issues. Sometimes, the broadband provider goes under maintenance, without informing their customers, so this type of problem arises.
Therefore, directly call the Support Team of your respective network provider and ask them. If they confirm, that everything is running perfectly from their side, it’s time for you to be in action and fix Mac wifi not working in macOS.
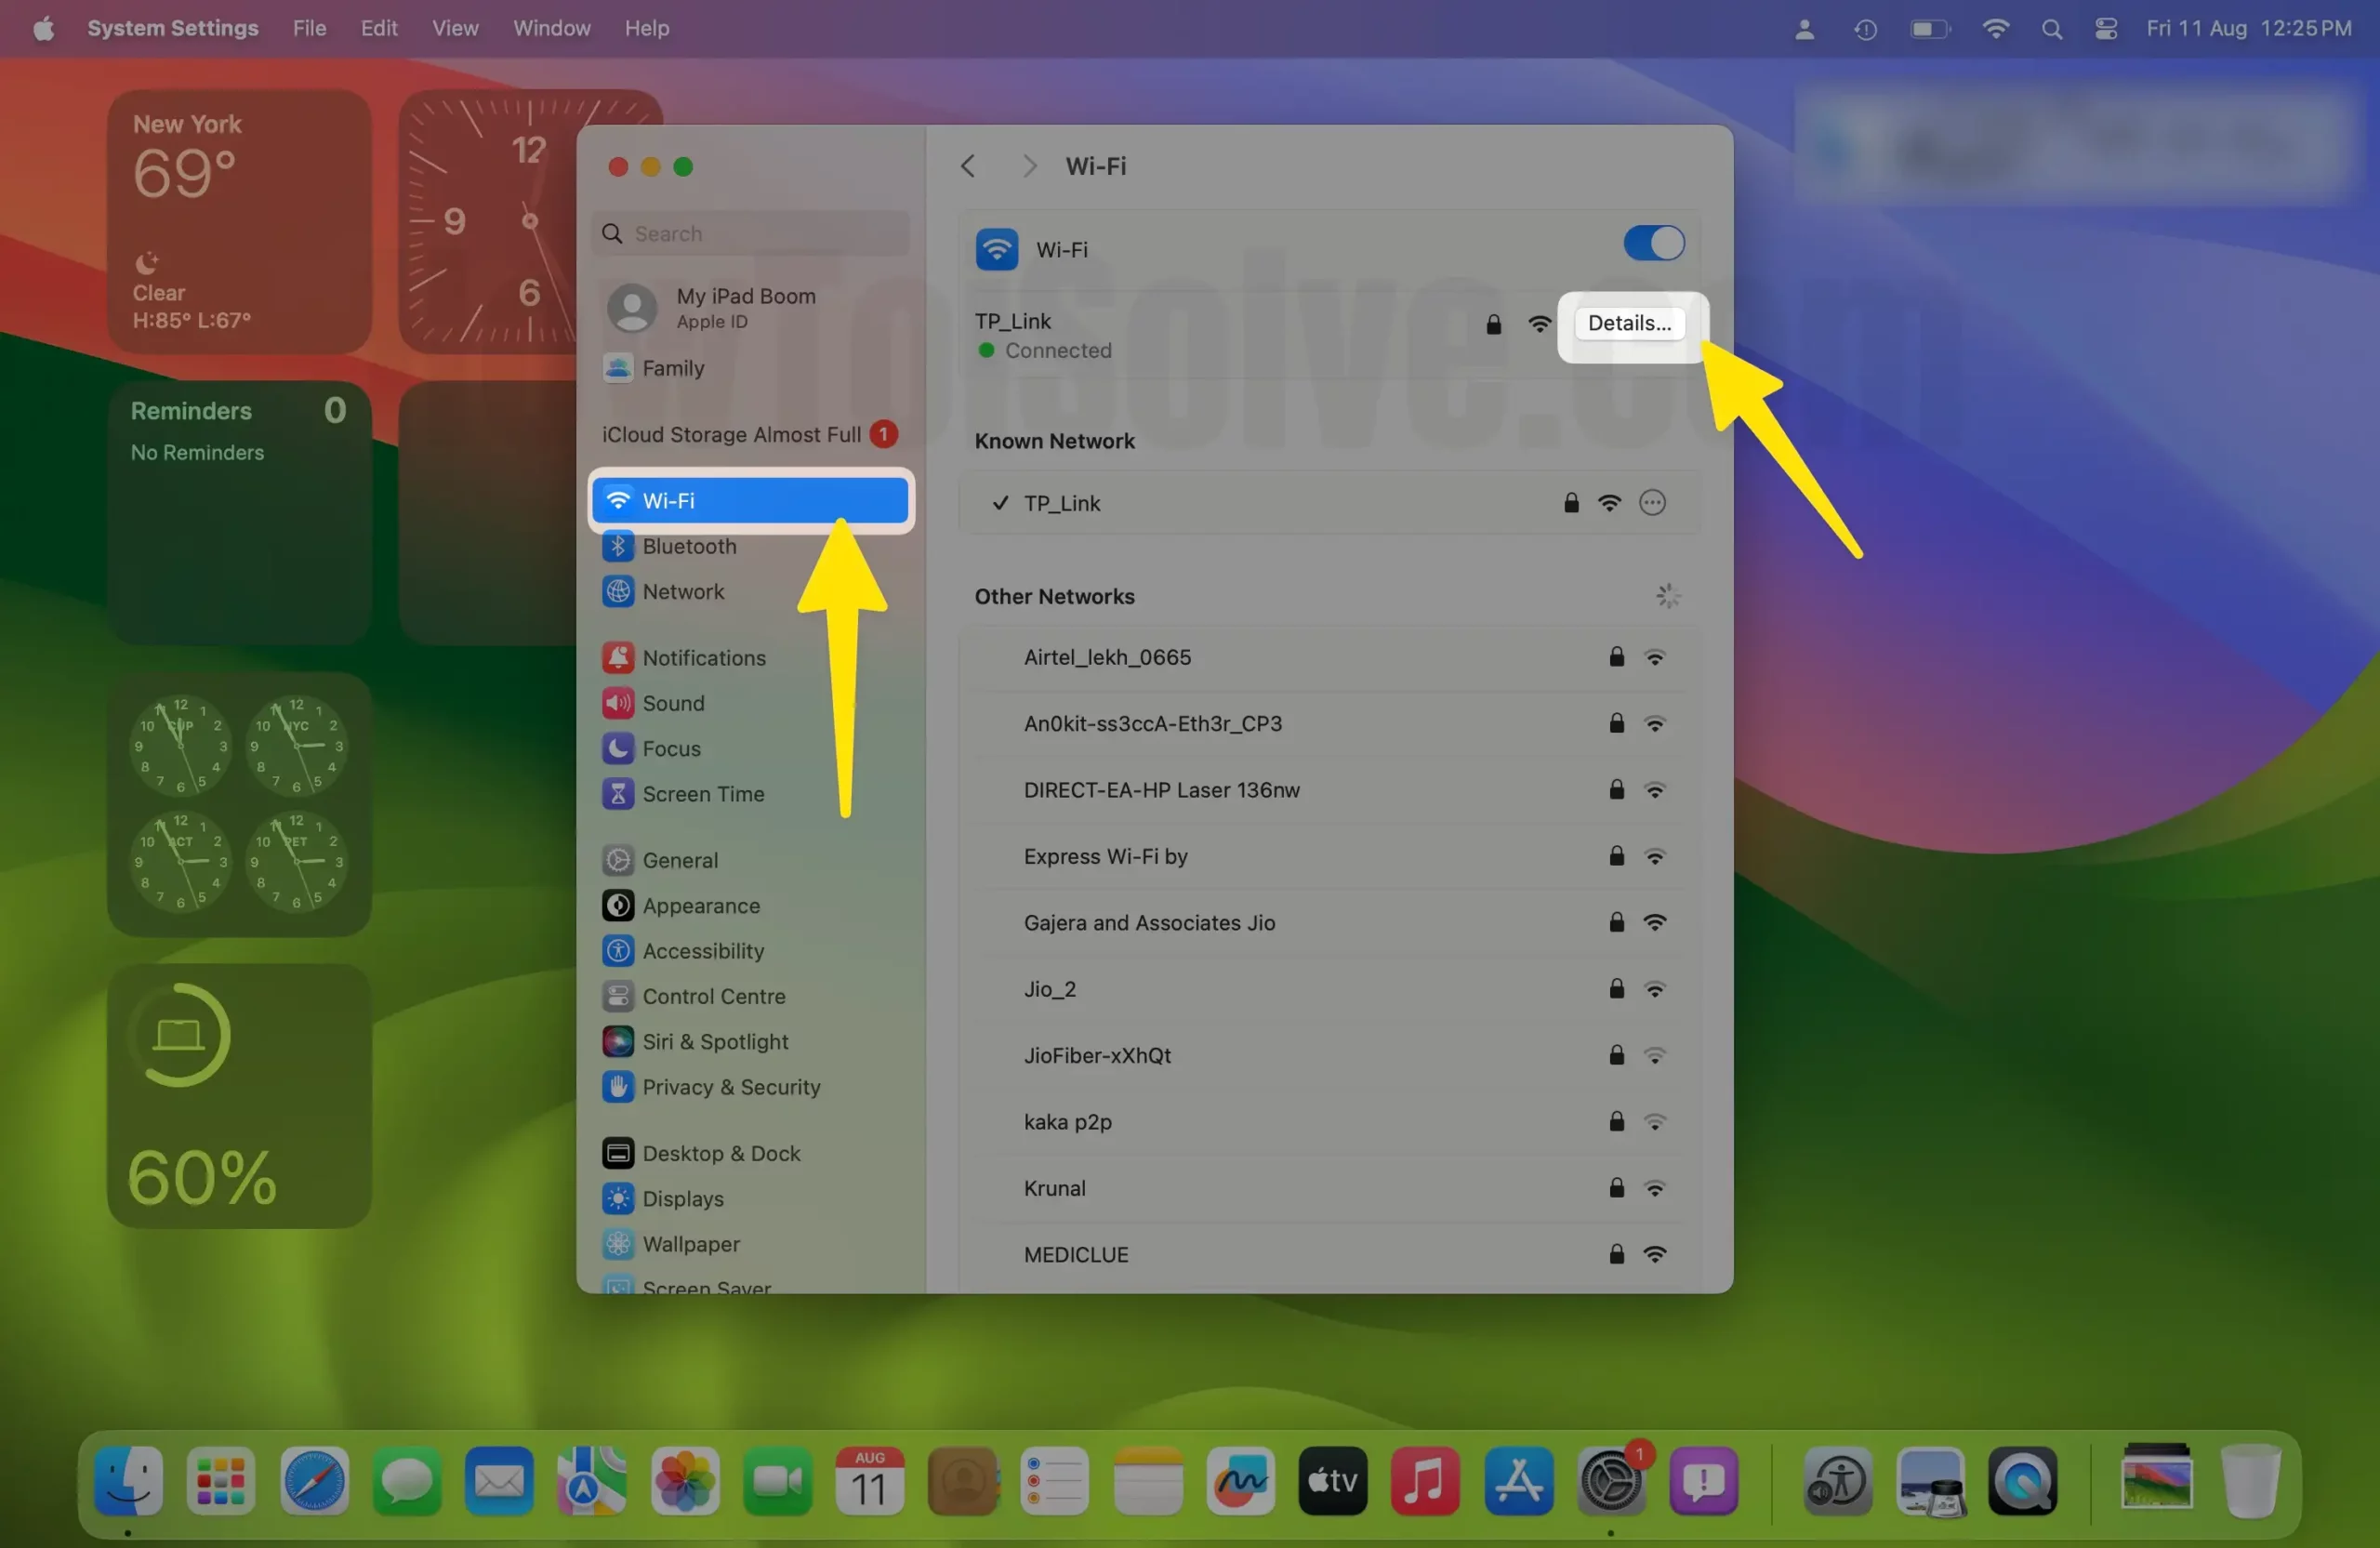
Solution 6: Create a new custom network location
Note: For macOS Ventura, follow the Solution 5 given steps. And obliterate the WiFi Profile, re-add it, and enable WiFi.
Step 1: Go to the Apple logo from the top menu > System Settings.

Step 2: Next, Select Wi-Fi > Click on Details next to the connected WiFi network.
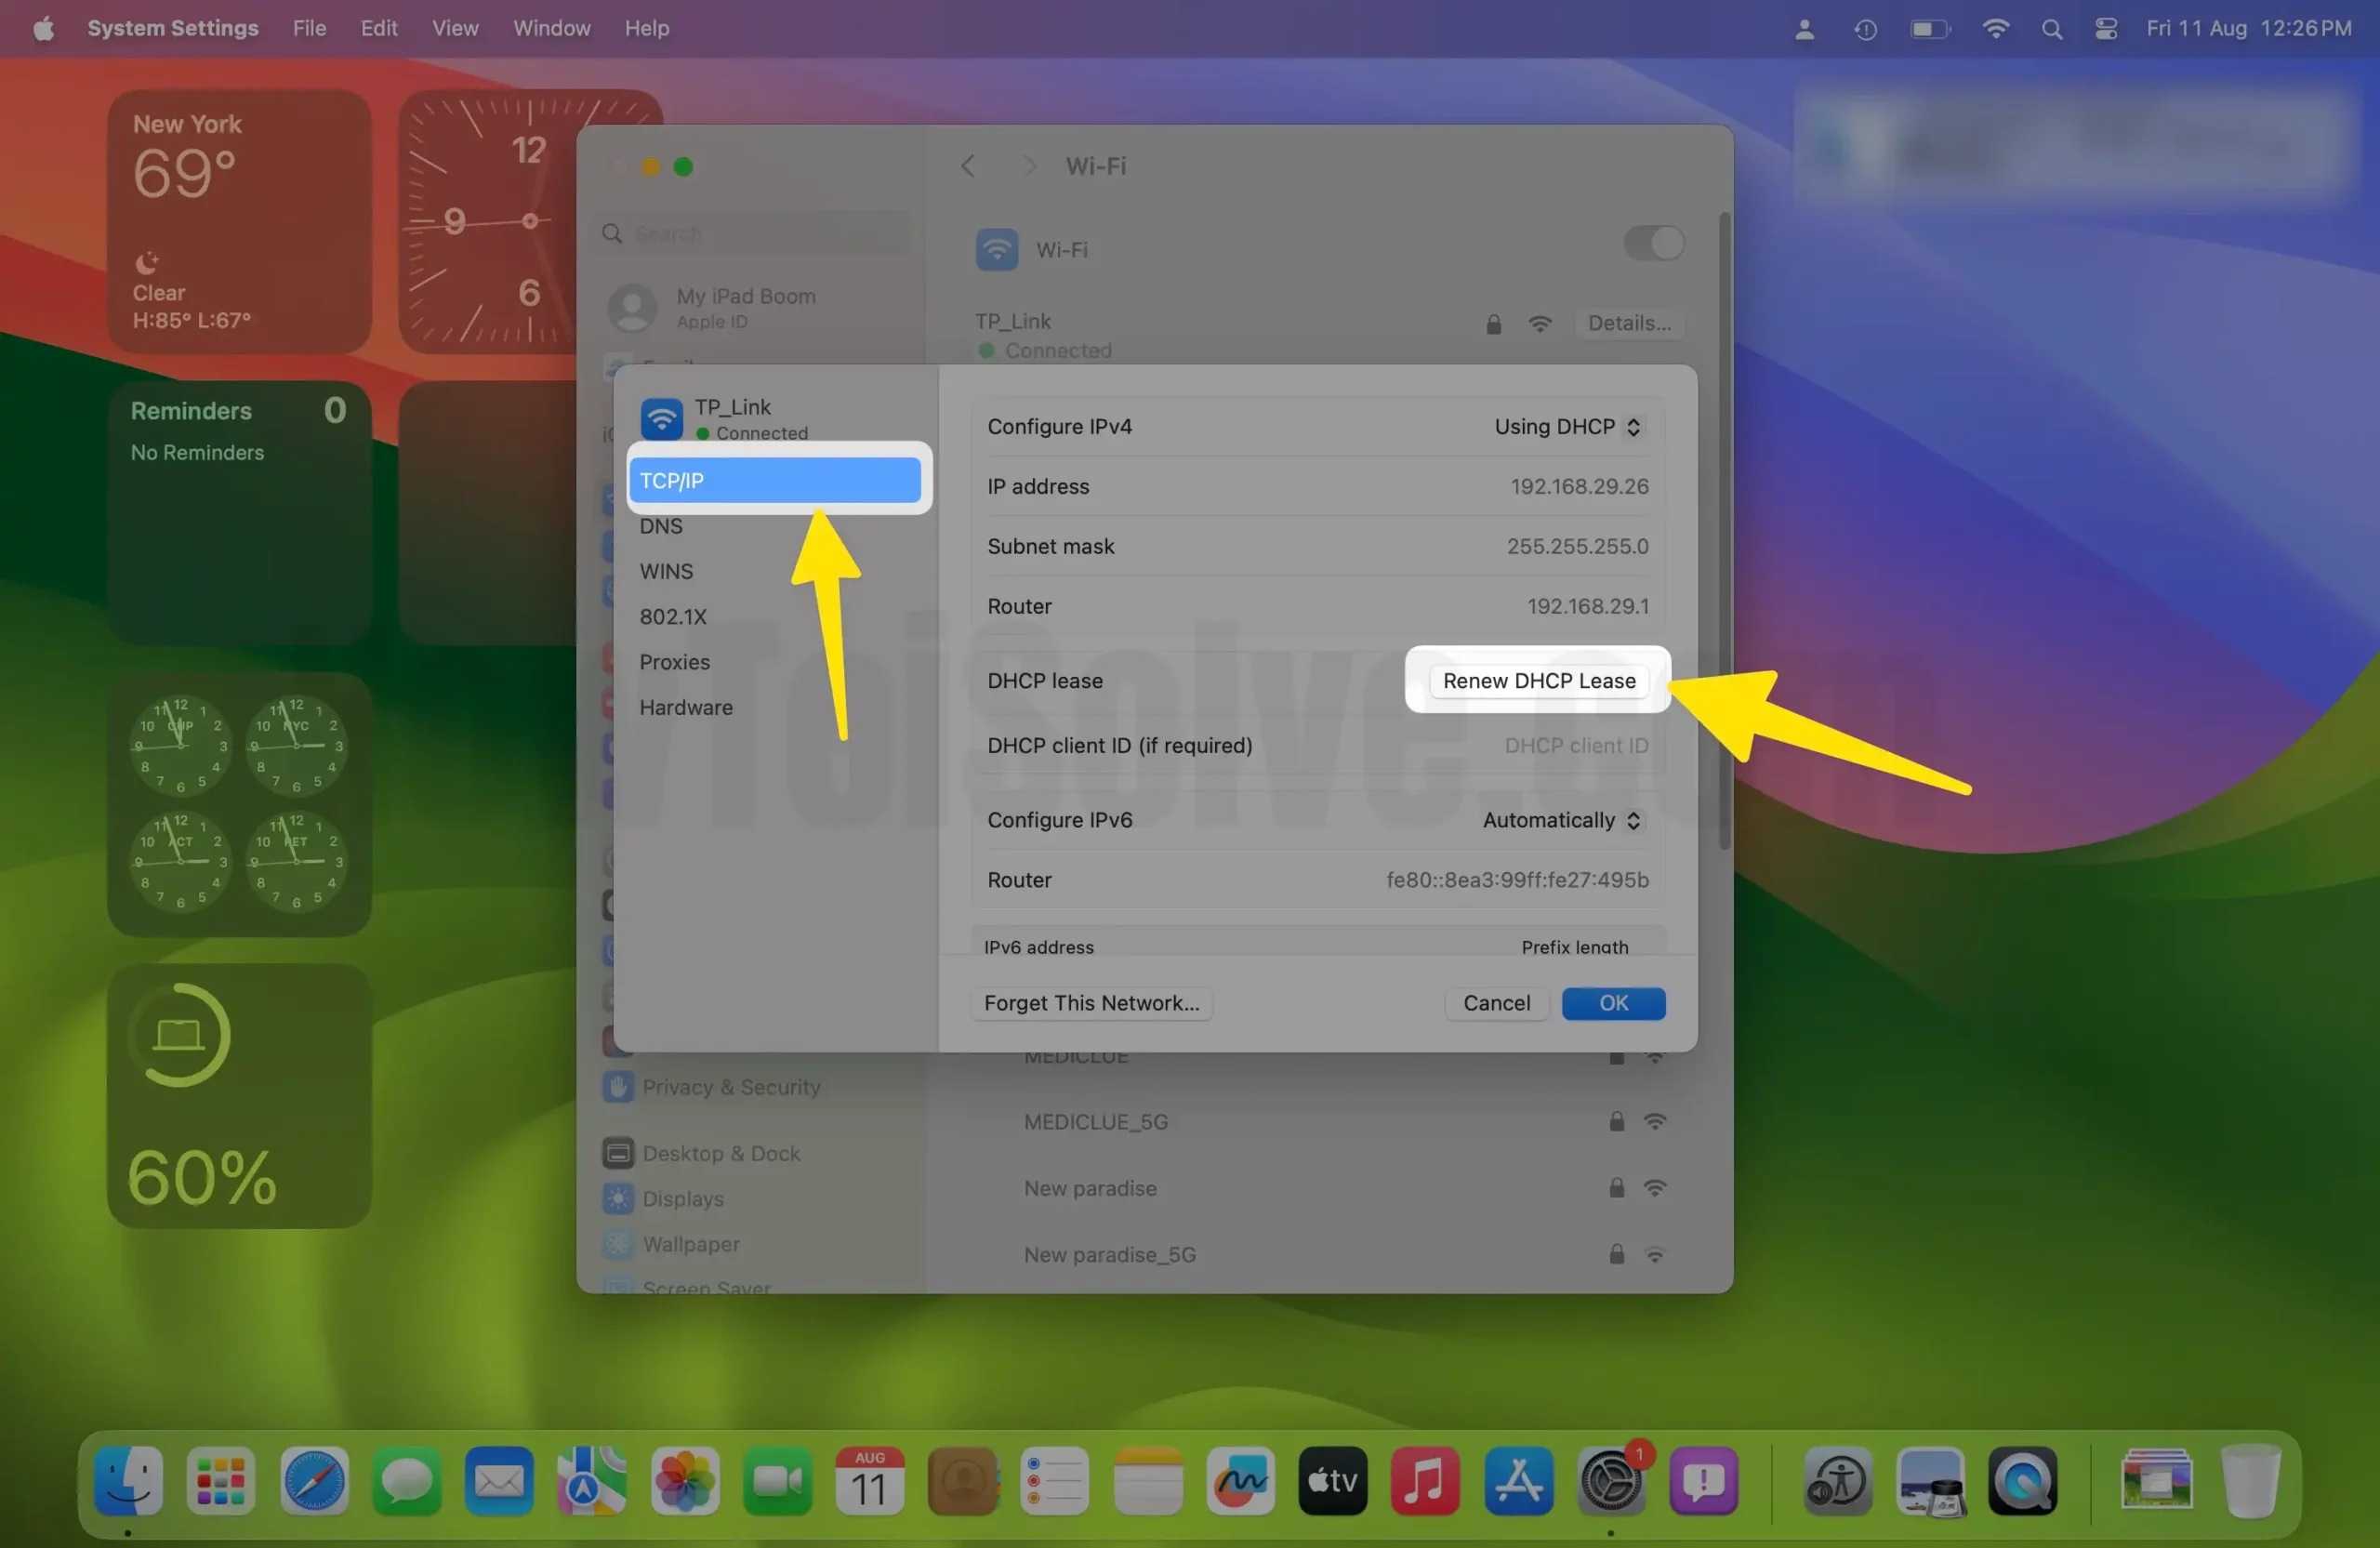
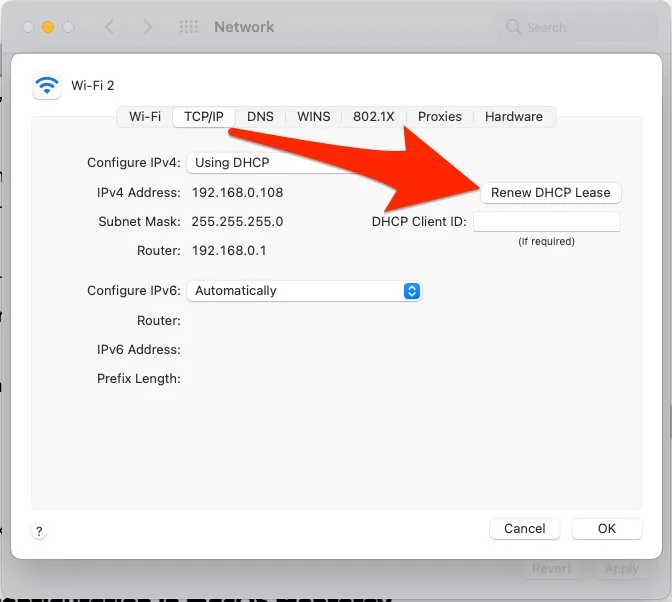
Step 3: Select TCP/IP from the left side of the window > Renew DHCP Lease.
Step 4: Select DNS from the left side of the window > Click on ‘+‘ to Add a New DNS Address.
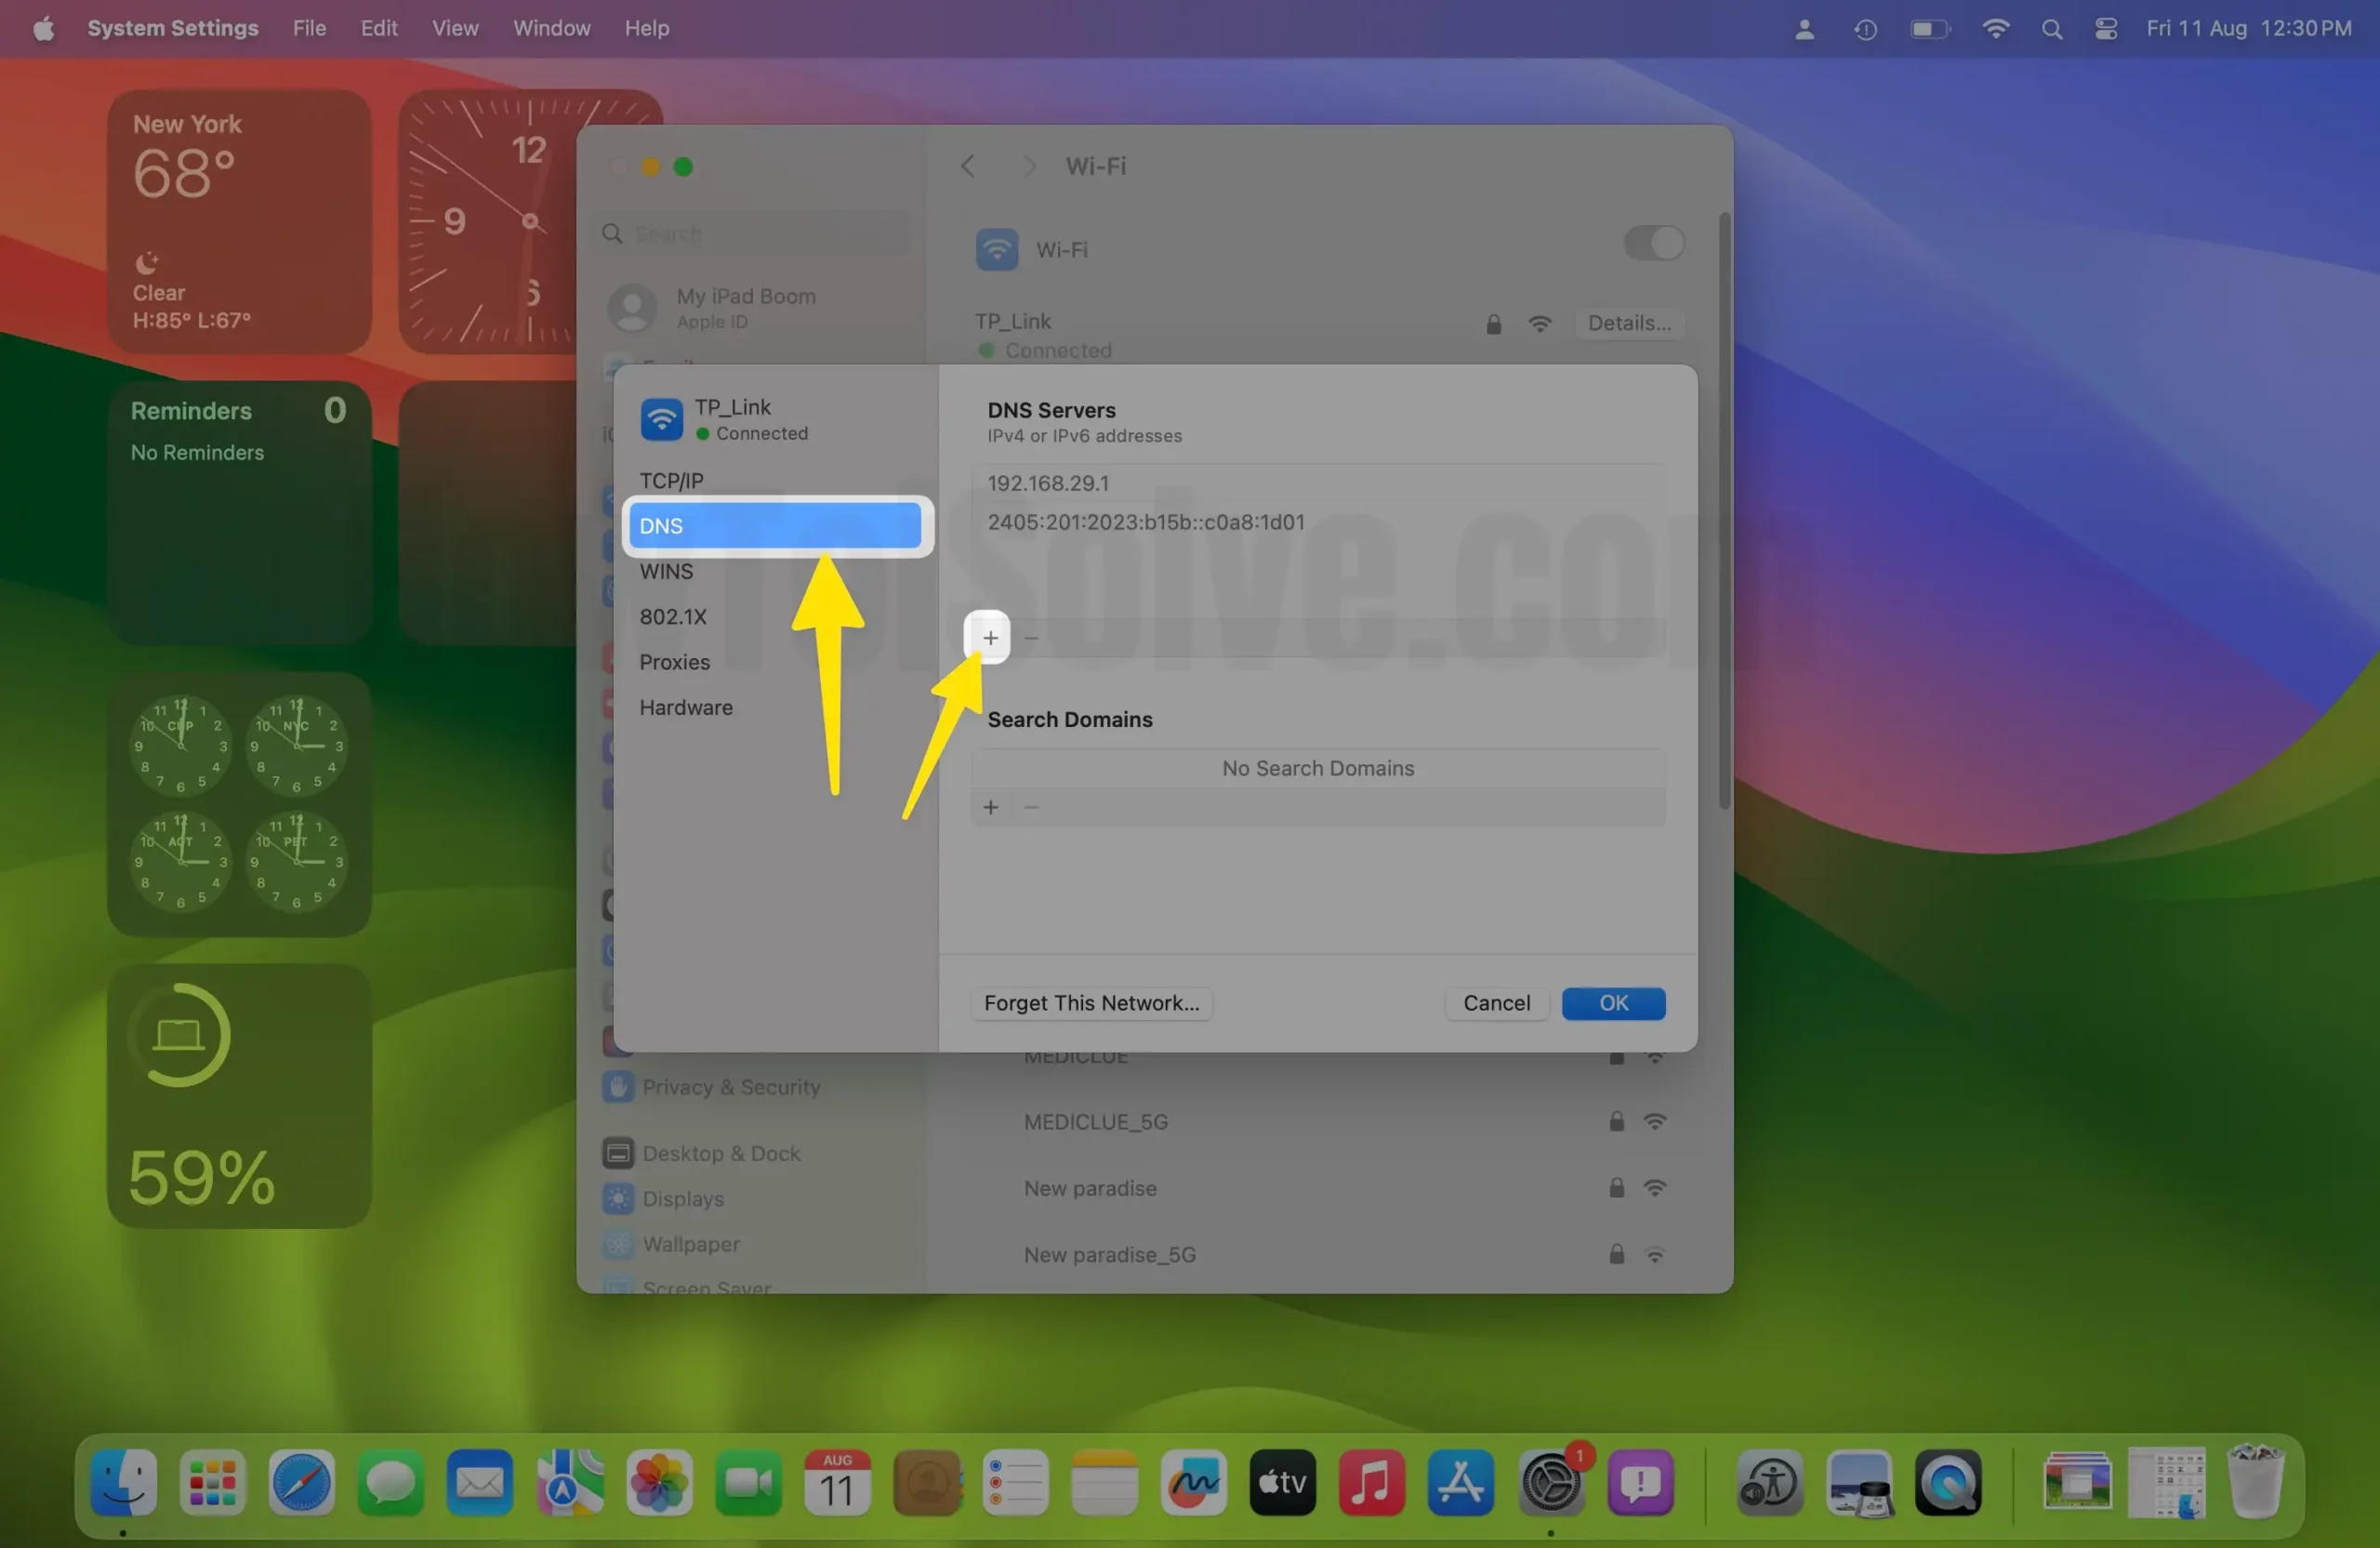
Step 5: Add Google Public DNS – 8.8.8.8 and 8.8.4.4 and Ok to Save.

On MacOS Monterey & Older
Step 1: Open “System Preferences”, from the Apple Menu.
Step 2: Open “Network” and then select “Wi-Fi”.
Step 3: Now, on the top, you will find the “Location” panel, drop down and select “Edit Locations”.
Step 4: Next, Tap on the “(+)” sign and give some identifiable name that suits you. Then tap “Done”.
Step 5: Pull down the “Network Name” panel and select the Wi-Fi network to join.
Step 6: Tap the “Advanced” button.

Step 7: Now click on “TCP/IP” and then click on “Renew DHCP Lease”.
Step 8: Now tap on the “DNS” panel and then click on the “(+)” symbol and enter “8.8.8.8” and “8.8.4.4”.

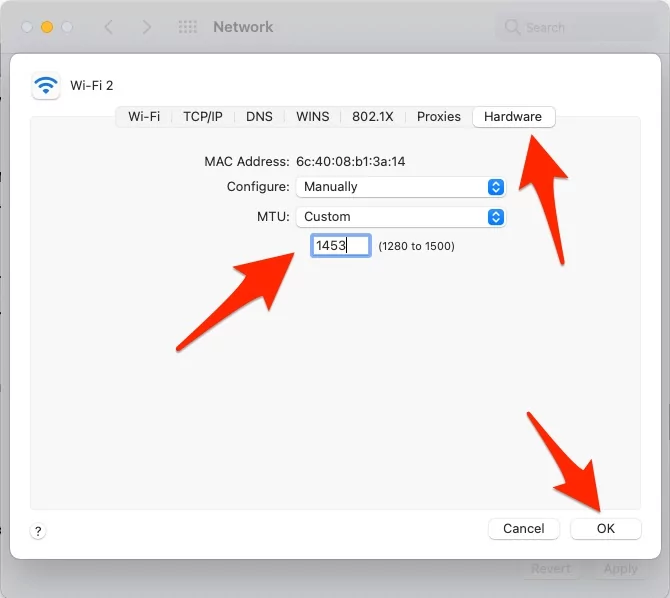
Step 9: Then, open the “Hardware” panel and set “Configure” to “Manually”.
Step 10: And “MTU” to “Custom” and enter “1453” below in the section.
Step 11: Tap “OK” to end this.
Step 12: To save all the changes you have made to tap “Apply”.
Step 13: Close this window.
Step 14: Now, launch “Safari” and check if it is working or not.
If the Wi-Fi issues on Ventura aren’t fixed?
Solution 7: Create a new Wi-Fi configuration in macOS Ventura
Before implementing this fix, back up your mac, these steps involve system-level changes. So if things go south, then you will not lose your data.
Step 1: From the upper right corner, drop down the “Wi-Fi” menu and turn it off.
Step 2: Now, create a new folder on the main screen, or even you can use the existing folder and name it “Wi-FiConfigBackup”.
Step 3: From the “Finder”, expand the “Go” menu and then select “Go To Folder”.

Step 4: “/Library/Preferences/SystemConfiguration/”, enter this code into the window and tap “Go”.
Step 5: Search and select all these files.
com.apple.airport.preference.plist
com.apple.network.eapolclient.configuration.plist
com.apple.Wi-Fi.message-tracker.plist
NetworkInterface.plist
Preferences.plist
Step 6: Open the “Wi-FiConfigBackup”, and drag the above selection into the folder.
Step 7: Now, reboot the mac.
Step 8: After the Mac restarts, connect to the Wi-Fi as usual.
Solution 8: Use Mac in Safe Mode
Still can’t connect Mac to Wi-Fi? Then try rebooting Mac in Safe Mode. Now, it depends on Which Mac Processor is installed on your Mac, Know your Mac has Intel or M1, M2 Chip.
For m1 Mac:-
Step 1: Shut down your Mac and Wait for 20 seconds. Now Press and Hold the Power button [Touch ID Button] until your Mac shows the Startup volume and Options gear icon on the screen.
Step 2: Select Startup Volume [Continue] and Press and Hold on Shift key and Click on Continue in safe mode.
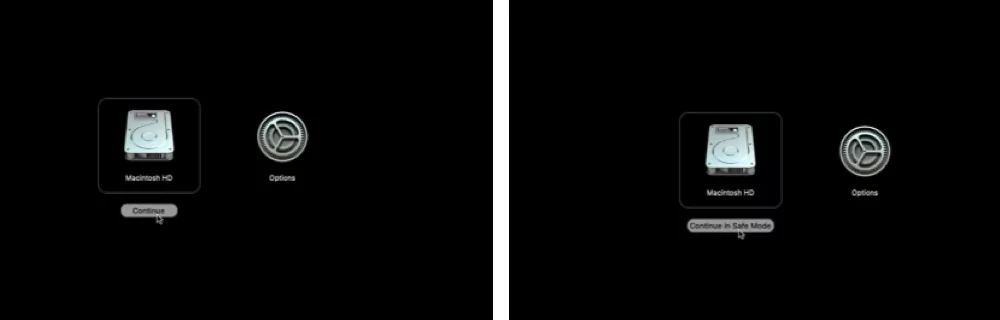
Step 3: Log in your Mac and check if the WiFi is working on not.
For Intel Mac:-
- Shut down the Mac.
- Power On the Mac and, at the same time, hold the Shift key until the login window appears.
- Enter the login credentials.
- The Mac will restart in Safe Mode.
- You can exit Safe Mode with a simple restart.
Solution 9: Reset PRAM/NVRAM
if your Mac is Apple Silicon M1 or T2 Chip then Skip this step.
So far, resetting PRAM/NVRAM has worked greatly. Let’s see if it fixes your issue or not.
- Turn off the Mac.
- Turn On the Mac and immediately hold down the Command+Option+P+R for almost 20 seconds.
- If your Mac chimes while booting, release the keys after you hear the second chime.
Solution 10: USB-C Dongle Killing WiFi Connection With MacBook Pro/Air
Remove all the Unnececcory connected Device Like USB drives, USB 3 or USB C Dongle, and more. Recently some manufacturers affected what WiFi connection when that’s plugged into Mac. Because of Poor shielding near to USB port. So, There is some wifi frequency disturbance, and your WiFi might be Dropping or Slow down.
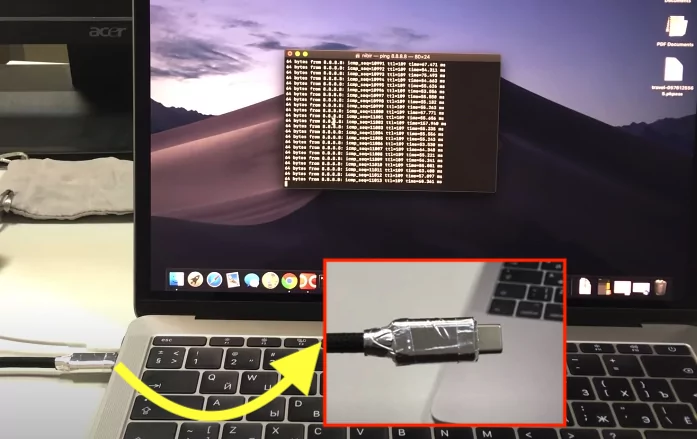
The solution is to Cover the Cable with aluminum foil.
Recommend using Apple Certified USB C Dongle or Extension if that’s really needed for LAN, and Other Accessories.
if you looking for more help and a Troubleshooting guide on your Specific WiFi issue then comment to me.


