
Is your Mac won’t turn on After recent macOS Update or software update stuck installing? Get here a complete guide on How to Fix a Frozen Mac During an Update. The latest available mac update is macOS.
New macOS Installation is required to check internet connectivity and confirmations from Apple service. So you can easily install it on a supported Mac. If the system is lagging or not responding to this check, your Mac felt in trouble while you tried to install New MacOS. The Mac users are fortunate who got their Mac updates to Sonoma in the first attempt. Unlucky are those who end up in multiple error loops while updating to latest macOS.
If you are the hapless one, sit tight and get ready for coming challenges to fix Mac stuck when installing macOS update. Everything should be in order if you are considering updating macOS successfully and fast. Strong Internet Connection, Enough Storage, Good Power Supply, Hardware issues, and final but not least is Software problems. If any of these things go south, the macOS will show errors while updating to the latest version of it will get stuck like now.
However, sometimes the Apple account itself causes updating errors on Mac. So make sure to check your Apple account before updating any Apple Device. Also, it would help if you kept in mind to check the Apple Server is working correctly and not under maintenance. Generally, Apple shows if any server goes down in your region check out this on the Apple Server page. Let’s fix Mac Stuck when installing Sonoma Update.
Pre-requisites That Lagging macOS installation
- Good Internet Connection: If possible connect Ethernet directly to the Mac, avoid Wi-Fi connectivity. Most of the Mac users experiencing issues with Slow down installation and Mac is waiting for the internet connection when it is disconnected. Haven’t any option to connect your Mac with Internet cable, then Switch to other wifi network or Reboot your Router to get the permeant fix from your side. Otherwise, you can ask Internet service providers.
- Storage: Check the required storage before updating the Mac, you should require at least 10 Gigabytes of free space. Let’s use Apple Recommended Optimization option under the Disk Utility. Open Apple Logo at top menu > About This Mac > Storage > Select Drive and Click on Manage.
- Power: If you are updating MacBook, then the battery level should be a minimal 50%.
- Correct Apple Credentials: Make sure to enter the correct Apple ID and Password when asked; otherwise, Apple Server will deny your request.
- Disable Firewall: If you are using any Firewall or Antivirus, disable it until the update is finished.
Still, Your Mac is stuck on update then follow the below troubleshooting tricks carefully.
Fix Mac Won’t Boot/Start/Turn ON after macOS (Sonoma) Update
This is real chaos when one can’t update the MacOS, and if luckily it happens, then Mac won’t restart after update Sonoma, isn’t it? Though this is a time problem, so stay cool and try the below solutions to fix the MacBook Pro won’t turn on after the update with few answers.
Solution 1: Disable Rootless/System Protection
If the Mac update is stuck at calculating or at 90%, then try this. It is a solution suggested by one of the Mac users dealing with the same problem as you, but this trick worked for him. First, make sure that your Mac has an m1 or intel Processor and Follow the steps for that…
- Shut down the Mac.
- On M1, M2 Mac, Press and Hold on power button untill your Mac show or Loading startup options. Click on the “Options” and click the Continue button. Now your Mac is in Recovery mode.
- On your intel Mac, Turn on After 20 seconds, Press the Command+R and then the Power button to boot the system. [You can get Fix command R not working on Your mac]
- Wait until the Utilities window comes up.
- Select Utilities from top Menu.
- Then, the Terminal.
- Type ‘csrutil enable’ and reboot the Mac.
Fix Error “macOS Could Not Be installed” and Installation in Boot loop
Solution 2: Force Restart Your Mac
How do I restart my Mac after failed to update? Force restarting the Mac will work. Here’s how it can be done.
- Hold down the Power button on Mac until it turns off completely.
Wait a while and reboot the Mac as usual.
Solution 3: Reset NVRAM/PRAM
Don’t try this on M1 Mac, For M1, mac users Don’t have to Reset PRAM/NVRAM, So Skip this step. Restart your M1 Mac to Reset the value.
The NVRAM/PRAM is a particular memory that stays active when we turn off the Mac, usually, it contains all the information such as Volume Settings, Brightness Settings, Screen Resolution, and more. This is why every time we turn on the Mac, everything is perfect as before.
Resetting these settings won’t be a trouble for you, so do it. This trick has always been the best when it comes to update and boot issues of the Mac.
- Turn Off the Mac.
- Press the following keys: Command+Option+P+R at the same time and then turn on the Mac.
- Release the keys when you hear the restart chime, hold the keys for at least 20-30 seconds.
- The Mac should start correctly.
Mac Won’t Complete Installion For Sonoma Update
Solution 1: Reset NVRAM or PRAM ON Mac [Clear Cache of Mac RAM]
Note: For M1, mac users Don’t have to Reset PRAM/NVRAM, So Skip this step.
All Mac has these two types of memories that can able to store information like TimeZone, Karnal Task, Display Resolution, Startup-Disk Selection when it’s shut down, and reuses while we turn on. Also, we can refresh or reset all data from this memory only. Call NVRAM Or PRAM. Apple is also suggesting to clear this memory first if we have issues startup, installation, or Crashing; slow down.
First of all, Shut down your Mac. we can long-press the power button to force shutdown.
Now, Turn on Mac using the Power button. After that, quickly press and hold Option + Command + P + R.
Press and hold all the keys until you listen to the Startup sound the second time. Lift your Fingers. Now your Mac will turn on in a fresh mood. Try again.
Solution 2: Restart Mac and download New MacOS Copy from App Store
For the first time, if your Mac is stuck when installing a macOS update, it is probably just a minor technical glitch. So we would suggest you restart the Mac as usual and then try to update. Here’s how to restart update Mac.
Re-Download New latest Updated Copy of MacOS from Mac App Store. Remove downloaded macOS Copy from Mac Finder’s Applications folder. Open Finder on Mac > Go from top Menu > Applications > Find macOS File [Right click on File and Move to bin]

Step #1: Click on the “Apple” icon on the top-left screen.
Step #2: Select “Restart”.
Step #3: Confirm, Restart by clicking on it.
The Mac will take a few seconds to restart. After that check out the below steps to update Mac.
Step #1: Go to the “App Store” on Mac.
Step #2: Find the “macOS Sonoma” in the search box.
Step #3: Click “Download”.
Step #4: If asked, enter Apple ID and Password.
Step #5: Now, read the on-screen instructions and update the macOS to Ventura.
Solution 3: Quit all the Background Apps
Multiple apps running in the background create an unusual load on the system and at last, the Mac crashes, and performance goes down. To check if this isn’t the real reason behind Mac being stuck on installing the latest macOS update, close all the background apps.
Step #1: Press the Option + Command + Escape on your keyboard.
Step #2: Now, Force Quit Application will show you certain background apps.
Step #3: Force Quit them.
Solution 4: Restart your Internet Connection
As I had mentioned earlier to connect the Ethernet port directly to the Mac and do not use Wi-Fi while updating macOS. The reason is Wi-Fi connections are not stable as the update required and your Mac is stuck with an update. To restart or refresh the internet connection, you should disconnect the Wi-Fi router or remove the Ethernet cable from the Mac. After 5-10 minutes reconnect the internet connection. Now retry to update macOS. Another way to disconnect the internet connection only for Mac is from the System Preferences. Here’s how to do it,
- Apple menu > System Preferences > Network. here are the all settings for networks like Ethernet, WiFi. Configure your Network from here as recommended by ISP.
Solution 5: Make sure Mac has enough Storage and Free Up if Want
Mac updates generally are in 5GBs or 7GBs size, so you have to make sure your Mac must have at least 10GB of free storage to install the update. From the mentioned path, check the remaining storage on your Mac. If possible delete some unused applications and files or move them to the iCloud.
- Apple menu > About This Mac.
- To free up space on Mac, Click on the Storage tab option in the same windows.
- Now select the drive that running your MacOS, Now Click on Manage. New Windows will show different optimization options. Go with the options and get it done.
Not all time you will get a problem with enough storage, but slow speed or stuck in the update process can use this tip only. Still, no help, follow the next solution to try Update macOS in Safe mode.
Solution 6: Update Mac in Safe Mode
Still, Mac Stuck when installing macOS update, then try to put Mac into safe mode and update. In safe mode, Mac will disable all the third-party applications and only keep the system applications.
For M1 Mac,
- Go to the Apple Logo from the top Mac menu > Shut Down your Mac, and Wait for 20 seconds.
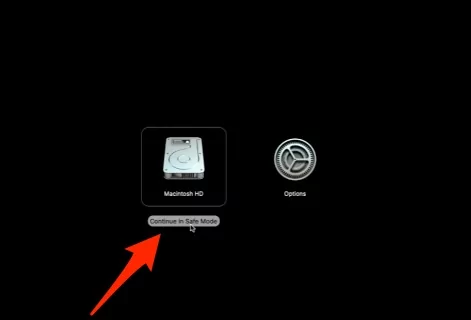
- Next, Turn on your Mac by Press and Hold on Power button [Touch ID] Until your Mac show, “Loading startup options“.
- Select a Volume only.

- Next, Press and Hold on Shift key from Keyboard and Click on Continue in Safe Mode.
- Your computer will restart automatically and Login with your Passowod in Safe mode.
For Intel Mac,
- Step #1: Shut down the Mac by holding the Power button. Don’t release the Power button, until the Mac turns off.
- Step #2: To turn on Mac in Safe Mode, press and hold the shift key after pressing the power button.
Safe more disabled some MacOS functionality, In Safe mode Mac deletes all kinds of Cache files like Kernel, System files, Fonts Cache.
How to identify Mac as in Safe mode?
First Way: On the Mac Login screen will show safe mode watermark text at the top right corner of the screen.
Second Way: Go to Apple Logo at the top Mac menu > About This Mac > System Report.

Next to System Report, Scroll sidebar, and select software section, here’s Boot mode is Safe. that’s it.
Solution 7: Reinstall in Recovery Mode [No Data Loss]
Reinstall MacOS in Recovery mode on your Mac is a safe way to install the new latest copy of the final supported MacOS on your Mac. Before start following the steps below, Take Backup your Mac in Time Machine, Know your Mac has intel Mac or M1 Mac, Proceed for the recovery mode steps,
For M1 Mac,
- First Turn off your Mac and Wait for 20 seconds. Now, Press and Hold on Power button.
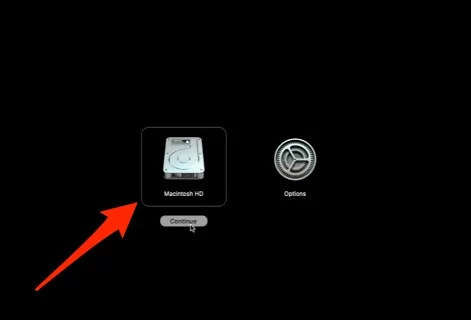
- Until your Mac screen show Startup volume and Options.

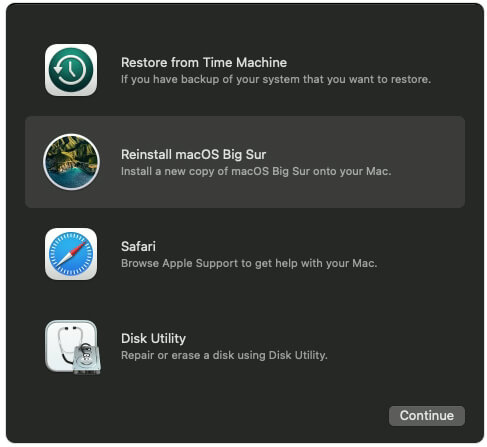
- Select Options and See “Reinstall MacOS” Option.

- Tap on Continue and Folld the on screen instructions to complate the setup process.
- Don’t shut down your Mac, Becuase your Mac download 6 to 12 Gbs of MacOS setup file from internet and install on Mac.

For Intel Mac,
- Shut down your Mac and turn on after 20 seconds.
- Next, Quickly Press and Hold Command + R Key from keyboard. Until you see macOS utility Window on screen.
3 Now, Select Reinstall macOS and Continue. Follow the on-screen guide, Select Primary drive where your Mac fix the installation problem. and Compalte setup.
Hope you sucessfully installed New MacOS on your Mac.
Solution 8: Perform Clean Install: Erase Drive, Reinstall new macOS and Restore
You can fix all kinds of Mac problems using this solution but sometimes Mac users are ignoring it because this is a long but easy process. Trust me I personally felt very good after performing this process. Right now my Mac is super fast on the latest MacOS. I think the process is 10 times faster than a new MacBook.
First Step: Backup Data on Mac Using Time Machine
First Take a Backup using Time Machine on Mac, if Data is important for you and want to restore after installing the new MacOS in step 3.
- Go to the Apple logo at the top Mac menu.
- Next, click on System Preferences.
- Now, Find the Time Machine option and Go with it.

- On-Time Machine windows select Drive [Use External Drive, G-Technology], otherwise clean install remove time machine data as well. Or We can also select a local drive to save the Backup file. Important: Don’t Erase This local Drive-in Step 2.
- Enable Backup Automatically to Receive a new Backup all-time for External Drive.
- That’s it.

Second Step: Clean Install using macOS Utilities
- Shut Down your Mac from the top Mac menu. Wait for 20 Seconds.
- For M1 Mac: Press and Hold Power button (Touch ID Button), Until you see Loading startup options. Click on “Options“, Select Reinstall MacOS from macOS Utilities.
- For Intel Mac: Press and hold the Command + R key on the keyboard after listening to startup sound on Mac. Continuously press and hold keys until you see MacOS utilities window on the screen.
- The last Option is Disk Utility. Click on it and Select Macintosh drive and Erase in we are installing new MacOS. Now Use Erase option to successfully erase all data.
- Close Disk Utility window and now you are on MacOS Utilities window.
- The second option is Reinstall MacOS. Click on it. Also, Turn on WiFi internet on Mac to download the latest version of MacOS on Mac. Once Download complete.
- The installation process will start on the same screen. it will take time depends on internet speed. ideally, download speed is too fast. within 20 minutes we can download 7 GBs of macOS Catalina File size from the internet.

Third Step: Restore Mac Data from Time Machine Backup
- Copy all data back to on Mac from Time Machine’s latest backup that I explained in the first step.
- Restart your Mac, Press, and Hold command + R on the startup screen.
- After that, On MacOS utility windows Select Restore Backup from Time Machine. and Select External Drive or Local Drive that is selected or saved on backup Time.
Error While Installing MacOS: You May Not install to this Volume Because it has a Disk Password

Here’s all about the guide to Turn off Disk Firmware Password on Mac after protection is enabled. if you are reinstalling macOS in recovery mode, Your Mac will ask to enter the Firmware password in the Password field with the lock icon screen.
If you are not aware of Don’t know about the Firmware Password then turn off or remove the password from the Disk and Try to Reinstall or install MacOS In Recovery mode.
- During the Utility window on your Mac screen.
- Click on the Utility option in the top Menu, And Choose Startup Security Utility or Firmware Password Utility.
- Click on the Turn Off Firmware Password Option and Again Re-enter Firmware password.
- Once you turn off the Firmware password, Quit Disk Utility and Restart your Mac Apple Logo > Restart.
- That’s it.
What Happen if I Forgot The Firmware Password on Mac
Password Protected or Encrypted Disk doesn’t allow users to reinstall or Erase the Data without the firmware Password.
In this case, the User must have to contact nearby apple support, and Schedule an appointment at apple support, Bring your Mac’s Purchase Receipt or Original Proof of identity.
Above all are the helpful solutions that we discovered and mark as a help to all people. Share which solution is worked for you.


