
The Mac is the expansion of the brain, as it’s filled with all essential data such as Emails, Videos, Data, and at-last communication with other people. Regardless of whether you are worried about the organization spoofing out important data. Indeed, you want to add an extra layer of security. Here in this article, we have mentioned 21 settings to change on your Mac for security.
However, some of the settings come at the cost of comfort, but we will let you know how each security setting of revamped macOS works on your Mac.
New Security Settings…
The new macOS creates the thing in a better way. They collaborate with new techniques and technology to enhance the user’s experience. It was released on Sep 2023, but pro users might want to know the new Mac security settings.
Tip#1. Use Two Factor Authentications

The foremost setting you need to configure is Two Factor Authentication, as it adds dual-layer security to your Apple Account. In this scenario, activating the settings on Mac will require the Password along with One-Time -Password if it’s done from a peculiar device.
For instance, if someone is familiar with your device password, they will only be able to access your Account with your phone or Mac. But if you have made the new Apple ID on device consuming macOS 10.15.4 or later, your Account will automatically be set up with Two-Factor-Authentication. Vice versa, you created Apple ID Account long ago and need to Set Up Two-Factor-Authentication.
Tip#2. Create Strong Password
Nowadays, a Mac carries lots of important stuff that needs to be secured to prevent the surrounding suspicious eyes. And one of the most basic but essential configurations required to create is Strong Password On Mac.
Because creating a weak password can get quickly hindered. For a dual layer of security, you can also set up Touch ID on the Mac device except for the Mac Mini series.
Tip#3. Firmware Password On Mac
What is the Firmware password? Is that the question, right? Well, it is the aspect that disallows the users who don’t carry the password to start any external or internal device rather than the start-up disk you have chosen. This aspect needs the Mac with an Intel processor, but for Mac with an Apple Silicone chip, the enabled File vault is enough to secure your device in a case. It’s managed by MDM (Mobile Device Management). So it’s better to Set Up The Filevault On macOS.
macOS Ventura & Later:
- choose Apple Logo > System Settings… > Privacy & Security > Turn On FileVault… > Enter Password In System Settings Pop-up > on the next screen, you will receive a pop-up“Your Icloud Account “Account Name” Can Be Used To Unlock Your Disk And Reset And Reset Your Password If You Forget It” choose the Create Recovery Key And Do Not Use My iCloud Account > Continue.

macOS Monterey & Earlier:
- Select Apple Logo > System Preferences… > Security & Privacy > Fire Vault > Lock Icon present at the left bottom of the screen > Enter Password > Turn On FileVault. On the next screen, you receive a pop-up “Your Icloud Account “Account Name” Can Be Used To Unlock Your Disk And Reset And Reset Your Password If You Forget It” tick on the Create Recovery Key And Do Not Use My iCloud Account > Continue.
Tip#4. Ensure That Find My Mac Is Enabled
Were you always being afraid of mac getting stolen? If yes, you should Enable Find My Mac on your device, as this feature helps safeguard the stolen or lost Mac. You only need is an Apple ID, a spare iPhone, or a computer to locate and erase the important data.
Tip#5. Time Machine
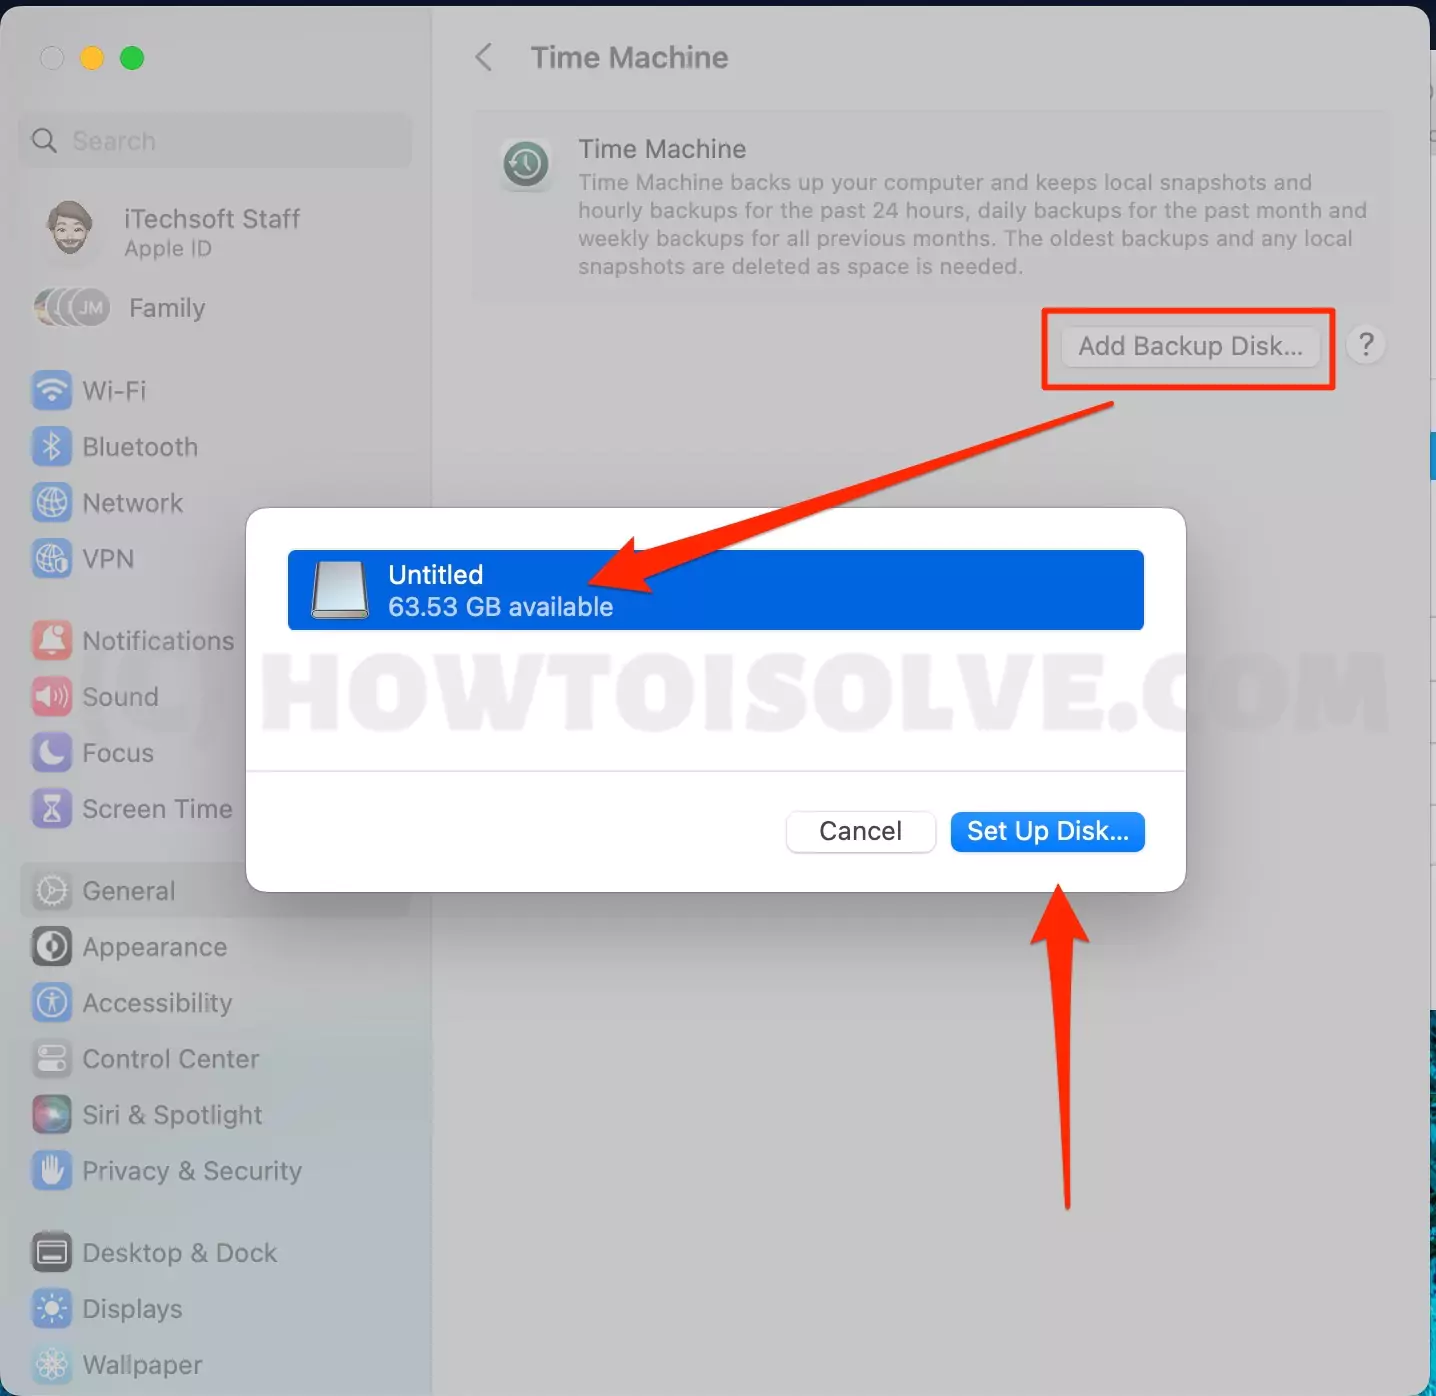
There is no need to pay extra for the Best Hard Drive For Mac. Currently, macOS Ventura & later comes with the same backup feature introduced in the older macOS versions, known as Time Machine. When you set up The Time Machine On Your Mac, it will back up all the personal data storage like photos, apps, music, and document automatically in a weekly, daily, and hourly manner. However, the oldest data will get cleared when the storage is fully acquired.
Tip#6. Use FileVault
FileVault is the most advanced Apple execution that works to encrypt on both Mac and macOS. Once enabled, all your data gets encrypted in the start-up disk and will work seamlessly in the background. However, at the same point, it asks all the users to re-write the Password even if they have kept the Mac device in sleep mode. So to prevent the data from getting encoded from unauthorized use, you MUST ENABLE FileVault…!
Note: If you carry the iMac Pro or any other Mac computer craved Apple T2 Security Chip, your device data will get automatically encrypted in the drive. Still, enabling FileVault adds an extra layer of security.
Step 1 → Select Apple Logo > System Settings… > Privacy & Security (for macOS Monterey & Earlier Version, Apple Logo > System Preferences… > Security & Privacy).
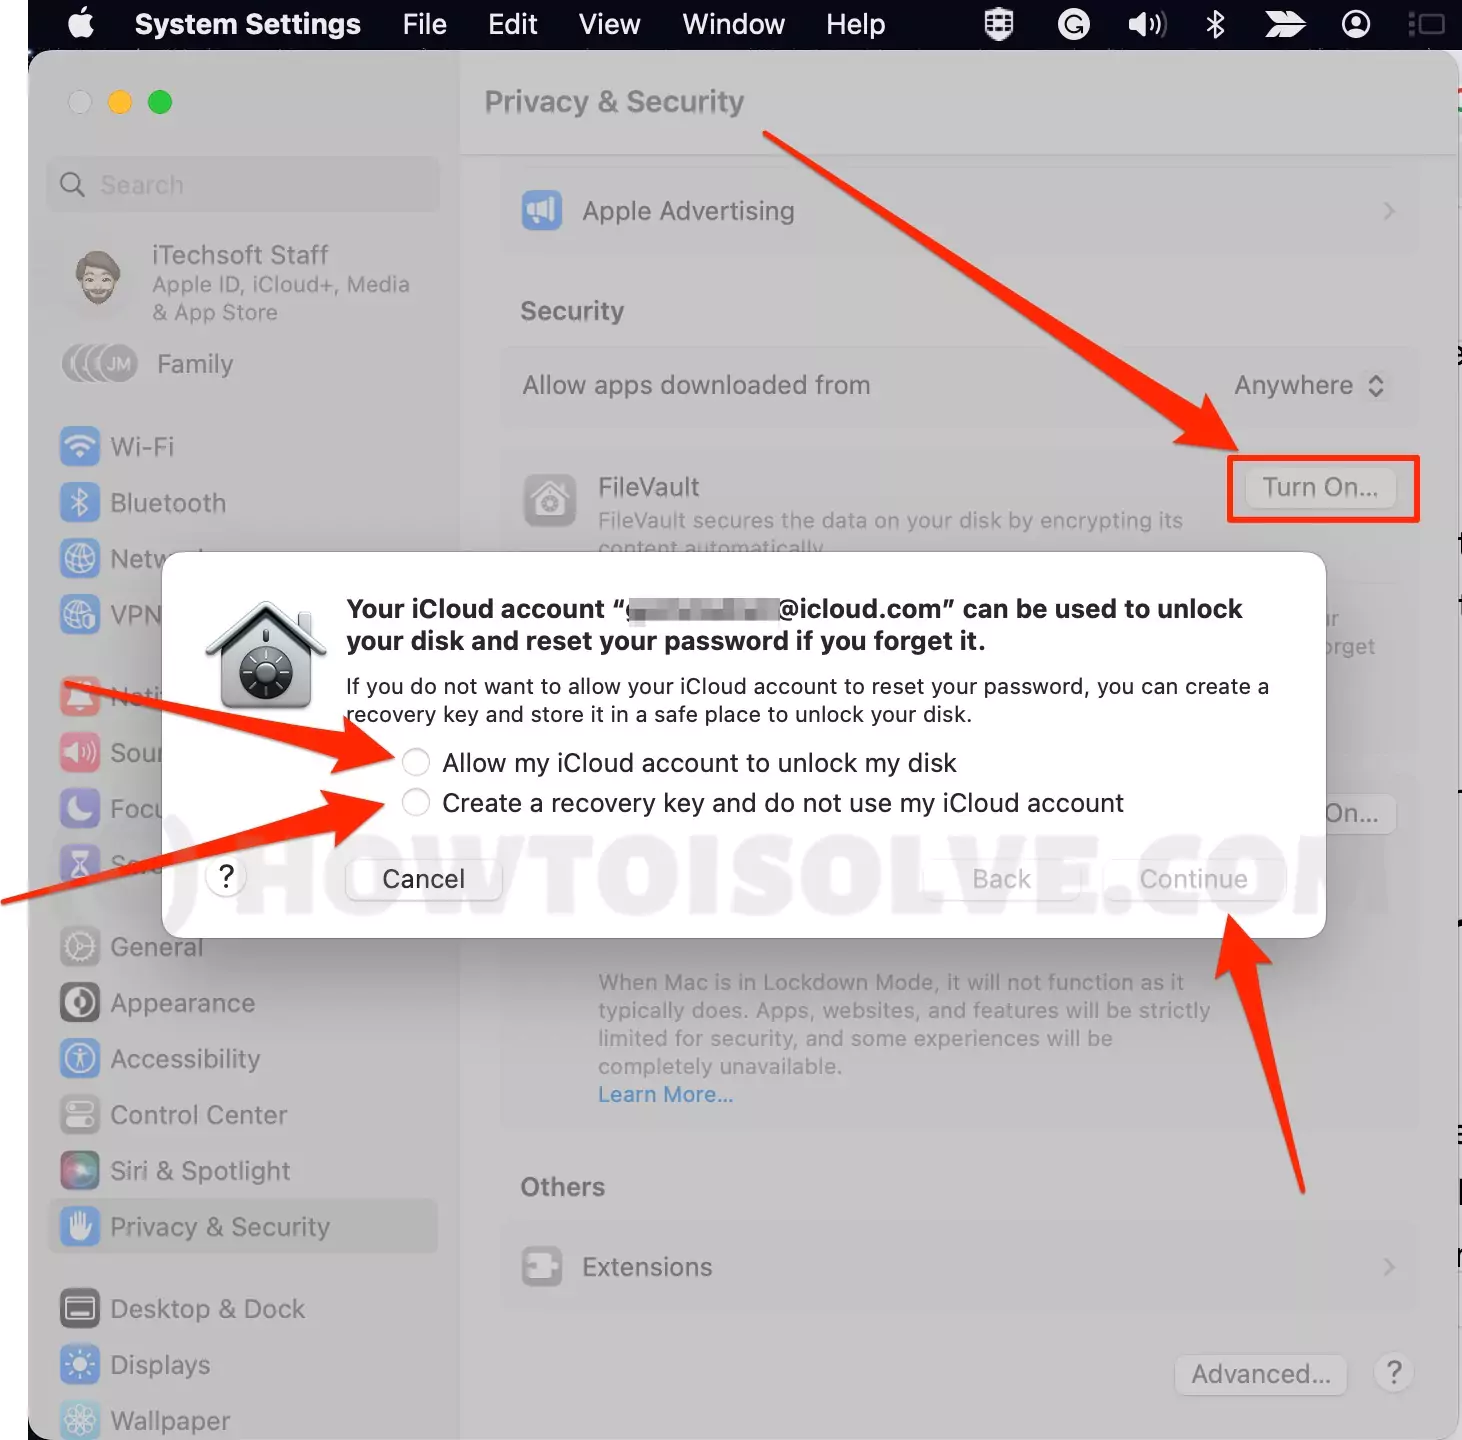
Step 2 → Select Turn On FileVault… > Enter Password In System Settings Pop-up (for macOS Monterey & Earlier, Click on the Lock Icon at the bottom of the screen and enter Password > Turn On FileVault). Now you will encounter the pop “Your Icloud Account “Account Name” Can Be Used To Unlock Your Disk And Reset And Reset Your Password If You Forget It”
Step 3 → Select any one:
For iCloud Account: Tick the box next to the “Allow My iCloud Account To Unlock My Disk.”
Note: We suggest you select the iCloud Account
For Recovery Key: Tick on the box next to the “Create Recovery Key And Do Not Use My iCloud Account” and then, after copy, paste it, and store it securely.
Step 4 → Choose Continue.
In case, If your Mac has multiple users, their data will also get encrypted. Then, they can open the encrypted disk with the help of a login password.
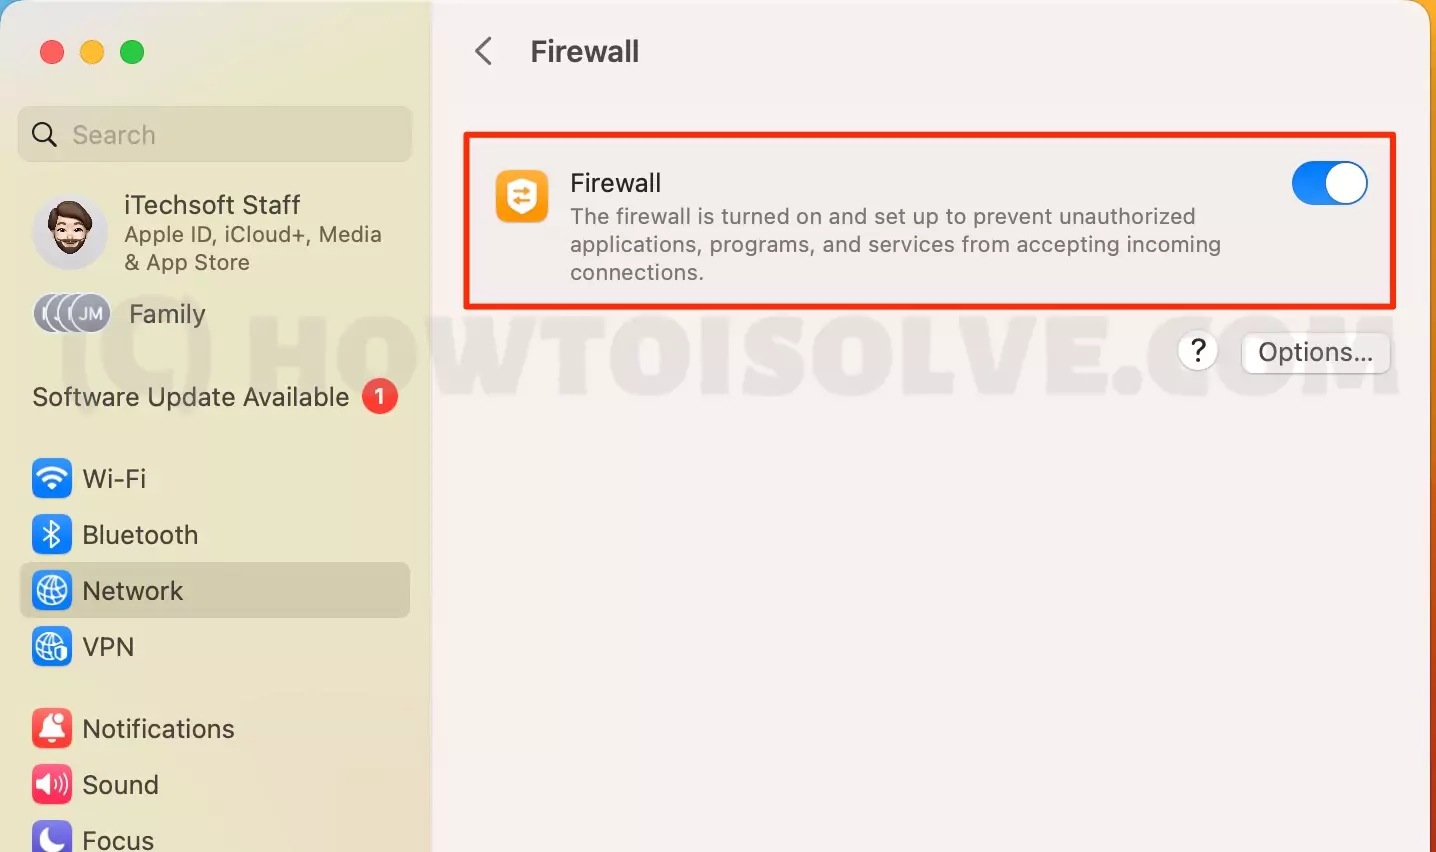
Tip#7. Enable Firewall
As of now, you might constantly be scrolling through the various unprotected sites over the unsecured public network. That’s where we suggest you Enable The Firewall. The Firewall on the Mac works as a shield to protect the Mac from unauthorized contact commenced by the external device through a network.
Apart from this, there are various features like block all incoming calls, automatically allow to enable built-in software to receive incoming calls, enable stealth mode, and automatically allow downloaded signed software to receive incoming connections in a firewall that can be used for Further Control Over Specific Sites And Software.
For macOS Ventura & Later:
- Apple Logo > System Settings… > Network > Firewall > Turn On Firewall… > Enter Password In System Settings Pop-up.

For macOS Monterey & Earlier:
- Apple Logo System Preferences… > Security & Privacy > Firwall > Lock Icon > Enter Password > Turn On Firewall…
Tip#8. Use VPN
Since the Mac doesn’t offer advanced encryption, you can use the VPN as a precautionary measure. Vice versa, many Best VPNs for Mac will encrypt the data you fly over from one end to another.
At the same point, if your Mac is constantly over the shared Hotspot or public network hypothetically, someone can handily track you. But if you have an Enabled VPN, it can ruin such situations. Ideally, if you are not fond of using VPN, Apple itself offers the paid service known as Private Relay, which is not a VPN but consumes functionality like VPN.
Tip#9. Make Safari More Private
Every Mac user spends half of their day on Safari. So it’s better to check whether Safari is consuming security and privacy as feasible. What to do? Well, Safari offers some settings that need altering. If you want to become more familiar with it, follow the steps below.
Change Your Default Browser: Change Your Default Browser: As always, some users might have chosen Chrome Over Safari. But we suggest you change it to Safari because its security settings are better than any other browser.
macOS Ventura & Later:
- Apple Logo > System Settings… > Desktop & Dock > Default Web Browser and choose Safari.
macOS Monterey & Earlier:
- Apple Logo > System Preferences… > General > Default Web Browser > Safari.
Disable Tracking: There are a bunch of websites that take the help of third-party content. However, to prevent that third-party website from tracking you, simply disable Prevent Cross-Site Tracking In Safari. Here are the steps to do so.
Step 1 → Navigate to the Safari App > Safari > Preferences > Privacy > click on Prevent Cross-Site Tracking.
Moreover, you can use Private Browsing in Safari for security and privacy purposes. At the same time, if you are Fred up using Safari, Best Alternatives Of Safari For Mac have the same security settings.
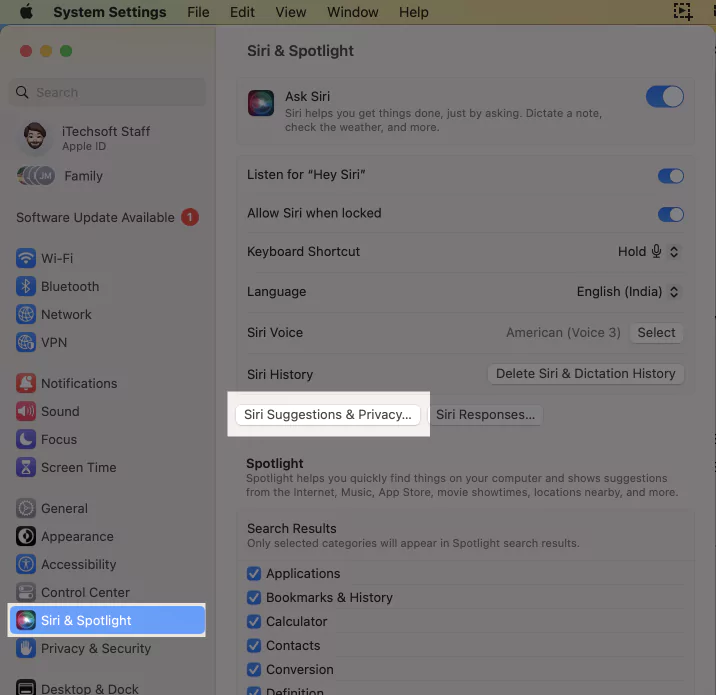
Tip#11. Customize Siri Settings
Some of us think of Siri as a “Voice Assistant,” but we can say it is a grit of the Apple Personalizing Settings. Which identically tracks your activity on the Mac and results in the suggestion mainly; that’s where privacy is a primary concern.
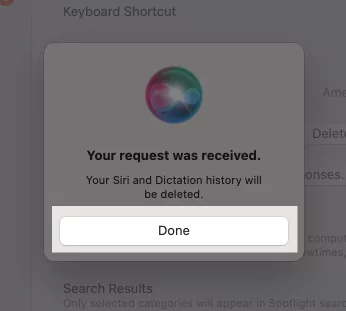
In that case, you need to delete Siri & Detection History. Doing so will delete the interaction between Siri & Dictation associated with the Mac computer and will be cleared from the Apple Server.
Must disable,
Allow Siri to learn from how you use this app in order to make suggestions across apps.
macOS Ventura & Later:
- Apple Logo > System Settings… > Siri & Spotlight > Beside Siri History, click on the Delete Siri & Detection History. On the next screen, you will receive a pop-up “Delete Siri & Dictation History” click on Delete > Done.


- To Disable Siri Learn Use of App, Go to Siri Suggestions & Privacy…Select the app from the left side of the window and Disable the option Learn from this App, Click on Done to apply the changes.

macOS Monterey & Earlier:
- Apple Logo > System Preferences… > Siri > Next to Siri History, choose the Delete Siri & Detection History > pop-up “Delete Siri & Dictation History” > Delete > Done.
Tip#12. Enable Automatic Update
Various developers usually launch frequent updates. Whether of Software or application, the main aim of the update is to enhance the performance and increase the Security & Privacy features. However, in a demanding schedule, we need a reminder for updates, or else you should Enable Automatic Update.
macOS Ventura & Later:
- Apple Logo > System Settings… > General > Software Update > i Icon present next to the Automatic Update. On the next screen, enable the Toggle next to the Check For Update, Download New Update When Available, Install macOS Update, Install App Updates From the App Store; that’s it!
macOS Monterey & Earlier:
- Apple Logo > System Preferences… > Software Update > On the next screen, select Advanced… > Tick on the box next to Check For Update, Download New Update When Available, Install macOS Update, Install App Updates From the App Store.
Tip#13. Block Mail Tracking (Apple Mail)
In the world of modern technologies, digital theft is increasing day by day. For instance, random email consumes the tracking technology that notifies the sender that you have opened the mail and given access to your location. However, it’s a rare case, but it’s just like prevention is better than cure. So here is what you need to do.
Step 1 → Open Apple Mail > Mail > Preferences… > Privacy > tick on the box present next to the Protection Mail Activity.
Lastly, the sender can still track you even after enabling the Protection Mail Activity.
Tip#14. Apps Permission
Whenever you download the applications on your Mac device, it asks you to grant access to Mac’s Hardware or System Services, just like the Camera, Microphone, Location, and Data. However, accepting those notifications can cause a certain issue with a close eye.
For instance, you might have recently installed the Weather App that doesn’t require the location but still has access, which can be considered INVALID!
Follow each step mentioned below and remove the application from the list to make mac security settings blocking application. In case apps are unused or can run without access to the particular feature.
macOS Ventura & Later
Note: While disabling or enabling the application from the various settings on the macOS, you receive a pop-up saying “App Name” Will Have Access To Your “Feature Name” Until It Is Quit. In this pop-up, choose Quit & Reopen.
Camera: Apple Logo > System Settings… Privacy & Security > Camera.
Microphone: Apple Logo > System Settings… > Privacy & Security > Microphone.
Speech Recognition: Apple Logo > System Settings… > Privacy & Security > Speech Recognition.
Location Service: Apple Logo > System Settings… > Privacy & Security > Location Service.
macOS Monterey & Earlier:
Camera: Apple Logo > System Preferences… > Security & Privacy > Lockin Icon and then enter password > Camera.
Microphone: Apple Logo > System Preferences… > Security & Privacy > Lockin Icon and then enter password > Microphone.
Speech Recognition: Apple Logo > System Preferences… > Security & Privacy > Lockin Icon and then enter password > Speech Recognition.
Location Service: Apple Logo > System Preferences… > Security & Privacy > Lockin Icon and then enter password > Location Service.
Hereafter, scroll through. every option mentioned above and remove the application to change security and privacy settings on Mac.
Tip#15. Allow accessibility apps to access your Mac
Accessibility is one of the most advanced security settings for the application you have downloaded from the browser. As it’s refined, it needs to configure in the right ways. However, under these settings, Third-Party like Zoom and Grammarly can be configured to allow or disallow to have access to the mac data.
So if you have installed the Third-party application from an authorized source or want to prevent access to the data, disallow them to access the data on Mac. Here are the steps to do so.
Note: Whenever you receive the pop-up “Install Would Like To Control This Computer Using Accessibility Feature,” Grant Access To This Application In Privacy Security & Preferences, located In System Settings. Always click on Deny. But if you have selected Open System Preference, alter it manually if the application is not trusted.
macOS Ventura & Later:
- System Settings… > Privacy & Security > Accessibility > tap on the toggle next on the application and enter the Password in the System Settings Pop to disallow it.
macOS Monterey & Earlier:
- System Preferences… > Security & Privacy > Accessibility > Lock Icon located at the bottom of the screen. Click on the desired application to highlight and then choose – Minus Icon.
Tip#16. Don’t Use USB Thumb Drive
One of the most common; lot’s users do is plug the random USB Thumb Drive into their mac device. We suggest you only do so if you are confirming from where it came. Many USBs, including the executable, can result in malicious activity.
Tip#17. Use Screen Timeout
You might be wondering, What Is Screen Timeout On Mac? It’s an ordinary feature that overviews how much time you spend on websites and applications.
Moreover, it offers the tool through which you set up certain limitations, such as the amount of time spent on an application in a day. The feature is helpful to the guardian and parent to keep an eye on the children. Here are the settings you need to look at.
- Downtime: This aspect allows you to create a schedule for your children and yourself. At the same point, you can also disable or enable the downtime when needed, so there is no need to alter the schedule. However, if you are using the Mac during downtime, you will receive the notification; similarly, when your children extend using the Mac during downtime, they can ask for more time from you.
macOS Ventura & Later:
- Go to Apple Logo > Sytem Settings… > Screen Time Out > Downtime.
macOS Monterey & Earlier:
- Go to Apple Logo > System Preferences… > Screen Time Out > Downtime.
On the Downtime Menu, you will receive various necessary settings like Setup Downtime Schedule, Turn Downtime Schedule On or Off, and Downtime On or Off immediately.
App Limits: App limits are the basic features that allow you to set up screen time for yourself and your children. Well, enabling this feature on your Mac computer prevents your children from wasting their time over various applications simultaneously to avoid access to any personal stored data in your Mac.
macOS Ventura & Later:
- Apple Logo > System Settings…(for macOS Monterey, System Preferences) > Screen Time > App Limit.
On the App Limit window, you will receive the Settings for the app; in case to add an application, click on + Icon and schedule the timing accordingly.
Communication Limit: The needed aspect that every Parent needs to configure. Why? This feature automatically finds out the nudity in the picture before the message is received or sent on the messaging app by your children.
macOS Ventura & Later:
- Apple Logo > System Settings… > Screen Time > Communication Limit.
macOS Monterey & Earlier:
- Apple Logo > System Preferences… > Screen Time > Communication Limit.
In the communication limit menu, you will receive the during screen time allow communication with, during downtime allow communication with settings. However, this feature is only available in some regions.
Always Allowed: Here, you can select an application that can be accessed anytime, even when you enable downtime.
macOS Ventura & Later:
- System Settings… > Screen Time > Always Allowed.
macOS Monterey & Earlier:
- System Preferences… > Screen Time > Always Allowed.
Content Privacy: Restrictions must priotized when handing the Mac to your children or anyone else. Setting up the content privacy feature on the Mac disallows various activities like making a purchase, limiting access to the content, and much more.
- To setup it, navigate to the Apple Logo > System Settings… (for macOS Monterey & Earlier, System Preferences…) > Screen Time > Content Privacy.
Tip#18. Turn off Automatic Login
Is it safe to have Automatic Login on Mac? You should completely neglect such settings because if your device comes with someone suspicious, it can hinder your data stored in the Mac device.
macOS Ventura & Later:
Apple Logo > System Settings… > User & Group > Automatically Log-In As… > Off > Enter Password > Unlock > On the next screen you will receive Pop-up Turn On Automatic Login ID Will Disable The Touch ID And Remove Any Apple Cards From This Mac > Continue.
macOS Monterey & Earlier:
Apple Logo > System Preferences… > User & Group > Lock Icon > Enter Password > Unlock > Login Items. From the Automatic Login, Items drop down, select Off.
Sometimes the Automatic Login On Mac Greyed can be due to the multiple users.
Tip#19. Keep Turning On Airdrop For Contact Only
Yes, the Airdrop is a fantastic feature as it’s allowed to share & receive images, documents, and much more stuff within a limited area. But keeping it configured for Everyone should be ignored.
As the alternate unknown device, either Mac, iPhone, or iPadOS device can sometimes disturb you by continuously Accept & Decline Pop-up, and if you accidentally click on the Accept will result in Big Loss! So, it’s better to alter it to the Contact Only Settings.
Step 1 → Click on the Control Center present in Menu Bar.
Step 2 → Select Airdrop. And change it to the Contact Only Option. That’s it!
Tip#20. Don’t Show Notification Preview Always
Notifications Preview Always is the default setting for Mac users with no sensitive data. But in the same vein, if your Mac has sensitive data, there are chances of getting acknowledged to the surrounding SPY CAMERA OR EYE! So, in conclusion, customize the Notification Preview Settings to When Locked or Never.
macOS Ventura & Later:
- Apple Icon > System Settings… > Notifications > Show Preview. Select When Locked or else Never.
macOS Monterey & Earlier:
- Apple Icon > System Preferences… > Notifications & Focus > Notifications > Show Preview. Click on When Locked or else Never.
Tip#21. Stop Sharing Mac
The Mac is the most advanced machine with various features we would never wonder about. And one such part is SHARING; it allows you to access the device remotely. However, sometimes it works in the wrong because if the faulty person gets access can cause Theft, Hinder, or Loss of data. So it’s better to disable the aspect that comes under the Sharing. So here is what you need to do.
macOS Ventura & Later:
- Go to System Settings… > General. On the Sharing Window, disable all toggles if they are not in use.
macOS Monterey & Earlier:
- Go to System Preferences… > Sharing > Uncheck the box next to every feature.
MAKE YOUR MAC SECURE!
Making your device secure is one of the most needed things you should ever do. But proper security settings make it more convenient to use. Follow a guide on 21 settings to change on Mac security.
How Do I Find Security Settings On My Mac?
If you want to change the General settings, just like Allow App to download from, FileVault, Firewall, Lockdown Mode(new macOS), or any password-related settings. Then, follow the steps mentioned below as per the installed macOS.
macOS Ventura & Later:
Apple Logo > System Settings… > Privacy & Security.
macOS Monterey & Earlier:
Apple Logo > System Preferences… > Security & Privacy
Where Is Security And Privacy In Settings?
There is only a minor change to access Security settings in the revamped macOS; the Security & Privacy in the older macOS version is now highlighted as the Privacy & Security. It presents below the Siri & Spotlight. For older macOS, under the System Preferences… and then beside the Extension option.
Is My Mac Protected From Hackers?
Yes, the latest macOS version, known as macOS Sonoma, is built with a safety feature known as Lockdown Mode. But for more convenience and security, you can Turn On Firewall, FileVault, and at-last use Best Antivirus For Mac.
How Do I Get To Security Settings On Safari?
On the Safari App, go to Safari and follow Preferences. You can Enable or Disable The JavaScript present in the Security Window from the next window.
Do You Need Virus Protection On A Mac?
If there is no sensitive data in your Mac, The Lock down mode in the latest macOS Version is enough to protect your Mac. But if you desire to add an extra layer of security or else you have an earlier version of macOS, you can install the Best Antivirus For Mac.
How Do I Reset My Security Settings On My Mac?
There is no identical way to reset Mac’s security settings, but if you still want to Change Security Settings, the only option is hindering it manually.
How Do I Reset My Mac Without Losing Data?
The most secure and prominent way to reset without losing the data is by Creating a Backup and then Erase All Settings And Settings on Mac.
How Do You Reset Permissions On Safari?
In the Safari Application, choose Safari, next Preferences… Select the Privacy Option at the top of the window. Followingly, Manage Website Data… and click on Remove All.
How Do I Allow Apps To Download Anywhere On Mac?
Being a multitasker on the Mac requires various kinds of applications. Anyhow the App Store on Mac only devours some applications. That’s why you are wondering about Allow Apps To Download From Anywhere! Then, follow the steps mentioned below.
macOS Ventura & Later:
Apple Icon > System Settings… > Privacy & Security > Anywhere present below Security Menu.
macOS Monterey & Earlier:
Navigate to the Apple Icon > System Preferences…. > Security & Privacy > Lock Icon, enter Password > App Store And Identifies Developers.
What Happens If You Forget Your Mac Password?
Don’t hesitate; you can use the FileVault Recovery Key. It’s nothing but a long string of numbers that you receive when you turn on FileVault. At the same point, you can also Reset Mac Login Password or Regain The Lost Mac Password.
Where is the Allow button in Security and Privacy Mac?
To get Allow Button on macOS Ventura: Navigate to the Apple Icon > System Settings… > Privacy & Security > Allow under the Security Menu. And similarly, for macOS Monterey: System Preferences… > Security & Privacy > Allow present next to the System Software From Developer “Sophos” Was Blocked From Loading.
How Do I Change The Security Settings On My Mac Apps?
Willing to make your app more secure, or else want to alter security settings. Good luck. Apple offers various ways to do so; if you wish to access security settings related to Notifications on latest macOS, navigate to the System Settings… > Notification. Similarly, head to the System Preferences… > Notification & Focus for macOS Monterey. Moving forward, go to the article mentioned above if you want to go deep down into the more security settings like Location Service, Camera, Microphone, and Accessibility.
How Do I Change My Security Settings To Default?
Unfortunately, you can’t change security and privacy settings on mac to default, but you can still do so by manually going through each security setting, as mentioned above in this article.
How Do I Change My Apple Privacy Settings?
To customize the privacy settings on Mac, navigate to the System Settings… > Privacy & Security > Privacy and then customize whatever you want.


