The menu bar size of the Mac is sometimes too small or difficult to read by certain people [Mostly Big screen iMac – 24 inch, 27 inches, and Mac mini while using Big screen, external monitor]. If you want to change your Mac’s menu bar size but don’t know how? Then here’s a complete guide for changing your Mac’s menu size. Now make your menu bar larger according to your preference.
We are assuming that you are running a version of supported macOS. Here is how you can change the size of your Mac’s menu bar.
How to Change Menu Bar Size on Mac
On MacOS Ventura, Sonoma: Change menu Bar size Settings
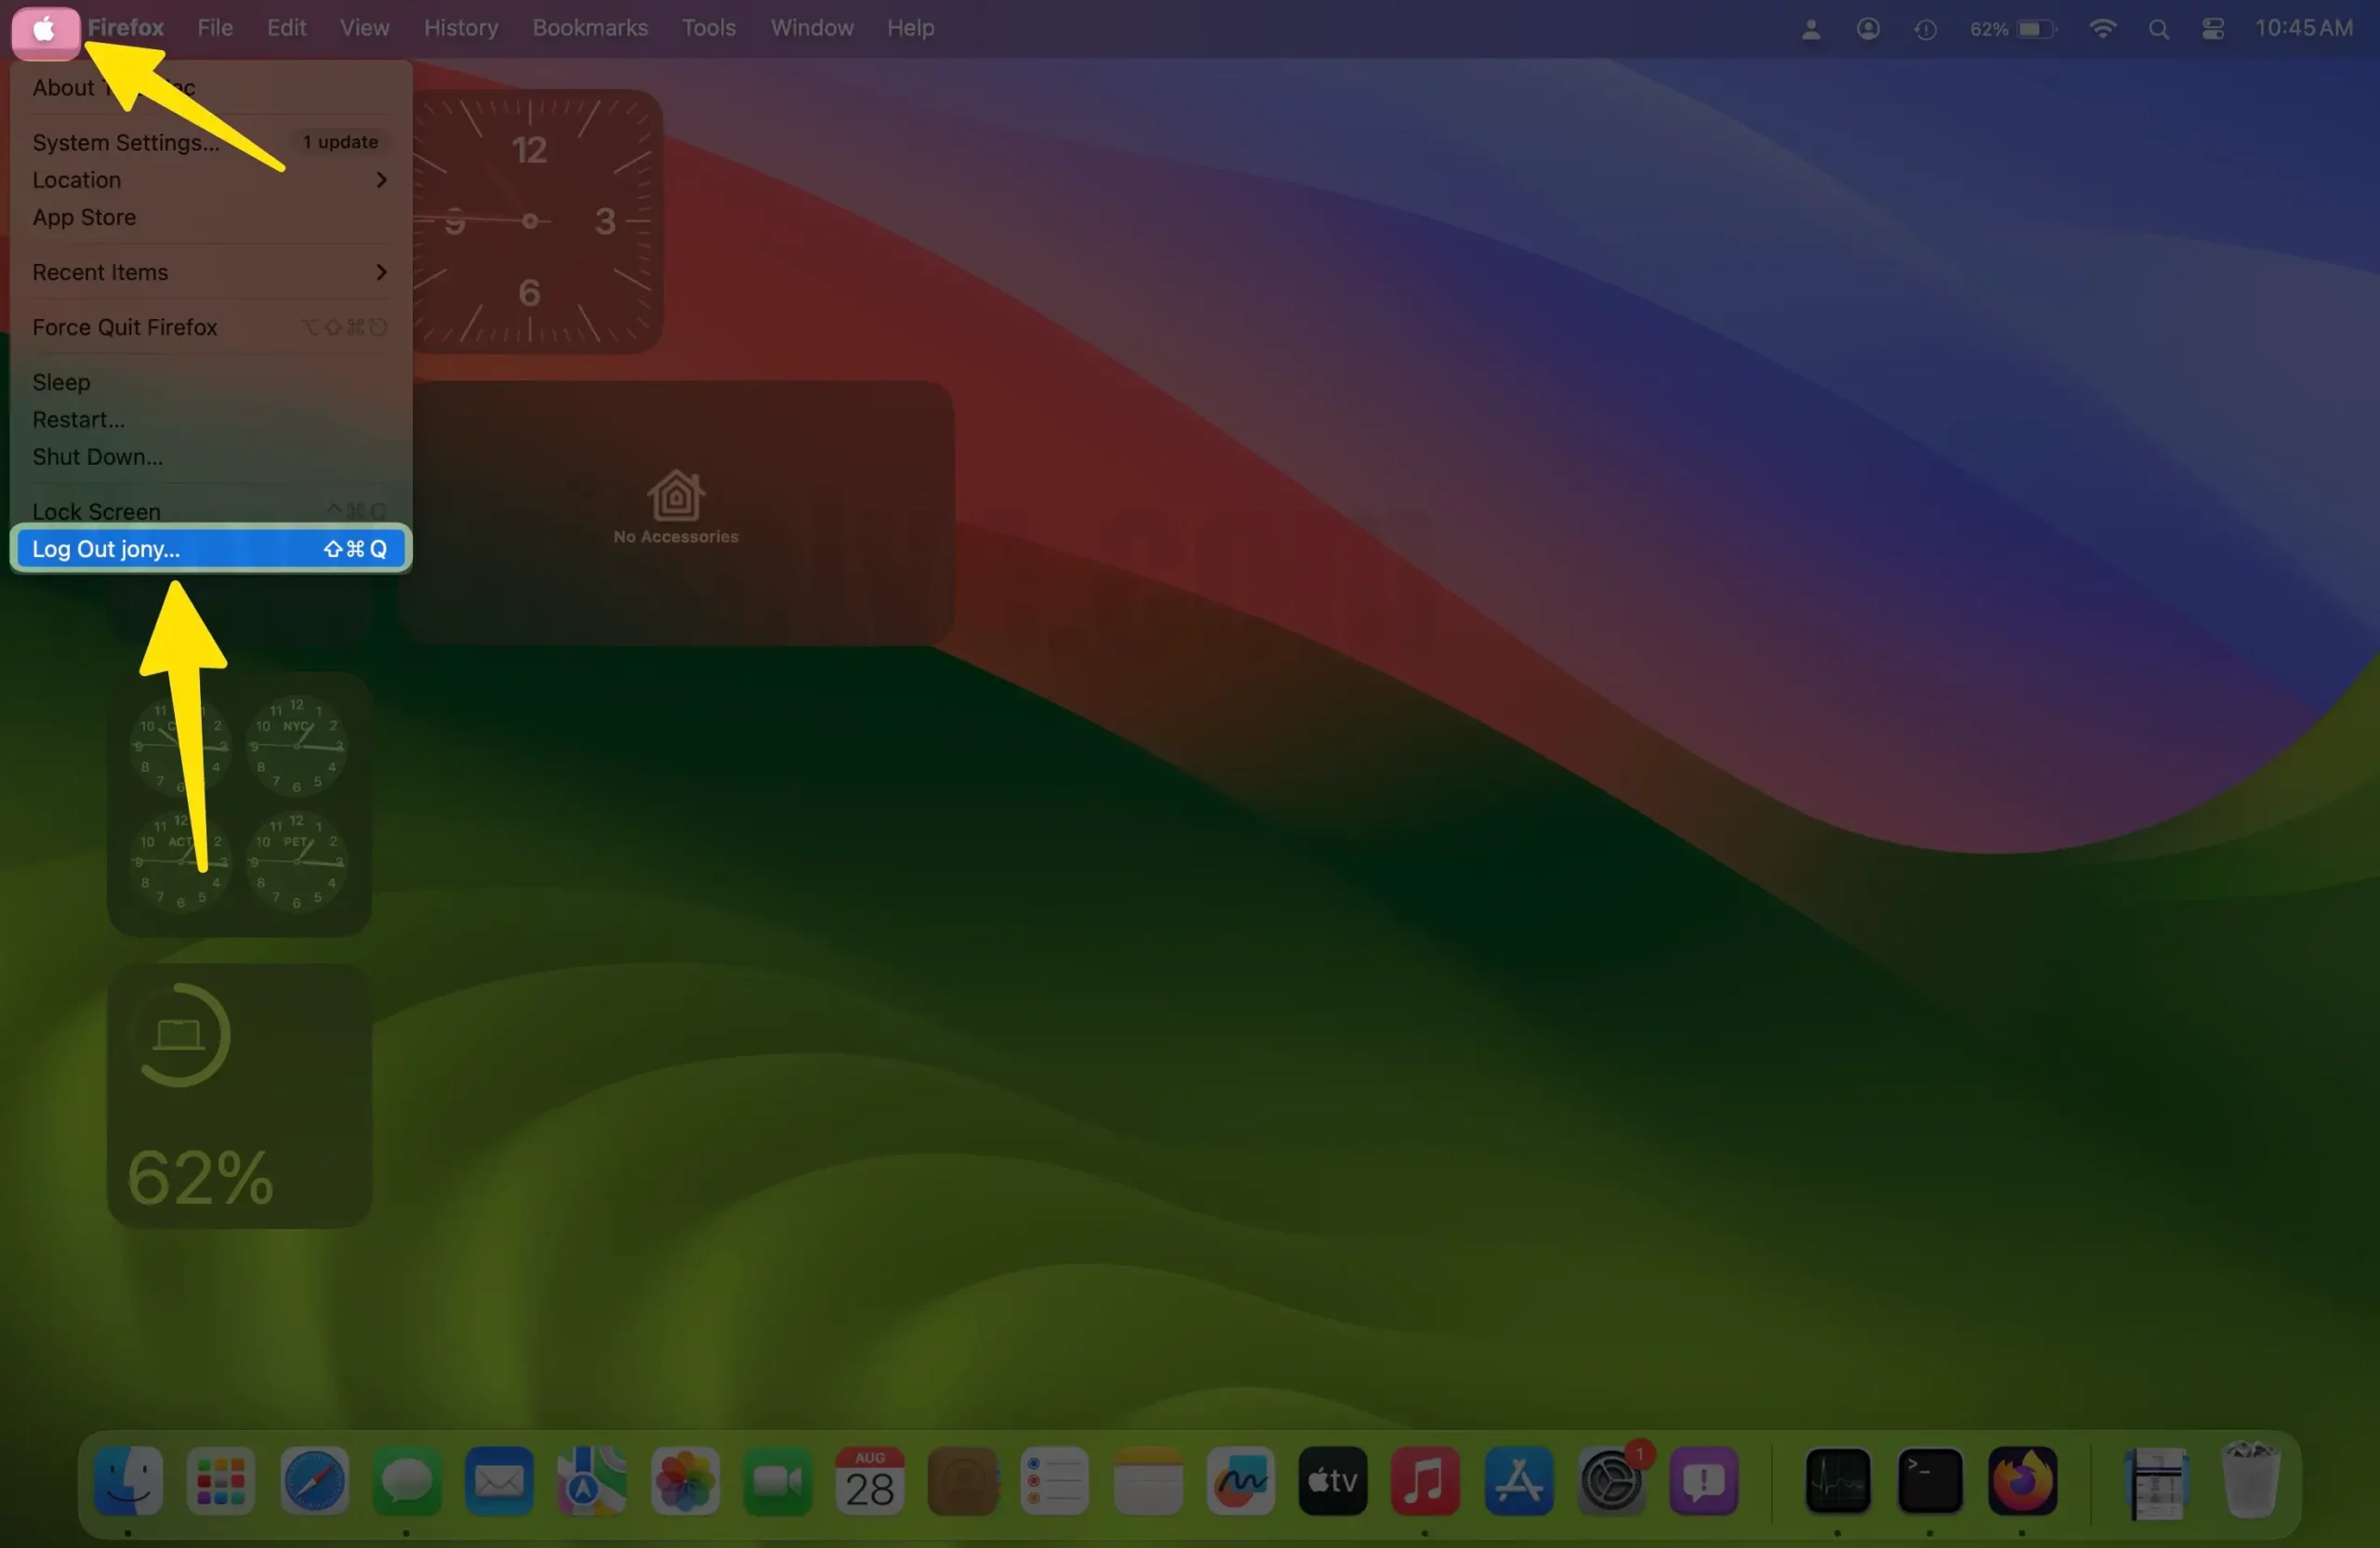
Step #1. Go to the Apple Logo from the top menu > System settings.
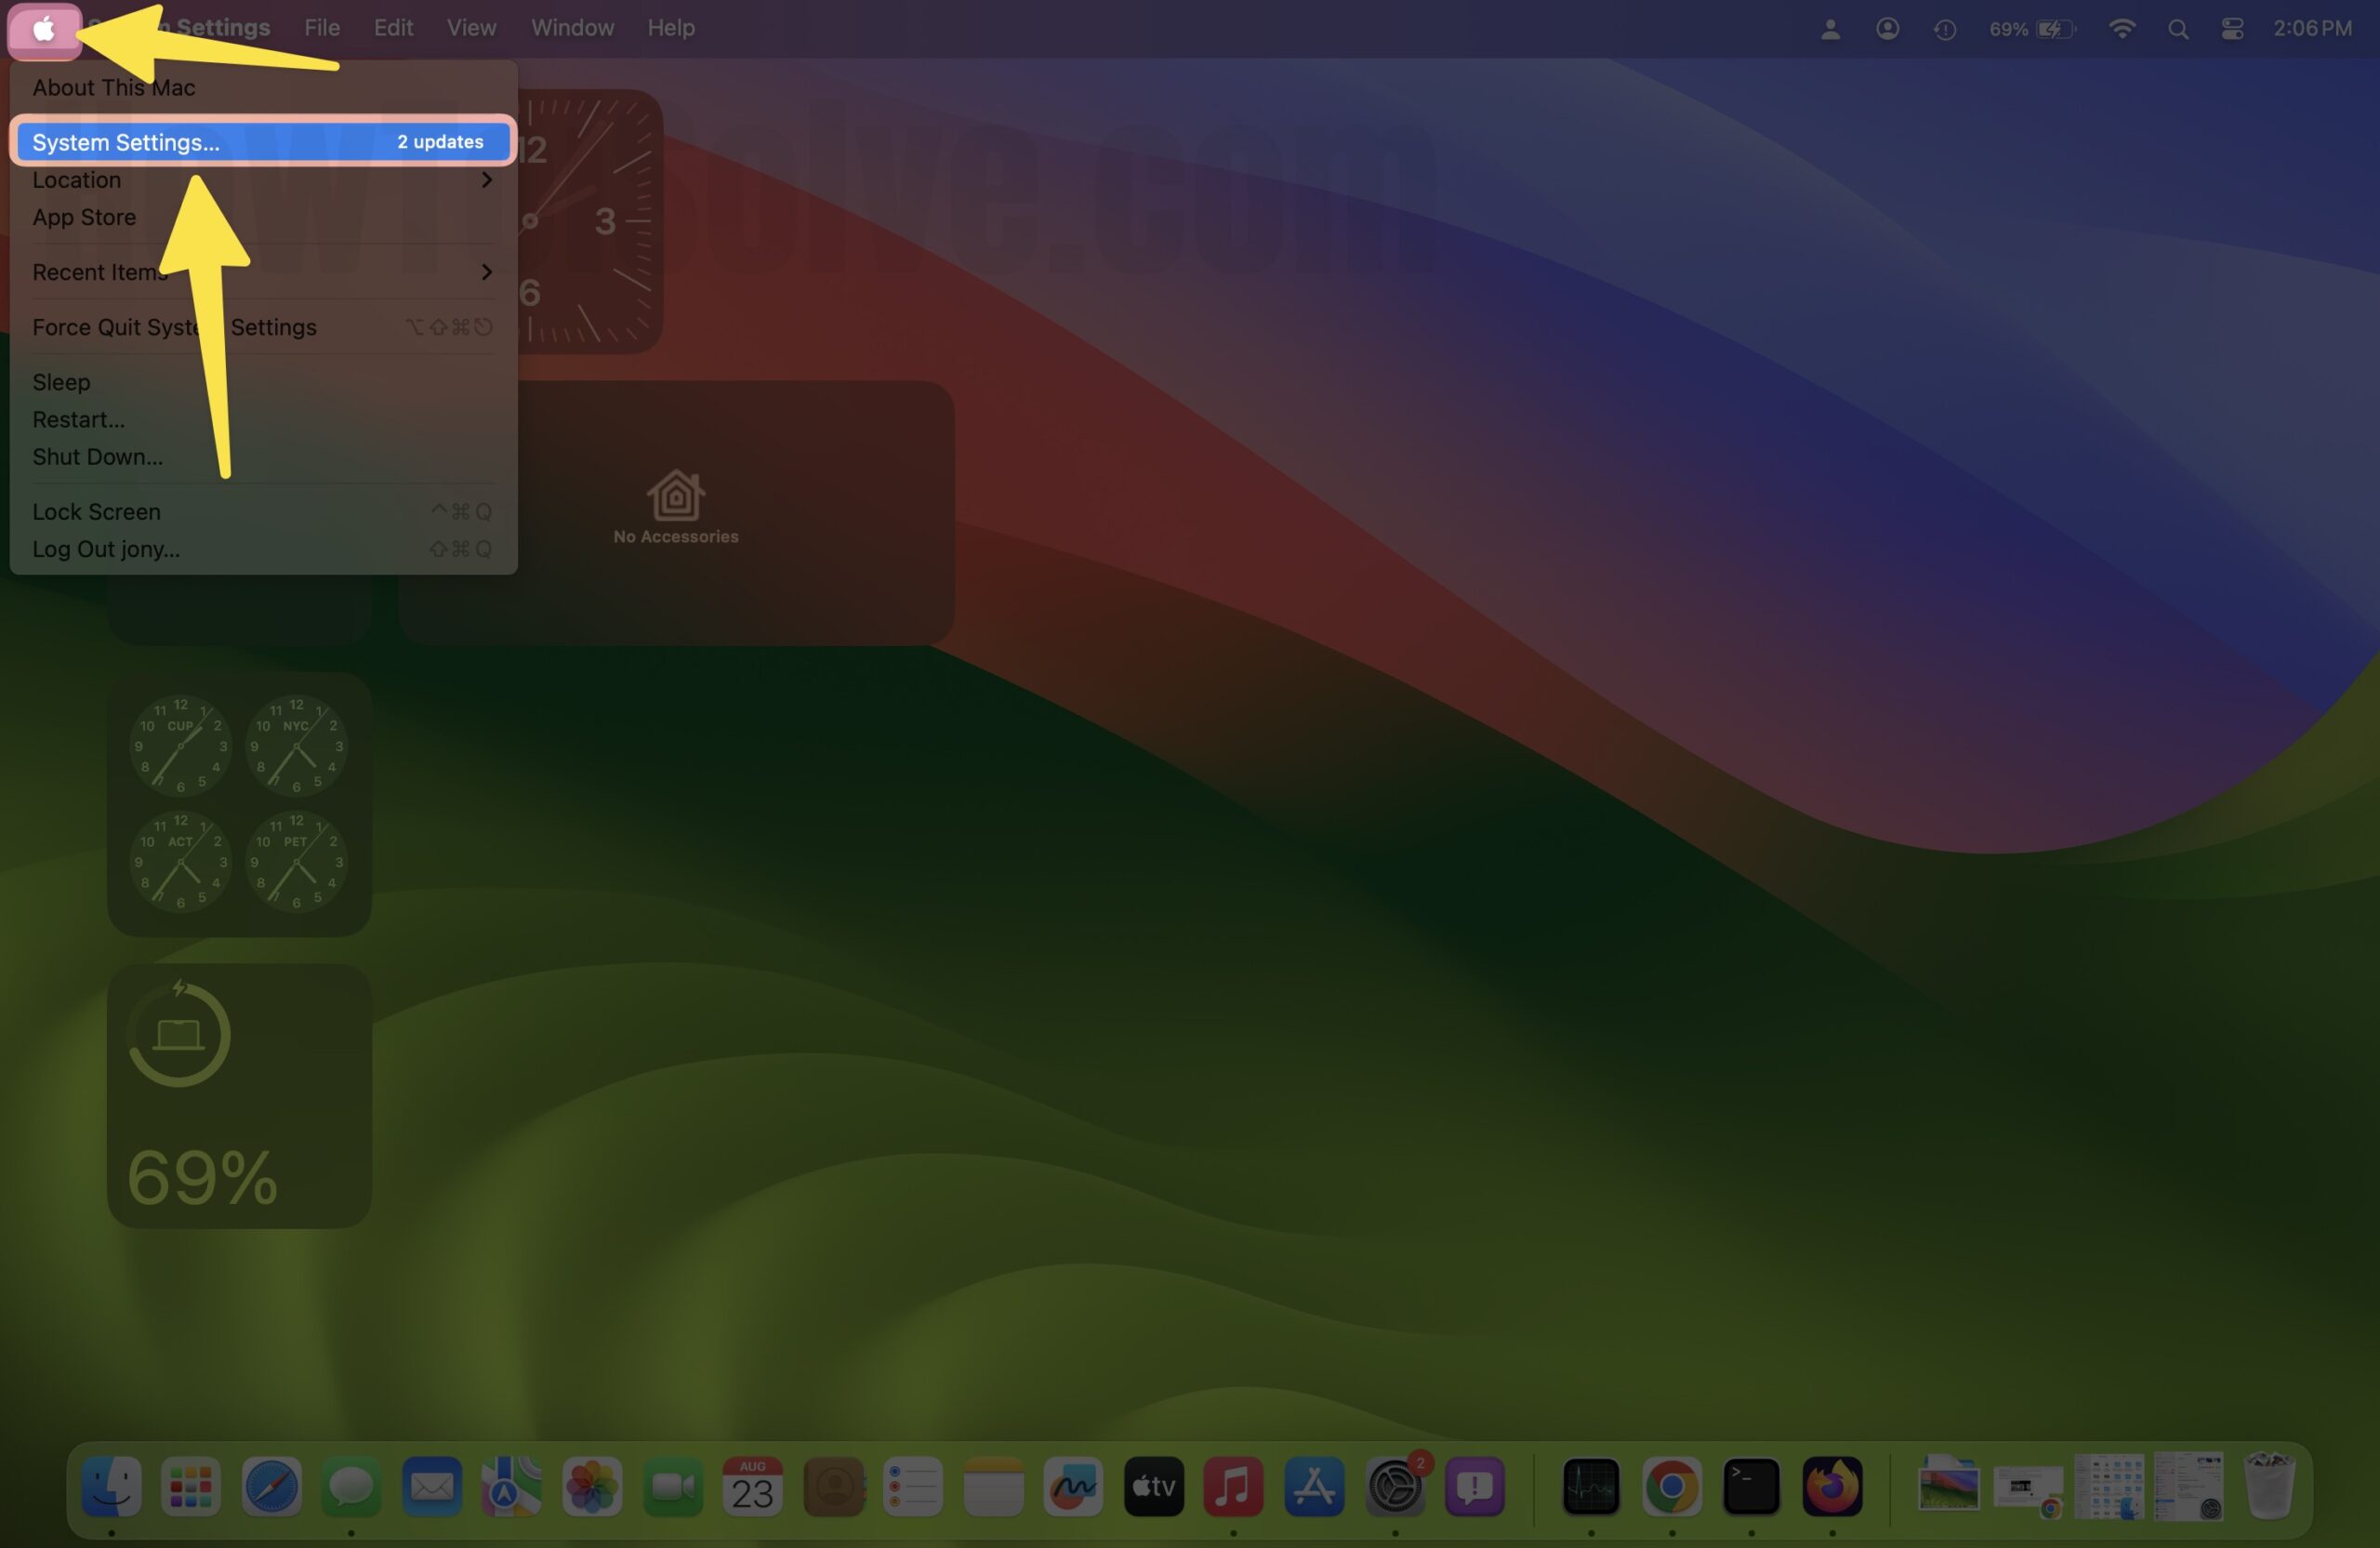
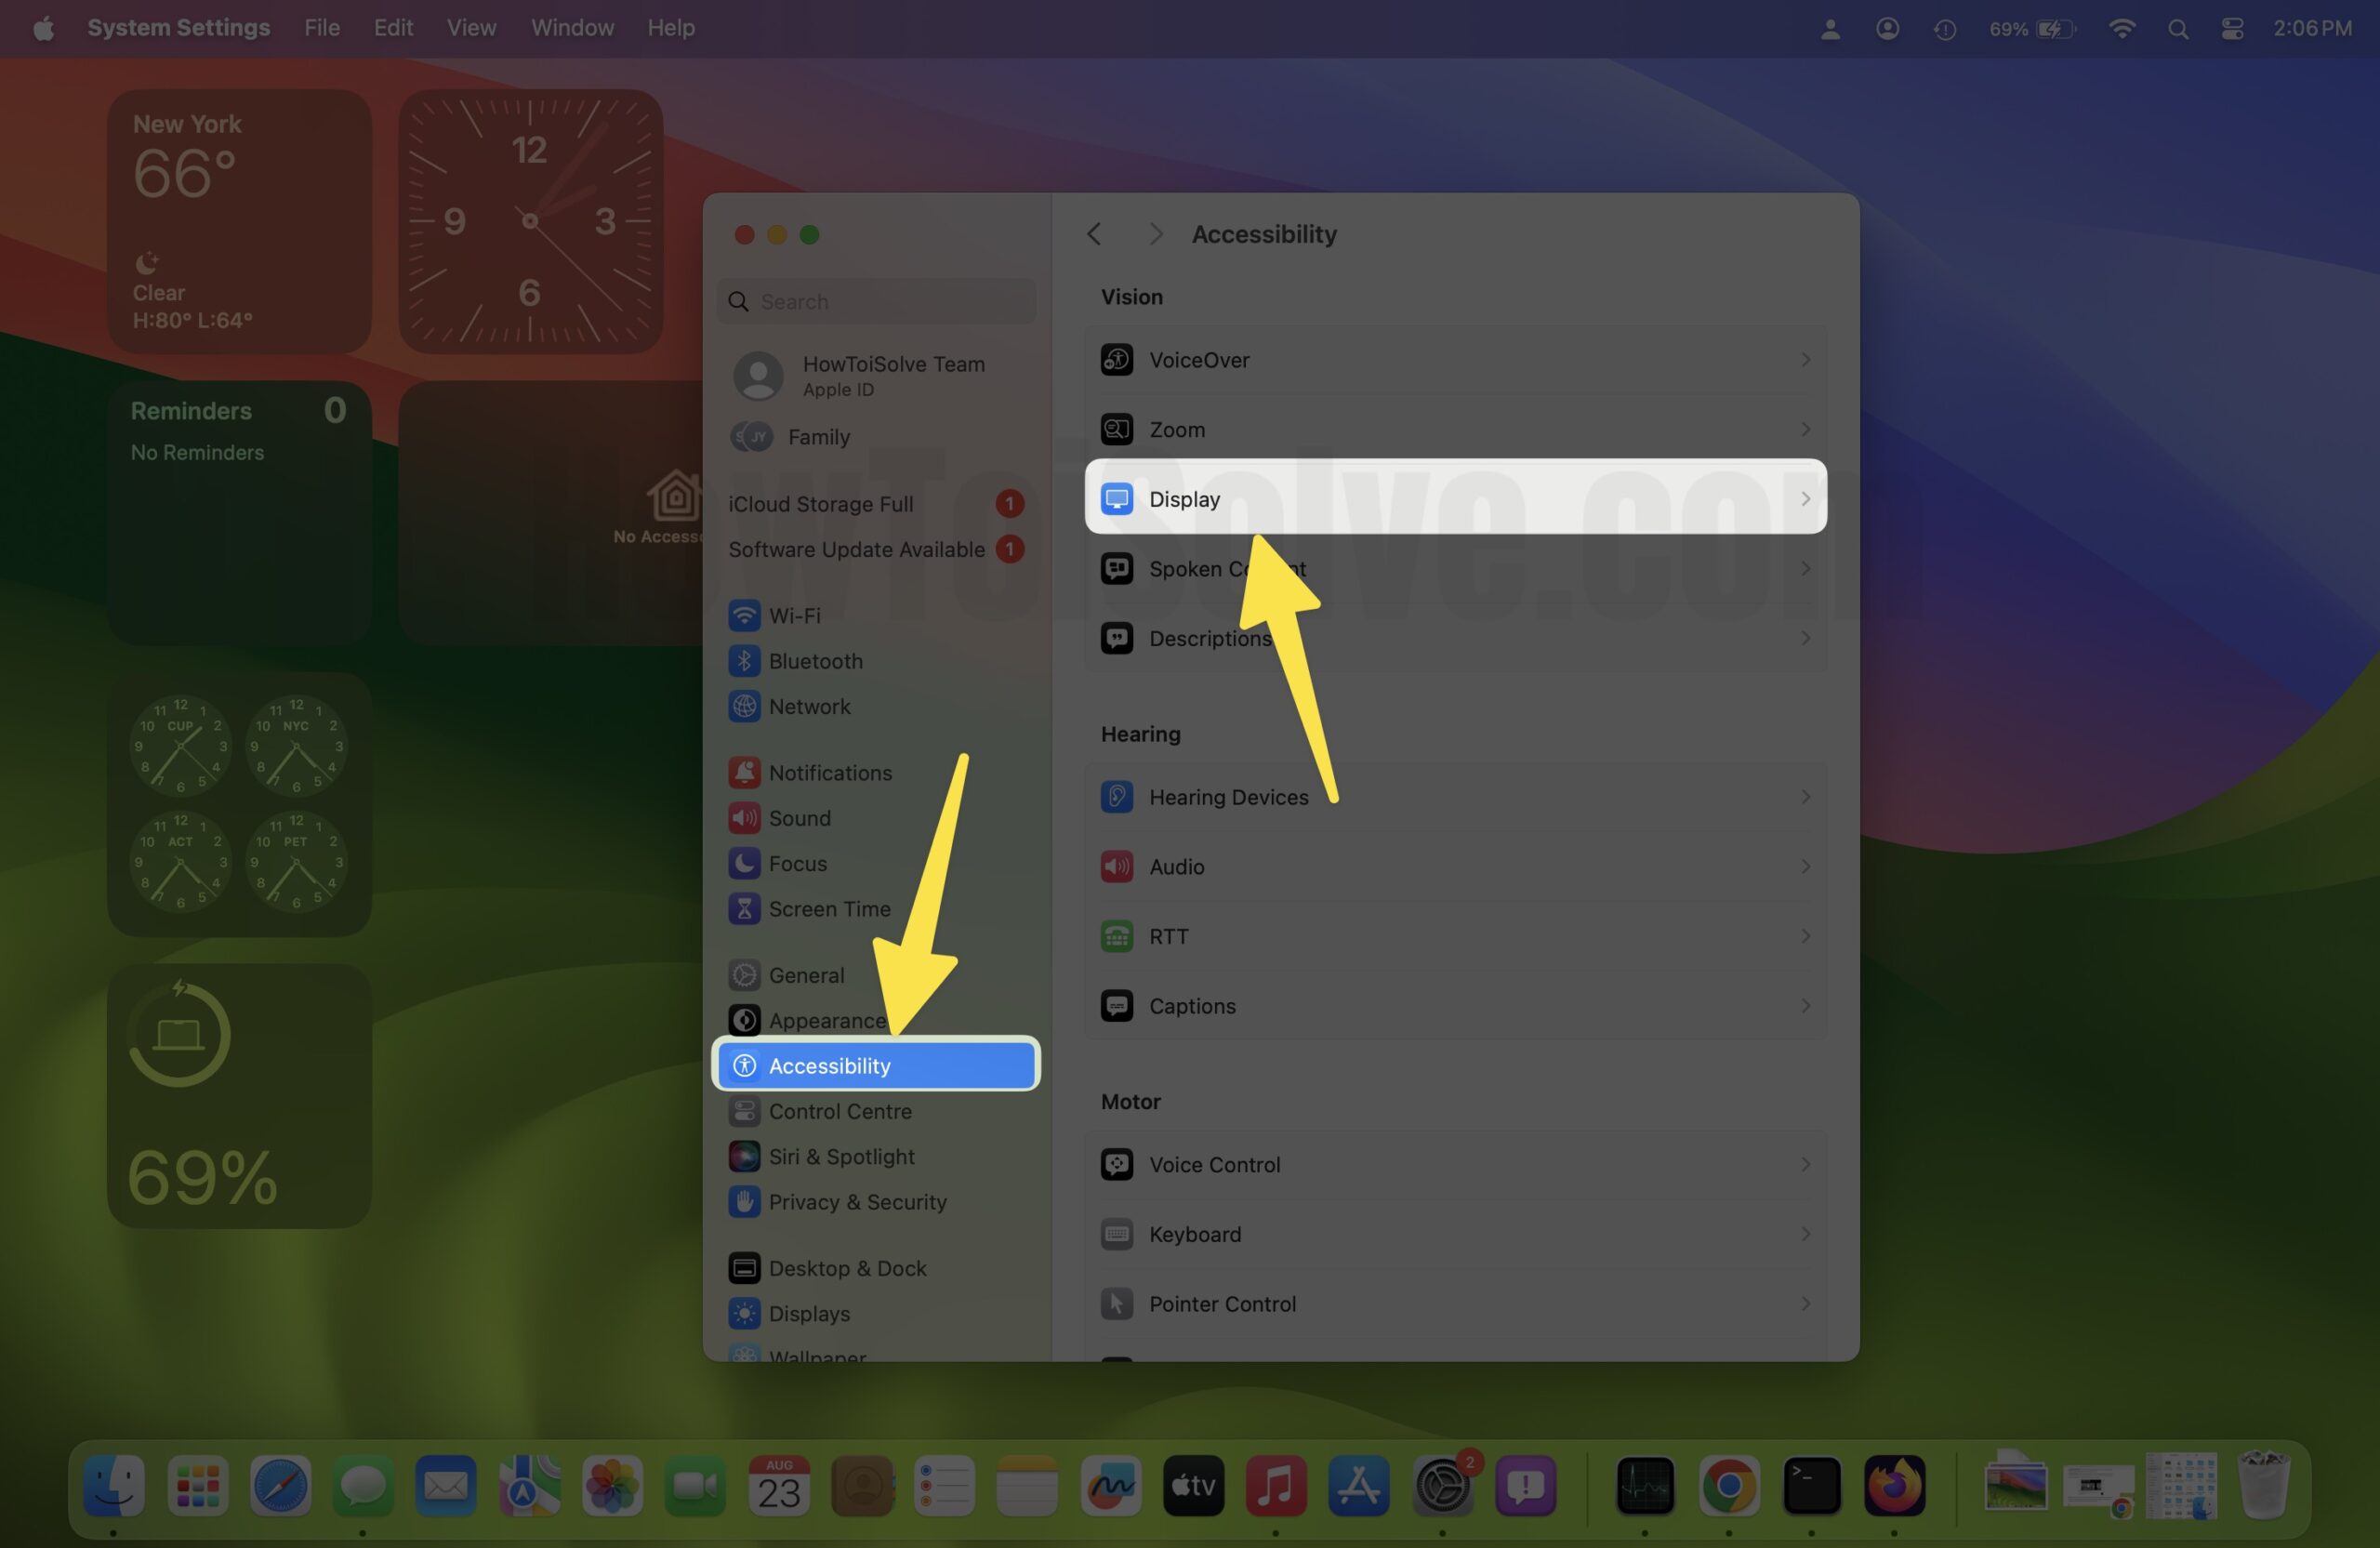
Step #2. Click on Accessibility > Display.
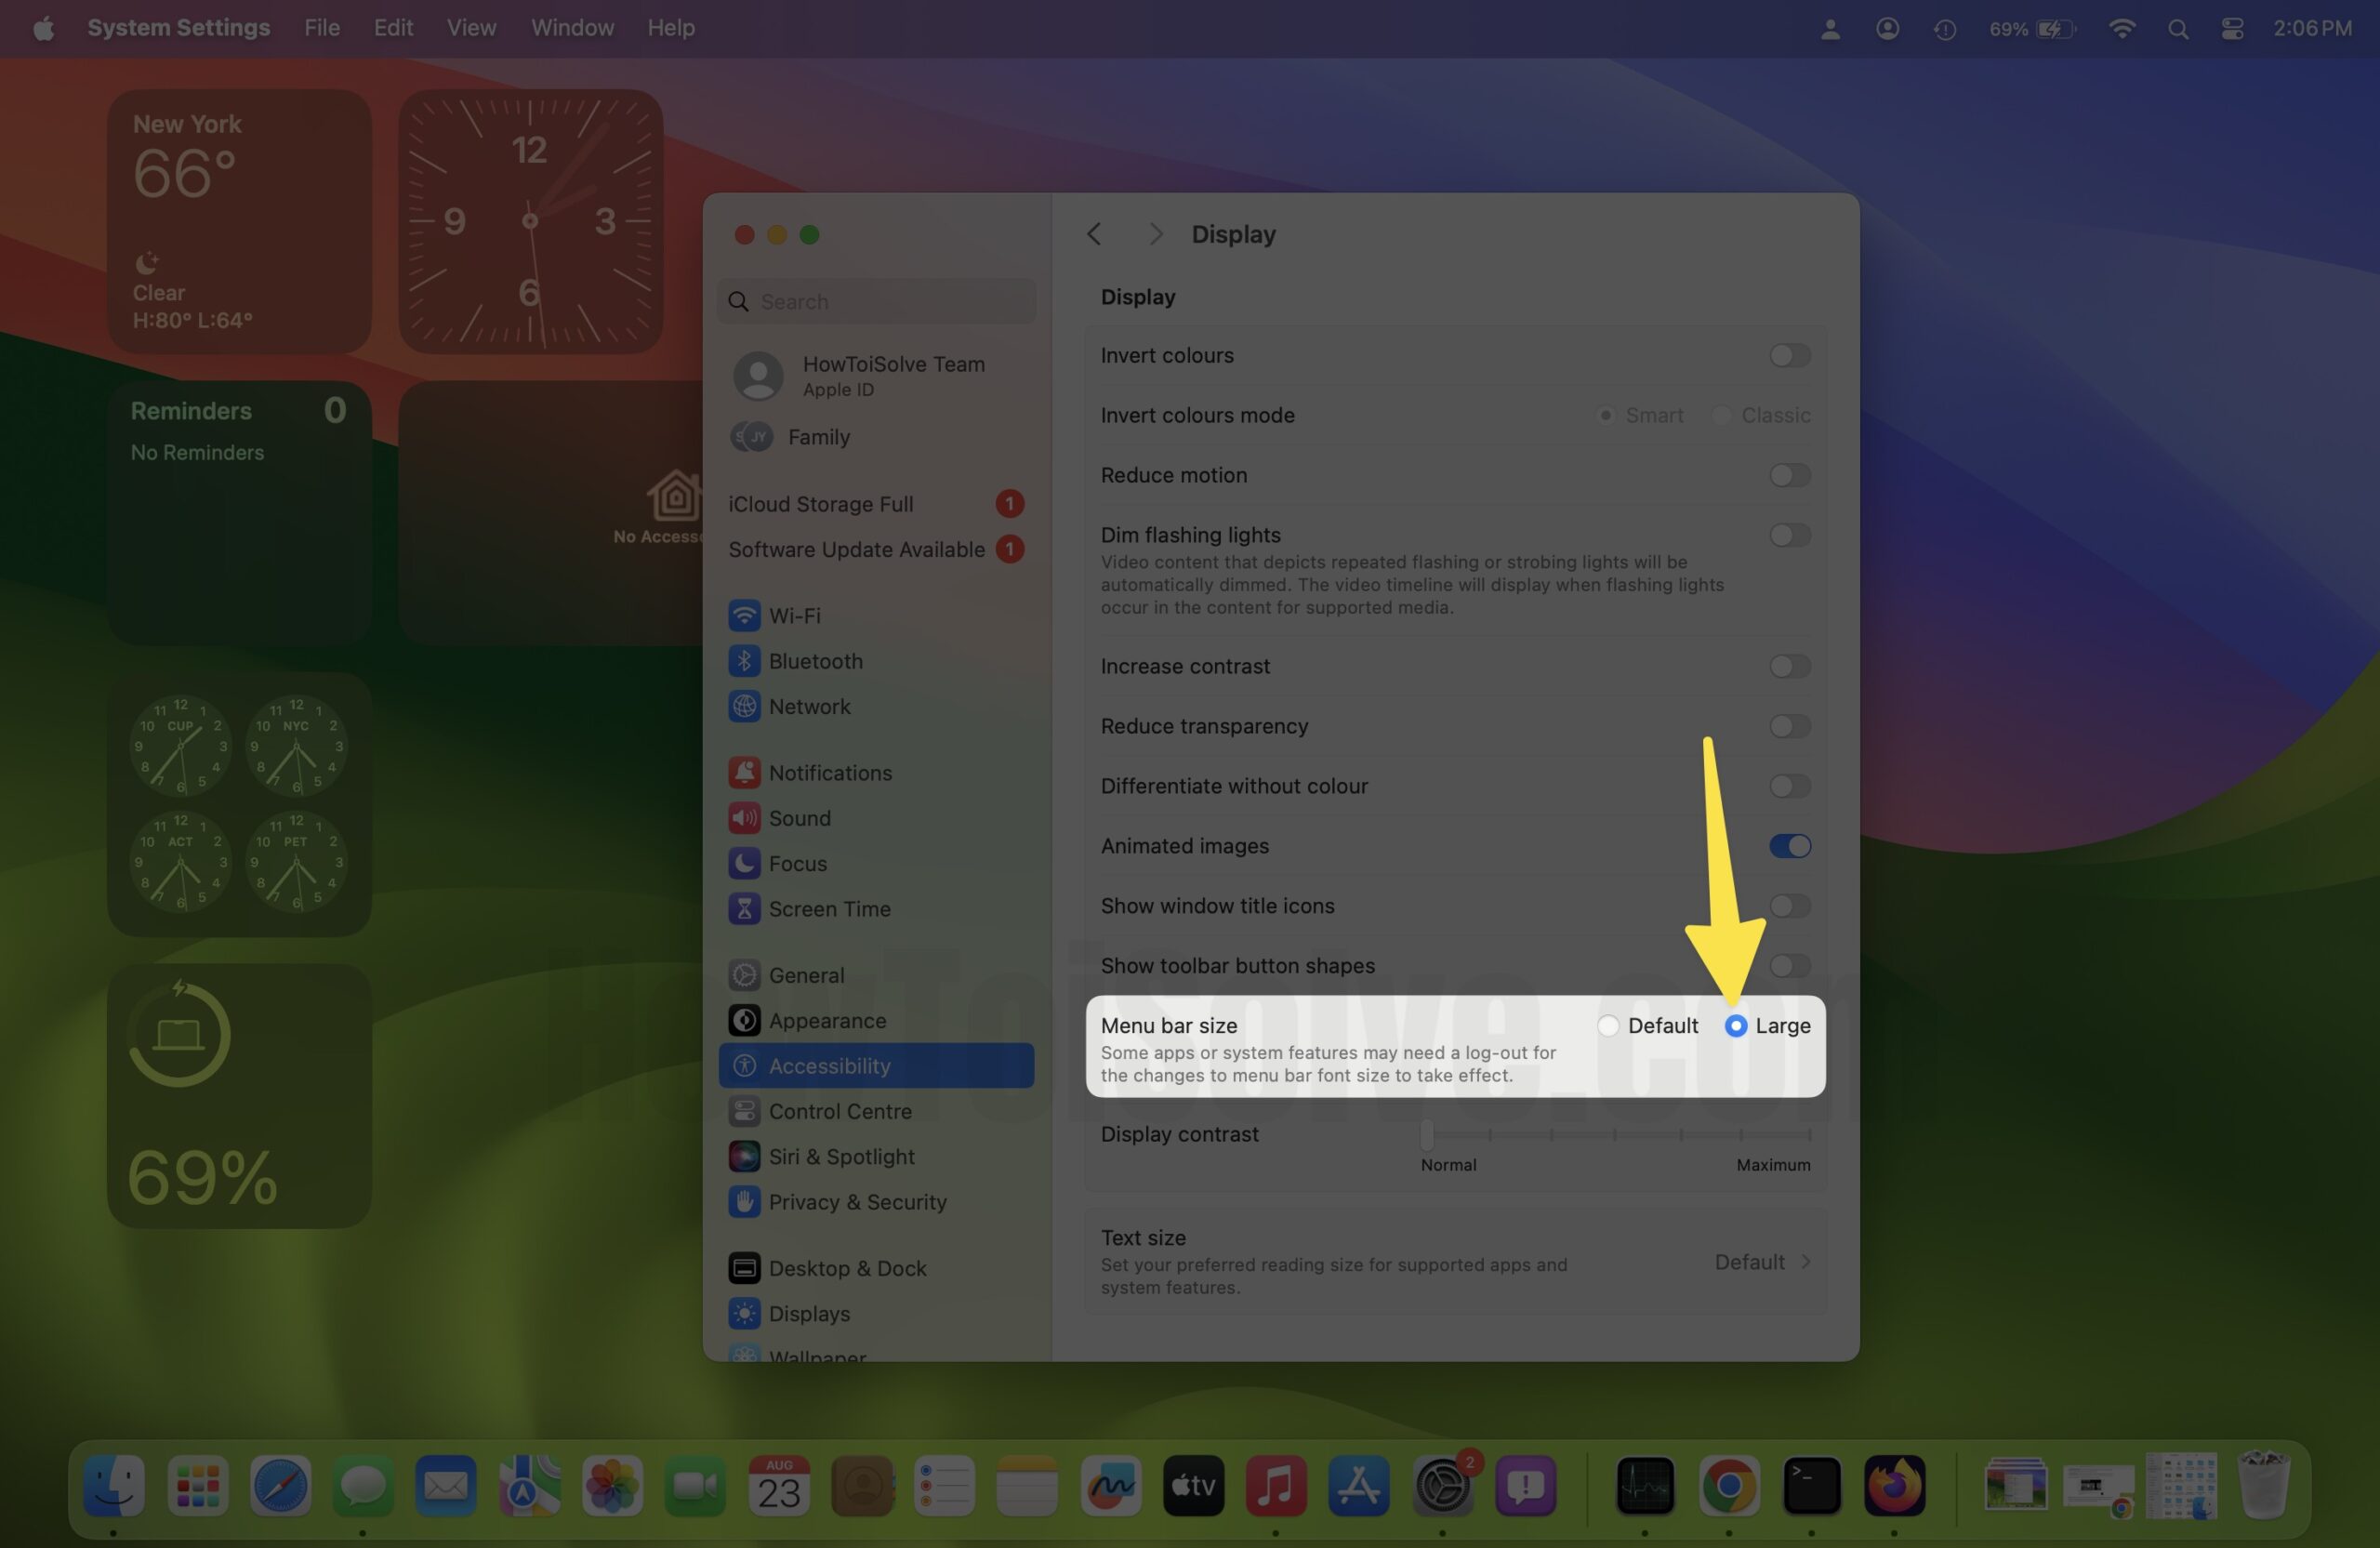
Step #3. See Menu bar size Option and Select large from Default.
Step #4. From top menu Apple Logo () > Log Out… Now, you have to require to log out to take effect. Click on Logout Now.
The changes are very subtle, or they might look the same to a few users. However, if you look closer, you will see the actual size of the menu bar remaining the same, the changes are only applied to the menu bar icons, and the size of the fonts will be bigger than it was before. The subtle change of the bar looks more effective if you are using a 4K Retina display or a larger screen. Now, you can easily change the size of the bar menu of your Mac.
Here are a few other tips to improve your screens.
On MacOS Monterey & Earlier – Change menu Bar size Settings
Step 1: Start your MacBook and initiate “Apple logo” > “System Preference” from your Mac’s Dock or menu.

Step 2: In order to proceed further, click on accessibility After the panel of system preference opens up.

Step 3: Afterwards, you will see the overview of macOS accessibility settings. Now select the option of “Display” from the left side panel.

Step 4: Once the window opens up, you can see the option of “Menu Bar Size.” It will be set to “Default.” Now all you have to do is click on it and choose the option of “Large” from the drop-down menu if you want to change the size.
Step 5: When you exit the accessibility setting, you will see a popup window asking you to log out, in order to apply the change you have just made. Click on “Logout Now“.
Step 6: Once you log in to your Mac, you will see the changes made on the menu bar size. Your text will be a bit larger than it was before.
How to hide Menu Bar on a Mac
If you want a little more space or don’t want the menu bar to stay on the screen all the time. Then you can also hide the menu bar of your Mac. All you need to do to enable this feature, is follow these simple steps,
On MacOS Ventura, Sonoma : Hide Menu Bar on Desktop & Full Screen
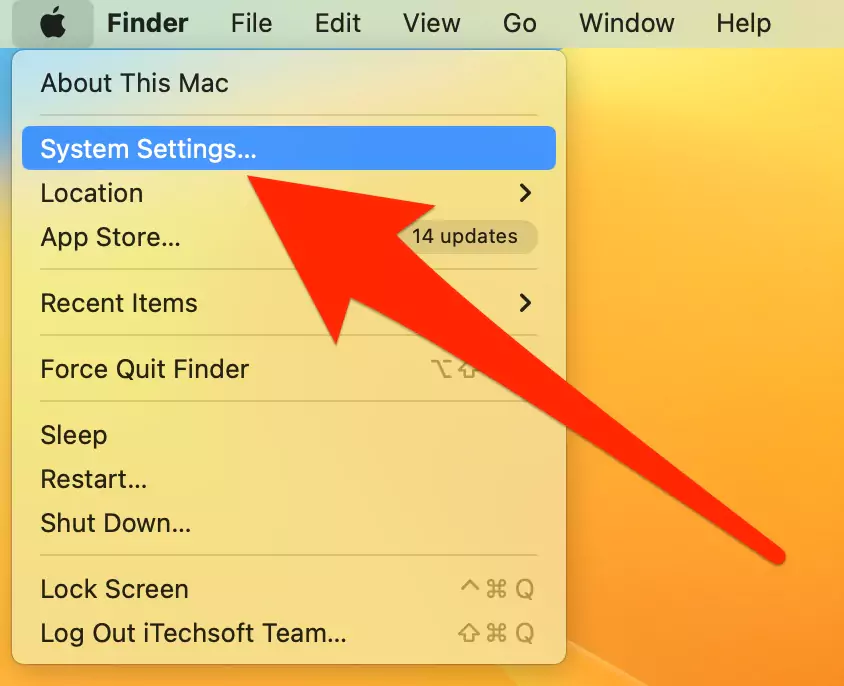
Step 1: Go to the Apple Logo from the top menu > Click System Settings.
Step 2:
On MacOS Sonoma, Select Control Center > Automatically Hide and Show the Menu Bar > Never.
On macOS Ventura, Select, Desktop & Dock > Select, “Prefer tabs when opening documents” with Option,
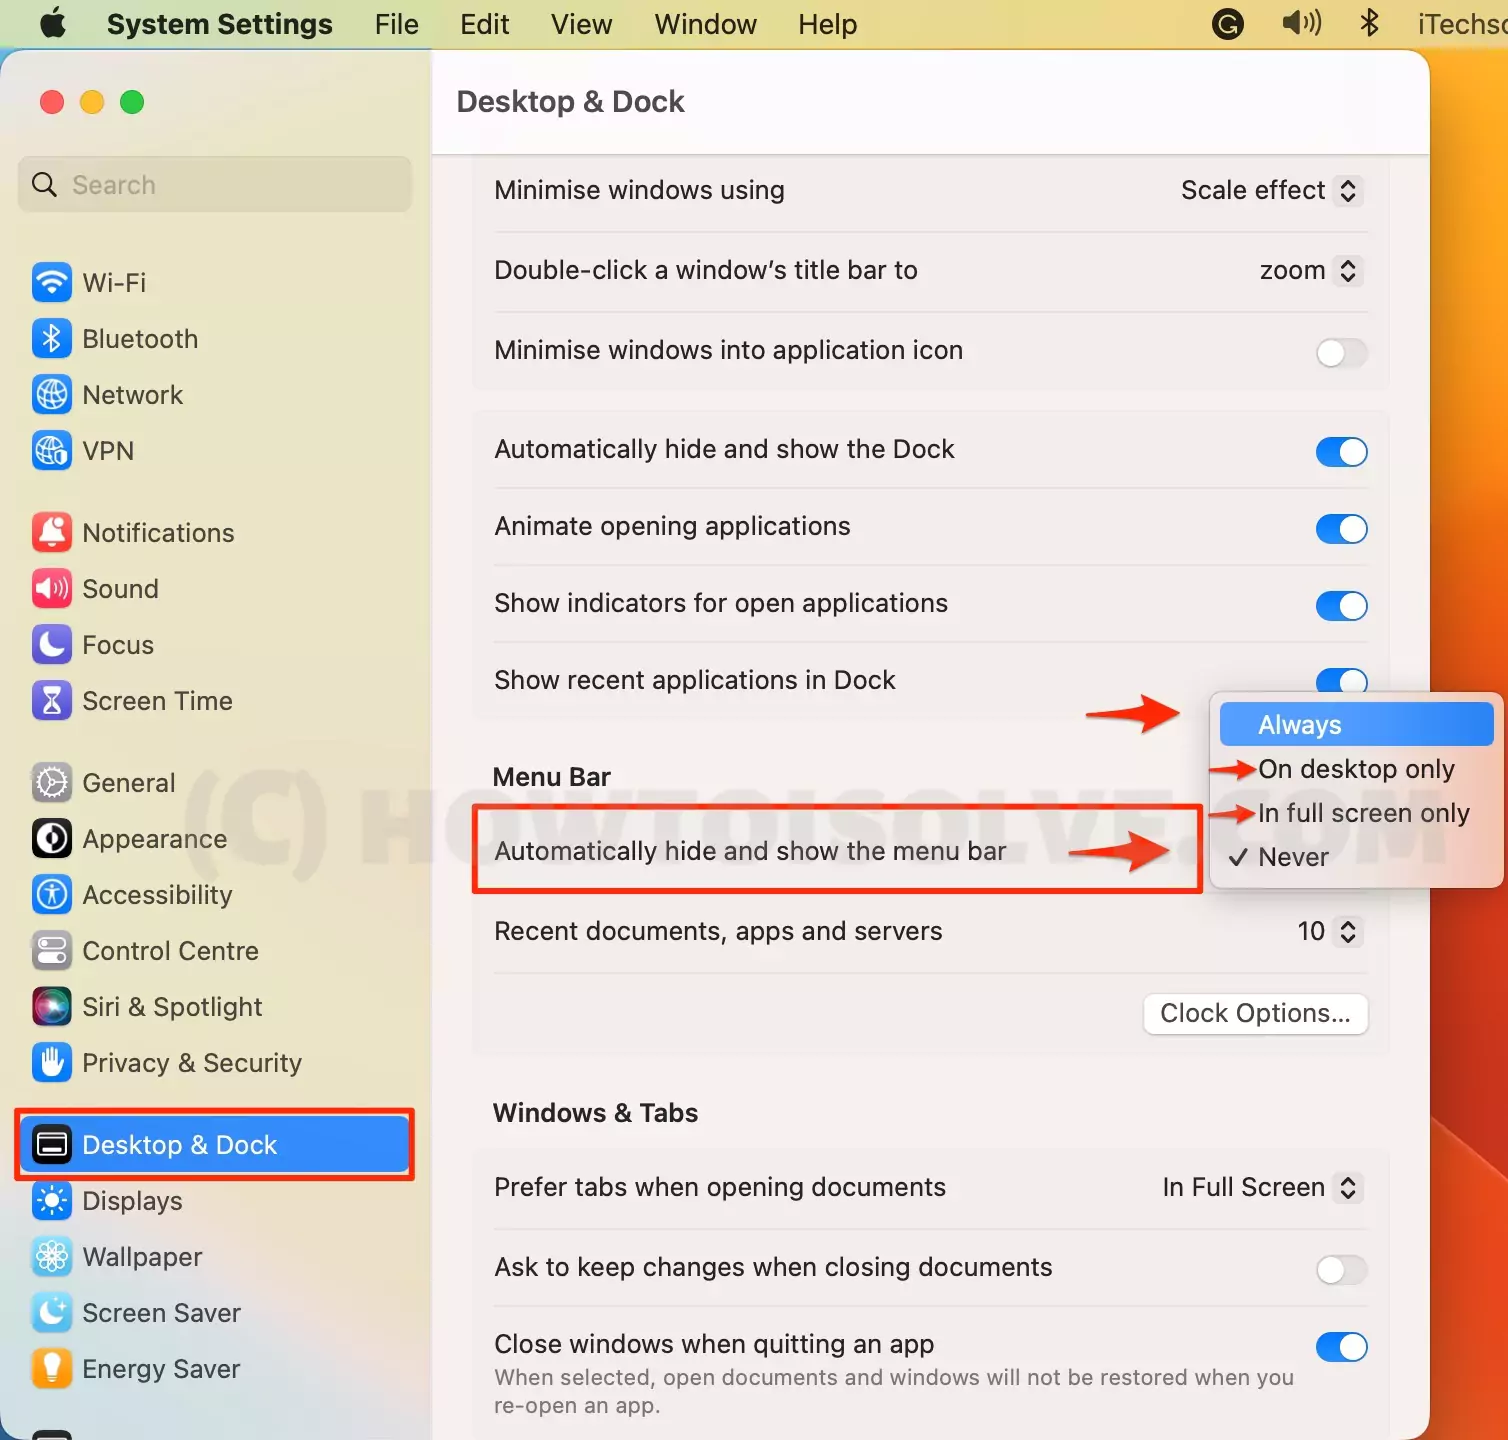
- Always
- On desktop only
- In full screen only
- Never
The menu bar isn’t gone anywhere, you can find it just like the Dock. All you have to do is to Hover your mouse’s pointer over that part of the display, and the menu bar will pop up again and will disappear as you move the pointer away from there.
On MacOS Monterey & Earlier: Hide Menu Bar on Desktop & Full Screen
Step 1: Click again on the “System Preference“

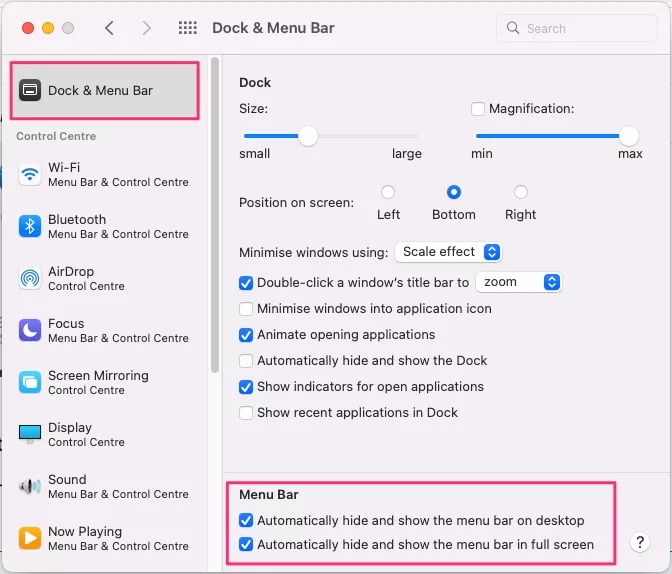
Step 2: Once the system preferences window opens up, click on the option of “Dock & Menu Bar” > Select “Dock & Menu Bar” from the left side of the window.
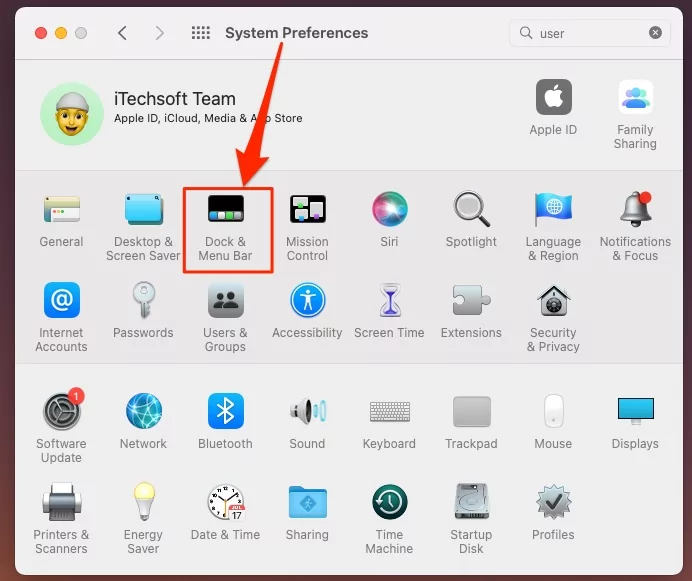
Step 3: Thereafter, on the next window, you will notice a check box, “Automatically Hide and Show the Menu” on desktop or in Fullscreen at the bottom of the page. Then click on the box to enable it.
How to Hide Dock
By default, the Dock of a Mac always stays there hovering on the screen. But do you really need to be kept reminded of your waiting emails? Or about the software you are currently using? Does it make you more productive?
Absolutely not. In order to hide your Mac’s Dock, all you have to do is to click on the horizontal line that separates the section. Once you click on it, you will see a popup menu. Then click on the option of “Turn Hiding On“. Once you click on the option, your Dock will be hidden by default, freeing up more space vertically.

In order to see the Dock again, all you have to do is to move your pointer to the bottom screen. When you hover the pointer from that portion, your Dock will hide itself again.
If you aren’t ready to hide your Dock but do want a few spaces, you can quickly go for it. All you have to do is click on that separation line and drag it up and down to resize the Dock. By doing it, you can make a small dock.
If you can’t understand the icons on the app and are having trouble with this feature, worry not. Again click on that separating line and click on the option of “Turn Magnification On”. This will enable you to see the icons in more detail as you hover your pointer over those icons.
How to Shrink Your Mac’s Window
If you want more space or just want the windows to be more compact, all you have to do is to shrink your Mac’s window. In order to free up more space, follow these sets of instructions,
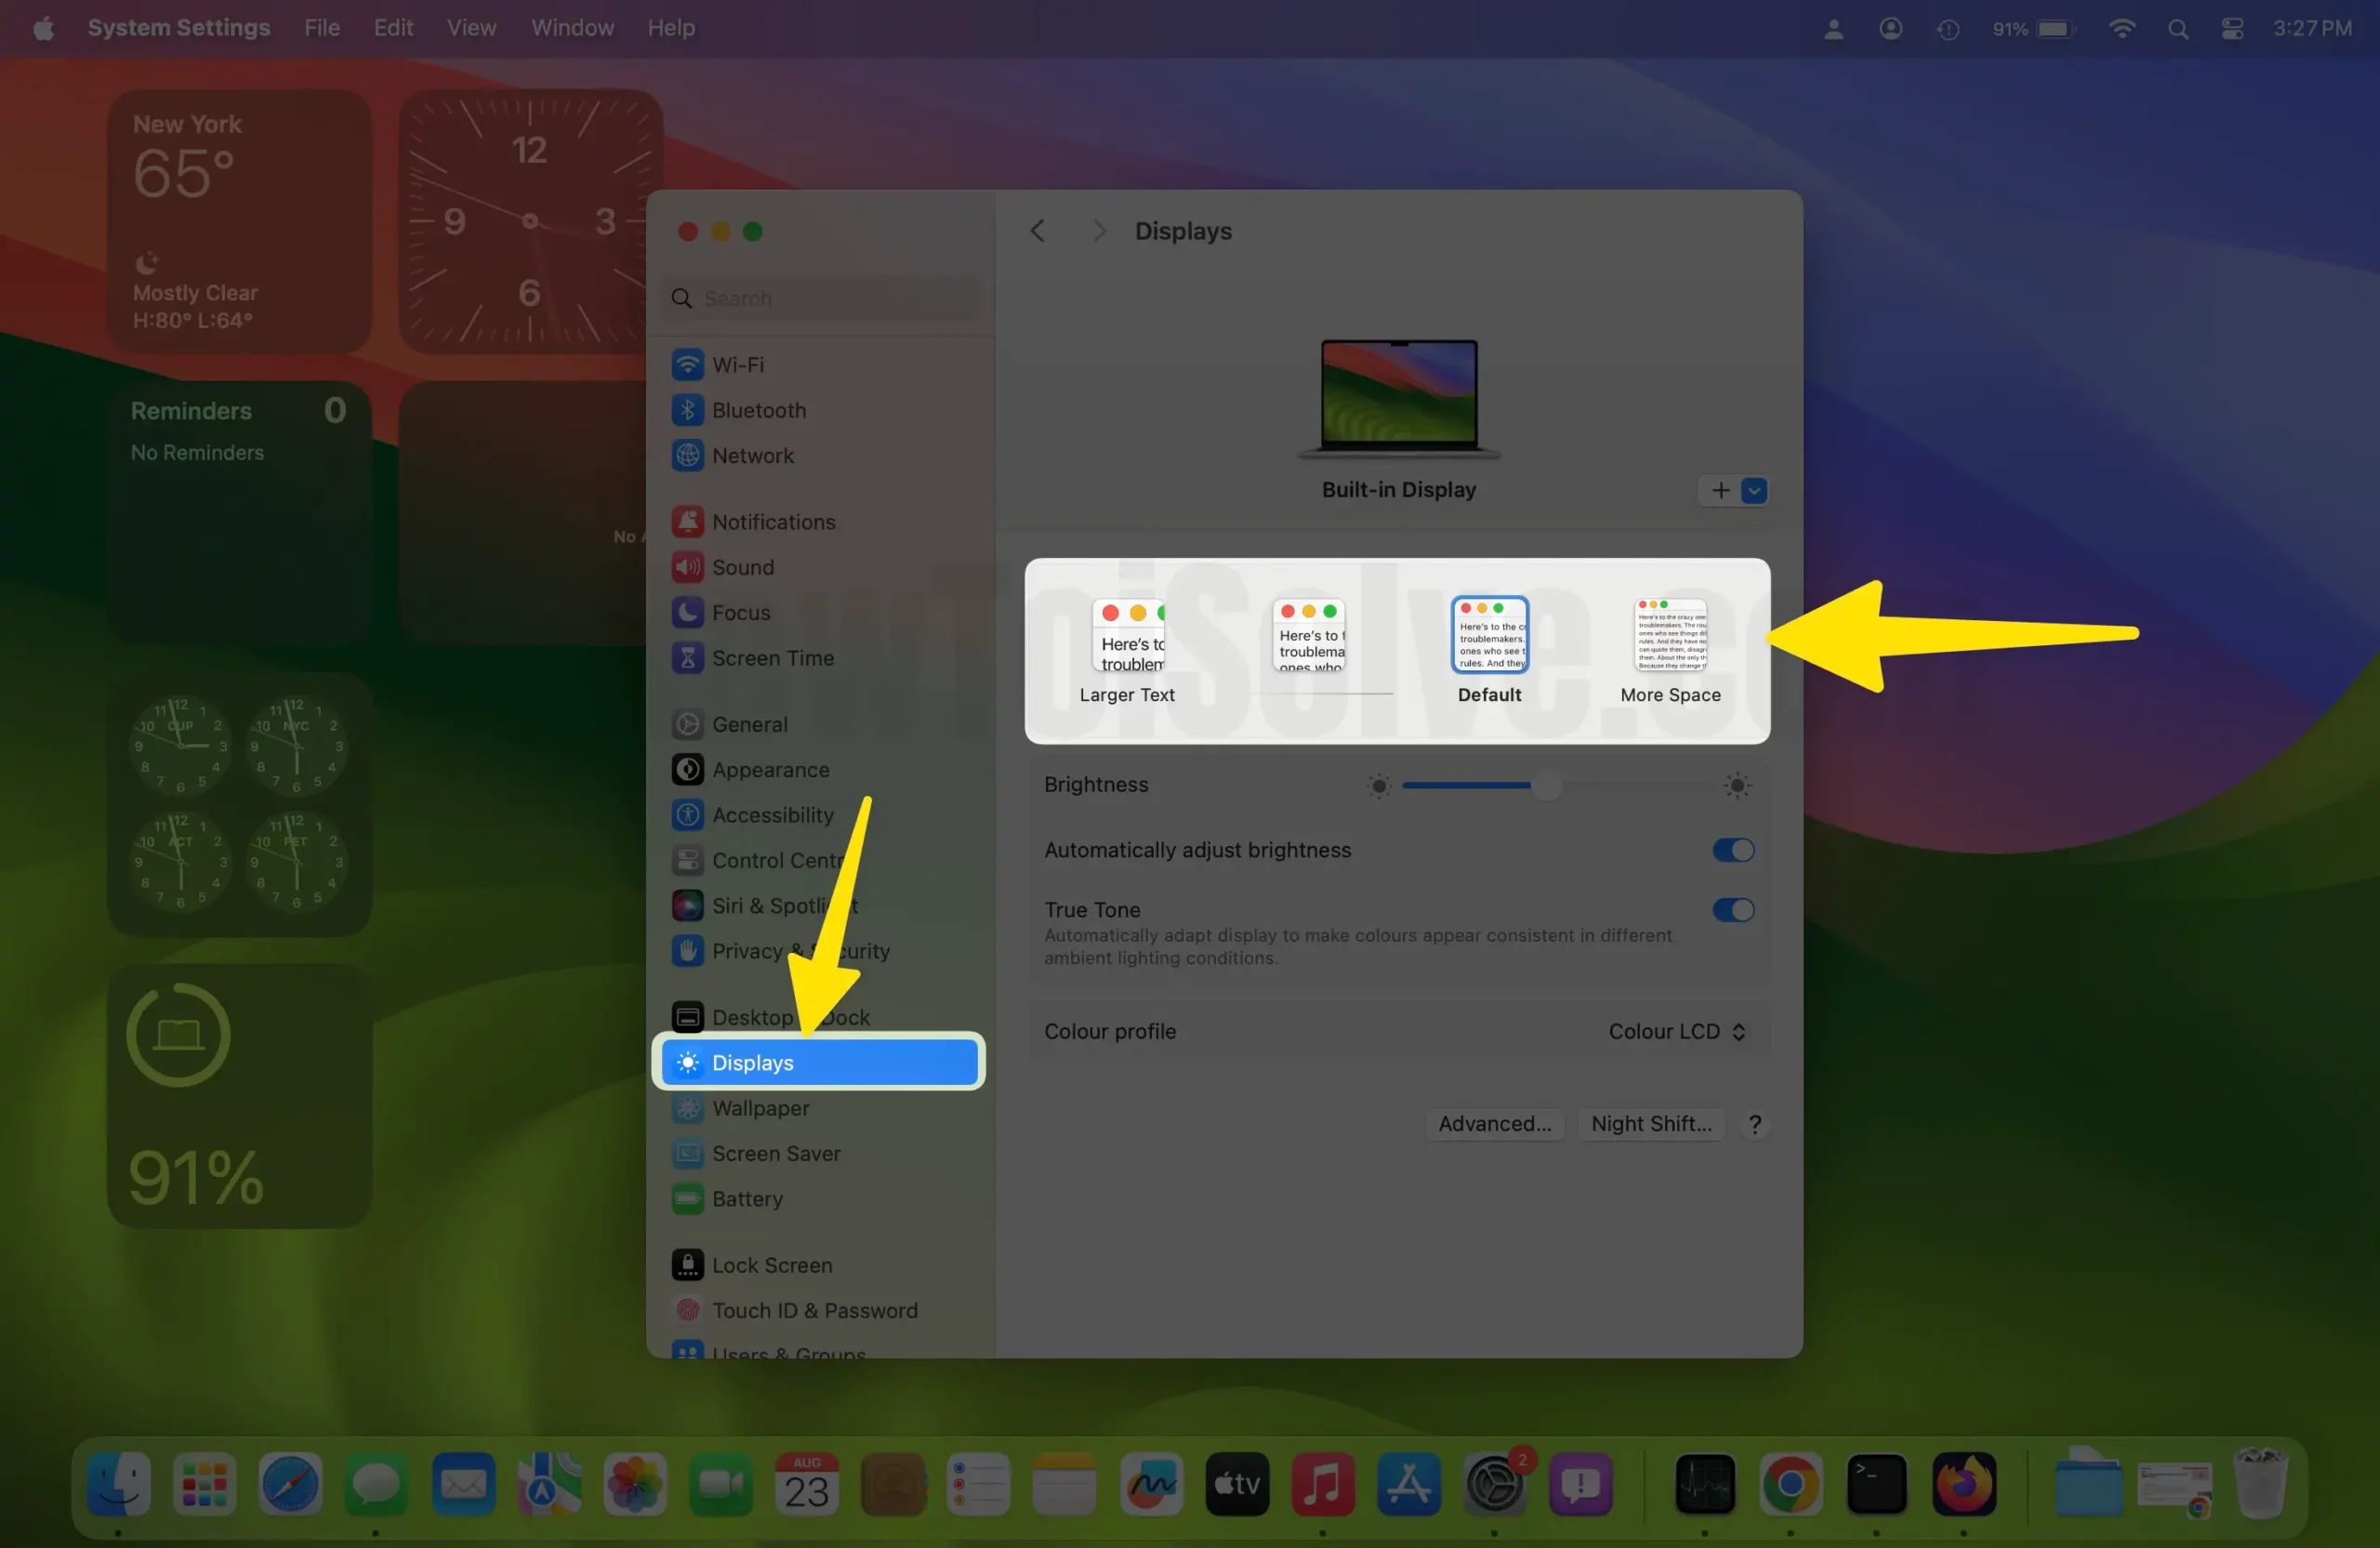
On MacOS Ventura:- Go to the Apple Logo > System Settings > Display > Change “Resolution“, Default for Display and Scaled.
On MacOS Monterey & Older,
Step 1: Click on the Apple logo in your menu bar and the “System Preference“.

Step 2: Once you click it, you will be able to see a window of icons. Click on the icon named “Display.”
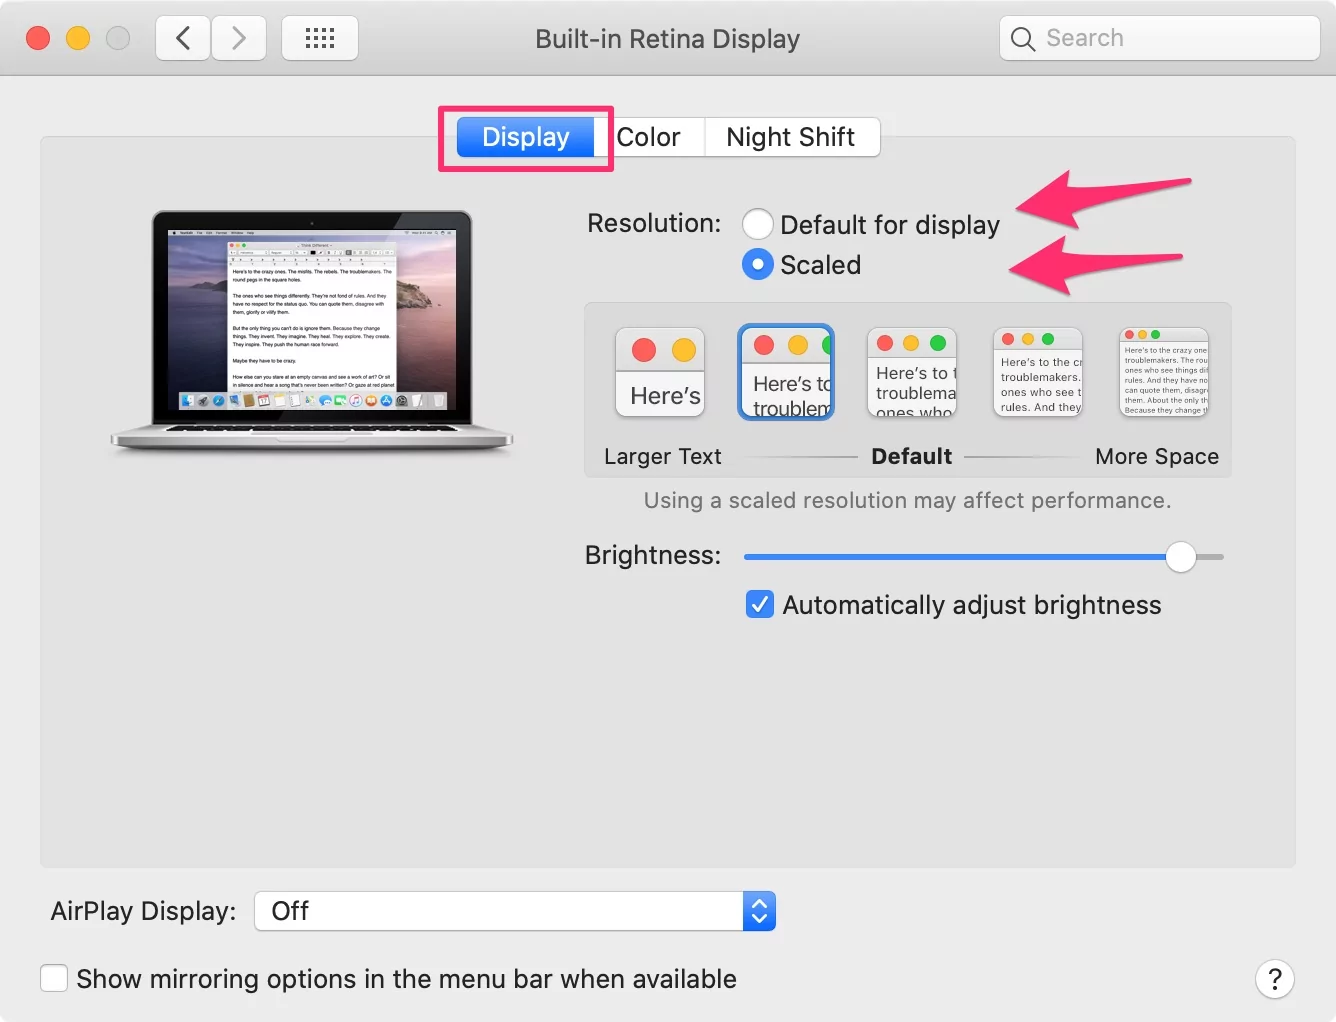
Step 3: Thereafter, you will be able to see the option “Default” and “Scaled” under “Resolution.” Click on the”Scaled” option.
Step 4: Upon clicking the option “Scaled” it will bring up a few scaling options. If it’s available, then click on the option of “More Space.” At once, you will be able to see the content of your screen taking up a lot less space than it was before.
FAQs
Q. How to change the size of the Dock?
A: click and drag the slider to change the size of the Dock. or change from settings, Apple logo > System Preferences > Dock & Menu Bar > Again select “Dock & Menu Bar” from the left side of the window, and See the Increase size doc with slider, From small to large.
Q. How do I remove something from the menu bar of a Mac?
A: To remove or rearrange icons on your Mac, all you have to do is to go through these instructions
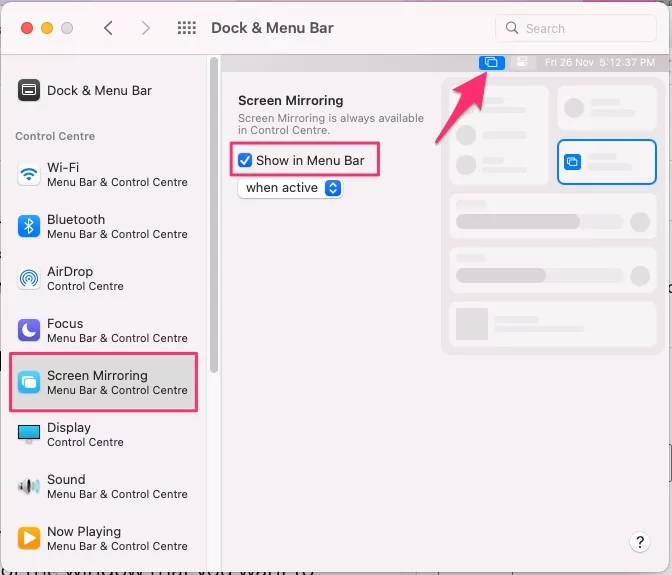
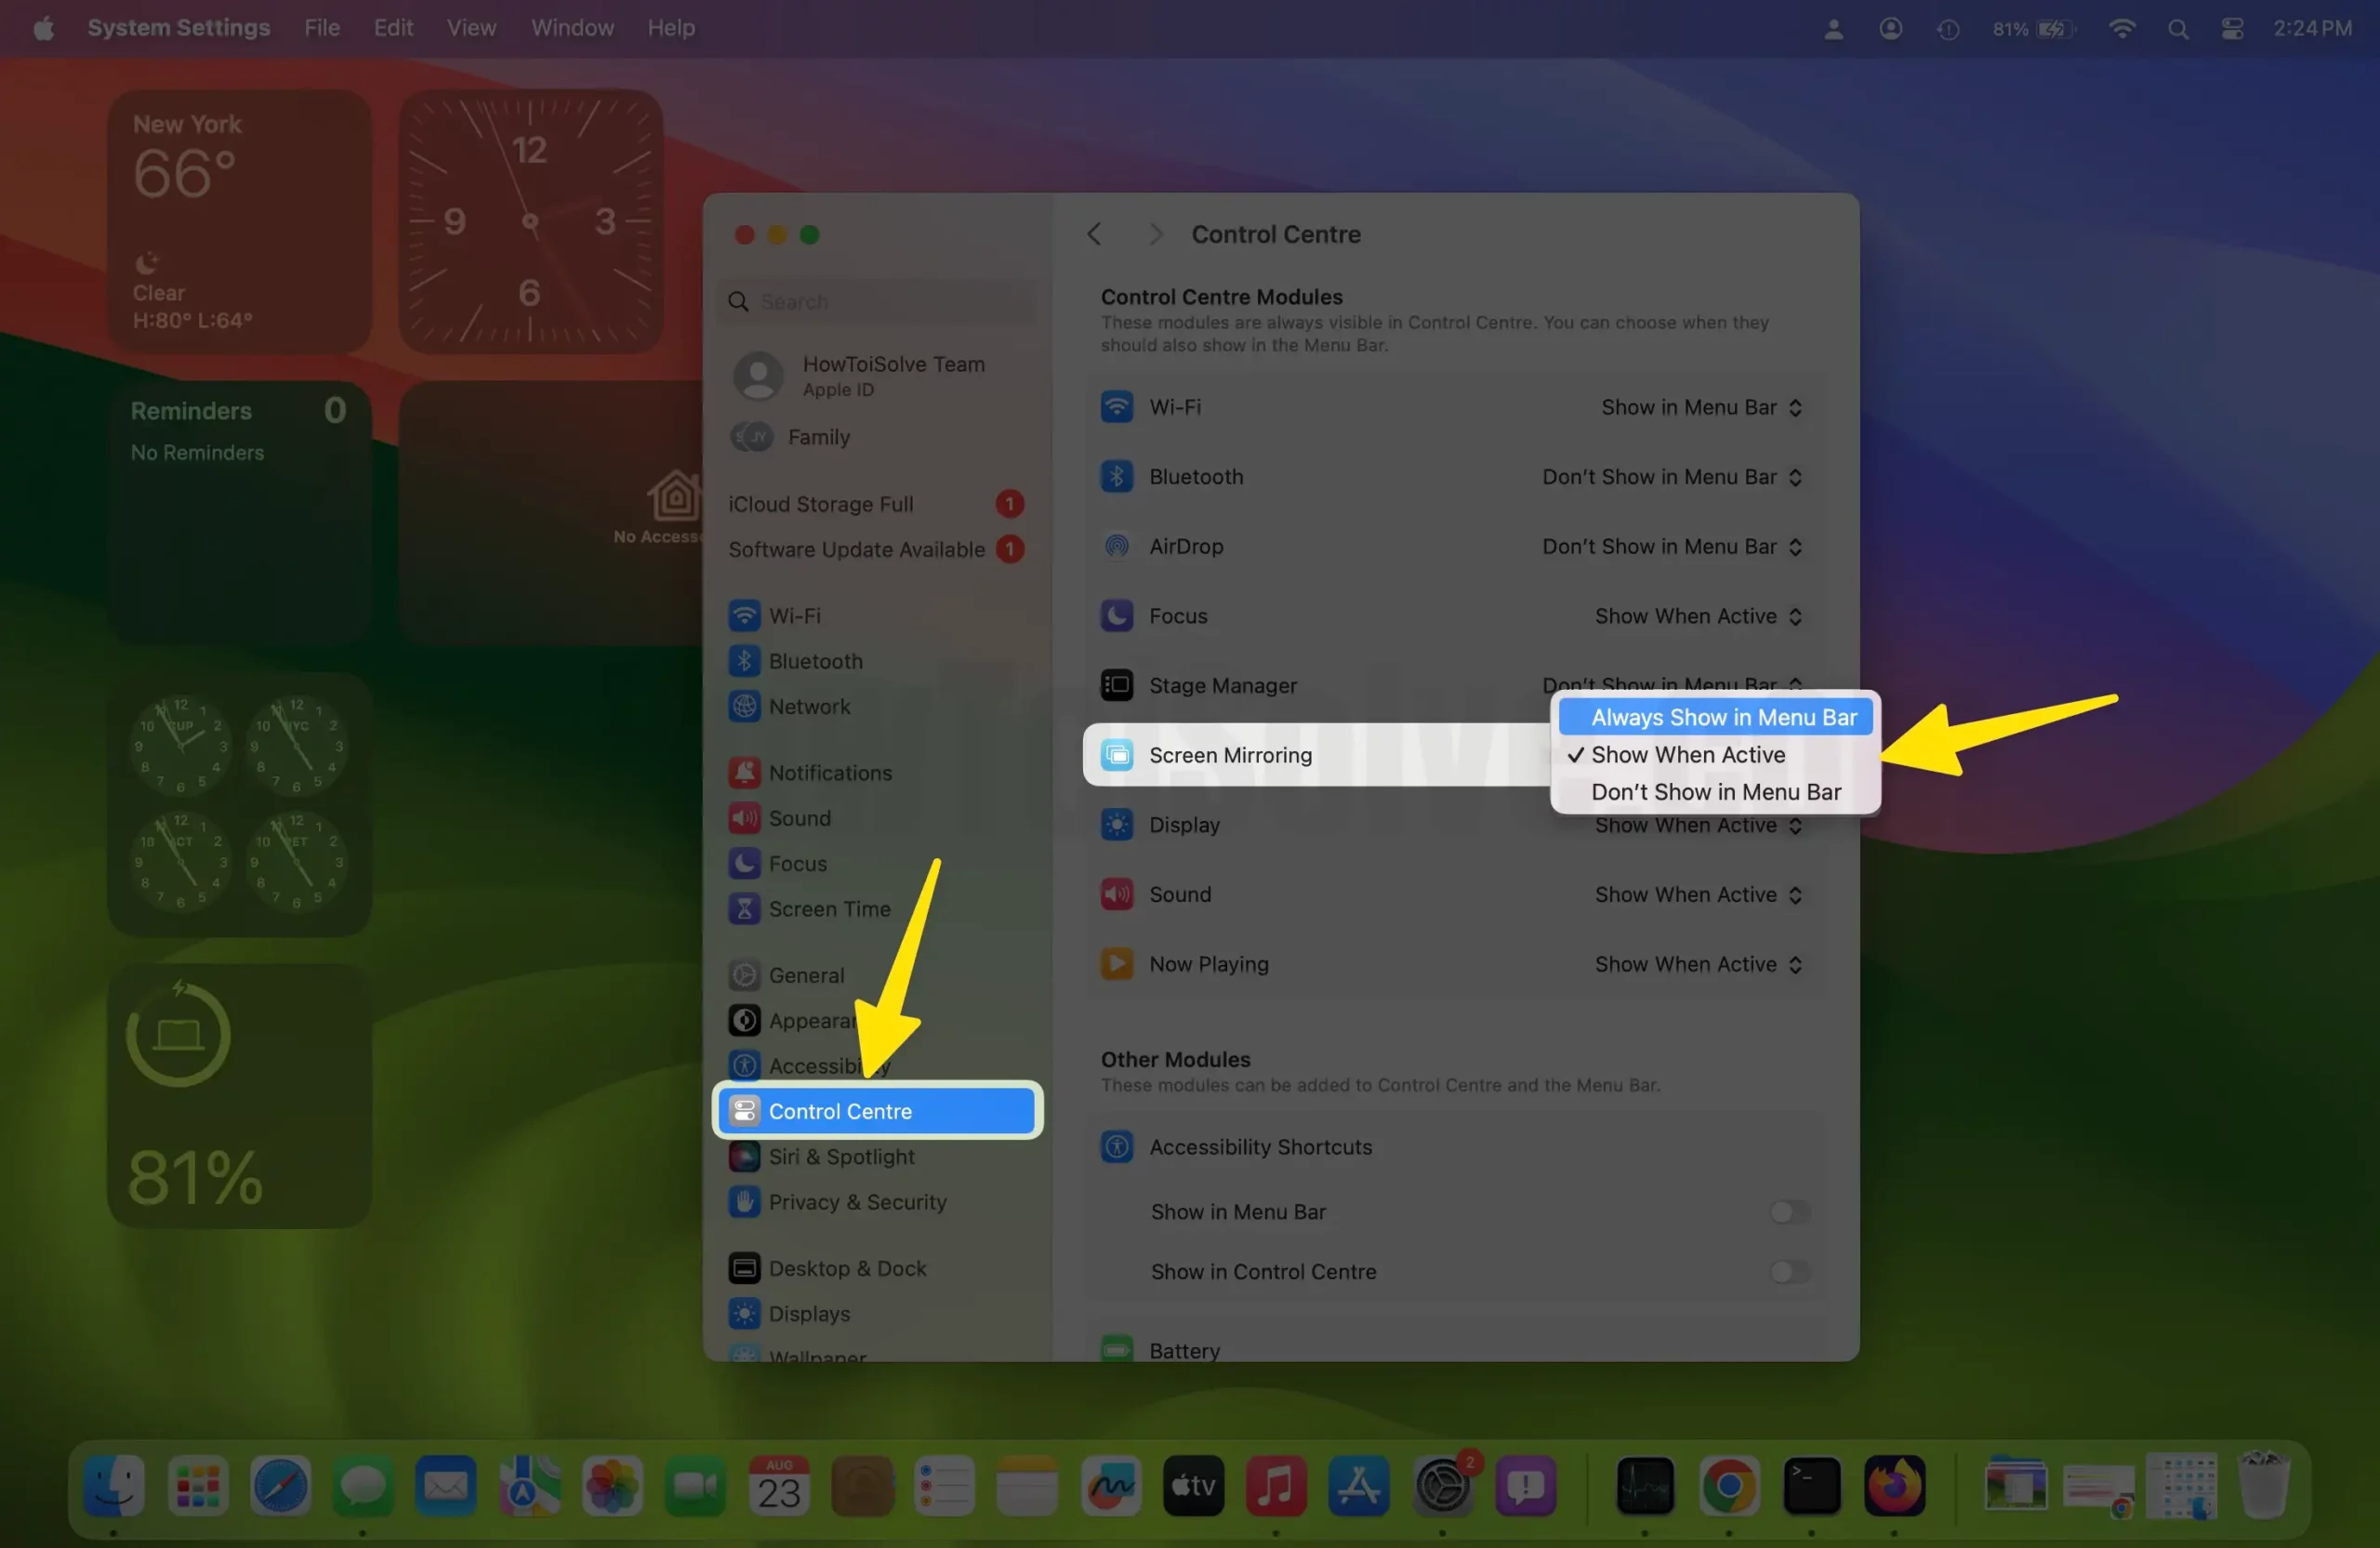
on MacOS Ventura: Go to the Apple Logo > System Settings > Control center > Screen Mirroring > Choose “Always show in Menu Bar, Show when active, Don’t show in Menu Bar“
on MacOS Monterey:-
- Go to the Apple logo from the top Mac menu > System Preferences.
- Select “Dock & Menu Bar” > Select the item from the left side of the window that you want to hide from the Top Mac Bar. and Uncheck option, “Show Menu Bar,” for each item one by one. To Remove from the Top Mac menu bar.

- That’s it.
Q. Can I change the size of the menu bar rather than Changing the display preference?
A: No, You can’t do that. You can change the size of the fonts and icons, but you can’t change the size of the menu bar.

