To begin charging clients for their services, you need to produce the invoices in Microsoft Excel. You may alter a preinstalled Excel template or create a presentable invoice from scratch.
From web designers to consultants, more individuals than ever are breaking free from corporate restraints and attempting to make a living as freelancers. Invoicing clients and paying is perhaps the most critical yet often disregarded process component.
This article will learn how to create a simple and auto-fill invoice in Excel on Mac and PC.
Let’s begin!
Steps to Creating an Invoice in Excel on Mac
Microsoft Excel provides various templates that you can use to create an Excel invoice template that will suit your needs. If you want to learn how to create a simple and auto-fill invoice in Excel on a Mac computer, follow these steps.
Microsoft Excel provides various templates that you can use to create an Excel invoice template that will suit your needs. If you want to learn how to create a simple and auto-fill invoice in excel on a Mac computer, follow these steps.
1. Open Excel on your Mac
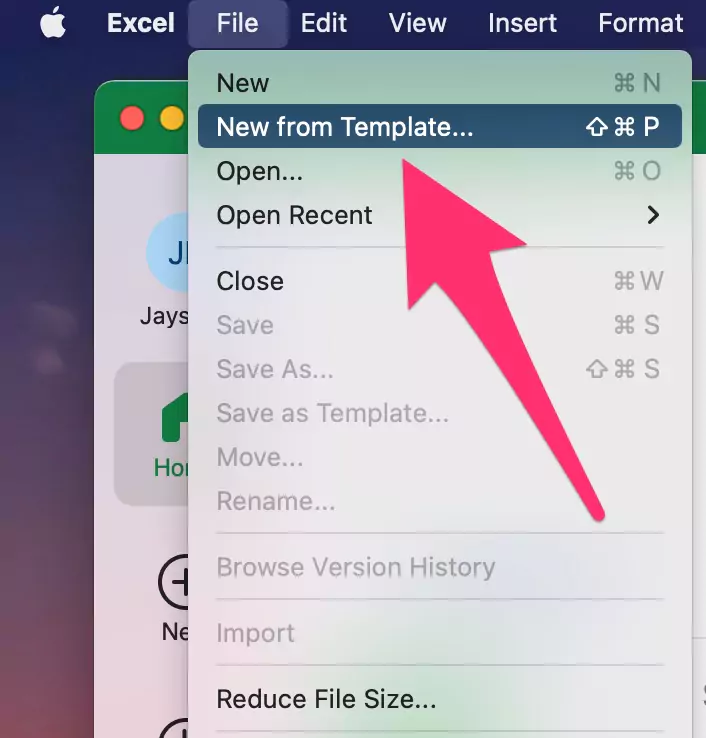
Launch Microsoft Excel on your Mac. On the menu bar, go to File. Then, click on the New from Template. The page will display a selection of potential templates.

2. Look for an Invoice Template
To explore the template options, use the Search Option in the upper right of the screen, enter “invoice,” and press enter.
3. Select an Invoice Template
There are several Excel invoice templates to pick from, including company invoice templates and tax invoice templates. They also include formulas to compute taxes automatically. Choose the one with all the details you require and designed to match your theme.

4. Access the Template
Once you’ve chosen an Excel template that meets your needs, double-click it to get a preview page. Then select the Create option to open a new Excel sheet.
5. Insert the relevant data
To insert the relevant project data, edit the invoice template. Be sure to include the following:

- Your company’s contact information.
- Contact details for your customer.
- A unique invoice number.
- The date of the invoice.
- An itemized account of the services you supplied to the customer, including the number of hours you worked and the rate you were paid.
- For each of your services, a subtotal.
- Accepted payment methods and late charge terms are part of your payment terms.
- The deadline for payment.
- The entire amount is payable, including any taxes that may apply.
6. Save the invoice on your Mac.
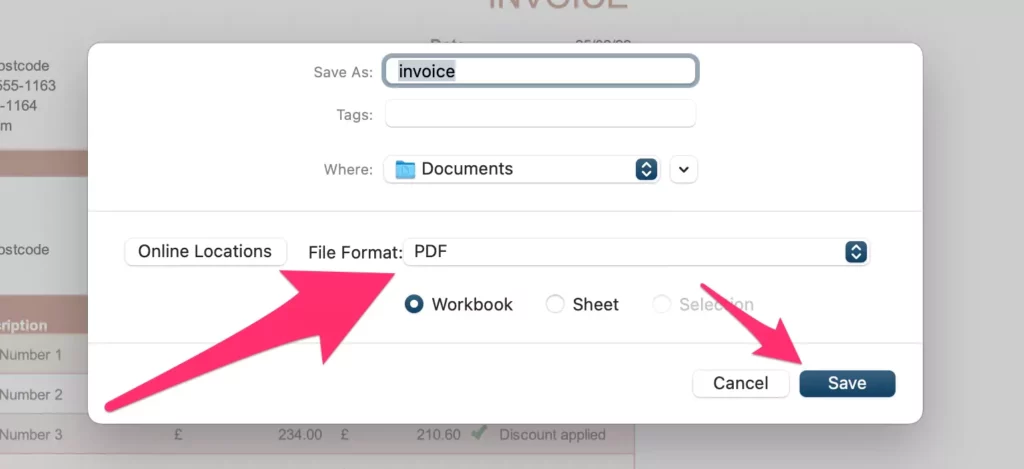
As soon as you’ve filled out your invoice, save it as both a .xlxs and a PDF on your Mac.
It is best to send your client the PDF version of the invoice, so they won’t be able to change it after the invoice has been sent.

Now, you know how to create a simple and auto-fill invoice in Excel. Next, we will create a simple and auto-fill invoice in Excel for Windows PC.
Steps to Create invoice on Excel on PC
Follow these steps on a Windows PC to create an Excel invoice template:
1. Open Excel on your PC
Launch Microsoft Excel on your device to begin producing an invoice using an Excel template.
2. Look for an invoice template
To acquire invoice designs, open Excel on your device and enter “invoice” into the Search Box at the head of the screen. Make sure you’re hooked up to the internet before you start searching.
3. Select a Template
Choose from the many available invoice template choices to find one that fits your needs. Then, select a template design that satisfies your needs and aspirations.
4. Fill up the details
Once you’ve chosen an Excel template that meets your needs, double-click it to get a preview page. Then select the Create option to open a new Excel sheet.
5. Save the Invoice
Once you’ve input all of the necessary details into your invoice, save the completed excel sheet to your device. You should save it as a .xlxs document so you may change it later if necessary. It is best to send your client the PDF version of the invoice, so they won’t be able to change it after the invoice has been sent.
Following these steps, you will create an Excel invoice template in no time. Next, let’s create a simple and auto-fill invoice in excel on Mac/PC from scratch.
Step to Create Invoice on Mac/PC from scratch
Steps to Create your Own Custom Invoicetemplate,
Using Excel to create your personalized invoice allows you to customize and edit the invoice to meet your specific needs. It’s really simple if you understand the fundamentals of formatting and mathematics. Here’s how you can create an Excel invoice template on a Mac/PC from scratch:
1. Sizing Columns and Adding Borders
You’ll need to resize columns and use the Borders and Outline tools from the top bar to format your invoice. The data entry sites will be defined by the table you build.
2. Formatting Headers and Adding Labels
The next step is to input the labels for each cell address, ensuring that they are aligned correctly and have adequate font size. Finally, you can use your labels in place of the ones provided.
3. Using Formulas to Calculate Totals and Subtotals
It’s now time to put your invoice into action. This entails including algorithms to assist you in calculating the cost of your goods and services. Depending on the value of a product or service selected, you will almost certainly require a conditional function on your invoice.
4. Number Formatting
The right-hand column should then be formatted as currency. First, select the relevant row, then under the Number area of the Home menu, select the $.
5. Adding Protection to a Spreadsheet
Now that your invoice’s format and formulae are complete, you’ll want to lock off some cells so they can’t get accidentally modified, potentially ruining your invoice. You may accomplish this by making your spreadsheet protected. However, it would help unlock the cells to enter data before enabling protection.
Choose the appropriate cell ranges. Select Format from the Home ribbon. Keep an eye out for Lock Cell. If it’s turned on, click it to turn it off.
Click the Format menu, then Protect Sheet. Setting a password is optional and not necessary in this case. Make sure to select the necessary options and click OK.
Except for the rows you’ve unlocked for data entry, your spreadsheet is now locked for modification.
Here, now you’ve got your invoice template.
Where are the Free Invoice Templates in Excel for Mac & PC
To access invoice templates on Microsoft Excel, use the search box at the top of the window and type “invoice.” To search, you will need to be online.
Can I Create an Invoice Without Excel on My Mac?
Yes, you can create an invoice without using Excel on a Mac by using the Numbers app [Free app on MacOS]. As Explained below step by step guide.
How to Create Invoice on Numbers on Mac
A poorly prepared and designed invoice might be the matter of getting paid on time and chasing down money from clients. For example, to create an invoice on Numbers on Mac, follow these steps:
1. Open Numbers on Mac from Launchpad or Using Spotlight Search.

2. Next, Click on New Document Option.

3. Search or Find the Invoice template from the numbers app and Create. This will bring up a screen with several different templates. Go to the Business tab on the left and select the pre-built invoice template.

4. Enter your Amount and Details.

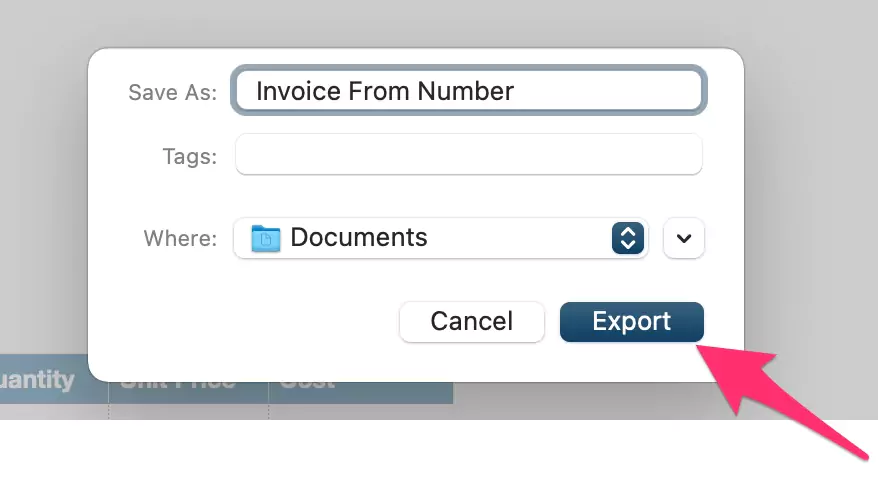
5. To Save into PDF, Go to the Top menu, File > Export To > PDF

6. Save your Invoice to PDF, Select PDF, Set the Quality, and Click on Next.

7. Select Target to save location and Save.

Now, Your PDF invoice from Created Numbers app on Mac.

In this template, you’ll find nearly everything you need to create an invoice. However, you can tweak it to make it suitable for your needs.
How to Create PDF invoice in Excel
Follow the instructions mentioned above to create an Excel invoice template. When you save the invoice on your system, Excel will give you the choice of saving it as a .xlxs file or as a PDF file. Select the PDF option to save your invoice as a PDF file.
How to Create Multiple invoices From an Excel Spreadsheet
One of the many benefits of using Excel to create invoices is making multiple invoices using just one template. Here’s how you can create multiple invoices from an Excel spreadsheet.
1. Follow the instructions mentioned above to create or Use Default an excel invoice template [As Of Explained Above]. or Use the Numbers app and Find Invoice Template [As of Explained above].
2. Save it as a .xlxs file or a PDF file.
3. Then, make the changes to the current Excel File and save it by going to the Save As an option instead of the Save option.
4. Then, save it as a .xlxs file or a PDF file.
5. You can create multiple invoices by repeating the steps as often as needed.
That’s it. That’s all the stuff you will need to create invoices using Excel on Mac and PC.


