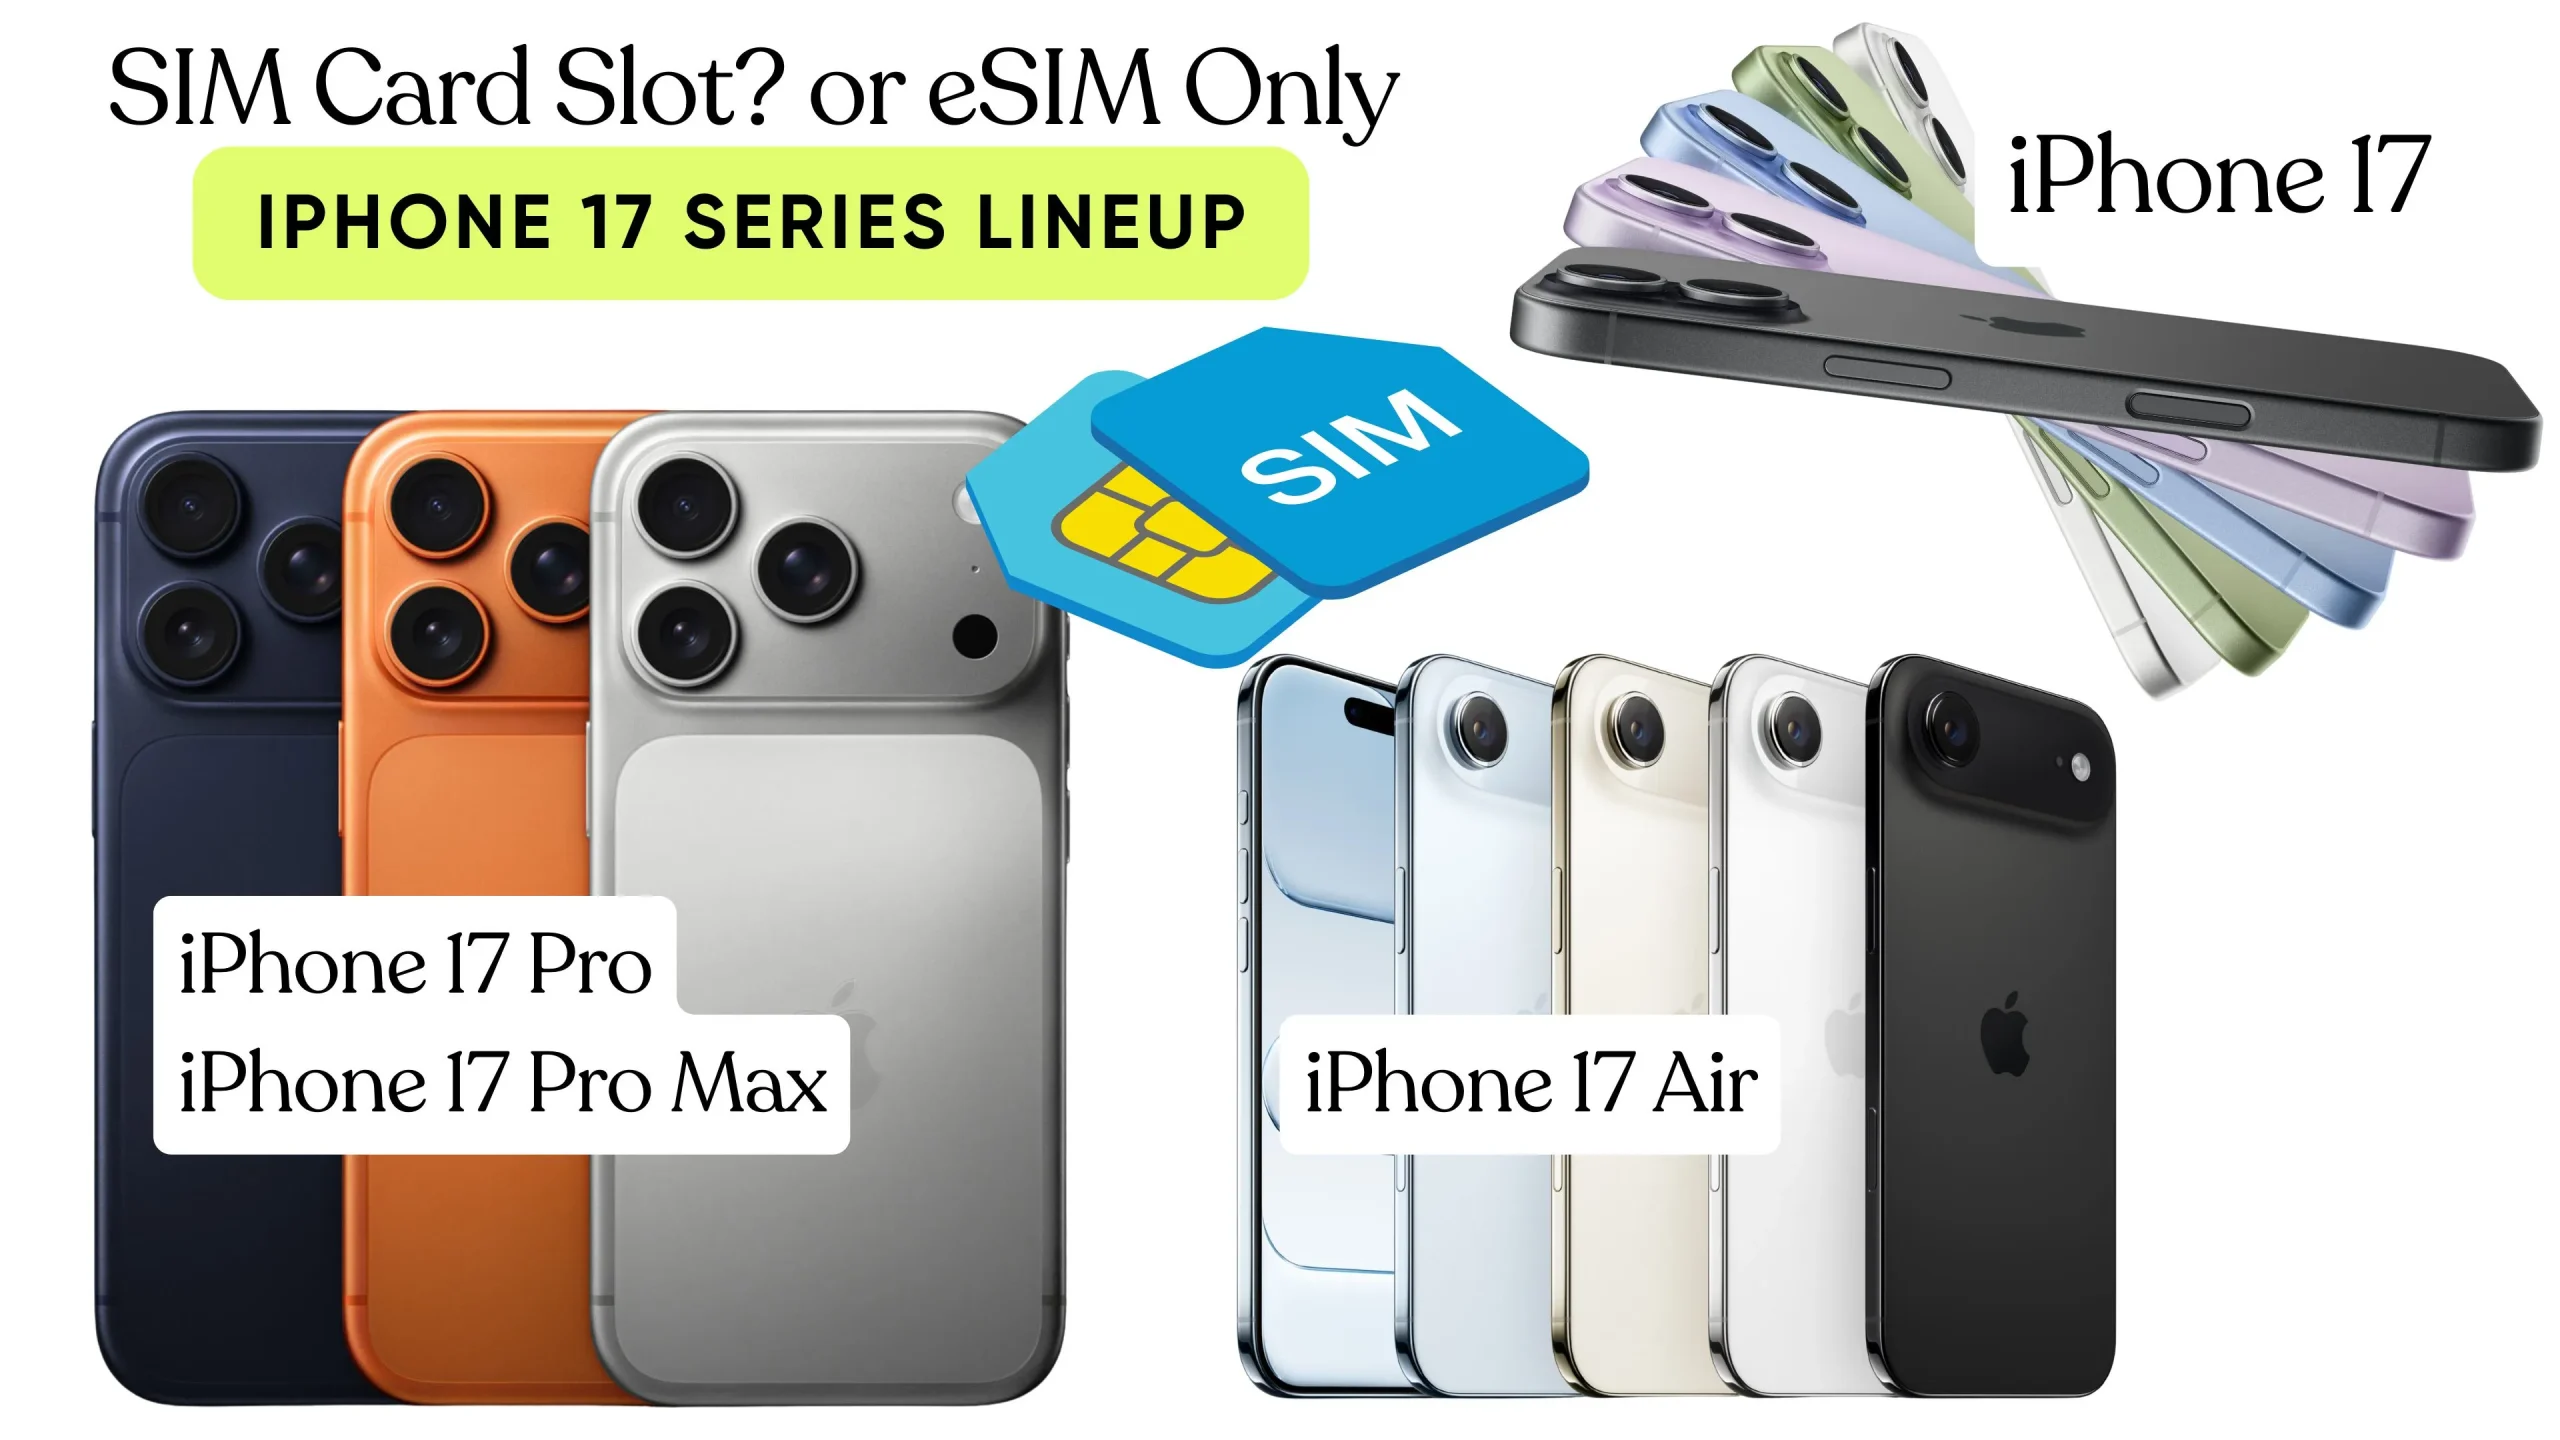
With the launch event on September 9, 2025, Apple confirmed that the iPhone 17 series—comprising the iPhone 17, iPhone Air, iPhone 17 Pro, and iPhone 17 Pro Max—is embracing eSIM-only connectivity in many regions.
Model-by-Model Breakdown (Physical SIM or eSIM)
iPhone 17 (Base Model)
- Apple’s technical specifications explicitly state that iPhone 17 uses advanced eSIM technology and is not compatible with physical SIM cards.
- However, in certain countries—including several EU nations—there are still physical SIM card slot models available. These are not clearly differentiated in Apple’s materials but are region-dependent.
iPhone 17 Air
- Designed for maximum thinness, the iPhone Air completely removes the SIM tray worldwide. It is eSIM-only in all markets, including China.
iPhone 17 Pro and Pro Max
- Apple notes that these models rely entirely on eSIM technology, incompatible with physical SIM cards.
- They will be available only with eSIM in a growing list of countries: Bahrain, Canada, Guam, Japan, Kuwait, Mexico, Oman, Qatar, Saudi Arabia, UAE, the U.S., and the U.S. Virgin Islands.
- In other regions, physical SIM variants may persist—particularly in areas with regulatory or infrastructure reasons—but Apple is clearly reducing their availability.
Why Apple Is Making This Shift
- Design & Space Efficiency
eSIM allows Apple to shrink internal components—such as in the iPhone Air—and allocate more room for larger battery capacity or leaner structure. For instance, eSIM-only models may feature slightly higher battery capacities thanks to this gained internal space. - Industry Trend toward Digital-First Solutions
Apple has been steadily moving toward eSIM since the iPhone 14. The iPhone 17 lineup accelerates this move, extending eSIM-only to more countries—a significant step in digital transformation. - Convenience & Security
eSIM offers easier switching between carriers, enhanced security, and digital flexibility (e.g., storing multiple eSIM profiles).
Summary Table
| iPhone 17 Model | SIM Slot Availability |
|---|---|
| iPhone 17 (base) | Primarily eSIM-only, but physical SIM still sold in select countries (e.g., EU) |
| iPhone 17 Air | Fully eSIM-only worldwide, no physical SIM slot |
| iPhone 17 Pro / Pro Max | eSIM-only in many regions, possible physical SIM in others (depending on local availability) |
Final Thoughts
- Yes — eSIM is the norm across the iPhone 17 lineup, particularly emphasized for design and digital-first convenience.
- Physical SIM slots are not present at all on iPhone 17 Air and are phased out on iPhone 17 Pro models in many markets.
- The base iPhone 17 may still offer physical SIM variants in select countries, but that is increasingly rare.
- This is a pivotal shift toward fully digital cellular connectivity in smartphones.
Let me know if you’d like help checking whether your country will still offer physical SIM variants—or how to set up an eSIM on your iPhone 17!
How to Set Up eSIM on iPhone 17 Series
Apple’s iPhone 17 series continues the shift toward eSIM technology, with many models no longer including a physical SIM tray. If you’re upgrading or switching carriers, here’s how you can set up your eSIM quickly.
Step 1: Make Sure Your Carrier Supports eSIM
- Check your carrier’s website or Apple’s eSIM support list.
- Not all carriers worldwide support eSIM yet, so confirm before starting.
Step 2: Get an eSIM From Your Carrier
Carriers usually provide:
- QR Code: A printed or digital code you can scan.
- Carrier App: Install the official app to activate your eSIM.
- Carrier Settings (Automatic Transfer): If you’re upgrading from an older iPhone, your carrier may let you transfer your number directly.
Step 3: Open iPhone 17 Settings
- Go to Settings > Cellular (or Mobile Service in some regions).
- Tap Add eSIM.
Step 4: Choose Your Setup Method
- Scan QR Code: Use your iPhone camera to scan the QR code provided.
- Use Carrier App: Tap the option to open your carrier’s app and follow instructions.
- Transfer From Another iPhone: If your old iPhone has an eSIM, you may see an option to transfer it directly during setup.
Step 5: Activate the eSIM
- Follow the on-screen instructions until you see the network signal.
- Your carrier may ask for confirmation via SMS, email, or app login.
Step 6: Label Your eSIM (Optional but Recommended)
- After activation, you can label your line: Primary, Work, Travel, etc.
- This helps if you plan to use multiple eSIM profiles.
Step 7: Set Default Line & Data Usage
- Go to Settings > Cellular > Default Line to pick which number to use for calls and messages.
- Under Cellular Data, select which eSIM handles internet.
- You can also enable Allow Cellular Data Switching for dual eSIM use.
Extra Tips
- International Travel: Many travel eSIM providers let you buy data plans instantly without swapping SIM cards.
- Multiple eSIMs: iPhone 17 supports storing several eSIMs but only two active at once.
- Troubleshooting: If activation fails, restart your iPhone, update carrier settings, or contact your provider.
✅ Bottom Line: Setting up an eSIM on iPhone 17 is straightforward. All you need is your carrier’s QR code or app, and you can ditch the physical SIM for a fully digital setup.