Using an ethernet cable for using the internet on your MacBook is ideal as it eliminates any network lags and packet losses experienced over a wireless connection. Ethernet connection offers faster browsing and downloading speed and is more trustworthy than WiFi. WiFi shows that the ethernet network connection is more secure and does not require data encryption.
However many users have faced problems with their MacBooks where the ethernet connection does not show up or is inaccessible on their devices. Even after connecting your Mac to the router, using an ethernet cable seems useless as it does not allow you to connect to the internet. To solve this problem, we have curated this article to provide effective and simple solutions for fixing the problem of Ethernet missing on Mac in the network preferences tab.
No Ethernet Port!
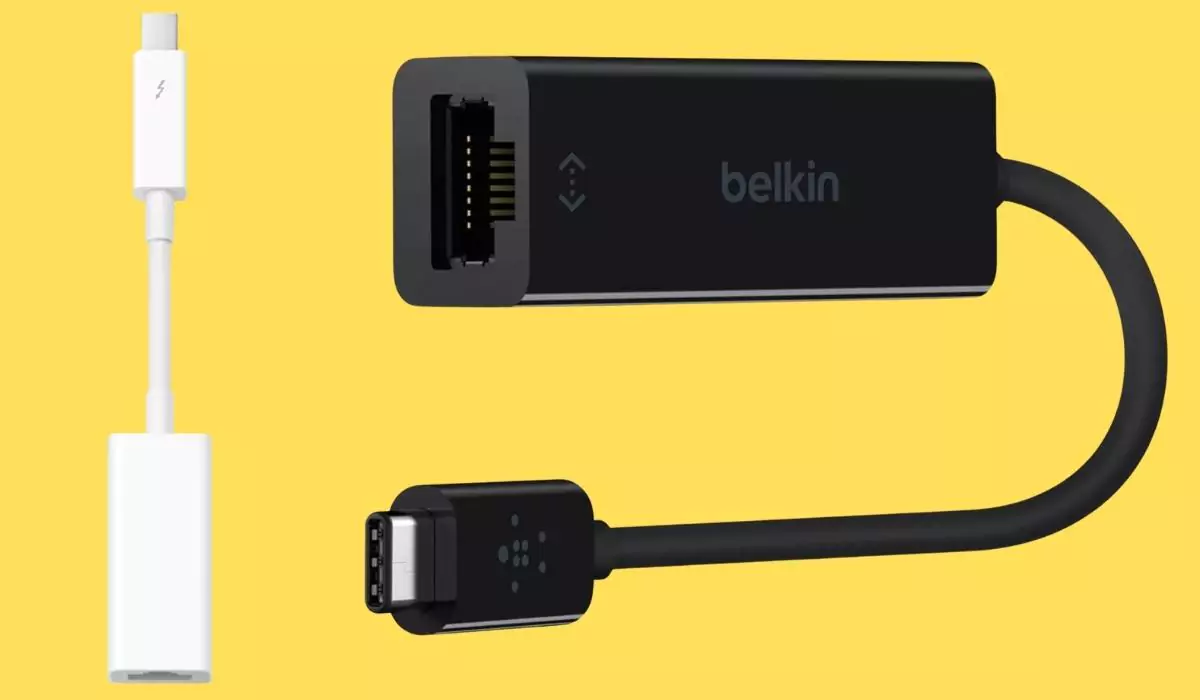
Macbook has no ethernet port and Some iMac as well, so we can start using Ethernet with an External Ethernet converter. Plugged this USB-C to Ethernet Adapter or Thunderbolt to Gigabit Ethernet Adapter. And Make a connection using the below steps,
Troubleshooting steps to Ethernet Not Showing on Network Preferences and won’t Connect
Method 1: Steps to Add Ethernet Interface on Mac
Before getting into this process, ensure your MacBook is compatible with Ethernet connectivity. To verify this, check if your MacBook has ethernet ports or not. If your Mac does not have ethernet ports, you cannot use the ethernet cable to establish a connection to the internet.
Although the MacBook contains all the network preferences services by default for all the network ports, sometimes the settings get altered, which affects the connection of Ethernet to your device. This is how to add an ethernet interface to your MacBook.
Steps to Add Missing Ethernet Service in MacOS 13 Ventura, Sonoma
I hope these steps will let you get your missing ethernet setting on macOS and later operating system.
Step. 1→ Go to the Apple Logo from the top menu > System Settings.
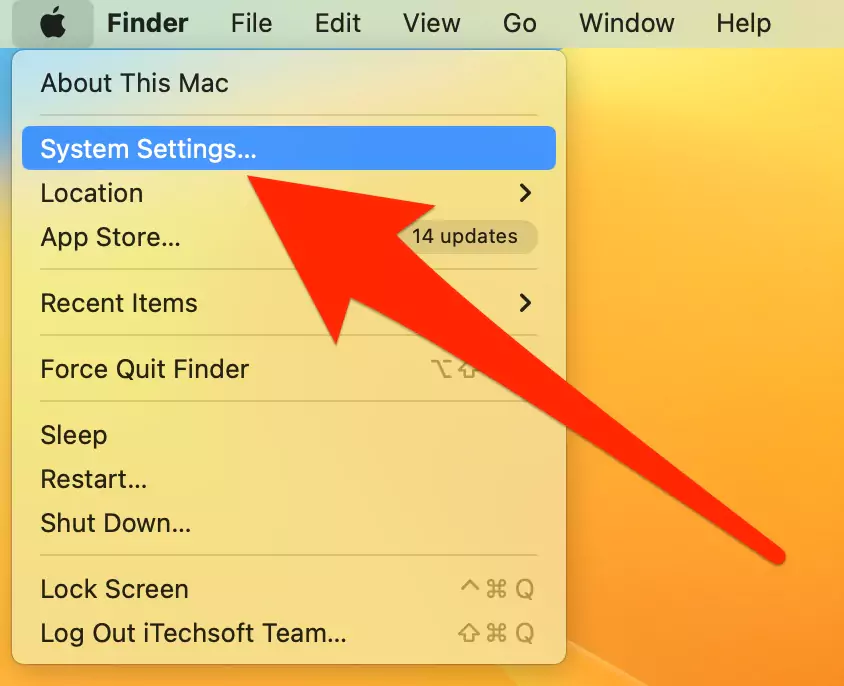
Step. 2→ Choose Network > Click on the Down arrow icon with more options and select “Add Service“.

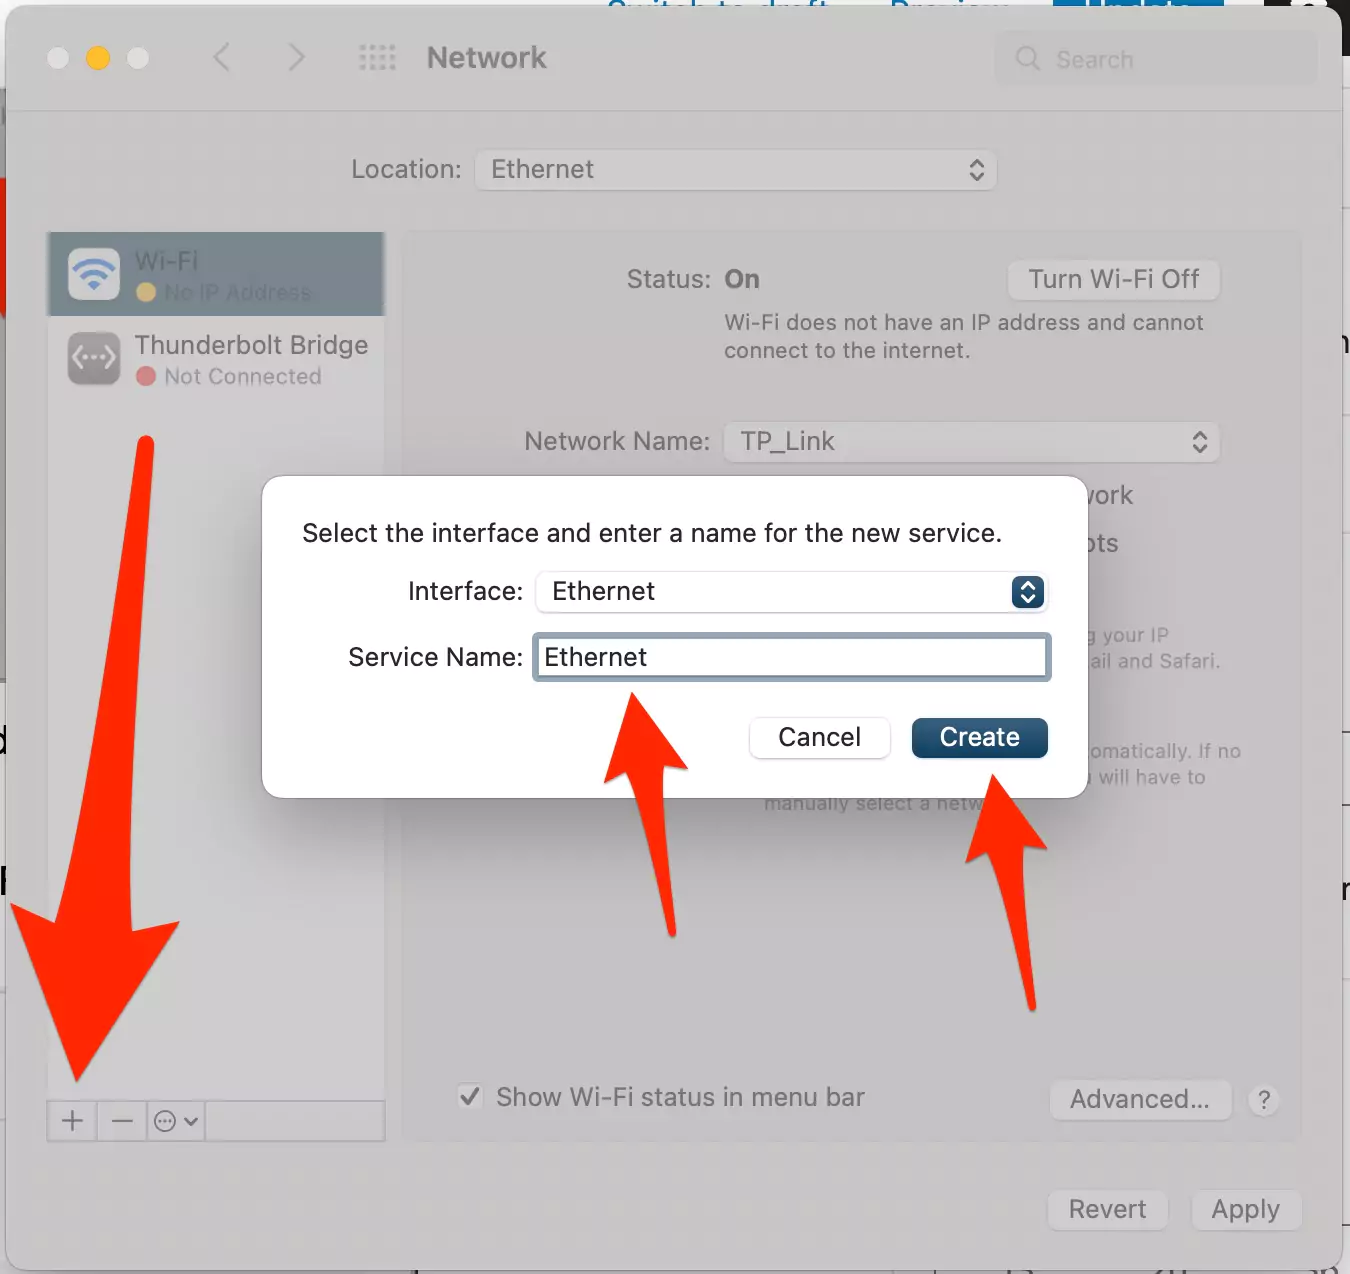
Step. 3→ Now, you must select the interface and enter a name for the new service. I am selecting Ethernet Interface > and Service Name “Ethernet“. and Clicking on the Create Button.

Step. 4→ Ethernet Profile added to the list. Under the network Preference. And ready to join. Ensure WiFi is turned off if your Mac is connected with an Ethernet cable.

Add Missing Ethernet Service in MacOS Monterey & Earlier
Step. 1→ On the home screen of your Mac, hit the Apple logo and navigate to system preferences.
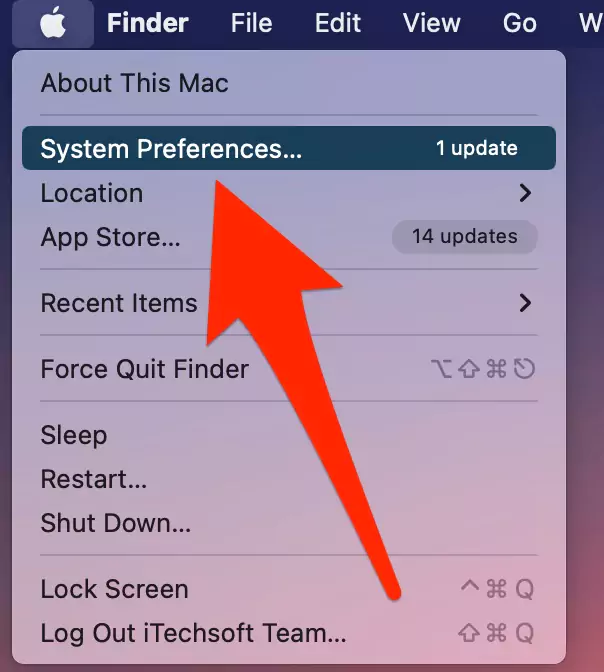
Step. 2→ Now click on “network” to open the Network settings.

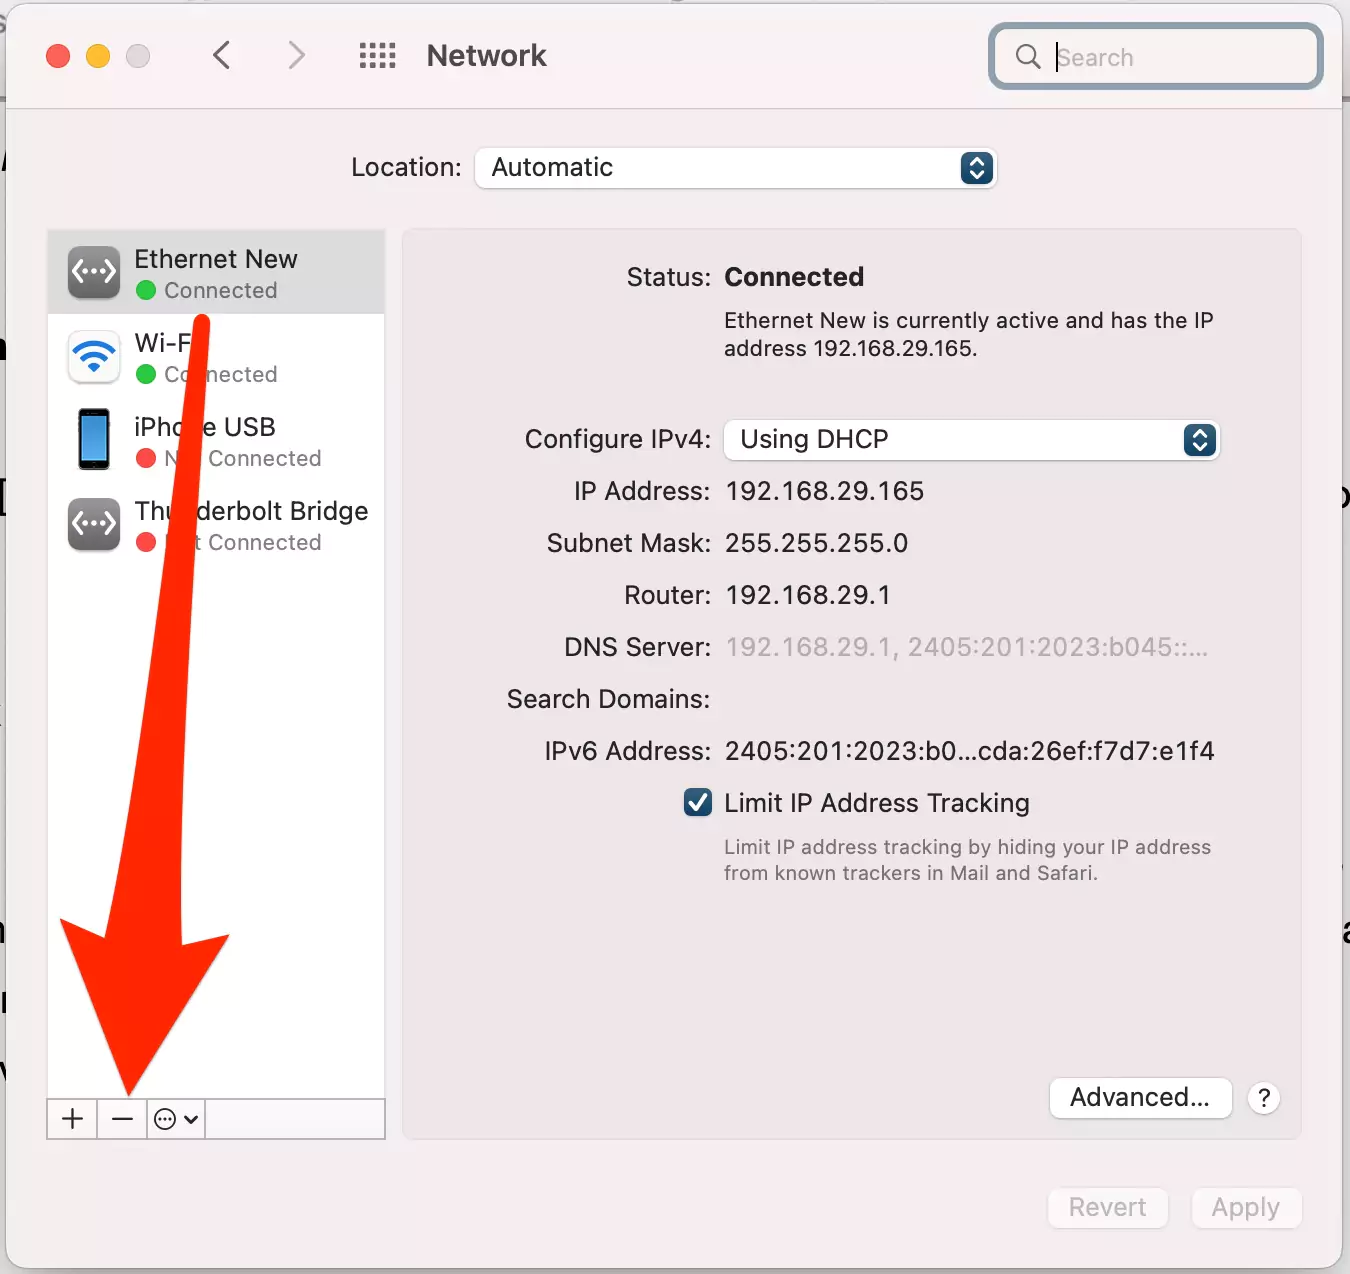
Step. 3→ Then, at the bottom left of the list of networks, click on the Add (+) icon.

Step. 4→ Tap on the Interface option to open the pop-up window.
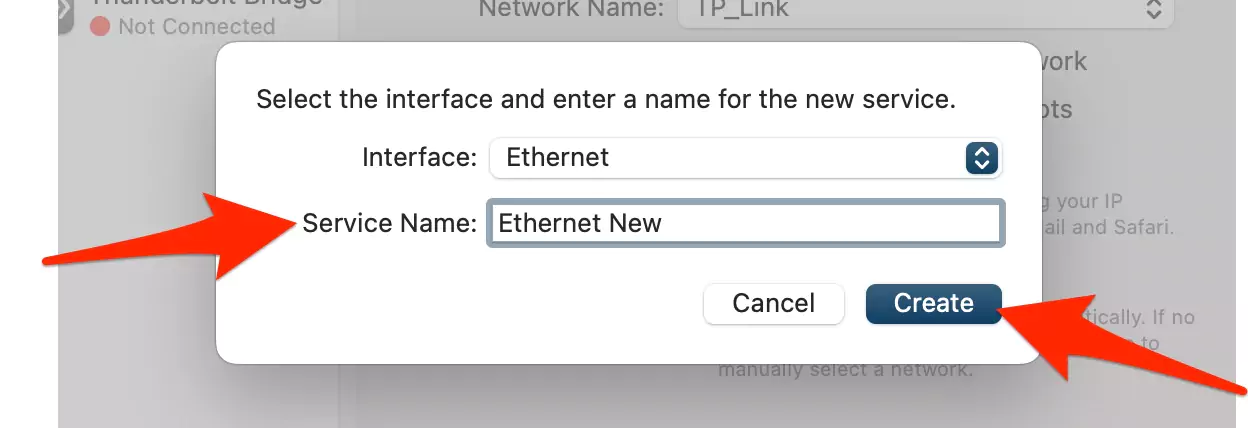
Step. 5→ After that, select the ethernet network interface.
Step. 6→ Give the network interface a name and tap on Create.
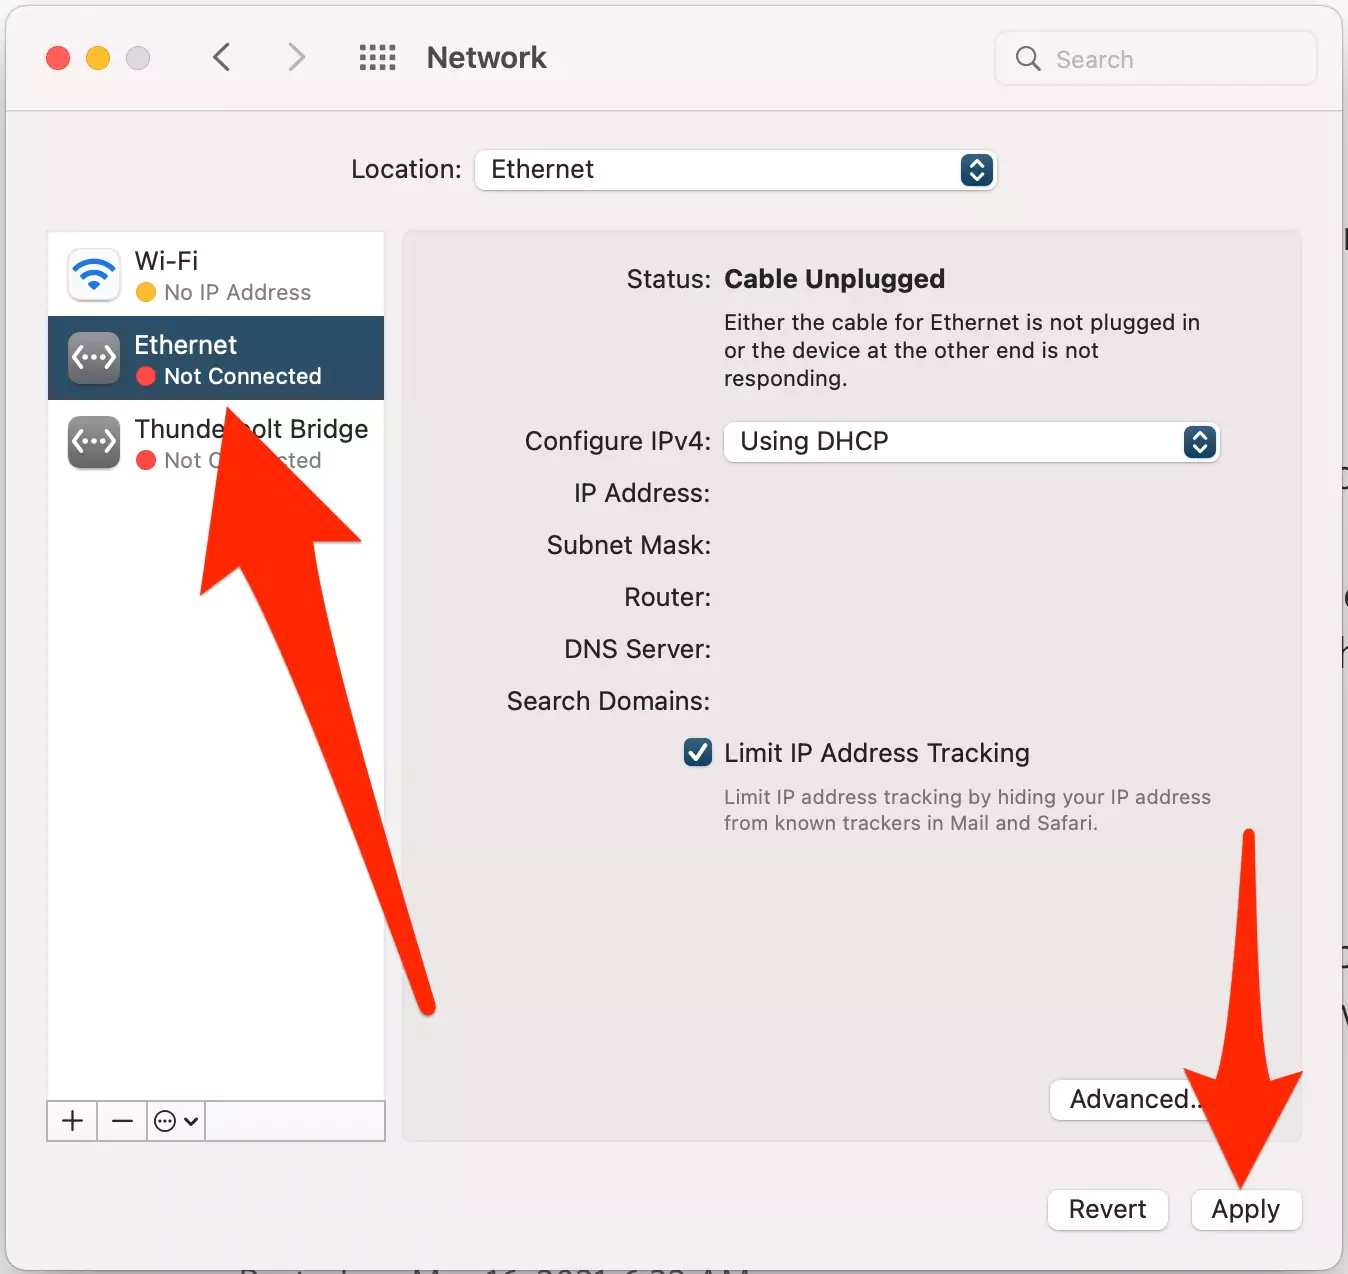
Step. 7→ In the list of services, choose a new service and apply the settings of your choice.
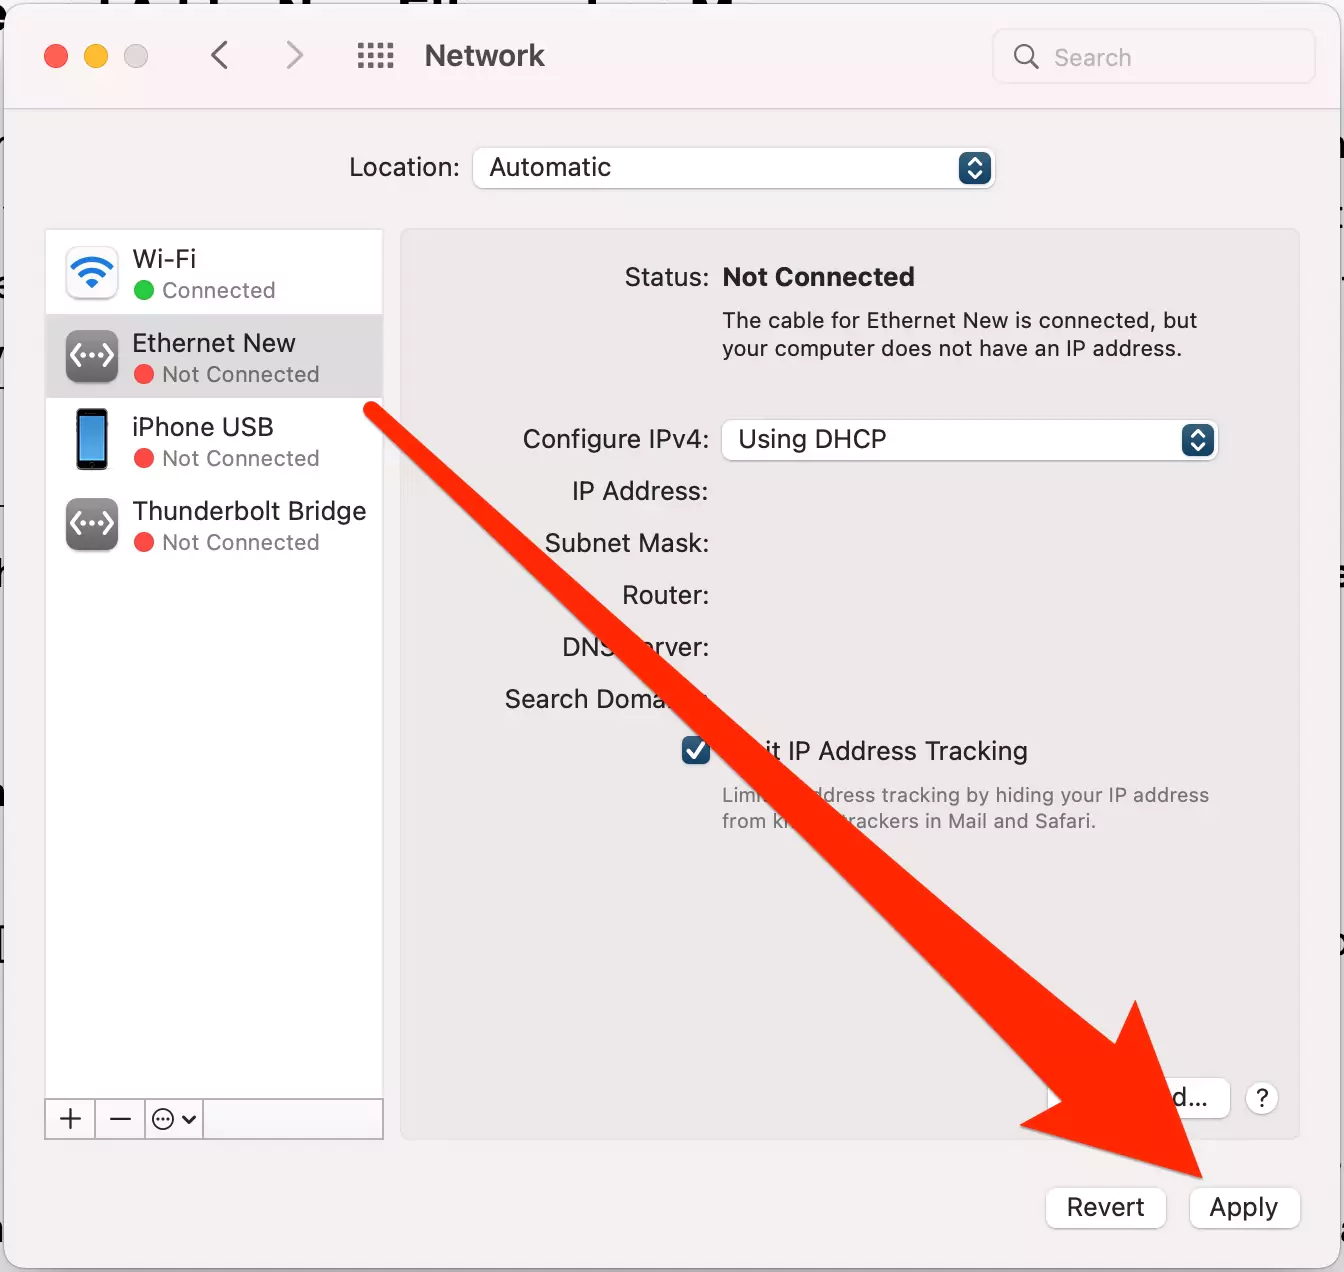
Now, Ethernet has connected my mac,

Step. 8→ Hit the Action menu denoted by three dots at the bottom of the list to decide which configuration to use first in case multiple configurations are active.
Step. 9→ Finally, click on the “Set Service Order” button and place the ethernet service at the top of the list.
Also, Turn off Wi-Fi to Enable Ethernet connection on your Mac,

This process will add the ethernet interface to your Mac and force your MacBook to connect to the internet using the ethernet connection even if the WiFi is enabled.
Method 2: Remove and Add a New Ethernet on Mac
Suppose you have an ethernet connection saved on your Mac, but you cannot use the internet even if it is connected. In that case, you should try removing the existing Ethernet from your Mac’s network settings and creating a new Ethernet interface. You add a new ethernet interface on your MacBook using the above method. To remove the existing Ethernet from your Mac, follow the procedure below.
On MacOS Ventura, Sonoma Re-add Ethernet Profile on Mac
Step. 1→ Go to the Apple Logo from the top menu > System Settings.
Step. 2→ Select Ethernet from the list and right-click on Ethernet > Delete Service…
On MacOS Monterey Readd Ethernet Profile on Mac
Step. 1→ Head over to the Network settings by clicking on the Apple logo from the top Menu > System preferences.

Step. 2→ Now, select the existing ethernet connection from the list of network services.
Step. 3→ Finally, hit the [-] Button “Remove” button to remove the current ethernet configuration from your Mac.
Hopefully, this article will help you fix the problem of Ethernet missing from the Network preferences of your MacBook. Although the methods given in this post are simple and effective, many users are unaware of them. Hence, enlightening the Mac users about resolving this problem helps the users better understand how their devices work and what must be the cause of the problem.
Fix: Internet Sharing Not Working on Mac
Using Add New Location Under Network Preferences
We can Re-Add all network interfaces in New Location on Mac. So, add Location using the below steps,
- Go to the Apple Logo from the top menu > System Preferences.

- Select Network.

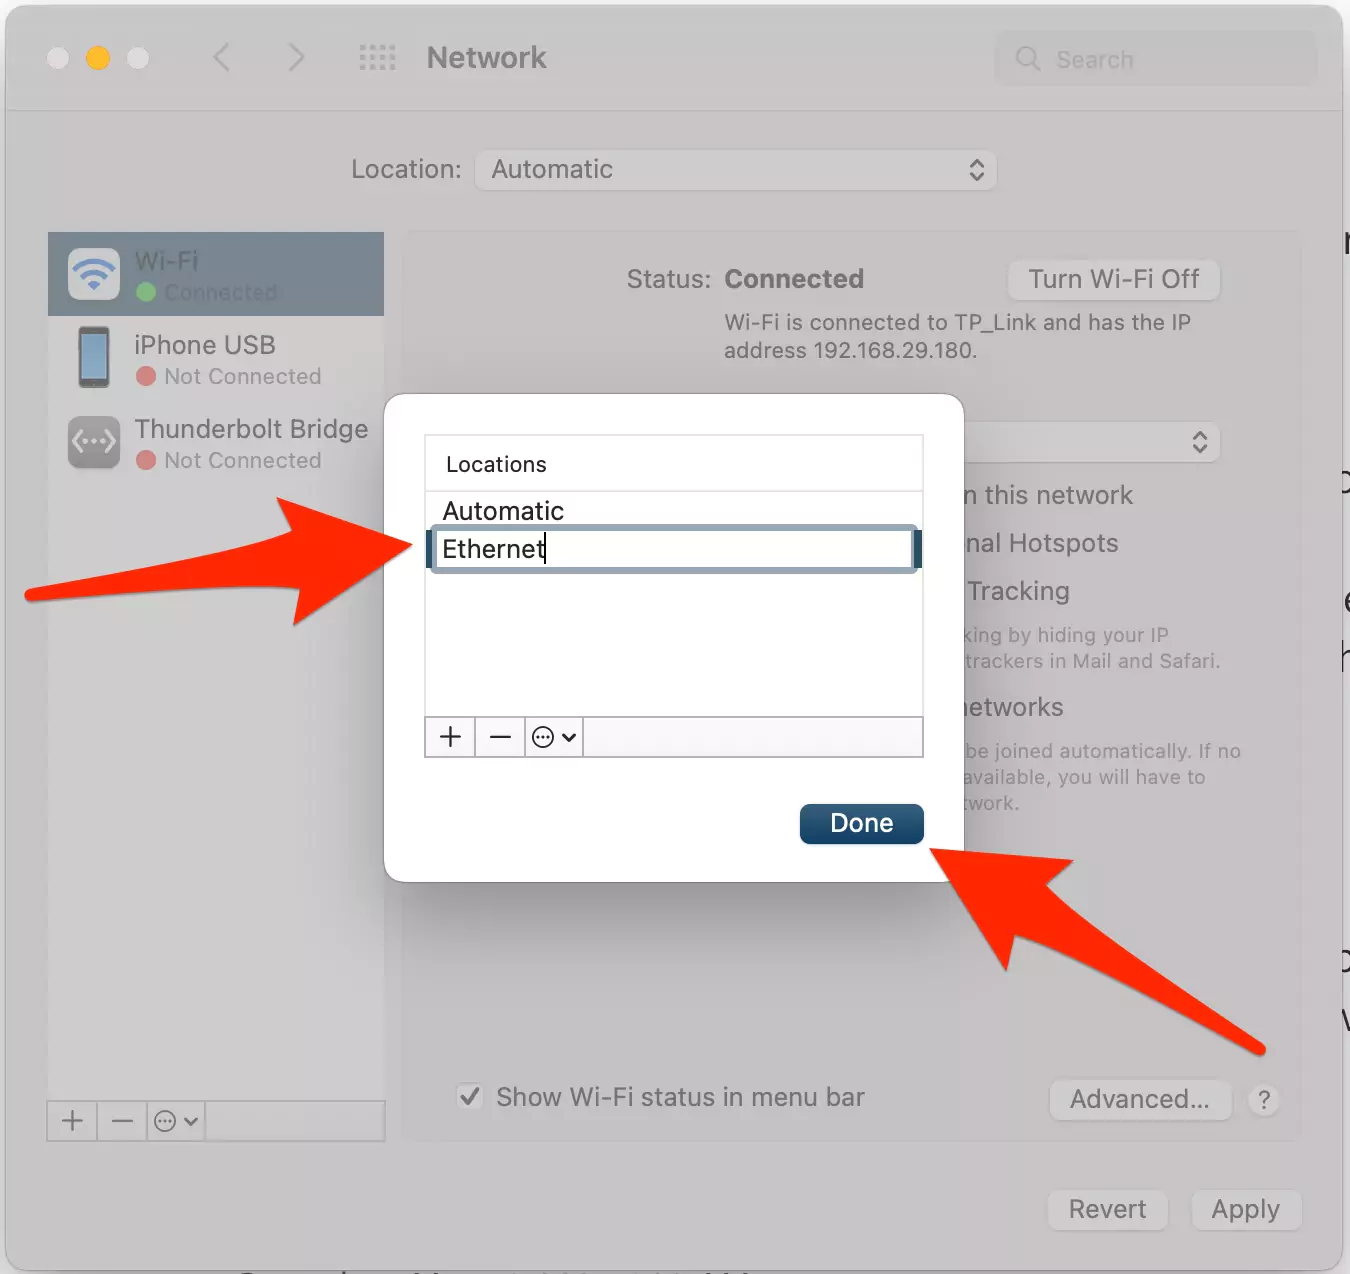
- Under the Location, Select Edit Locations…

- Click on the Plus button [+] Given a New Location name, Click on Done.

- Now, Add a New Interface by clicking on the Plus button [+], and Select Ethernet from Interface Dropdown.

- Now, Click on Apply Button to add Changes. and Make sure the WiFi is Turned off, Select WiFi and Turn off it. That’s it.

Mac Models have Ethernet Port,
- iMac 21.5 In
- iMac 21.5 4K Retina
- iMac 24-In (M1, Four Ports, 2021)
- iMac 24-In (M1, Two Ports, 2021) – Not Available but Configurable with Gigabit Ethernet
- iMac 27-In (5K Display)
- iMac Pro
- Mac Mini (M1, 2020)
- Mac Mini (2019)
- Mac Mini (Later 2014)
- Mac Studio (2022)
- Mac Pro
Mac Models Doesn’t Have Ethernet Port,
The below Mac Computer has no Ethernet Port, so we have to connect an External Adapter to Turn on Mac using Ethernet.
- M1, M2, M3, M4 – MacBook Pro & Air
- MacBook Pro 14-in. (2021)
- MacBook Pro 16-in. (2021)
- MacBook Air (M1, 2020)
- MacBook Air (Retina, 2020)
- MacBook Air (2017)
- MacBook Pro 13-in. (M1, 2020)
- MacBook Pro 13-in. (Two Thunderbolt 3 ports, 2020)
- MacBook Pro 13-in. (Two Thunderbolt 3 ports, 2016)
- MacBook Pro 13-in. (Four Thunderbolt 3 ports, 2020)
- MacBook Pro 16-in. (2019)
- iMac 24-in. (M1, Two ports, 2021)
FAQs→
→ If your Mac has trouble recognizing the ethernet cable connected to it, follow the process below to force your Mac to recognize the ethernet cable.
Step. 1→ Go to the system preferences of your Mac by left-clicking on the Apple logo at the top.
Step. 2→ Within the “Internet & Network” tab, click on the Network icon.
Step. 3→ Select “Ethernet” from the list of connections available on the left side.
Step. 4→ Now tap on the “Configure IPv4” menu.
Step. 5→ Then, select “Using DHCP” in the drop-down menu.
Step. 6→ Finally, hit the “Apply” button and press the “Command + Q” keys on the keyboard to successfully save and exit from the system preferences window.
→ Suppose you have an Ethernet hub, router or a cable modem connected to your MacBook, and it does not show up on your device. In that case, it is suggested to network settings of your Mac and verify whether the cables are working or are damaged.
→ To add an ethernet connection to your MacBook’s network settings, use method one explained in this article. if you don’t have an ethernet port then, Connect an External USB to Ethernet Cable, USB-C to Ethernet, and Thunderbolt to Ethernet.
→ Take note of the methods described in this post to enable the ethernet connection on your Mac.


