Frequently Printing different types of Papers or envelopes is a challenging task. But with Presets on Mac, everything is at ease. Here is how you can create, change, save, reset, and delete Printer Presets (Print Job Preset, Custom Preset) on Mac.
The Preset is exceptionally important because default print settings don’t let out the result you want. And at the same point, the presets offer consistency while printing PDFs, Pages, or Envelopes once you save them on your Mac. Here are all things you should know about Mac Presets.
Save, Change or Delete Frequently Used Print settings for routine printing on Mac
This guide will let you know the complete details for Preset on Mac. So read the article until the end without missing any important notes.
What Are Printer Presets?
If you are frequently working on a different printer or professional type, that’s where saving printing presets comes in the role. As of now and forever, print presets are fastest and most reliable method. The presets stores accurate and consistently needed settings; using those, you can print out an envelope or manual paper as per the setting design.
How To Create & Save Preset On Mac
If you haven’t created any of the Presets and are willing to learn how to create and save presets on Mac, follow the steps below. Note there are two types of Print Job Preset and Custom Preset.
Print Job Preset: For instance, you want to create a Printing Job Preset to print the report once a month and another for booklets and envelopes. This preset will be highlighted under Print Job Preset. Only one Print Job Preset can be applied at a time.
Create Print Job Preset,
1→ First, Open the PDF, and click on the File from the top menu bar. or Command + P Shortcut.

2→ Choose Print… from there, and following the preview, you will receive various settings; Copies, Pages, Print Color, Double Sided, Paper Size, Orientation, etc. Configure as per your need.

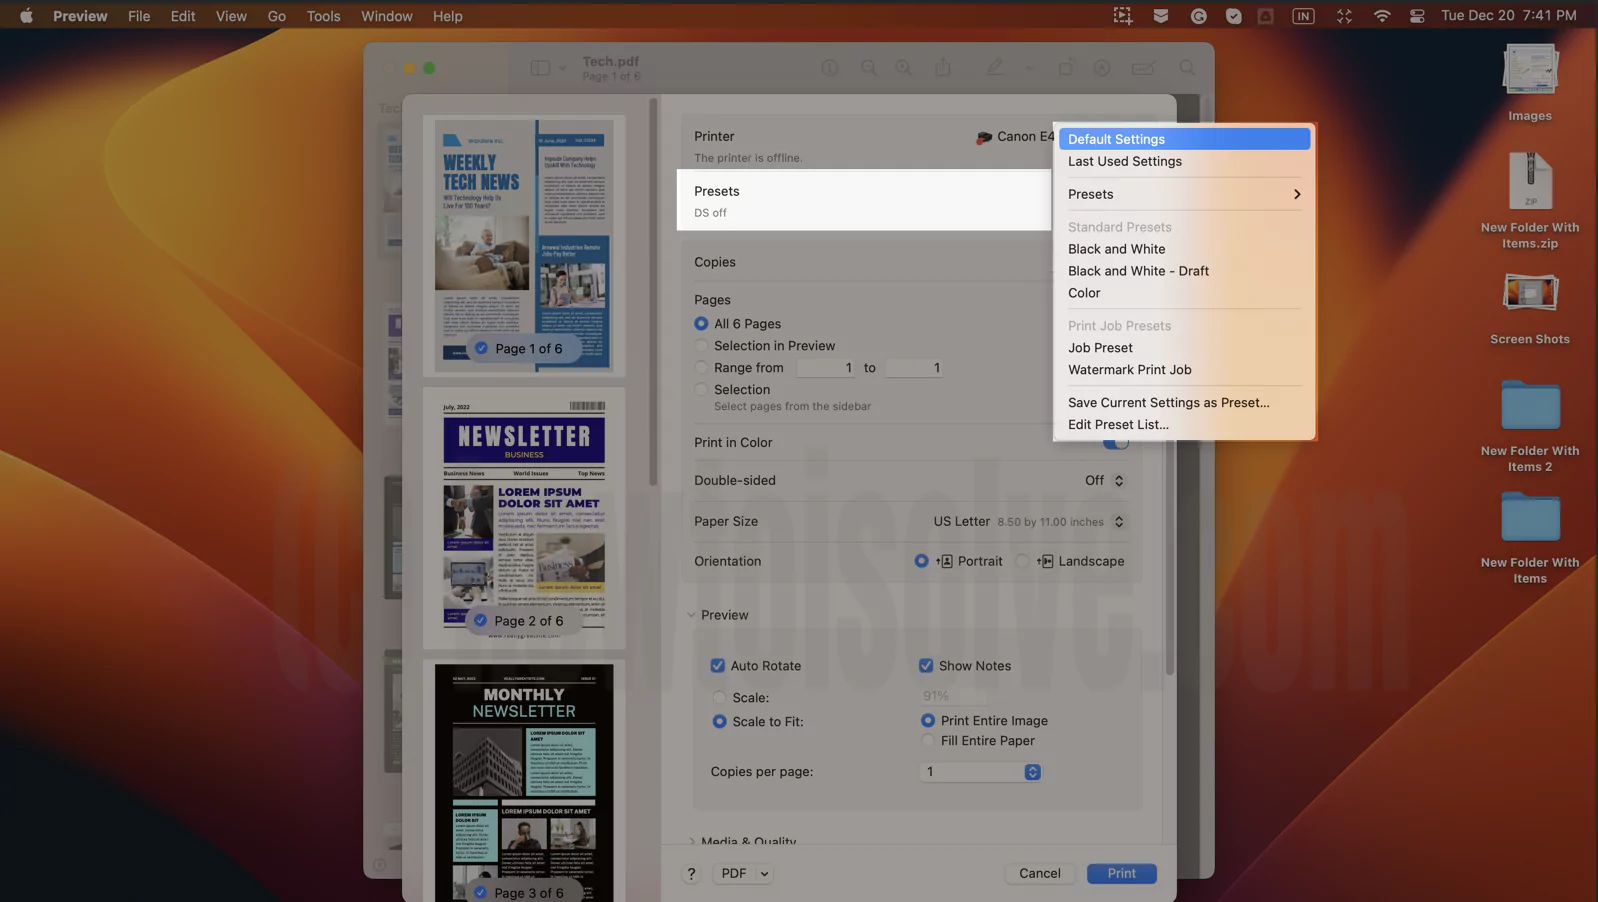
3→ Right after this, click on the Preset Dropdown and select Save Current Settings As Preset…

4→ Now give the Preset Name and choose the appropriate settings.

5→ Select either the connected printer or All Printer in Available For. Next select Print Job Preset. That’s It.

Custom Preset: The custom preset can say as in branch preset for Print Job Preset. In case you want a Print Job Preset for Envelope. You can create a new Preset within the Custom Preset with a few changes. You can also apply Multiple Custom Preset.
Create Custom Preset,
1→ Open the PDF > File > Print… unlike the Print Job Preset, you can configure the settings you want for Custom Preset.
2→ Now Preset Dropdown> Save Current Settings As Preset… Give a name to Preset. Select a convenient option from Available For. And then, choose Custom Preset from the type menu. Lastly, click on OK.

Now, we can add newly Custom preset with Existing Selected Print Job Preset.

Make Printing perfect with all small changes (Custom Preset) and Microprinting settings (Print Job Preset).
Printer Presets Not Saving
Trying to create the preset but, at last, ended up with a print preset do not save. First, verify that you are performing the exact steps to save preset; cross-verify the steps mentioned in How To Create & Save Preset On Mac.
If everything is alright, try force quitting the app(Preview or Adobe) in which the PDF is open. Now retry, create the Preset and then save; it can fix the issue. But if not, you can follow the steps below.
1→ Open the Finder. Select Go.
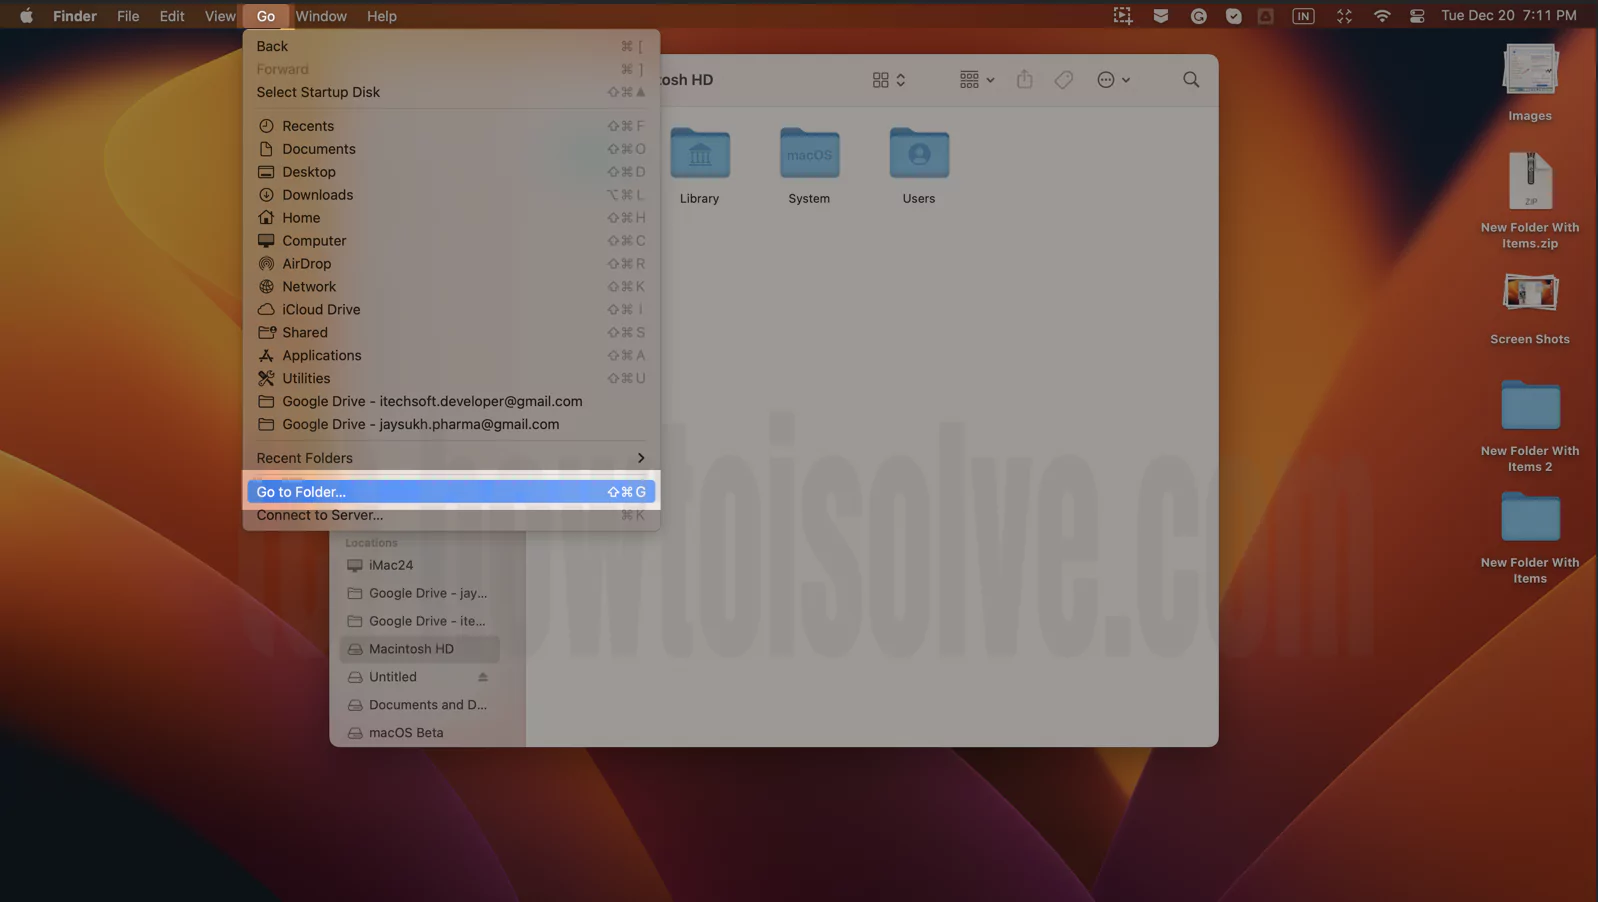
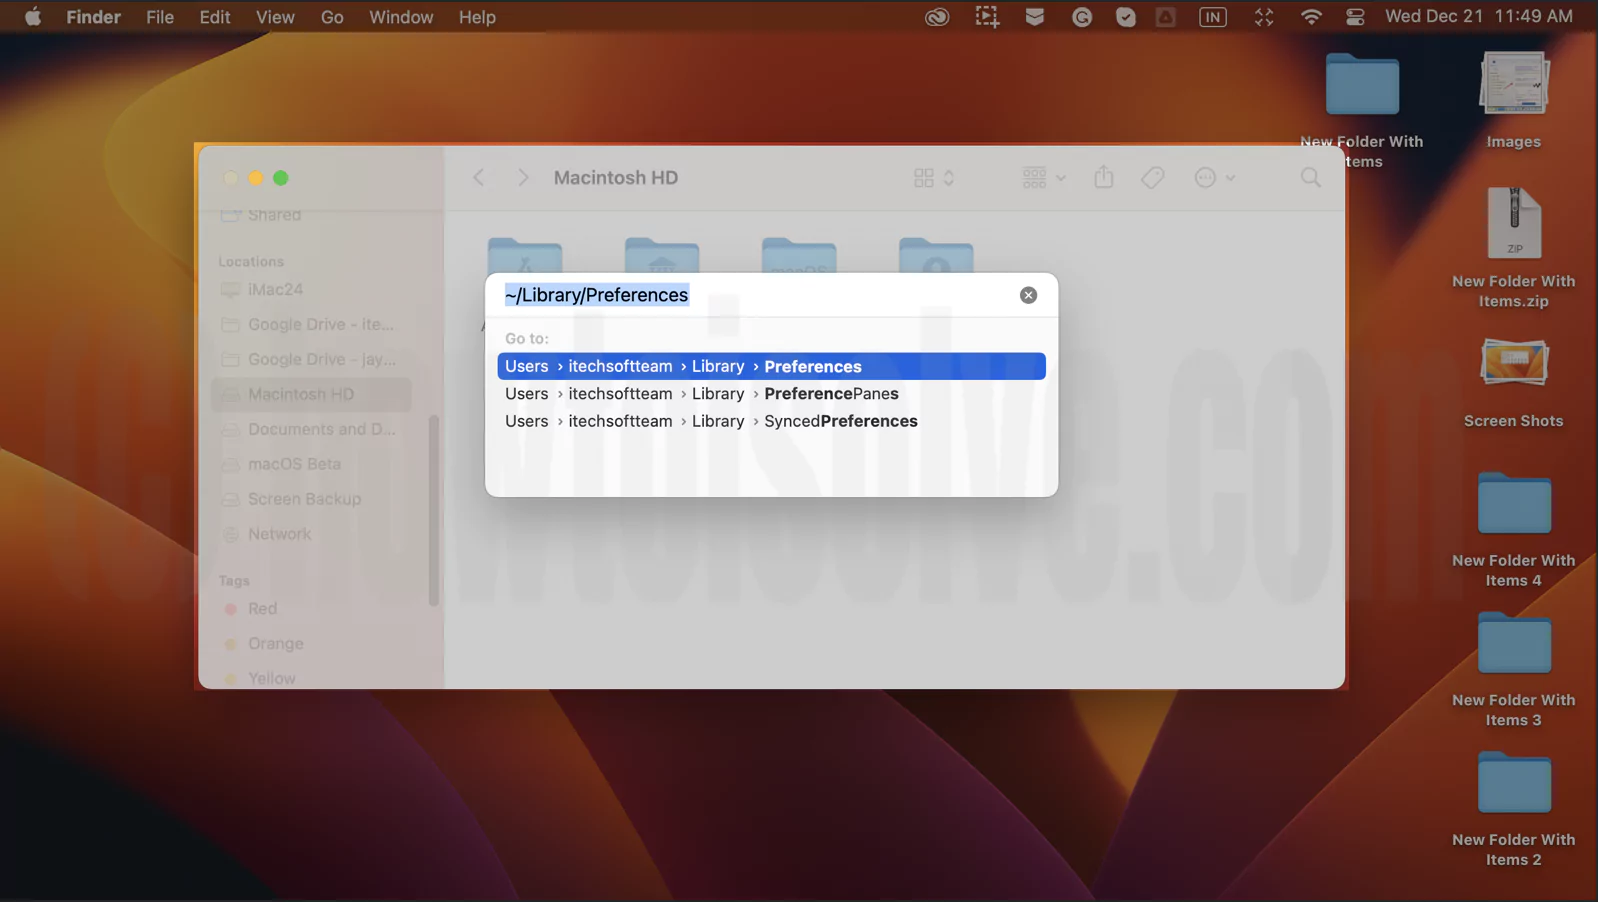
2→ Choose Go To Folder… > enter the path ~/Library/Preferences/.
Search “Print” in Finder, Choose List and Under the Preferences Tab, see all Preset file.

Right-click on it and Move to Trash.
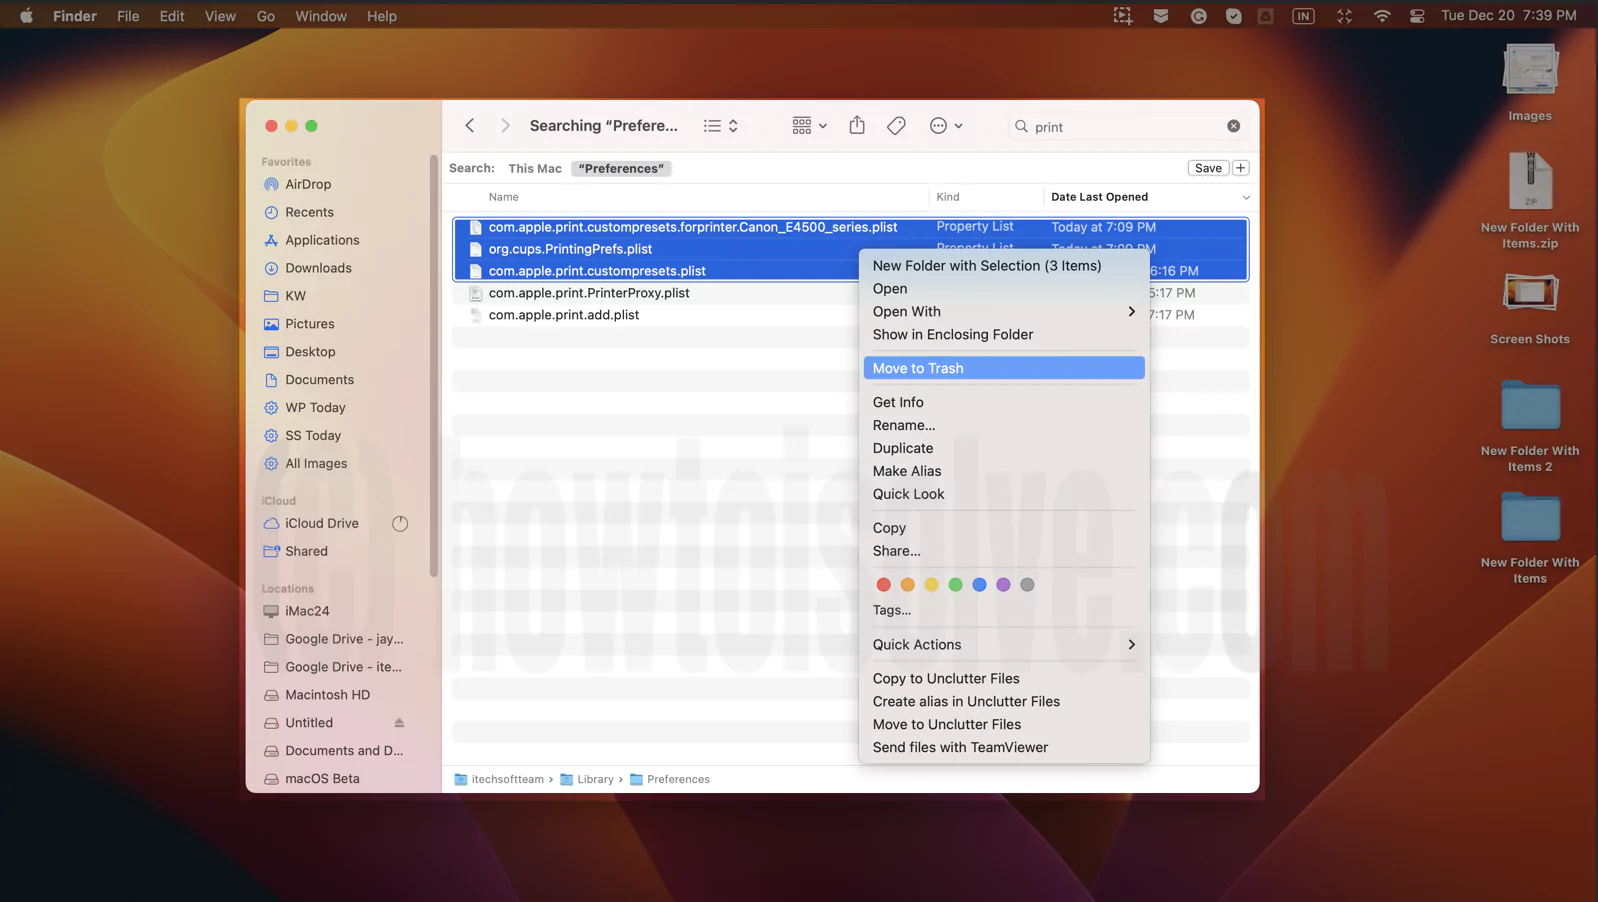
From the result, search for com.apple.print.custompresets.forprinter. You will get plist.lockfile. And .plist file. Move both folders to the trash. Restart the computer, and the problem is solved.
How Edit Printer Presets Mac
Misconfigure the Preset On Mac, due to which you have received the wrong layout or design of the print you have given. If you can change the presets of any Preset Profile On Mac.
For instance, you have created a Print Job or Custom Preset within which you want to enroll double-side print, but mistakenly you have configured it to a single side.
1→ Open the PDF. Select File from the Menu Bar.
2→ Choose Print… From the next window, select Preset Dropdown > Corresponding Preset (From Preset or Print Job Preset). Make change you want to have.
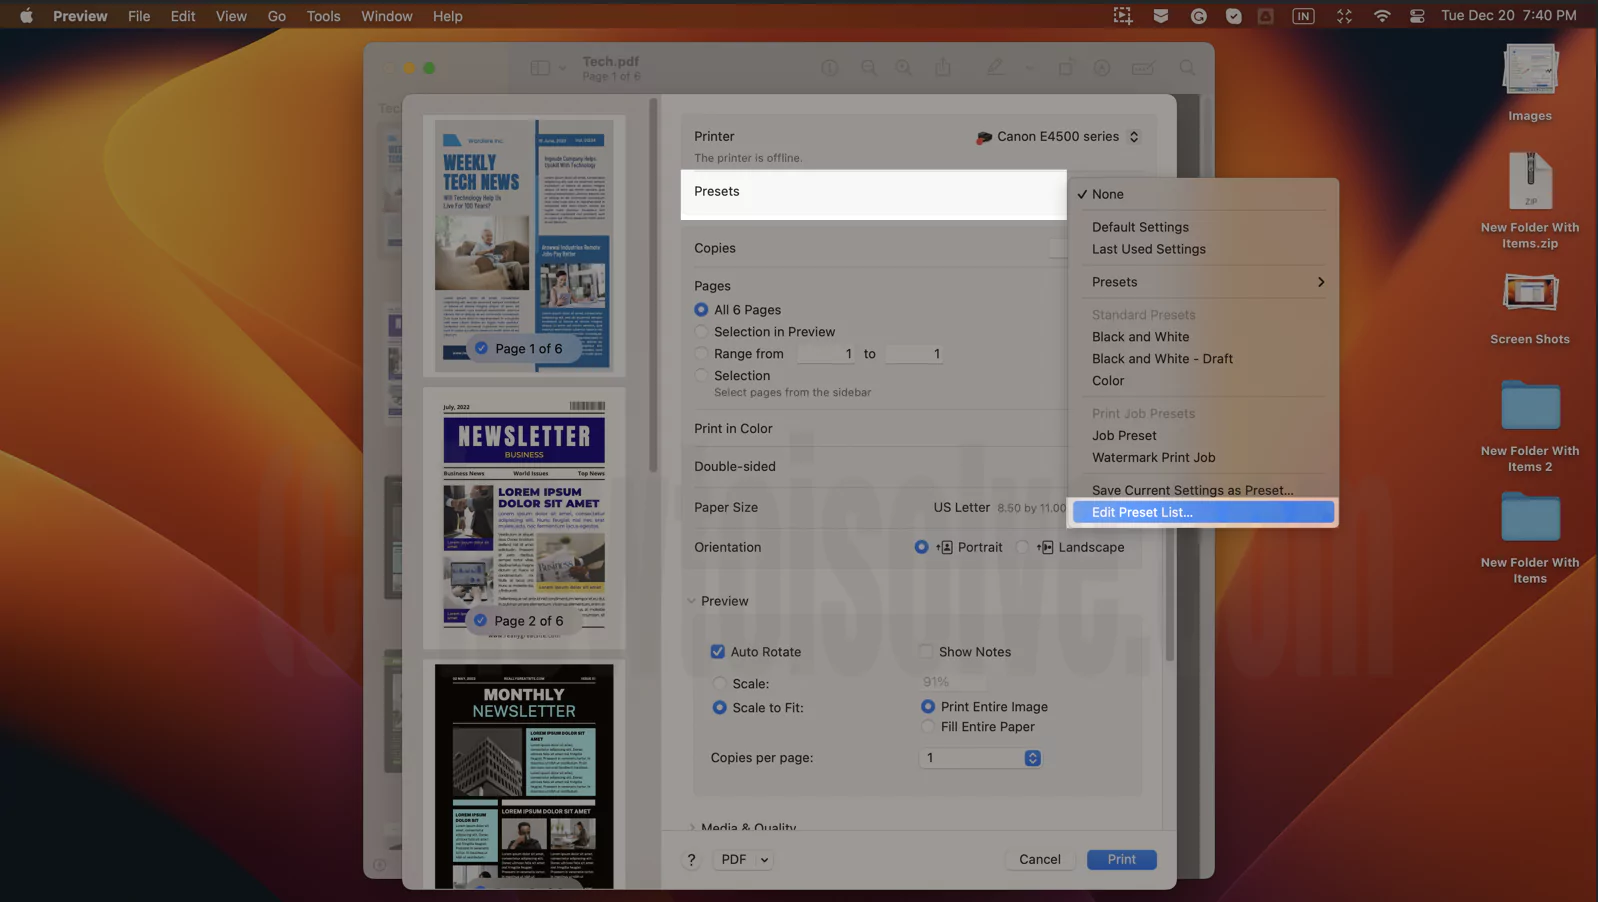
3→ Now head back to the Preset Drop Down and select Edit Preset List… select and double click on the Preset in which you edit the settings, and give it a new name. That’s It!
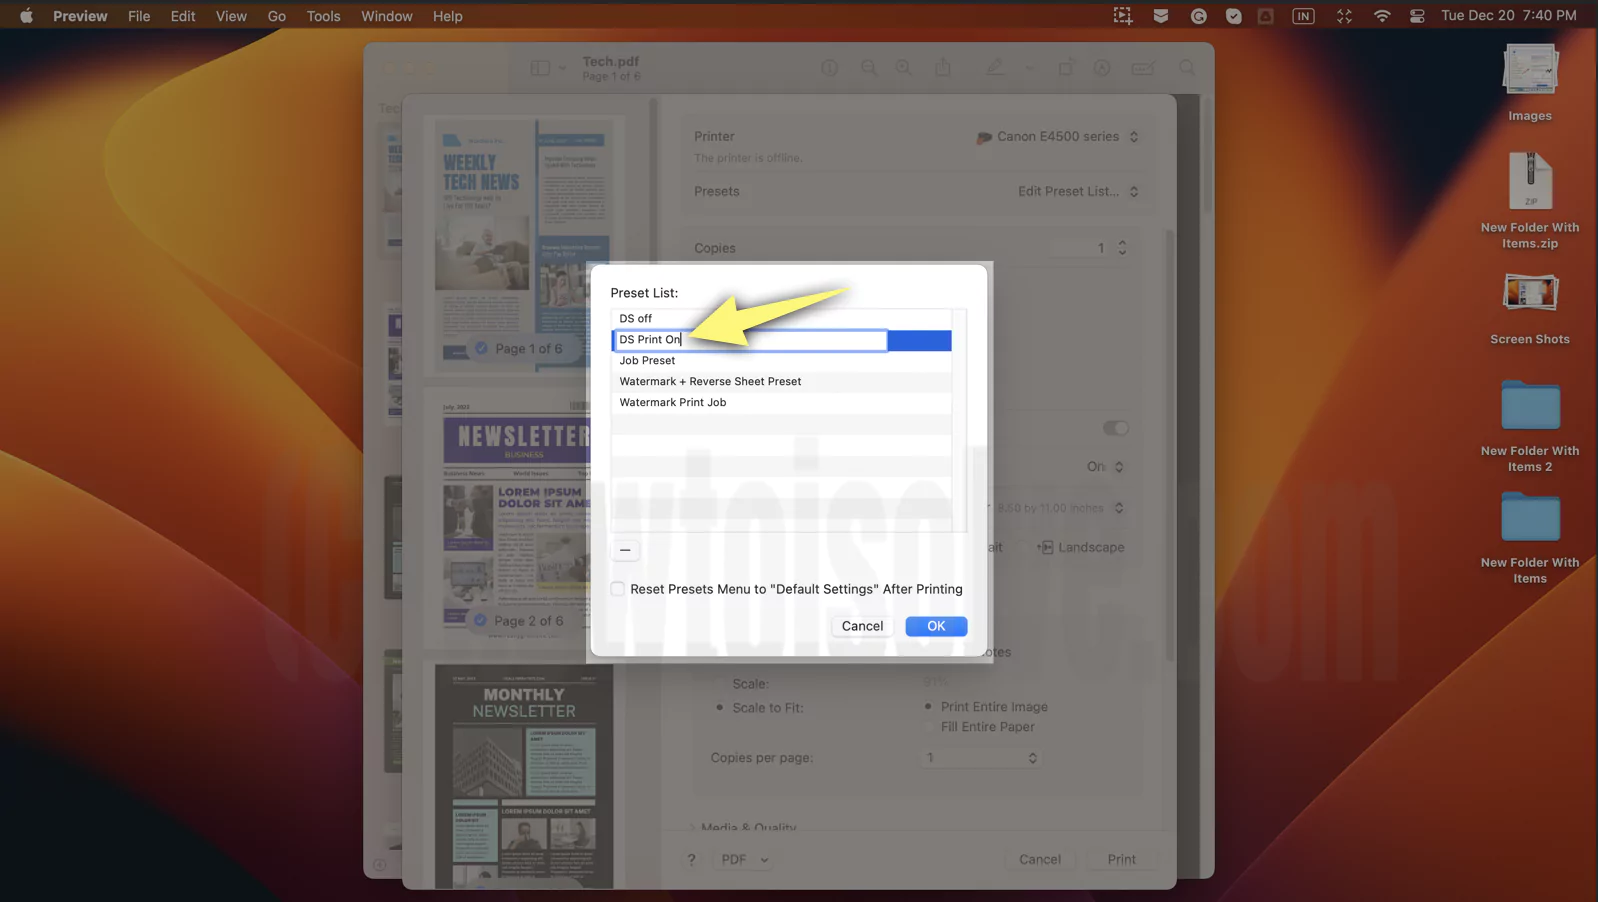
You can perform this with any settings you want to change, but remember to rename the Preset.
How To Change Preset On Mac
You have indeed created multiple presets on Mac. But what if you want to apply a different preset from the one configured as Default Preset? Follow the steps.
1→ To change presets on Mac, open the PDF.
2→ Select the File from Menu Bar. Now click on Print… From the next window, select Preset DropDown.
You can select multiple presets from Custom Preset(mention as Presets) and anyone Preset mention under the Print Job Preset.
How To Delete Preset On Mac
Already enlisted too many Presets on Mac. Some of them are unused, or else they are wrongly configured. Are you planning to delete those? Let’s crack the deal by following the steps below.
1→ Open the PDF. Click on the File from the Menu Bar.
2→ Choose Print… Select Presets Dropdown.

3→ Click on Edit Preset List… Next, click to select the one you want to delete. Lastly, – Minus Icon > OK.

How Do I Find My Saved Preset
Having a save preset on Mac but not knowing where it is accessible is one of the common problems many users are stuck with. To find a saved preset, follow the steps below. Open PDF > File > Print… > Preset Drop Down. All the save Print Job Presets will appear here. And click on Presets to access the save Custom Presets.

How Do I Reset Printer Presets
Sometimes, you only want to use the in-built Presets on the Mac. However, you can configure the presets to default while giving the Print of PDF on Mac.
Access the PDF > File > Print… > Presets Dropdown> Default Settings.
Nevertheless, loading the Mac computer with multiple Presets can often cause issues while giving the print, like lagging and freezing while accessing Print Menu. So you can also delete presets by performing the steps above in How To Delete Preset On Mac.
Where Are Presets Stored On Mac?
The Presets are saved in the Finder of Mac. To find the preset folder, access the Finder, select Go > Go To Folder… Next, enter the path ~ /Library /Preferences. And then search for com.apple.print.custompresets.plist. That’s It!
How To Set Preset As Default Preset On Mac
There is no way to set a preset as default preset on the Mac. However, if you want to use default preset settings, Access the PDF > File > Print… > Presets Dropdown > Default Settings.
Adobe PDF Preset For Printing
Sometimes, users prefer to use Adobe as the default PDF reader on Mac. But they don’t know how to configure a preset for printing on Adobe. Follow the steps below.
1→ Open the PDF in Adobe and select File from the Menu bar.
2→ Next, choose the Printer Drop down and click on desired Printer.
3→ Click on Advanced Button.

4→ From the Settings Drop down, select Custom. Now you can set up Output, Marks Bleeds, PostScript Options, & Color Management.
Note: PostScript Settings are only applied when your Mac computer is connected with PostScript Enable Printer (Best Postscript Printers). For a better understanding, click on this Adobe Document link.
5→ Once you finish, click Save As Button and give the name to Preset. Lastly, choose OK.
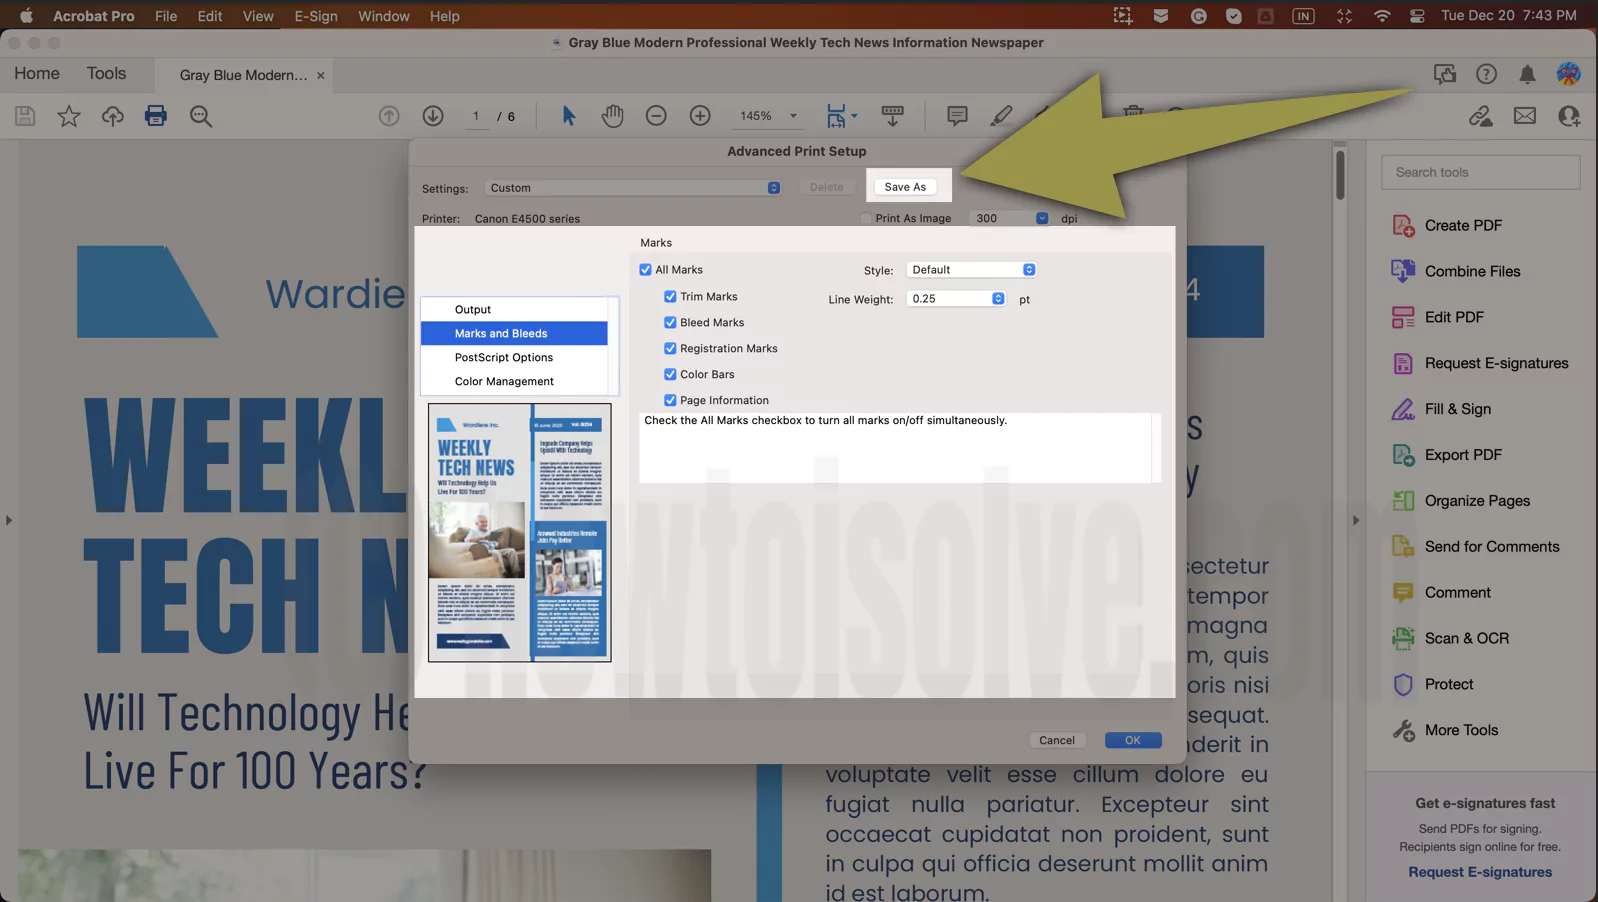
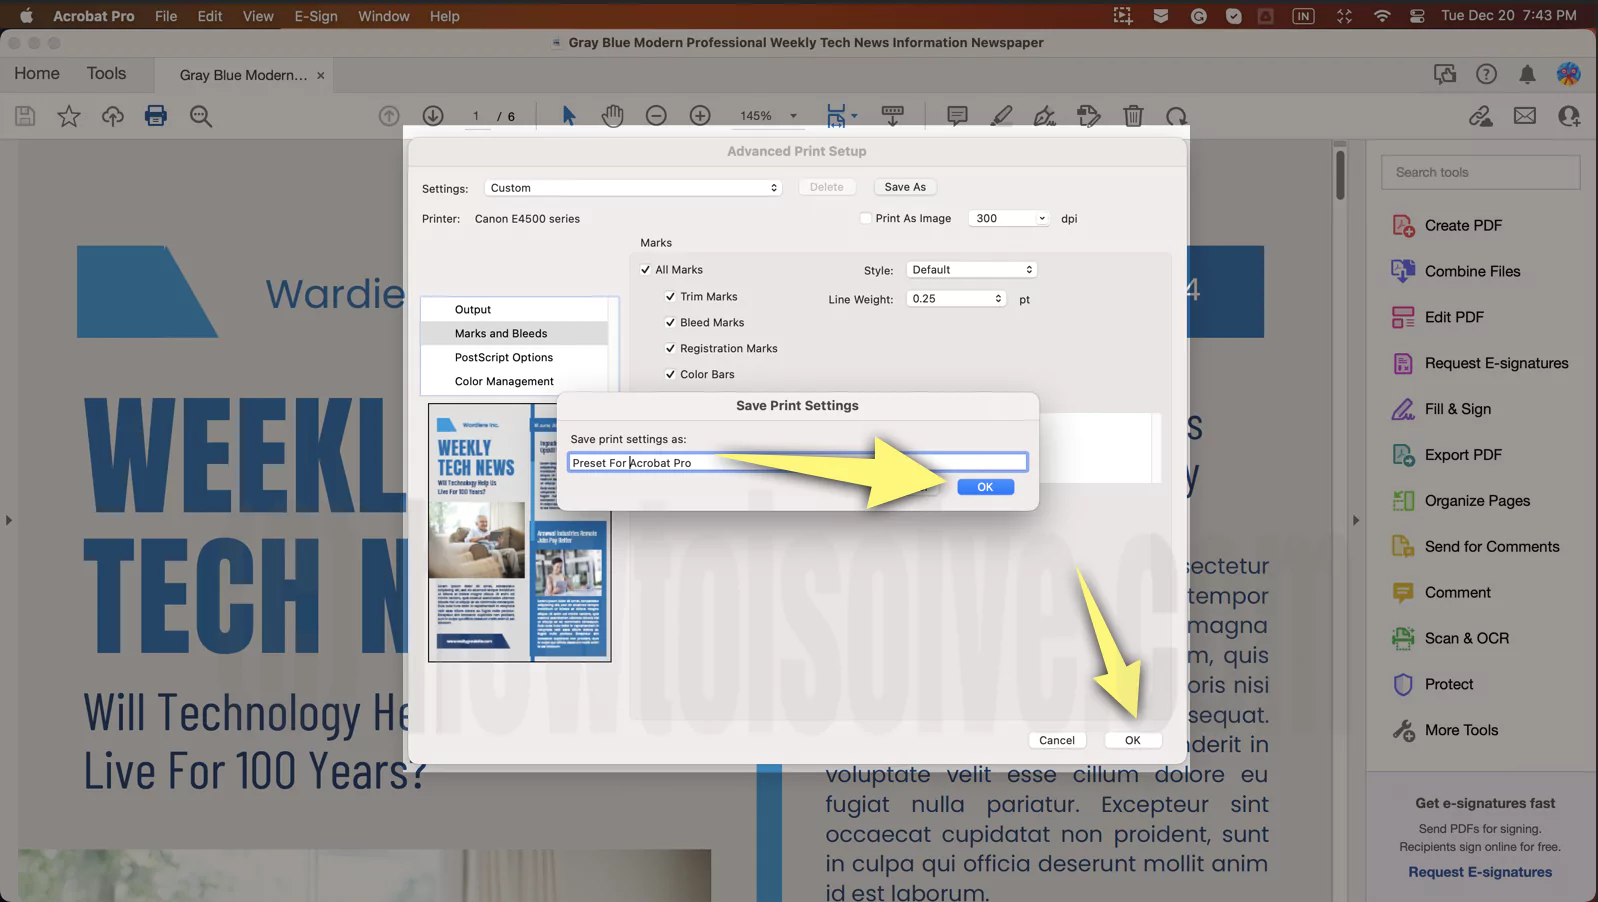

Note: In Adobe, the Presets you have lastly selected will remain as default presets while giving the print.
In case you want to use the System Preset, from the Print Window, select Printer…
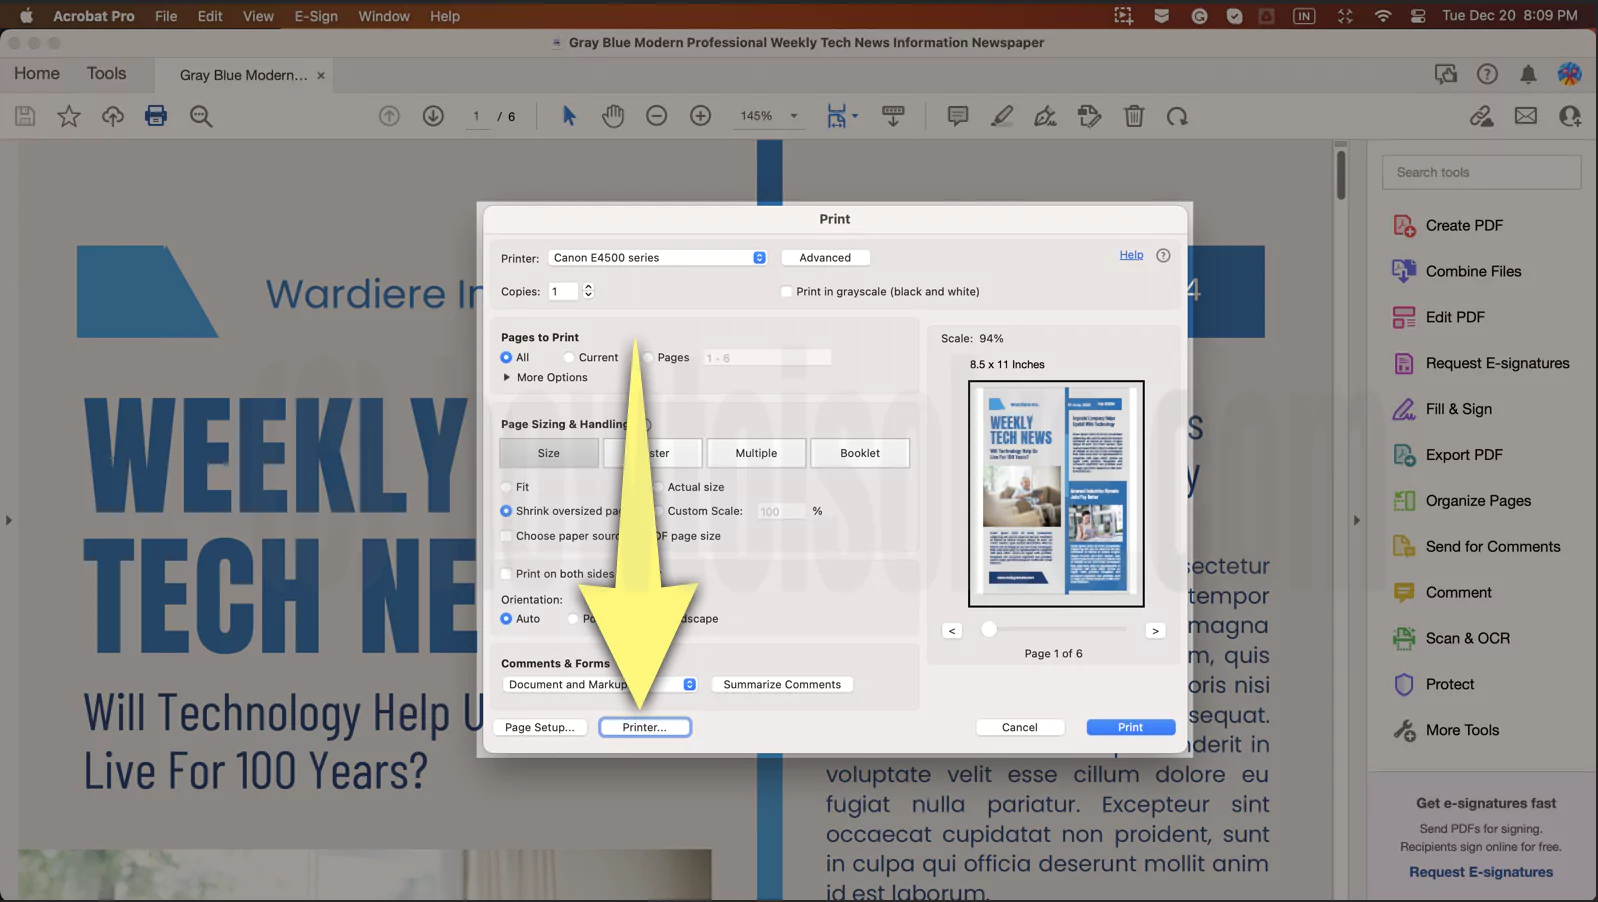
Then, from the pop-up, click on Yes.

Next, select Presets Drop Down; there, you will receive Default Settings, Custom Presets(Preset), and Print Job Presets that you have created.

Bottom Line
That’s It, Folks! With the above mention steps, you can now create, save, change, reset and delete the printer preset on Mac.
What is PDF preset?
The PDF presets are some settings that affect the process while creating the PDF. Mainly settings are designed to balance quality and size.
How Do I Add Presets To My Printer?
To Add the preset, open the PDF next choose File. From there, select Print… Customize Print settings. Then click on the Preset Drop Down. From there, select Save Current Settings As Preset… Give the Name to Preset, select either Print For Presets or Custom Presets, then OK.
What Is Preset For?
In simple words, the combination of settings that is most frequently used while giving the print on Mac. If you need to become more familiar with creating and saving Presets on Mac, follow our guide.
Are Presets Worth It?
It’s worth it, as it’s utterly time-saving if you work in a profession that frequently asks for different print styles.
Can You Make Your Own Preset?
With the Mac, everything is possible, to create your own preset, you have to go to print screen. Next, configure the settings for the preset you want. Now scroll up and choose Presets Drop Down > Save Current Settings As Presets… Now give the name to Preset and choose below settings accordingly. However, if you want to know more details, you can follow our guide.
Do Professionals Use Presets?
Yes, professionals use the Presets while giving the print, as the presets are a complete time saver. In addition, it allows configuring the Print Dialogue to handle different kinds of print smartly.
What Pdf Preset Should Use For Print?
As per the InDesign, the “High-Quality Print” Preset will create high-quality print on proofers and desktop printers.
