Despite the cut-throat competition from various music apps like Spotify and Apple Music, Apple Music remains by far one of the best-streaming music apps with millions of users. Apart from boasting the largest library of tracks, the app is feature-packed and includes tons of customization for a personalized music-listening experience. Whether you are new to Apple Music or just hunting down the best Apple Music Tips and tricks to get the best out of it, this guide has got you covered.
Get the Most Out of Apple Music with These Tips and Tricks
Here are some useful tips and tricks for Apple Music that you might find interesting.
Tip#1. Explore the Apple Music App
Taking a moment to explore and get known with the Music App is worth it.
- Listen Now: Let you know what you recently played, mixes made for you, recommended radio stations, and recommendations based on your listening history.
- Browse: Go through a premade playlist, radio show, new music, tips, and top charts.
- Radio: Described further in the next section, you can go to the Radio Tab to listen to a station.
- Library: In this menu, you’ll get music playlists, songs, albums, compilations, and downloaded items.
- Search: Look for songs, albums, radio stations, shows, and more with the help of a search box. Jot down your request, or use the microphone icon to speak it.
Use the shortcut menus
Long press a song: Along with other items you’ll read below, you can long press to see full lyrics even without playing the song or creating a station with it.
Long press an album: You can long press an album or one of your playlists to add it to your listening queue, either at the end or beginning.
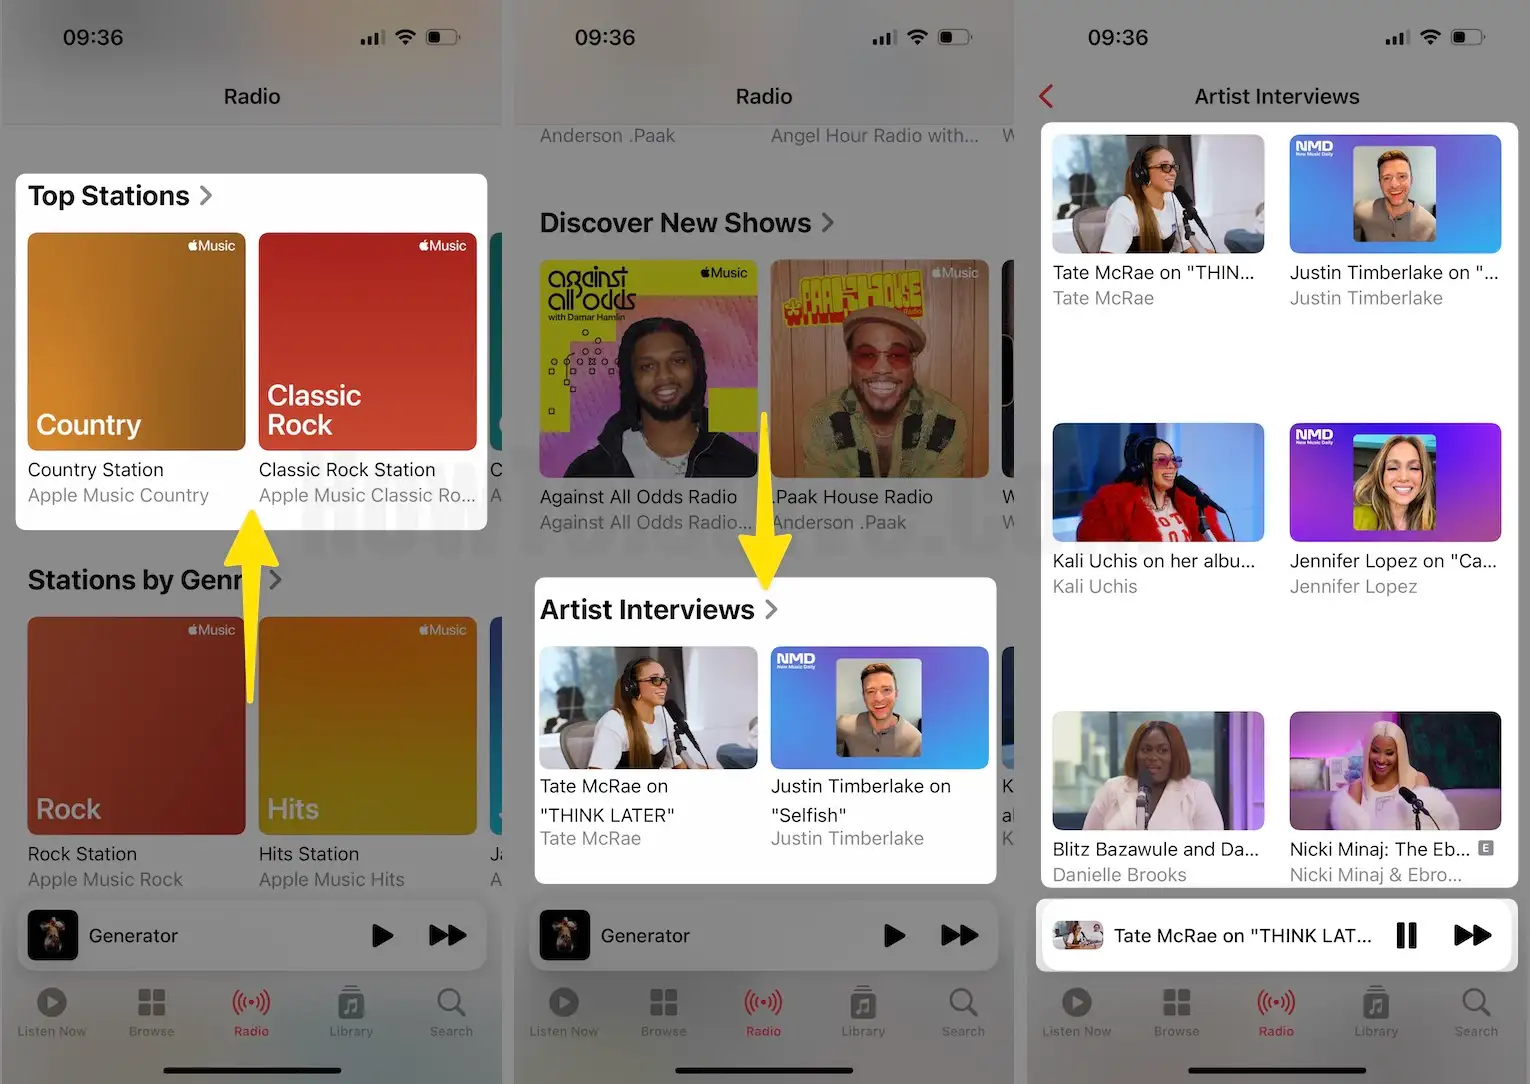
Tip#2. Take advantage of radio stations
The radio stations in Apple Music are one of the options for background music while work to play. They offer a continuous stream of songs and podcasts so you can relax and listen without lifting your fingertip.
Step 1: Launch the Music App on your iPhone > Tap on Radio in the Bottom Menu.
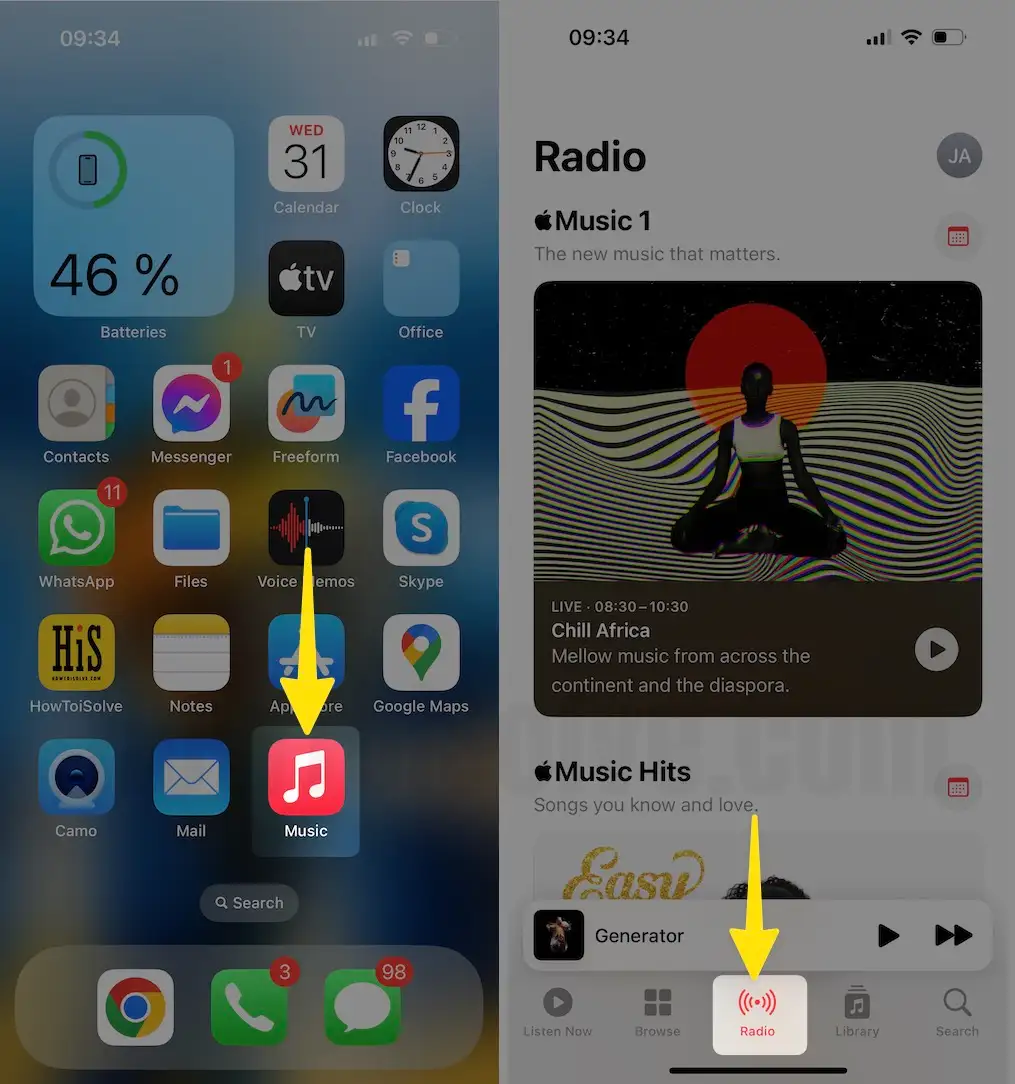
Step 2: Next, Click on Top stations > Tap on Artist interviews > Listen to a radio with your favorite artist.
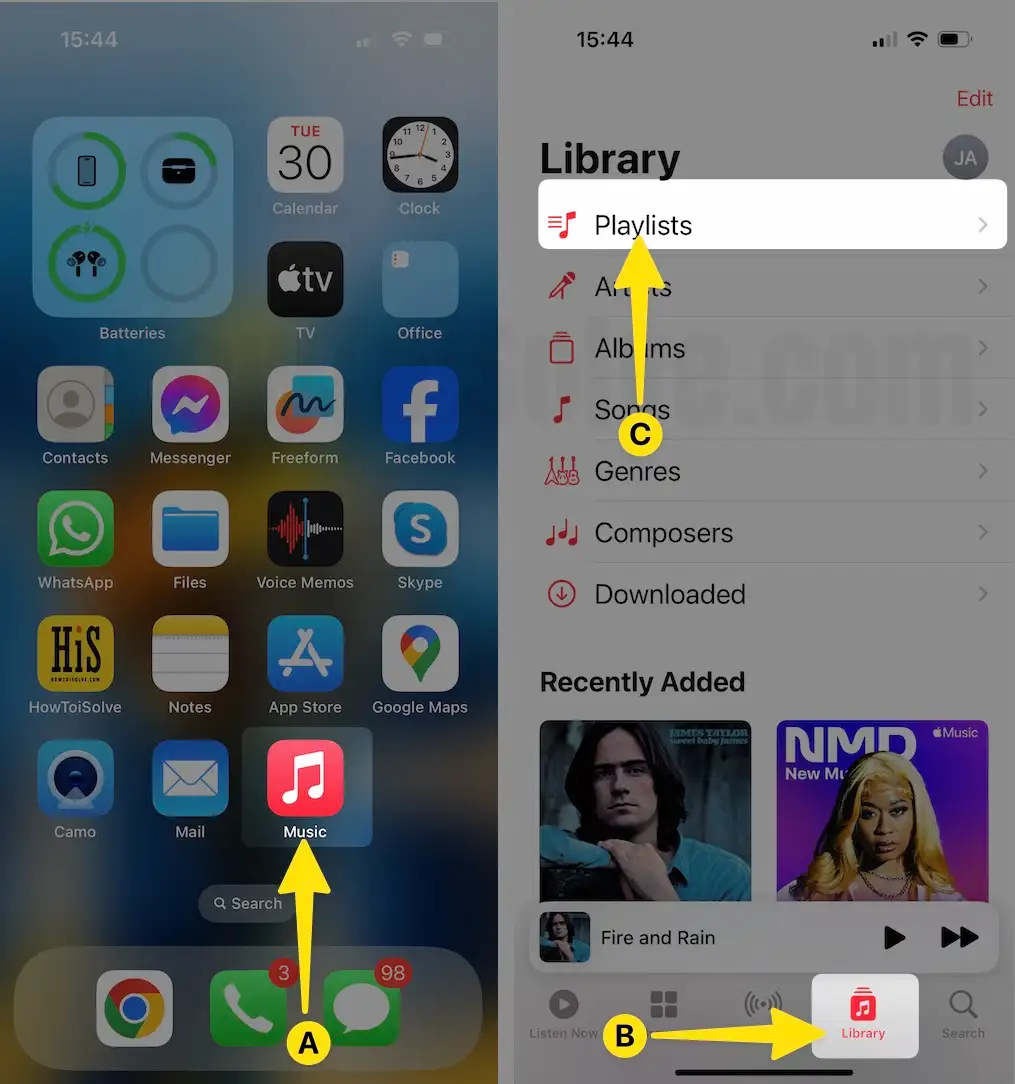
Tip#3. Check out premade playlists
If you want to try new songs, why not one of the premade playlists in the Music app? The songs are designed for you, and you can skip over the tunes you don’t like; you can choose various genres like activity, country, workouts, etc.
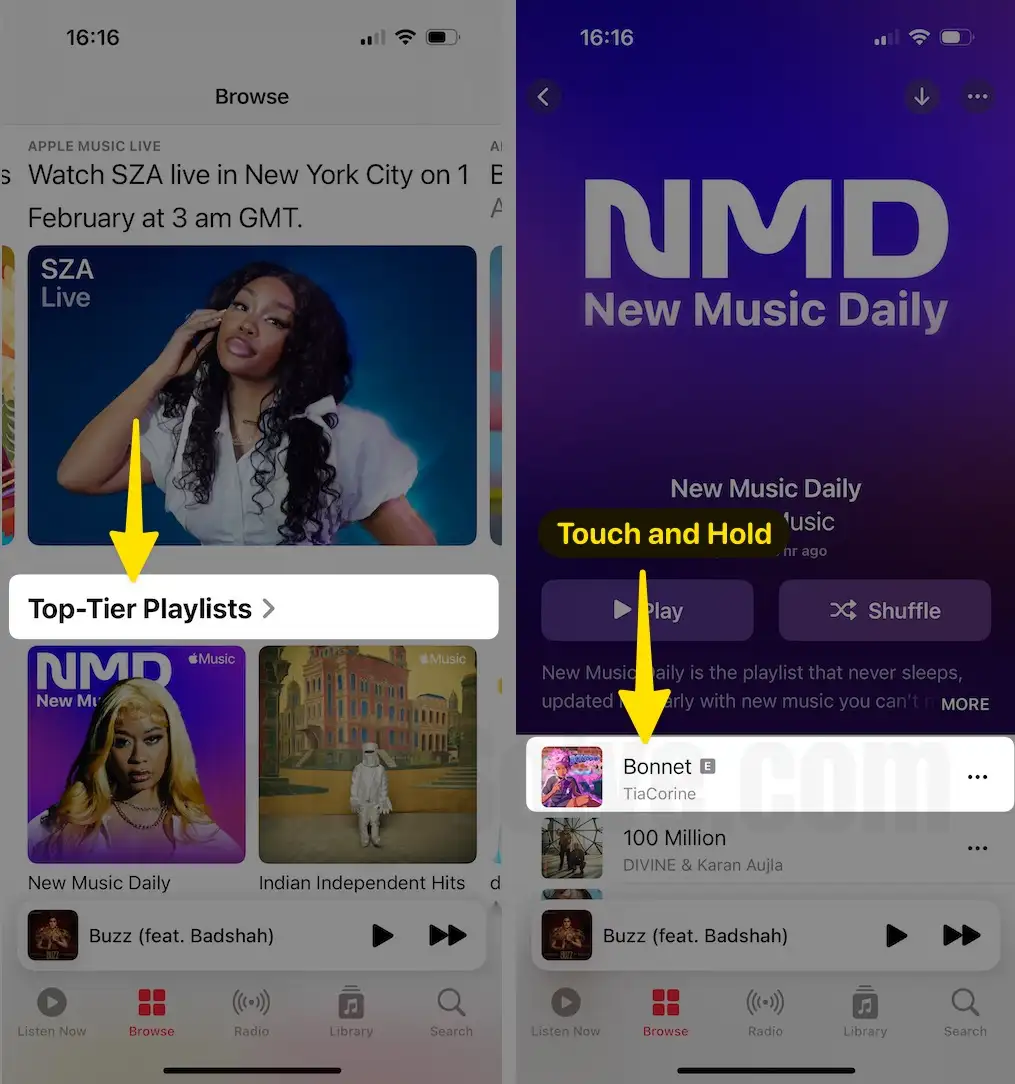
Step 1: Launch the Music App on your iPhone > Tap on Browse in the Bottom Menu > Click on Top-Tier Playlists.
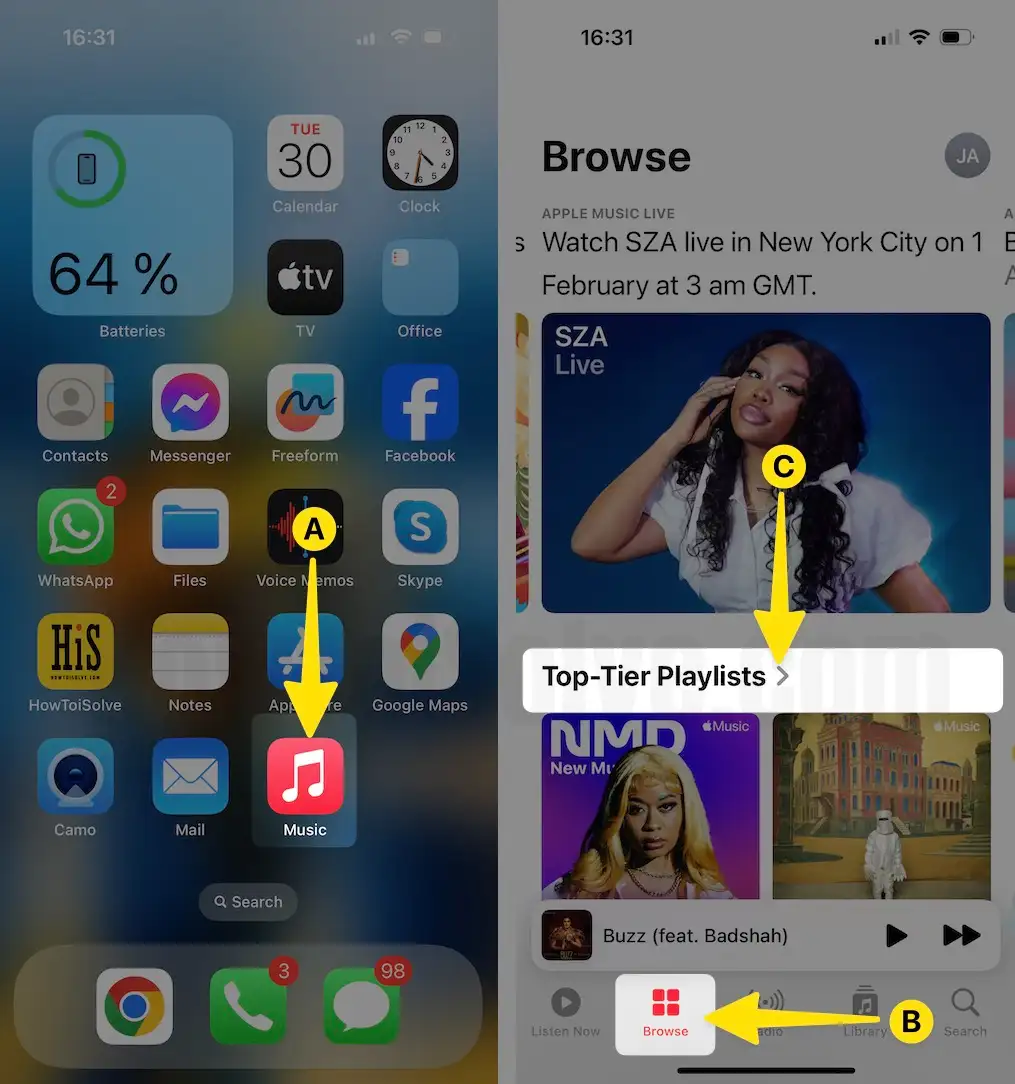
Step 2: Hit on the Playlist > Select the Play button to Enjoy the Music > Select Three Dots next to it and Tap on add it to your library.
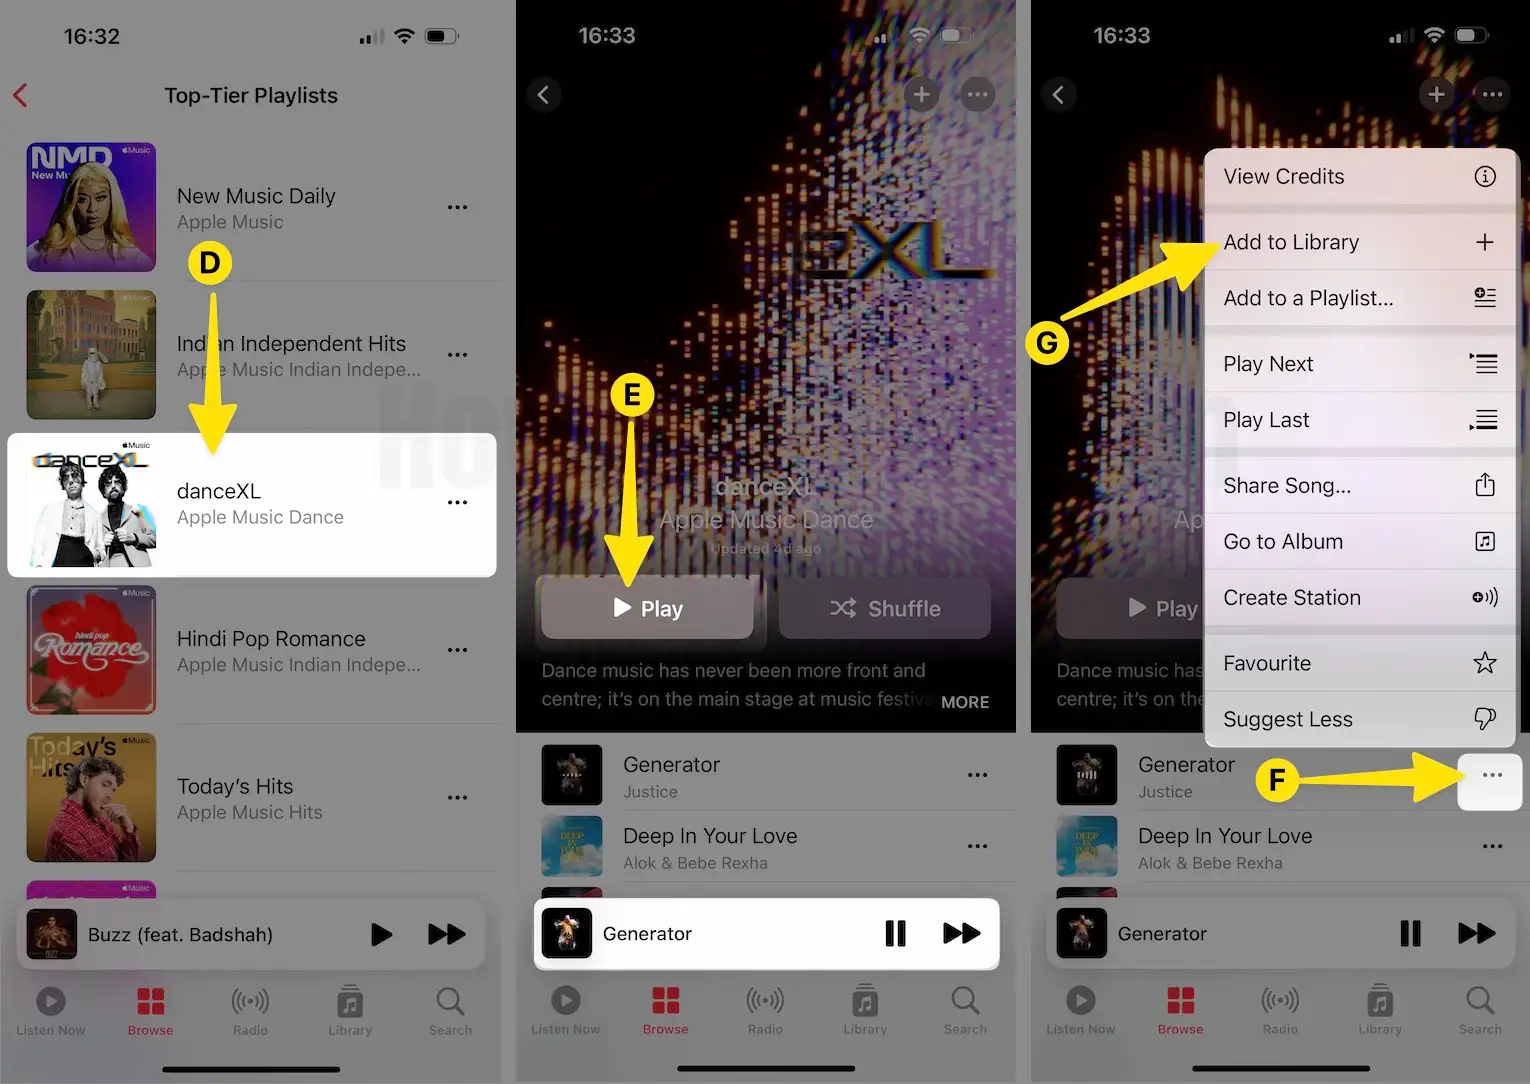
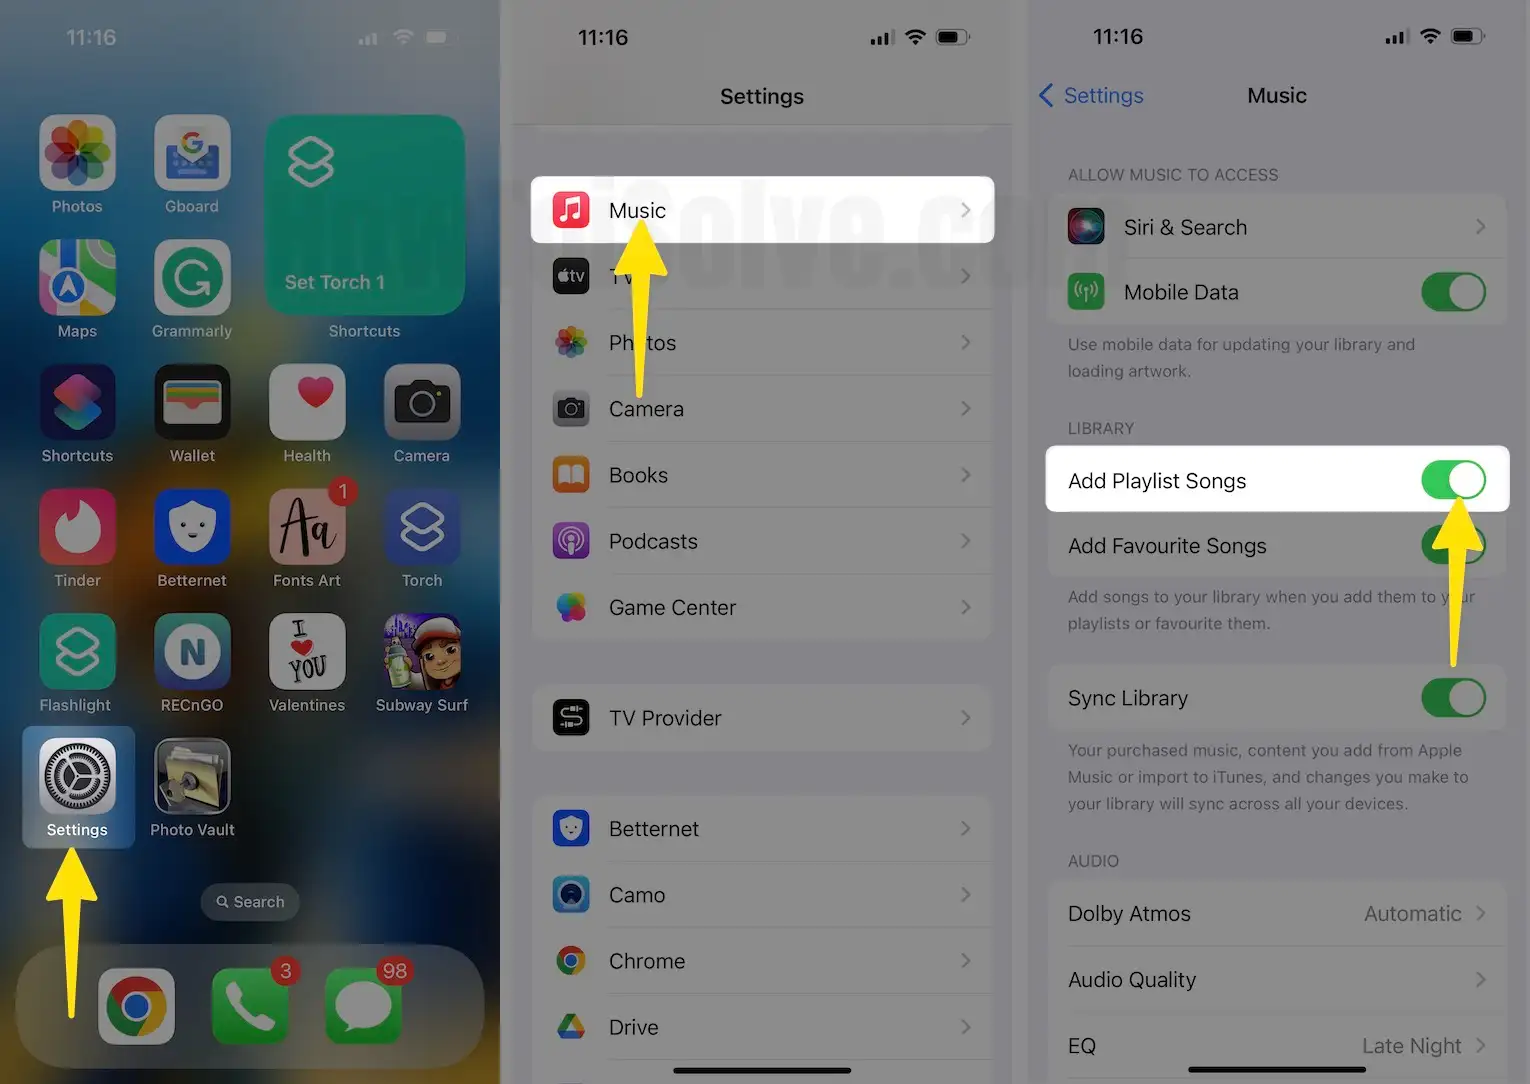
Tip#4. Automatically add song to your library
If you find something interesting and want to add it to your playlist, you can also plop it automatically into your Music Library. This means the song is always available to you, even when you delete it from a playlist.
Step 1: Launch the Settings App on your iPhone > Select Music > Enable the Add Playlist Songs. After this, any song you add to your playlist will be available in your library.
Tip#5. View your Apple Music Replay
After using Apple Music for a long time, you’ll get the playlist of the songs you listen to most of the time. It’s automatically generated for you; Apple Music Replay allows you to easily access the songs you played more than others.
Step 1: Access the Music App on your iPhone.
Step 2: Tap on Browse and swipe down to the bottom.
Step 3: You’ll see a section tagged as Replay: Your Songs by Year with a playlist for each.
Step 4: Pick up the one to review and tap on Play to listen.
Tip#6. Check what your friend is listening to
If you and your friend share the same music taste, it’s always fun to know what type of music they are listening to right now. Here’s how.
Step 1: Access the Apple Music App on your iPhone.
Step 2: Tap on your Profile Icon in the top right corner.
Step 3: Tap on Set Up Profile > Get Started. Then, give your profile Name & Username and set a profile picture. Tap Continue to Find Contacts.
Step 4: In the Follow Friends screen, follow the desired friend and tap on Next.
Step 5: From Choose who can follow your screen, select either Everyone or People you approve. Tap Next.
Step 6: In the Show off your Playlists, select the box next to the desired playlist. Next, tap Done. Now, share your profile with friends and family, let others find you, and decide what you want to share.
Step 7: After this, find and follow the friends who have set up Apple Music Profiles. You can do the same when you set up your profile or later by selecting Follow More Friends on your profile screen.
Alternatively, select your Profile Icon and choose your name. You’ll see who you’re following and select friends to see exactly what they’re listening to.
Tip#7. Sing, search, or share with song lyrics
Besides having access to the song lyrics, you can search for a song using particular lyrics and share specific lyrics with others. Here’s how.
View Song Lyrics
Step 1: Launch the Apple Music App on your iPhone > Tap on Library > Select Songs.
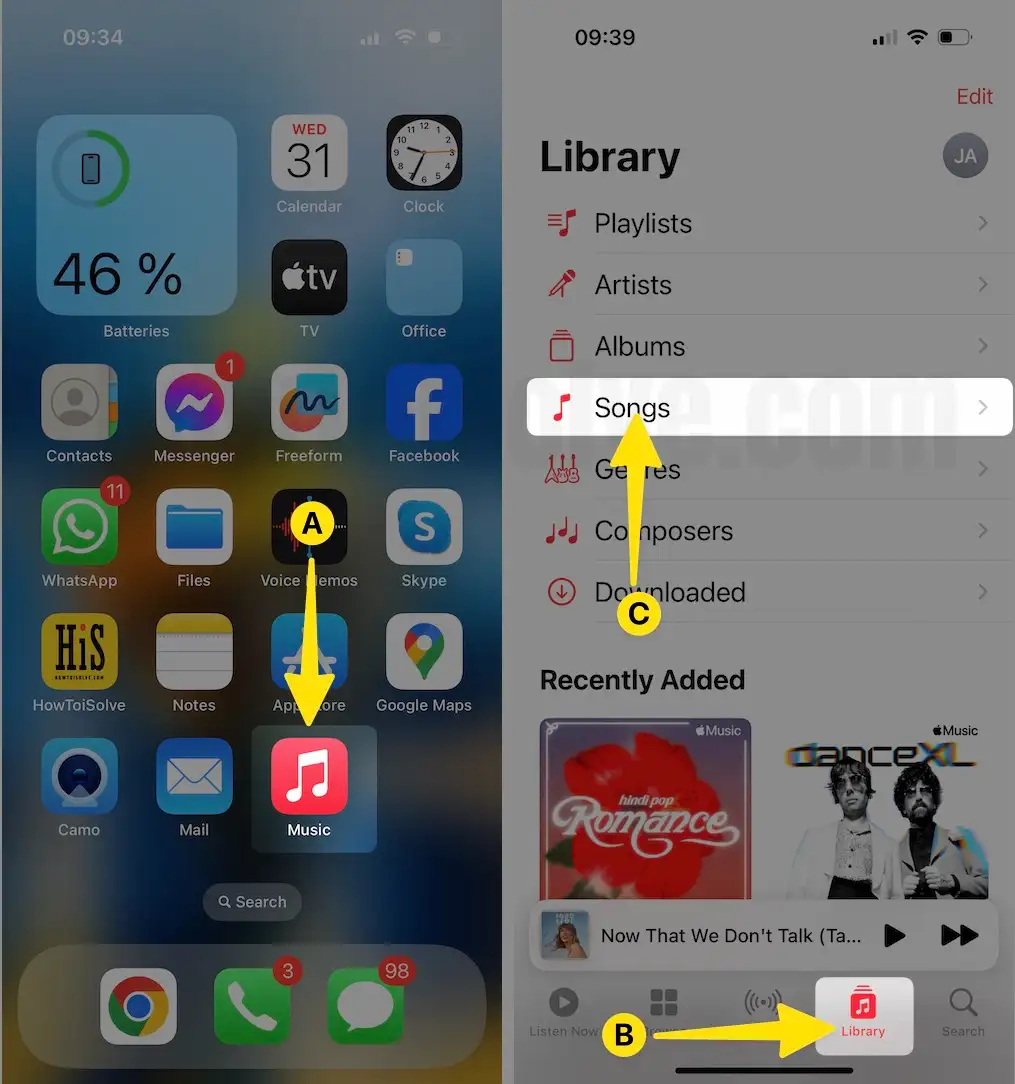
Step 2: Tap on Play the desired song > While playing the song in the Now Playing, Select the Lyrics Icon > You’ll see the synced lyrics moving as the song continues.
Search with Lyrics
Step 1: Open the Music App and tap on the search bar at the top.
Step 2: Type or use a microphone to speak song lyrics.
Step 3: You can select between Your Library and Apple Music to find the song that matches your lyrics.
Share Lyrics
When you view lyrics for currently playing a song as shown above, long press on the desired song, you want to share. You’ll then see the lyrics in a pop-up on a separate screen where you can share it using AirDrop, Social Media, or a Message.
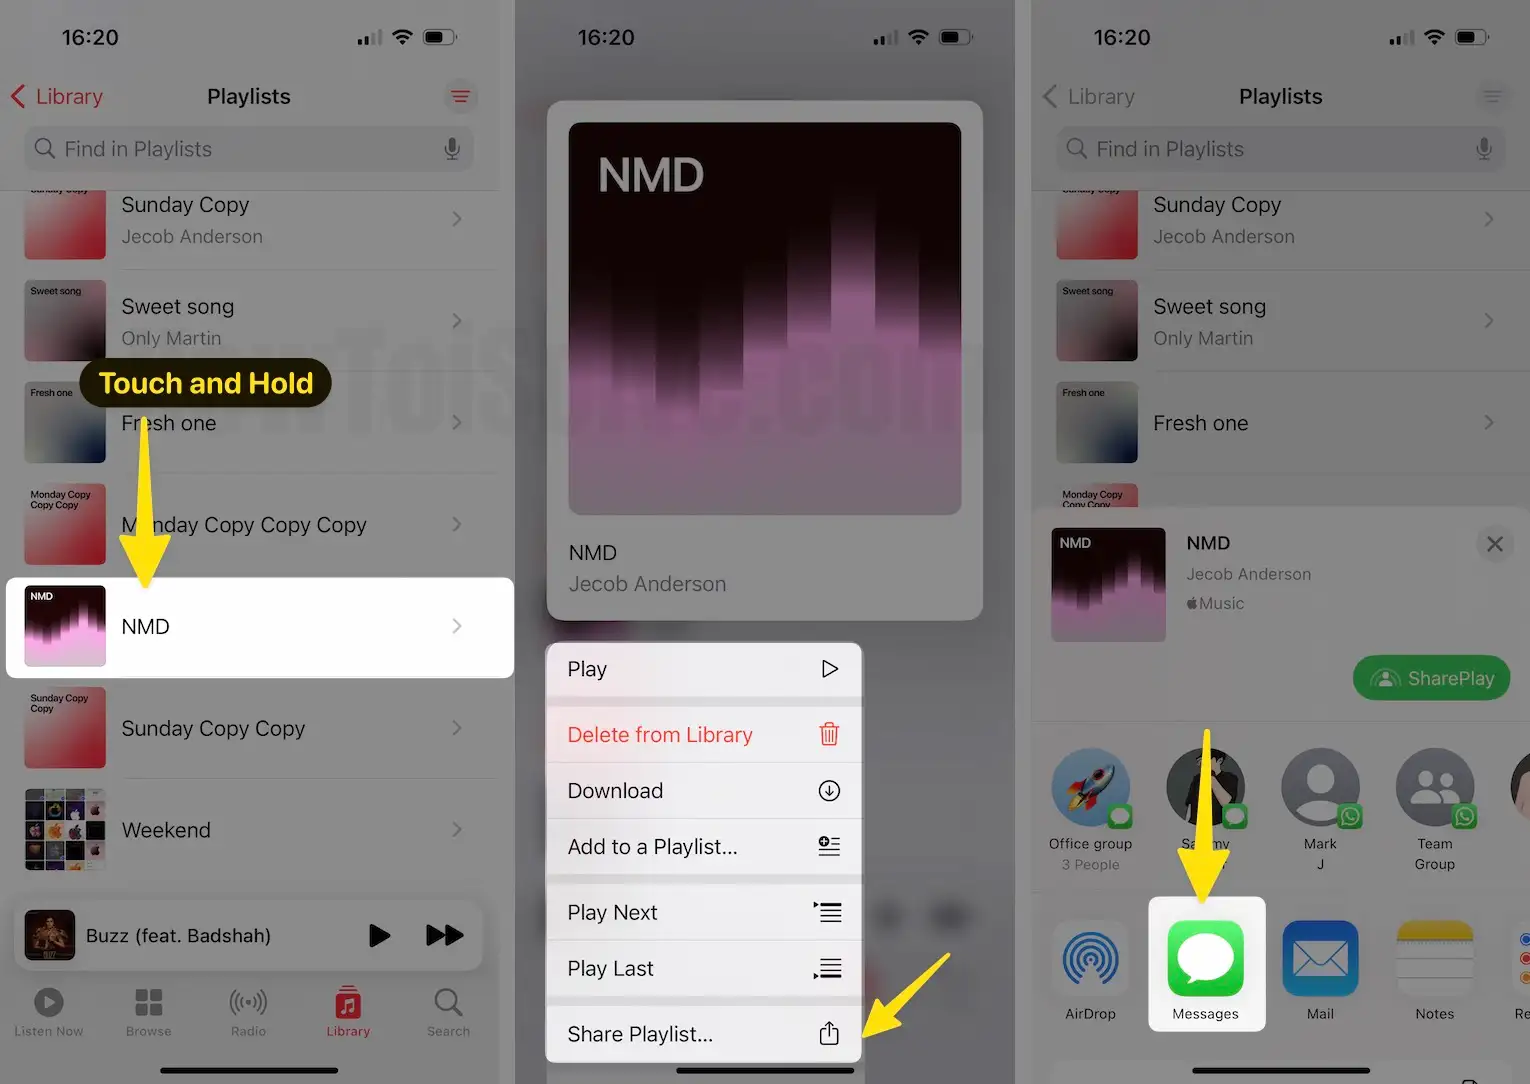
Tip#8. Create and share a playlist
Unlike accessing your friend’s playlist, you can now create and share playlists directly with them. This helps create a playlist of songs you know they’ll love.
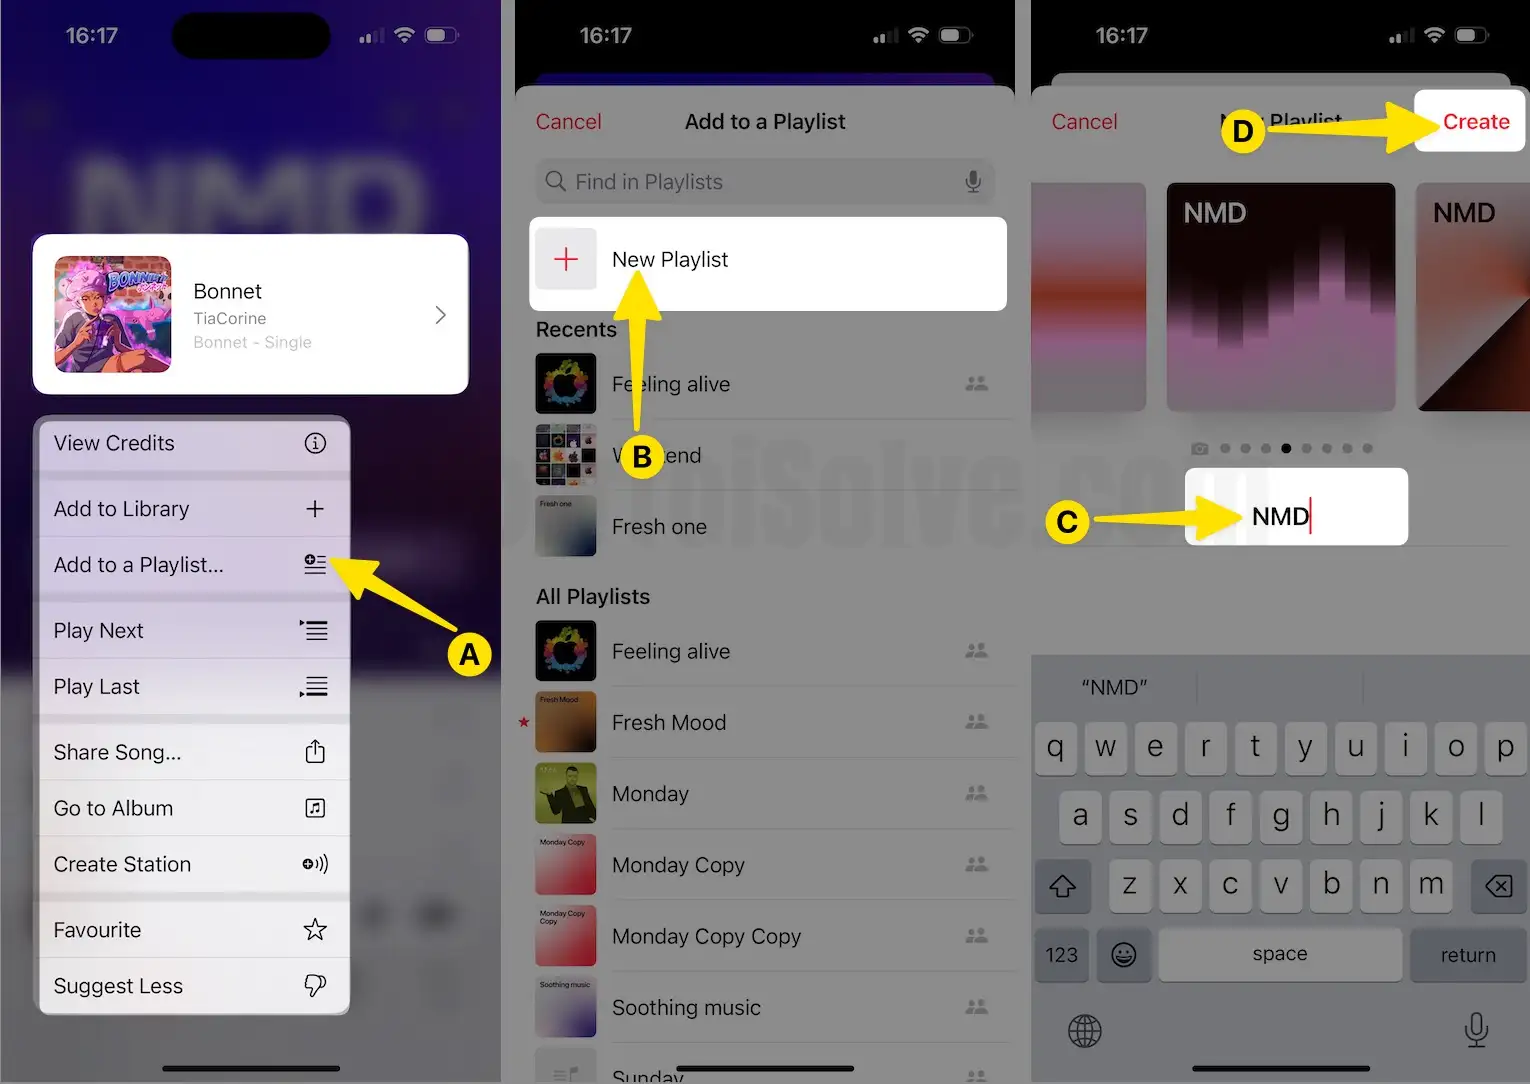
To create a playlist based on a song,
Step 1: Launch the Apple Music App on your iPhone and Tap on Top Playlists > Long-press the song or Select Three Dots.
Step 2: From the Pop-Up, Select Add To Playlist > Tap on New Playlist and follow on-screen instructions to Create a Playlist.
To create a new playlist from scratch,
Launch the Music App on your iPhone > Select Library Tab > Tap on Playlists > Click on New Playlist.
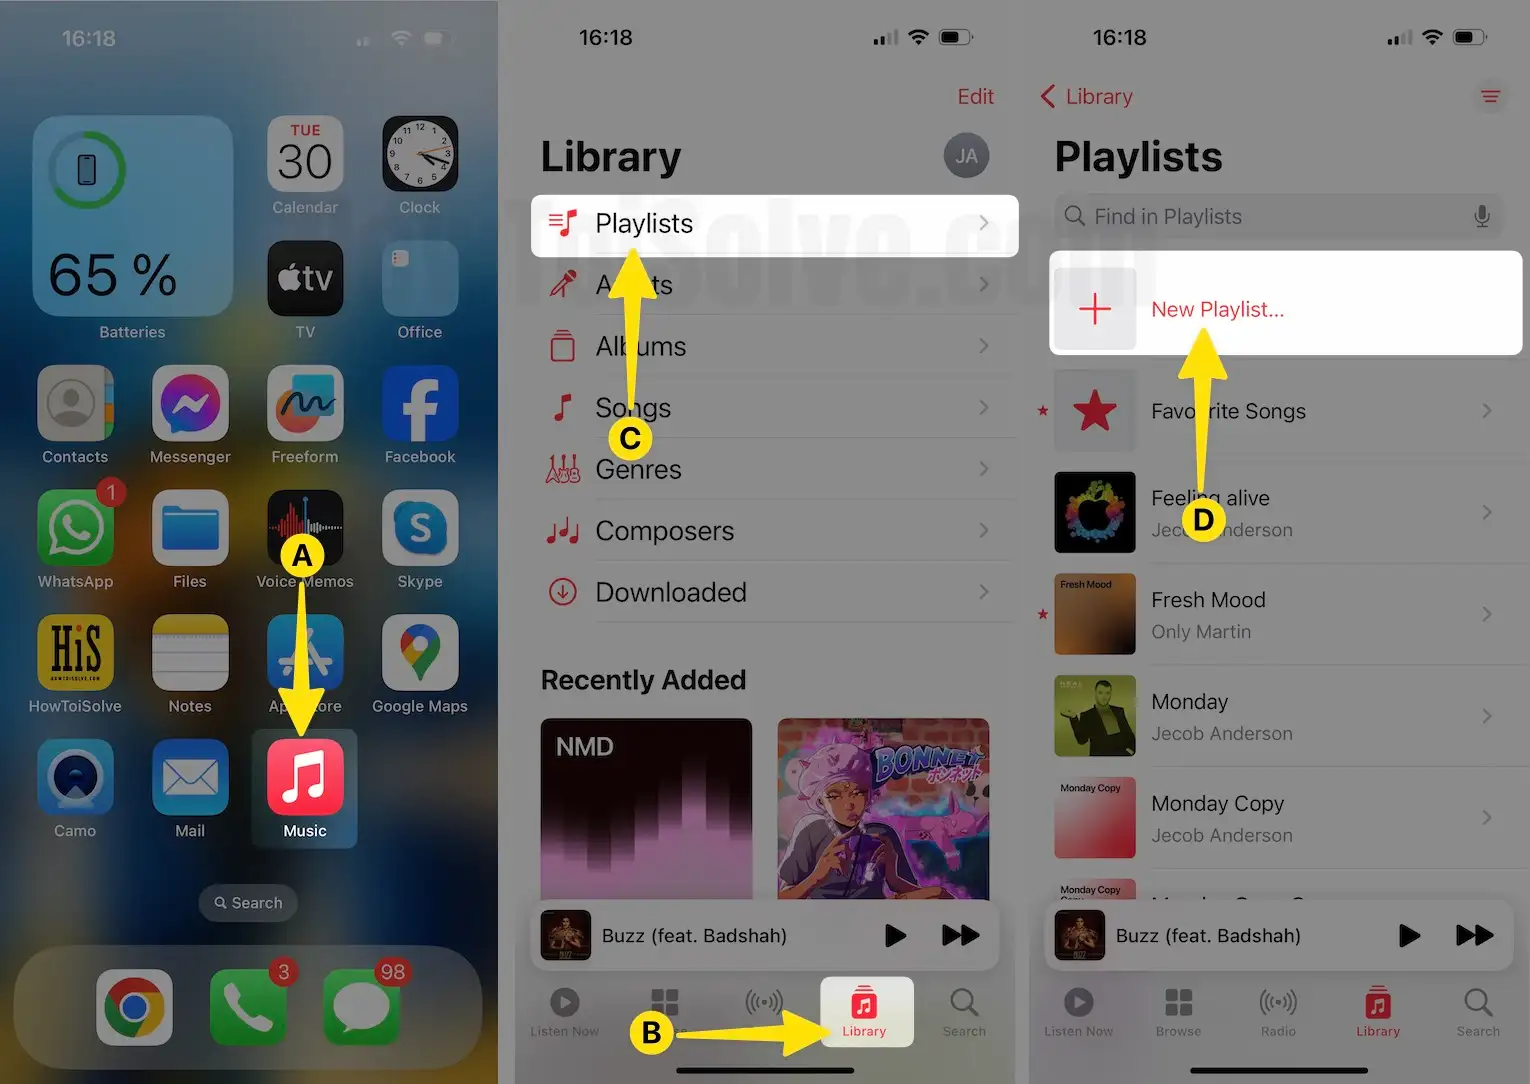
Once you’ve created a playlist, here’s how to share it!
To share a playlist via Mail, Messages, AirDrop, etc,
Touch and Hold the playlist and Select Share Playlist > After this, Choose the preferred sharing option via Mail, Messages, AirDrop, etc,

To share a playlist via SharePlay:
Touch and Hold the playlist > Select SharePlay > Choose the Preferred Sharing Option via Messages.
Tip#9. Listen to Apple Music without the internet
If you frequently travel somewhere with no or weak internet, then fuss not; you can listen to Apple Music offline. All you need to do is download the song you want, and you’re ready to go when no signal message appears on the screen.
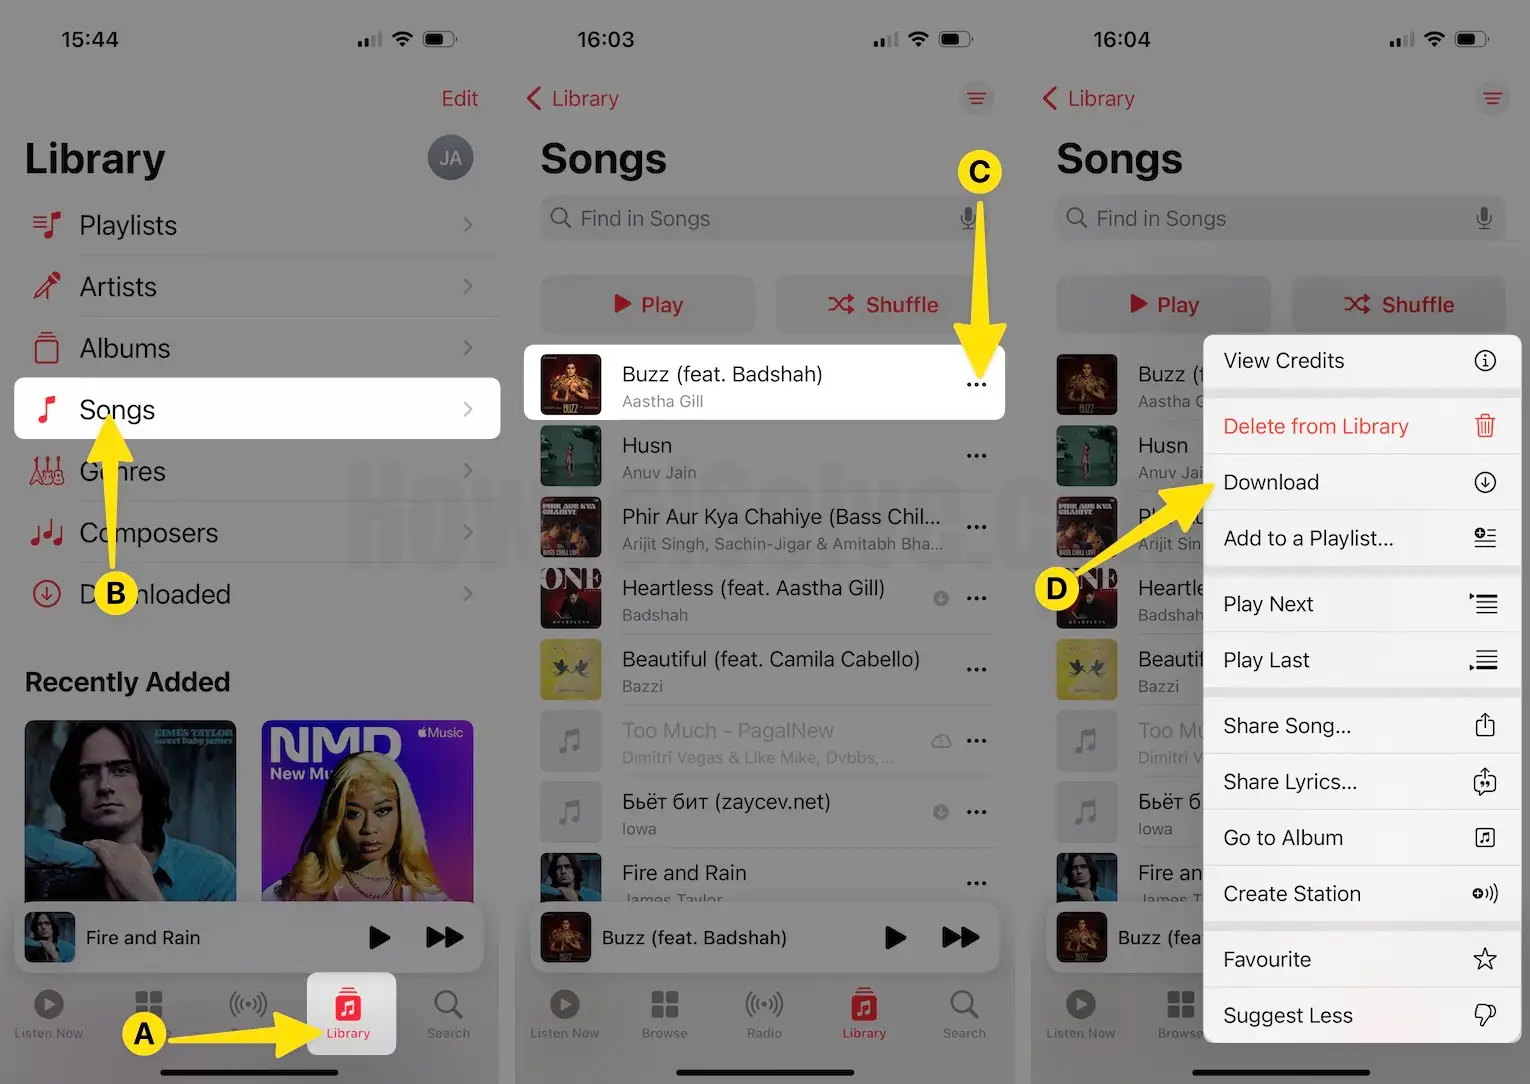
Step 1: Launch the Apple Music App on your iPhone > Tap on Library > Select Playlists.
Step 2: Tap or Touch and Hold the Three Dots Next to the song > Select one to Add to your Library or Add to a Playlist.
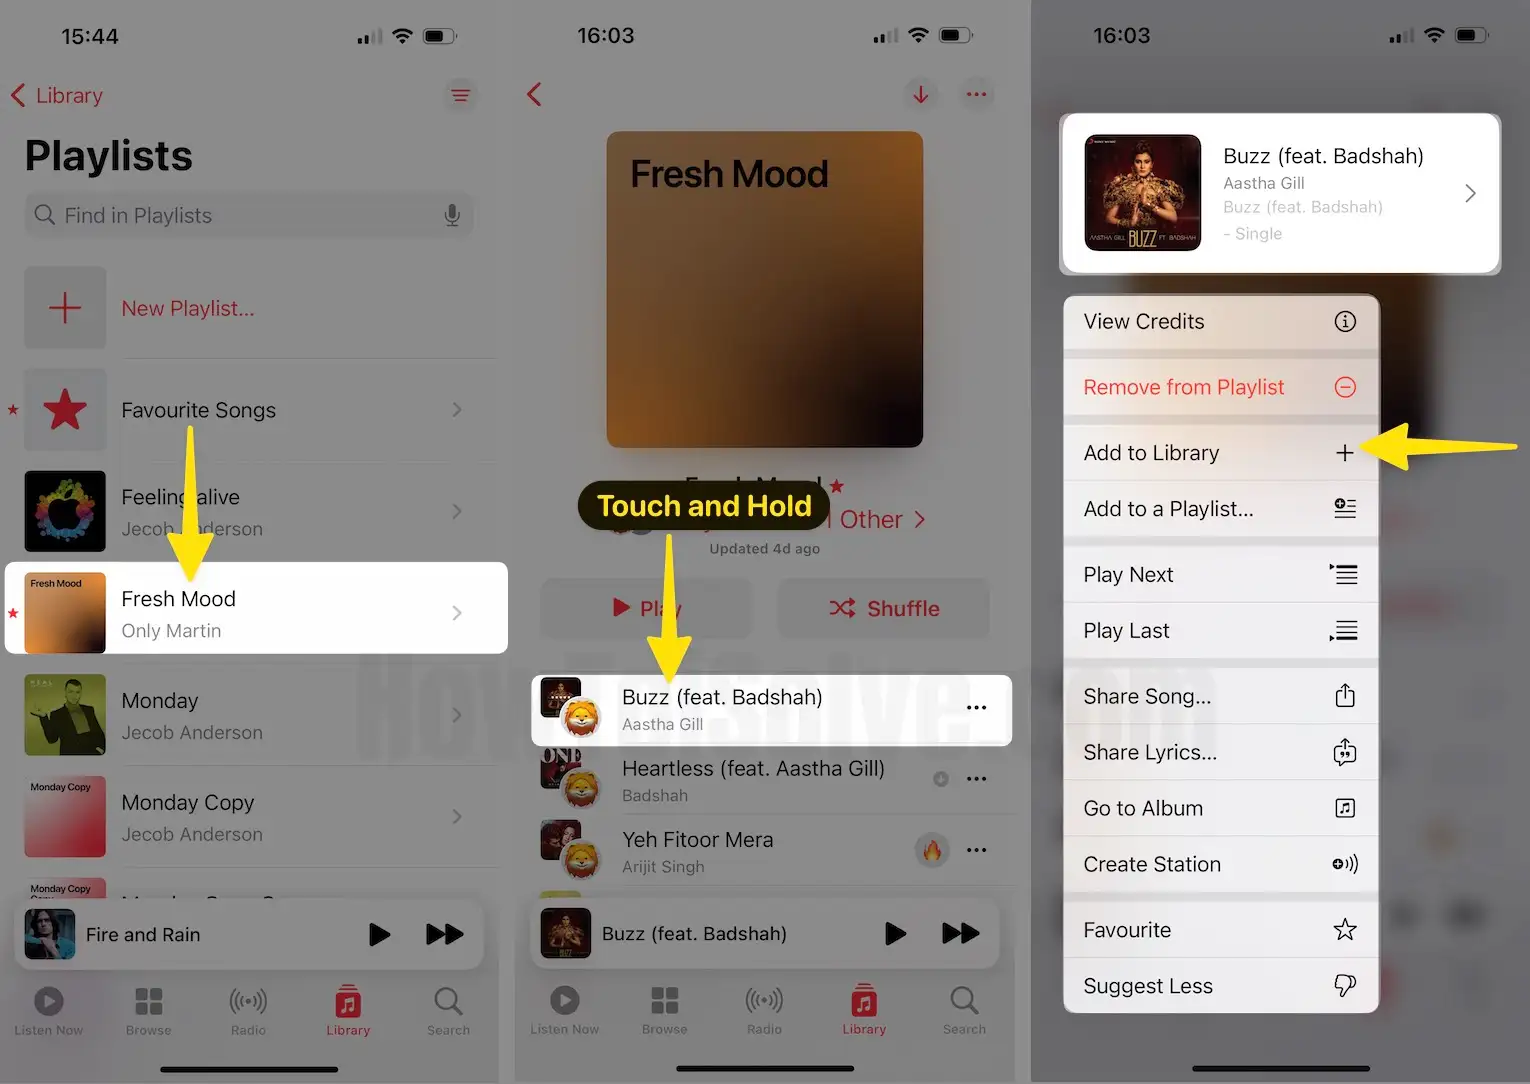
Step 3: Once you have added the song to your Library, Access your Library and Select the Songs to open it > After this, Tap or Touch and Hold the three dots next to the song > Select Download.
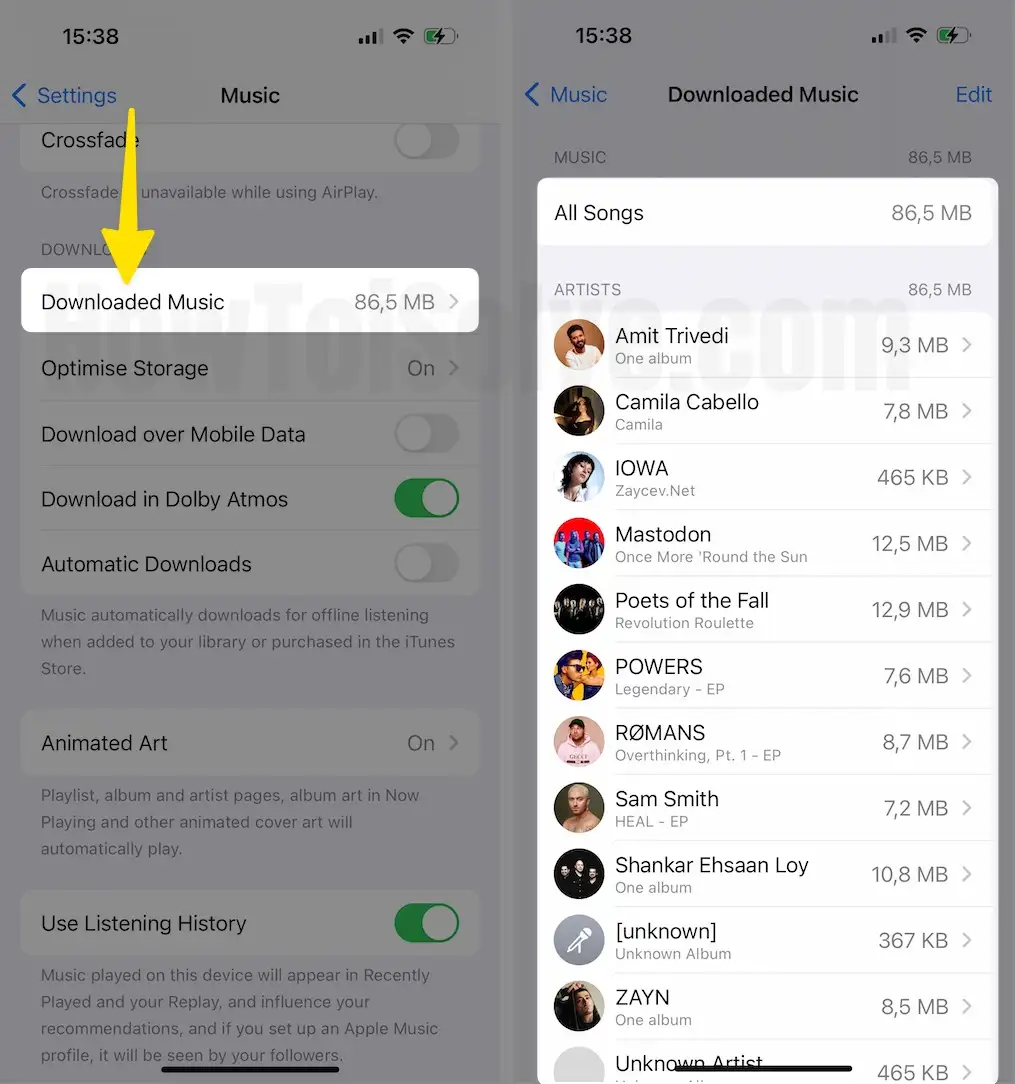
Note: If you want to see how much space is acquired by downloading music,
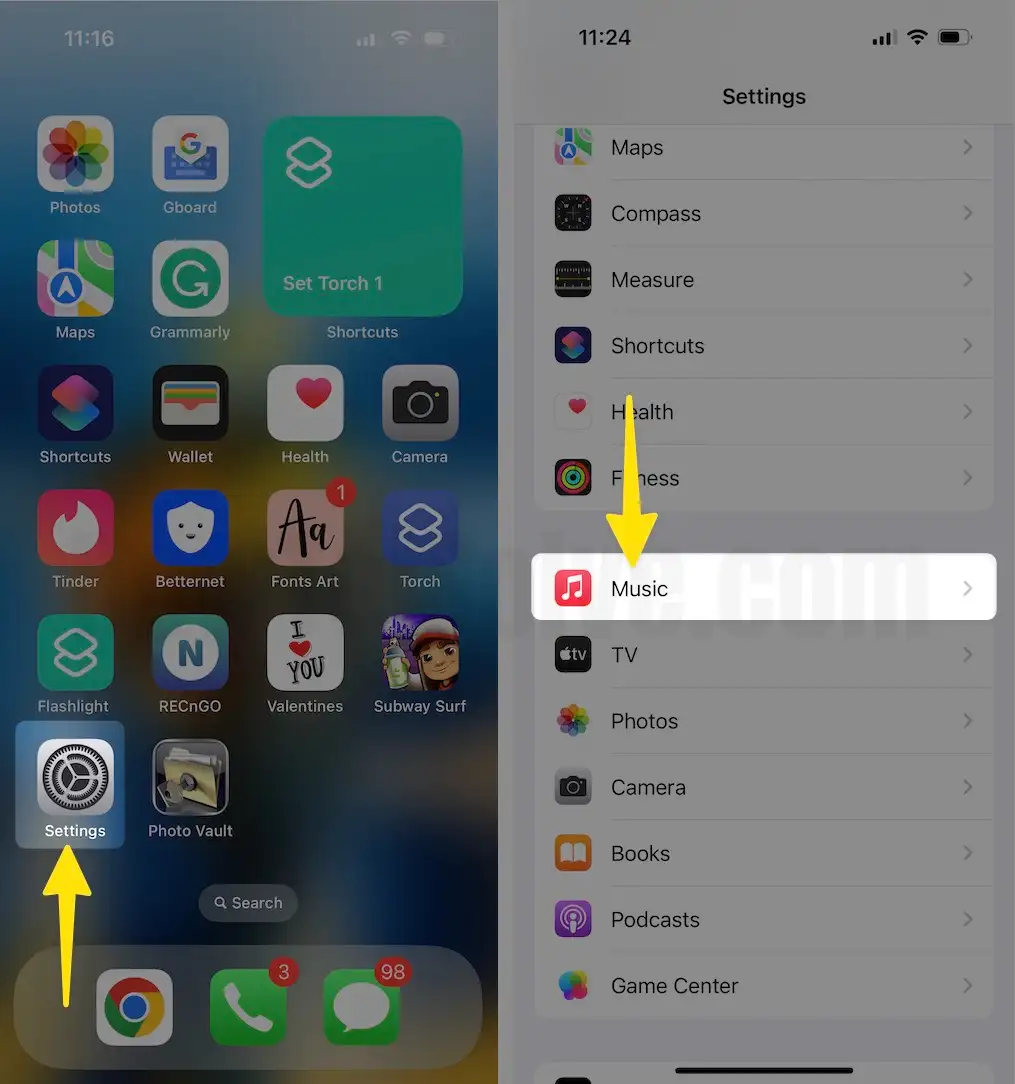
Step 1: Launch the Settings app on your iPhone > Tap on Music.
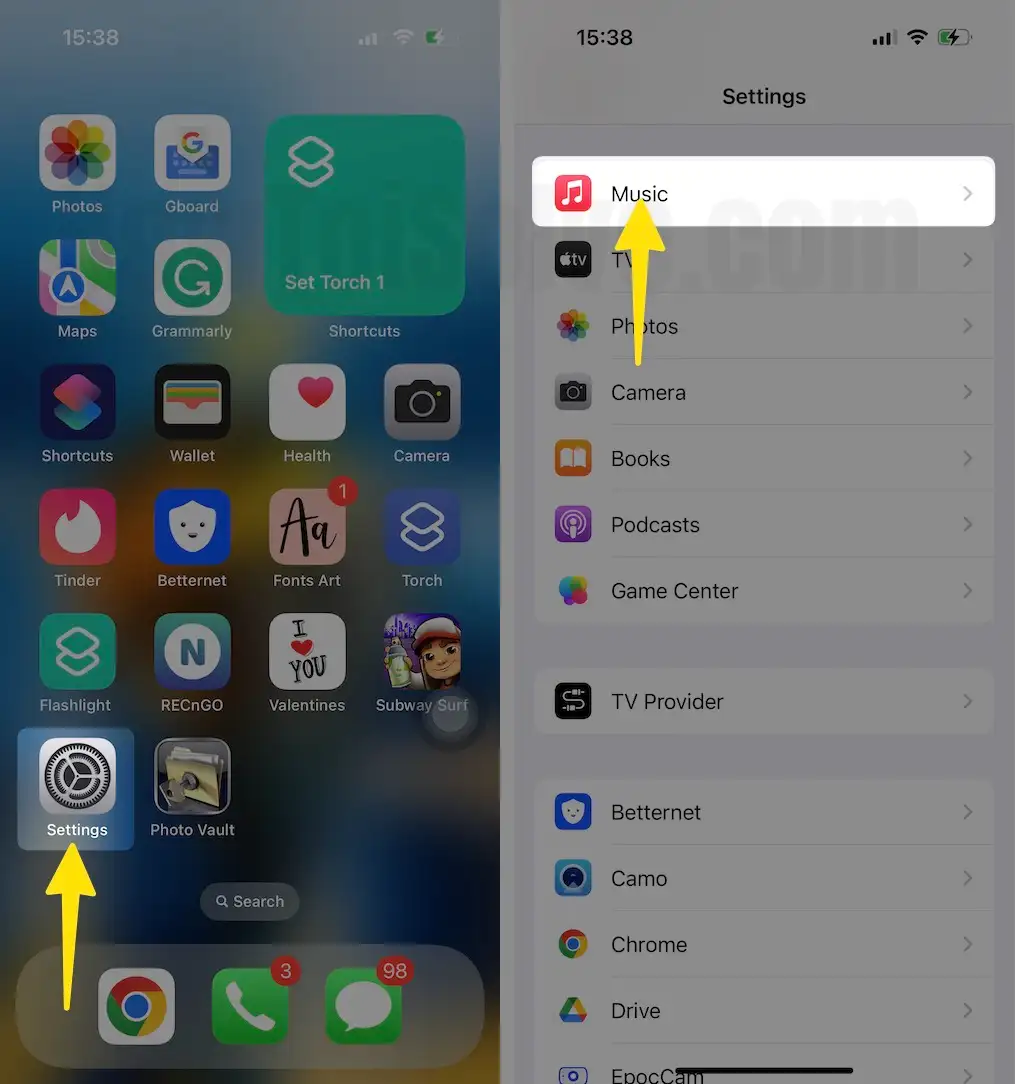
Step 2: Click on Downloaded Music > See All Downloaded Songs.
Tip#10. Change the Sound Quality
What makes Apple Music convenient is that it lets you change the sound quality to booming bass to a toned-down instrumental background, etc. To enhance your Apple Music quality, follow the steps below.
Step 1: Launch the Settings App on your iPhone > Swipe down to Select Music.
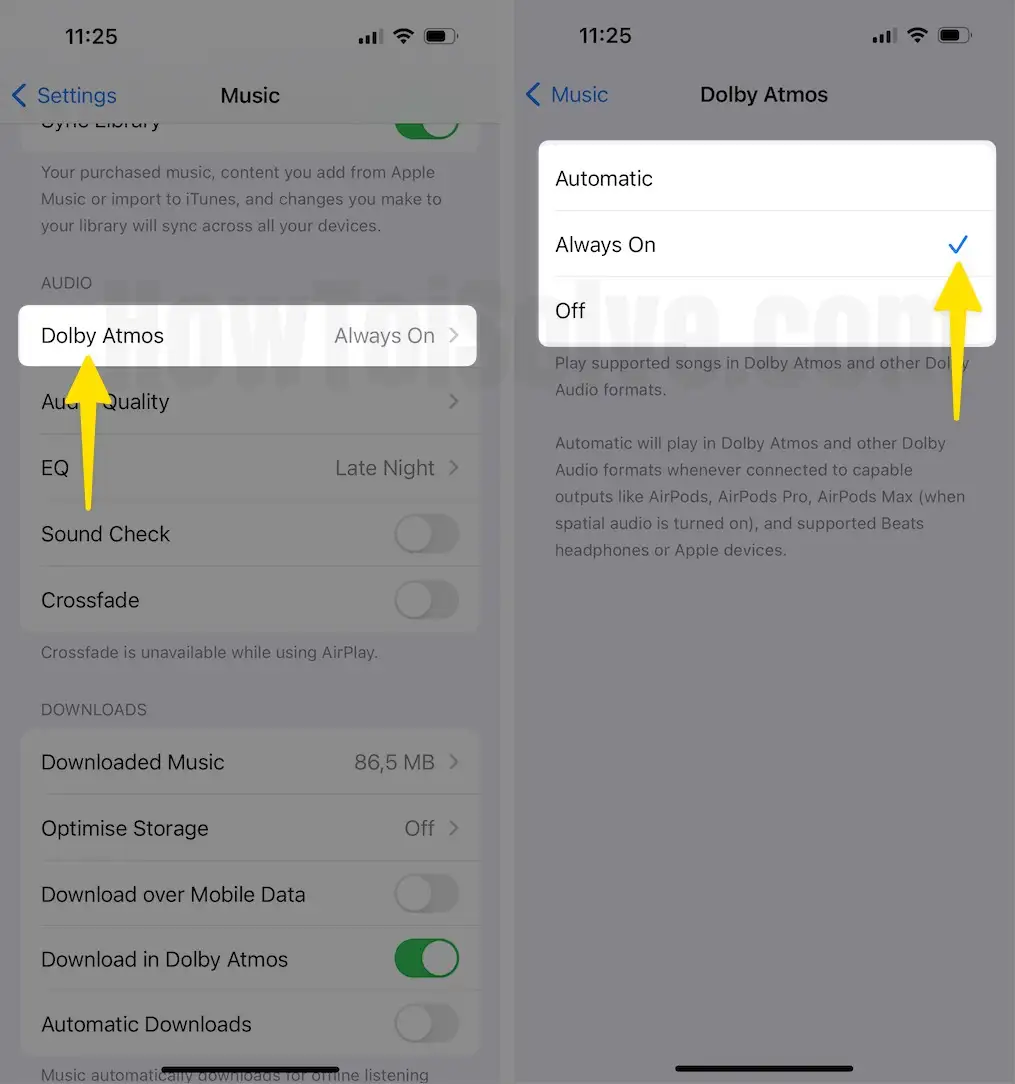
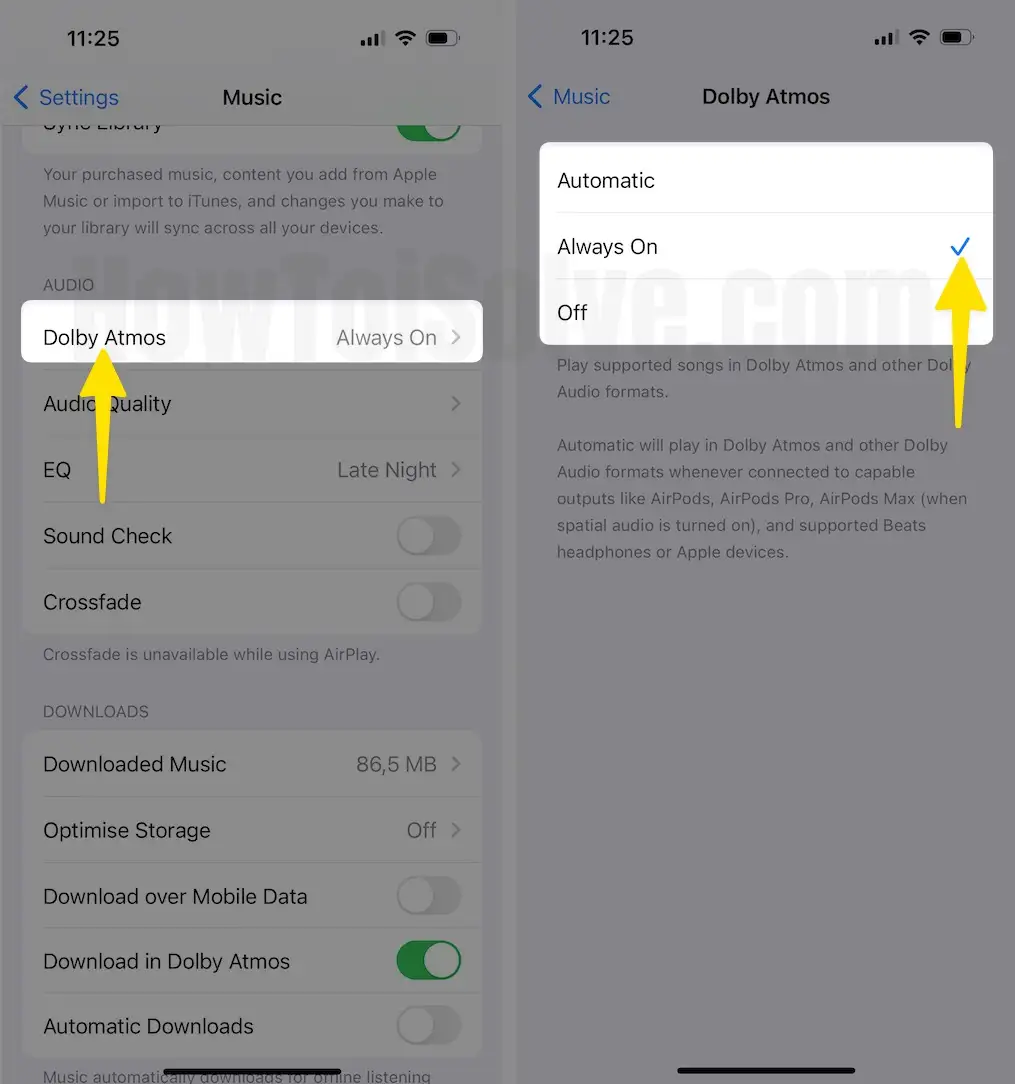
Step 2: In the Audio Section, you’ll get different Audio features. Tap on Dolby Atmos > By default, this feature is set to Automatic. You can change it to Always On if you want to use Dolby Atmos, even if your earphones don’t support it.
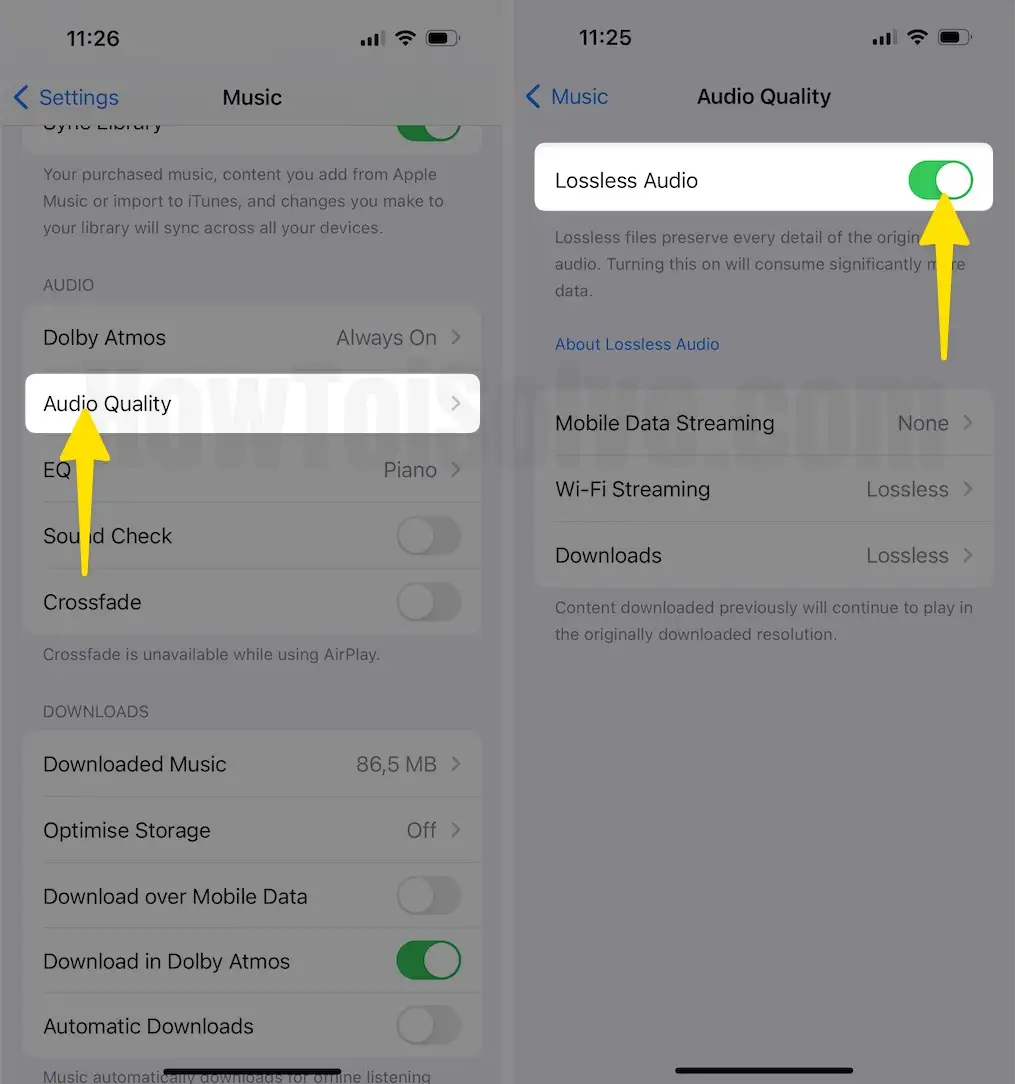
Step 3: Tap on Audio Quality > Enable Lossless Audio.
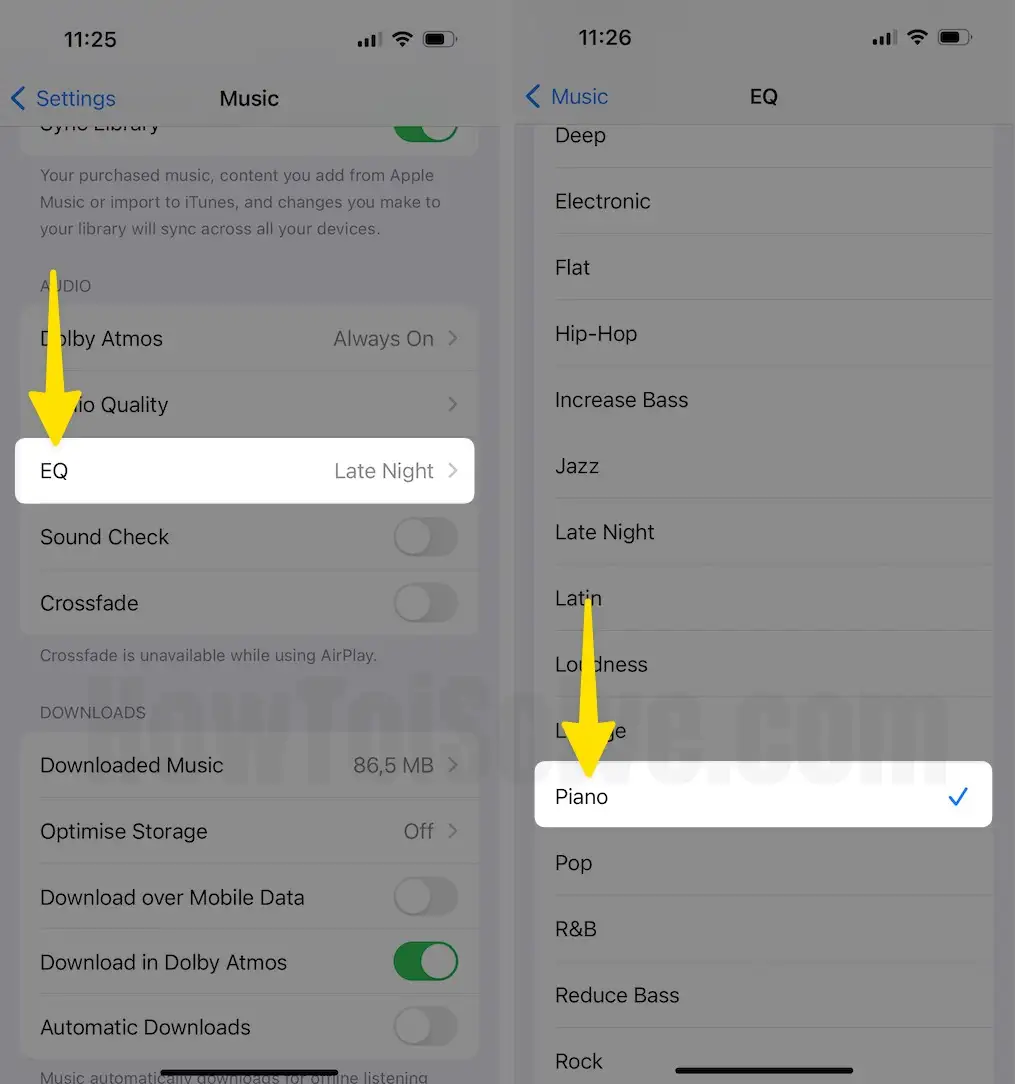
Step 4: Tap on EQ > You can Choose one from various EQ presets, such as piano, dance, pop, rock, bass, and more.
Tip#11. Croon karaoke with Apple Music Sing
It’s always great to sing along with lyrics, but what’s even better is when your voice is only one. Unlike karaoke bars you visit on weekends, Apple Music Sing allows you to right from bed.
To do so, play the song normally and select the Lyrics Icon. Warm up your local cords and then select Karaoke Icon.
You’ll then see the song’s vocals vanish, and the melody and the lyrics stay on the screen for you to enjoy the song. Remember, this feature is available on the iPhone SE 3rd generation, iPhone 11 series, and later versions. However, if you found the feature isn’t working, read our article on Apple Music Sing not working.
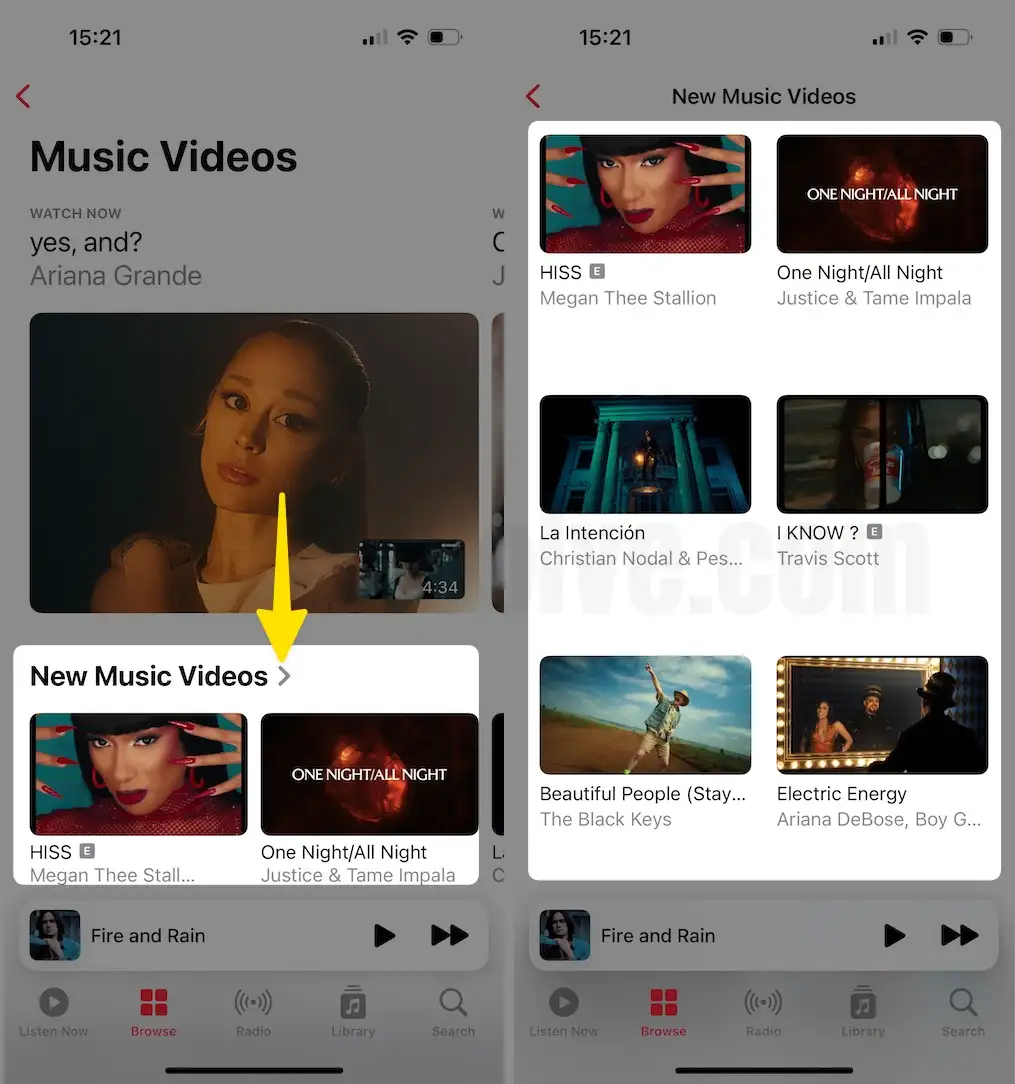
Tip#12. Watch music videos on Apple Music
Step 1: Launch the Apple Music app on your iPhone > Tap on Browse in the Bottom Menu > Scroll down to More to Explore Section > Select Music Videos.
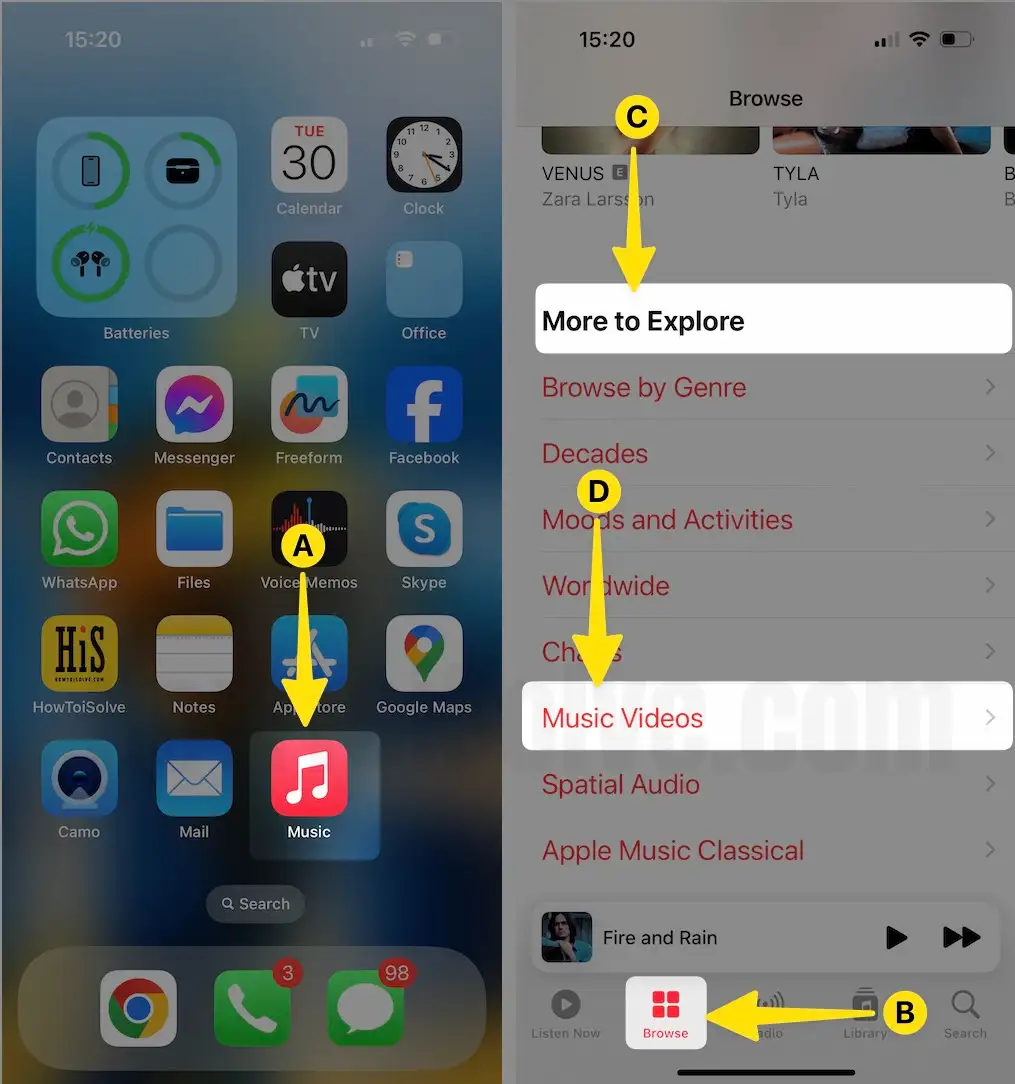
Step 2: On the Next Screen, you’ll see the Section of Videos alongside the video playlist and everything from new songs by genre.
Tip#13. Receive Music Notifications
If you want to keep receiving song notifications from your favorite artist frequently, you can enable these notifications in the Music app. To do so, follow the steps below.
Step 1: Launch the Apple Music App on your iPhone > Tap on Profile Icon in the top right corner.
Step 2: Select Notifications > Turn on the toggle next to the New Music and Friend Activity.
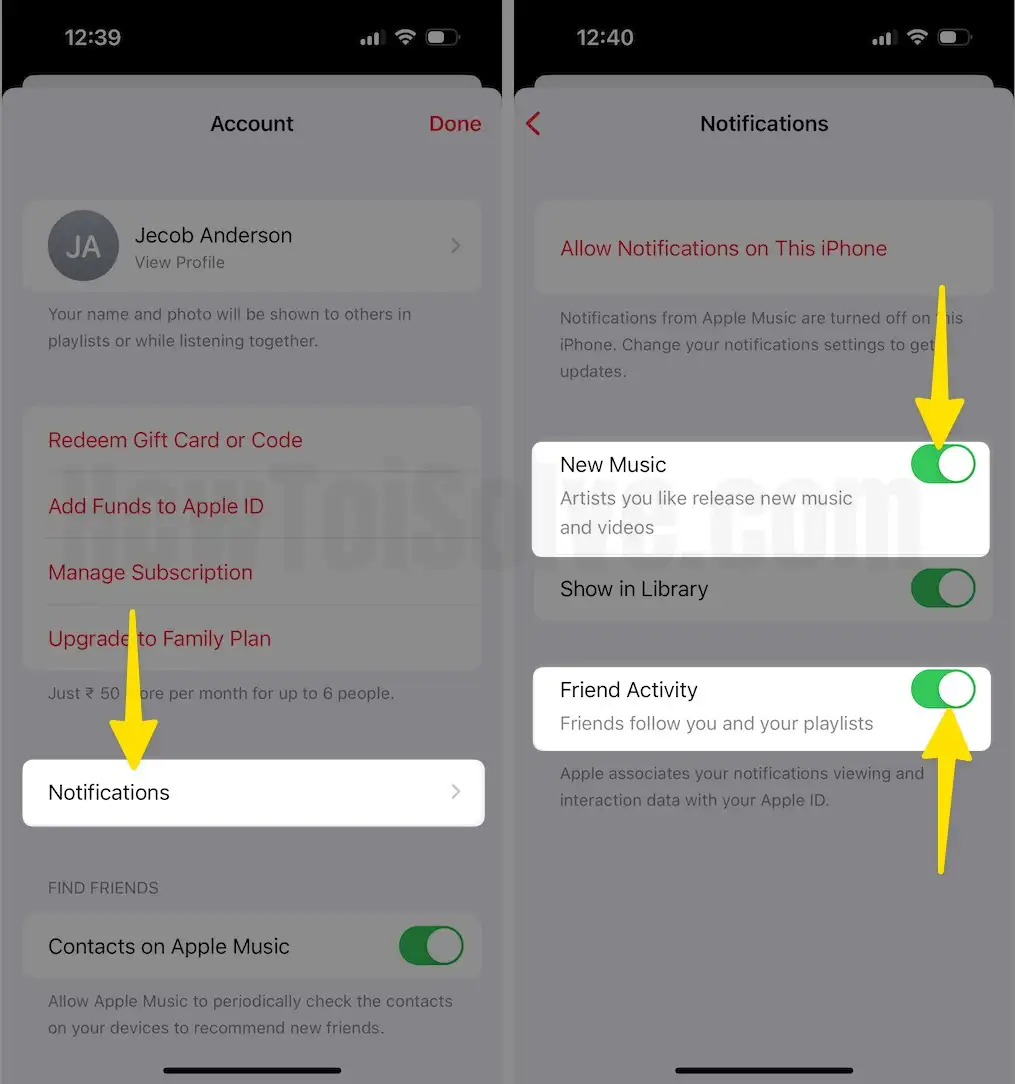
Besides this, ensure that iPhone Notifications is turned on for the Music App.
Step 1: Launch the Settings App on your iPhone > Tap on Notifications.
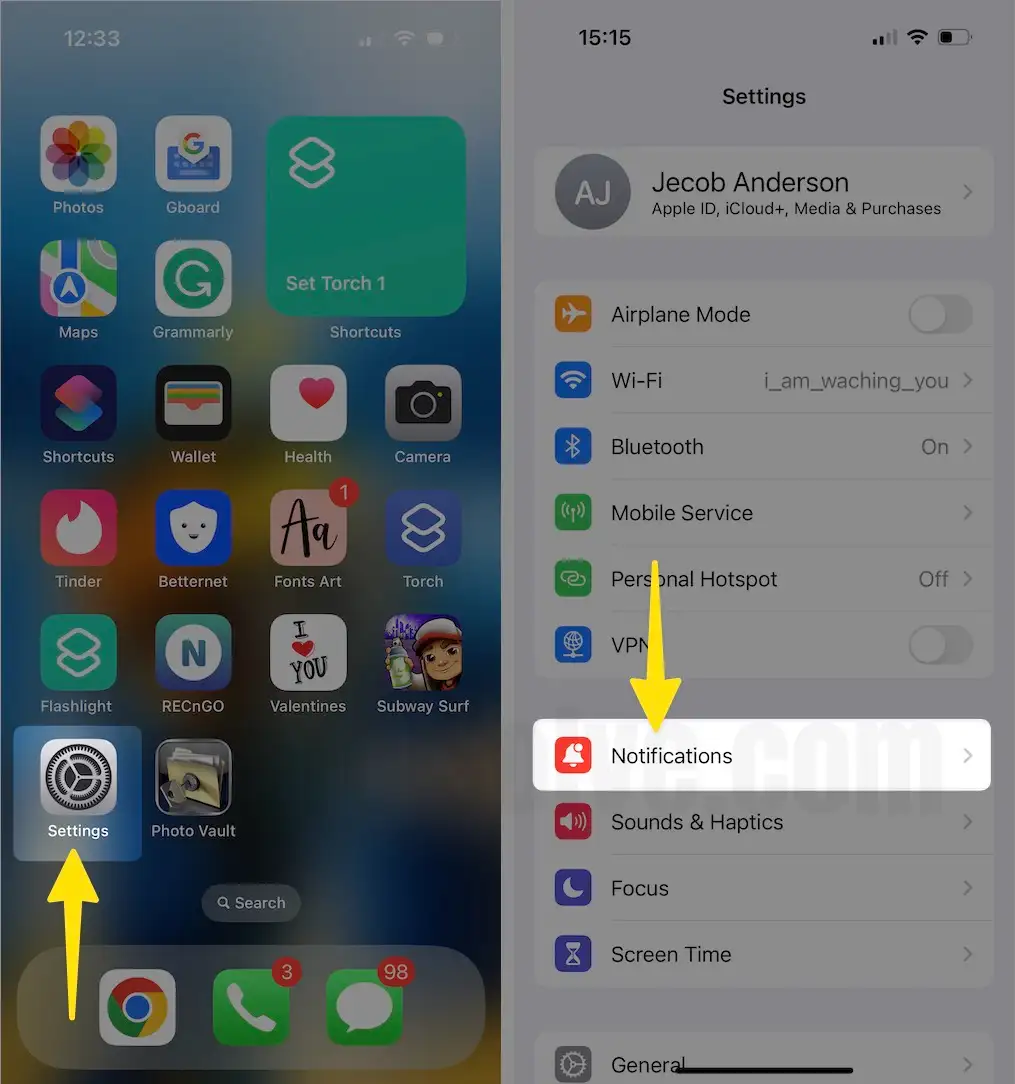
Step 2: Select Music > Enable toggle next to the Allow Notifications.

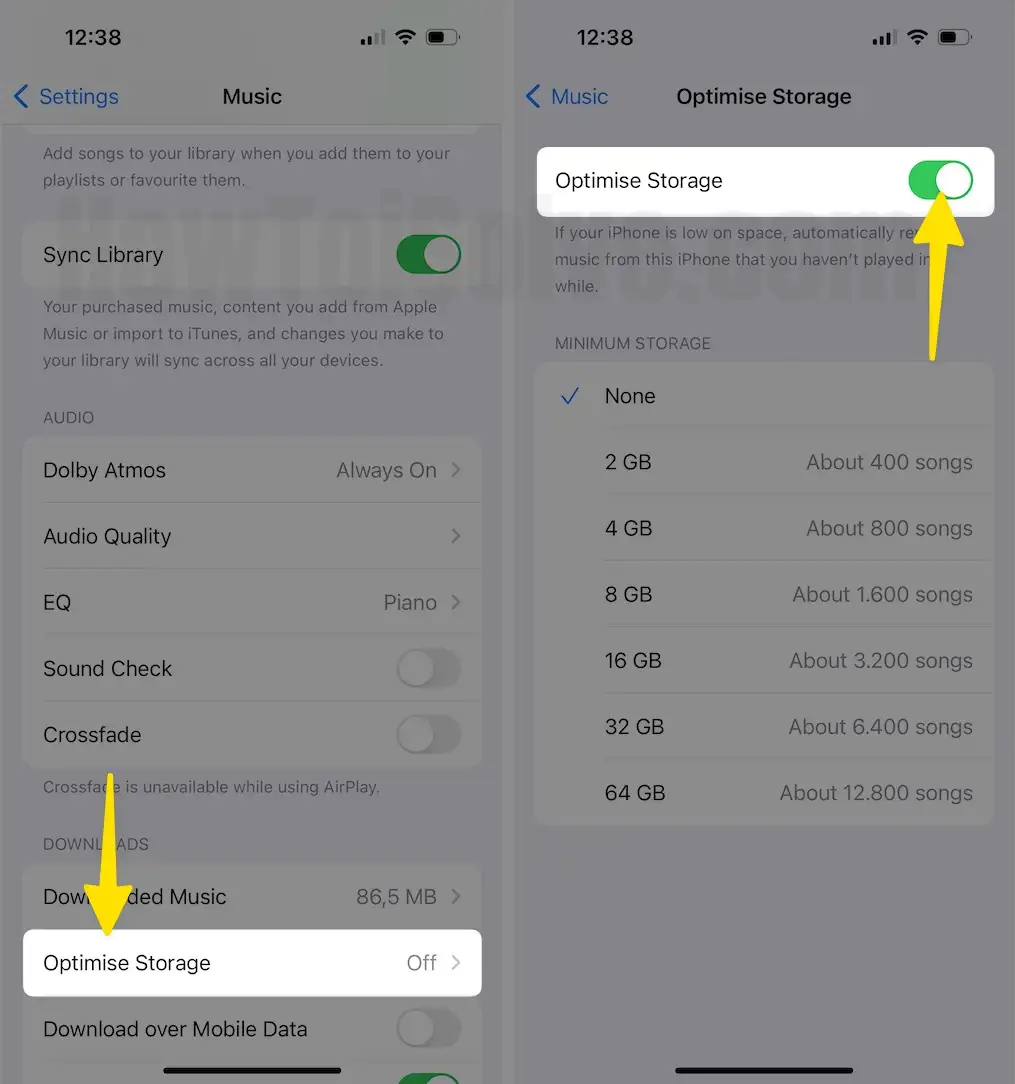
Tip#14. Free music from your iPhone’s Storage
If you keep downloading various songs, playlists, and albums, it could lead to higher iPhone storage space. Luckily, Apple offers a feature, “Optimize Storage,” that will automatically delete the song you haven’t listened to in a long time once the device starts running out of Storage. Here’s how.
Step 1: Launch the Settings App on your iPhone > Swipe Down to Select Music.

Step 2: Select Optimize Storage > Enable the toggle next to Optimize Storage.
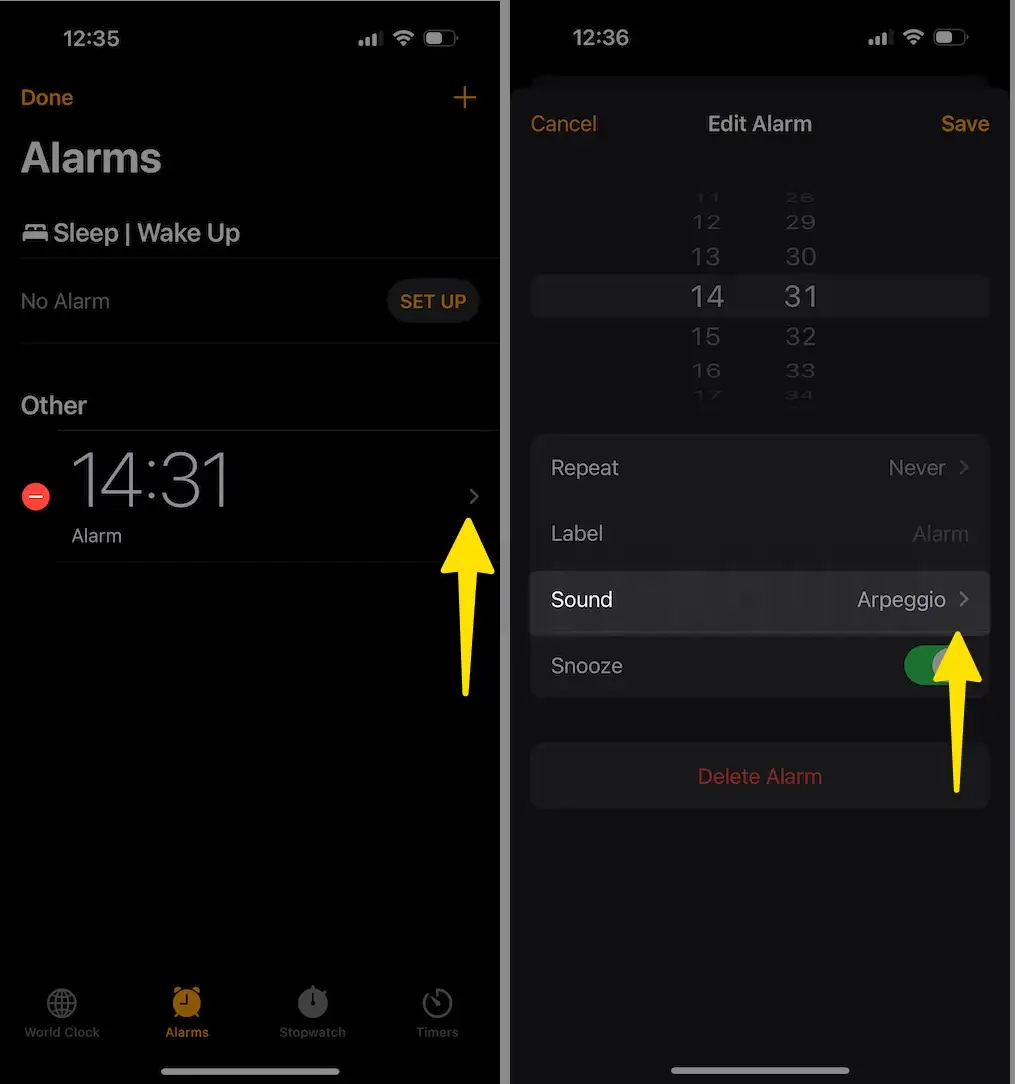
Tip#15. Set an Apple Music Song as an Alarm
Step 1: Launch the Clock App on your iPhone > Tap on Alarms in the Bottom Menu > Select Edit in the top left corner.
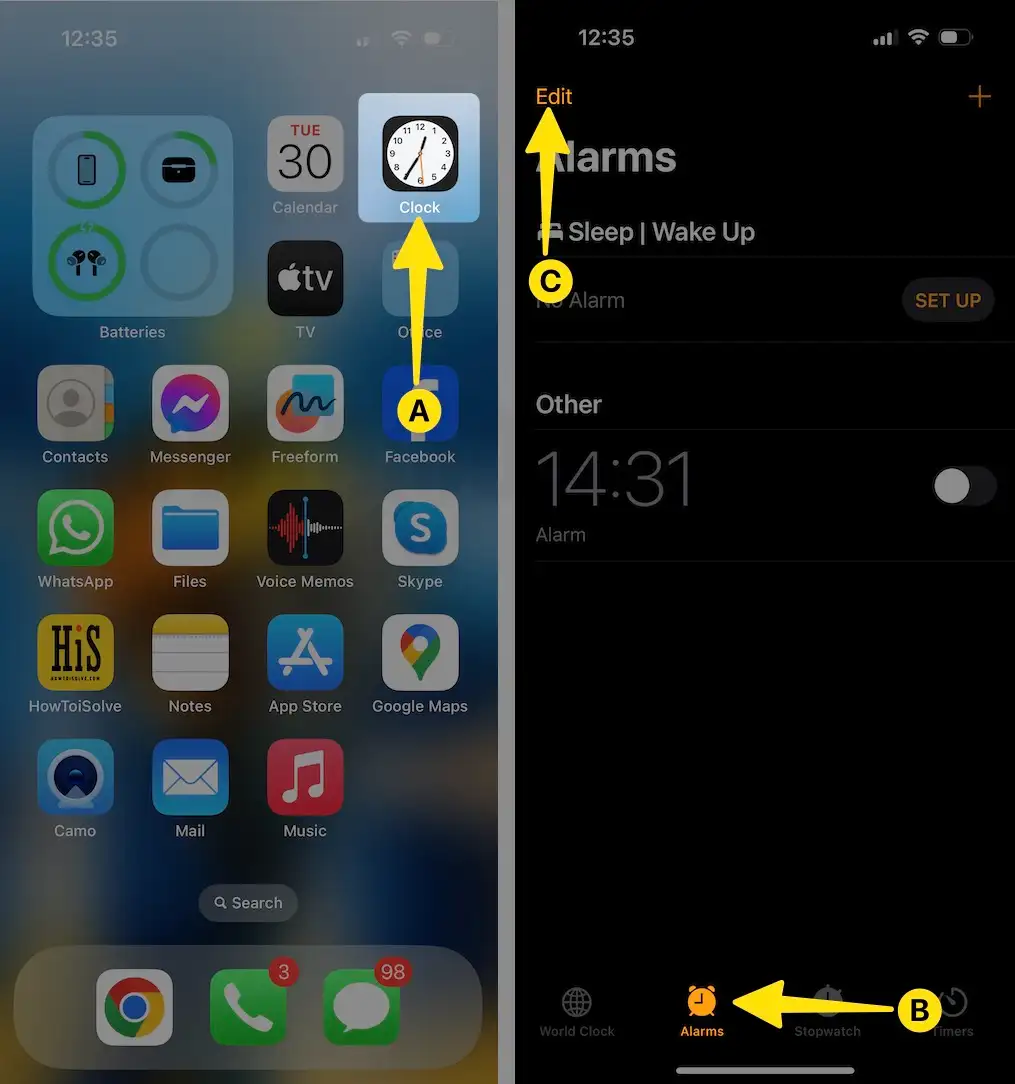
Step 2: Tap on Specific Alarms > Pick-up Sound.
Step 3: In the Songs Menu, Tap on Pick a Song > Tap on Songs.
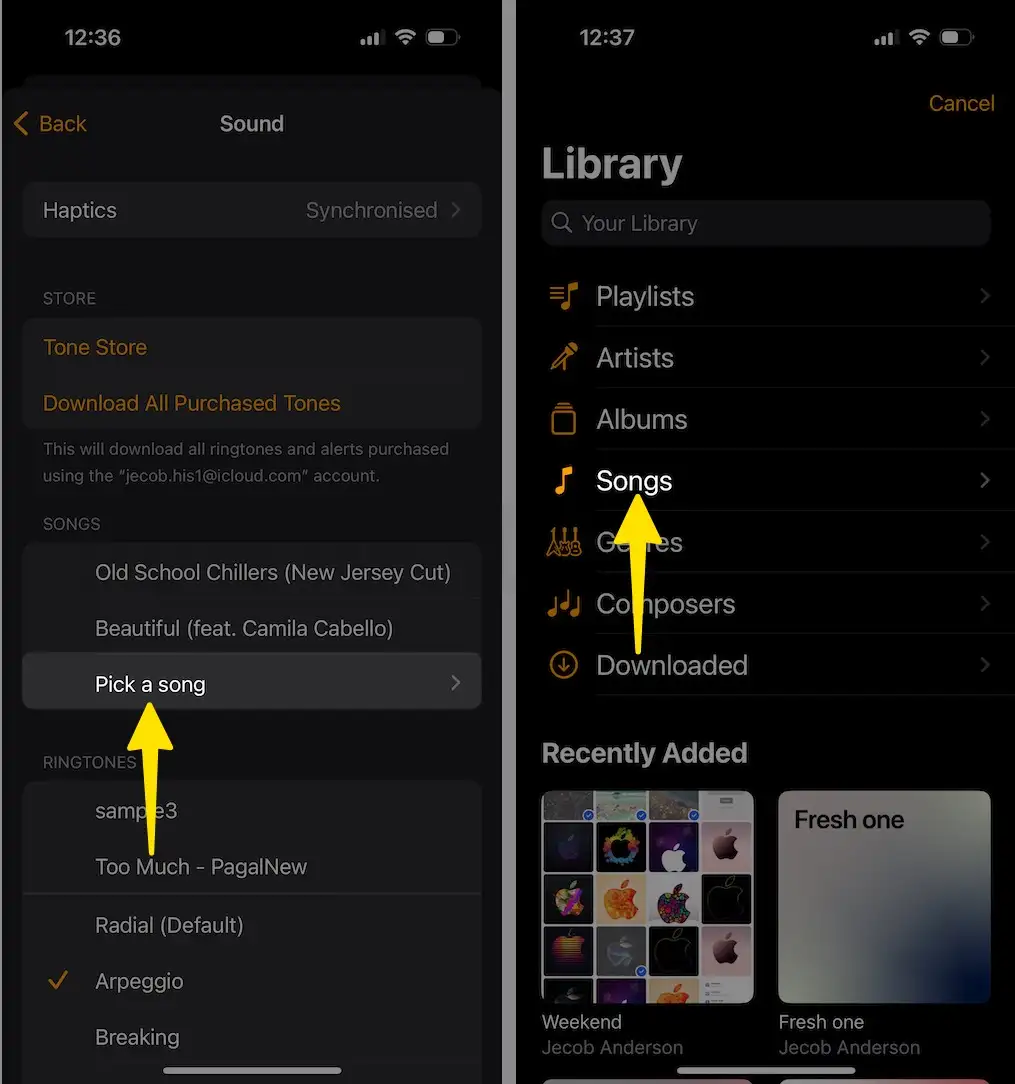
Step 4: Select a Song accordingly.

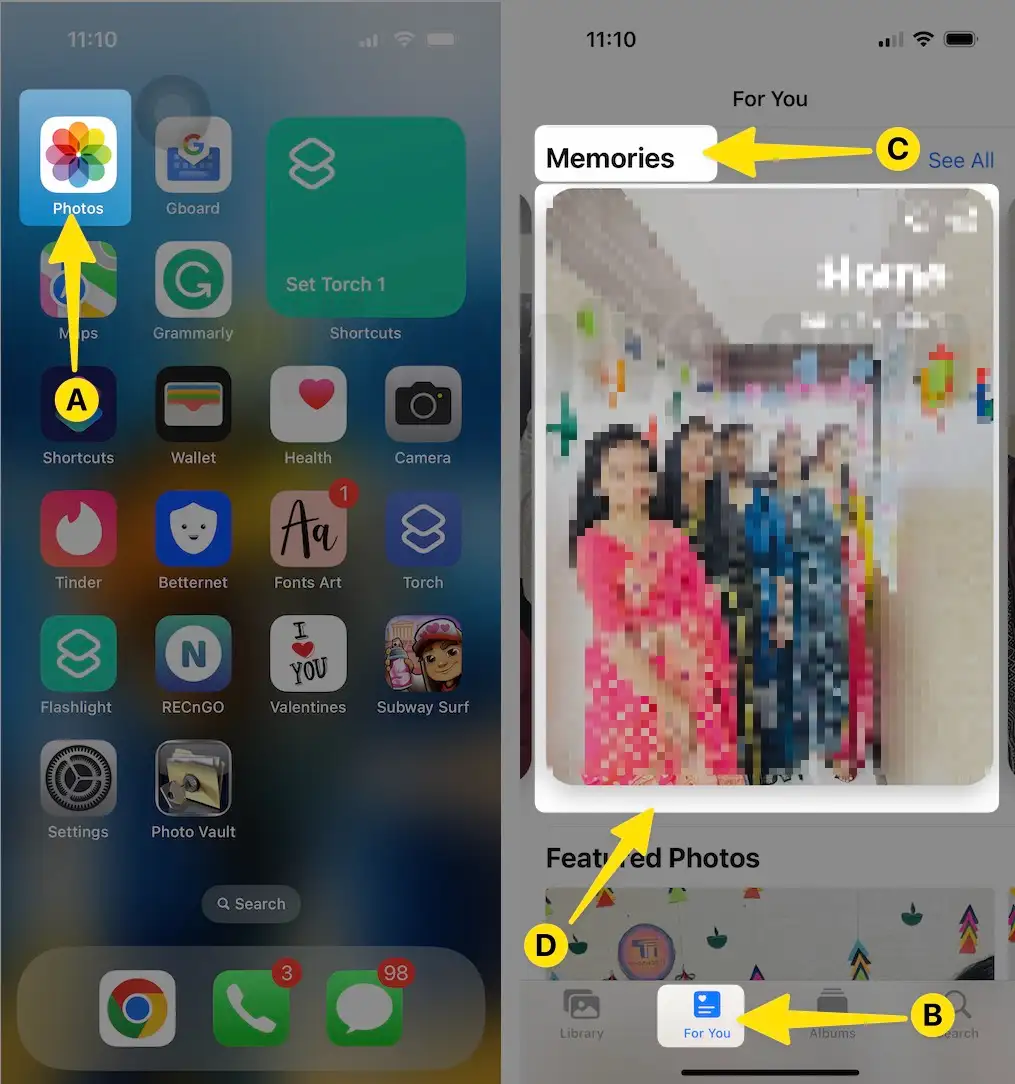
Tip#16. Create a soundtrack to your photos
With iOS 15, Apple rolled out a deeper integration between photos and music apps. In particular, it permits Apple Music subscribers to choose songs to play while using the Memories features within the Photos App. To do so, follow the steps below.
Step 1: Launch the Photos App on your iPhone > Tap on For You in the Bottom Menu > Select the Memories Tab and pick up a Specific Memory to which you want to add music.
Step 2: Tap on the Music Icon in the bottom left corner, and you’ll be redirected to the Music App > Select Song > Tap on Done.
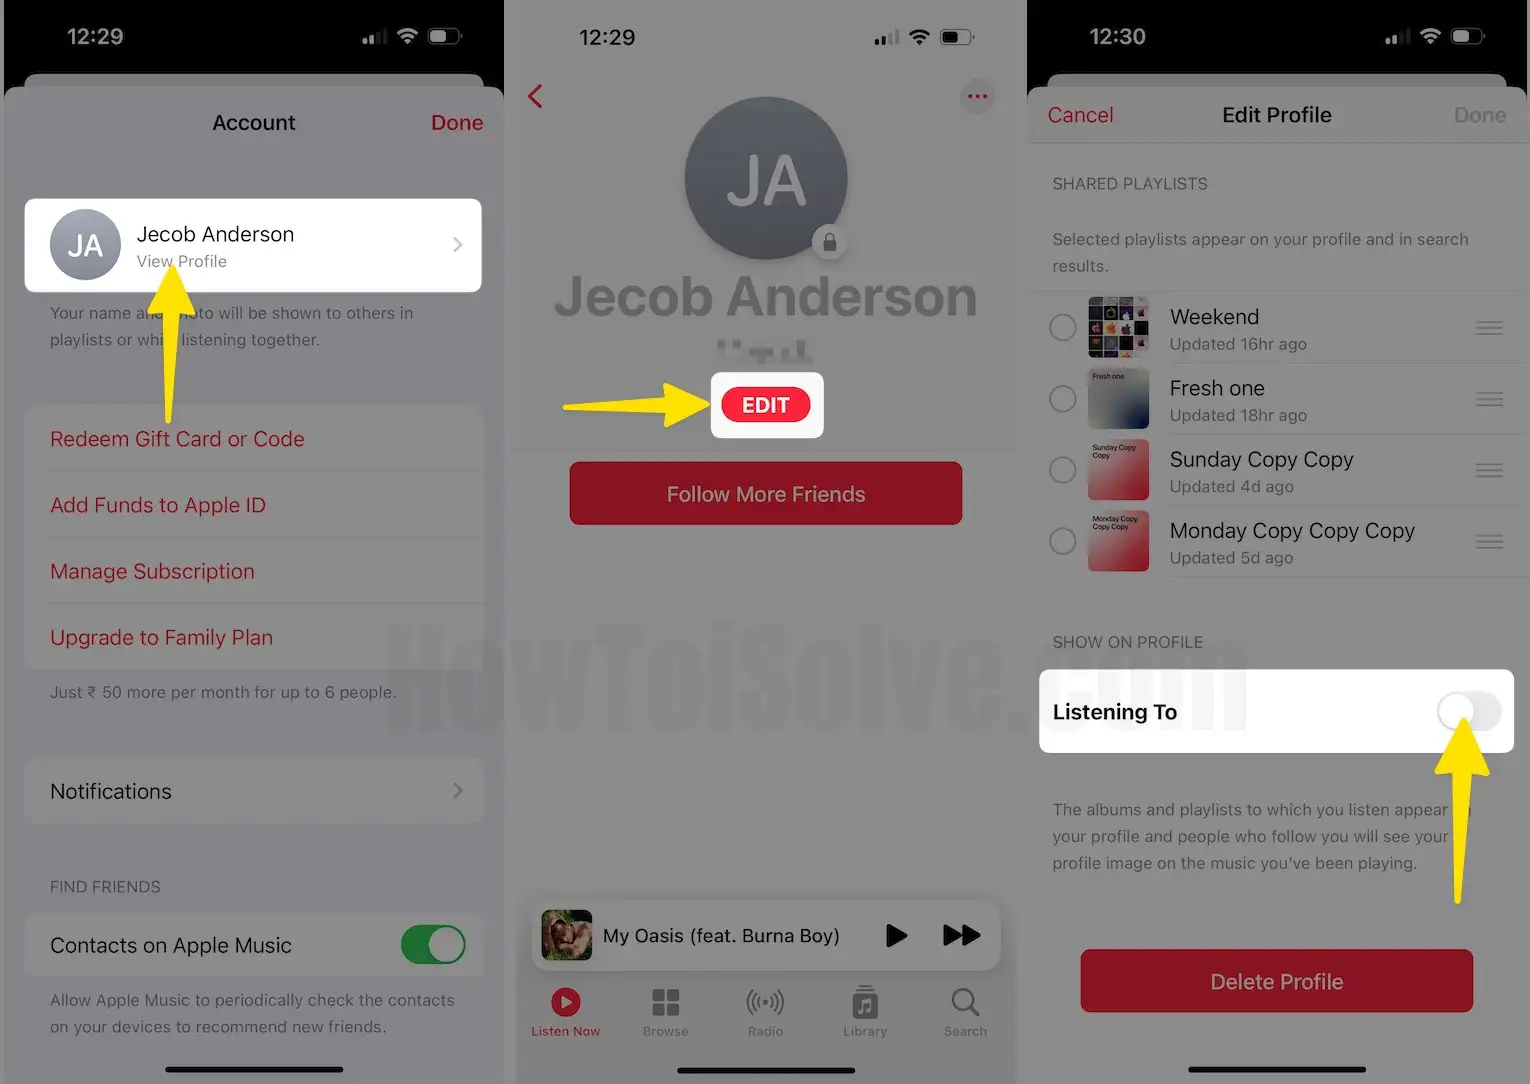
Tip#17. Apple Music’s use Listening History feature
In a nutshell, the Use Listening History feature allows Apple Music to Track your listening activity. This keeps your personalized playlist, like favorites and replay, updated. It helps Apple Music algorithm offer accurate song recommendations. But if you no longer want everyone to know your passion, you make the info private.
Step 1: Launch the Music App on your iPhone > Tap on your Profile icon.
Step 2: Tap on your Profile > Select Edit > Disable the toggle next to the Listening To.
Tip#18. Customize Apple Music with Love and Dislike
Another effective way of helping Apple Music understand your music tastes is making songs, playlists, and albums with either ‘Love’ or ‘Dislike.’ To do so, hit three dots and mark them accordingly. Apple Music, learn your song taste and use this to shape future suggestions.
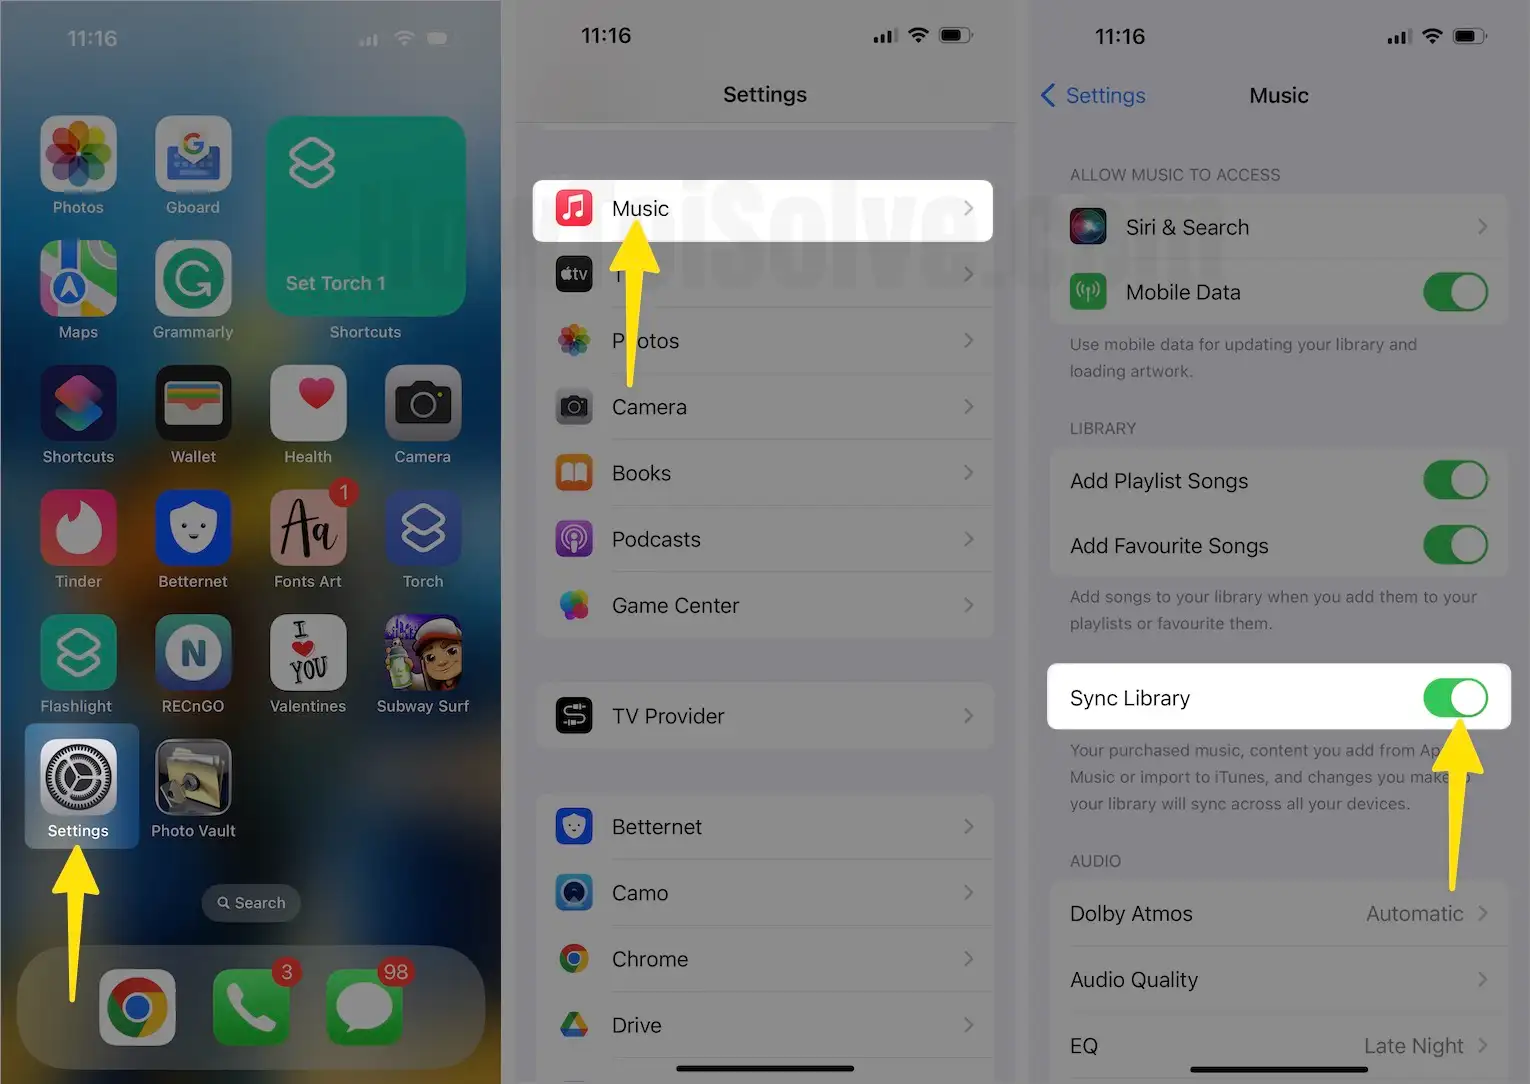
Tip#19. iCloud Music Library
An extra that comes with Apple Music’s paid version, iCloud Music Library, allows you to store up to 100,000 tracks in the cloud and differentiates from your regular iCloud storage capacity. Anything you store offers access to your saved music on up to ten devices. Here’s how to enable iCloud Music Library.
Step 1: Launch the Settings App on your iPhone > Swipe down to Select Music > Enable the toggle next to the Sync Library.
Tip#20. Listen to lossless music on your iPhone
Apple Music offers access to millions of tracks encoded using lossless audio compression to Apple Music subscribers. It’s a form of compression that preserves all original data. The feature is also known as Apple Lossless Audio Codec—the entire. The entire music catalog is encoded via ALAC in resolutions ranging from 16 bit/44.1 kHz up to 24 bit/192 kHz.
Step 1: Launch the Settings App on your iPhone > Swipe down to Select Music.

Step 2: Hit on Audio Quality > Enable Lossless Audio > Choose Wi-Fi Streaming.
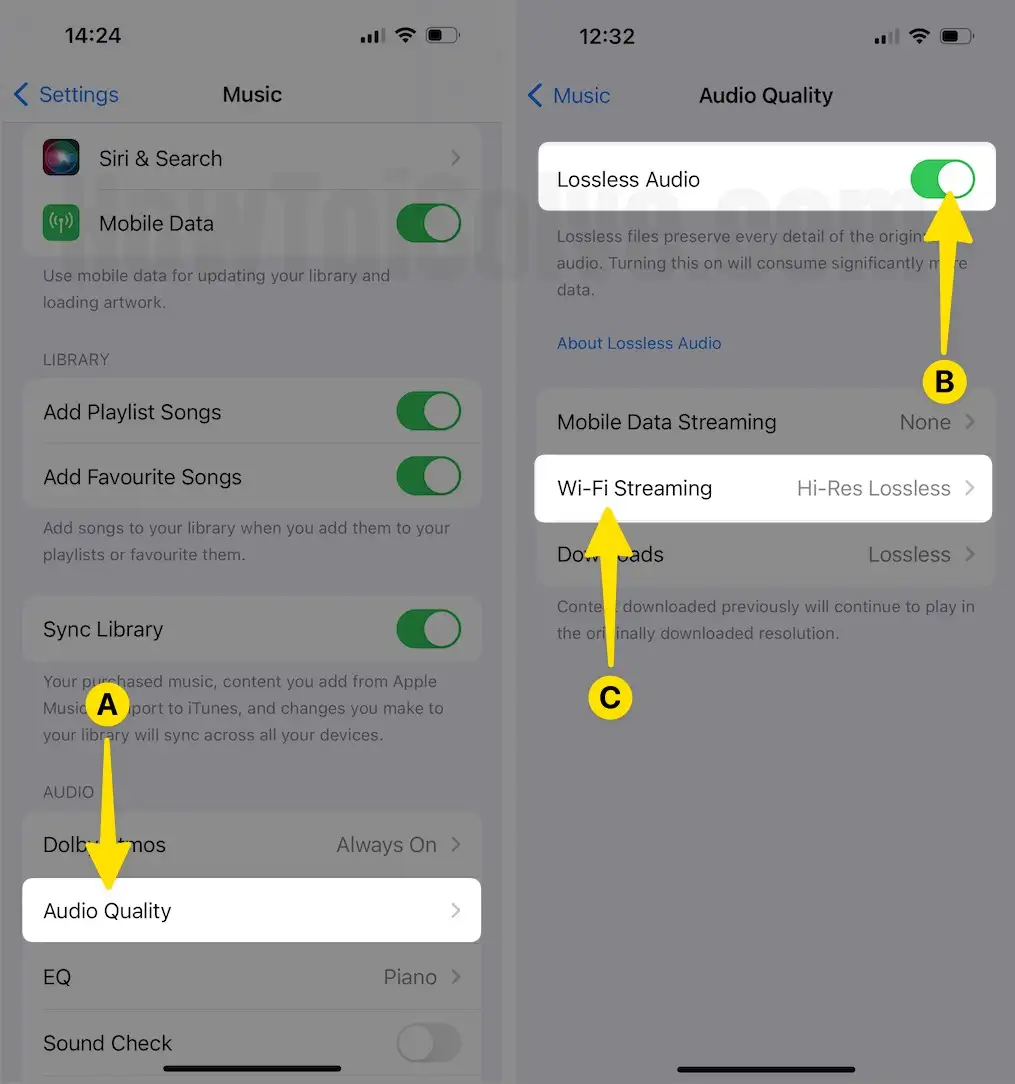
Step 3: Choose Hi-Res Lossless for a maximum resolution of 24-bit/192 kHz for Wi-Fi Streaming > Tap on Downloads > Select Lossless for a maximum resolution of 24-bit/48 kHz.
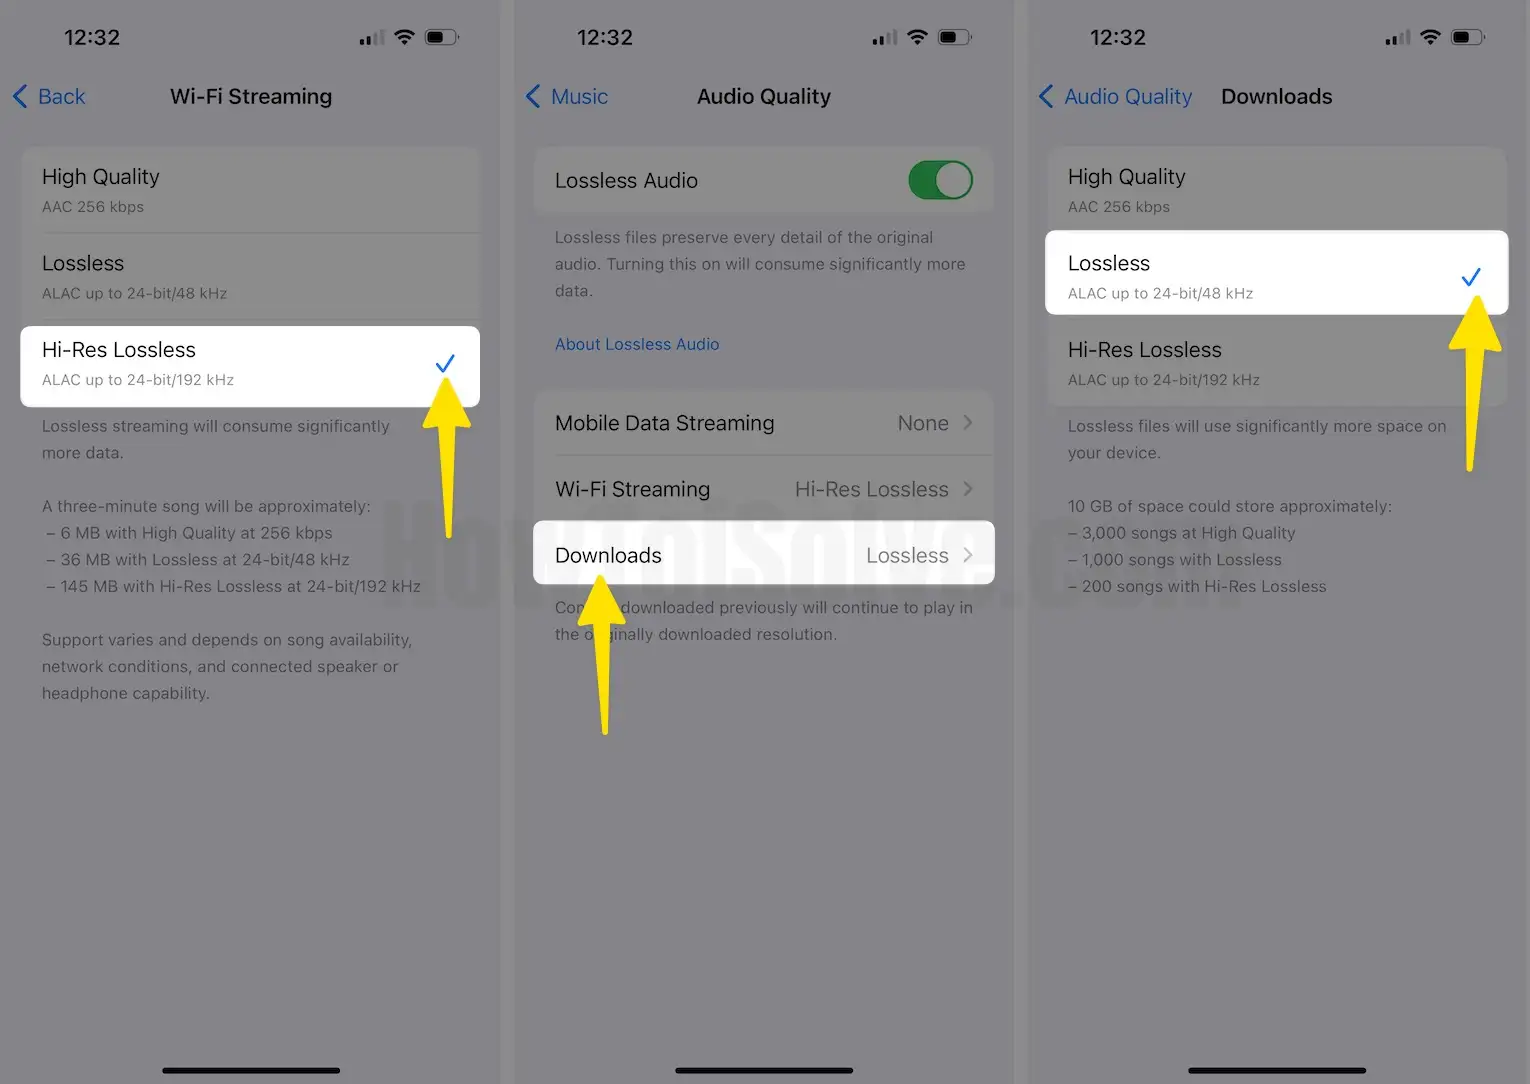
The audio quality of streamed music depends on network conditions, song availability, and the capability of connected speakers or headphones.
Tip#21. Enable Spatial Audio
Note: If you paid Apple Music, you can listen to selected songs in Spatial Audio with Dolby Atmos.
Before performing the procedure, ensure your iPhone is updated to the latest iOS version.
Step 1: Launch the Settings App on your iPhone > Swipe down to Select Music.

Step 2: In the Audio Section, Tap on Dolby Atmos > Choose one from Automatic, Always On or Off.
Final Verdict!
That’s It! These are some of the best Apple Music tips and tricks. Further, if you have some Apple Music tips that aren’t mentioned in the article, then feel free to drop them in the comment box below.


