Here you will get a full troubleshooting guide on How To Fix “Verification Failed There was an error connecting to the apple id server 2025.
The most common iTunes and Apple ID connection error is the message verification also failed. Sometimes you will see there was an error in connecting your Apple ID. People are using a different methods to use the account on the new iPhone and old iPhone. Here I am talking about the new iPhone, iPad, and iPod Touch.
Error Connecting Apple ID, Verification Failed? Here’s Fix
Follow The Below Quick Fix,
- You have a good internet connection with cellular data or a Wi-Fi network.
- Correct the Date and time or set to automatically.
- Use one Apple ID for all the Apple services like FaceTime, Apple Store iTunes, messages, and Game Center.
- Log out of your Apple ID settings app and log in to Apple ID to reset the login session on the Apple Server.
- If you are connected from the VPN services, disable the VPN, and try to again.
- Force Restart or Hard Reboot iPhone.
- Use the alternate device to Get Verification Code and use that code to sign in, for iPhone, iPad, iPod Touch: open the Settings app > tap on your name > Password & Security > tap on Get Verification Code.
- If you own Mac, then click on the Apple logo > System Preferences > Apple ID option > Password & Security > Get Verification Code.
Generally, this error message will appear on the screen after restart or reboot the device or sometimes update iOS with the latest version. For authentication purposes, every iOS update required the apple ID login that you are using on your iOS device.
And the problem is that some people are using different Apple IDs for iCloud data! Contacts, messages, free download purchased the app, sync applications, and Apple Store apps.
At that time, iCloud Apple ID is your primary Apple ID, which we need to sign the data back after the update or on the new device.
We can fix the issue by simply Re-login using a password for that Apple ID you saw on your screen.
Solution 1: Check the Apple Service status; it should be up in your country
Device Activation needs authentication from the Apple server. Connect your iPhone using your Account and register your Device under the account. You should check Apple Server status for different services like App Store, iTunes, iMessage, and more. Check the Apple System Status Page from here.

Solution 2: Set Date and Time Automatically
For privacy and security reasons, your device has not been updated to the correct time and date, which does not match the Apple server.
- Launch the Settings app on your iPhone or iPad.
- Tap General.
- Scroll to the Date and Time option.
- Enable the toggle for Set Automatically.

Solution 3: Sign out of Apple ID and Sign In Again
Manually verify Apple ID after logging out of the settings app on the iPhone.
- Go to the Settings app on the iOS device.
- Next, tap on the profile name.
- Scroll down the screen to tap on the sign-out option.
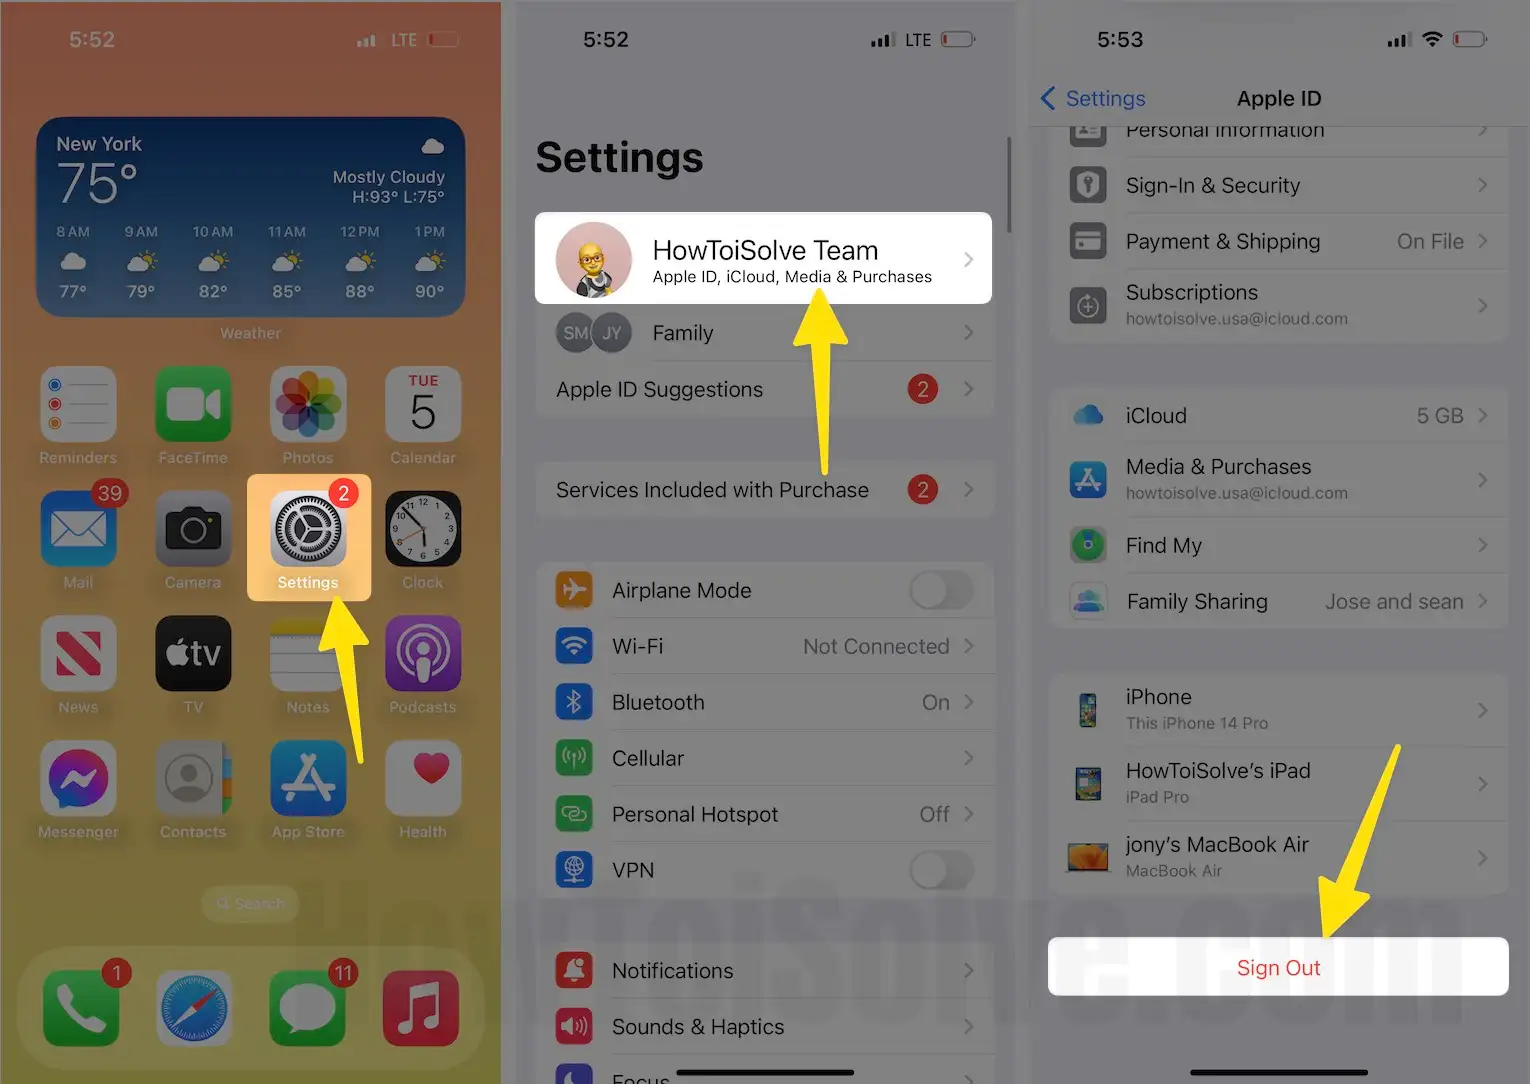
- Here, enter your Apple ID password for confirmation. [Hint – Trick to Reset Apple ID password]
- The next screen will ask if you want to keep a copy of your data on this iPhone? If you want, please turn the toggle next to the specific app name, then tap on Sign Out available in the top-right corner.
- Click on Sign out to confirm.

- After that, sign in again. [Steps – Launch Settings – tap on Apple Account option – two options available: Use another Apple Device or Sign in manually – after this, follow on-screen instructions.]

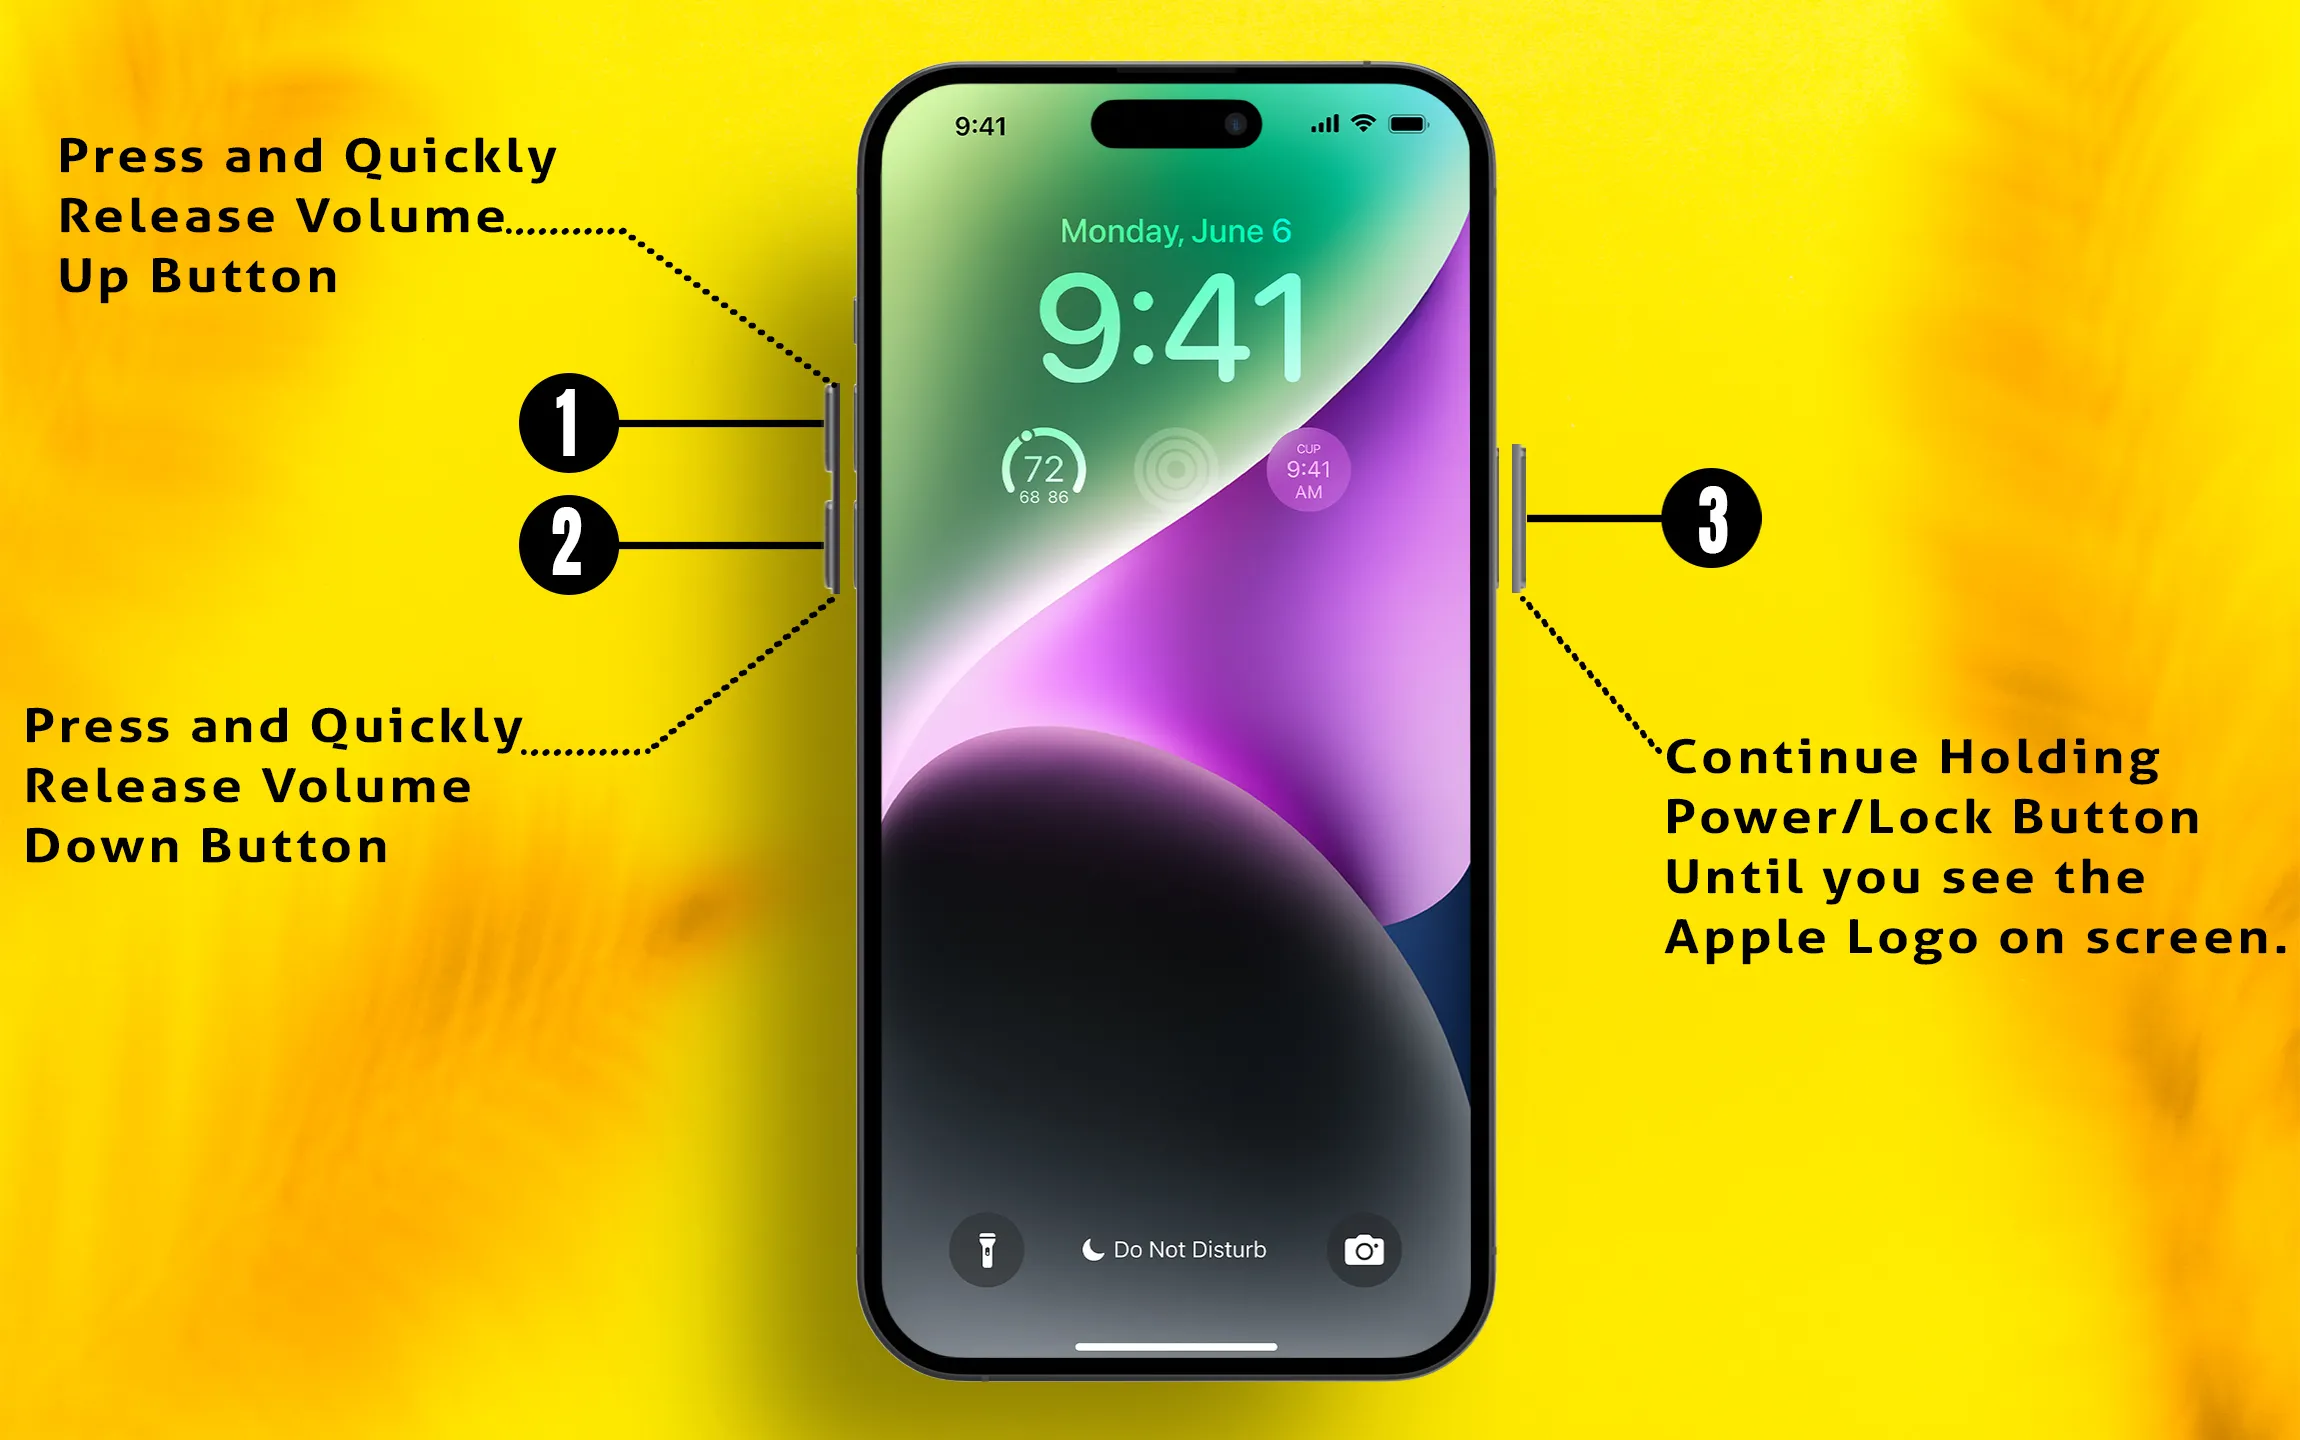
Solution 4. Hard Reboot or Force Restart your iPhone
To perform a hard reboot on your iPhone, follow these steps:
- Press and Quickly Release the Volume up button.
- Press and Quickly Release the Volume Down button.
- Now, only press and hold the side button until you see the Apple logo on screen after the black screen.
Solution 5. Restore iPhone to Recovery Mode using iTunes
Performing a factory reset or updating iOS can automatically resolve internal glitches. If you are confused and unable to identify the problem, it could be related to WiFi, cellular issues, software problems, and more.
Install iTunes on your Mac and PC to the latest version. Open iTunes.
Connect your iPhone to your Mac or PC. Force restart or Hard Reboot in recovery mode.
- Press and quickly release the volume up button.
- Press and quickly release the volume down button.
- Press and hold the side button for at least 10 seconds. After that, your iPhone will show a black screen with only the iTunes logo and Lightning cable. Also, iTunes pops up with the message, Your iPhone is in recovery mode so we can update or restore (IPSW) method to reinstall the iOS copy on the iPhone.
That’s the screen for recovery mode.
Now, Launch iTunes on Mac or PC. Connect your iPhone to iTunes via lightning cable, iTunes will pop up that your iPhone is in recovery mode, and we can update or restore using the button in the pop-up.
- Restore Option: This option will erase all the data and install the New iOS on the iPhone. Also, use iTunes to set up your iPhone, which will restore all the data back to the iPhone.
- Backup Option: This option will only update the iOS version to the latest version without Data loss.
Solution 6. Reset Network Settings
You can watch the complete video on how to reset network settings on your Apple device below. Wi-Fi is disconnecting over time and reconnecting again and again. Completely erase all the settings.
We appreciate your feedback! Please share this guide with friends on your social media, and follow us. Don’t forget to subscribe to our YouTube channel.


