Apple Voice Memos app is a way of professional audio recording on apple devices. Apple Device users are recording high-quality audio through devices directly. Voice Recorder is always synced with iCloud, Between iPhone, iPad, Mac, and Apple Watch with Recording Microphone compatible headphones.
Keep all your apple devices up-to-date and get the latest Voice Memos to update with stunning features like changing audio quality in Voice memos, Removing backgroud sound, and more…
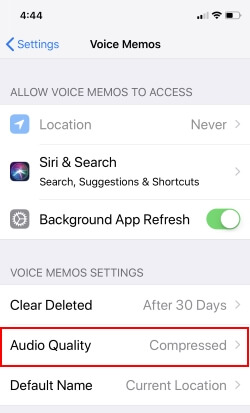
How to Change Audio Quality in Voice Memos on iPhone, iPad
Step 1: Go to “Settings”.
Step 2: Find and open “Voice Memos”.
Step 3: Select “Audio Quality” in iPhone and “Audio Compression Quality” in iPad.
Step 4: You will see two options, “AAC (Smaller File Size)” and “Uncompressed (Larger File Size)”.
Also Read: Best External Microphone
Steps for Change Audio Quality in Voice Memos on Mac
1. Open Voice Memo app on your Mac.
2. Go to Preferences (Settings…on macOS Ventura) at the top of the Mac Menu, and Find Audio settings.
3. Find the options for managing recording Audio Quality Files (AAC and Uncompressed).
The AAC is standard Apple Audio quality that always compresses the file and makes it comfortable and small in size, which results in quality loss. Whereas, Uncompressed doesn’t change anything and delivers the same audio quality. Typically, uncompressed files will occupy ample storage compared to AAC-formatted files.
Most of the users opt to use AAC format, which saves a considerable amount of space for them, and yes, it gives Apple Music level quality which is good if they don’t want the original quality of Voice Memos. For more natural and professional purposes, uncompressed is preferable.


