Always keep in mind, your security is in your hands; in this line of the tutorial, we’ll show you how to delete spam Calendar Invites or Appointments on iPhone after the update. Apple is trying hard to avoid malware, suspicious apps that can harm your privacy as well as the iPhone, but it can only be worth, if you carefully use the iPhone and double-check everything before downloading, adding, and using on the iPhone. Since you’ve encountered the spam calendar invites and appointments, do you know from where did they enter into your Calendar app?
Whenever we surf on Google, the pop-up with two buttons Yes and No appears out of nowhere. If you have mistakenly selected Yes, then it might be possible that you’ve granted permission to send appointments and spam calendar invites to your inbox. Here are some workarounds that will help you get rid of spam calendar invites and appointments on the iPhone.
How to Delete Spam Calendar Invites and Appointments from iPhone
Solution 1: Remove the Calendar Account
Firstly, if the calendar invites are visible in your iCloud Calendar, then deleting that invite is pretty simple. From the iPhone settings, you can remove the spam calendar invite and see if it appears again.
- iOS 14 or Later iOS Version: Open Settings app > Calendar > Accounts > Tap on the Account name and Disable to Calendar toggle or Completely Remove Account from your iPhone (Delete Account).
- iOS 13 or Earlier iOS Version: Open the Settings app on your iPhone > Scroll down and tap on Passwords & Accounts > Look for the suspicious calendar account under the Accounts section > If it appears, then tap on it and Delete Account. > You may have to reboot the iPhone if the Spam Email isn’t leaving your iPhone.
Solution 2: Report the Calendar Invite Event
An alternate option to delete the Calendar Invites across all of your devices signed in with iCloud is to report the Calendar Invite from the iCloud. After reporting the invite as it will be removed from your iCloud account and may never appear again from the same address.
- Visit the iCloud on your PC or iPhone. For a clear view and bigger results, always prefer to use iCloud on Mac/PC.
- Log in to the iCloud account.
- Click on the Calendar
- Go to the Spam Event, Email, or Invite.
- Find and select Report Ju
- Lastly, click OK.
Solution 3: Delete Calendar
Next up is deleting the calendar from iPhone. When anyone invites you to the calendar, it will be shown on your iPhone with a few details and an option to Delete the calendar permanently from the iPhone. Take your iPhone and start following the below steps.
- Navigate to the Calendar App on your phone.
- Once the Calendar displays, tap on the Calendars tab located at the lower side of the screen.
- Choose the Edit option at the upper-left corner.
- Select the Spam Calendar that you want to remove.
- Tap Delete.
- Confirm Delete.
Solution 4: Delete & Reinstall Calendar App
There are plenty of new features that come in the phone when we update, alongside, some glitches also target the iPhone. In that case, it might be possible that your calendar app is triggered by the bug and unable to delete the spam invite. To fix this, deleting and reinstalling the calendar app is worth trying.
- Go back to the Home Screen where you can find the Calendar App.
- Touch and hold the Calendar app and (For iOS 13 or later: when the menu appears, choose Edit Home Screen.) When the App Start jiggling, tap on the Calendar App and Delete
- Now you can open the App Store and download the fresh Calendar App.
Solution 5: Disable Calendar Syncing
Still, if the above troubleshooting doesn’t help to fix the delete spam calendars from the iPhone, then disabling the calendar syncing could be your final shot without losing any data.
- Go to the Settings app.
- Tap on your name.
- Select iCloud.
- Disable Calendars.
Solution 6: Reset All Settings
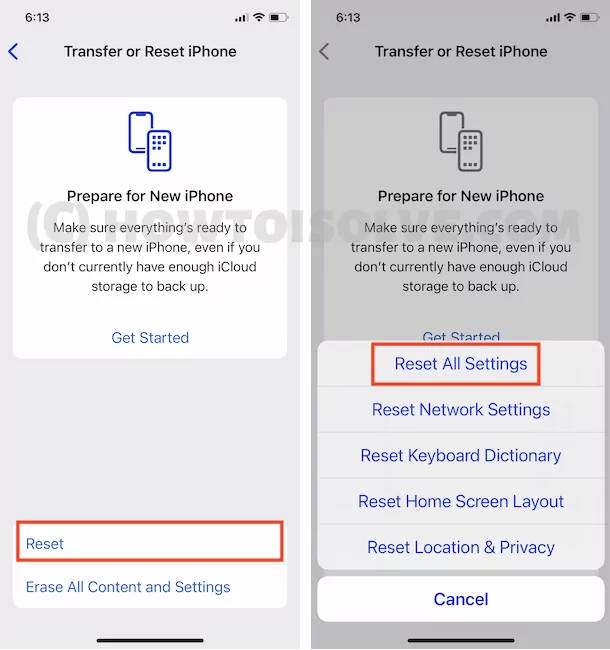
Now the time has come where you’ve to bring back all the customized settings to the default. When you reset all settings, it doesn’t cost any personal data stored on the iPhone, just the iPhone Settings will be reset to default. There’s no harm in doing that.
Steps For iOS 15 and later version
- Go to the “Settings” app
- Tap “General”
- Find and open tap “Transfer or Reset iPhone”
- Tap “Reset”
- Lastly, tap on “Reset All Settings”

- For security reasons, you will be asked to enter the iPhone Passcode.
- Tap Confirm Reset All Settings.
- After that iPhone will Reboot.
Steps for iOS 14 and Earlier Version
- Open the Settings app.
- Find and tap General.
- Scroll down to Reset.
- Choose Reset All Settings.
- Enter the iPhone Passcode to Reset All Settings.
Solution 7: Factory Reset iPhone
Last but not the least, perform Factory Reset. However, factory reset iPhone results in loss of data unless you back up the iPhone to iCloud or iTunes. So before erasing all contents and settings make sure to back up the iPhone.
- Navigate to the Settings app.
- Tap General.
- In the end, tap Reset.
- Then select Erase All Contents & Settings.
- Enter the passcode to confirm Erase All Contents & Settings.
