Estimated reading time: 5 minutes
Key Takeaways
- Secure Boot ensures your system boots only trusted software, protecting against boot-level malware.
- Check Secure Boot status in Windows 11 with ‘msinfo32’ via the Run dialog box.
- Access UEFI settings through Advanced Startup in Windows 11 to enable Secure Boot.
- Disable CSM in UEFI settings for Secure Boot to function properly, and ensure your disk is GPT formatted.
- Suspend BitLocker before enabling Secure Boot to avoid being locked out of your system.
Secure Boot is an essential security feature in modern PCs that ensures your system only boots trusted software, protecting your device from boot-level malware and rootkits. This guide will explain, in detail, how to enable Secure Boot in Windows 11, securing your system from the very first step of startup.
Step 1: Check Your Current Secure Boot Status
Before you begin enabling Secure Boot, it’s important to first check whether it’s already enabled on your system. If Secure Boot is already on, there’s no need to make changes.
How to check Secure Boot status:
- Press Win + R to open the Run dialog box.
- Type msinfo32 and press Enter. This opens the System Information window, which provides a detailed report about your system’s hardware and software configuration.
- In the System Summary, look for the field Secure Boot State.
- If it says “Off”, this means Secure Boot is not enabled on your system. You’ll need to proceed with enabling it.
- If it says “Unsupported”, it means your PC’s hardware does not support Secure Boot. This could be because your system is using an older BIOS or legacy hardware that doesn’t support this feature.
Step 2: Access UEFI Firmware Settings
Secure Boot is a firmware-level security feature, meaning you need to make changes within the BIOS/UEFI settings of your PC. These settings are not accessible from within the Windows operating system itself, so you’ll need to restart your computer and enter the UEFI settings.
How to access UEFI Firmware Settings:
The easiest way to access UEFI on Windows 11 is through Advanced Startup, which allows you to restart your PC into UEFI/BIOS without physically pressing keys at boot.
- Open the Start menu and select Settings.
- In the Settings window, navigate to System > Recovery.
- Under the Advanced startup section, click Restart now. This will restart your PC into the Advanced Startup Options screen.
- Once the PC restarts, select Troubleshoot.
- In the next menu, select Advanced options.
- Click on UEFI Firmware Settings.
- Click Restart to enter your UEFI/BIOS interface.
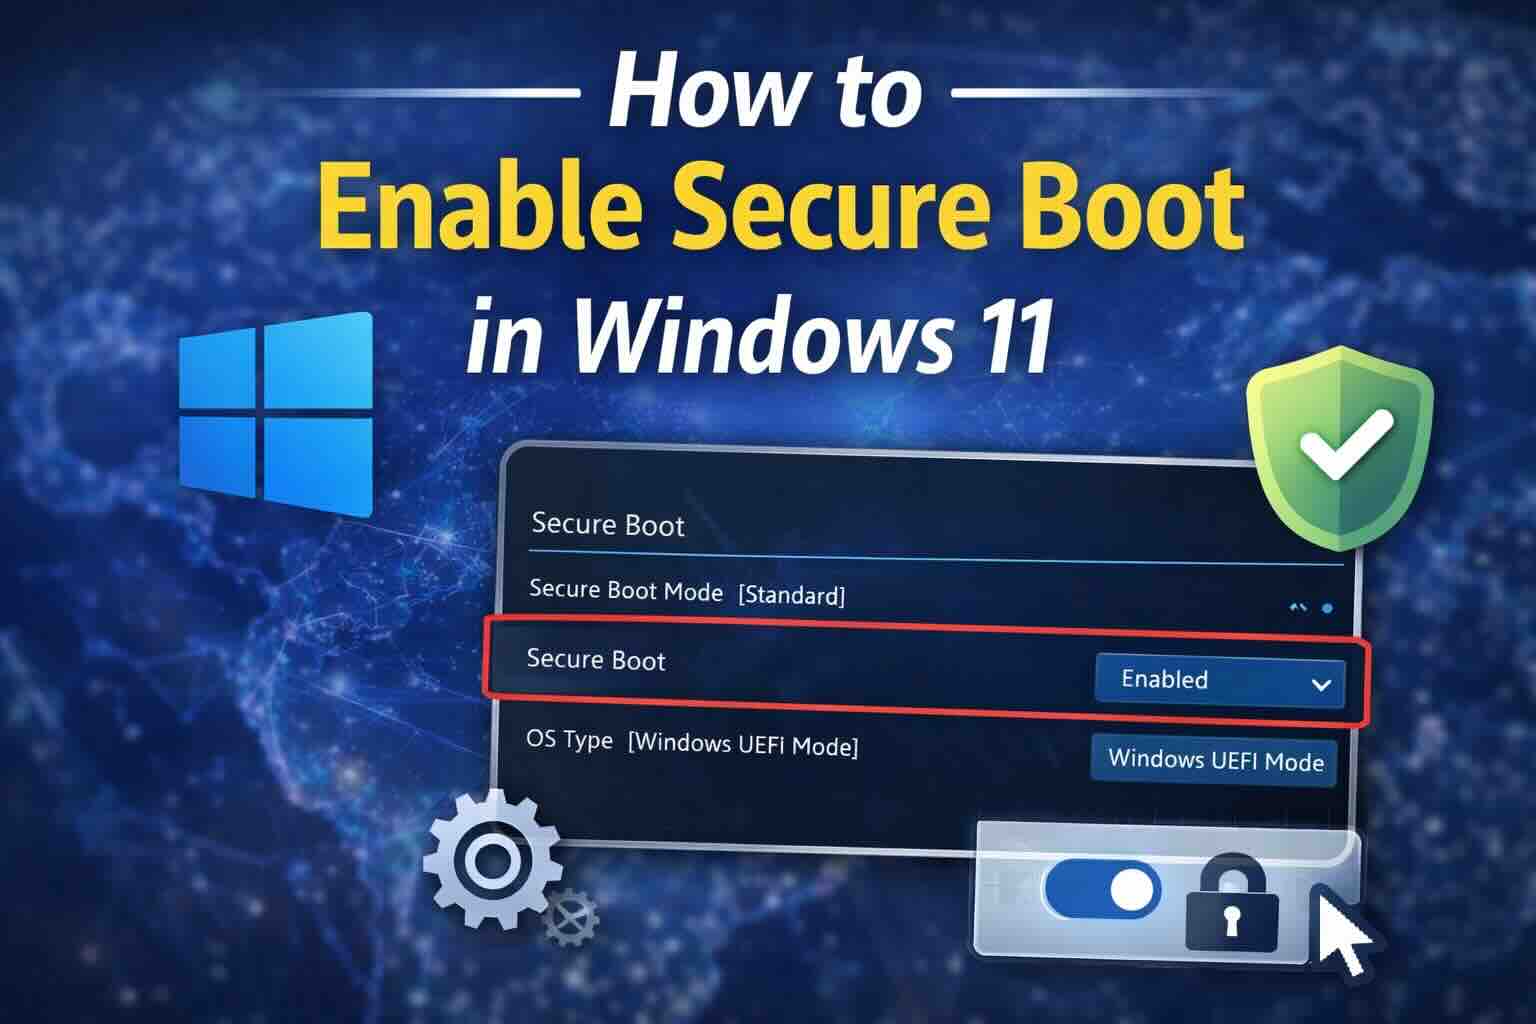
Step 3: Enable Secure Boot in BIOS/UEFI
Once you’re inside the UEFI/BIOS settings, you can enable Secure Boot. Note that BIOS/UEFI interfaces vary by motherboard manufacturer, but the general steps outlined here will apply to most systems.
Steps to enable Secure Boot:
- Locate the Secure Boot Menu:
- The option to enable Secure Boot is generally found under the Boot, Security, or Authentication tabs in the UEFI/BIOS interface. You might need to explore these tabs to find it.
- Disable CSM (Compatibility Support Module):
- In some UEFI systems, you’ll need to disable CSM (Compatibility Support Module) to fully enable Secure Boot. CSM is a legacy feature that allows your PC to boot older operating systems that aren’t compatible with UEFI, but it interferes with Secure Boot.
- To disable CSM, look for a setting labeled CSM and set it to Disabled.
- Why Disable CSM? Secure Boot operates in UEFI mode, which is a modern boot standard. CSM supports the older BIOS mode, which conflicts with UEFI and prevents Secure Boot from working properly.
- Enable Secure Boot:
- Once CSM is disabled, locate Secure Boot in the UEFI settings.
- Set Secure Boot to Enabled.
- Some systems may require additional settings like:
- Secure Boot Mode to Standard.
- OS Type to Windows UEFI Mode (Ensure this is set for compatibility with Windows 11).
- Save and Exit:
- After enabling Secure Boot, press F10 (or the corresponding key for your system) to save the changes.
- Select Yes when prompted to confirm, and your PC will restart.
Important Troubleshooting Notes
Disk Format: GPT vs. MBR
Secure Boot requires your hard drive to be formatted as GPT (GUID Partition Table) rather than MBR (Master Boot Record). If your system is using MBR, enabling Secure Boot will prevent your system from booting properly.
How to check your disk format:
- Press Win + X and select Disk Management.
- In Disk Management, right-click on your system disk (usually Disk 0) and select Properties.
- Go to the Volumes tab and check the Partition style.
- If it says GPT, you’re good to go.
- If it says MBR, you need to convert your disk to GPT before enabling Secure Boot, otherwise, Windows won’t boot.
How to convert MBR to GPT (if needed):
- Backup your data before proceeding (this process will erase everything on the drive).
- Use the DiskPart command to convert MBR to GPT.
- Open Command Prompt as an administrator.
- Type the following commands:
diskpart list disk select disk X (X = the disk you want to convert) clean convert gpt exit
- Reinstall Windows or restore your data after converting the disk.
BitLocker Encryption:
If you use BitLocker for disk encryption, you may be at risk of being locked out of your system after enabling Secure Boot, as the boot process will change. It’s highly recommended to suspend BitLocker before making changes to your BIOS settings.
How to suspend BitLocker:
- Open Control Panel > BitLocker Drive Encryption.
- Select Suspend Protection and follow the prompts.
Alternatively, ensure you have your BitLocker recovery key ready in case you need it after enabling Secure Boot.
Conclusion
Enabling Secure Boot on your Windows 11 PC is a critical step in improving your device’s security. By following the steps above, you ensure that your system will only boot trusted, signed software, blocking malicious programs from taking control during startup. Remember to check your disk format, disable CSM, and suspend BitLocker to avoid potential issues.
If you’re unsure about these settings or encounter any issues, consult your motherboard’s manual for specific instructions, as BIOS/UEFI interfaces can vary between different manufacturers.
Stay secure, and make your system safer by enabling Secure Boot today!