Older iOS and iPhone were limited to few features, but today iPhone and iOS support hundreds of functions that you don’t even know. So, today, we will explain to you a handy way to export voicemails from an iPhone. We have seen that many users are asking how to export Voicemails from iPhone running on any iOS.
If you are the one looking for the answer on how I can transfer voicemail from iPhone, then merely look at the three different ways. They will definitely help you to transfer and save your essential voicemail somewhere safe.
iCloud can’t back up your voicemail, so you need to prevent losing or deleting voicemails saved on your iPhone before you erase your iPhone.
You can download or play voicemail messages from Verizon, Sprint, AT&T, T-Mobile, or Others using these tricks.
Method #1: Share With Your Own Mail or To Mac PC/iOS (Airdrop)
This is the simplest method to export voicemails from an iPhone. All the sharing options you will get, such as iMessage, AirDrop, Mail, etc., select the appropriate sharing option that is suitable for you.
- Step #1: Launch the “Phone” app.
- Step #2: On the bottom line, select “Voicemail”.

- Step #3: Now locate the voicemail you want to export from your iPhone and tap on it.
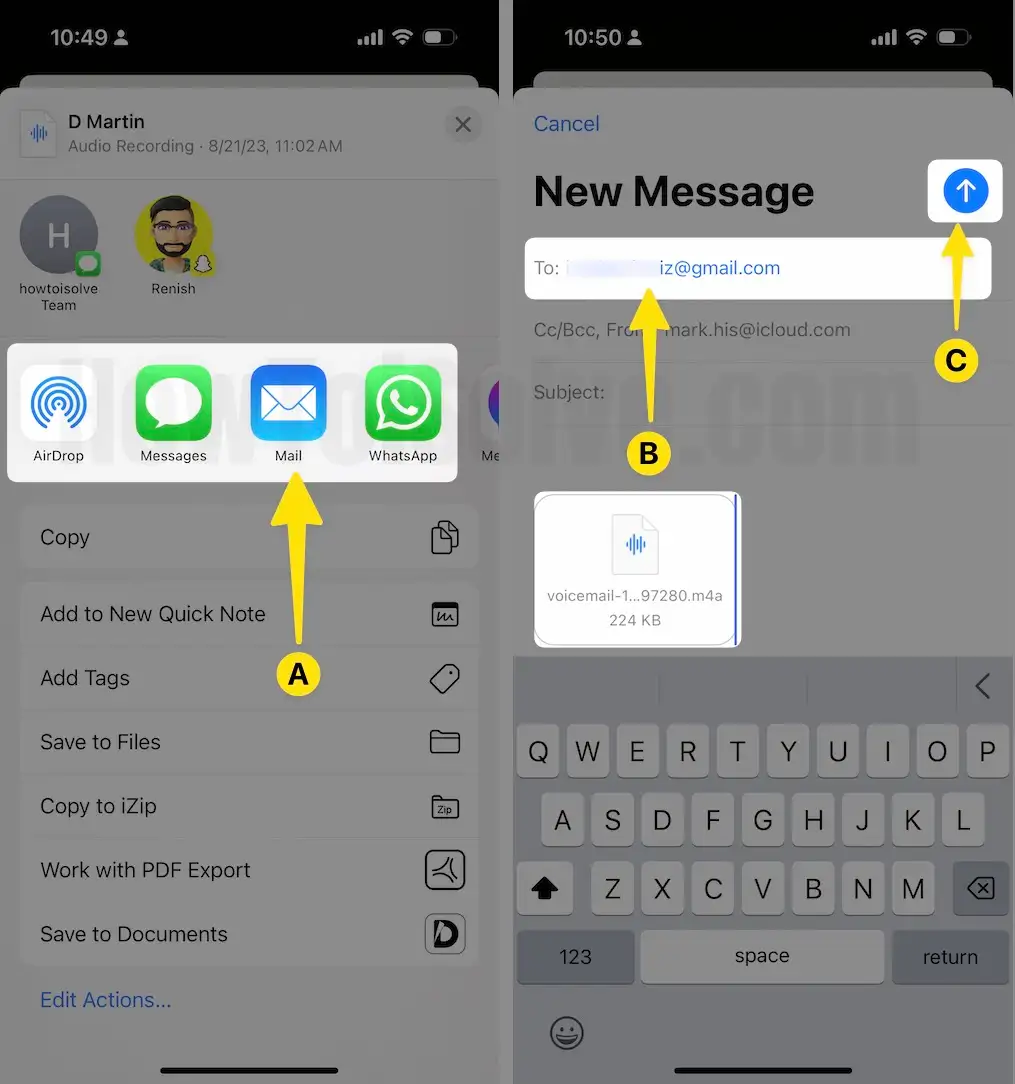
- Step #4: Tap on the “Share icon”.

- Step #5: There, you will find multiple options such as AirDrop, Mail, iMessage, and more.
- Step #6: I recommend you go for Mail because there is nothing safer than Mail. So enter an email address where you want to receive your voicemail attachment for backup purposes.

Once you share with your Mail, you can access that Voicemail from any device and download it anytime anywhere.
Way 2: Use Screen Recorder [Official option]
Screen Recorder might not work for outdated iOS. If your iPhone is updated to the latest iOS, then only you can use this procedure to export voicemails from your iPhone to a computer or any other device. Don’t forget to enable audio otherwise, voicemail won’t get recorded only the screen without a voice will be recorded. However, if you haven’t added the Screen Recording in Control Center, first add it by the following steps,
Start Recording with Screen Recorder options, Add Screen Recorder shortcuts on the Control center
Step #1: Go to the “Settings” app.
Step #2: Tap “Control Center”.

Step #3: Select “Customize Controls”.
Step #4: Find the “Screen Recording” option and tap on the + symbol to add.

Start Recording using Recording Shortcuts,
Now, get back to the Home screen.
- Step #1: Bring down the Control Center. You will see the Screen Recording symbol.

- Step #2: Start the Screen Recording and play the Voicemail to record the voicemail.

- Step #3: The recorded file will be stored on the “Photos” app.

- Step #4: Now, you can store that voicemail anywhere.

Way 3: Using App Export Voice mail for offline play
If both options to export voicemail from the iPhone didn’t work for you, then it’s time to go for a third-party application. iMazing is a popular app that is used for file transfer on iPhone, macOS, and Windows. Download the free version of it and start exporting the voicemails from the iPhone.
