Family Sharing was introduced with iOS 8 and macOS Yosemite, and to date, it has been a great use for families who own Apple products. It is quite a handy feature that lets you access and share purchased applications, music, and more with family members, so, once you set up Family Sharing on iOS/iPadOS on iPhone/iPad and macOS on MacBook/Mac, there is no need to purchase individual applications, Apple Music, Books, and other stuff that you could use free of cost if you are a member of Family Sharing group.
Since Apple has included the Family Sharing feature in its products, most app developers offer family sharing support for In-App Purchases.
You can add up to six family members to your family sharing group. In addition, whenever one of your family members has to purchase an app or book or anything, they would have to ask for your (organizer’s) permission, and if you allow, then only purchased can proceed.
Points to be considered before starting with this tutorial,
- If you are a member of the Family Sharing group, then you cannot join any other Family Sharing group unless you decide to leave the current Family Sharing Group.

How to Setup Family Sharing on iOS/PadOS and macOS
We have written this article to help you set up family sharing on iOS/iPadOS and macOS. So don’t bother. Even if you are new to Apple products, it’ll be much easier for you to set up family sharing.
For iPhone/iPad,
Step #1: Launch the “Settings” app.
Step #2: Tap on your name.
Step #3: Go to “Family Sharing.”
Step #4: Tap “Get Started,” or if you want to learn more about Family Sharing, then select the below option.
Step #5: Select any of the mentioned features you would like to share with your family.
Step #6: Next, you will be asked to “Confirm Account,” to use the current Apple ID, tap “Continue” and for different Apple ID, tap “Use a Different Account”.
Step #7: As you are the organizer of the Family Sharing group, it is necessary to enter the Payment method for the Family Sharing group. Also, your Payment method will be shared with the members of the Family Sharing group. Tap “Continue”.

Step #8: It’s time to Invite Family Members, you can add up to five members to join the Family Sharing group. Invitations will be sent over the Messages app of your iPhone.
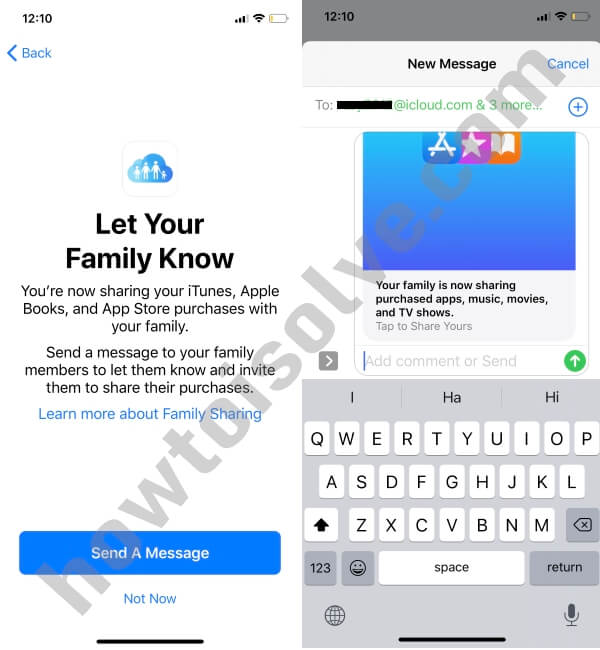
Step #9: Once invitations are sent, tap “Done”.
Invite Family Member in Family Sharing and Family Sharing Services on MacBook, Mac
For macOS Catalina and Later macOS,
Step #1: Click on the “Apple” logo.
Step #2: Go to “System Preferences” (System Settings on MacOS Ventura or later).
Step #3: Select “Family Sharing”.
Step #4: Read the on-screen instructions and complete the setup.
To Invite People in Family Sharing on macOS Catalina or Later macOS
Step #1: Click on Apple Logo from top mac Menu and click “System Preferences”.
Step #2: Click “Family Sharing”.

Step #3: Select the “Family” or “Family Sharing” tab.
Step #4: Click + and add members.
Step #5: You can directly enter the Apple ID of the Family Member that you want to add or send them an invitation.
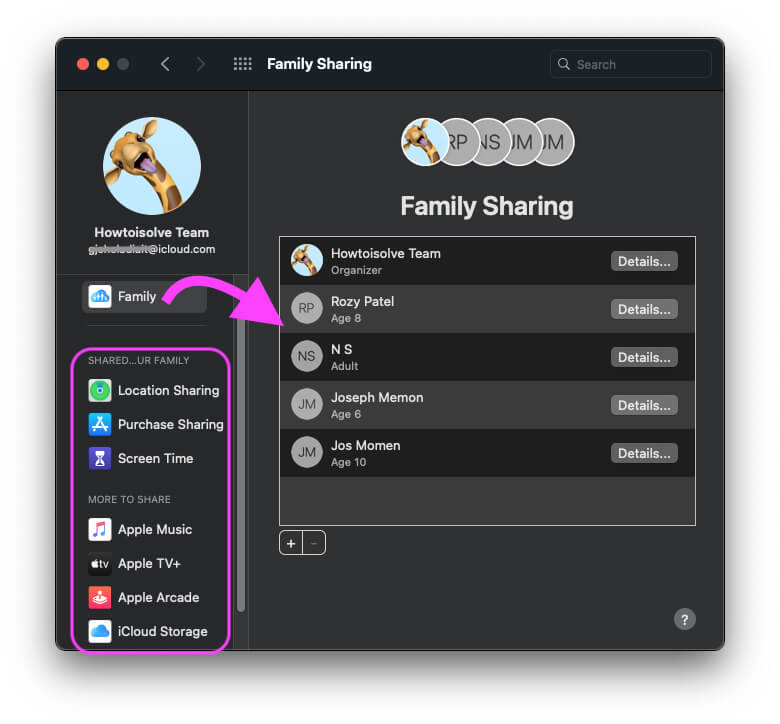
These are the Services we can use Family Sharing:
Apple Music: Give Apple Music to each family member, Up to 6 Family members can play and download millions of songs. Everyone can use their own account and keep their own music library.
Apple TV: Apple TV channels lets you subscribe to just the channels you want and share them with your family members. No additional apps, Accounts, or Passwords required.
Apple Arcade: Games your whole family will love. When you subscribe to apple arcade, everyone in your family will get instant access to a diverse collection of games across the iPhone, iPad, Mac and Apple TV. With over 100 ad-free games, there’s something for everyone.
iCloud Storage: Enough Storage for the Whole Family, With 200 Gb of iCloud storage, you can share it with your family. It’s enough to keep everyone’s photos, Videos, and Documents safely stored in iCloud.
Ask to Buy: Enable for the member who will ask you every time, when he/she purchase premium service that is shared with them. You will give final approval for App Store, iTunes, Apple Books.
How to Join Family Sharing Group on iOS 13 & Later and macOS Catalina or later macOS
Once, organizer set up the family sharing and invites you to join the family sharing group, you can check and accept an invitation to join the family sharing group like this,
For iOS,
Step #1: Open the “Settings” app.
Step #2: Tap on your name.
Step #3: Tap on “Invitations”.
Step #4: Follow the on-screen instructions and join the Family Sharing group by confirming your account details.
For macOS,
Step #1: Click on the “Apple” logo.
Step #2: Open “System Preferences”.
Step #3: Go to “Family Sharing”.
Step #4: Accept the Invitation and confirm your account.
Unable to join Family Sharing Group on iOS and macOS?
If you are unable to join the Family Sharing group on iPhone iOS 13/macOS Catalina, then make sure nobody has joined the Family Sharing group using your Apple ID. Because Apple allows you to join only one Family Sharing group at a time. Besides, you can change the Family Sharing group only once per year.
How to Set up App Store Purchase Sharing on iOS and macOS?
Now the critical part of family sharing arrives. As an organizer, you have privileges to deny any app purchase request from a family member. The best part of App Store Purchase Sharing is that you can easily use the in-app purchases on the devices added in the family sharing group. In addition, it allows you to keep track of all the purchases it uses the organizer’s payment method to make any purchases purchase.
For iOS,
- Settings app > tap on your name > Family Sharing.
- Under Shared Features, tap Purchase Sharing > Set Up Purchase Sharing.
- Confirm your Account > Check the Payment Method > Continue.
- Send A Message to Family Sharing Members to let them know that you are sharing App Store Purchases with them.
For macOS,
- Click on Apple logo > System Preferences.
- Go to Family Sharing.
- Select Purchase Sharing.
- Check the box of Share My Purchases.
If you want to turn off purchase sharing in the Family Sharing group, then click on Turn off, at the bottom of the window.
How to Set up iCloud Storage Sharing for Family Sharing Group on iOS and macOS?
iCloud storage will only work with the family sharing group if you upgrade it to 200GB or more. This is because the free plan doesn’t support the family sharing group.
For iOS,
- Settings app > Tap on your name.
- Family Sharing > iCloud Storage.
For macOS,
- Apple logo > System Preferences.
- Go to Family Sharing.
- Select iCloud Storage.
Note: Keep note that, to share iCloud Storage with Family members, you have to upgrade iCloud Storage to 200GB or more. With a free plan, you cannot share iCloud Storage.
How to Set up Screen Time for Childs in Family Sharing Group iOS and macOS?
Screen Time is a great way to keep track of your child’s activities while you are busy with your office and works. After adding your kid in the Family Sharing group, you can look at all of the activities like time spent on a particular app, and also you can control your kid by setting up App Limit on iPhone.
Another worthy feature of screen time is that it allows you to access all the functions and customized settings across all your devices that are signed in with your Apple ID. Enable Access across all devices from, Settings > Screen Time > Access across all devices, on your iPhone.
For iOS,
- Settings app > Go to your name.
- Family Sharing > Screen Time.
- Choose a child to set up screen time.


For macOS,
- Open the Apple
- Select System Preferences > Family Sharing.
- Click on Screen Time.
- Mark the box next to the person, to enable Screen Time.
How to Set up Apple Music in Family Sharing Group on iOS and macOS?
Buying Apple Music subscriptions individually is much expensive than buying Music subscription of Family Sharing. So, avoid subscribing to Apple Music on an individual account, better be go with Family Sharing.
For iOS,

- Go to Settings app > Tap on your name.
- Open Family Sharing.
- Select Apple Music > Get Started.
- Go to your Apple Music.
- You will need to purchase Apple Music Family Sharing Plan which will cost you $14.99/mo. Up to Six Family Members can use the same Apple Music.
For macOS,
- Open System Preferences.
- Click Family Sharing > Apple Music.
How to Set up Apple Arcade in Family Sharing Group on iOS and macOS?
Apple Arcade is something new that you are going to experience in iOS 13 and macOS Catalina. Hundreds of interesting games are waiting for you in the Apple Arcade, here’s the way to go.
For iOS,
- Settings app > Tap on your name > Family Sharing > Apple Arcade.
For macOS,
- System Preferences > Family Sharing > Apple Arcade.
Follow the on-screen instructions and start playing games on your iPhone and Mac.
How to Set Up Apple News in Family Sharing Group on iOS 13?
- Download the Apple News app on your iDevice.
- Navigate to the Settings app > Tap on your name.
- Go to Family Sharing > Apple News+.
- Subscribe to Apple News+ at $9.99/mo to access Apple News in Family Sharing.


