here’s how to backup MacBook to an external hard drive? That’s called Time Machine Backup. Just like Windows OS, We can not Take Mac Backup on the Same Mac or on another Partition/Same Partition. A good habit in the case of update OS on any device takes full backup without taking risk or haste about using new OS X.
Here I cover the full guide on How to Backup a full Mac before the update with the latest MacOS. In any case, you skip steps for Taking Backup in Time Machine, you might lose data then you have to use any of data recovery tools for Mac. A time machine is an official way to take a backup of your full system, Settings, Mail, Contacts, Photos/ Videos, Document, and folder. One of the secure services given by Apple within your device. Learn how to start Time machine backup on your device.
Compatible Devices: MacBook, iMac, MacMini, MacBook Retina, MacBook Air.
OS X Version: macOS Sonoma, Ventura, macOS Monterey, macOS Big Sur, MacOS High Sierra, MacOS Mojave, Mavericks, Yosemite, or Upcoming also.
So you can take full backup in the external drive, So you need one high-capacity data storage external drive. I think 6TB is best suited for this time and then you can use the remaining space for Any Use. You can order the top best External Drive for Mac.
Step for Taking Backup in Time Machine on Mac OS X
Back up your Mac with Time Machine On MacOS Ventura, Sonoma
Step 1) Go to the Apple Logo from the top Mac menu > System Settings..
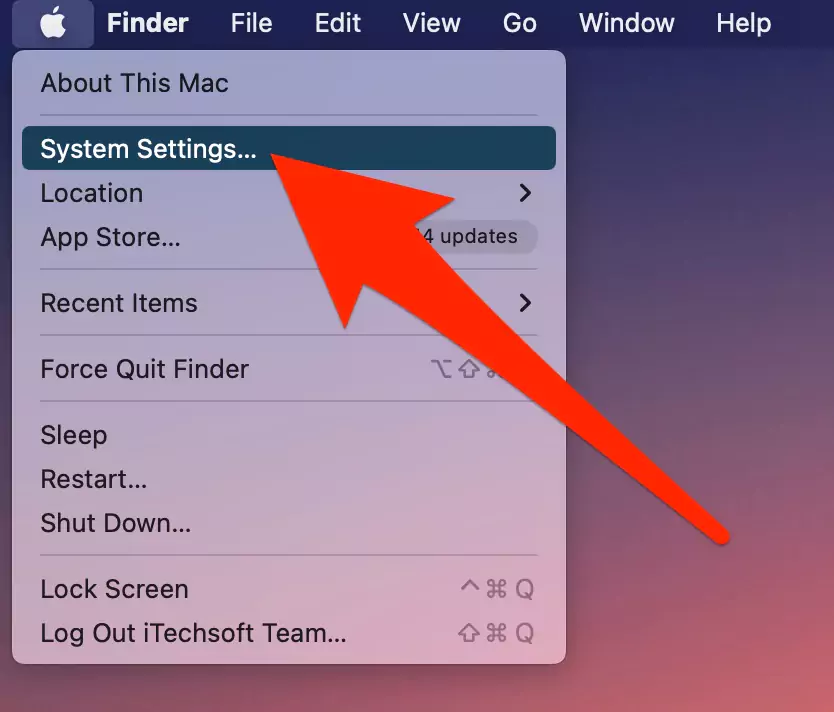
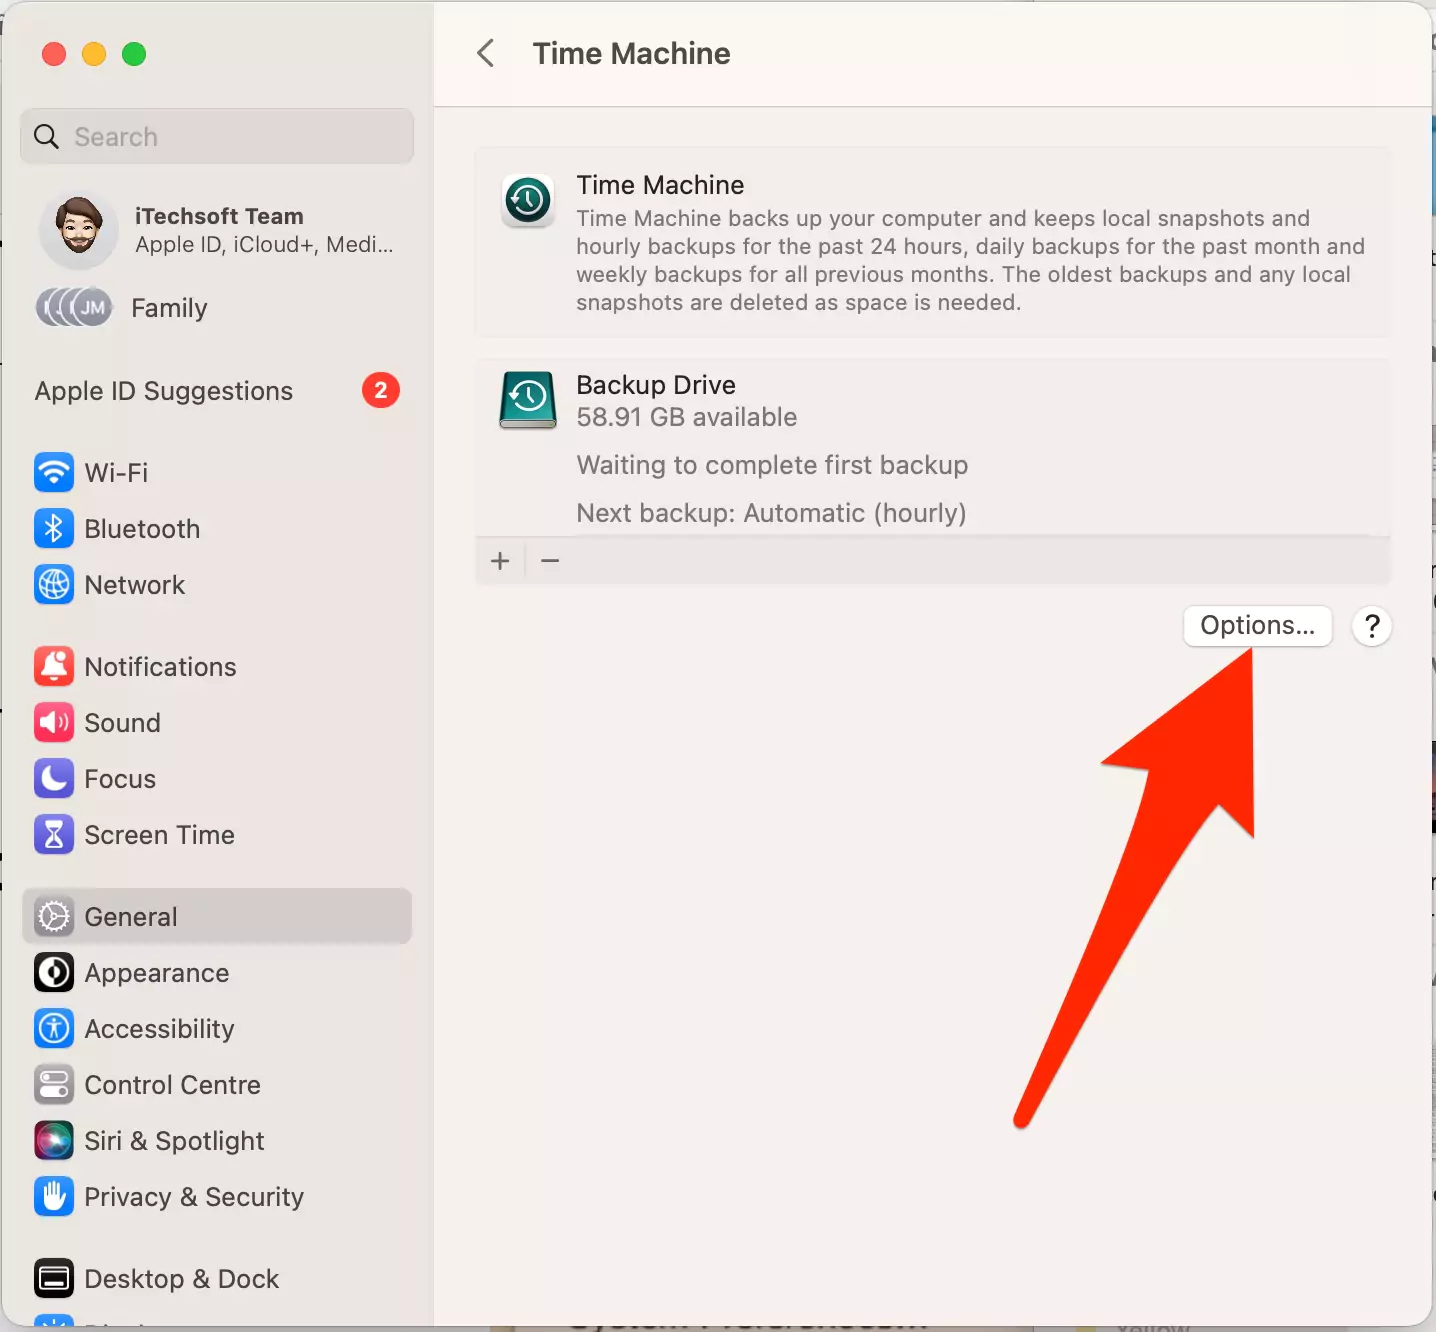
Step 2) Open General > Time Machine.

Step 3) Click on Add Backup Disk Option.
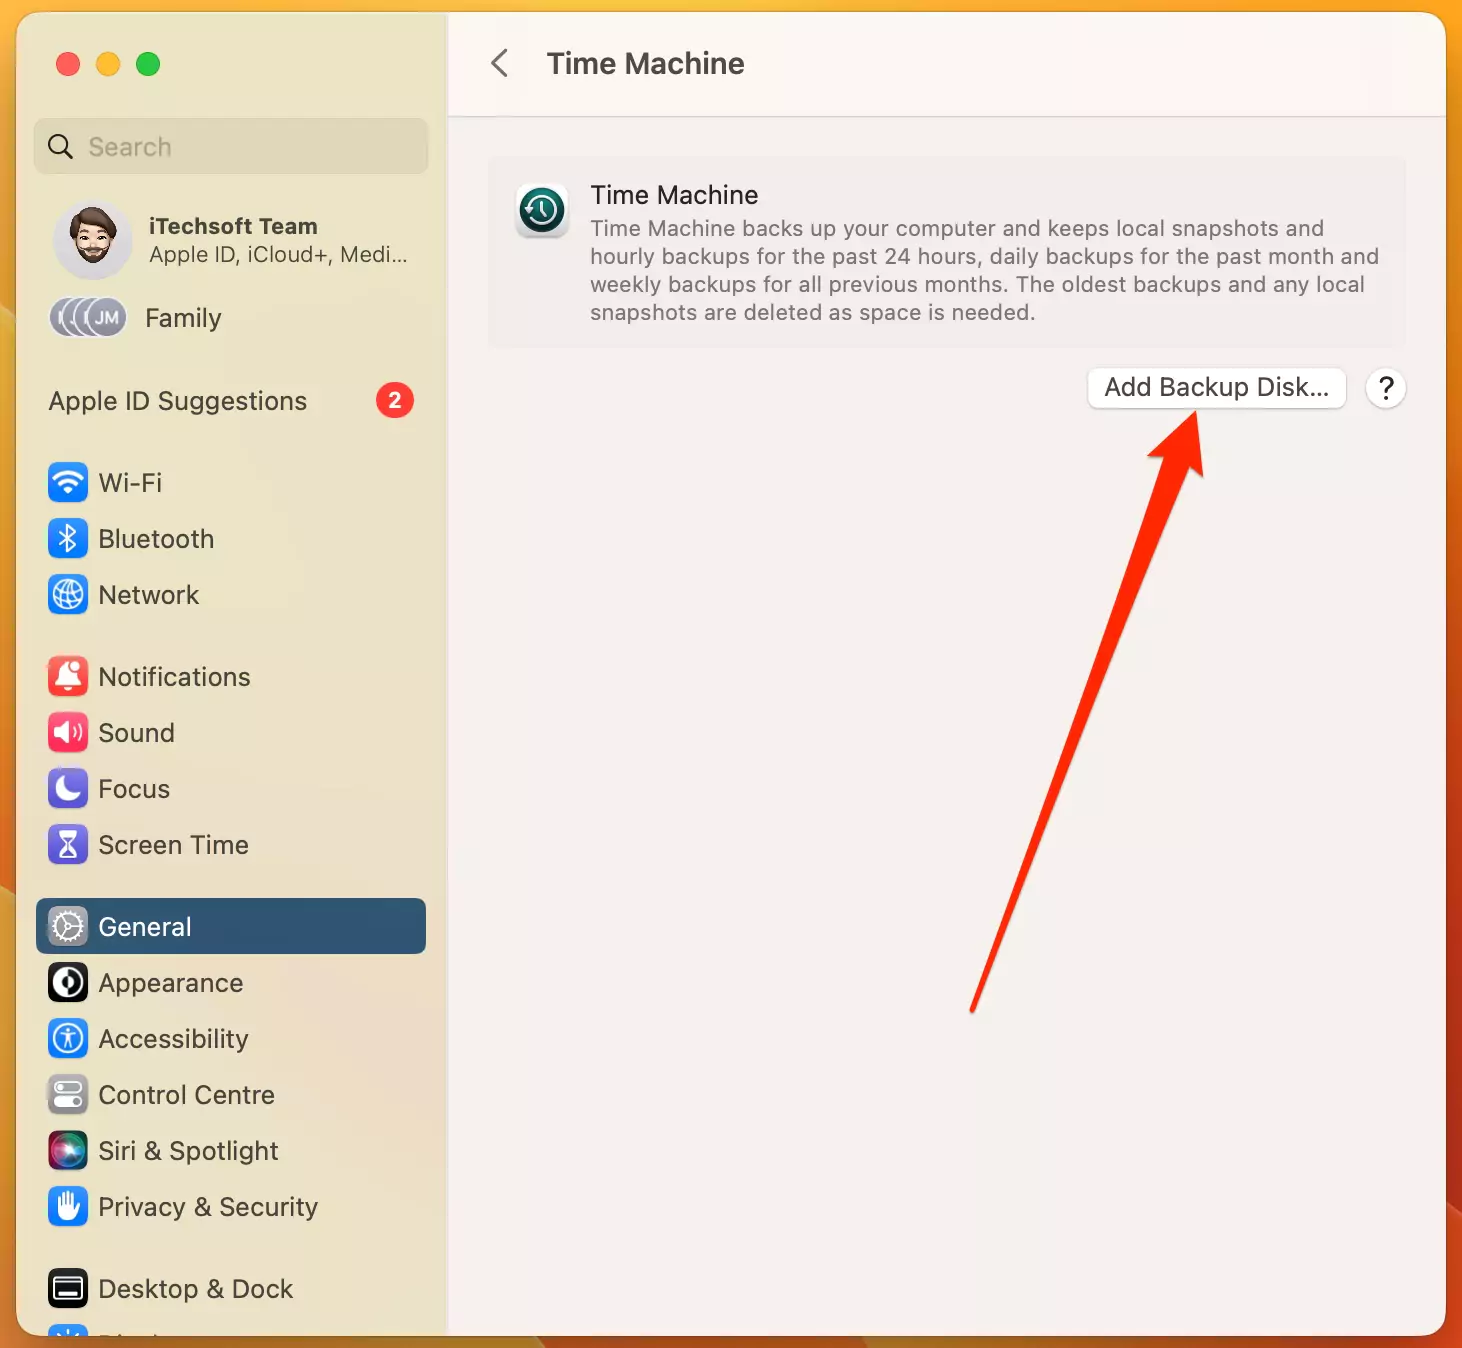
Step 4) Select External Backup Drive and Choose Setup Up Disk.

Step 5) Now, Allow the Backup disk to use Maximum Space Used for Backup. Tap On Done.
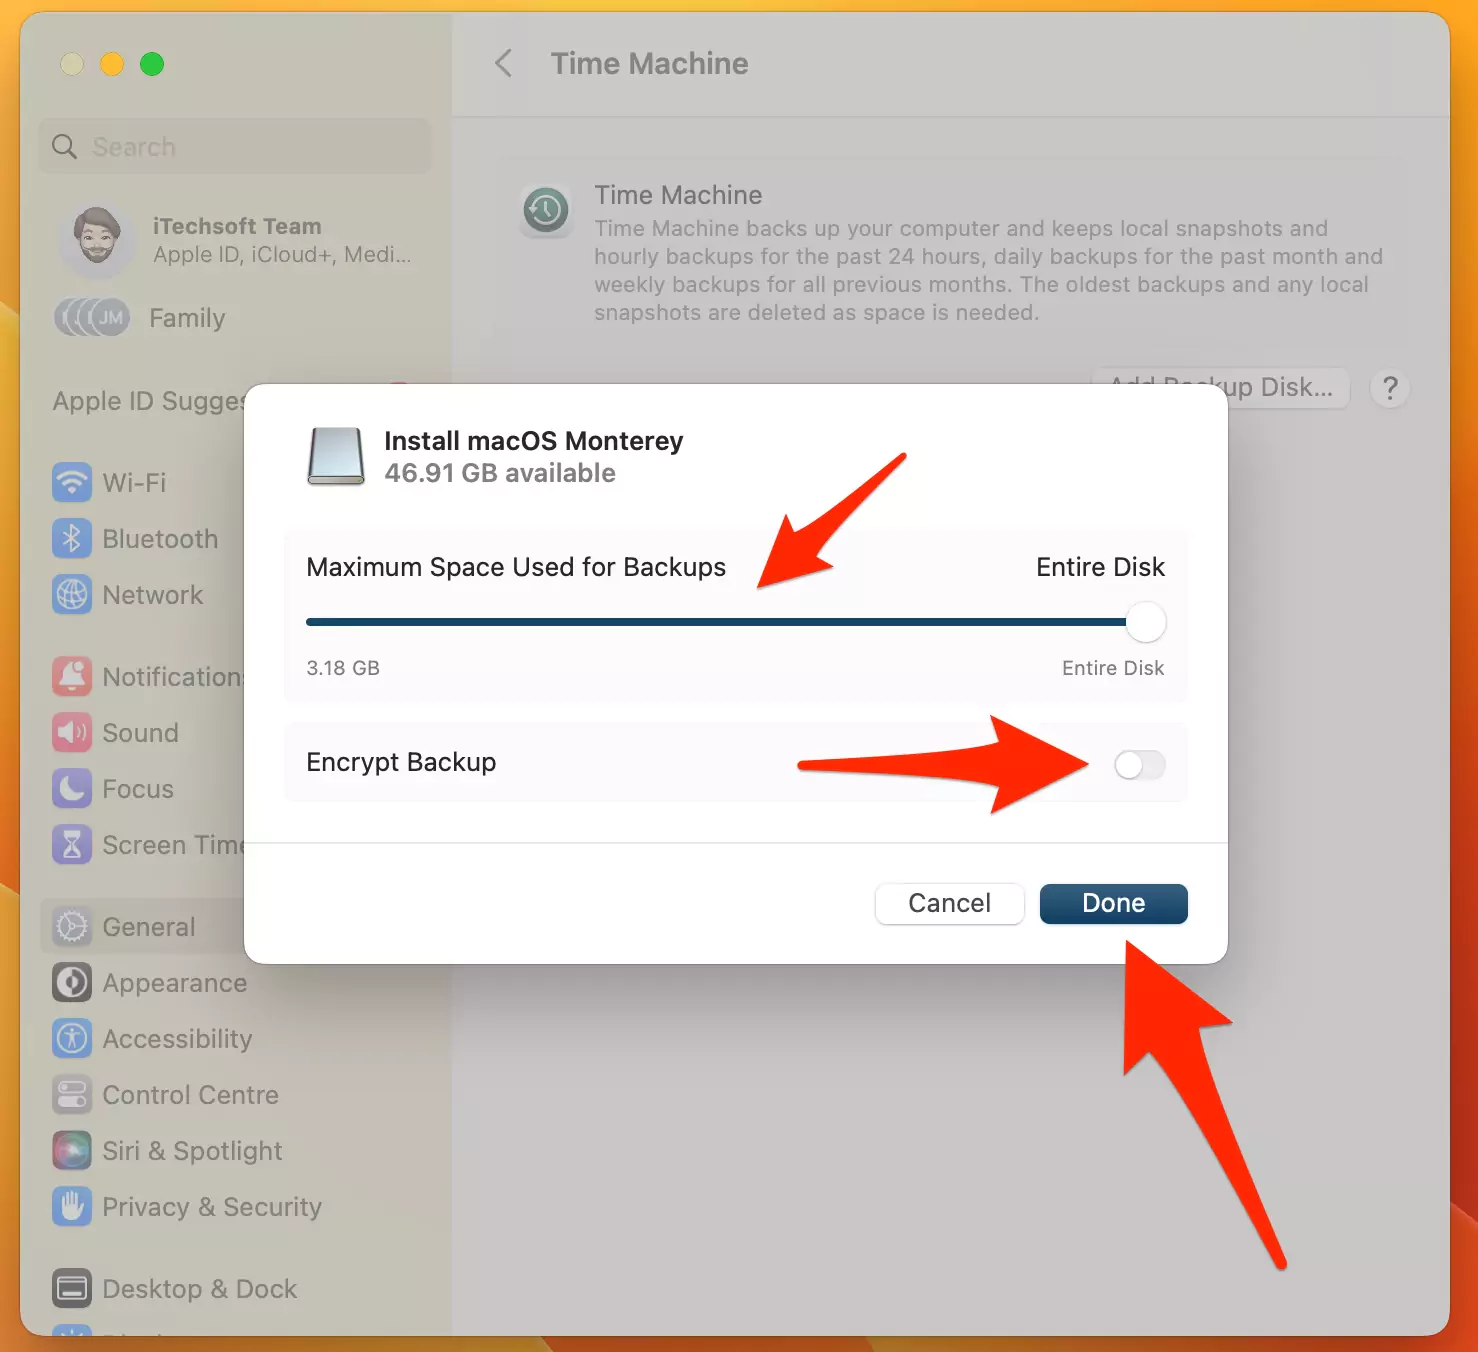
Step 6) Optional – The next Option is for “Encrypt Backup“, But Your data can’t be restored if the password is forgotten. so make sure and Remember. if you can’t do that then i recommend to Disable the Encrypt Backup.

Step 7) Tap on Done, and See the Backup process in Calculating time remaining… and Size.

Step 8) To Remove or Stop Using Backup drive in Time machine, Right-click on Backup drive and see Backup now or Stop Using Drive for Backup option.

Another Important Setting is the Backup frequency for Automatic Backup in Backgroud. Given in next step.
How to Turn on Automatic Backup on MacOS Ventura
An automatic backup is a safe option that allows users to run backup in the backgroud, so with minimum effort mac use can recover all data at any time without worry. But you have to enable the option from Time Machine settings on Mac. follow the below steps.
Step 1) Go to the Apple Logo > System Settings > General > Time Machine > Options > Back up frequency > Select from,
- Manually
- Once every hour
- Once every day
- Once every week

Tap on Done to apply the changes. and manage time machine backup itself.
How to Add Time Machine On Menu Bar on Mac
Time machine shortcut on the top mac menu bar is an easy way to start and stop Backup at any time without opening settings preferences. Here’s on MacOS Ventura, let’s add or remove the Time Machine shortcut to the menu bar.
Step 1) Go to the Apple Logo from the top menu > System Settings.
Step 2) Next, Click on Control Center > Scroll to the List, under the “Menu Bar Only” section, and select Show in Menu Bar for Time Machine.

Step 3) That’s it. Now TM Shortcut is added to the menu, click on it and see the options for Start Backup now, or Stop if Running.
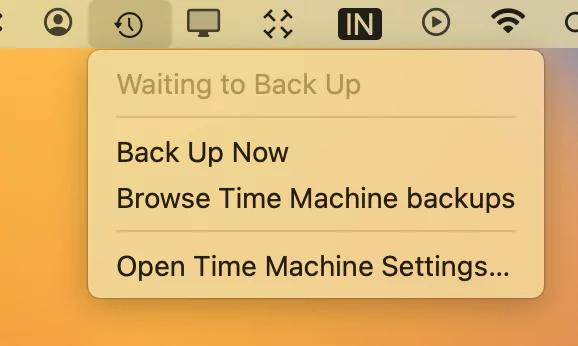
- Browse Time Machine backups
- Open Time Machine Settings…
Back up your Mac with Time Machine On MacOS Monterey & Earlier
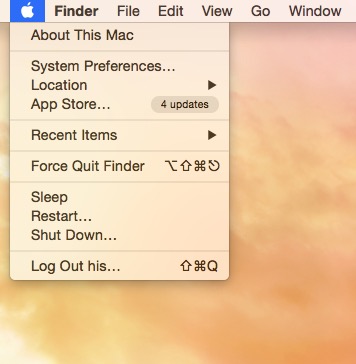
- Step #1: Go to the Apple Menu
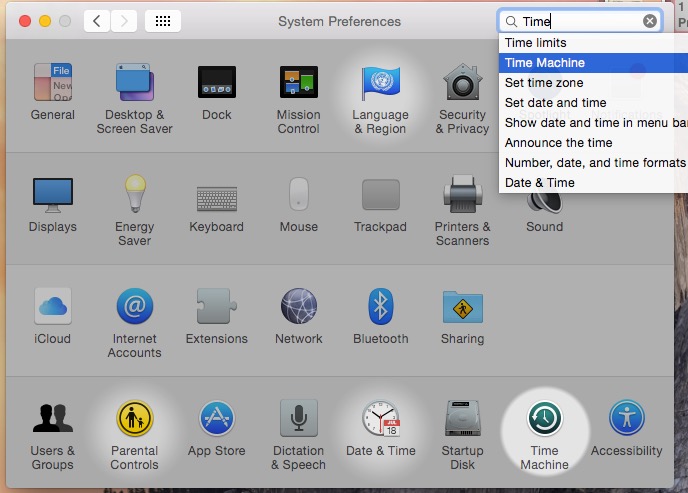
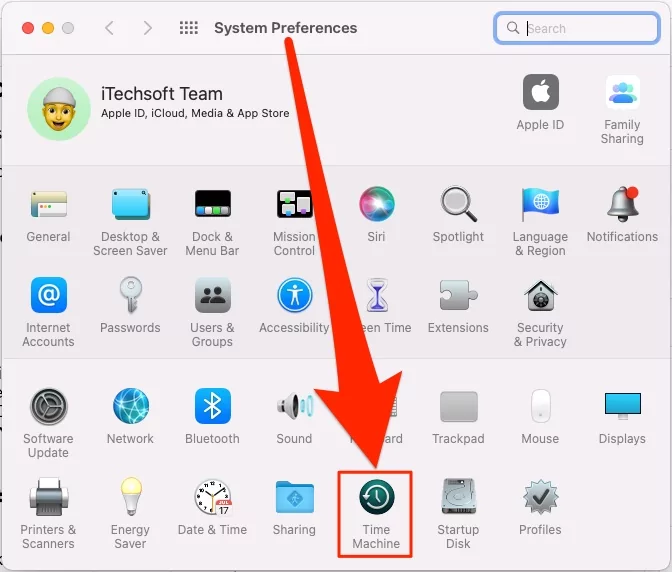
- Step #2. Next click on System Preference.
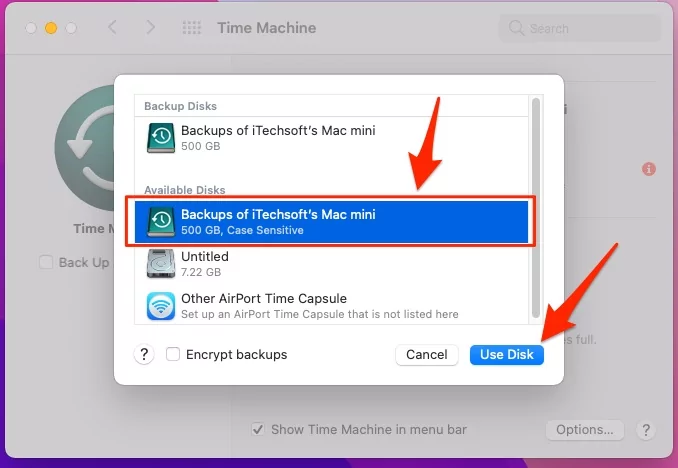
Here showing Bootcamp, it’s hence that Dual OS running on single Mac (macOS 11 and Windows). Otherwise, you will see your macOS system name only.
If you choose Bootcamp, you Will take full system backup means all the partition data.
Note: if you connect any third-party drive for a large backup, the external drive is also seen in the list.
- Step 4: Then, Click on Use disk.

- Step 5: Next, Enable Time machine backup toggle when you want to start.
Time machine always stores the latest data, in the case, your drive might be full then Time Machine erases old data – Backup file automatically.
Once your Time Machine Backup is Completed into External Drive, you will get the notification on your Mac screen.
Enable Time Machine directly from the top menu bar, click on the Time Machine icon and Start Backing up on your Demand “Back Up Now“.
Sometimes we fail to take Backup Mac using Time Machine.
Force Backup in Time Machine
The oldest backups are deleted when your disk becomes full. But sometimes can’t delete it. so at that time, we have to free up space manually, That’s explained in the below steps.
- Click on Apple Logo from the top Mac menu > System Preferences. Click on Time Machine.

- Click on Select Disk Option.

- Select the Backup Drive and use it for Start Time Machine Backup.

- Otherwise keep selected automatically.

Delete Backup in Time Machine
Time Machine Backup is a common process for all Mac and MacOS. So, it’s easy to manage even you are new and you are getting errors because of not enough space on External Drive [Time Machine Backup Drive].
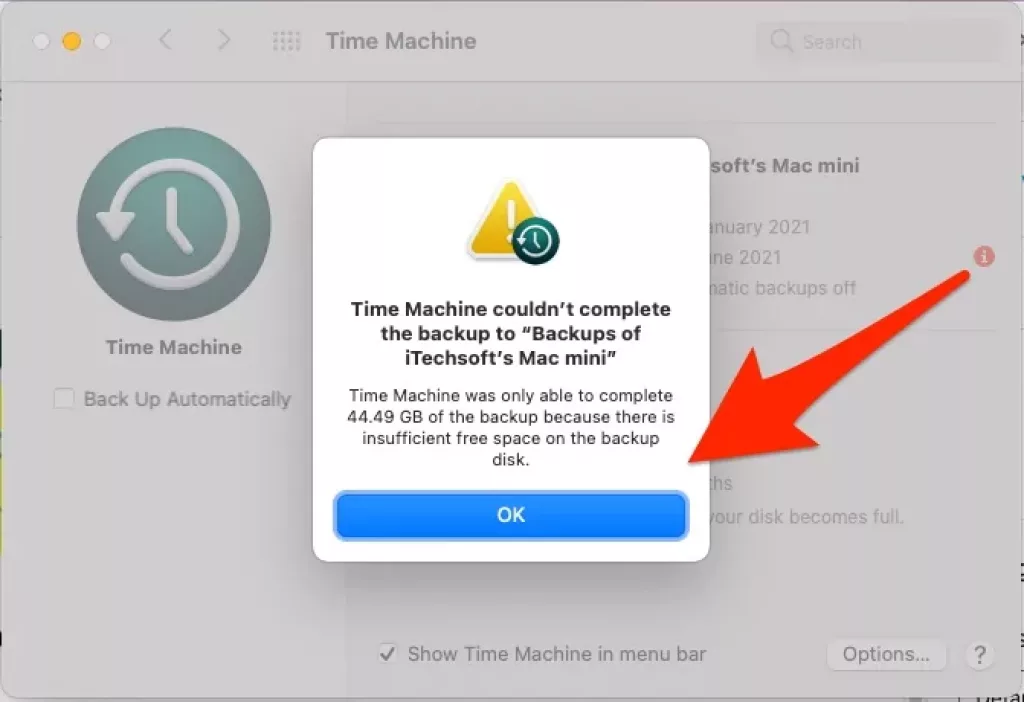
Follow the below steps to Open Time Machine Backup drive on Mac, Find & Delete Old Backup.
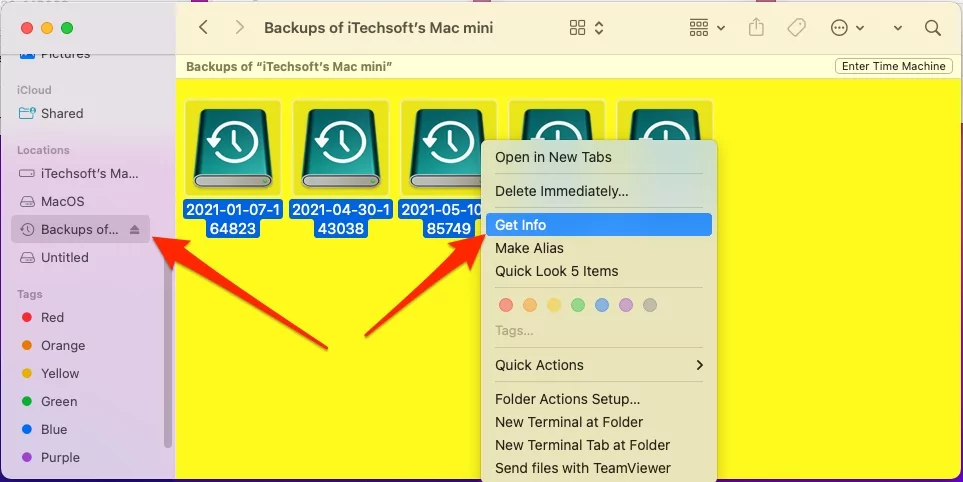
- Open Time Machine Backup drive from the Finder window sidebar on Mac.
- Click on the Time Machine Drive > Select all the Time Machine Backup Folder > Right Click on it > Get info.

- See the Backup size for Each folder and the last modified date.

- Find the Too old backups and Delete them completely.

- That’s it.
FaQs
How do I enable Time Machine on my Mac?
We can add Time Machine on the top Mac menu bar and quickly turn it on and stop the Backing up process to an external drive using Time Machine on Mac. For now, there is no option to enable and put the Time Machine shortcut icon on the menu bar in macOS Ventura Beta. Wait for the next update or check into Apple Logo > System Settings > General > Time Machine > Option and Select “Show Time Machine on Menu bar”.
Why won’t my Mac recognize my Time Machine?
There are several possibilities for your Mac won’t recognize the time Machine drive, That might be incompatible Drive format, Corrupted Data partition and Used on Other systems, Cable connection problem, or Hardware issue. Bug in MacOS. if your Time Machine drive is connected to the network, make sure your network is up and connected to your Mac and Time Machine drive.
Does macOS Ventura have Time Machine?
Yes, Just like earlier macOS on iMac, MacMini, MacBook Pro, and MacBook Air. We can take backup of whole macOS and Data, Settings. But the Steps and options are updated with new macOS Ventura’s redesigned system preferences.
Here in this article, you can find the option to Choose a New Backup Drive and Add on your Mac.
- Back up to “Backup Drive” now
- Stop using “Backup Drive” for backup
Or Remove the Time Machine Backup Drive from Time Machine settings.
Does Apple Time Capsule work with Ventura?
Yes, Apple Time Capsule Support all macOS version [Mac with OS X v10.5.7 or later]. So now you can set up Time Capsule with your Mac Running macOS Ventura. Get detailed specifications and features for AirPort Time Capsule here. Setup process is just like normal as you use External Drive for Time Machine backup on your Mac.
How to Restore Backup From Time Machine on MacOS Ventura?
Restoring Data from Time Machine Backup Drive using Time Machine is different for different situations.
- We can use Time Machine Backup Drive on New Mac Setup, While setup.
- We can use Time Machine Backup For Transfer Old Mac Data to New Mac using Migration Assistant.
- During Clean install, or Restore Using Recovery mode.
How to Transfer Data to Mac using Migration Assistant on MacOS Ventura?
Use Migration Assistant to transfer information (data, computer settings and apps) to this Mac from another Mac, a Windows PC, a Time Machine backup, or a disk. You can also transfer information from this Mac to another Mac. All other apps will quit when you click Continue.
You might need: Time Machine Backup Stuck on Preparing Backup or In Progress.
Still, have you been confused on the way for Taking Backup in Time Machine or query on Time Machine backup stop automatically, and then share your problem with us on the comment box.

