The focus will help in setting a mindset with your Apple Device. With Quick Access from the Control Center on Mac, Use it for Auto-Reply, Custom Focus as of your Work type, Urgent Messages, and Auto Apply Settings Across all devices. It Also Supports Third-Party apps.
It has distinctive and advanced features that give new experiences and are designed to enhance Mac’s capabilities.
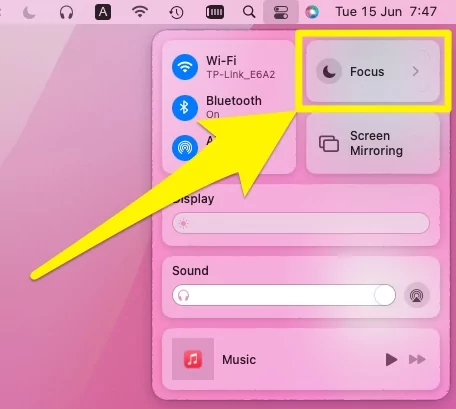
Quickly Enable/Disable Focus on Mac Control Center or Top menu
1→ Click on the Control Center icon from the top Mac menu > See Focus and click to Apply Different Custom Focus instead of Do Not Disturb.
2→ Now, Focus is showing in the Top Mac menu bar. Click on Focus again to turn it off.

What is Focus on Mac? & Why do we Use Focus?
The new Focus feature in macOS is an extension of Apple’s “Do Not Disturb” feature. It allows users to limit the messages, calls, and alerts they will receive during their sleeping or productive hours. This new feature aims to bring more flexibility, control, and automation to the user’s life and help them focus better.
This feature allows users to set periods that filter or block their notifications. With Focus, Mac users can stay in the moment by automatically filtering out notifications unrelated to their current activity. In addition, users can signal their status to let others know when they are focusing on something and are unavailable.
This feature will allow users to customize how they want to get notifications about events like incoming calls, texts, or updates from apps based on their current status. Users can enjoy this feature by not just silencing calls and notifications through the ‘Do Not Disturb’ mode but can set different notification preferences based on their status. For instance, when a user is driving, sleeping, or working, they can select different categories or choose a category from the custom categories.
The system uses onboard Artificial Intelligence (AI) to help determine what one’s status is at a given instance. For instance, the phone might suggest turning off their notifications when they are preparing for a presentation or arriving at a gym.
With this new feature, one can customize how and when they want to get notifications. For example, one can choose to be notified only by family, close friends, co-workers, or apps like Mail, Calendar, or other essential apps. When one uses the Focus feature, it also automatically syncs with all other Apple devices. It will help one to keep disciplined.
How to Use Focus on Mac?
The goal of Apple in coming up with the feature of Focus is to help users minimize distractions. Mac, iPad, and Apple Watch support this feature.
Create a custom Focus to filter notifications based on what you’re currently doing
On MacOS Ventura & Later
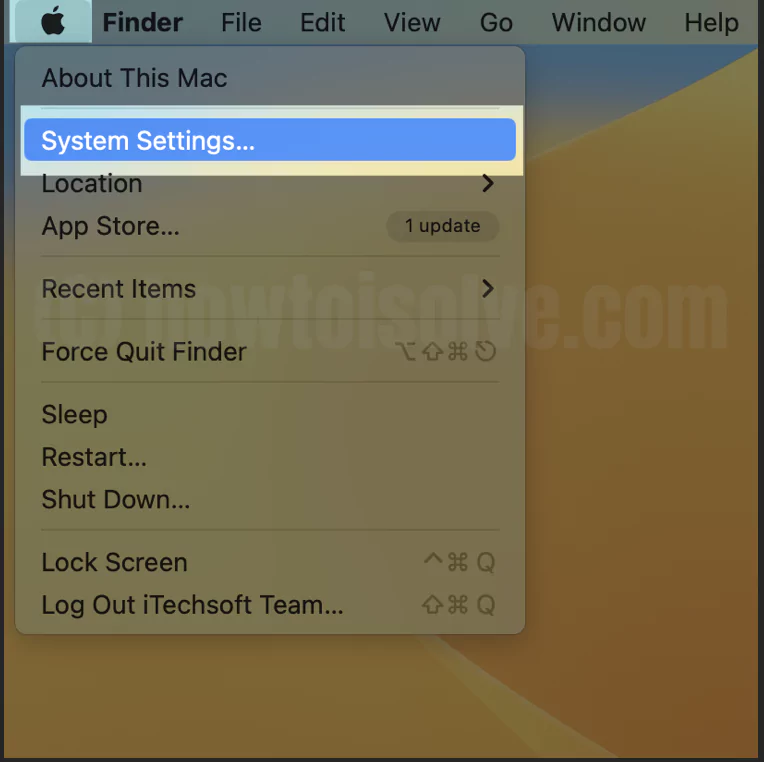
1→ Go to the Apple Logo from the top Mac menu > System Settings.
2→ Scroll and Find the Focus option. See the Add Focus Option on the right side of the windows.
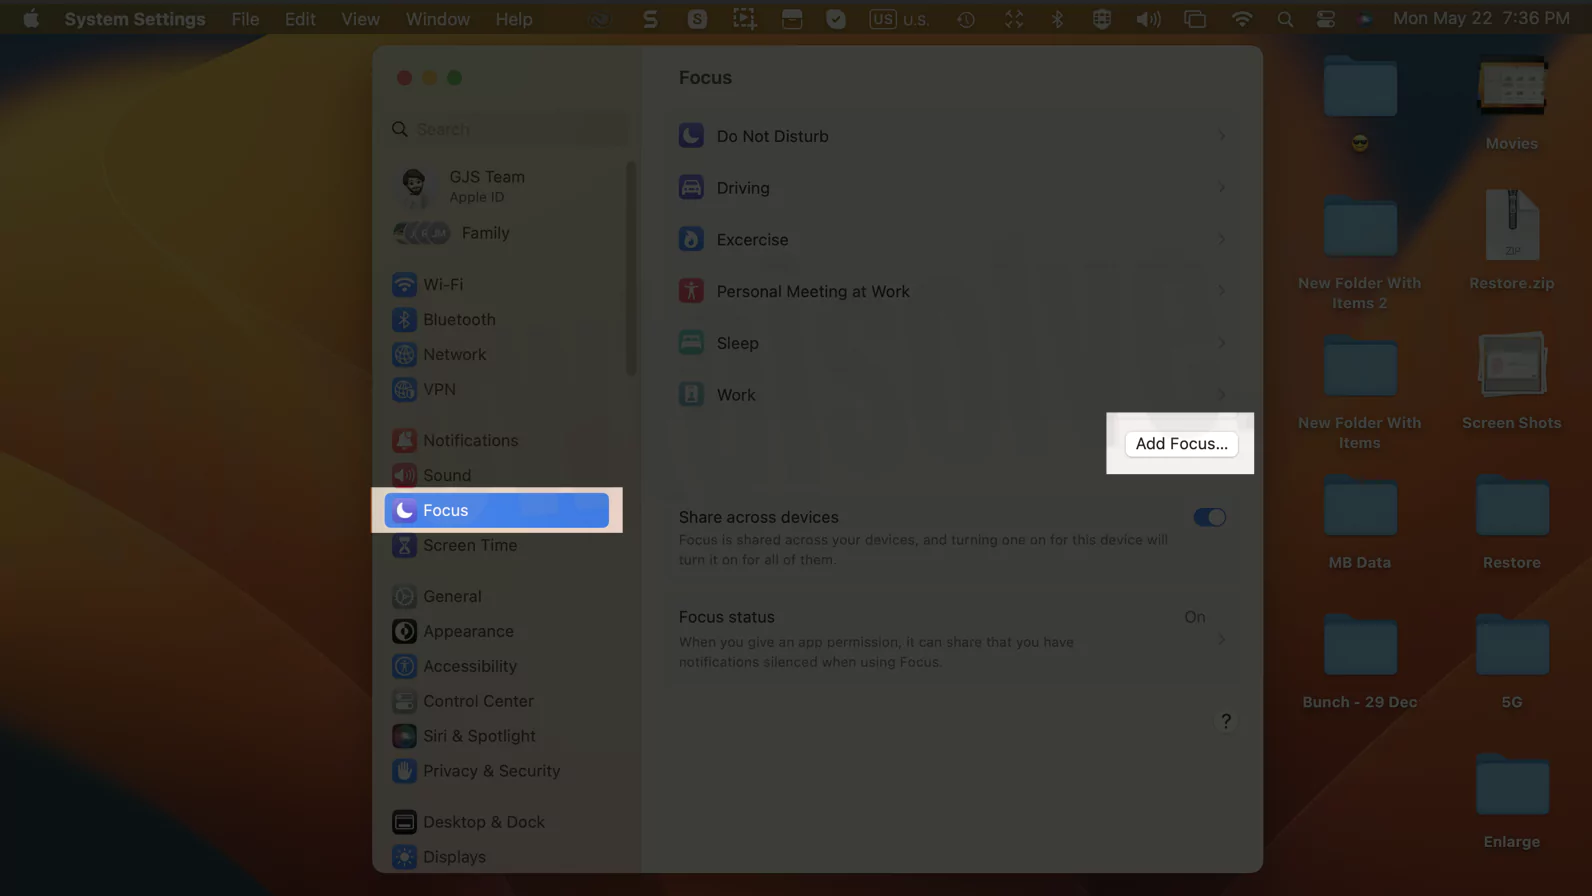
3→ Select from Gaming, Mindfulness, Personal, and Reading or Click on Custom Focus.

4→ follow the on-screen options to customize with the Focus Name. Select Focus theme color or emoji.
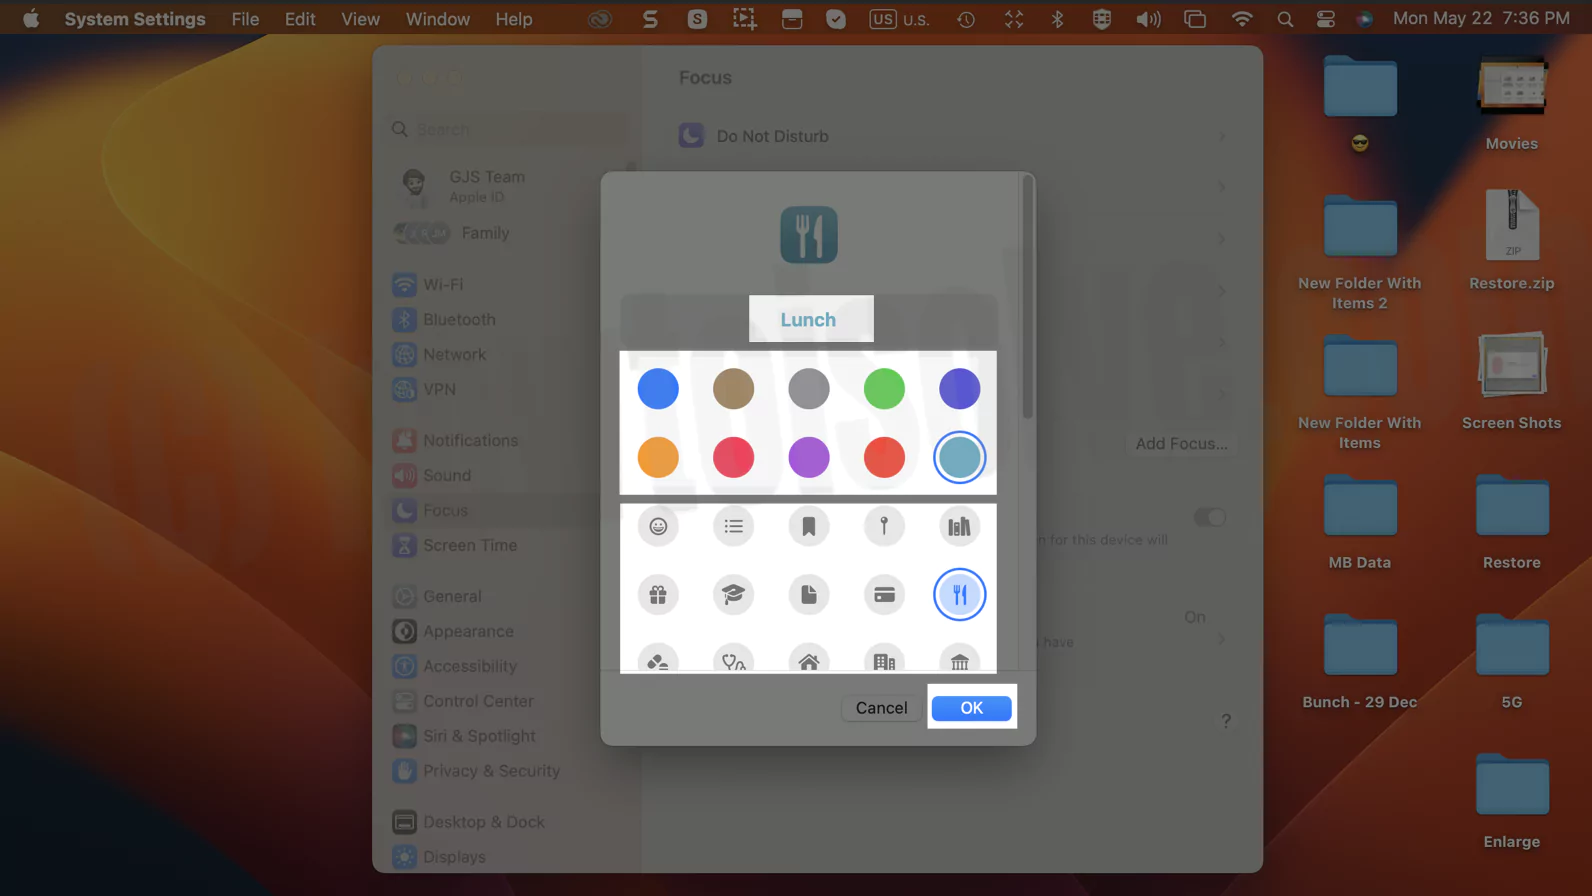
5→ Filter the notification by People and Apps. Next is to Set a Schedule and App filter.
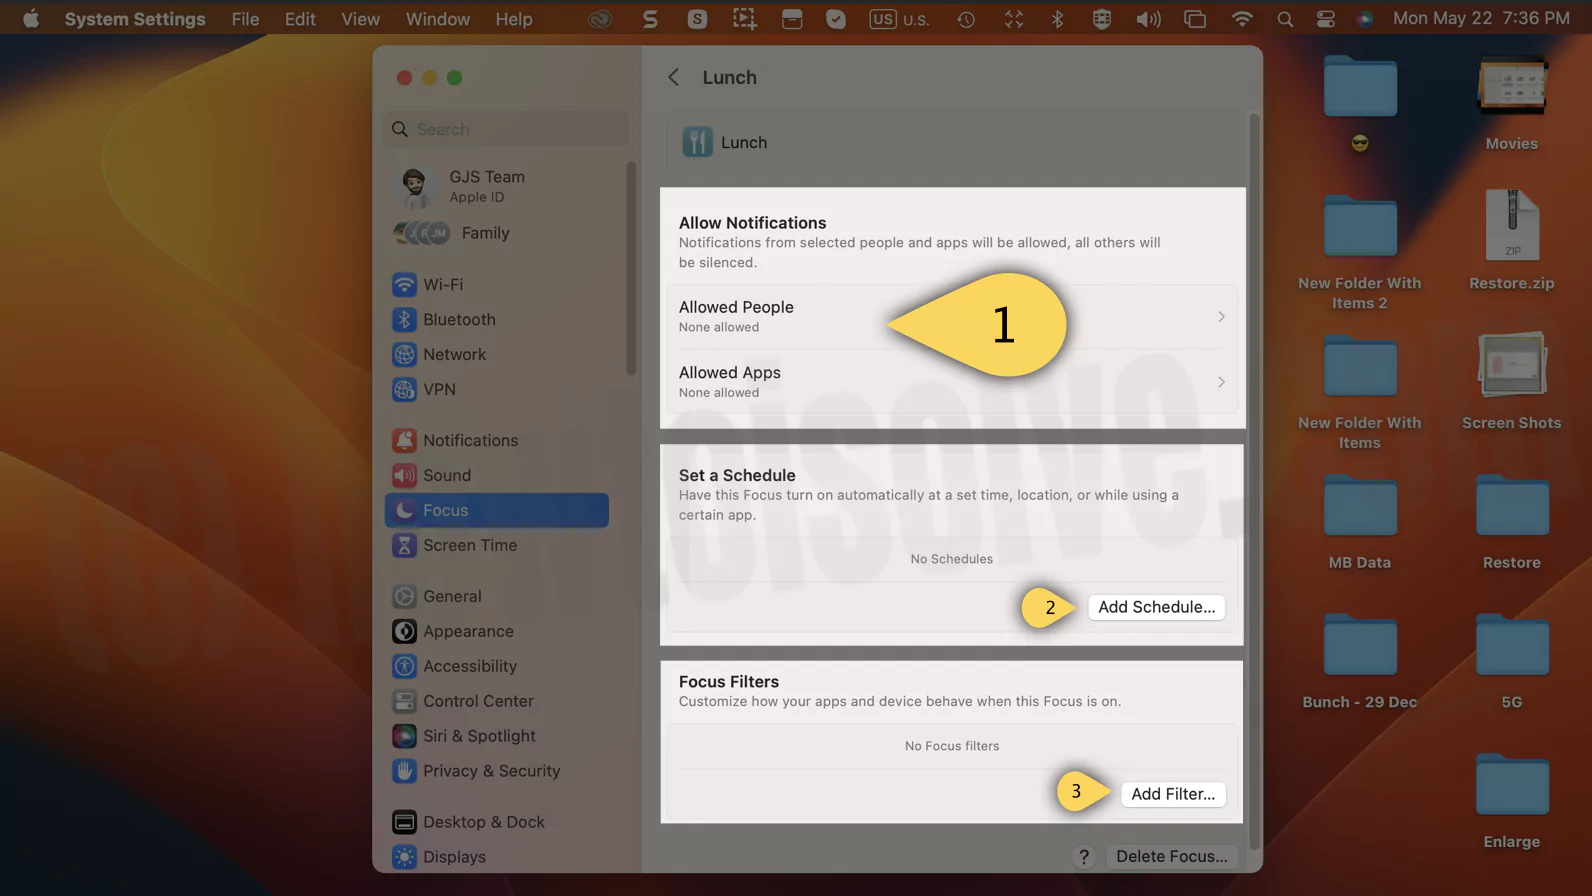
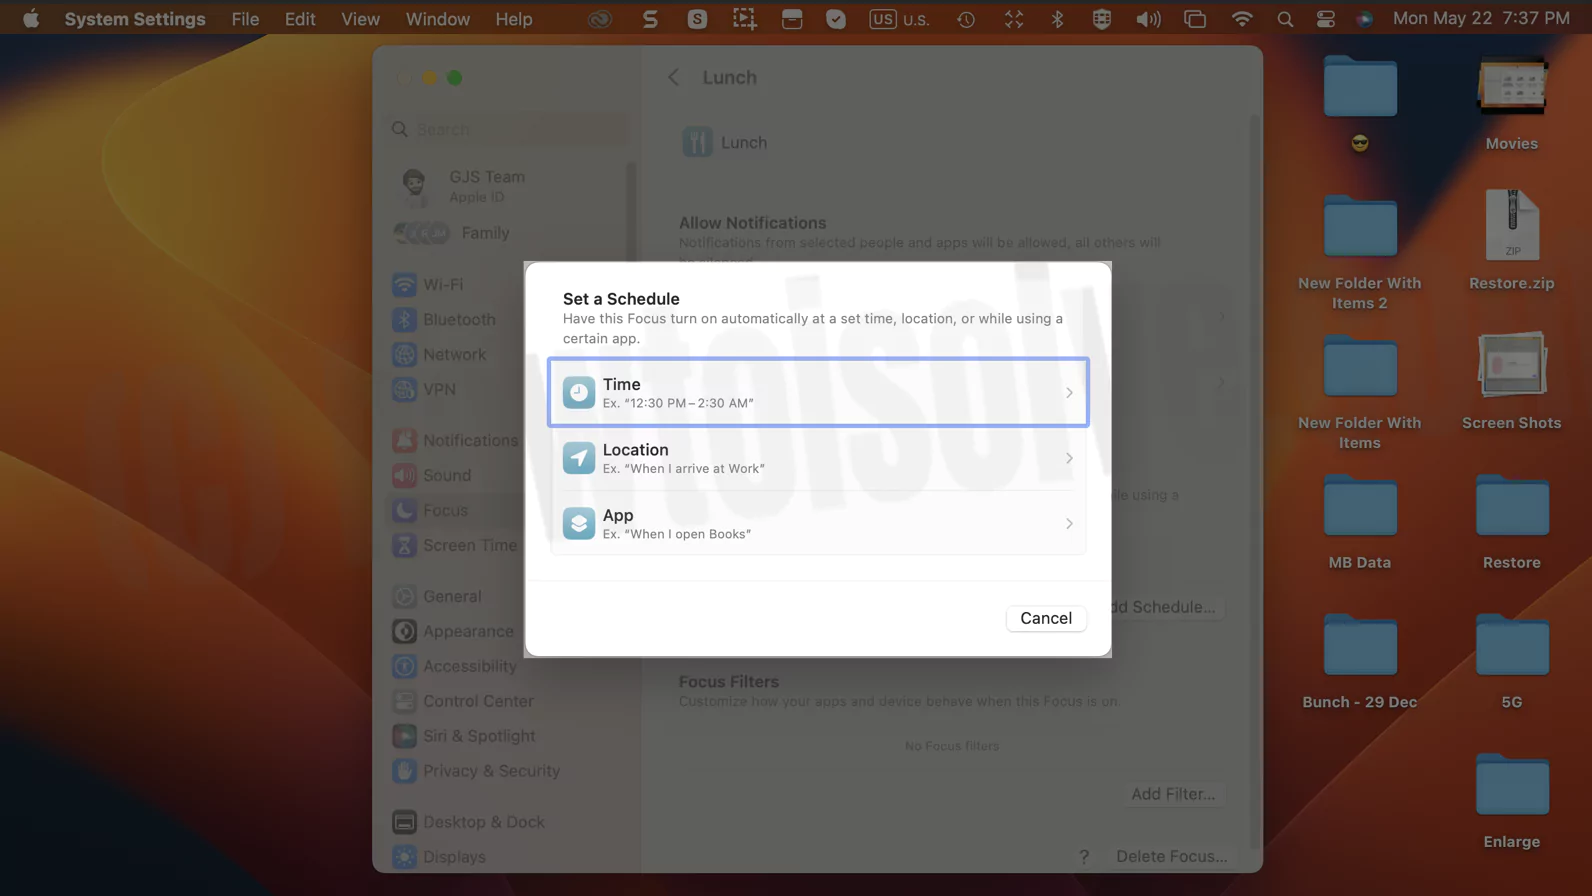
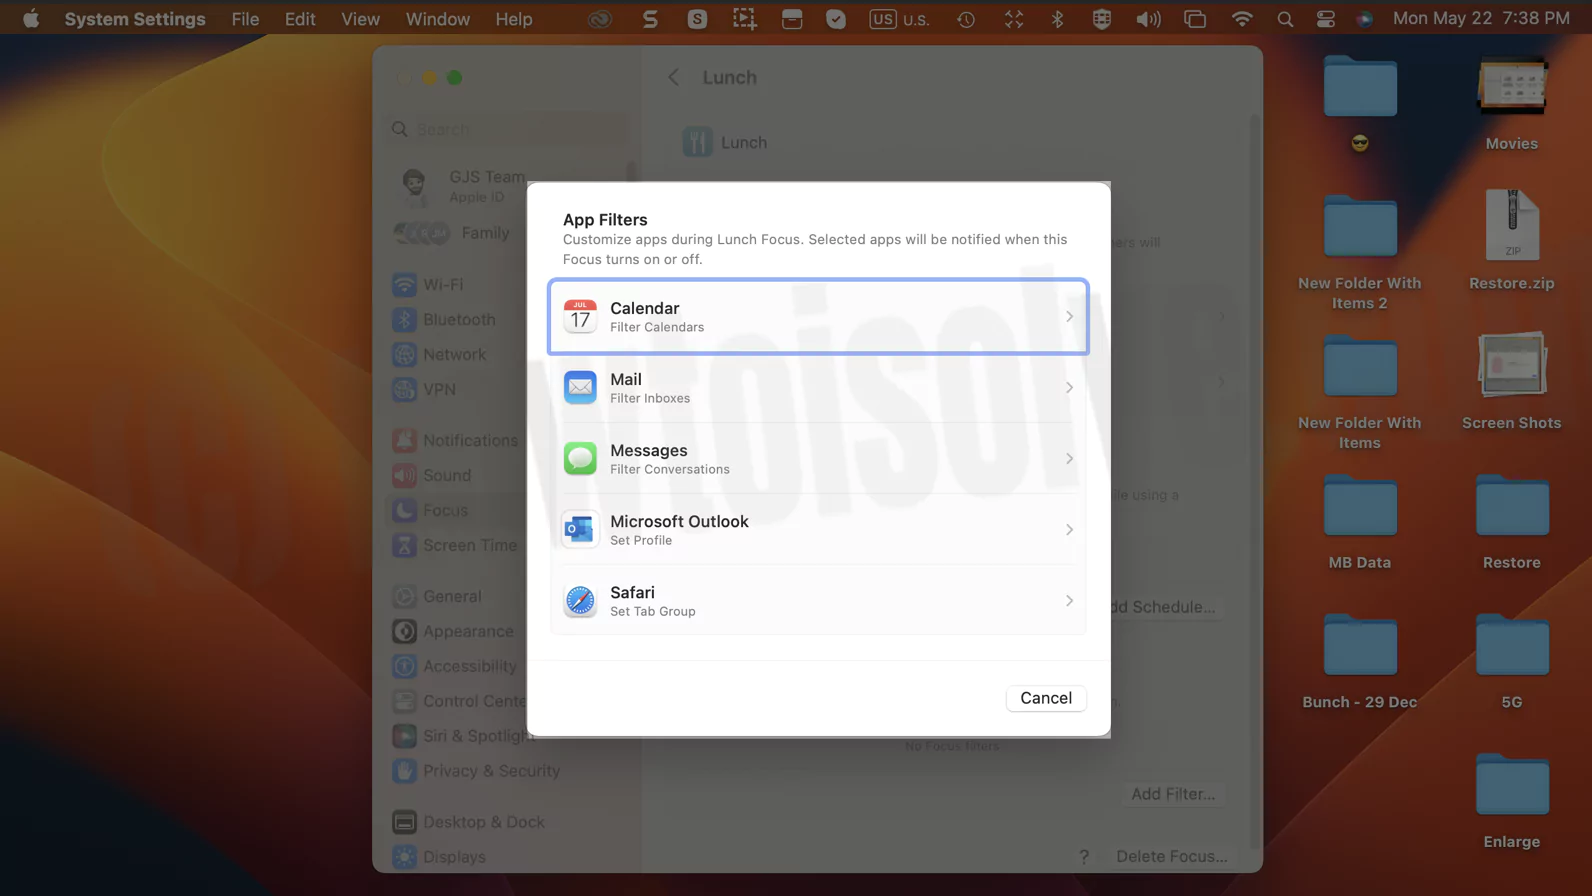
That’s it. Once you create Focus, activate it from the control center under the Focus Button.
On MacOS Monterey
1→ To set up Focus on Mac, one needs to click on the Apple icon at the display’s top left. Then choose ‘System Preferences.’
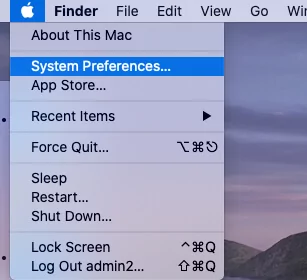
Then one needs to choose ‘Notifications‘.
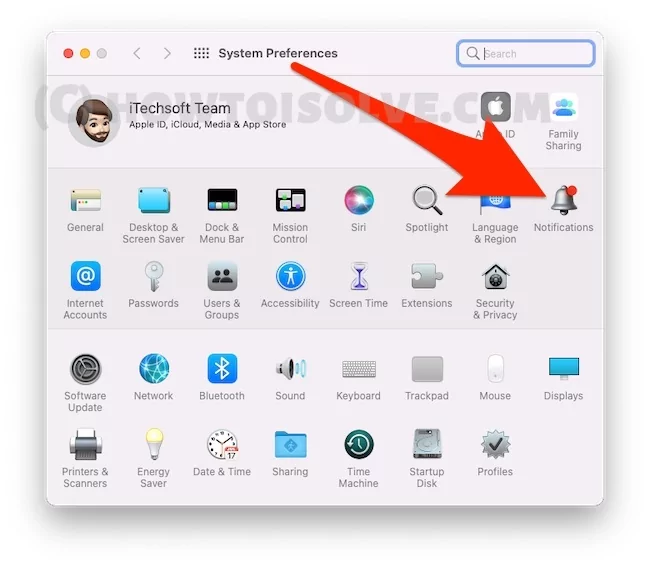
‘Focus‘ Tab. The original ‘Do Not Disturb’ settings exist here.
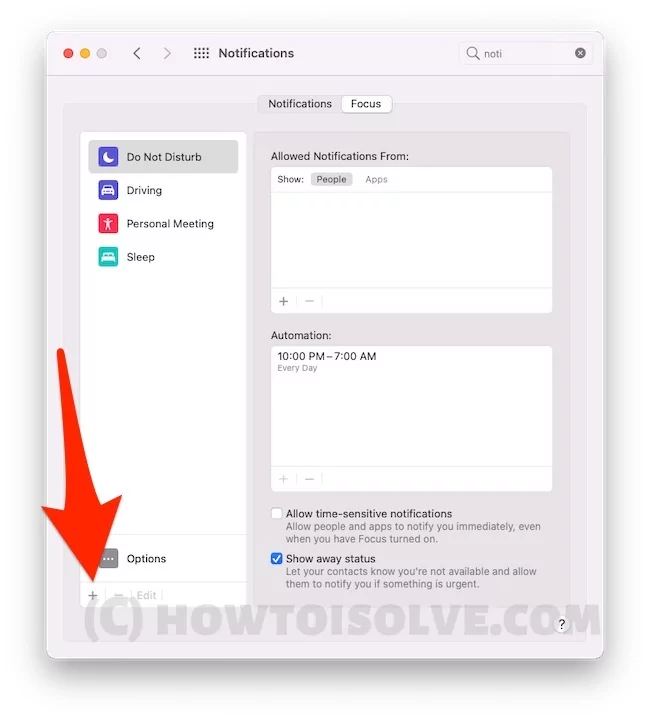
To get started, one needs to click on the ‘+’ on the left side of the screen. Here, one can add a name, color, and icon for a new setting.
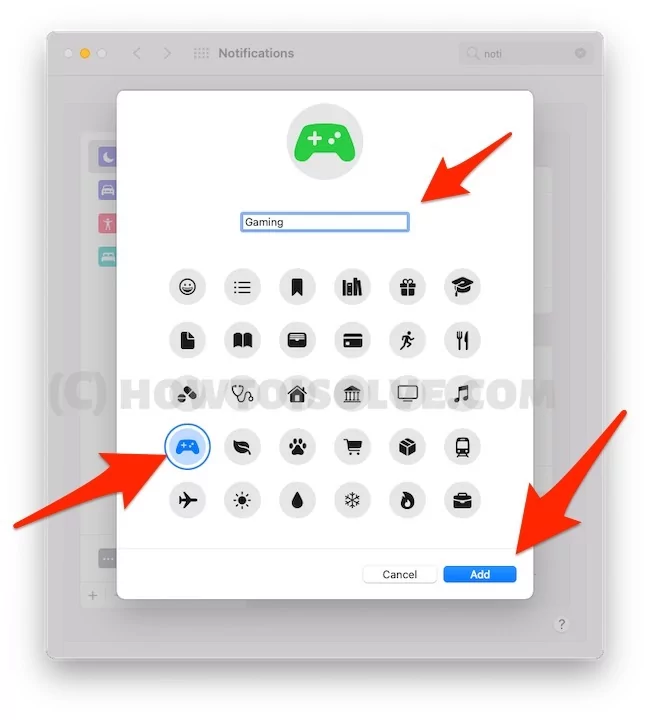
Then one needs to click ‘Add.’
One can assign contacts and apps they wish to receive notifications from during this event on the next screen. Here one needs to click the ‘+’ under the ‘Allow Notifications From’ section.
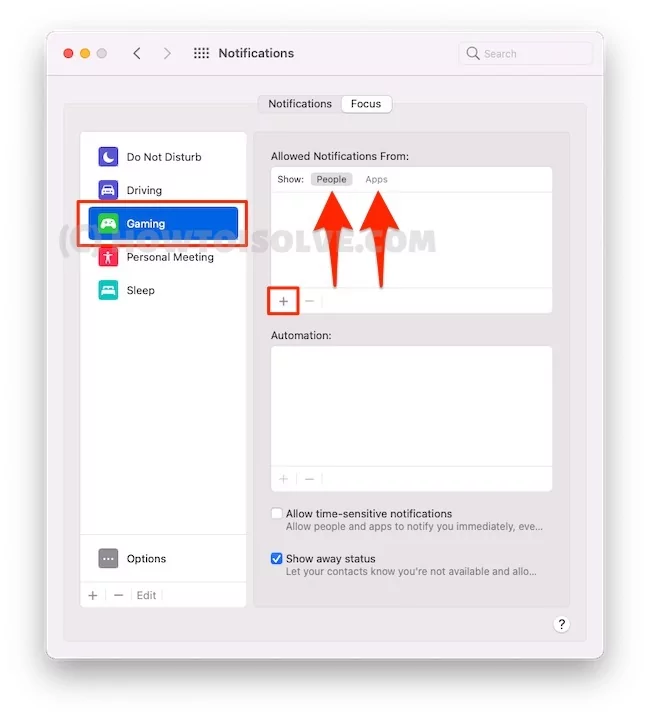
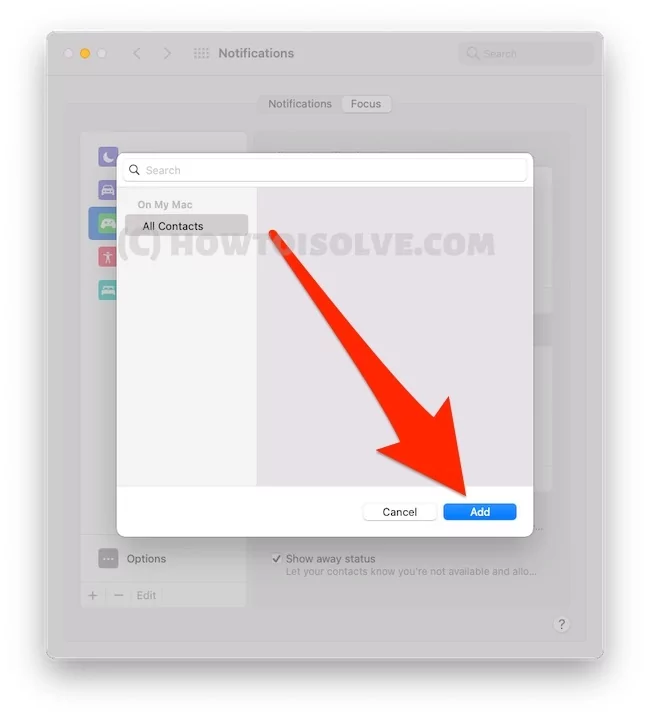
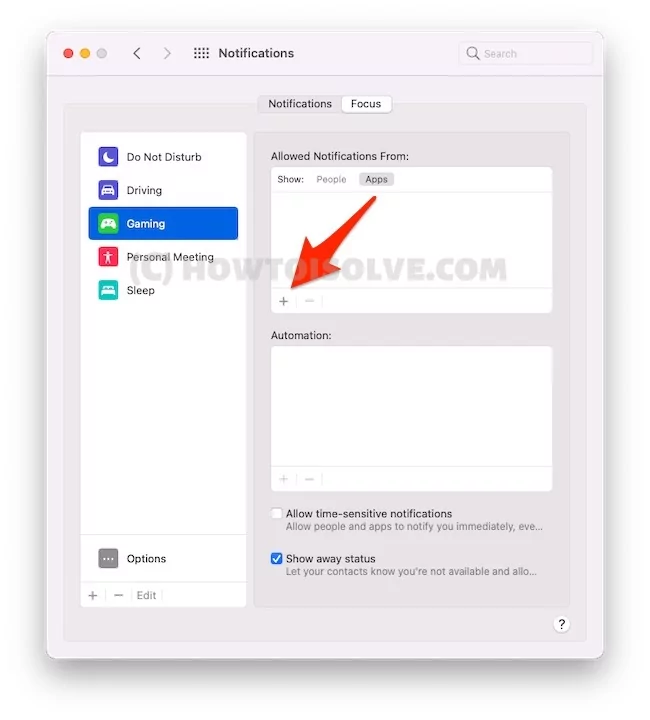
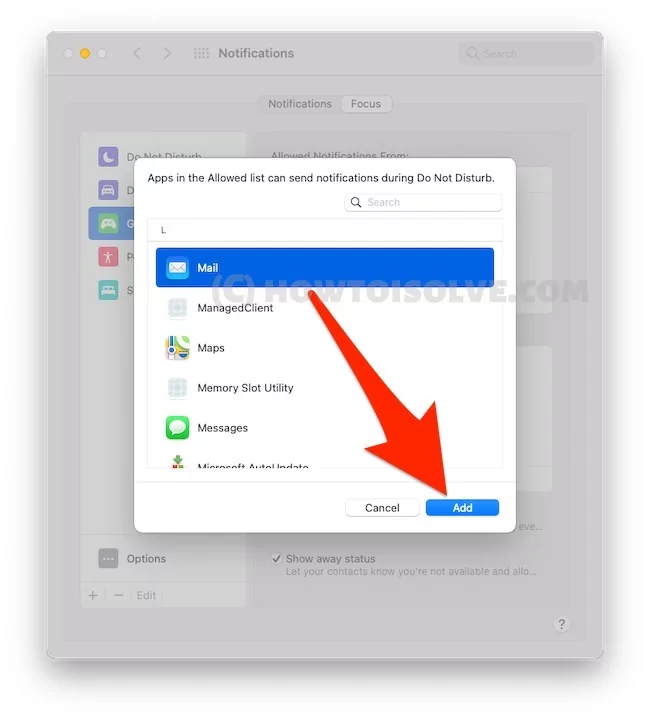
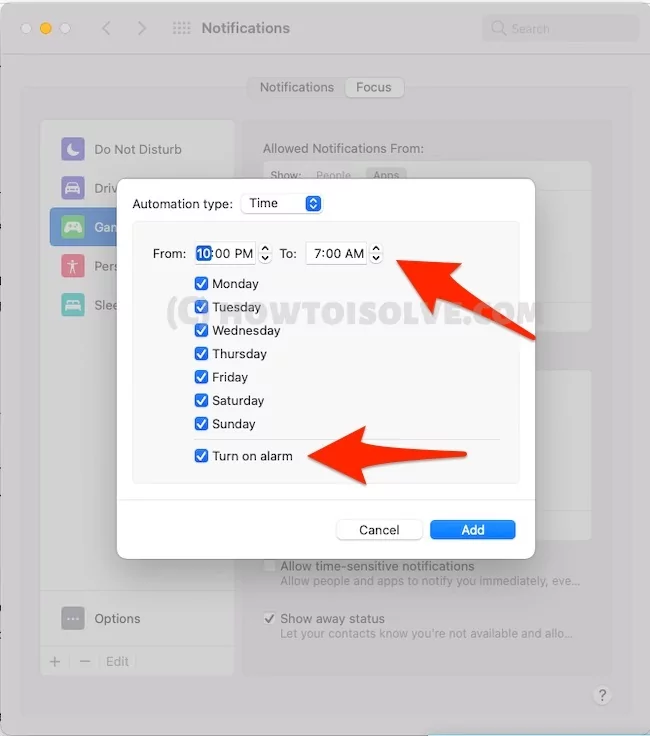
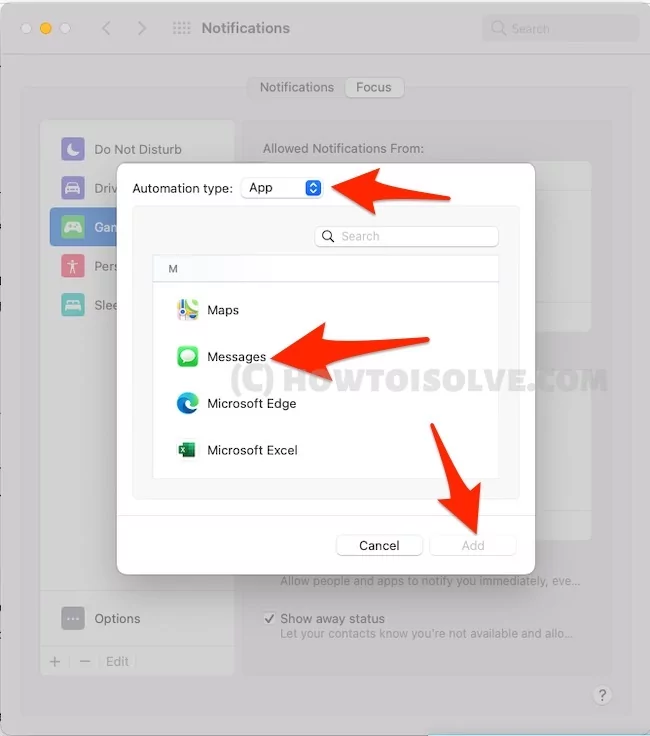
Under ‘Automation,’ one can add the start and end times of their events. Scheduling times and routine is crucial for events like work.
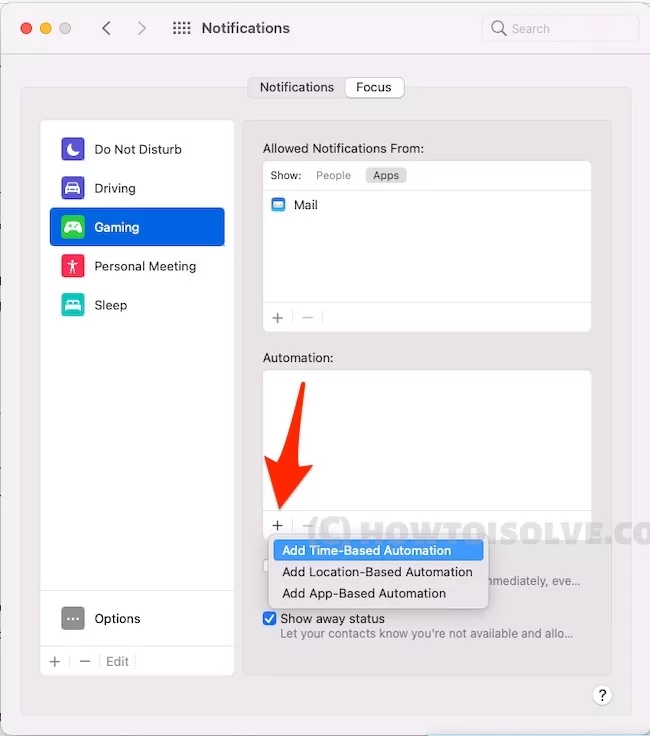

Allow Time-Sensitive Notifications in Focus on Mac
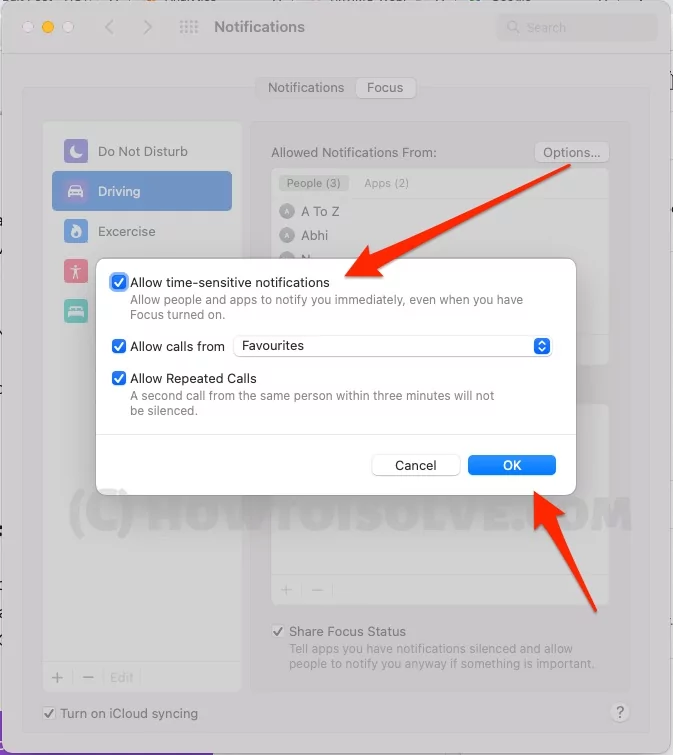
Allow Time-Sensitive Notifications on your Apple Device will help in allow people and apps to notify you immediately, even when you have focus turned on. Follow the below steps given here to manage time-sensitive notification settings in focus on Mac.
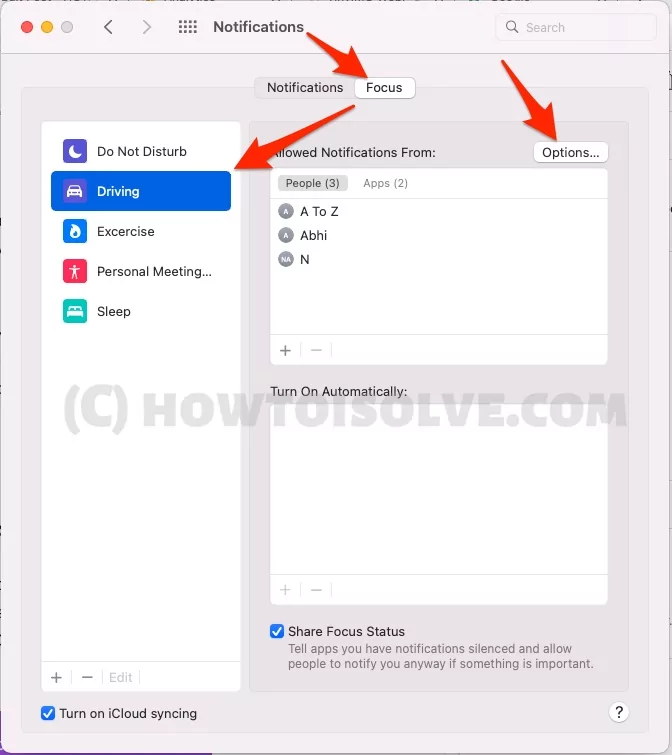
- Click on Apple Logo from top mac menu > System Preferences > Notifications > Focus Tab.

- Select Option from top for Specific focus type > Here I am selecting Time Sensitive notification for Driving focus > Select Driving Focus > Options > Enable check box “Allow Time-Sensitive Notifications”. > Ok to save.

That’s it.
Focus Across Your Devices – Mac, iPhone, iPad, Apple Watch
Focus is now available across all of your Apple devices that are signed in with the same apple id. Here are the Share Focus settings across all devices on Mac, The same settings are also available on your iPhone, iPad, Apple Watch Running on iOS 15, iPadOS 15, WatchOS 8, or Later OS.
When you use a Focus on one device, it’s automatically set on your other devices. How to Use Focus on iPhone and Apple Watch.
- Go to the Apple logo from the top Mac menu > System Preferences.
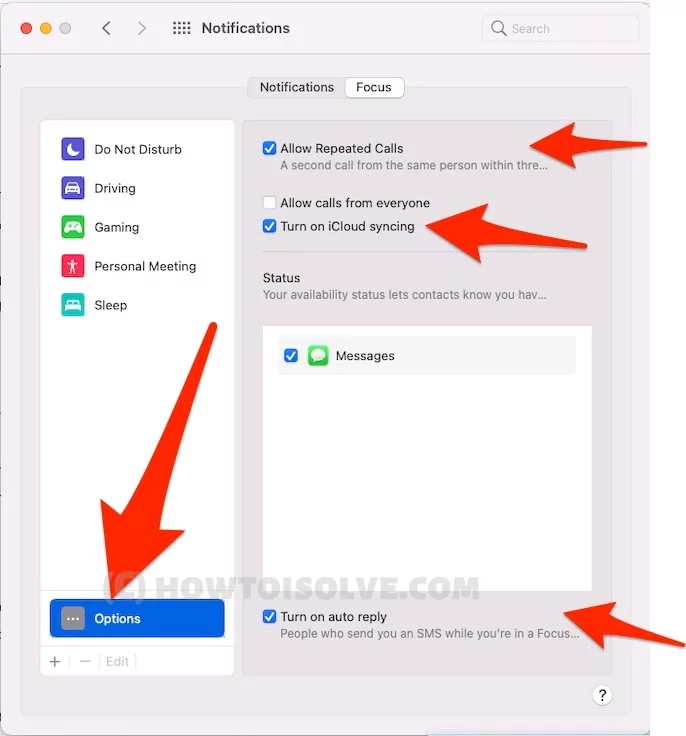
- Find and click on Notifications > Focus Tab > Click on the Settings option. Enable “Turn on iCloud syncing” checkbox.

- That’s it.
- For iPhone, iPad: Settings app > Focus > See “Share Across Devices” Toggle. That’s it.
Auto-Reply When Focus in Enabled
Auto-reply option is available on all the devices For Messages app on Mac, iPhone, or iPad, Apple Watch. here’s the steps for Mac.
Turn on a standard auto-reply for your contacts when they message you while you’re focusing.
- Go to the Apple logo from top mac menu > System Preferences > Notifications > Focus > Options > Enable Checkbox “Turn on Auto Reply”

That’s it.
Urgent Messages in Focus
If someone’s status is turned on, signaling that they have notifications silenced with Focus, you can break through with an urgent message. If you’re on the receiving end, you can prevent an app or person from breaking through.
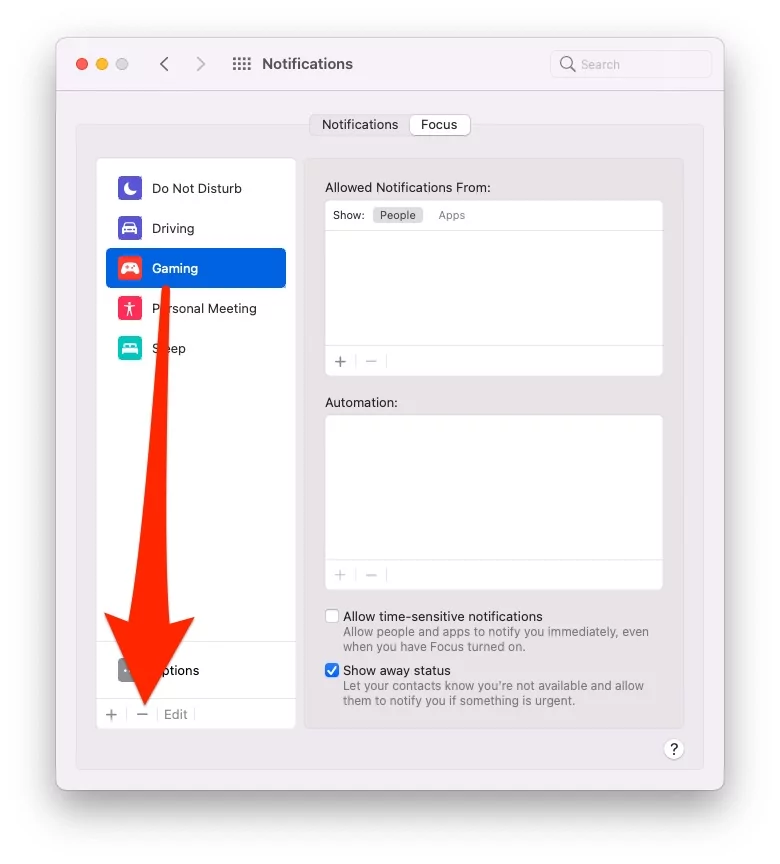
Delete Custom Focus on Mac
We can create any custom focus as of your Work types on all apple devices or specific devices. After making some sharp focus with best practices, we need to delete some of them from your Mac. here are steps to delete or Remove Focus from the list on Mac.
- Click on the apple logo from top Mac menu > System Preferences > Notifications > Focus Tab > Select Focus name from list.

- Click on the (-) button to delete it complately.
Before deleting focus confirm that Because we can’t recover.
Rename or Edit Custom Focus Mode on Mac
To edit Focus’ Notifications settings, Apps settings, and Automation. Just Select the Focus name from the side of the window and make changes on the right side of the window. that’s easy. But if you wish to change your name or icon then Select the Focus name and Click on the Edit button.
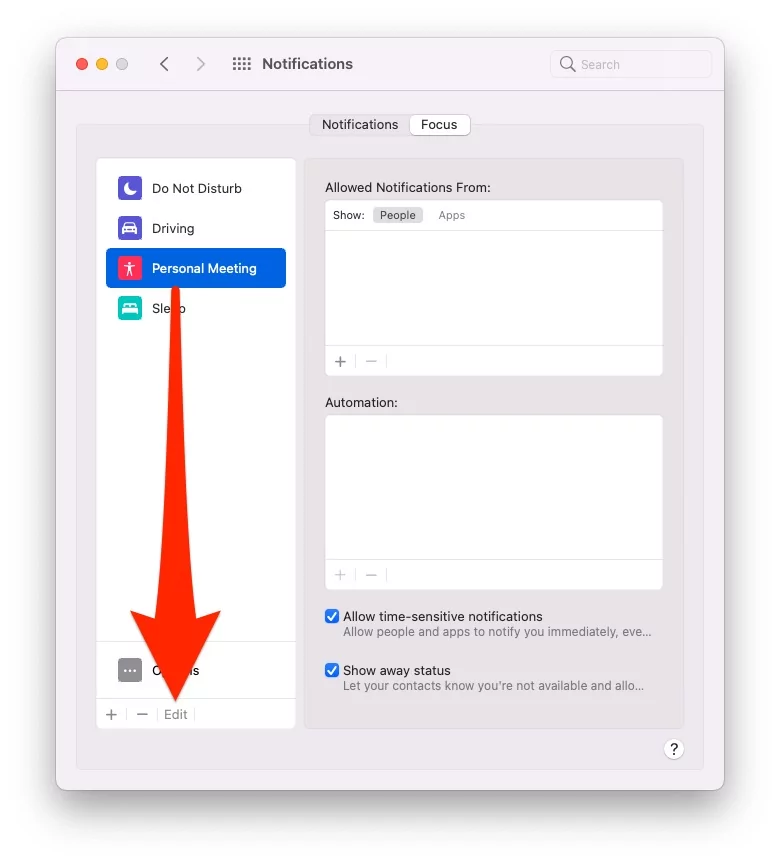

Once you Update the name or icon, Click on Save.
Features of Mac Monterey
Mac Monterey includes many of the same features of the iPhone and iPad. It also has several other features. Some of the significant features of Mac Monterey are:
- One can watch films or listen to music with other people over FaceTime. The New SharePlay support enables the users to share their experience while enjoying media like video, music, or even an app window during a FaceTime call.
- A new feature called ‘universal control’ allows a single keyboard and mouse to interact across multiple Macs and iPads at once.
- A redesigned Safari browser. The Safari browser gets a User Interface (UI) facelift to support its new tab-focused features.
- Support for playing AirPlay content received from iOS and iPad OS devices.
- One can easily factory reset the device from the System Preferences app.
- Live text, the ability to copy, paste, or lookup text in photos
- Another innovative feature that Mac Monterey comes up with is the new Focus feature. It allows one to set up a work focus that will filter one’s notifications and only convey work-related ones.
Conclusion
Alerts that come up during a Focus event are visible on the ‘Notifications Centre’ at any time. It means that one can access ‘missed’ notifications at any time. However, the best part is one cannot see them as a banner or lock screen, allowing them to concentrate on the urgent task at hand.
‘Focus,’ like the rest of mac OS Monterey, is presently being beta tested. As a part of this process, the operating system will likely receive different variations that could change its works. The finished product isn’t revealing until it releases for the public around September 2021. But the Focus feature indeed does look promising. It can help users remain focused and, at the same time, improve their mental and physical well-being.

