Bored of using the same stock fonts? Choosing perfect fonts is one of the most arduous tasks in the world; some fonts are too funky while some feel decrepit. However, this article is for you if you’ve got a reference or want to unearth the new fonts. There are a plethora of custom fonts available that works with Mac. Font Book for Mac comes first when discussing fonts since it is Apple’s own custom font app that lets us choose from hundreds of font options, or you can use font manager for Mac.
You can add or remove the fonts from the Font Book App; that’s one of the most convenient ways to manage custom fonts on Mac. Besides, third-party apps like Da Font, etc., are available to try out. So read the article, and install the custom font on Mac.
A step-by-step guide to Install, Remove, Edit, and Manage Fonts in macOS
Font Book is Apple’s own Font Managing App that lets us add, remove, enable, and disable the third-party fonts you have downloaded from the web. So, without wasting more time, learn how to install fonts on Mac, MacBook.
- First, download your favorite font from the internet.
- Once the font is downloaded, it will be stored in the Downloads folder of Finder.
- Now open Font Book on your Mac.
- Click on File in the top menu bar.
- Select Add Fonts… or “Command + O“

- Next, go to the location where the downloaded font is located.

- Click on the font to see preview in Font Book App.

- Furthermore, to be on the safe side, you should always Validate Font before using it with the Mac system.

- Select the Font and then click on the File in the top menu bar.
- Click on Validate Font. Get report for “font files passed. These files should be safe to use”.

- Wait for a while, let the system validate font, and if everything is good with the font, Mac will show No problems were found validating these font files with green ticks.
How to Enable/Disable Fonts in Font Book?
By default, the font is enabled when you add it to the Font Book App. If you’ve got a long list of fonts, it’s better to disable the unnecessary fonts.
- Open Font Book on your Mac.
- Select the Font that you want to enable or disable.
- Click on Edit on the top menu.
- Lastly, Disable[Font Name] or Enable[Font Name]. If the font is enabled, you’ll see an option to Disable it and vice versa.
How to Uninstall Fonts from Font Book on Mac?
Don’t need font? No worries, it can be removed from the system permanently. Moreover, you can remove the entire font library in one go.
- Go to the Font Book App.
- Click on the Font to uninstall.
- Click on File in the top menu.

- Select Remove “Font Name.”
Change Keyboard Language on Mac
As we know, On mac we can type any language to prepare documents, send an email, or more. For that, your Mac has to download the font and next Switch it from the top mac menu. Follow the below steps to Download and Type in Different languages.
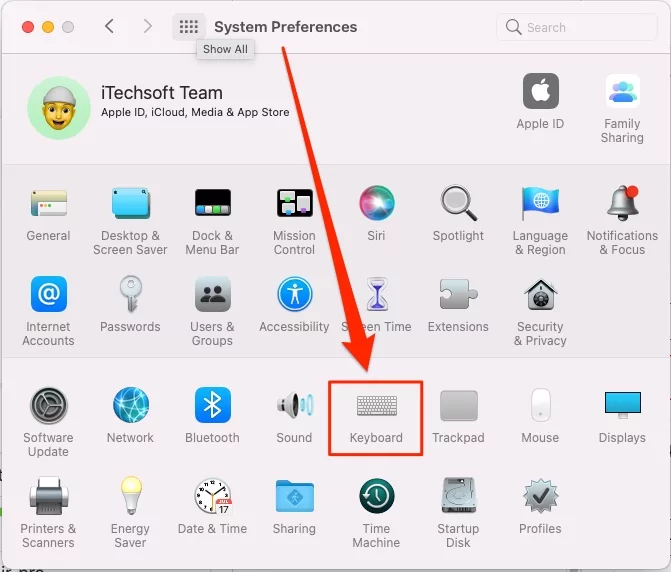
- Go to the Apple Logo from the top Mac menu > System Preferences.

- Click on Keyboard.

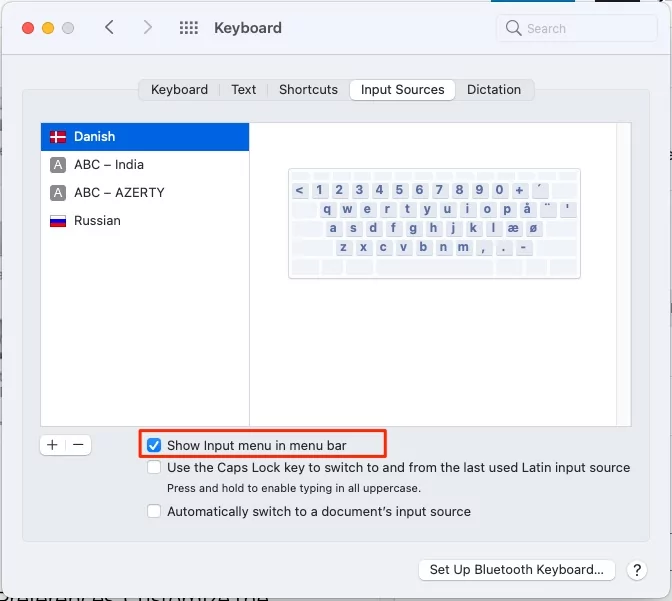
- Under the Input Sources Tab, Click on “+” sign to add a New Language. Click on Add.

- Also Select the Checkbox “Show Input menu on menu bar“.

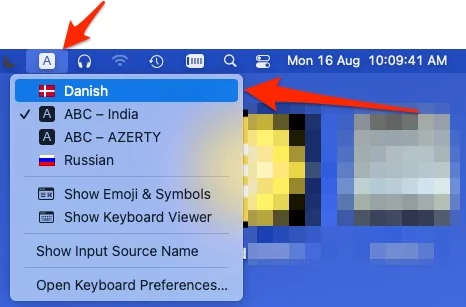
- Now, Choose Language to Type in a different language from the Top Mac Menu Keyboard icon.

- Start Typing in Another language.
Change App Language on Mac
On a mac, we can change app Language on Mac from Mac Language Preferences. Customize the language settings for the apps installed on Mac. Select the app and apply the new language.
- Go to the Apple Logo from the top Mac menu > System Preferences.

- Click on “Language & Region” > Click on Plus sign to Add a New App and Language.

- From the first drop-down menu, select the app, and From the second drop-down menu, select Language.

- Click on Add to Apply the changes. Re-Open App to see changes.

- That’s it.


