
Many of us need to record internal audio on our MacBook for various purposes like music production, recording podcasts, youtube videos, and different other uses. But recording audio from any online website can be very hectic, especially in the case of Apple Macs. So, to ease this pain of yours, we have put together the best ways to record audio from internet websites for Mac or On Audacity & QuickTime app.
These are the most elementary and quick ways using which anyone can record good quality audio from online websites in just a blink of an eye. So let’s get started and take a look at these handy methods.
How to Record Audio from Internet Website on Mac
1. Loopback – Record Internal Audio Mac
With Loopback installed on the Mac, passing audio from one application to others becomes relatively more straightforward. It can collect the audio notes from applications sources and audio input devices, then store it in whatever location on your Mac.
How To Setup Loop Back On Mac Computer
- Open the Loopback and install it on your Mac.
- Once the file of Loopback gets downloaded, click on it to open.
- Now you will receive a “Loopback” Is An App Downloaded From The Internet. Are You Sure You Want To Open It?” pop-up, click the Open Button.
- You will be navigated to the Loopback installer screen; choose on Install Button from the bottom right corner.
- Enter the Administrator Name And Password, and select OK Button.
- You will see a pop-up saying your System Extension Blocked, click on Open System Settings.
- From the next screen, click on Enable System Extensions…
- You will receive a Privacy & Security pop-up. There enter Administrator Name And Password. Choose Unlock Button.
- Click on Shut Down from Shut Down Your Mac.
- To boot Mac to the recovery screen, long press the Power Button until the Loading For Startup Items… appears.
- Choose Options. Select Admin Users and click on Next. Enter the Password and click on Continue.
- From the Recovery Screen, choose Utilities and select Startup Security Utility Screen.
- Select Unlock. Furthermore, enter your Password and choose Unlock Button.
- Click on Security Policy…
- From the Startup Security Utility Window, check the box next to Reduce Security and All Users Management Of Kernel Extensions From Identified Developers. Choose OK.
- To approve changes, enter Administrator Name And Password. Choose Continue. After this, click on the Apple Logo from the left top corner, and choose Restart.
- Now move to the Apple Logo, choose System Settings…(System Preferences…) > Privacy And Security.
- Under the Security Menu, click on Allow.
- Enter Administrator Name And Password and click Unlock.
And then click on Restart Button. Once the restarting procedure finishes, you will be set to use the application.
How To Use LoopBack On Mac
Once the downloading and setting up procedure of Loopback is finished, follow the below steps to use it.
- Open the LoopBack App on Mac, and follow the on-screen instructions.
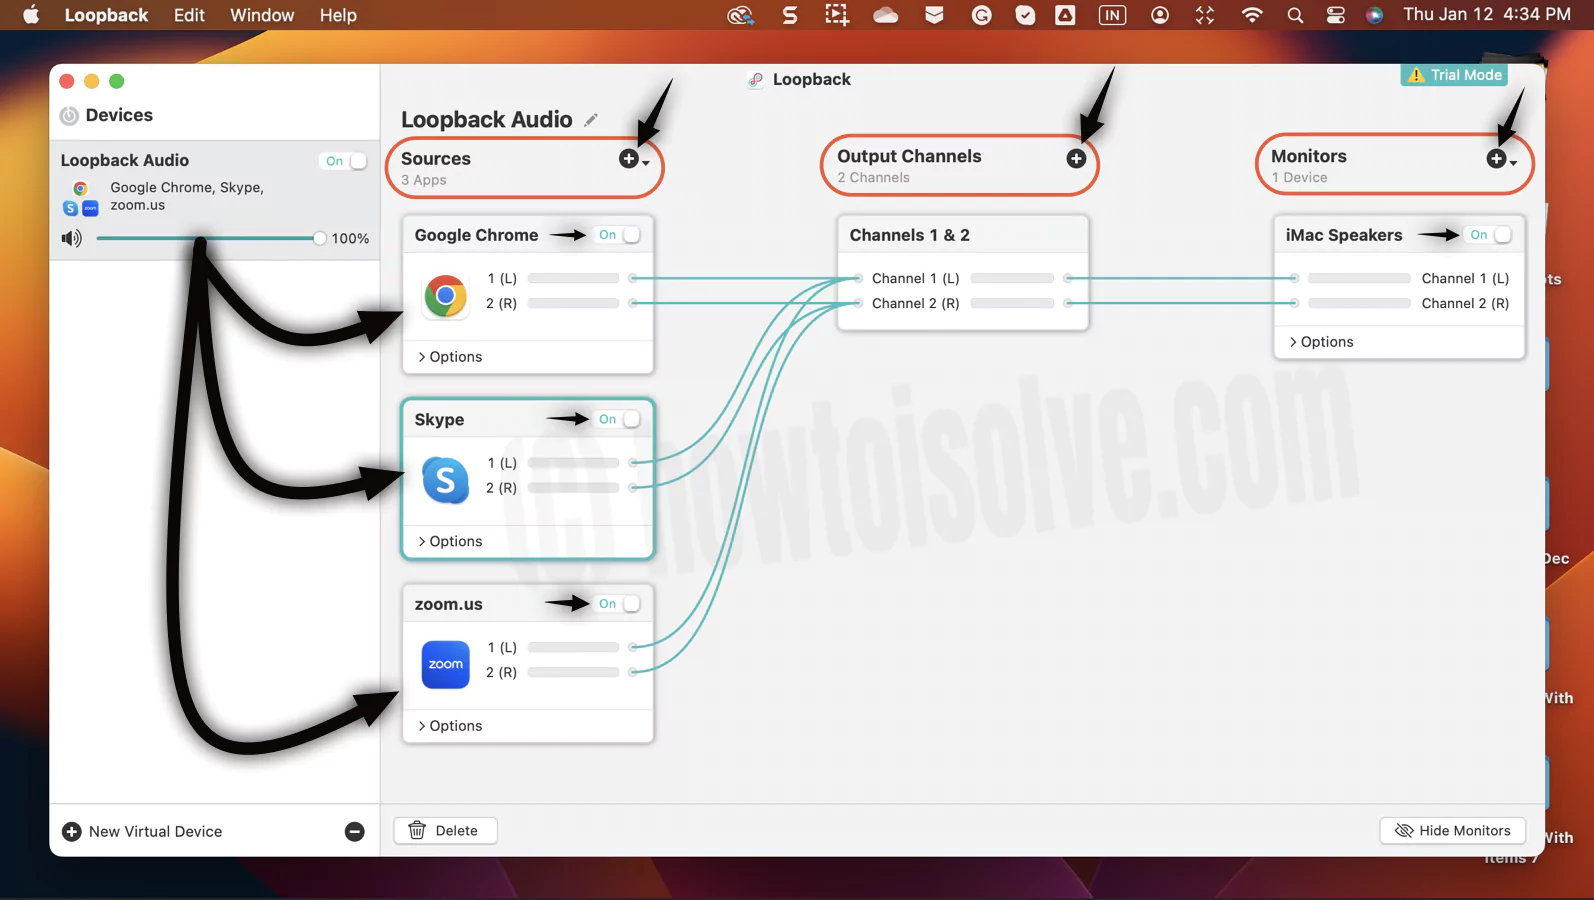
- Now click on New Virtual Device from the bottom left of the screen. You will receive Sources, Output Channels, and Monitors on the right side.
- Beside the Sources, click + Icon, and pick out the application you want to record the sound from. And enable the toggle next to all the applications listed in the Sources. If you want to delete an application from the Sources list, for instance, Safari, you have to click on it and choose Delete Icon at the bottom left corner.
- Now click on + Icon next to the Monitors. And configure the option either Mac or MacBook Speaker or Microphone(it will be available when the external microphone is connected to a Mac Computer).
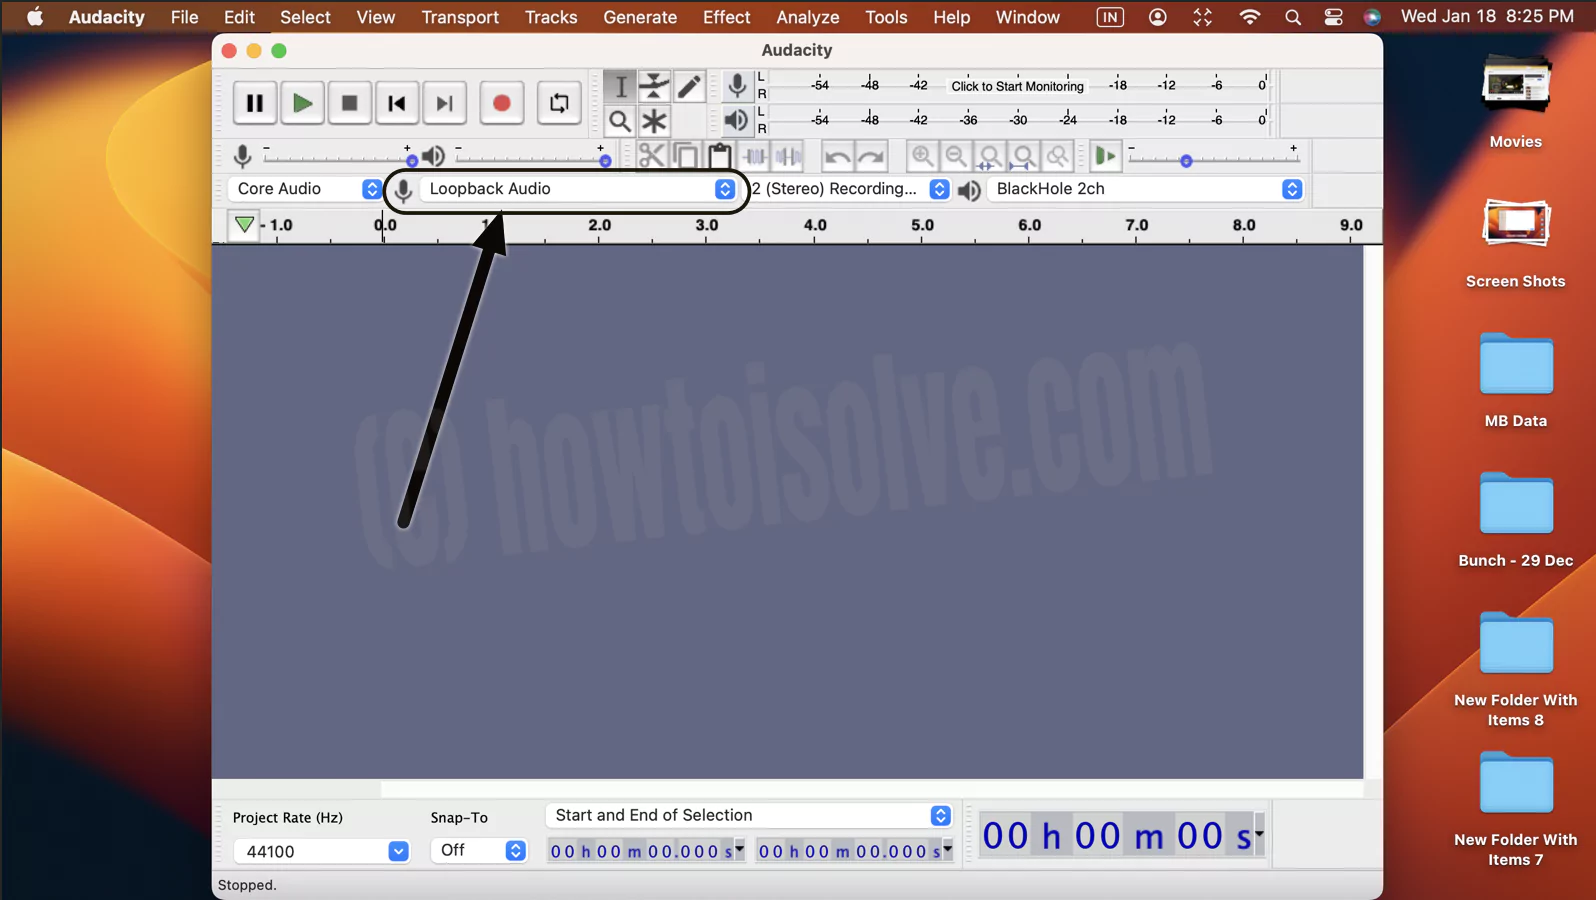
- Now open any audio recording mac; QuickTime, audacity Team, or press Shift + Command + 5 for Screen Recording > Options. Under the microphone menu, select Loopback.
Using QuickTime, Record Internal Audio on Mac

Using Audacity, Record Internal Audio on Mac
For testing, play the music on Safari and Apple Music. The Loopback will begin recording and save on your device.
2. BlackHole
Plenty of software allows the users to record crisp and clear audio from internet websites on Mac. But before getting into those software, the users need to install a virtual audio driver like the BlackHole that enables you to record audio from various browsers and other apps on your MacBook by creating a virtual link. The process of setting up this driver is very straightforward.
Step. 1→ Visit the BlackHole website to register and install the software on your device.
Submit the Details to get the Download BlackHole Audio driver on Mac in your Mail inbox.

And Download for your Intel or M1 Apple Silicon Mac,
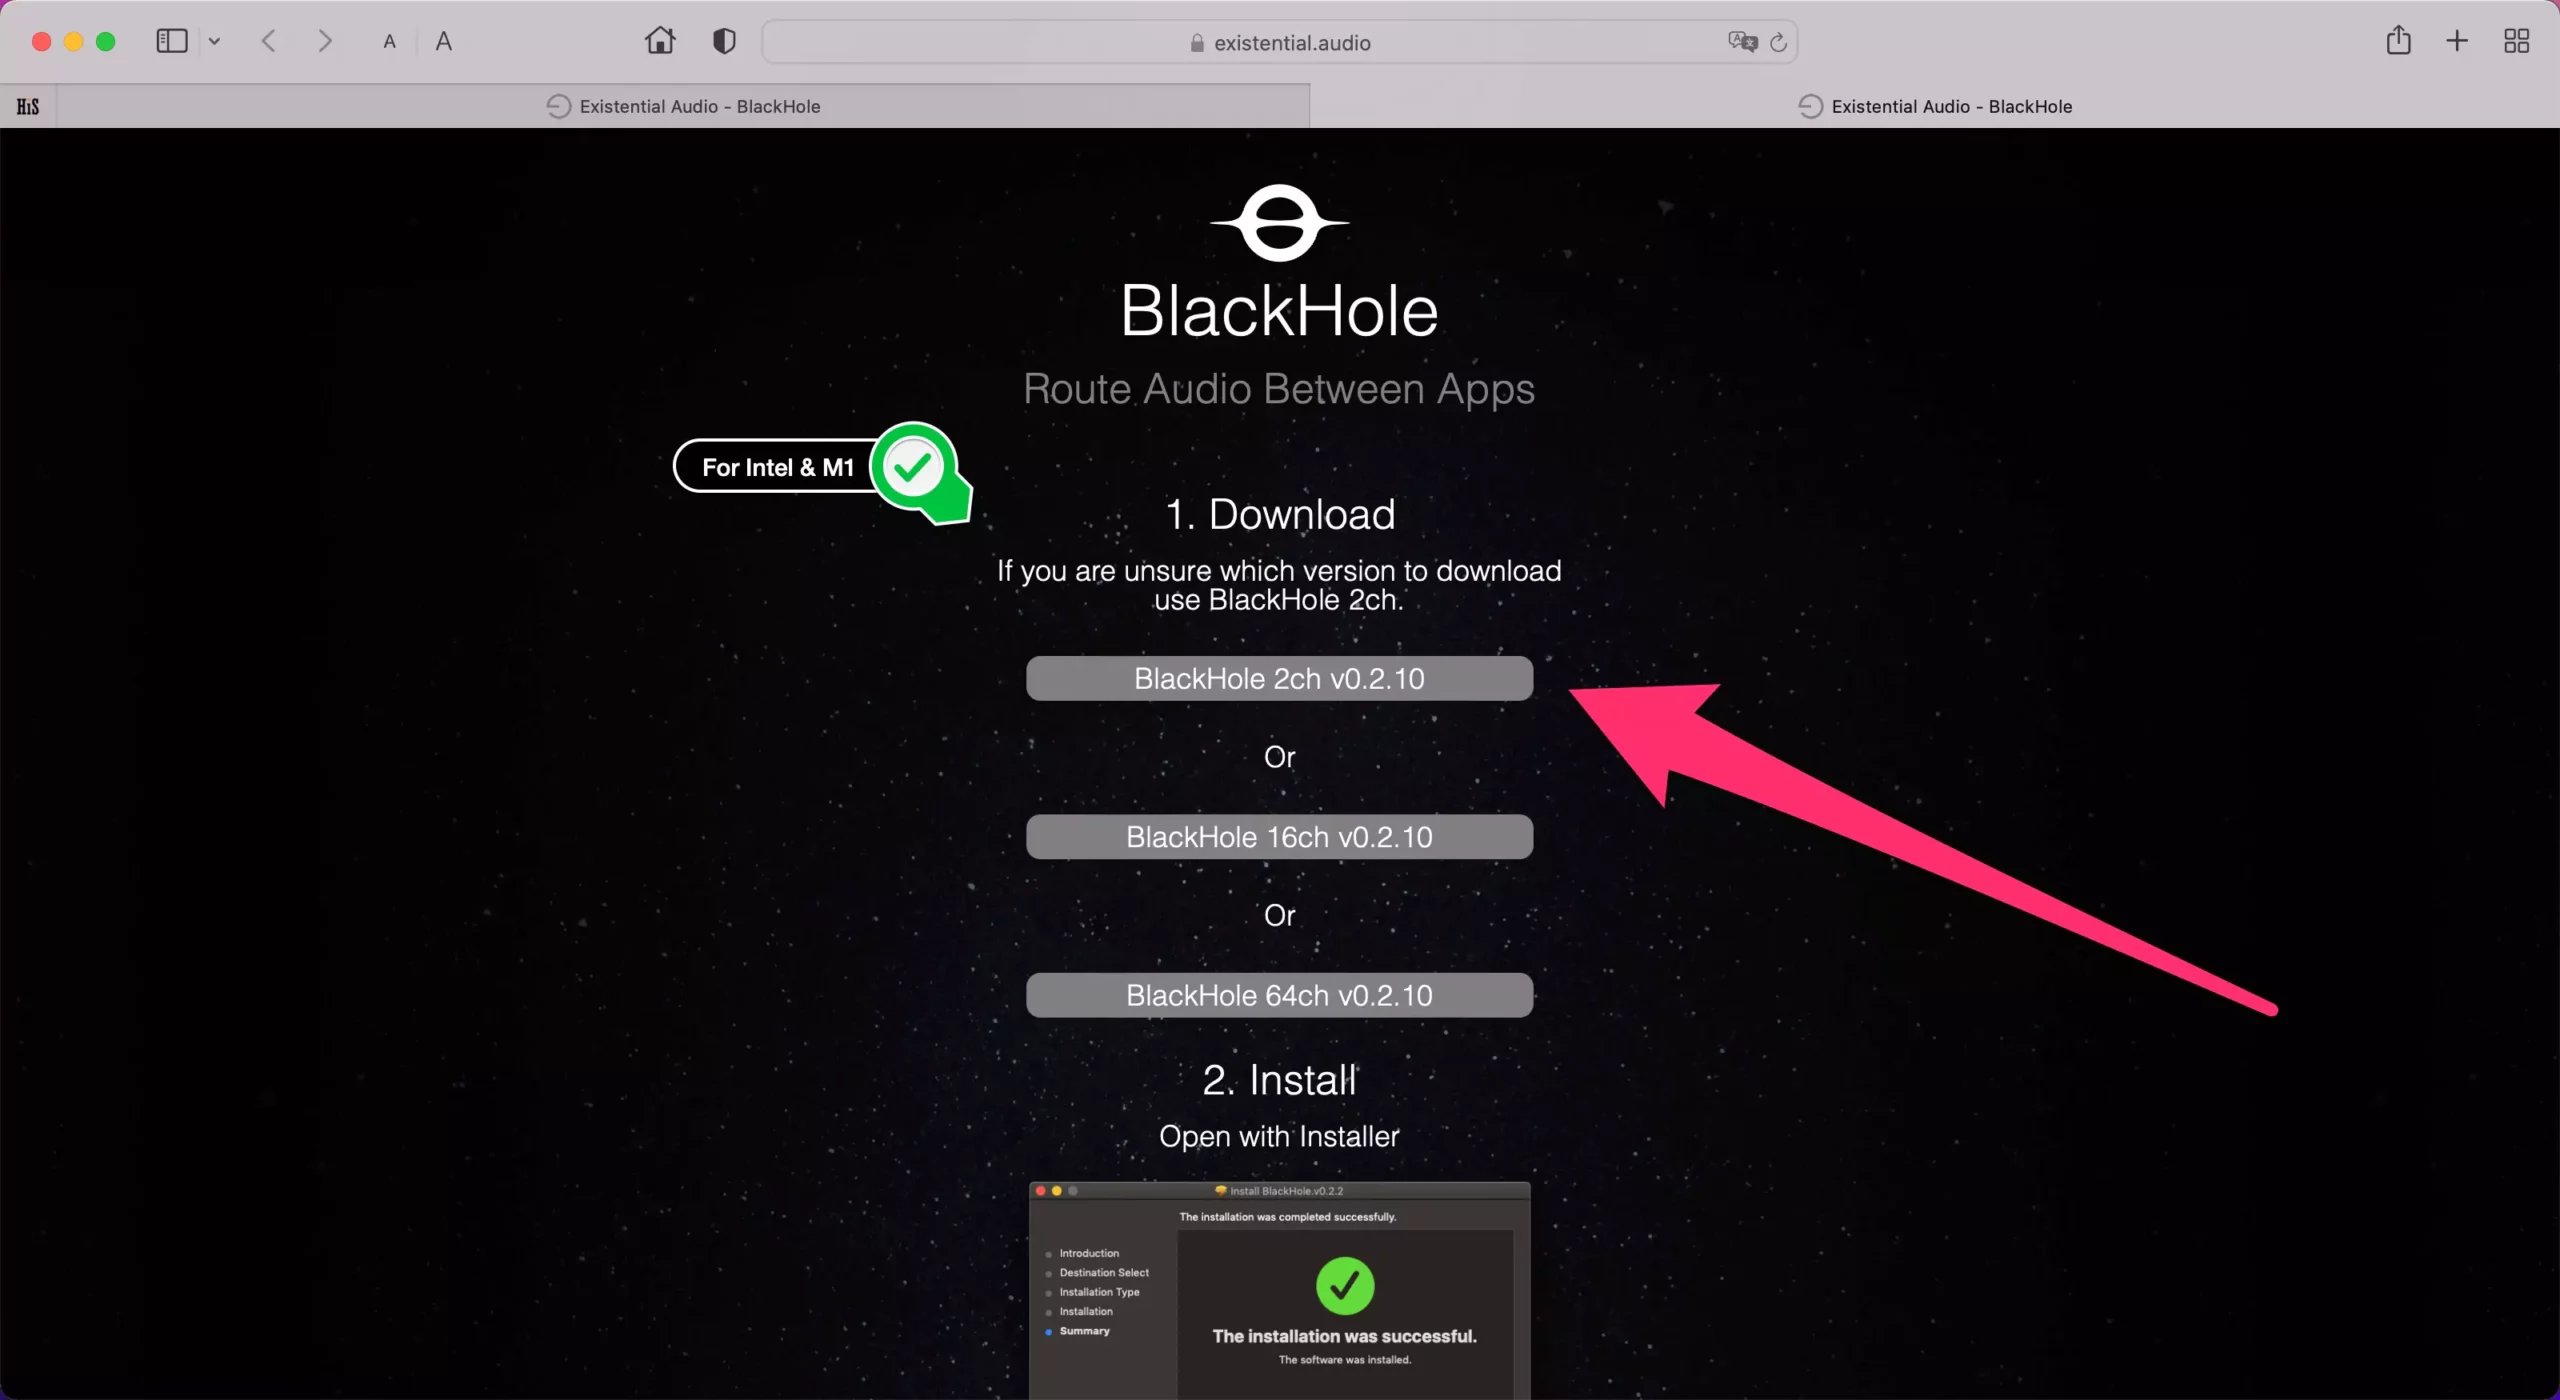
Install BlackHole: Run BlackHole Audio Driver setup,

Step. 2→ Then, reboot the MacBook.
Step. 3→ In the menu bar, click on Apple Logo at the top left corner of the screen.
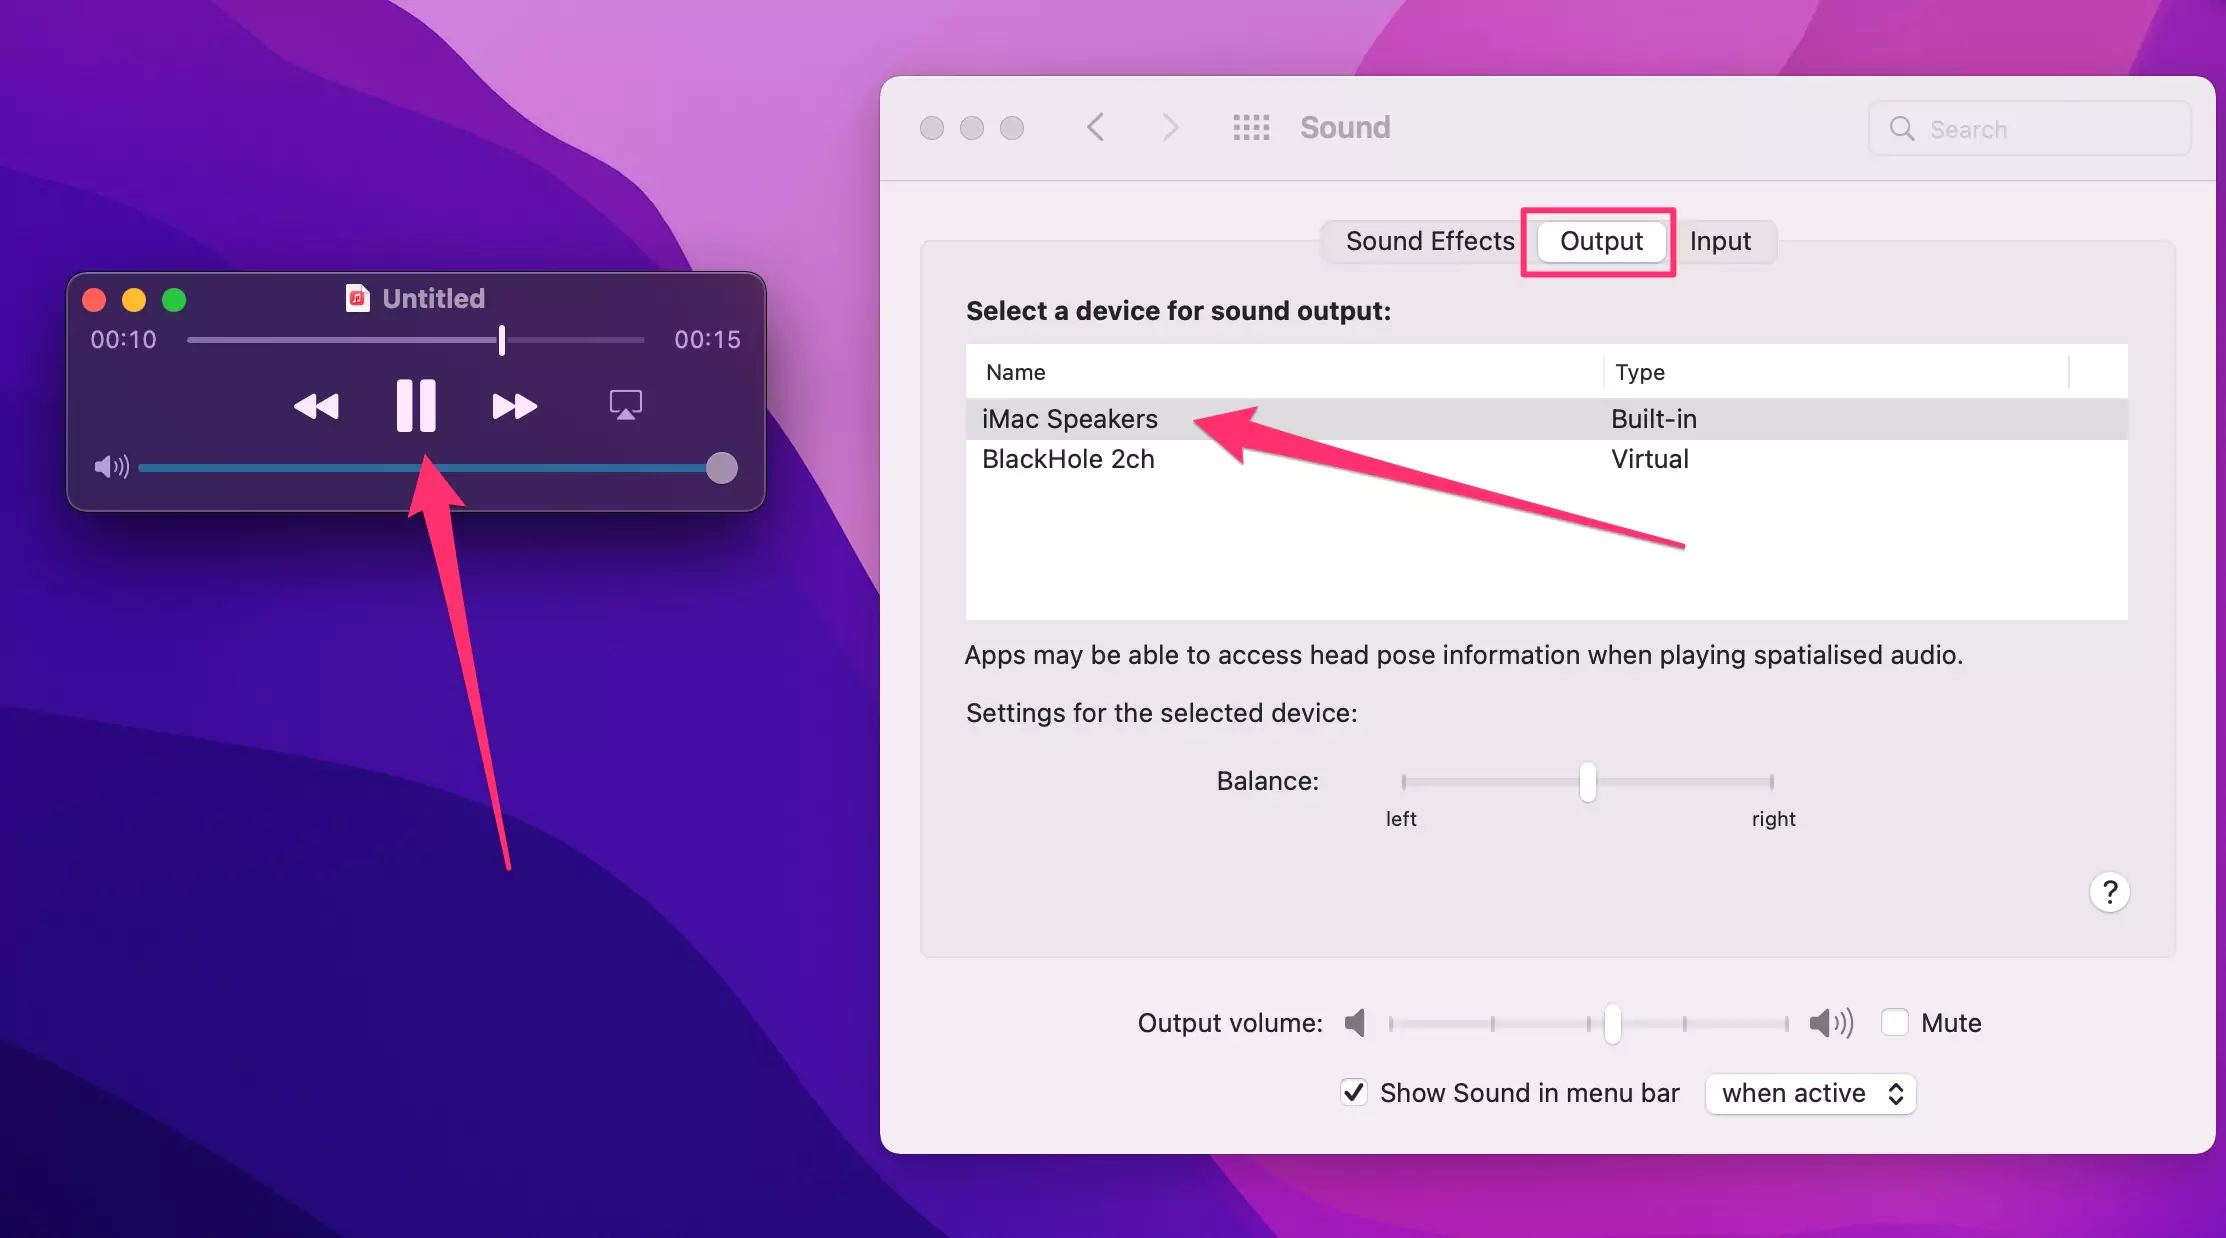
Step. 4→ Choose the option System Preferences.

Step. 5→ Then click on the sound option.

Step. 6→ After that, click the Output tab, and from the list of options available, choose BlackHole.

Step. 7→ Lastly, select BlackHole after clicking on the input tab to complete the process.

By setting up Blackhole for your MacBook, you can rest assured about the external noise getting captured as it is a virtual driver, so it only records the input from the desktop. Furthermore, once you set up BlackHole, one can record crystal clear and noise-free audio from the internet using QuickTime Player and Voice Memos.
Option 1: QuickTime Player
The QuickTime Player is a fantastic software widely used to record audio-video and even capture the display of your Mac. Go through these easy steps to record any audio on your MacBook. Also, You can change or Save to Different locations before starting Recording.
Step. 1→ Launch QuickTime Player on your Mac.
Step. 2→ In the menu bar, look for the File option and click on it.
Step. 3→ Then, choose New Audio Recording from the options available.

Step. 4→ Hit the Record button to start recording the audio from the browser.


Step. 5→ Once you are done, click the Stop button to stop recording. and Play recorded audio, Make sure you switch back to default settings for Mac Output Device.
The users can preview their recorded audio in the QuickTime Player, where they also get the option of trimming the recording. Before you close the app, you will be asked to save the recording, Choose external Drive or your Target folder if you would like to save a custom path.
Option 2: Voice Memos
Voice Memos software is one of the best native MacBook apps to manage, record, and play audio files. You can record any audio from online websites by following these simple steps.
Note: Make sure you have been selected Output and Input audio devices as BlackHole 2ch.
Step. 1→ Open the Voice Memos app on your Mac.

Step. 2→ Press the Record button to start recording whenever ready.

Step. 3→ Click on the Done button when you wish to stop recording.

Important:- Play Internal Recording on Mac, Make sure you have selected default output audio device under system Preferences > Sound > OutPut > Mac Speaker.
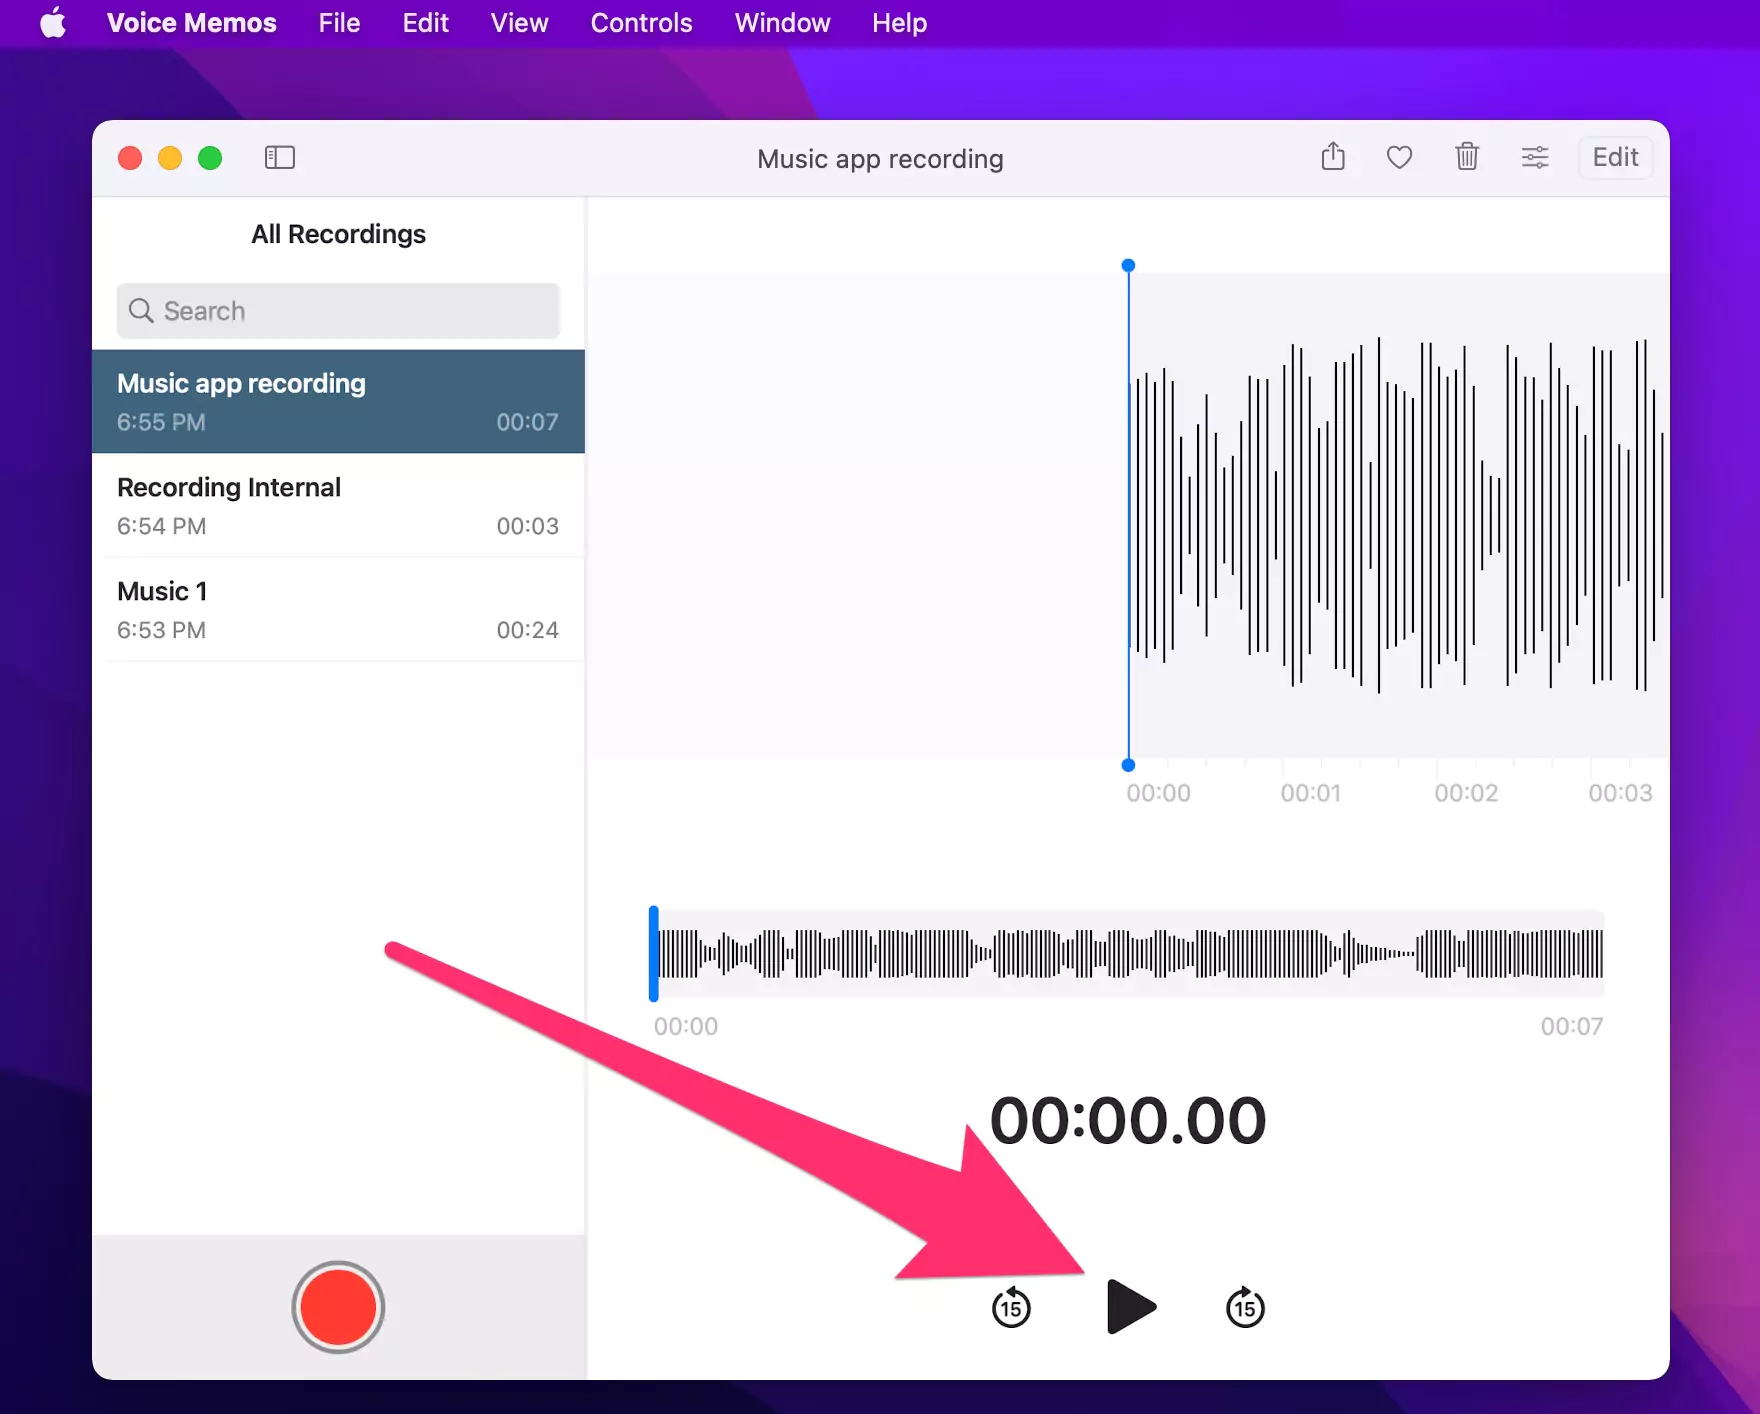
Anyone can use this basic process to record good quality audio on their Macs. The Voice Memos app also allows the customers to trim and edit the recorded files.
Tips: You can access the recorded files by entering ~/Library/ApplicationSupport/com.apple.voicememos/Recordings in the Go to folder window of the finder app.
How to Record internal Audio on Mac With Audacity
Since Audacity is the most popular and used application for recording audio on computers, it is evident that the new users may face some difficulty recording the internal audio on Mac with Audacity. However, with this method, all the people facing problems in recording internal audio using Audacity will record and edit the files very quickly. This is how to do so.
Step. 1→ Download and install the BlackHole, Register yourself, and Get the Audio download driver link in your Mail inbox,
As Explained above,
Step. 2→ Click on the Apple logo at the top and open system preferences.
Step. 3→ Then go to the output and select the source as BlackHole 2ch.
In the same way, Set Input as BlackHole 2ch.
Step. 4→ Now Download & open audacity and click on preferences under the Audacity menu.
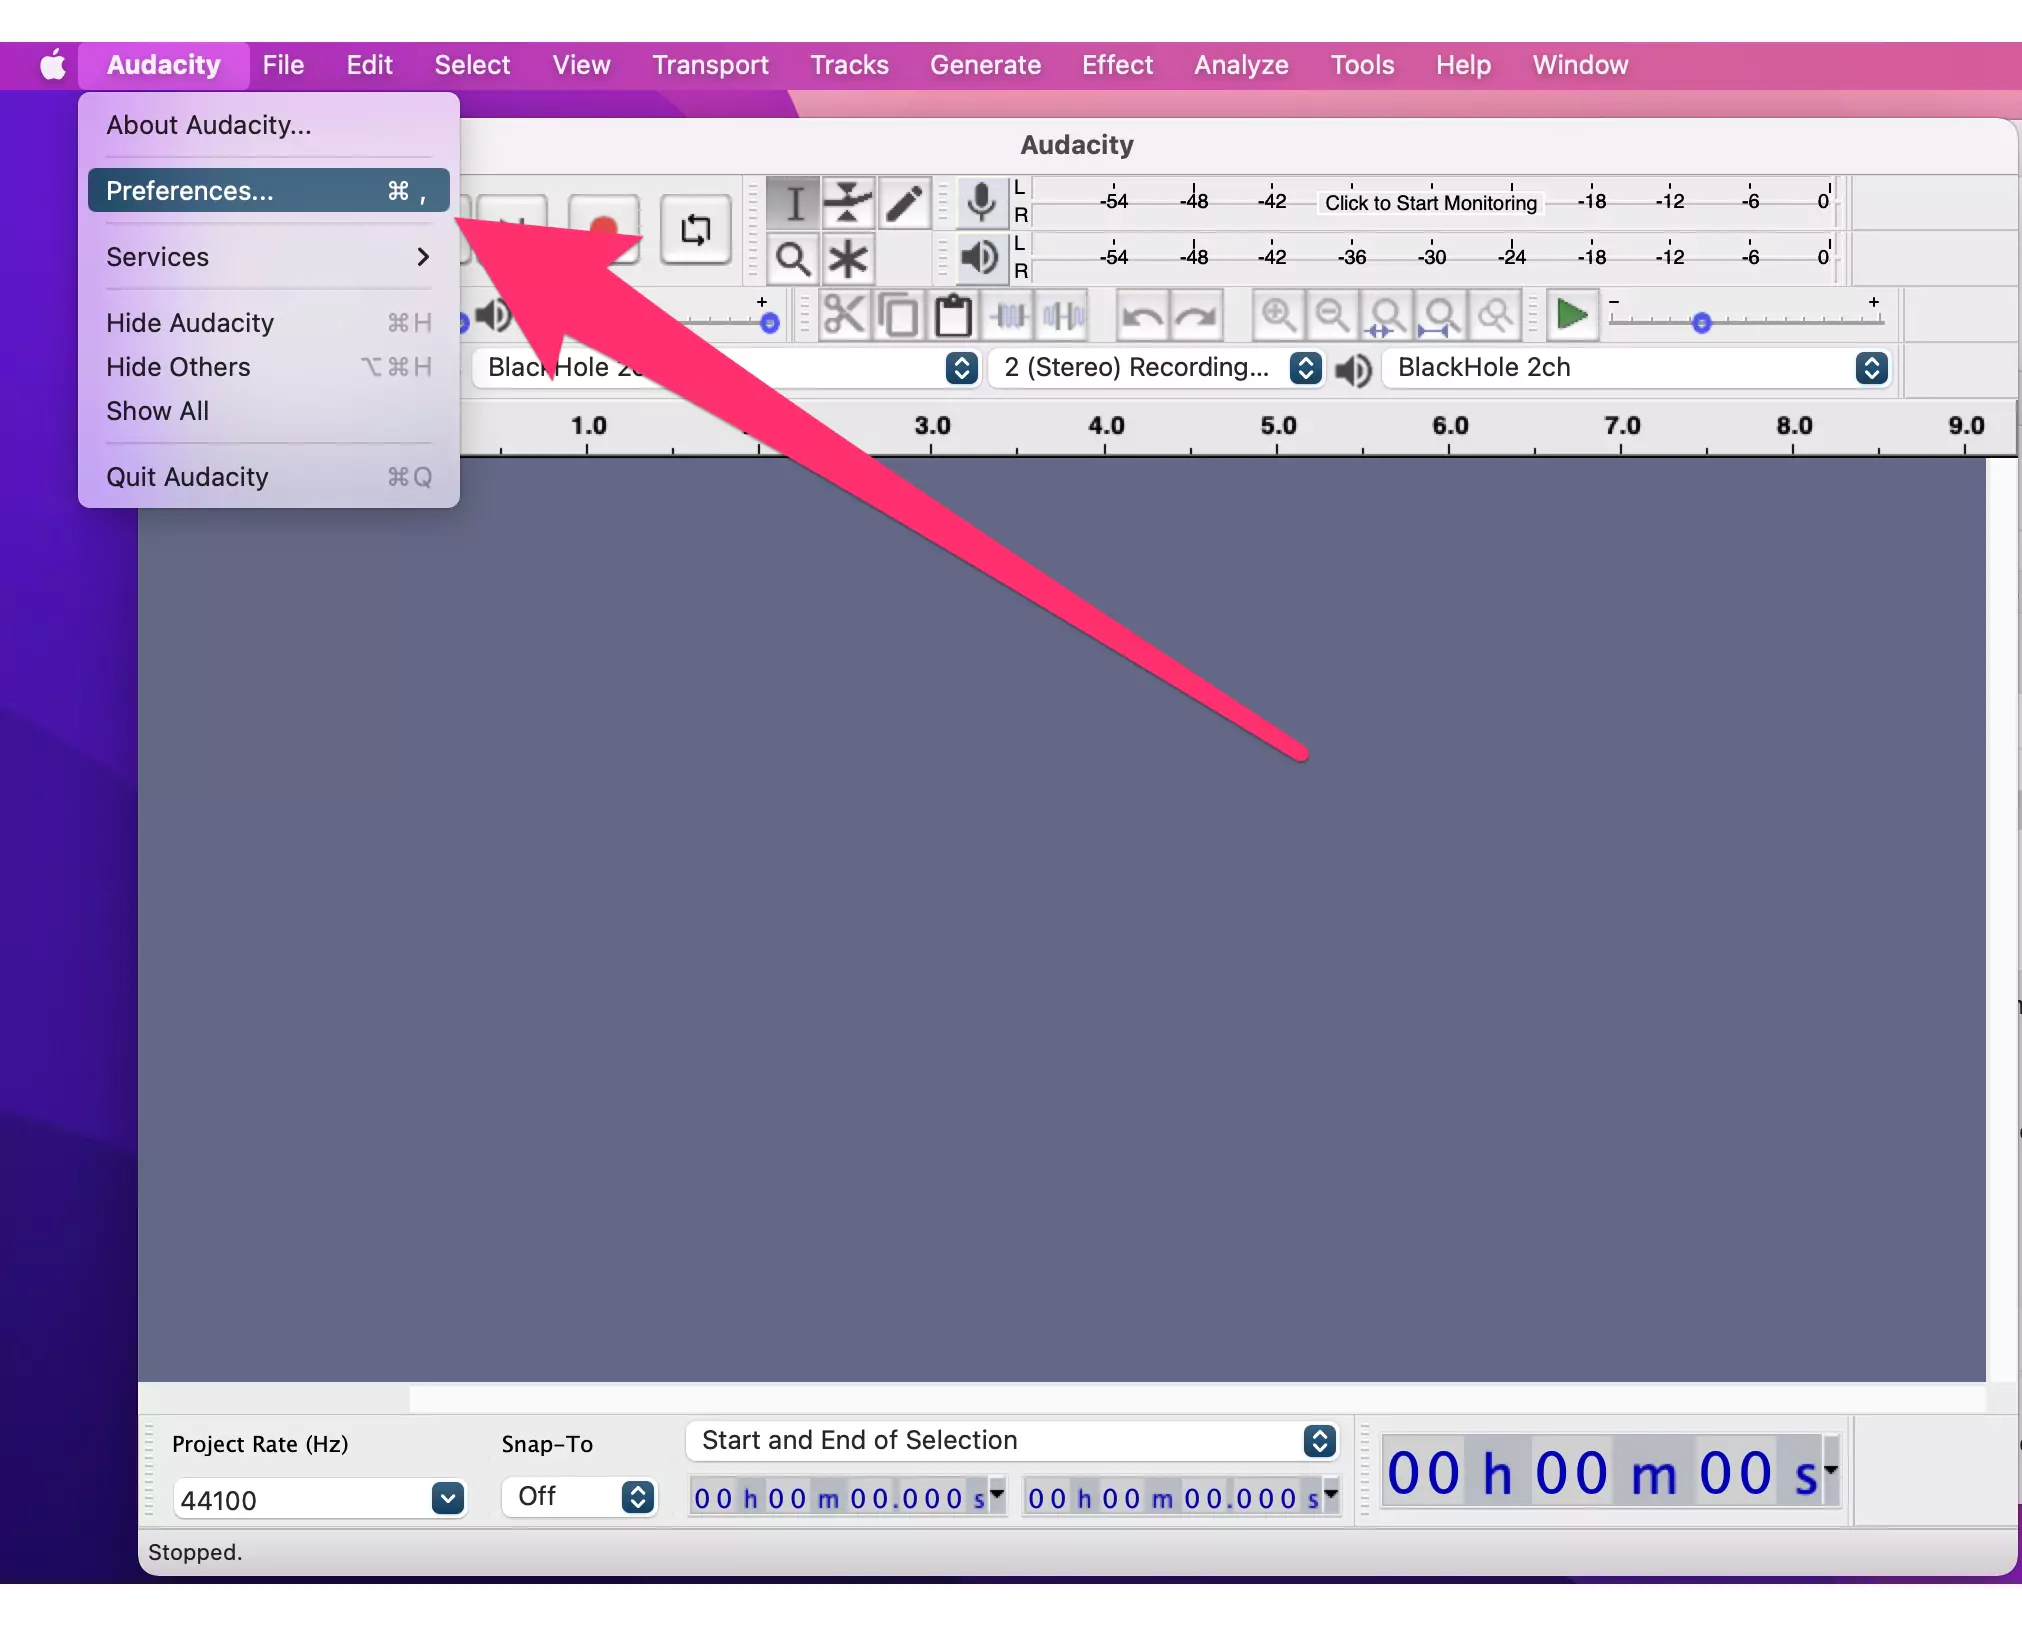
Step 5→ Now, check if BlackHole 2ch is selected as the device under the recording setting.

Step. 6→ Start recording the internal audio of the MacBook on Audacity by clicking on the record button. “Allow microphone access before start recording on your Mac” The users can also stop recording by pressing the stop icon.

Step. 7→ Click on the File option at the top and select the file format you wish to save it in by clicking on export.
This method will allow Audacity to record all the internal audio of your Mac without any external noise. It is the best way to record audio for music production, meetings, and seminars, and it produces crisp and clear recordings.
How Do Record Audio From YouTube on a Mac?
YouTube is one of the largest libraries of videos and audio. So it is evident that the users might wish to record audio from YouTube directly to their Mac for their usage. The MacBook customers can record audio from YouTube using a several software. However, we recommend you use the software mentioned below for the best results.
1. DemoCreator
The Wondershare DemoCreator is well known amongst the content creators as it gives the creators freedom to record and edit files with the help of its unique advanced features. You can set all the necessary recording parameters in the dashboard of this app for a better experience.
Step. 1→ First, download and install the DemoCreator app on your Mac.
Step. 2→ On the interface of the app, click on the “New Recording” tab.
Step. 3→ Choose the settings in which you want to record the audio from the pop-up.
Step. 4→ Now open YouTube on the Mac and press Shift + Cmd + 2 to start recording, and Opt + Cmd + 2 to stop recording.
As soon as the users stop the recording, the software will directly take them to the editing tab to export the recorded audio in both videos and audio formats.
2. MediaHuman
The MediaHuman tool is available both as a web tool and a downloadable application, and the users don’t need to install any extra recorder for capturing the desktop audio. The recordings done through this tool are produced in .mp3 format, which is universally usable. Take note of this step-by-step guide on how to record audio from youtube on Mac.
Step. 1→ After downloading the MediaHuman software, go to the YouTube video and copy its URL from the search bar.
Step. 2→ At the top left corner of the screen, you will find a (+) icon. Click on it to automatically paste the link that you had copied earlier.
Step. 3→ At the top right corner, you will find a download icon denoted by (⬇). Click on the download icon to start downloading the audio of that specific YouTube video.
3. Audacity
Audacity is one of the finest and most renowned applications for recording and editing audio files. It is effortless to record audio from YouTube videos using Audacity, but first, you will have to download SoundFlower on your system. Then, launch the Audacity app once you have installed SoundFlower and follow these steps.
Step. 1→ Click on the Audacity app logo at the top and check the output settings.
Step. 2→ Click on the Apple logo on your desktop and go to System Preferences > Sound settings.
Step. 3→ Then, select the sound output as SoundFlower(2ch) or Loopback.
Step. 4→ Now go to the YouTube video from which you want to record the audio.
Step. 5→ Finally, hit the Record button in Audacity and play the video to start recording.
By following these simple steps, the users can record and edit the recorded audio from YouTube on Audacity instantly.
4. Airy
Airy YouTube downloader is a tool built especially for recording audio and video from YouTube on MacBooks. It is a handy tool, especially when traveling on a plane, keeping you entertained by the pre-recorded content. This is how you can record audio from youtube on Mac using Airy.
Step. 1→ Launch the Airy app on the MacBook.
Step. 2→ Open the browser and go to the YouTube video you want to record.
Step. 3→ From the search bar, copy the URL of the video.
Step. 4→ Then, paste the copied URL into the application.
Step. 5→ Select the file format and hit the download button to start downloading the file in your specified path.
Since Airy is an application limited to recording YouTube videos and audio, you will not find any significant editing options available in the app.
5. Folx
Folx is one of the best software for recording and downloading audio and video from YouTube videos in good quality. The interface of the Folx software is very user-friendly and easy to use. To record audio from YouTube on your Mac using Folx go through the steps given below.
Step. 1→ Install Folx on your device and open it.
Step. 2→ Go to YouTube and copy its URL from the search bar.
Step. 3→ Then paste the URL that you had copied in the app.
Step. 4→ Lastly, press the enter key on your keyboard to start downloading the audio on default settings.
With Folx, you can directly download and save the YouTube videos on your device both as video as well as audio.
How to Record Internal Audio on Mac
There are numerous means using which one can record the internal audio on their MacBooks. These applications or software make it very straightforward for the users to record the internal desktop audio of the Mac. So let’s take a deep look at this excellent software and how to record internal audio on Mac.
There is plenty of Online and Offline Internal audio recording software in the Free [Trial] & Pro version.
1. EaseUS RecExperts
Step. 1→ Download and open the EaseUS RecExperts app on the Mac and click on the Audio button present on the home screen.
Step. 2→ At the bottom left corner, look for the setting labeled as sound and click on it.
Step. 3→ Toggle the system sound button to turn it on. This will allow the app to record Mac’s audio.
Step. 4→ Then, hit the settings option from the main interface to set output format, sampling rate, bitrate, and other settings.
Step. 5→ Click on the record icon to start recording.
The users can access the recorded files from the recording tab on the main interface of this software.
2. QuickTime Player
Step. 1→ Launch the QuickTime Player on your device.
Step. 2→ At the top of the menu bar, click on the File option and select the new recording option.
Step. 3→ Then, select the input source by clicking on the arrow next to the recording button > Select Loopback audio.
Step. 4→ Hit the record button to start recording and the stop button when you want the recording to stop.
You can play the recorded audio by clicking on the play icon, and you can save it by going to the file at the top menu bar, and clicking save.
3. Audacity
Step. 1→ First, click on Apple > system preferences > sound > output and select the output source as SoundFlower (2ch) or Loopback Audio.
Step. 2→ Launch Audacity and hit the record button.
Step. 3→ Then, open the app that you want to record the audio from and play it.
Step. 4→ Click on the stop icon to end the recording.
Once you have stopped the recording, the recorded file can then be exported in .mp3 format and saved on your MacBook.
4. Simple Recorder
Step. 1→ After downloading the app, click on the small icon that will appear on the menu of your computer.
Step. 2→ Specify and select the source of input for this app to capture the audio from on the Mac.
Step. 3→ Choose the location for the recorded audio to be saved in our device. You can do this by clicking on Preferences > Set Default Folder to select the default folder for saving the audio.
Step. 4→ Then on preferences again to personalize the audio settings like sample rate.
Step. 5→ At last, press the record icon to start recording and the stop icon when you want the recording to end.
This app will record all the internal audio of your Mac, and the recorded file can be accessed from the folder that you had previously selected.
5. Easy Audio Recorder Lite
Step. 1→ Open the app settings by clicking on the Settings icon present at the top of the app.
Step. 2→ Click on the Input device setting and select the device created by SoundFlower.
Step. 3→ Then; select the file format for your recording by clicking on the format option. Press ok once you have chosen the format.
Step. 4→ Tap on the record icon to start recording the internal audio of the Mac and the stop icon to end the recording.
The recorded audio can be accessed by going to the settings of the software and selecting the Go to files location.
6. MP3 Audio Recorder
Step. 1→ Launch the app after the installation process is complete. Next, click on the dropdown menu next to the Audio Device option to select the audio device to output the MacBook’s internal audio.
Step. 2→ Open the settings menu by clicking on the Settings icon to customize the quality of the recording.
Step. 3→ Then, head back to the main screen of this app and click on the red recording icon to start recording and the stop icon once you are finished recording.
After you end the recording, the software will automatically open the folder where the recording has been saved, and you can play audio by double-clicking on it.
With this, we conclude our post on recording audio from the internet on Mac. We have provided you with ample information and the necessary steps that one should consider while recording audio on their MacBooks. We hope that we could help you out with this article by clearing your doubts regarding any audio capturing issues on the MacBook.


