
Start Multiple Timer on your Apple Watch for different Time tracking activities like Think of a situation where you’ve put all of your energy into cooking your favorite dish; meanwhile, it’s your Yoga time; how would you manage both things at once? Either you can focus on Yoga or that delicious item. Now, that won’t be a problem, start multiple times on Apple Watch by setting different labels like fish, eggs, yoga, etc. and monitor on a single screen.
However, the Apple Watch needs to be running the watchOS 8 or later; if you have one of that Apple Watch, ensure it is up to date and then jump to the next section to learn how to use multiple timers on any Apple Watch.
How to Set Custom/Multiple Timer on Apple Watch
- Press the Digital Crown to bring all the apps on the screen.
- Find and open the Timer App on your Apple Watch.
- Tap on Custom Timer.

- Set the Timer.
- Next, label the Timer, whatever you want. It could be the name of a task for which you have set up a timer.
- Tap Start.

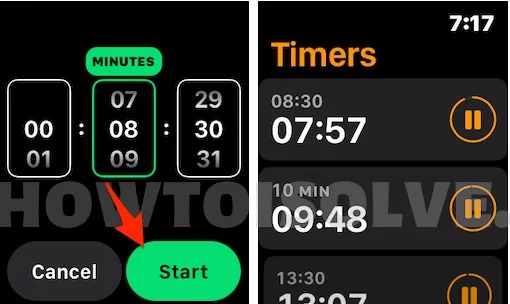
You can add several more timers by following the same steps on Apple Watch to keep track of different activities. Later, it might be possible with Siri; multiple timers can be started on the Apple Watch.
Meanwhile, you can list your favorite watchOS Features; we’re here to guide you on any setting or app you want to use with Apple Watch, iPhone, Mac, and iPad. Feel free to reach us.
![How to Set Multiple Timers on Apple Watch [WatchOS 10]](https://www.howtoisolve.com/wp-content/uploads/thumbs_dir/change-background-wallpaper-on-safari-iphone-mac-p8jpdxrwe52pqal905aq0qn26cq7wigjawk464sth8.webp)
![How to Set Multiple Timers on Apple Watch [WatchOS 10]](https://www.howtoisolve.com/wp-content/uploads/thumbs_dir/set-animated-memoji-on-lock-screen-on-mac-q1wjsu3ujna0w16vyff3dk5fr57jqhzdwfcnqa3upo.webp)


