Collaborate Your Desk and Your Face in FaceTime call Using Desk View feature in macOS Ventura… Wirelessly or Using USB Cable. Apple is always keen on expanding its capabilities, and the absolute truth of it is the declaration of Continuity Camera as a webcam on the latest macOS and iOS 16.
As of now, the owner of the iPhone with the latest iOS update can use the iPhone flagship as a high-quality webcam that exceptionally offers better performance compared to the Studio Display, MacBook Pro & Air, and iMac pre-installed Camera. And prominently better than other third-party webcams.
Nevertheless, the story doesn’t end here; Apple surprisingly enhanced the capabilities of the Continuity Camera by adding the feature known as Desk View along with Center Stage, Studio Light, and Portrait mode, which allows a cool top-down view to present the stuff on the Desk using the same iPhone camera.
Presumably, you will not be familiar with What desk view is and what its requirements are.
Considering all these points, we have made up the guide on it, to know the depth of the newly added Desk View in Continuity Camera. And at the end, we will let you know how to use desk view with Zoom, Google Meet, and Microsoft Team.
macOS Ventura: Full guide to Use Desk View on Mac for
In the recent macOS Update, Apple released a cool feature where you smartly use the iPhone as a wireless webcam. To make you safe when didn’t carry the High-Quality Webcam For Mac. But being unfamiliar with it, most users didn’t know how to use Continuity Camera Desk View on Mac, due to which they ended up with Desk View Not Working. So considering it, we have rounded the article for it.
What Is Desk View?
Considering you might be familiar with the name itself, Desk View. But if not, I will clear your doubt about it.
For instance, you are a presenter on the video call who is willing to share content present on the Desk; alternatively, keep the feed for your Face; that’s where the Desk View comes into action.
The Desk View uses the feed between both views so that the video participant can capture both your Desk and Face. In addition, since it uses the screen sharing feature, having two different angles with the same camera is feasible.
How is it possible?
The iPhone acts as a webcam; the Desk View intakes the iPhone’s Ultra-Wide camera capabilities. So instead of showing an unwanted background, it firmly focuses on Face and the overview of the Desk’s information.
It’s a complete show-stopper feature for the users by allowing them to show all stuff on the Desk; rather than individually capturing the line-up shot of data using the iPhone’s Wide Angle Camera.
But keep in mind there are some requirements you should reach to use the Desk-View on iPhone and Mac.
What Are The Requirements To Use Desk View?
You need to consider a few requirements before using the Desk View on macOS Ventura and iOS 16.
- Your iPhone should have iOS 16 and later and similar; your Mac should have macOS Ventura and later versions.
- Ensure that Wi-Fi and Bluetooth are enabled on the iPhone and Mac.
- You should be logged in with the same Apple ID on both peripherals, and 2-Factor Authentication should be enabled.
Desk View Keyboard Shortcut
Keyboard Shortcuts are always admirable as it offers the shortest way to reach out to the in-branch features of System or Apps.
Being familiar with the important Keyboard Shortcuts Of Desk View, we rounded up the list of shortcuts of Desk View to get acquainted with before setting it up.
- Open Setting → Command + ,
- Hide Desk View → Command + H.
- Hide Other → Option + Command + H.
- Quite Desk View → Command + Q.
- Zoom In Desk Camera → Command + +
- Zoom Out Desk Camera → Command + –
- Enter Full Screen → Globe/Fn Key + F.
Use Desk View
If iOS and macOS meet the requirements above, you can easily take over the Desk View feature.
Connect iPhone As Webcam On Mac
- Go to Settings > General > Airplay & Handoff > Enable Continuity Camera Webcam. And then turn on Wi-Fi And Bluetooth on both Mac and iPhone.
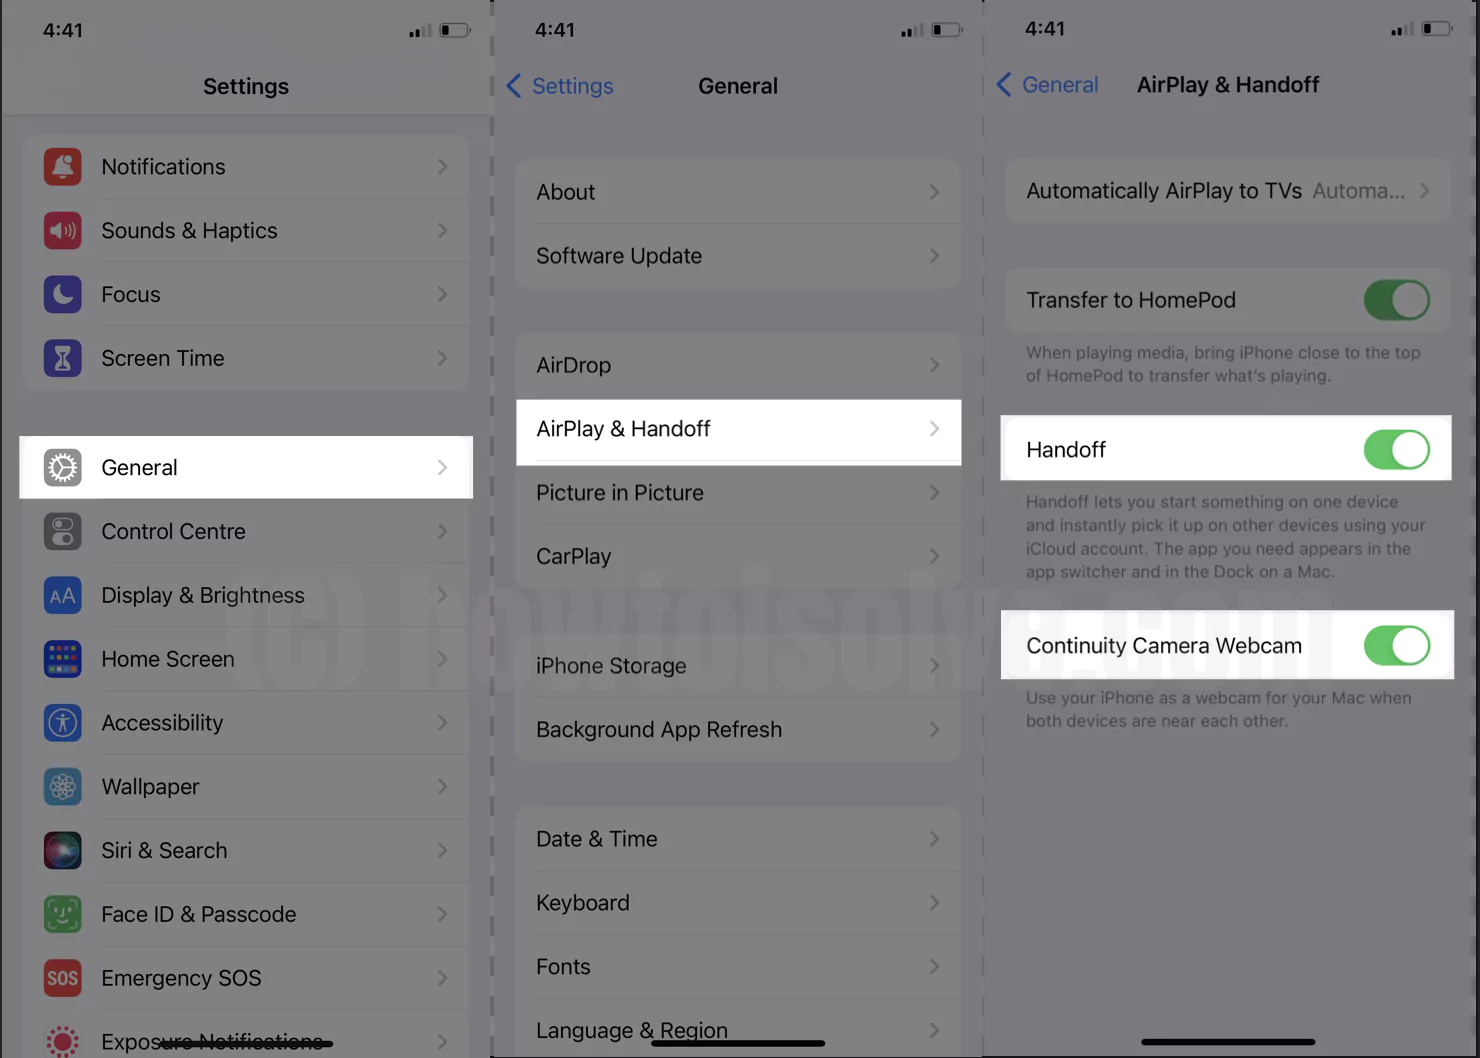
- Now bring both devices together. As soon as the iPhone and Mac are in the range of 40 FT; the iPhone Screen will receive a pop-up Connect To “Mac’s PC Name”. That’s It!
Although the feature is enabled by default, if the iOS 16 device is nearer to a Mac computer, it will automatically hunt down the iPhone Camera as an alternative to the Webcam.
Using Desk View Video Effect
However, some users might encounter the Desk View disabled on Mac; here is how to enable it.
1→ Open the video conferencing app (Zoom, Google Meet, Facetime, Microsoft Team, etc.). For instance, FaceTime.
2→ Keep Bluetooth and Wi-Fi enabled on the iPhone; to allow the Mac Computer to detect it.
3→ Now, Select & Connect iPhone as Continuity camera as Webcam from the FaceTime menu. or Use USB-C to Lightning cable.
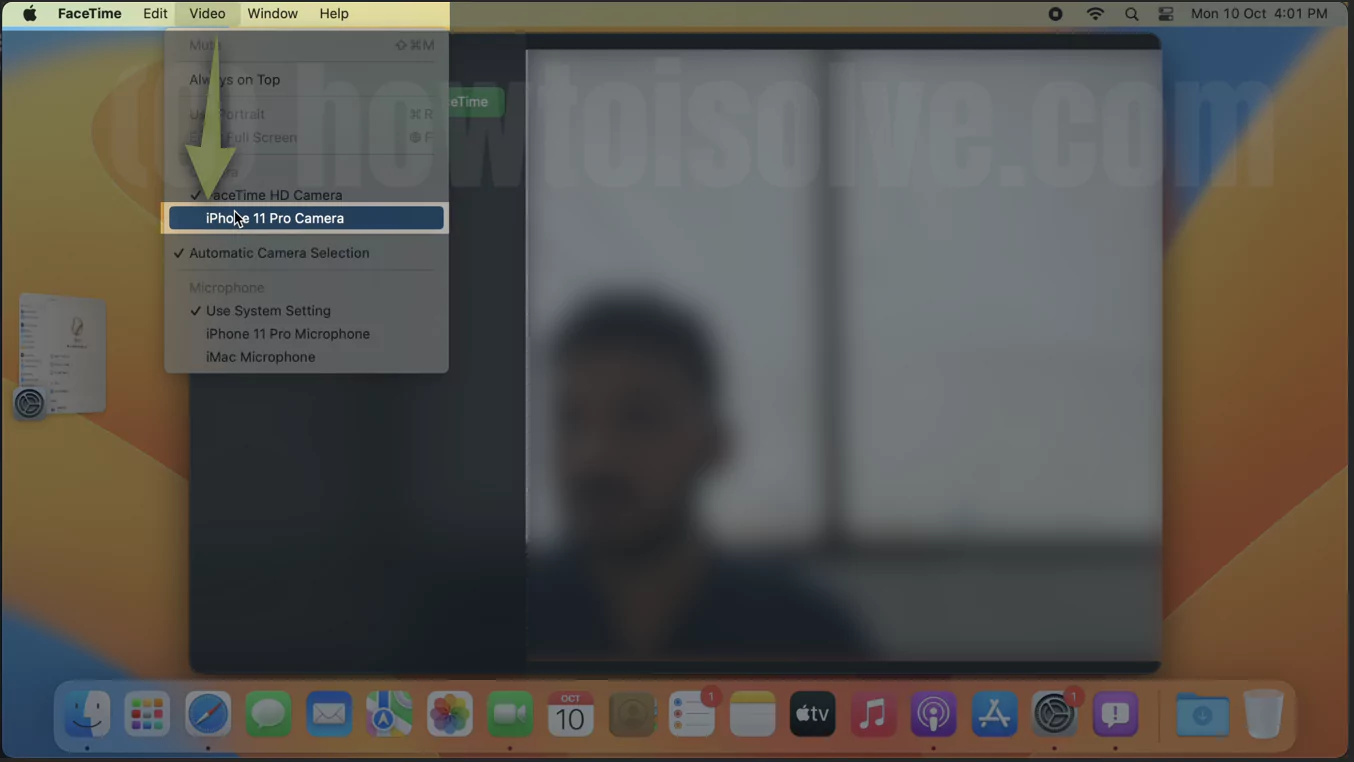
Or Connect Using USB-C to Lightning Cable,
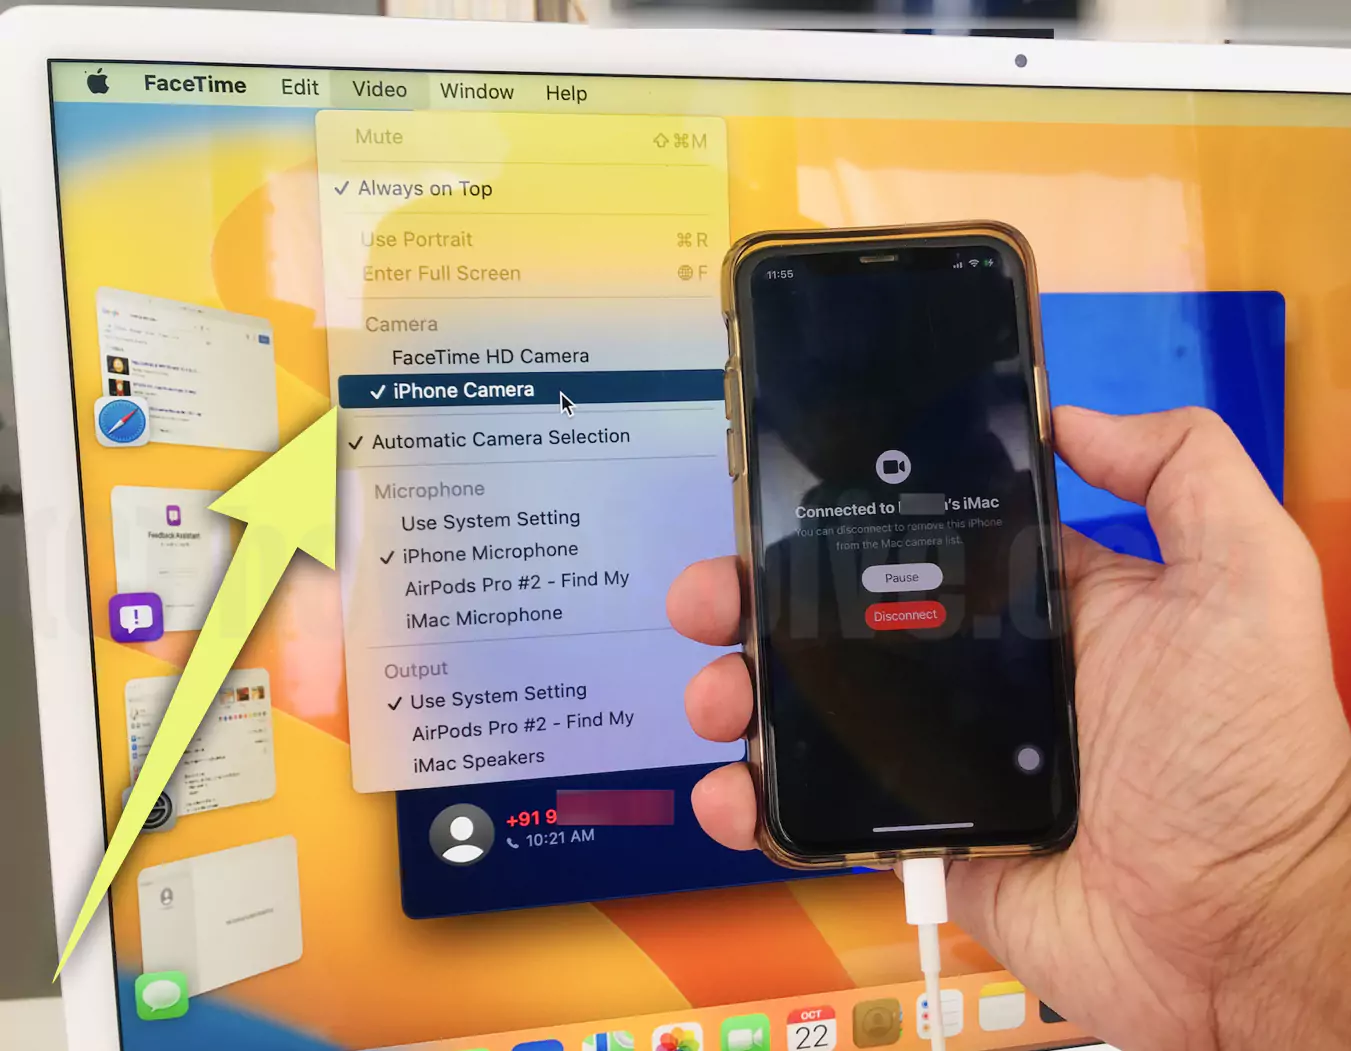
4→ Once you are on the call; and now willing to Desk View, click on Control Center from the Mac Menu Bar.
Note: If the Desk View is not showing on Mac, select the Video Option from the FaceTime Menu and then choose the corresponding iOS Device. If you are still unable to Desk view, your iOS device is not compatible with the feature. Since the desk view is available on iPhone having Wide- Angle Camera.
5→ Select Video Effect.
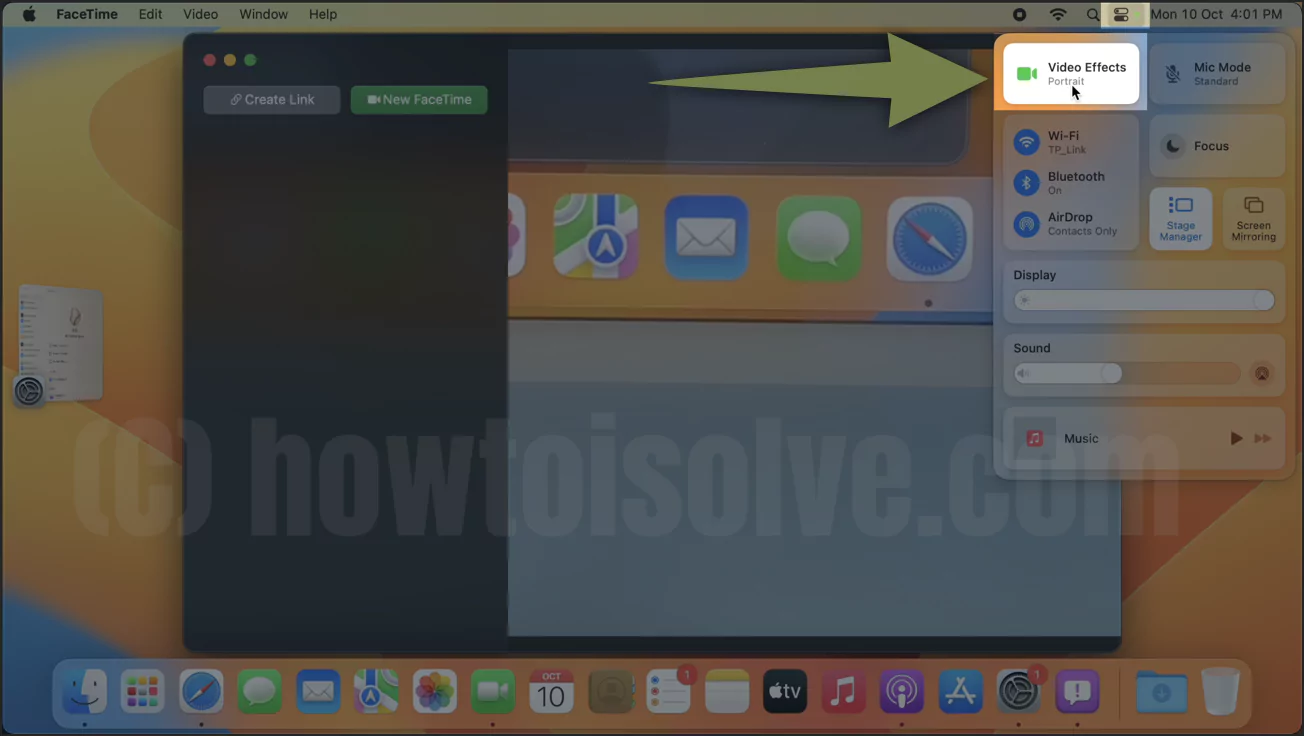
6→ From the Video Effect Menu; Center Stage, Portrait, Studio Light, and Desk View. Select Desk View.

7→ After clicking on the Desk View, the Center Stage is automatically activated and keeps the focus unremittingly as you share Desk View. But you can turn it off.
8→ The dialog box will appear if it’s your first time using the Desk View. Hover the cursor over the Continue Button and click on it.

How Does Desk View Work
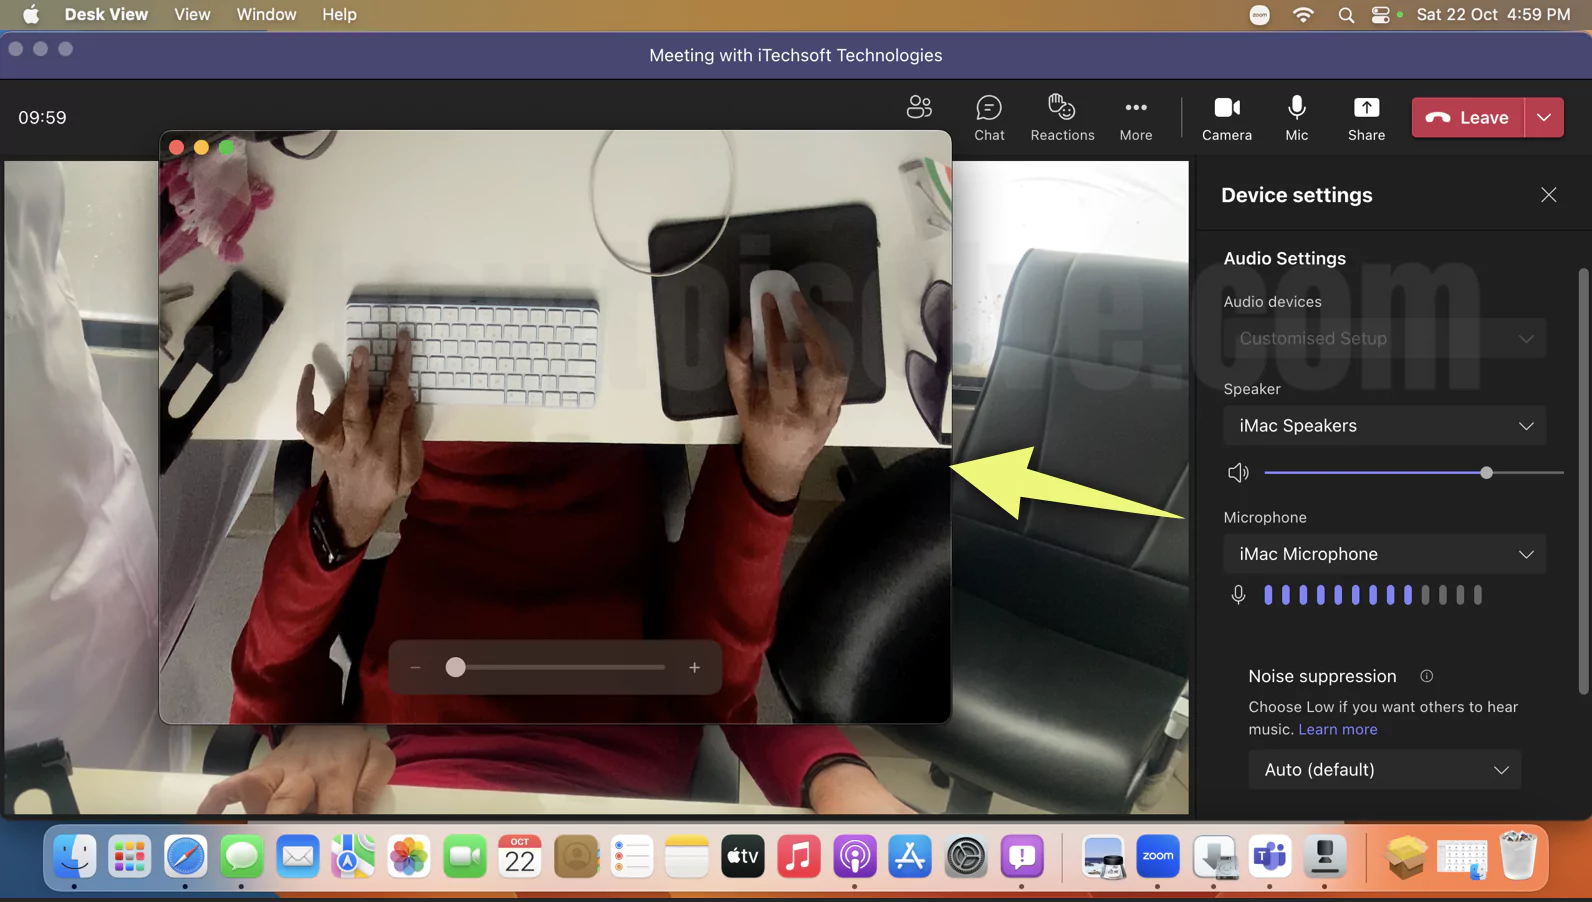
The View of the Desk will appear in a unique window. Formerly, share a window with receiver participants in a call using Screen Sharing Aspect. They will effortlessly be able to see both the feed of Desk and selected Window or Full Screen of a Mac Computer.
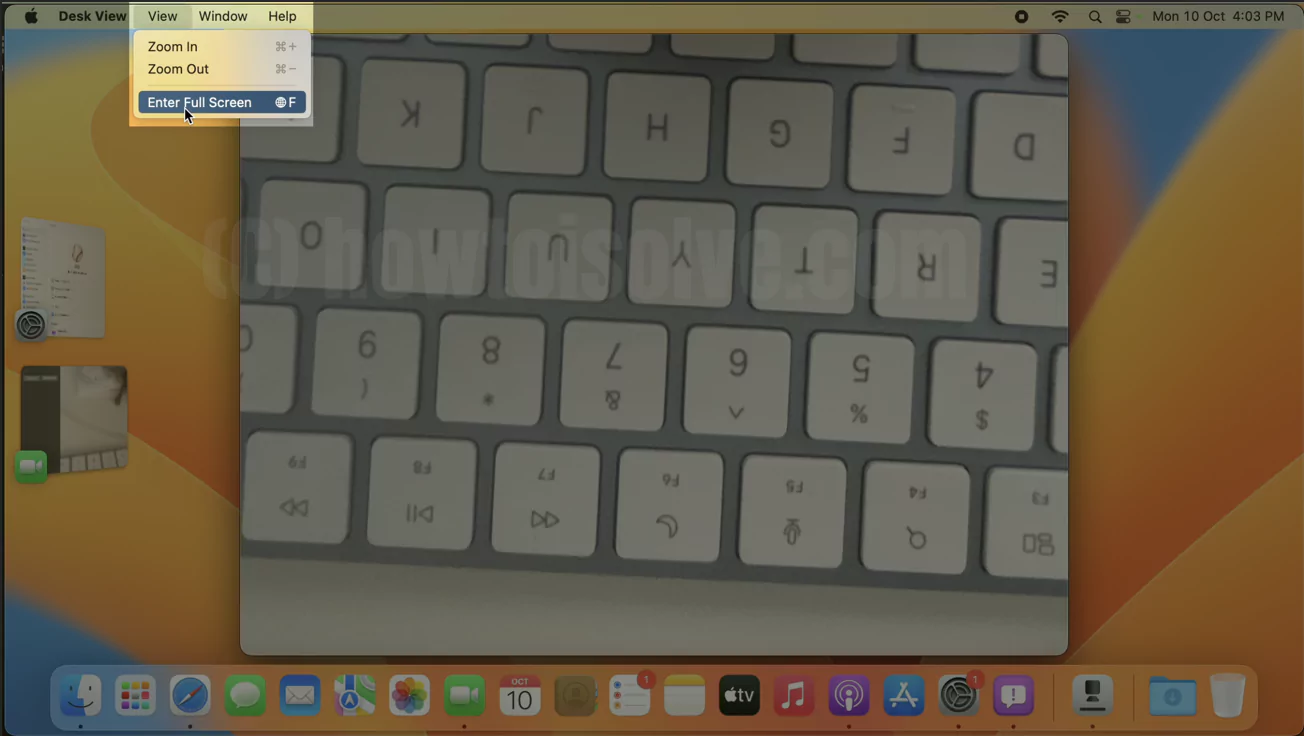
During the Screen Share feature video call, participants will not be able to see the feed of your Face.
To Zoom in & Zoom Out Desk Camera, use Slider or Use Shortcut,


For a better understanding, go through the steps mentioned below.
We are continuing with FaceTime as an illustration. But you can use it on a Video Calling application.
- Select the Screen Share Option from FaceTime. Doing so will command the pop-up menu to appear in the upper right corner of the screen.
There will be two options,
- Window: Suppose there are multiple screens on the Mac Computer, and you want to show only a single window to all participants. In that scenario, select the Window Option.
- Screen: Oppositely, if you want to show the whole set of windows to participants, select Screen Option.
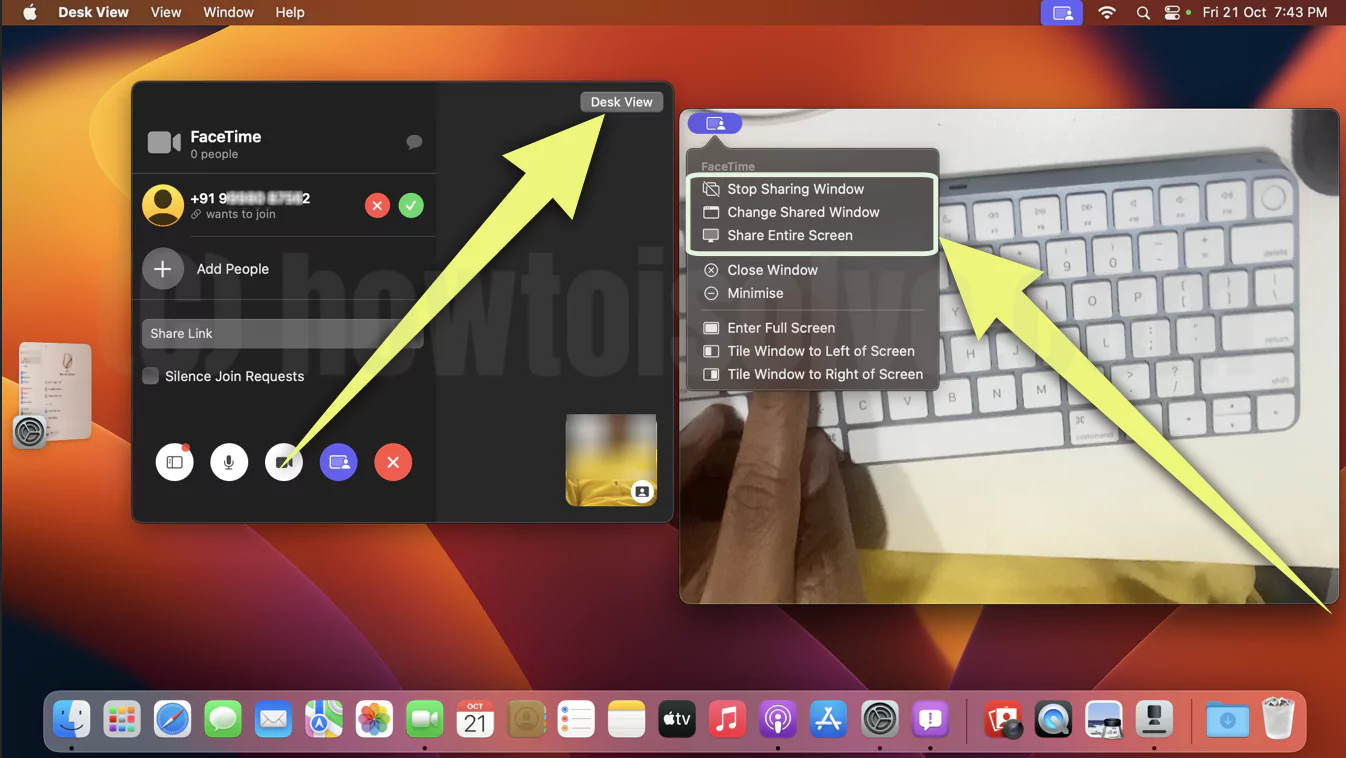
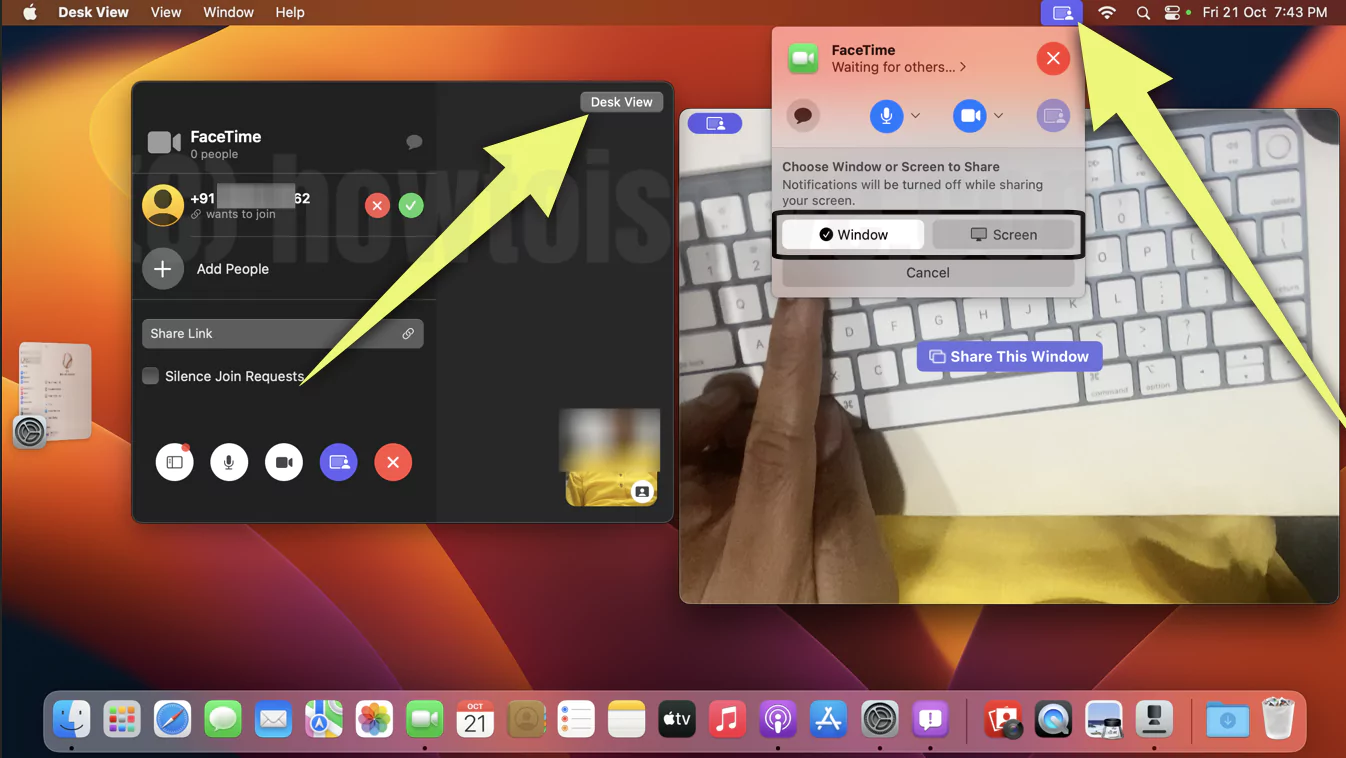
- If you have selected the Window option from Screen Sharing, navigate to the Desk View Window. The separate window highlights the View of your informative Desk, select Share This Windows.
Now all the participants can see both the Window and Desk View if you want to disable the Screen Share Window feature without affecting the Desk View.
Go to Desk View Window and select Screen Sharing Icon at the left-top corner. Then after, click on “Close This Windows. Or Glob Key + F” That’s It!
How To Use Desk View Zoom Google Meet & Teams Via Continuity Camera
Desk View is really an admirable aspect that highlights the tabletop top view using the same iPhone camera as webcam on Mac.
The feature is carved with endless limits, as it’s not compatible with only Apple App like FaceTime, but it can also be firmly used with Third-party applications like Google Meet, Zoom, Microsoft Team, etc, with the same straightforward procedure as mentioned below.
Use Desk View In Zoom
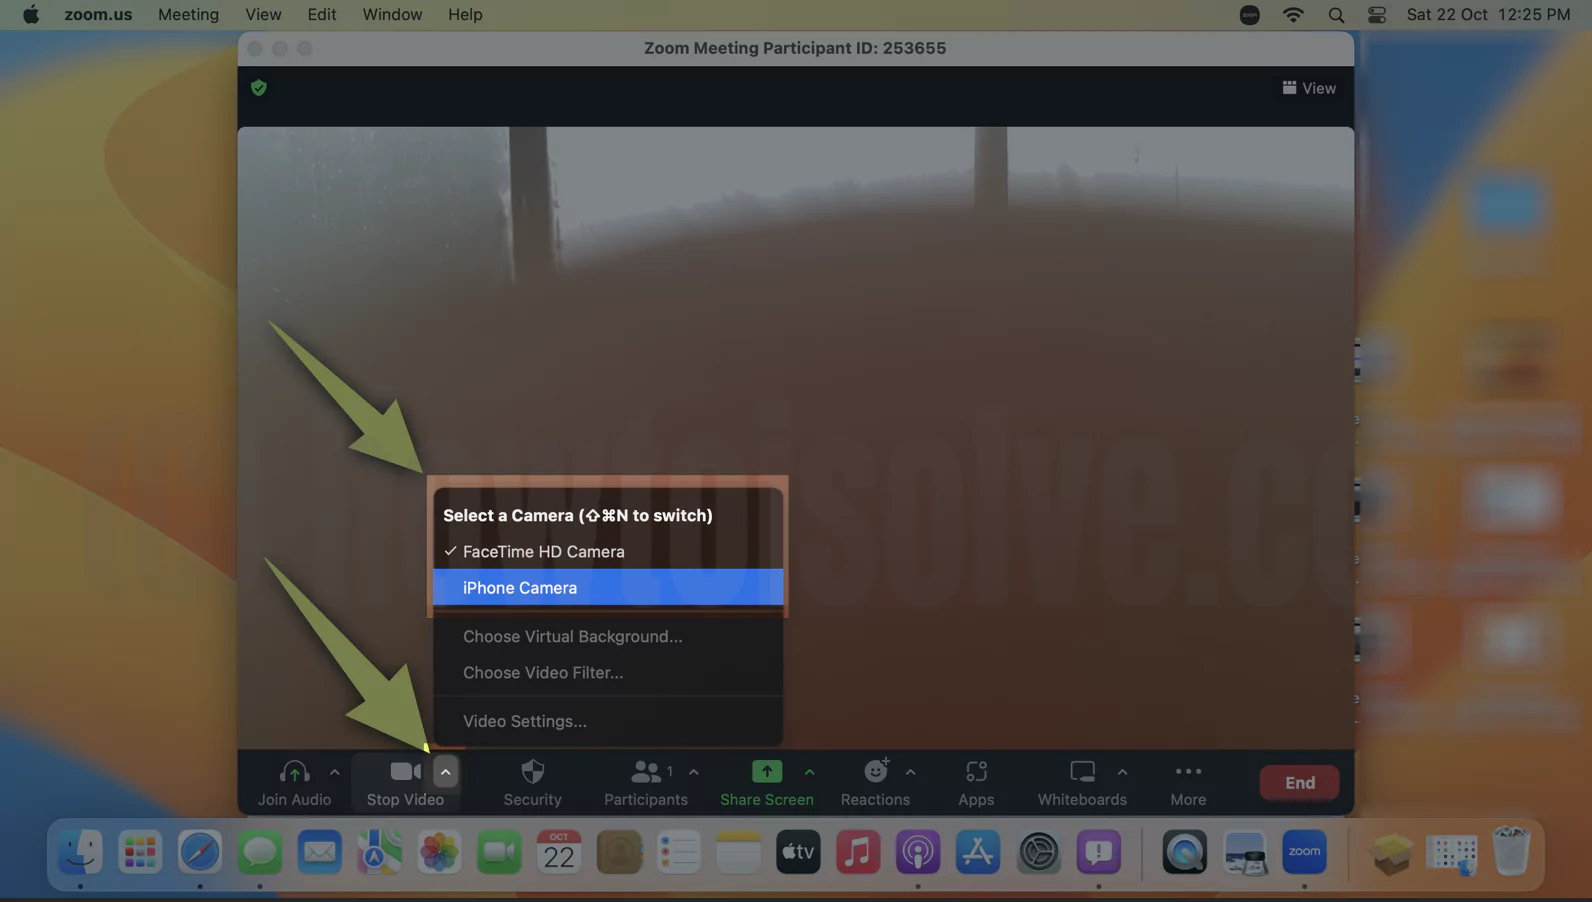
1→ Open the Zoom app on mac, Start Zoom Video call, or On the Existing Zomm Video calling screen. From zoom video toolbar, Click on the Upper arrow icon, Select the Camera, iPhone camera from FaceTime HD Camera.
2→ Now, From the top mac menu, Control Center > Video Effects.
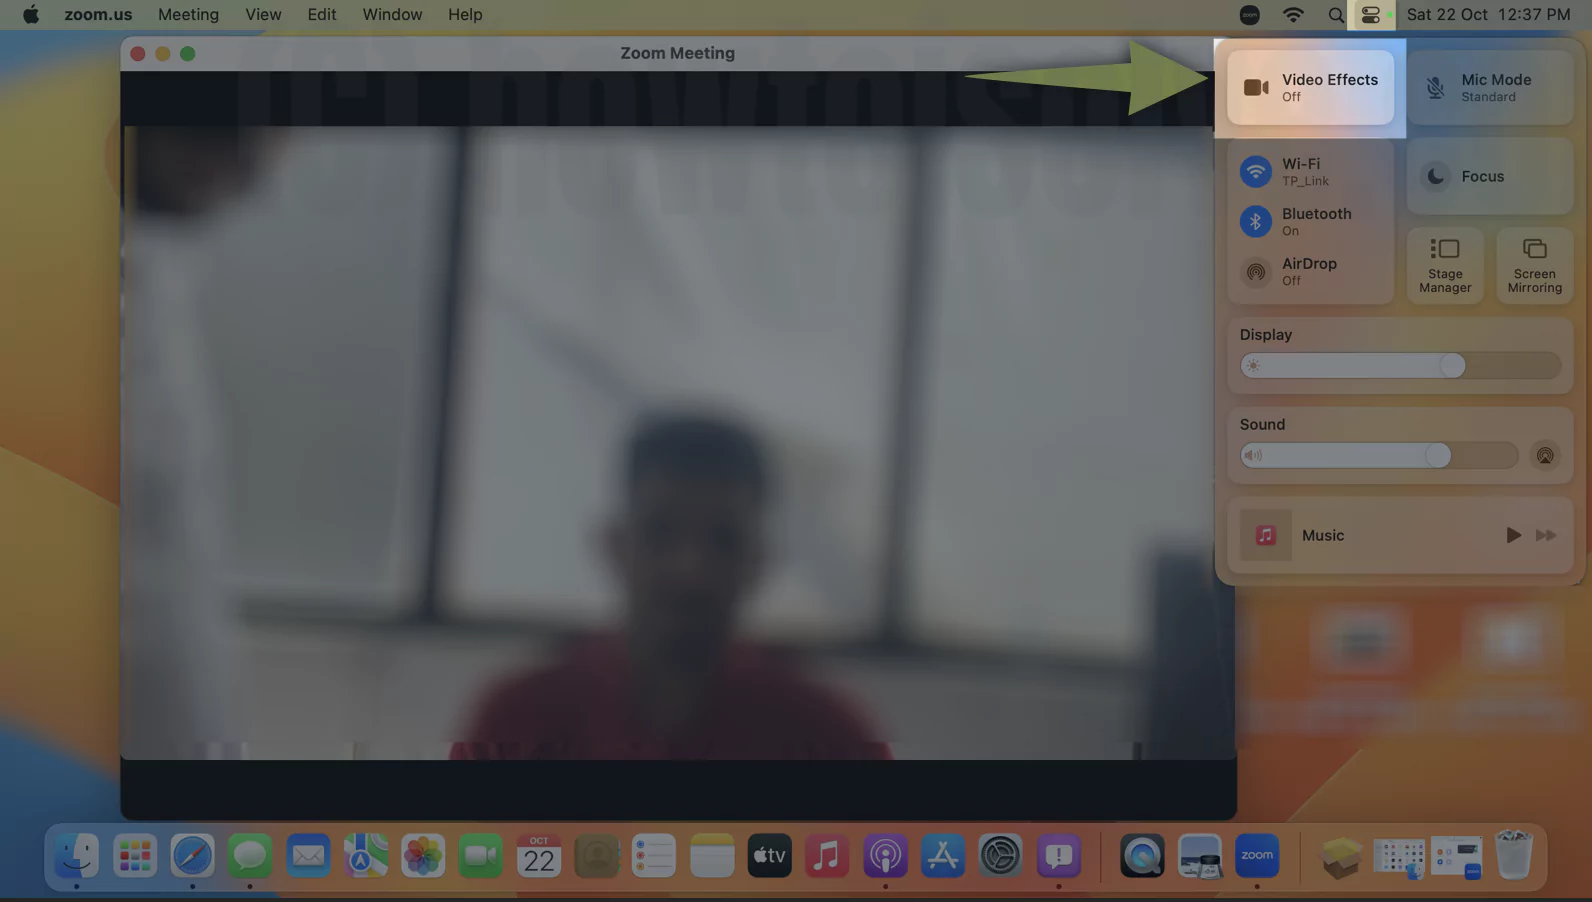
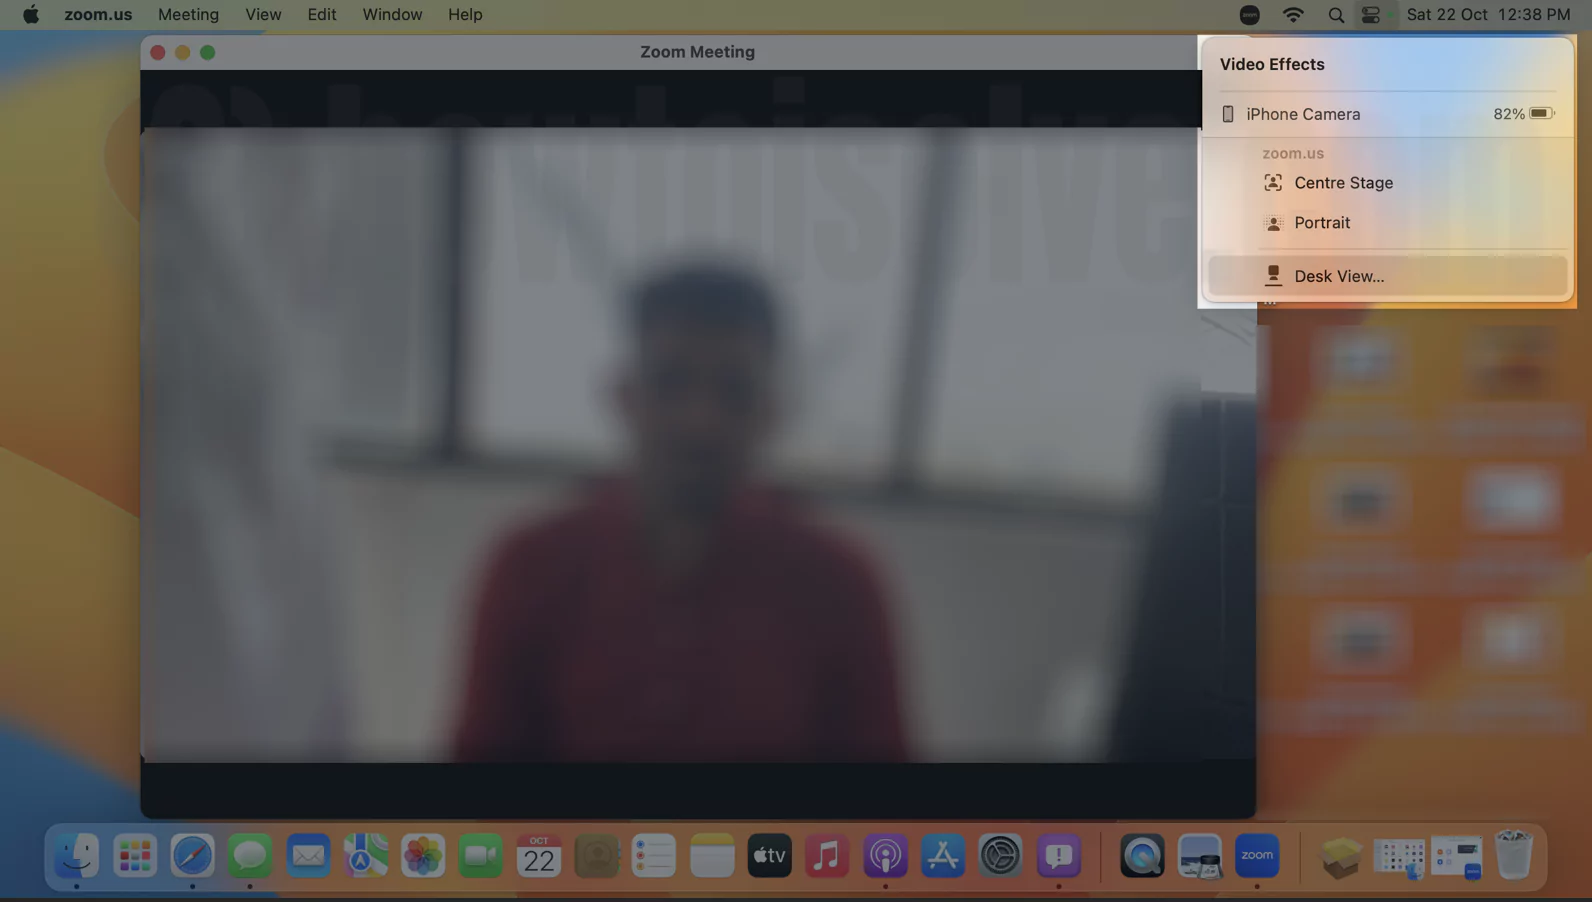
3→ Choose, the Desk View Option. along with Other options like Center Stage, Portrait.
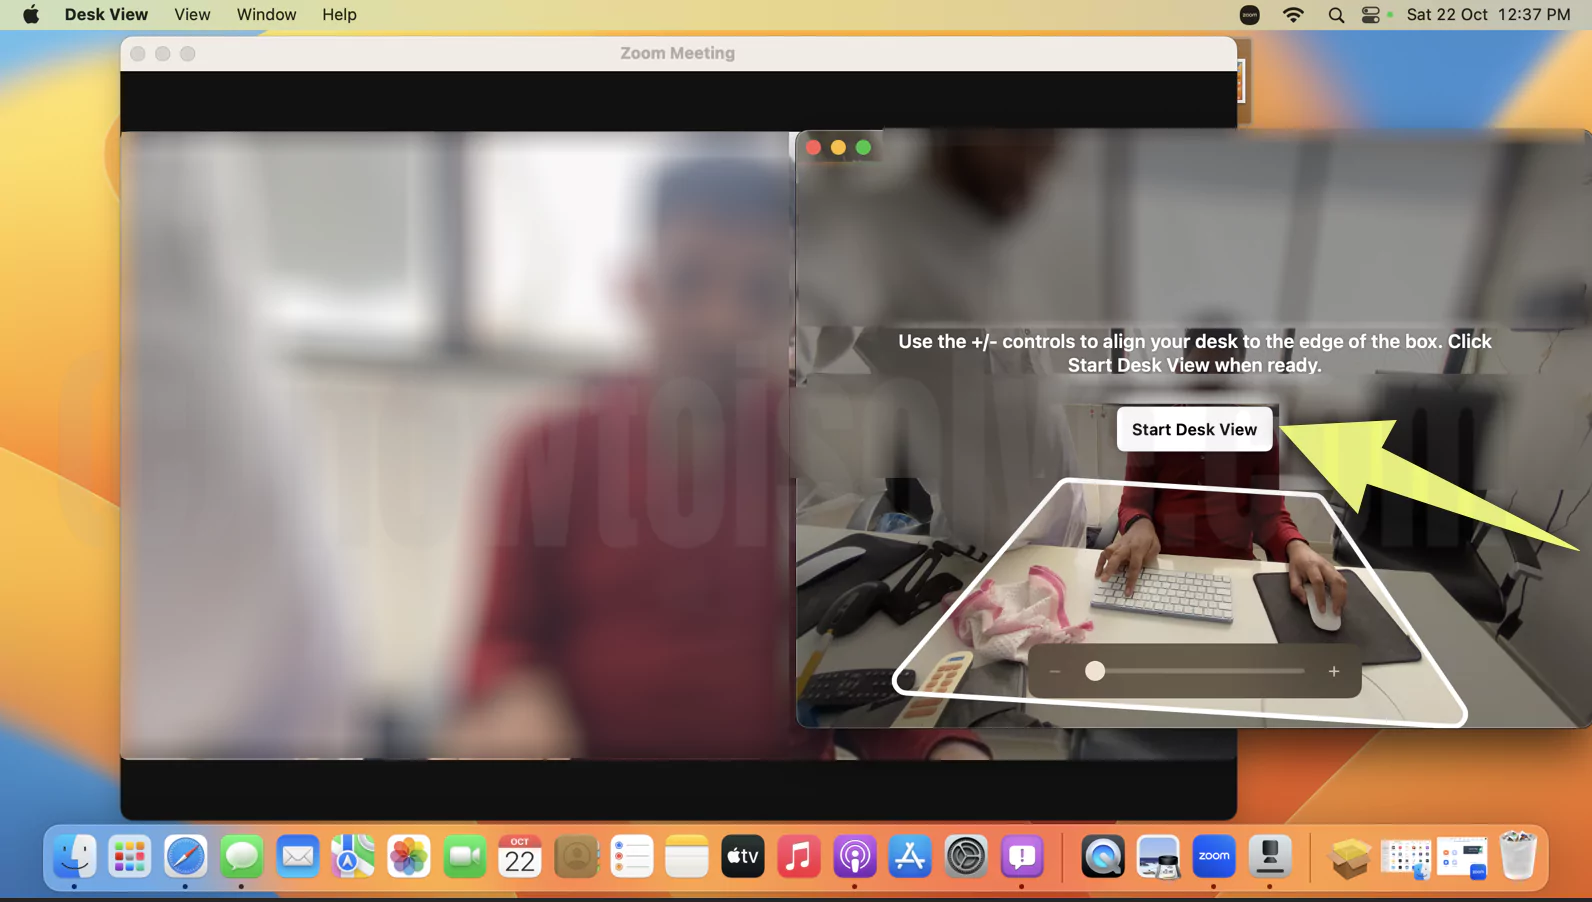
4→ Click on Start Desk View option. That’s it.
Use Desk View In Microsoft Teams
1→ Open Microsoft Teams on Mac and On the Video calling screen. Click on the More icon and see the Change camera option or iPhone camera option as of the below picture.
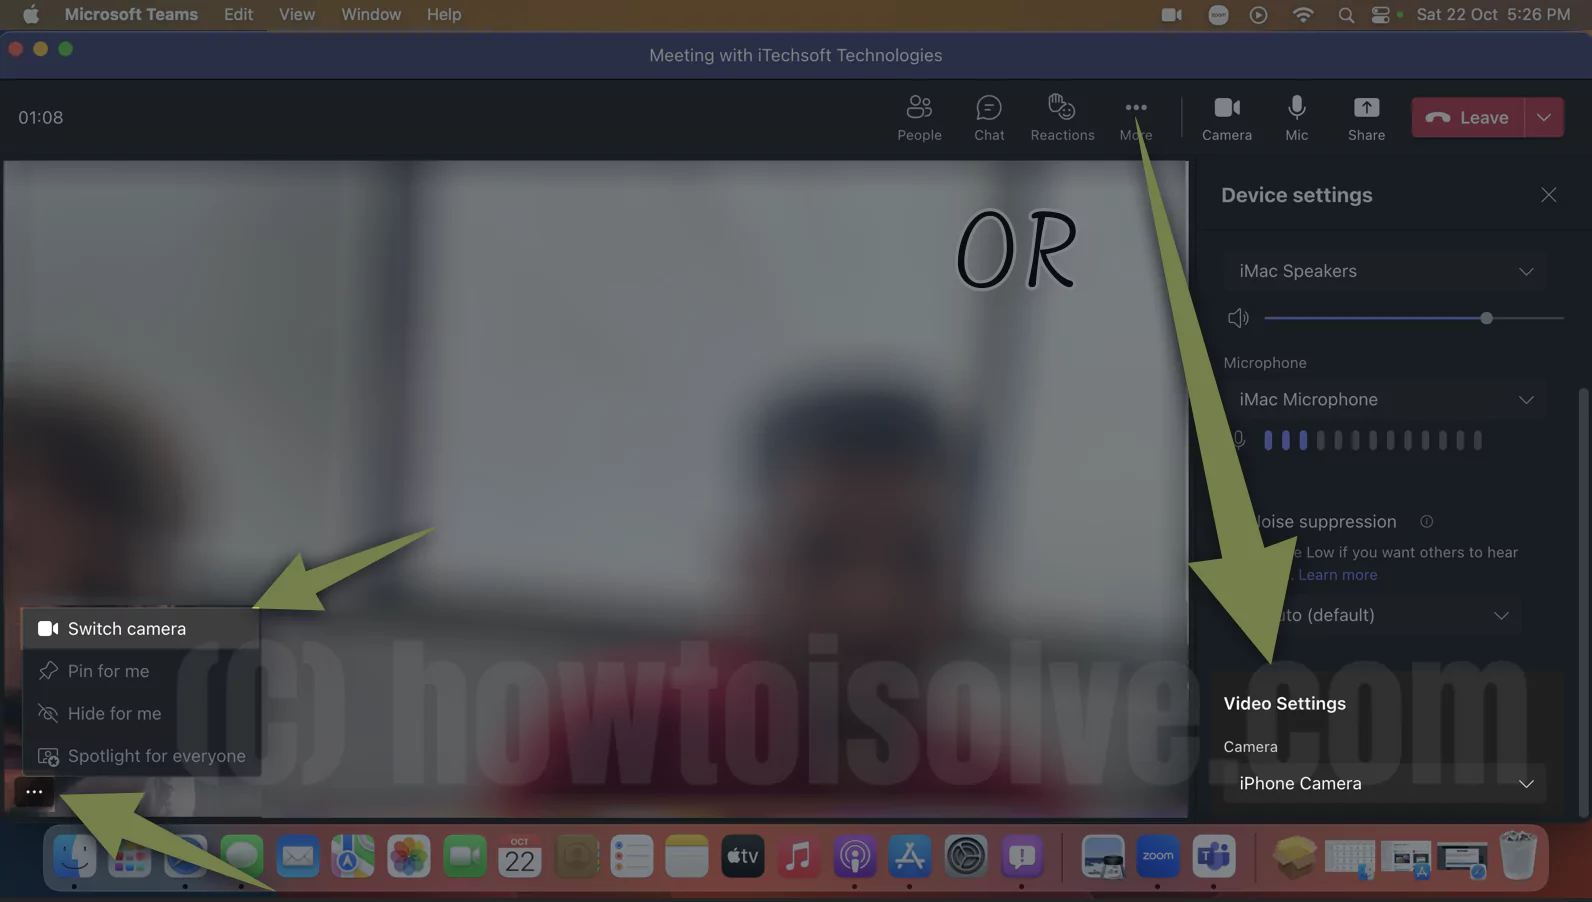
2→ Under the Control center > Video Effects.
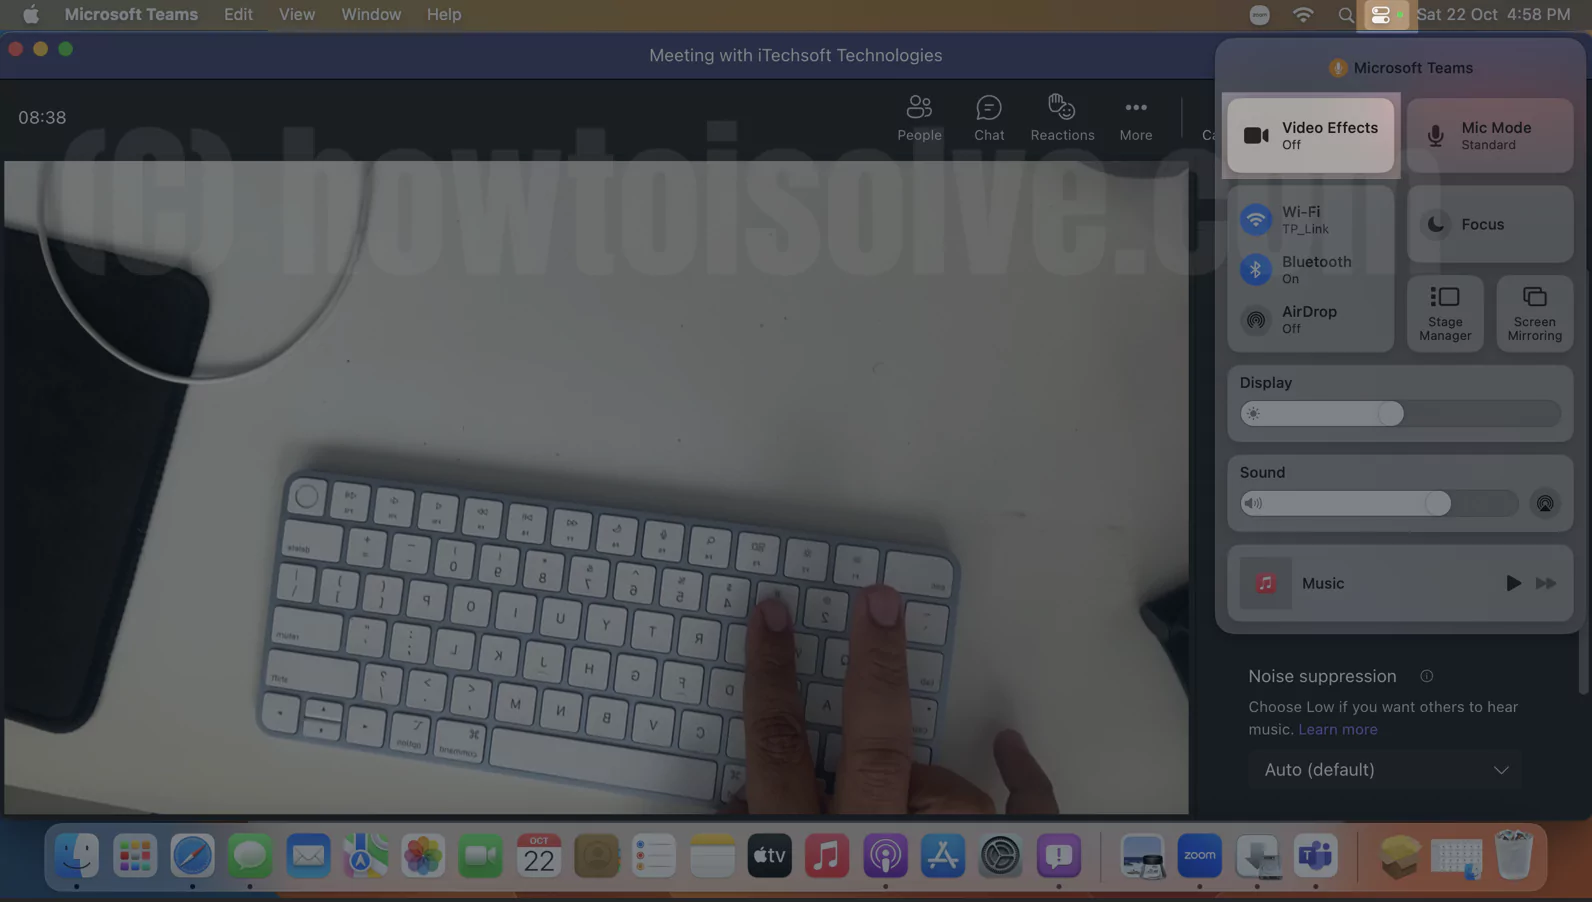
3→ Choose Desk View. Wait for a second.
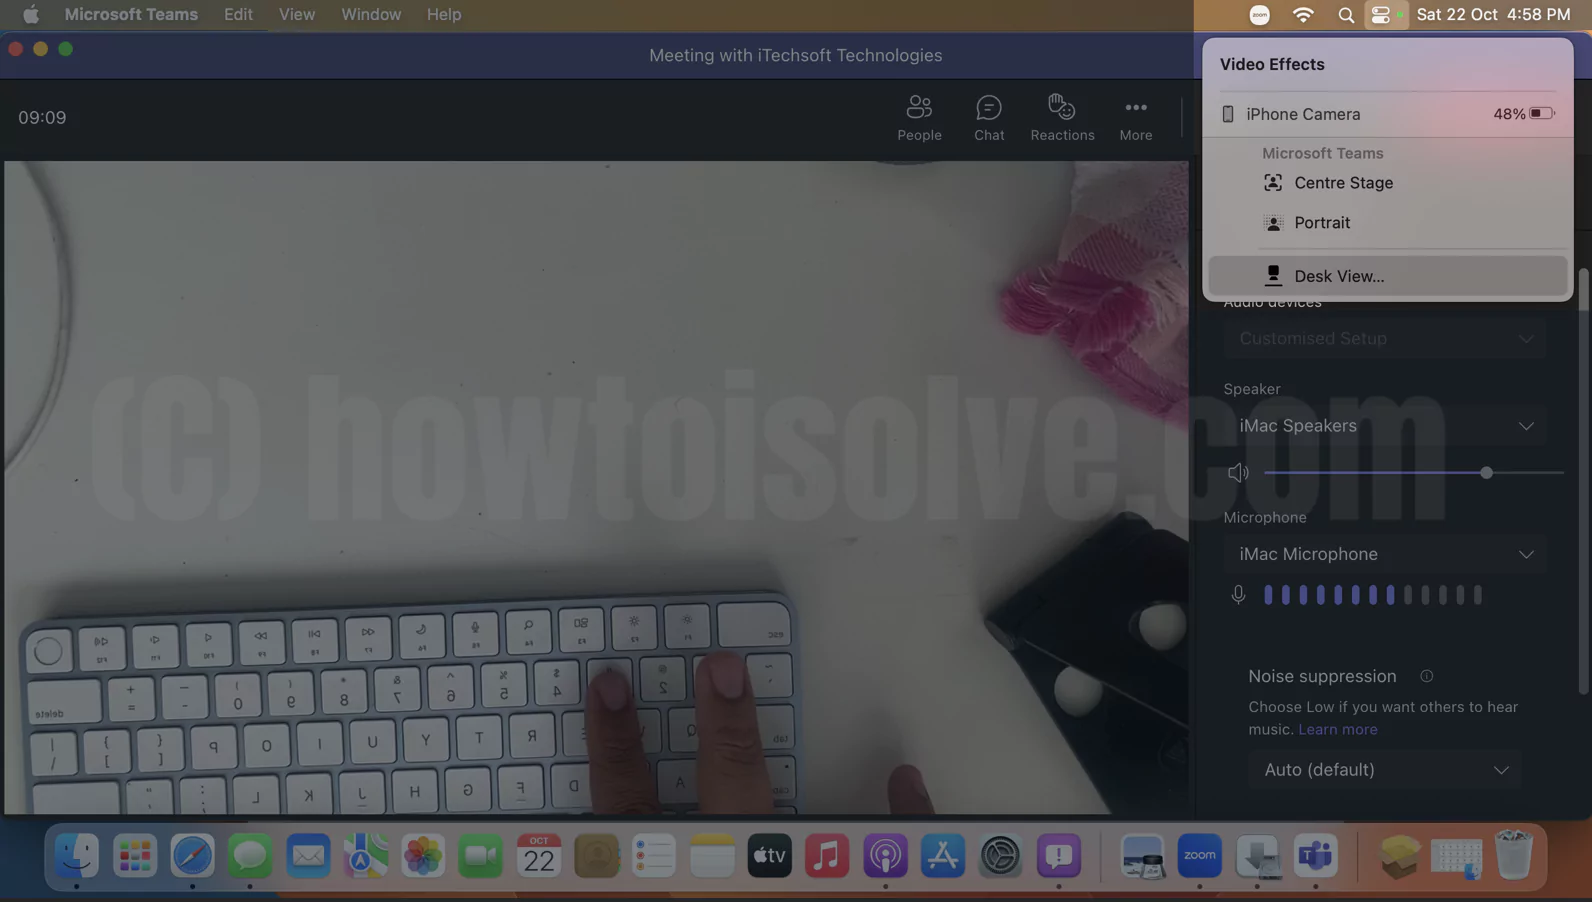
Start desk view, Adjust the iPhone on Mac using the Continitry camera mount.

Use Desk View In Google Meet
- Navigate to Google Meet and then create/join the meeting.
- Select Present Now; it looks like an Upper Arrow Icon in a box. Now select a Window Option to add the Window from your Mac.
- Doing so will feature the Share Application pop-up. Choose Desk View Window.
Use Desk View In Microsoft Team
- Navigate to the Microsoft Team and then create/join the meeting.
- Choose the Share Desktop Option.
- Now you will receive the What To Open pop-up. From this Window, select Window Tab.
- Next, choose Desk View Window and then Share option.
MacBook Keyboard Not Showing in Desk View?
The Desk View is mapped to interact with the Desk, not the MacBook Pro Keyboard. Therefore, it’s only possible when your Mac device is connected to Best Third-Party Keyboard.
However, you can try your luck by gently pushing back the MacBook Pro to show the Desk.
Apple Desk View Mount Holder for Continuity Camera
To use the continuity feature more provisionally, you must equip yourself with the Best Continuity Camera Accessories. Need to familiarize yourself with which to buy? We did work for you.
1. Doolkin® Pro Mount
If you want to position your iPhone horizontally to use the Continuity Camera for desk view, the Doolkin Mount is the best option. As of now, it is formed with a combination of Premium Strong Magnets and Soft Protective Rubber to make it last forever.
To improve stability, ¼ Inches of a Camera Screw firmly hold a Cell Phone, Handgrip, Tripods, poles, etc. iPhone or any other Smartphone between 55mm to 85mm never attempts an accidental fall when placed in this Mount.
2. Phone Mount NeoDymium Magnet
Most users; nowadays are always fond of carrying multiple accessories while attending frequent meetings. And to become more interactive through the presentation they have created, the Apulat Strong Magnet comes under consideration.
As of now, it’s best; as it firmly holds the iPhone, there are no chances of accidental falls and drops while using the Continuity Camera Feature.
Setup Desk View!
Setting up the desk view on the Mac computer seems easy when all the desk requirements are fulfilled. If you are still a bit confused regarding the procedure you can ask use by dropping in the below comment box.
