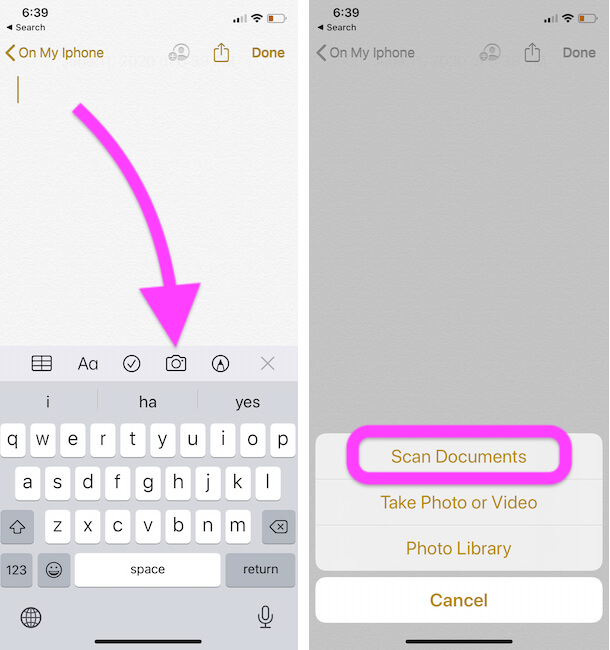
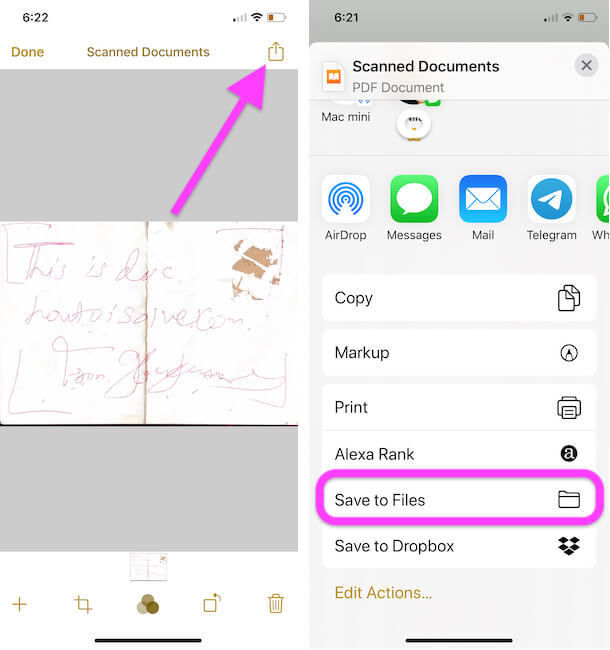
One way or another, you will need the document scanner to scan documents for yourself or your kid using the Apple Notes app. Then, convert the Scanned Document to PDF File, Exit Using Markup, Save to Files and Share the PDF file.
Previously we used to use third-party scanner applications, while some of us still depend on the scanner machine to scan the documents. That time has long gone.
If you own an iPhone and iPad, then lucky you. Apple has made scanning documents even more straightforward. We can Scan documents without any app like Camscanner or Other Third-Party apps.
However, a document scanner can be called a hidden feature of the iPhone since it is not available on the front end but using the Notes App, and you can use this functionality. Then, anytime convert and save the scanned documents on iPhone to PDF, share with anyone from the Notes App, and more.
How to Scan Documents on iPhone Using Notes App
Apple has pushed the document scanner feature of iPhone and iPad to the Notes app. Plus, you’ll get to use copious editing tools and options that will force you to delete the third-party scanner app from your iPhone.
- Launch the Notes App on your iPhone, iPad.
How to Markup Scanned Documents on iPhone, iPad
If you are unsatisfied with notes written on the Documents, use iPhone’s default markup tools to make various changes, including adding text, signature, enlarging, or highlighting the text or anything. Just go with it, and see how to mark up scanned documents on an iPad or iPhone efficiently.
- Open the Note, and select the Document to add a markup.
- On the top-right screen, tap Share
- Choose Markup.
- Select the markup tool that is most appropriate for you.
- If you want to change the color for the markup tool, then tap on the coloring Circled button, and set the color.
- Lastly, when you tap Plus (+), you can Add Text, Shapes, Use a Magnifier to enlarge certain areas, and also add a Signature.
How to Save Scanned Document as PDF on iPhone, iPad
Saving scanned documents as PDF on the iPhone is as easy as shooting videos and photos in the Camera App. Initially, we used to convert the documents into PDF, but with the latest update, when you save the documents to Files App or any other app, it will automatically convert into PDF, so all you need to do is choose the app and Save the document.
- Go to the Note, where the scanned documents are stored.
- Tap on the scanned document.
How to Share Scanned Document on iPhone, iPad
Sharing documents right from the Notes app is an alternative option if you want to save the Notes into the Mail App or share it over any application. Here’s how to share scanned documents on iOS devices.
- Navigate to the Notes app and open the Note of which document you would like to share.
- Tap on the Share symbol on the top-right screen.
- Select the app to share the note.
- It will directly convert to PDF, depending upon the application you choose to share.
How to Delete Scanned Document on iPhone, iPad
If you no longer needed the scanned document, so it’s better to remove it and reduce clutter from the Notes App. Moreover, the Notes app lets you delete a particular document that you may have mistakenly scanned twice. Carefully delete
- Open the Note to delete the scanned document.
- At the bottom of the screen, tap the Delete icon.
- Lastly, tap Delete Scan.


