Your Mac’s performance can sometimes slow down by running unnecessary processes. Even if unresponsive apps run in the background, your computer overheats, leading to sluggish performance. Whether you have a meeting to join or save a file, a slow computer is annoying at all times.
The ideal way to keep your Mac running smoothly is to know how to view and kill processes when necessary. Thankfully, there are multiple methods you can perform to kill background applications, startup, and other processes. Our experts have curated this guide comprising the best methods to see and kill different processes on macOS Sonoma and older versions. Go through now to manage your Mac effectively.
How to Kill a Process Using Activity Monitor
Activity Monitor is a built-in utility on macOS that allows you to monitor and manage running processes. You can use it to identify and terminate processes that may be causing issues or consuming excessive system resources. Here’s a detailed step-by-step guide:
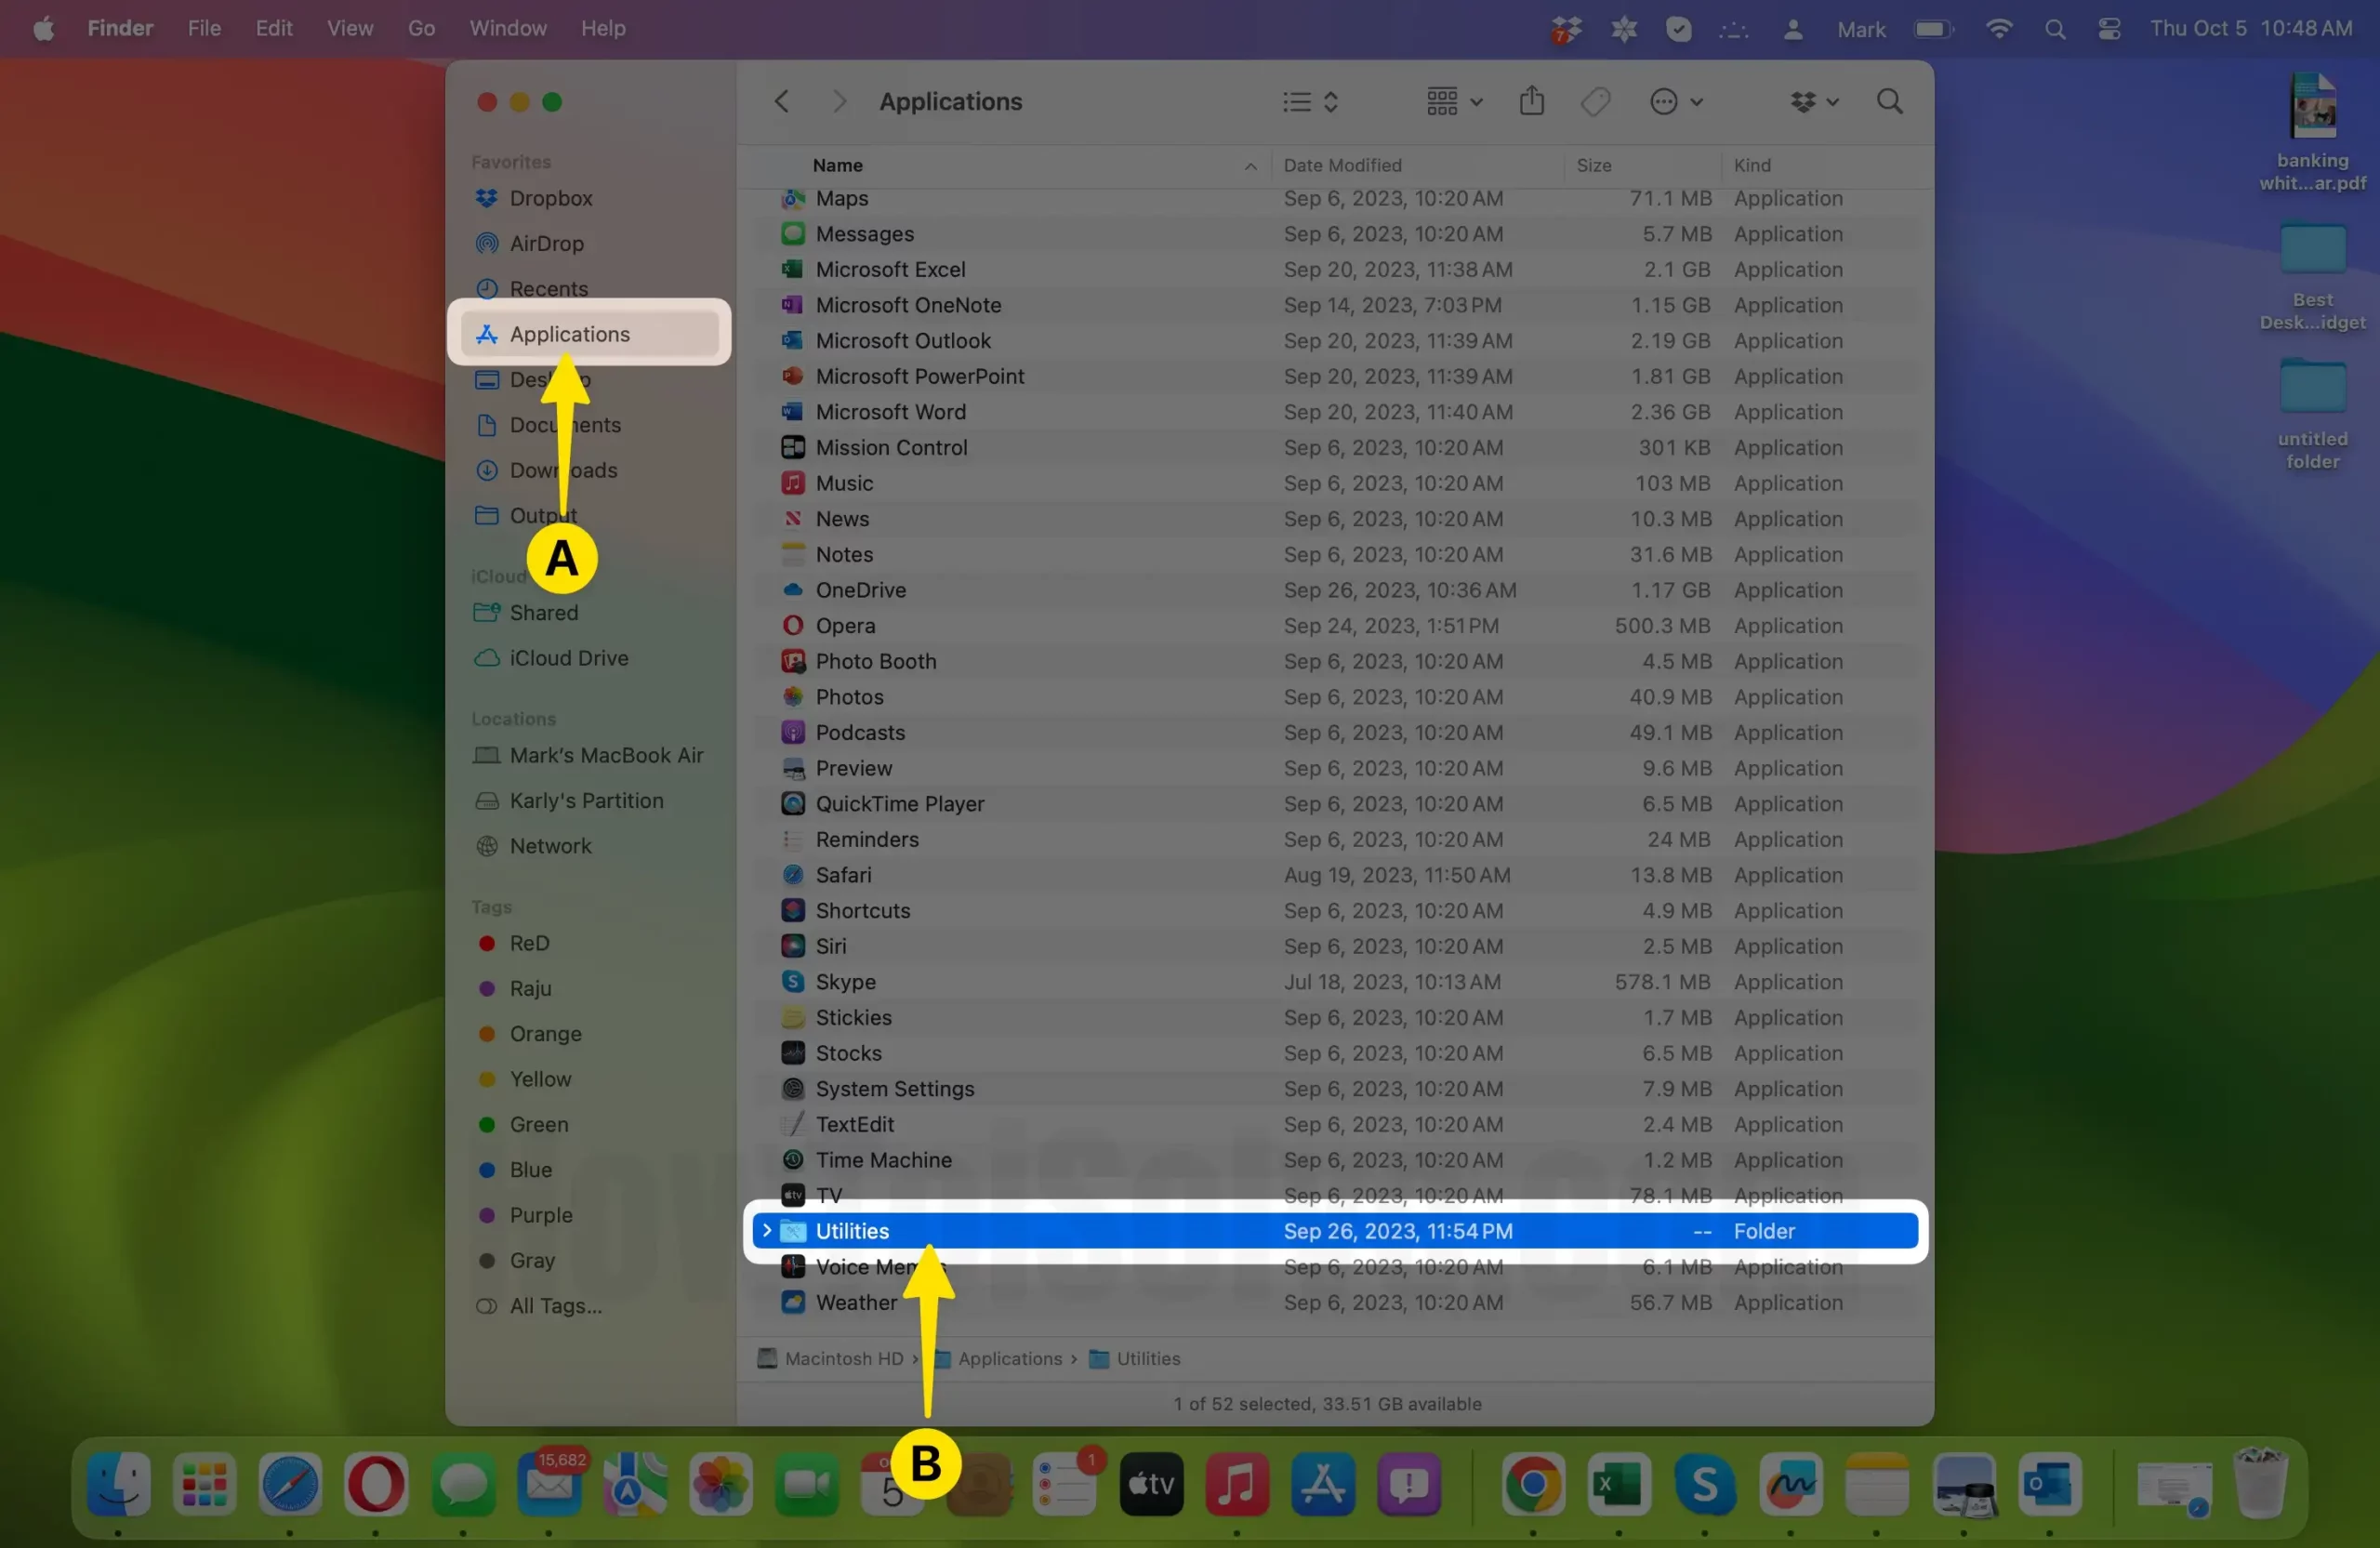
- Open Activity Monitor: Activity Monitor can be found in the “Utilities” folder within the “Applications” folder. You can access it by following these steps:
- Click on the “Finder” icon in the Dock.
- Navigate to “Applications” in the left sidebar.
- Scroll down and open the “Utilities” folder.
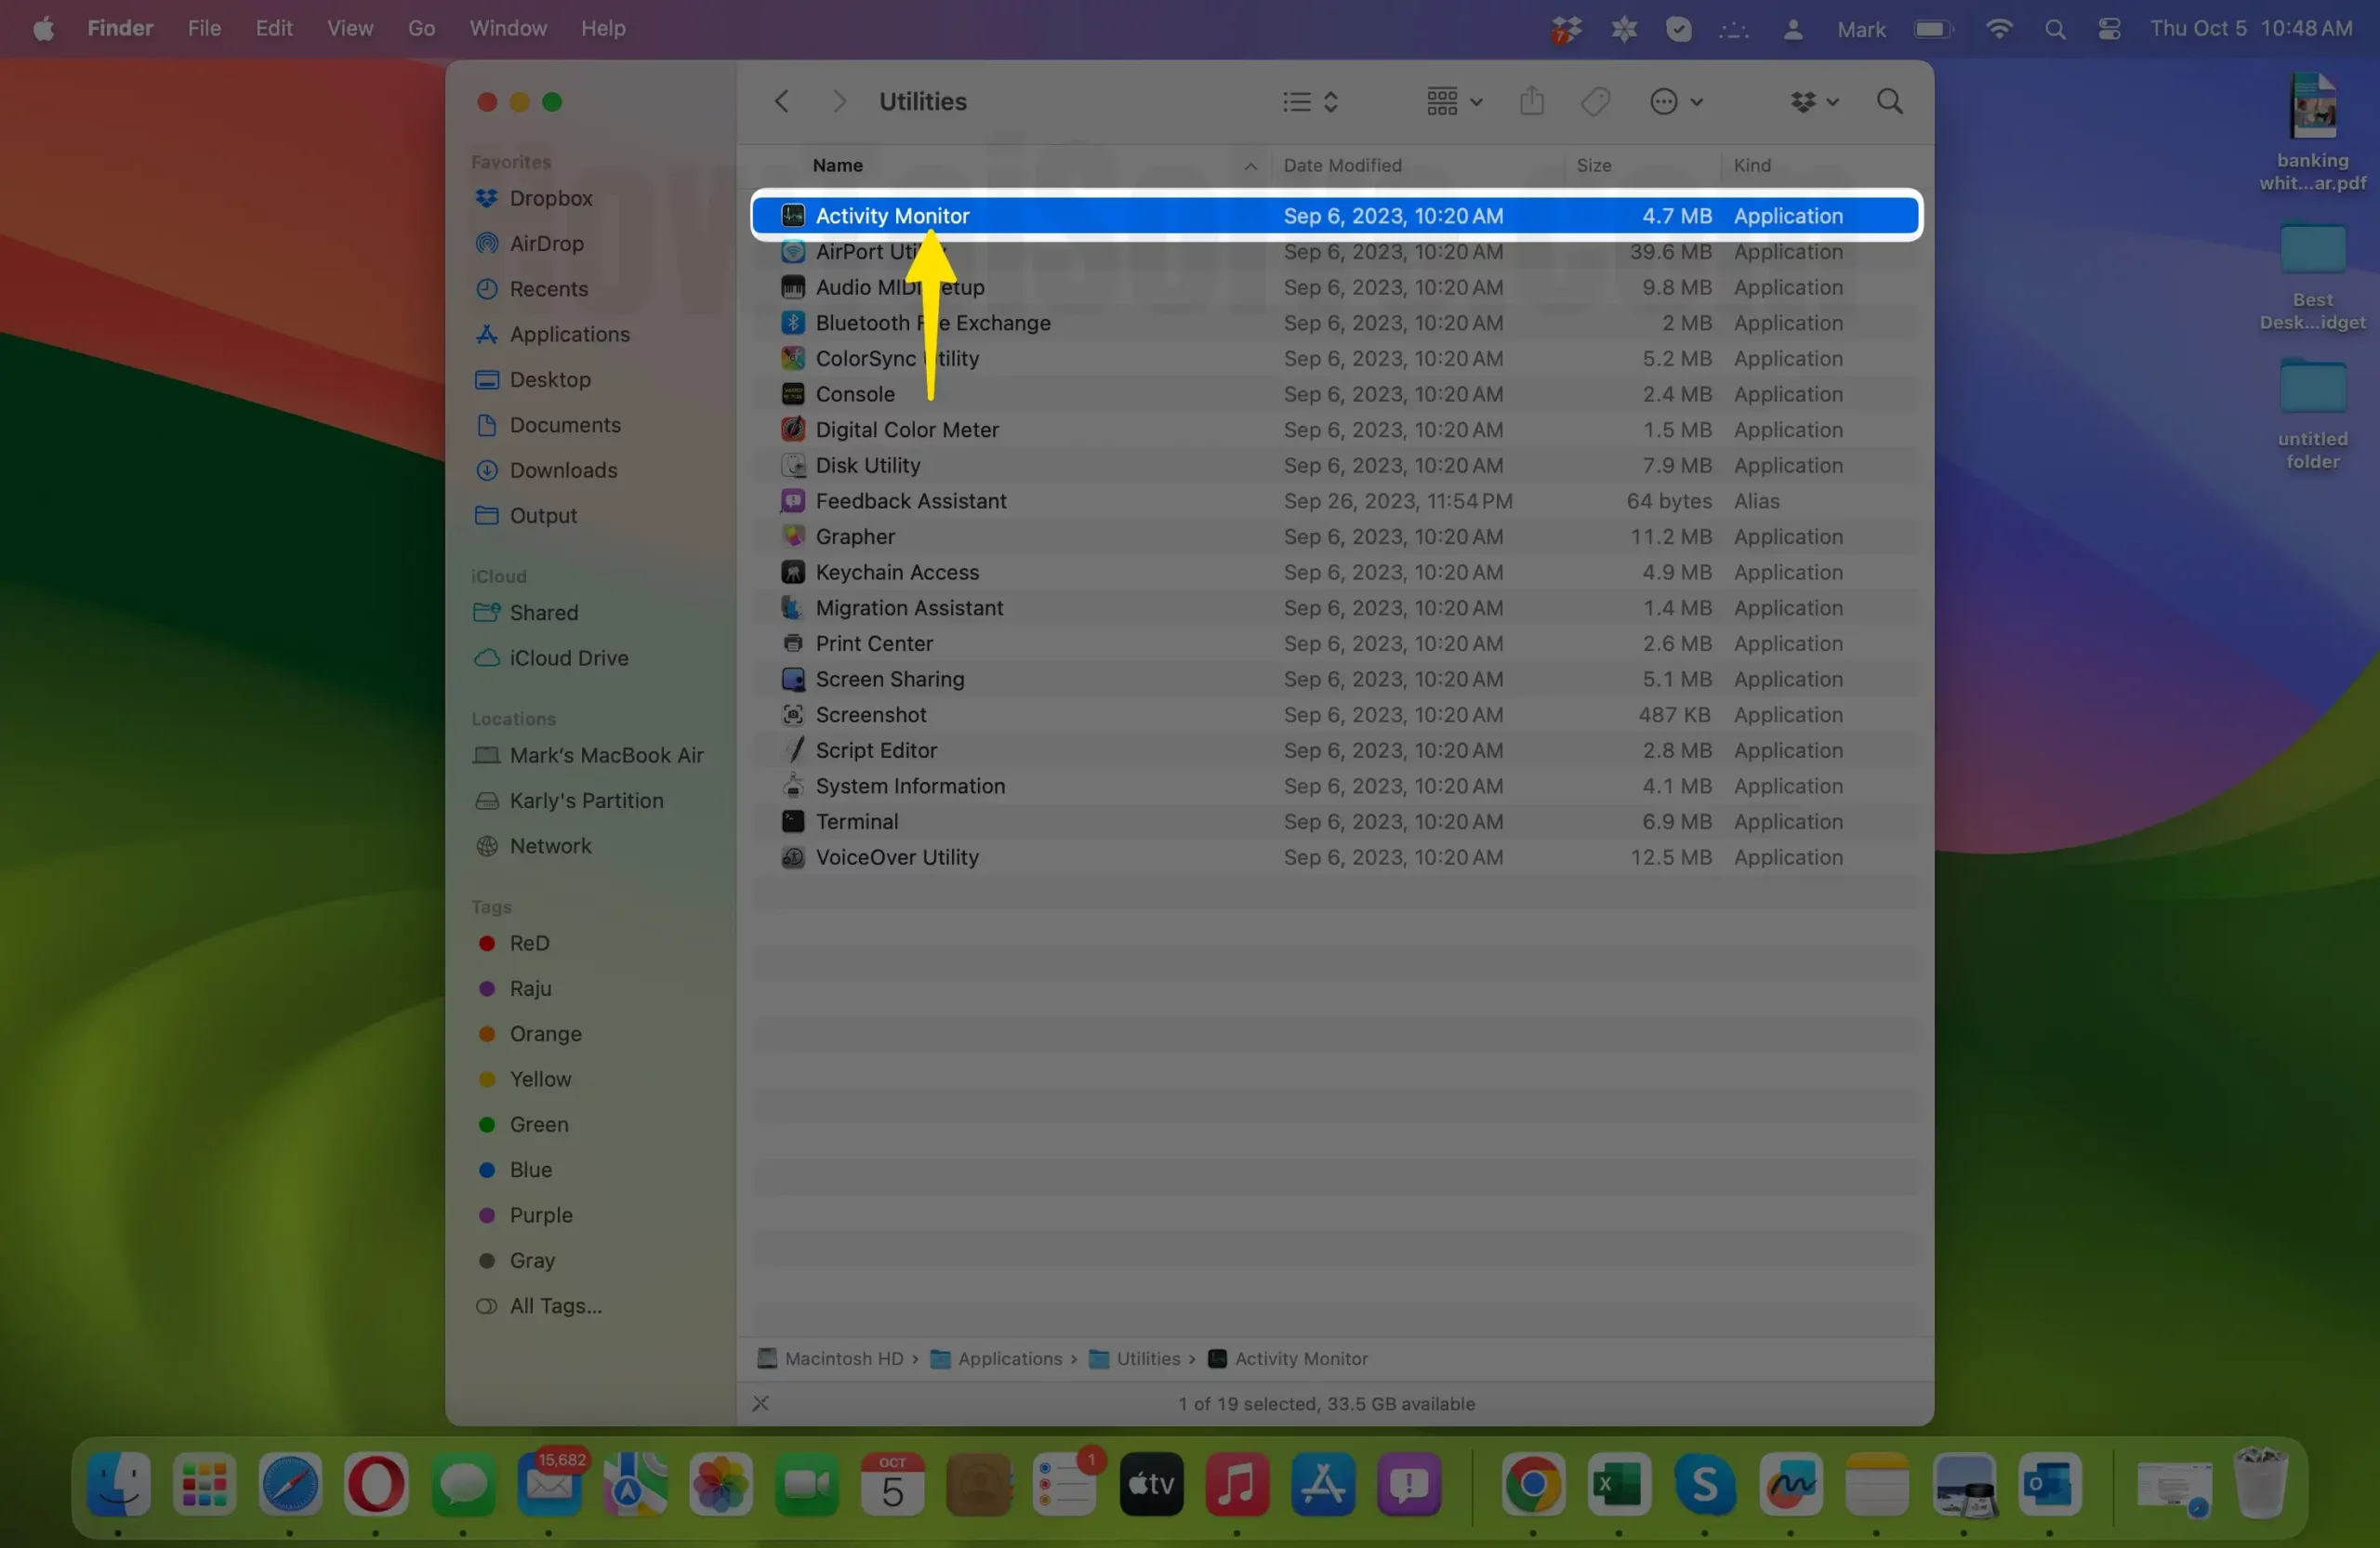
- Double-click on “Activity Monitor” to launch it.
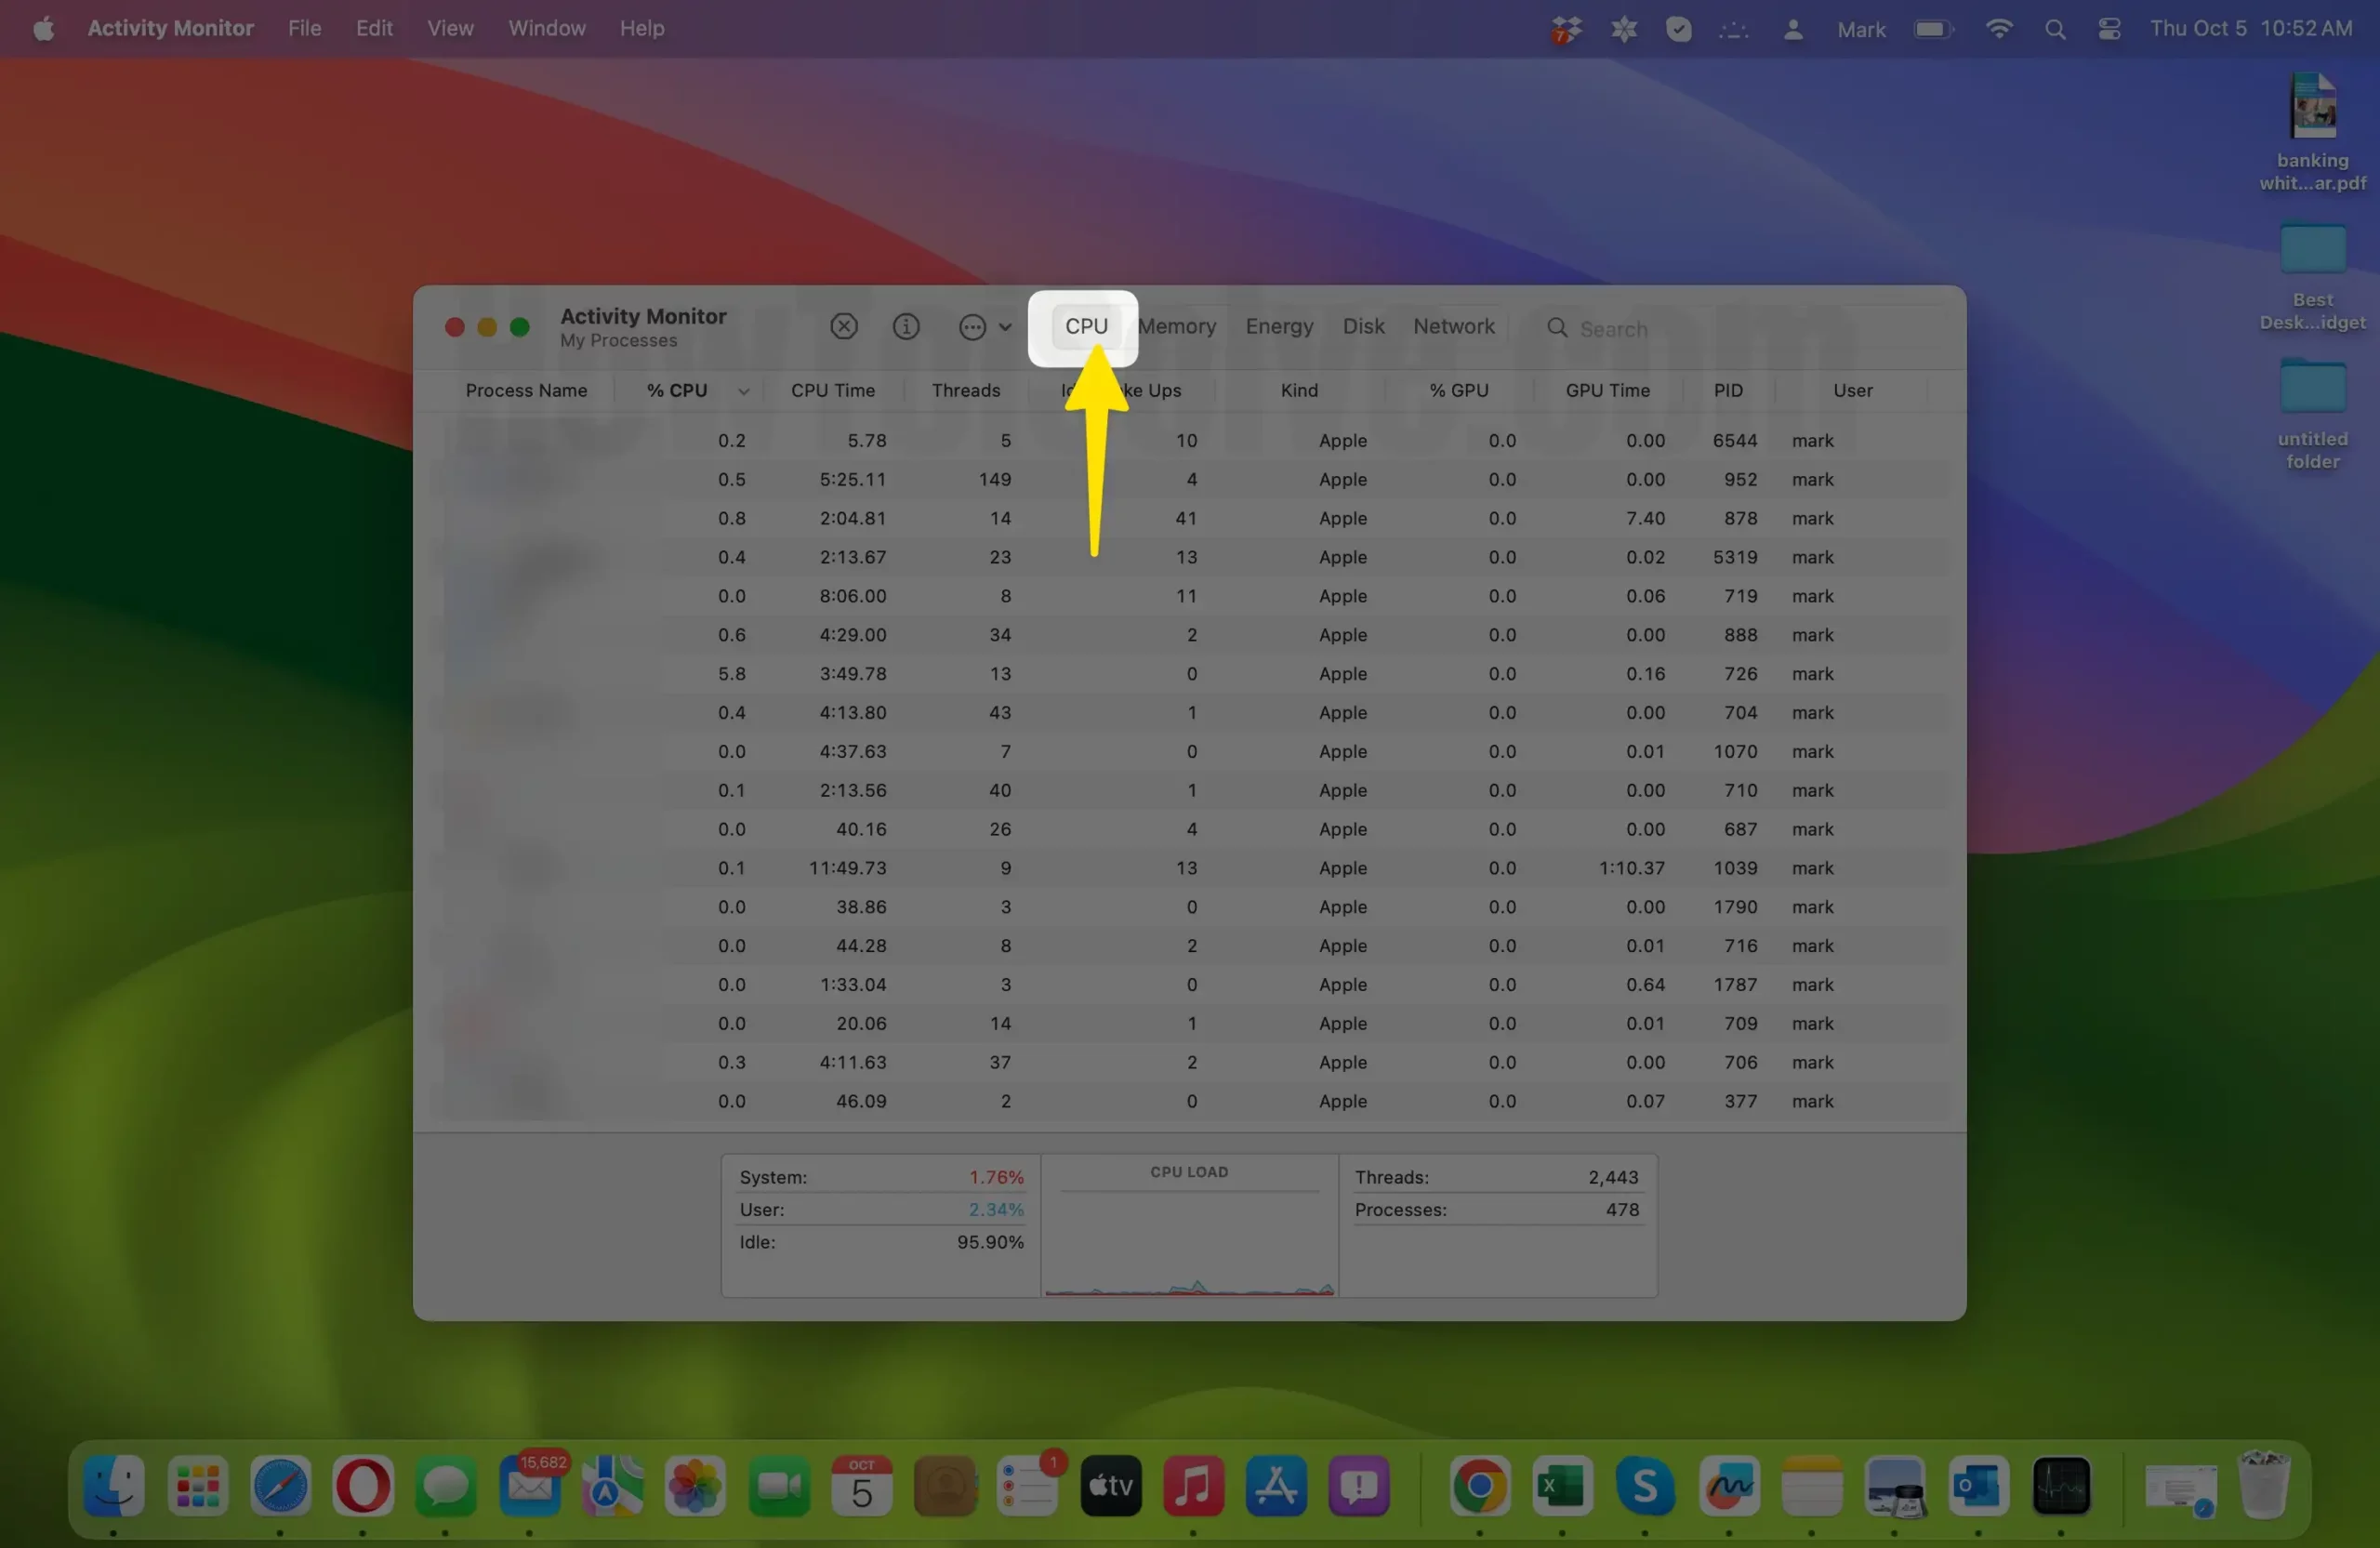
- View Running Processes: When Activity Monitor opens, you’ll see a window displaying various tabs, including “CPU,” “Memory,” “Energy,” and more. These tabs provide information about different aspects of your Mac’s performance. To identify the process you want to terminate, follow these steps:
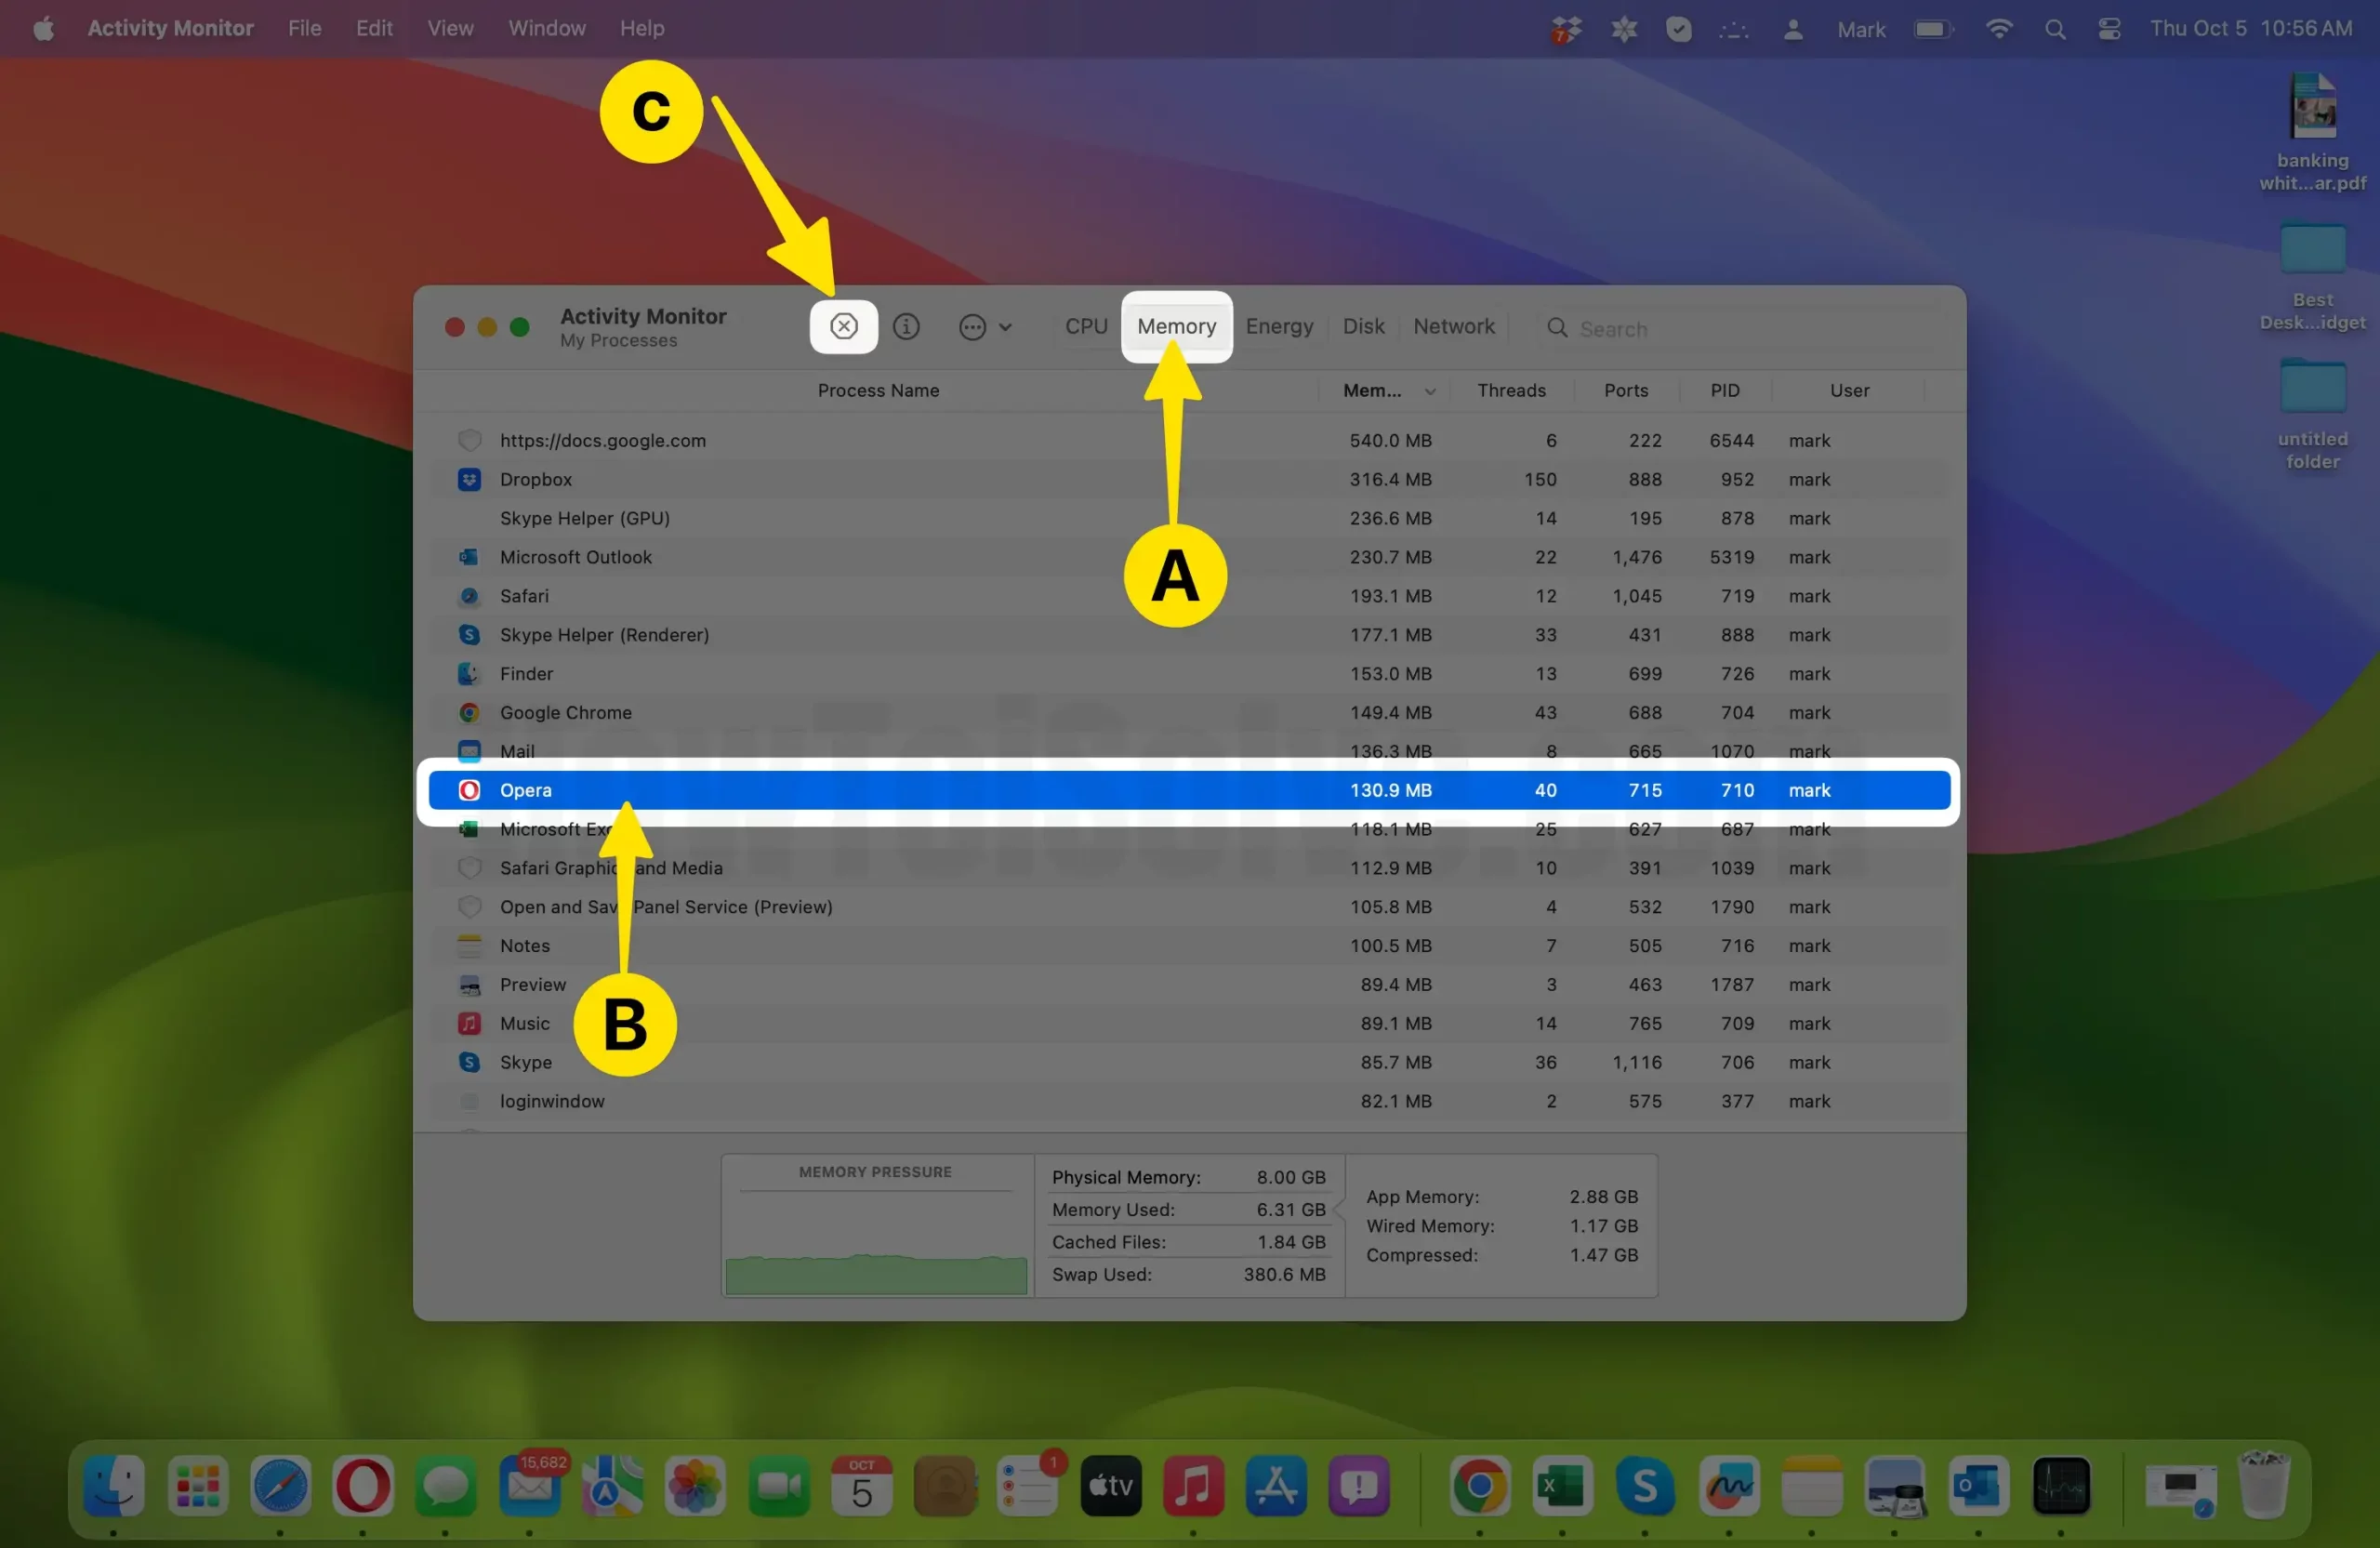
- Click on the “CPU” tab to view processes sorted by their CPU usage. This will help you identify any resource-intensive processes.
- Alternatively, you can use the “Memory” tab to identify processes based on their memory usage.
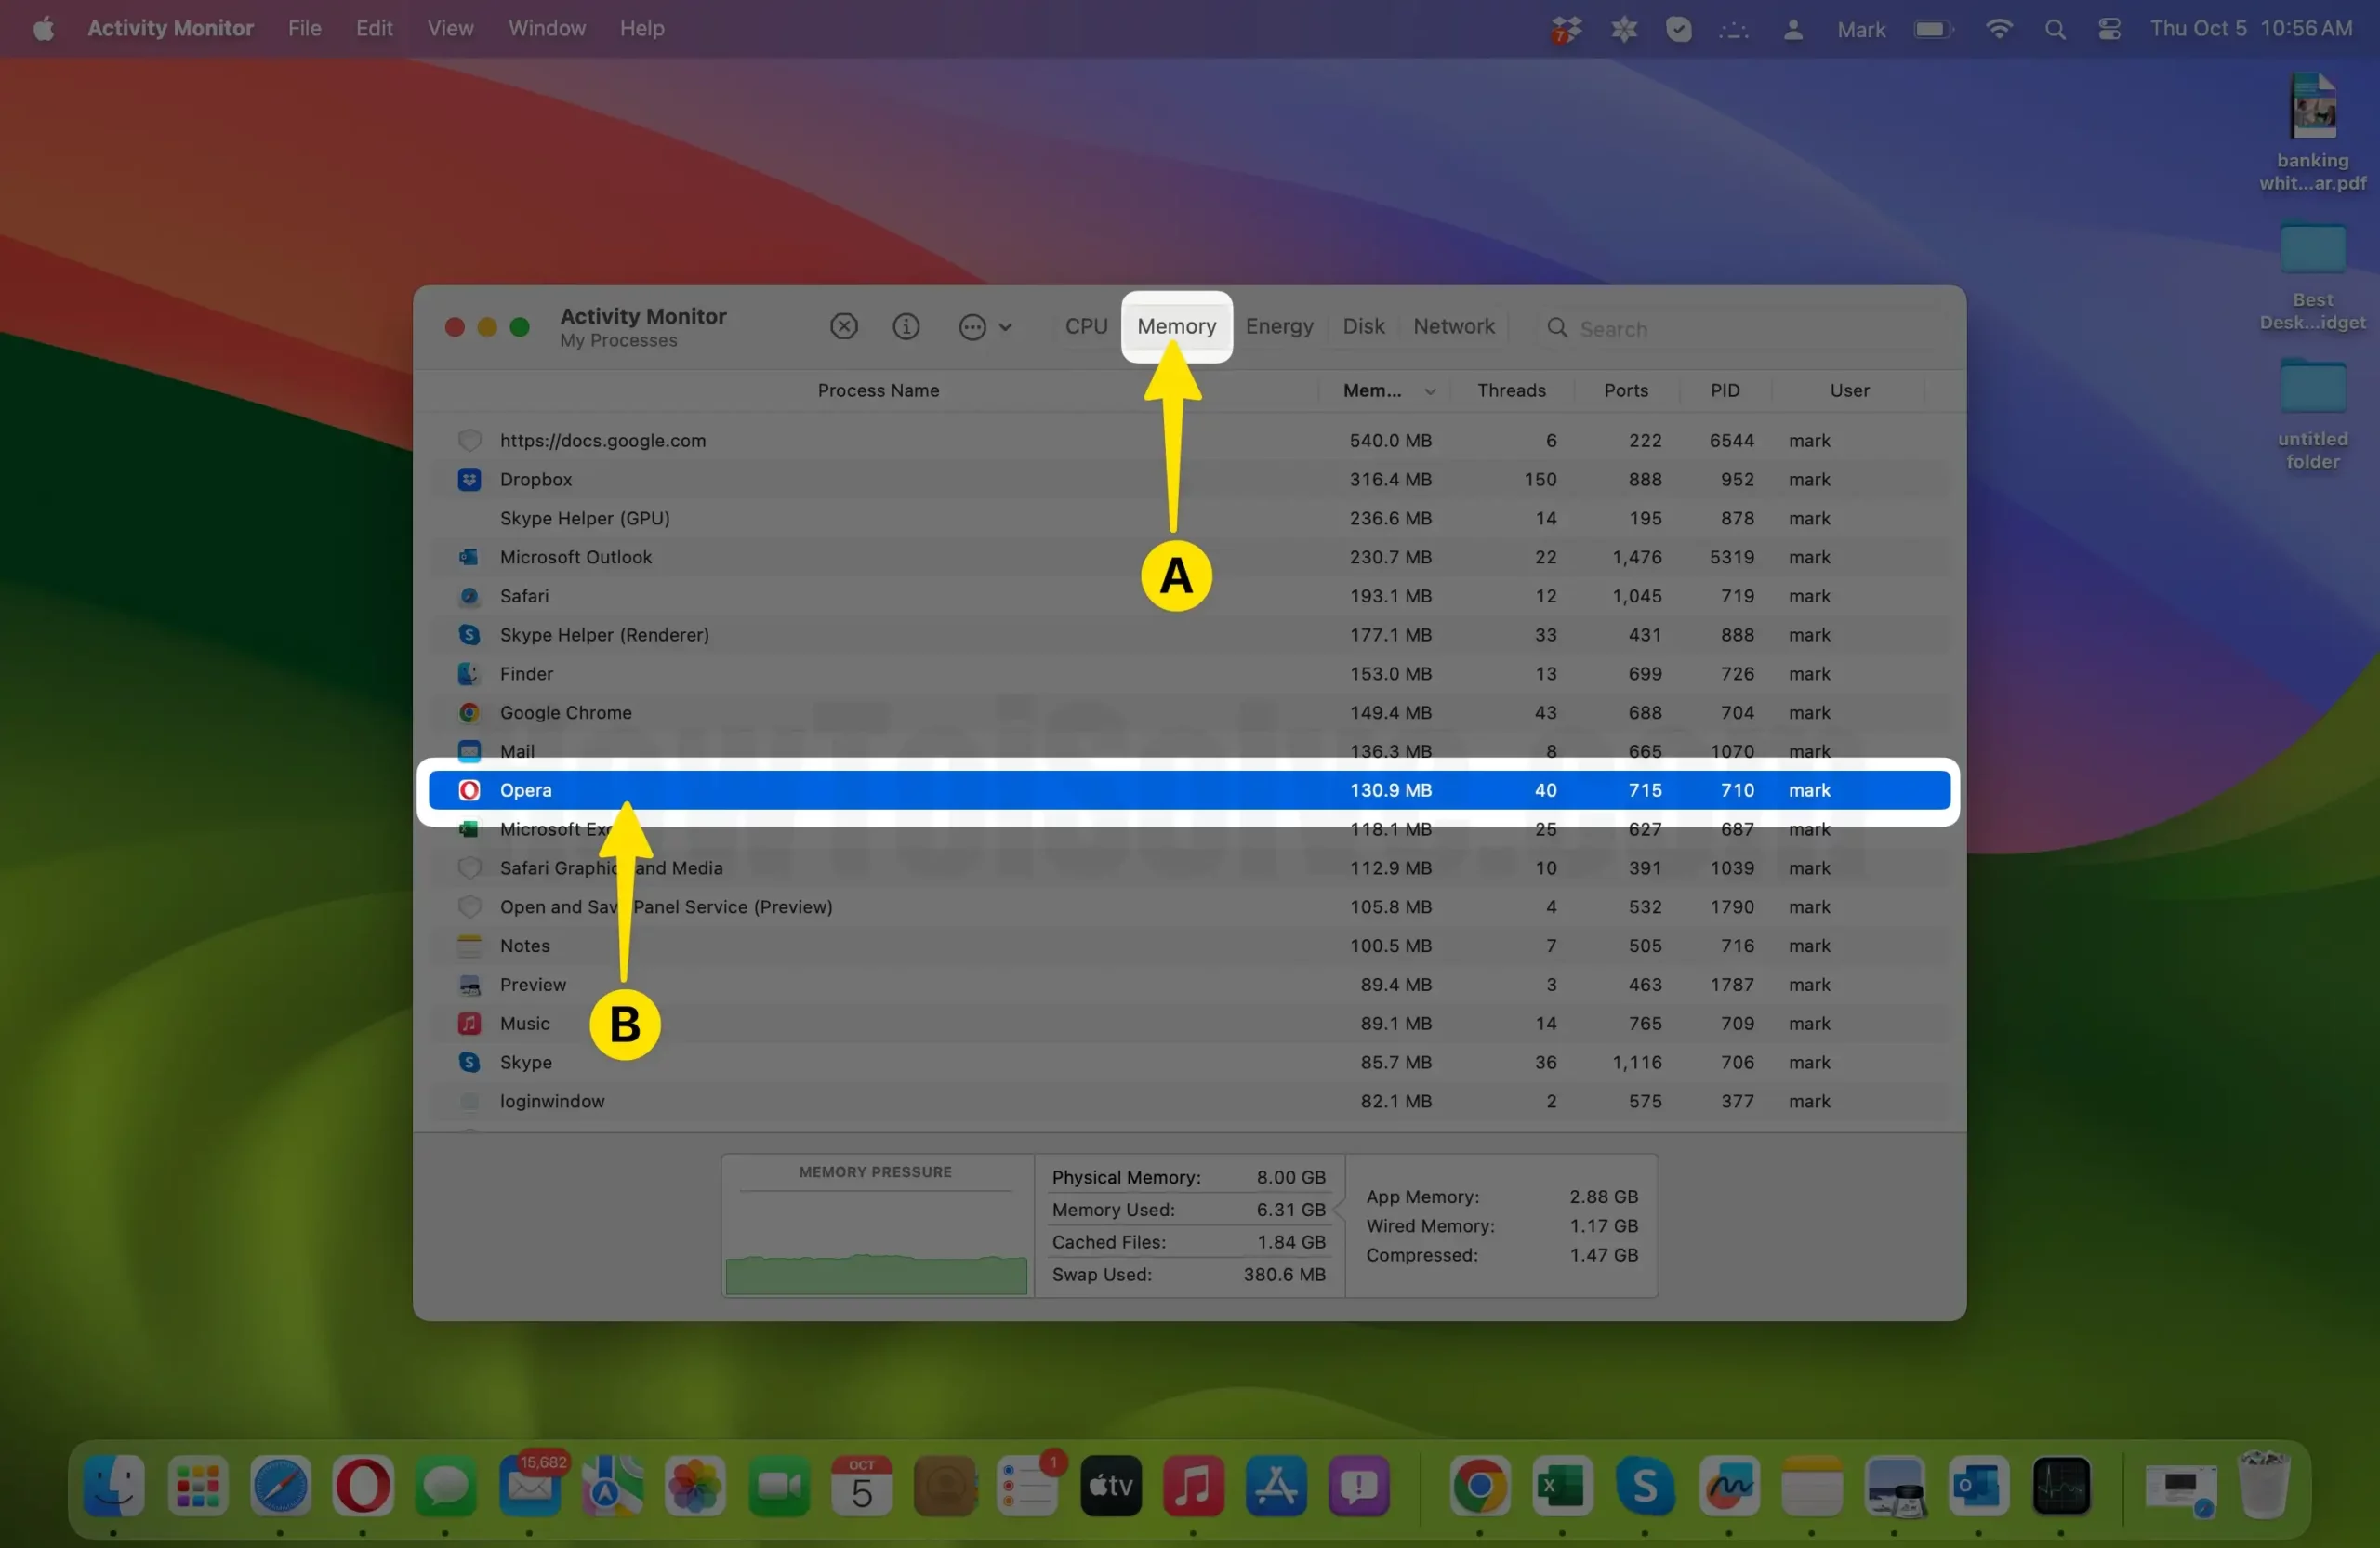
- Select the Process to Terminate: In the list of processes, find the one you want to terminate. You can click on a process to highlight it, and additional information about that process will be displayed at the bottom of the window, including its name, PID (Process ID), and other details.
- Terminate the Process: Once you’ve identified the process, you can terminate it by following these steps:
- Click the “X” button in the top-left corner of the Activity Monitor window. This button is labeled “Quit Process” when you hover over it.
- A confirmation dialog will appear, asking if you are sure you want to quit the process. Click the “Force Quit” button to confirm.
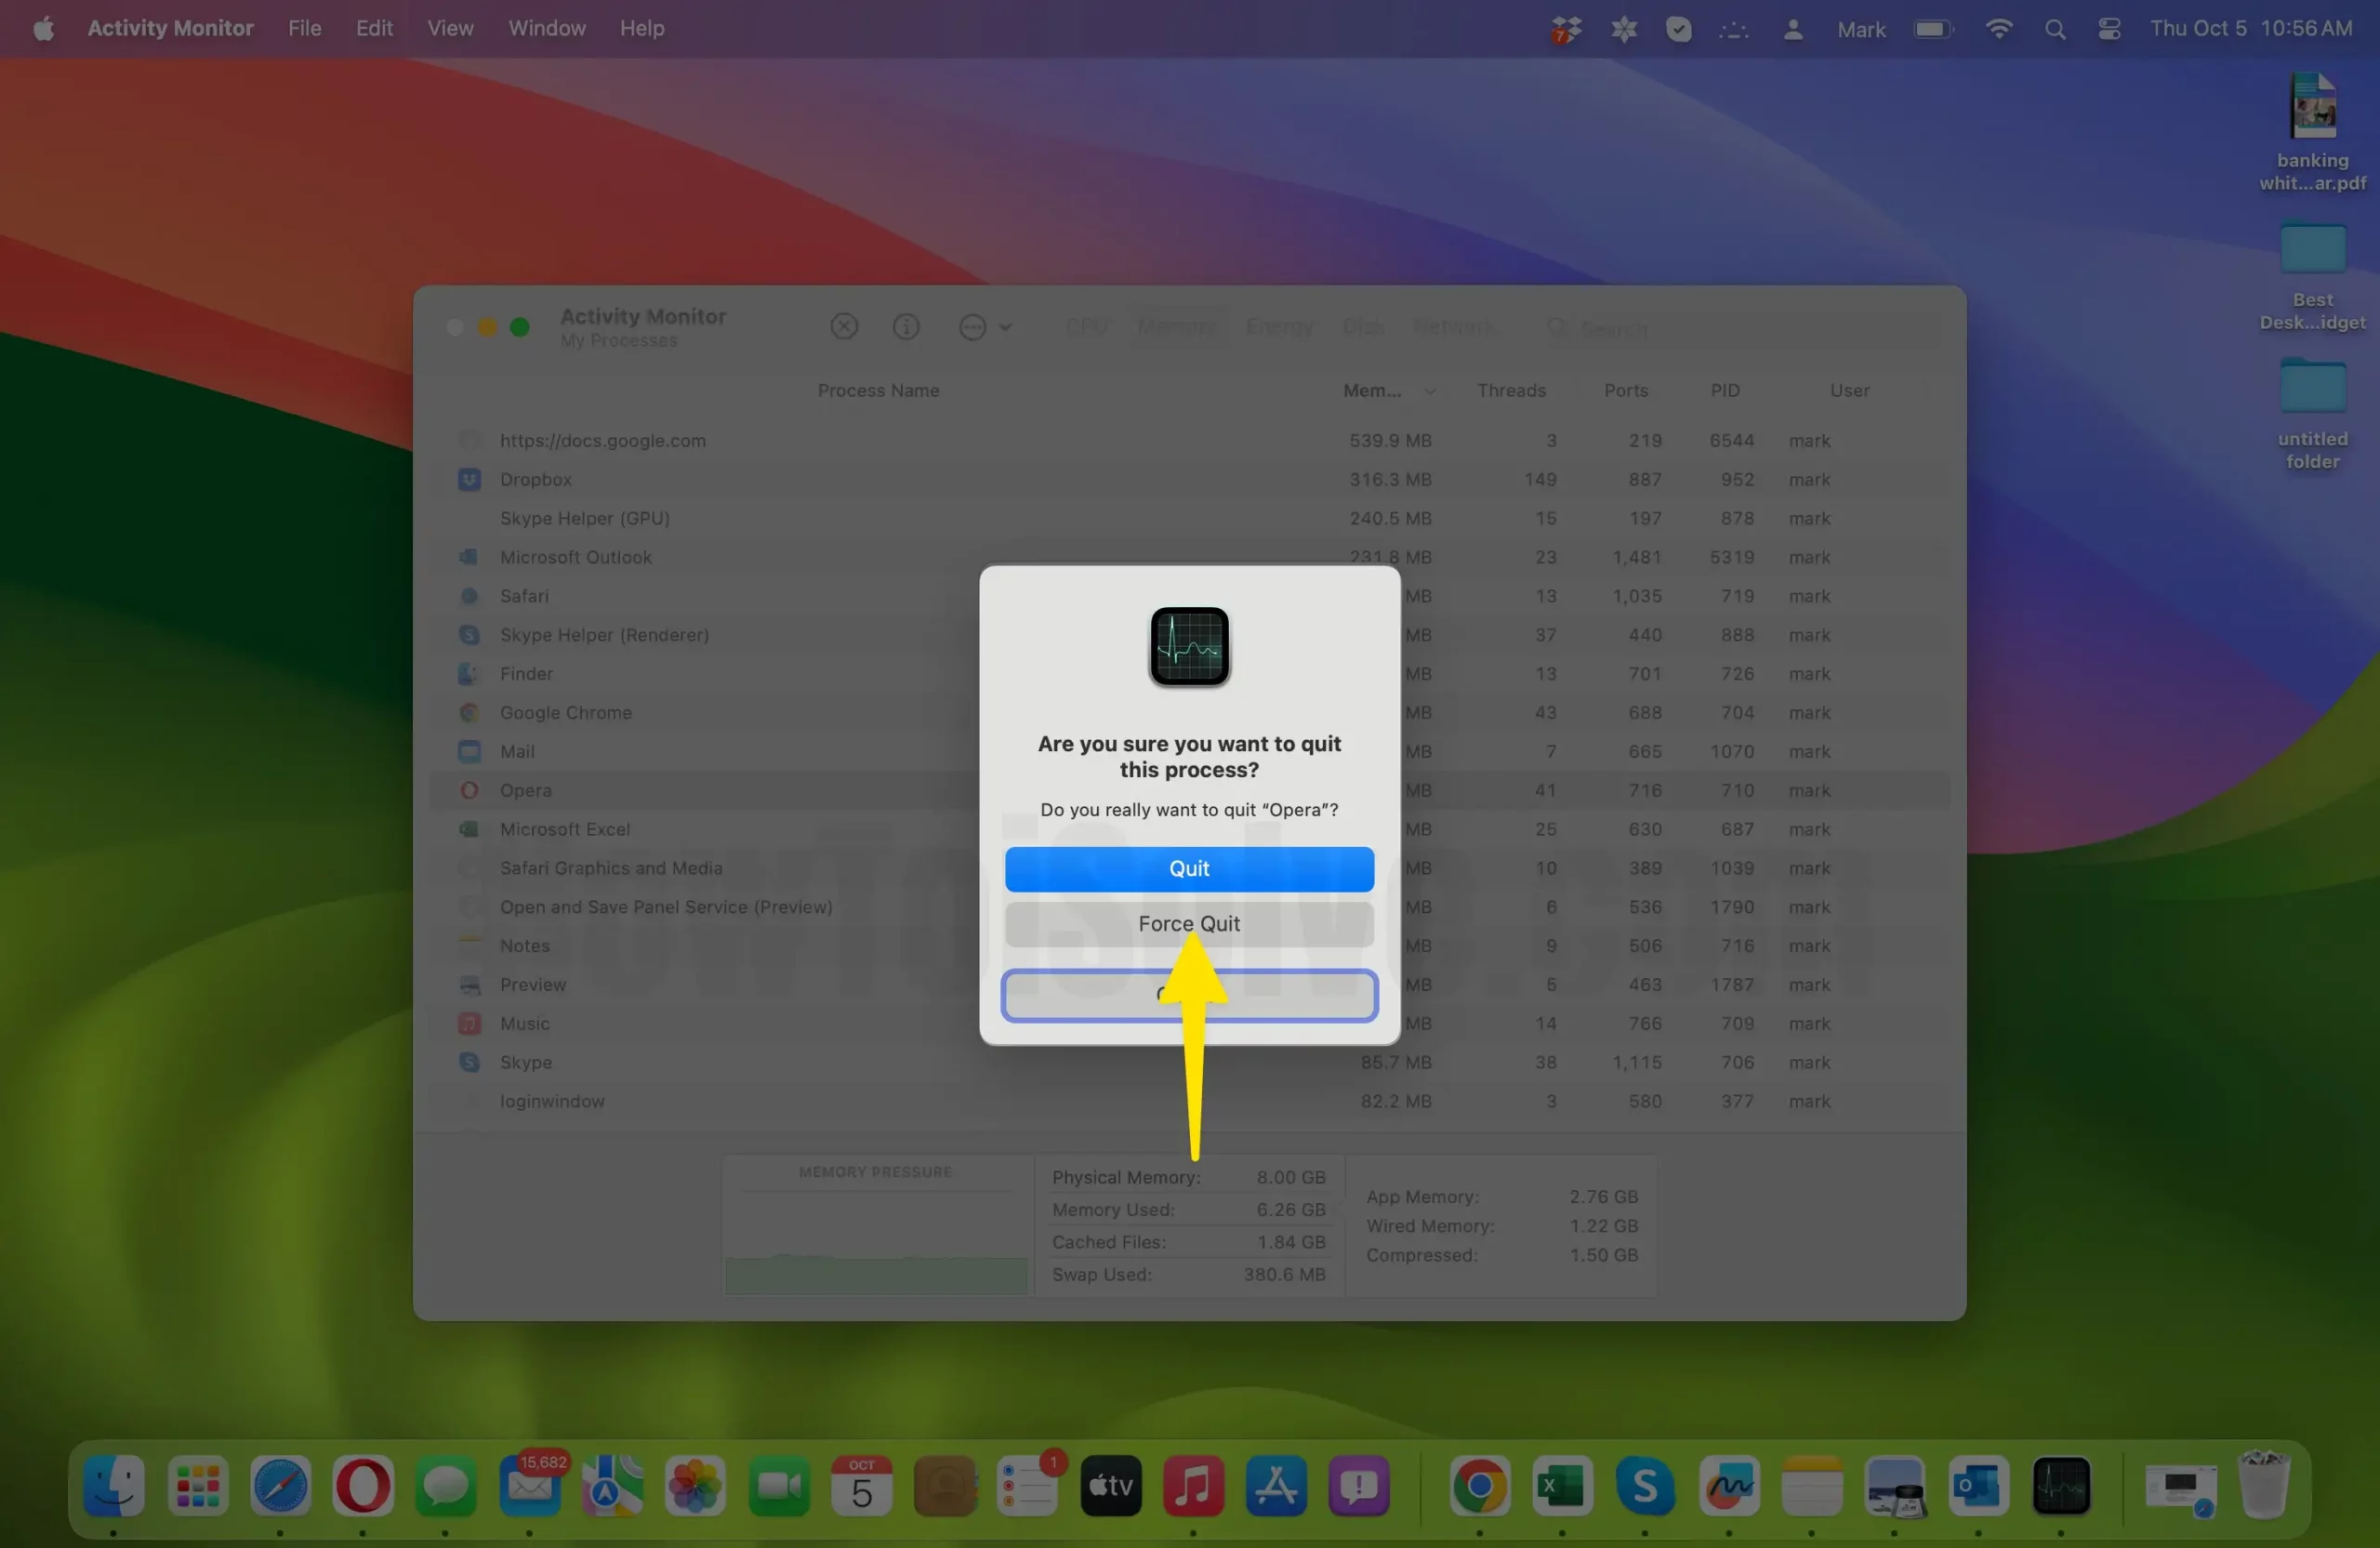
- Confirm Termination: After clicking “Force Quit,” the Activity Monitor will attempt to terminate the selected process. If successful, the process will disappear from the list, and its resource usage will cease. If it’s an unresponsive or problematic process, this should resolve the issue.
How to Shut Down Processes Using Terminal
Terminal provides advanced users with precise control over processes running on a Mac. Follow these steps to shut down processes effectively using the terminal:
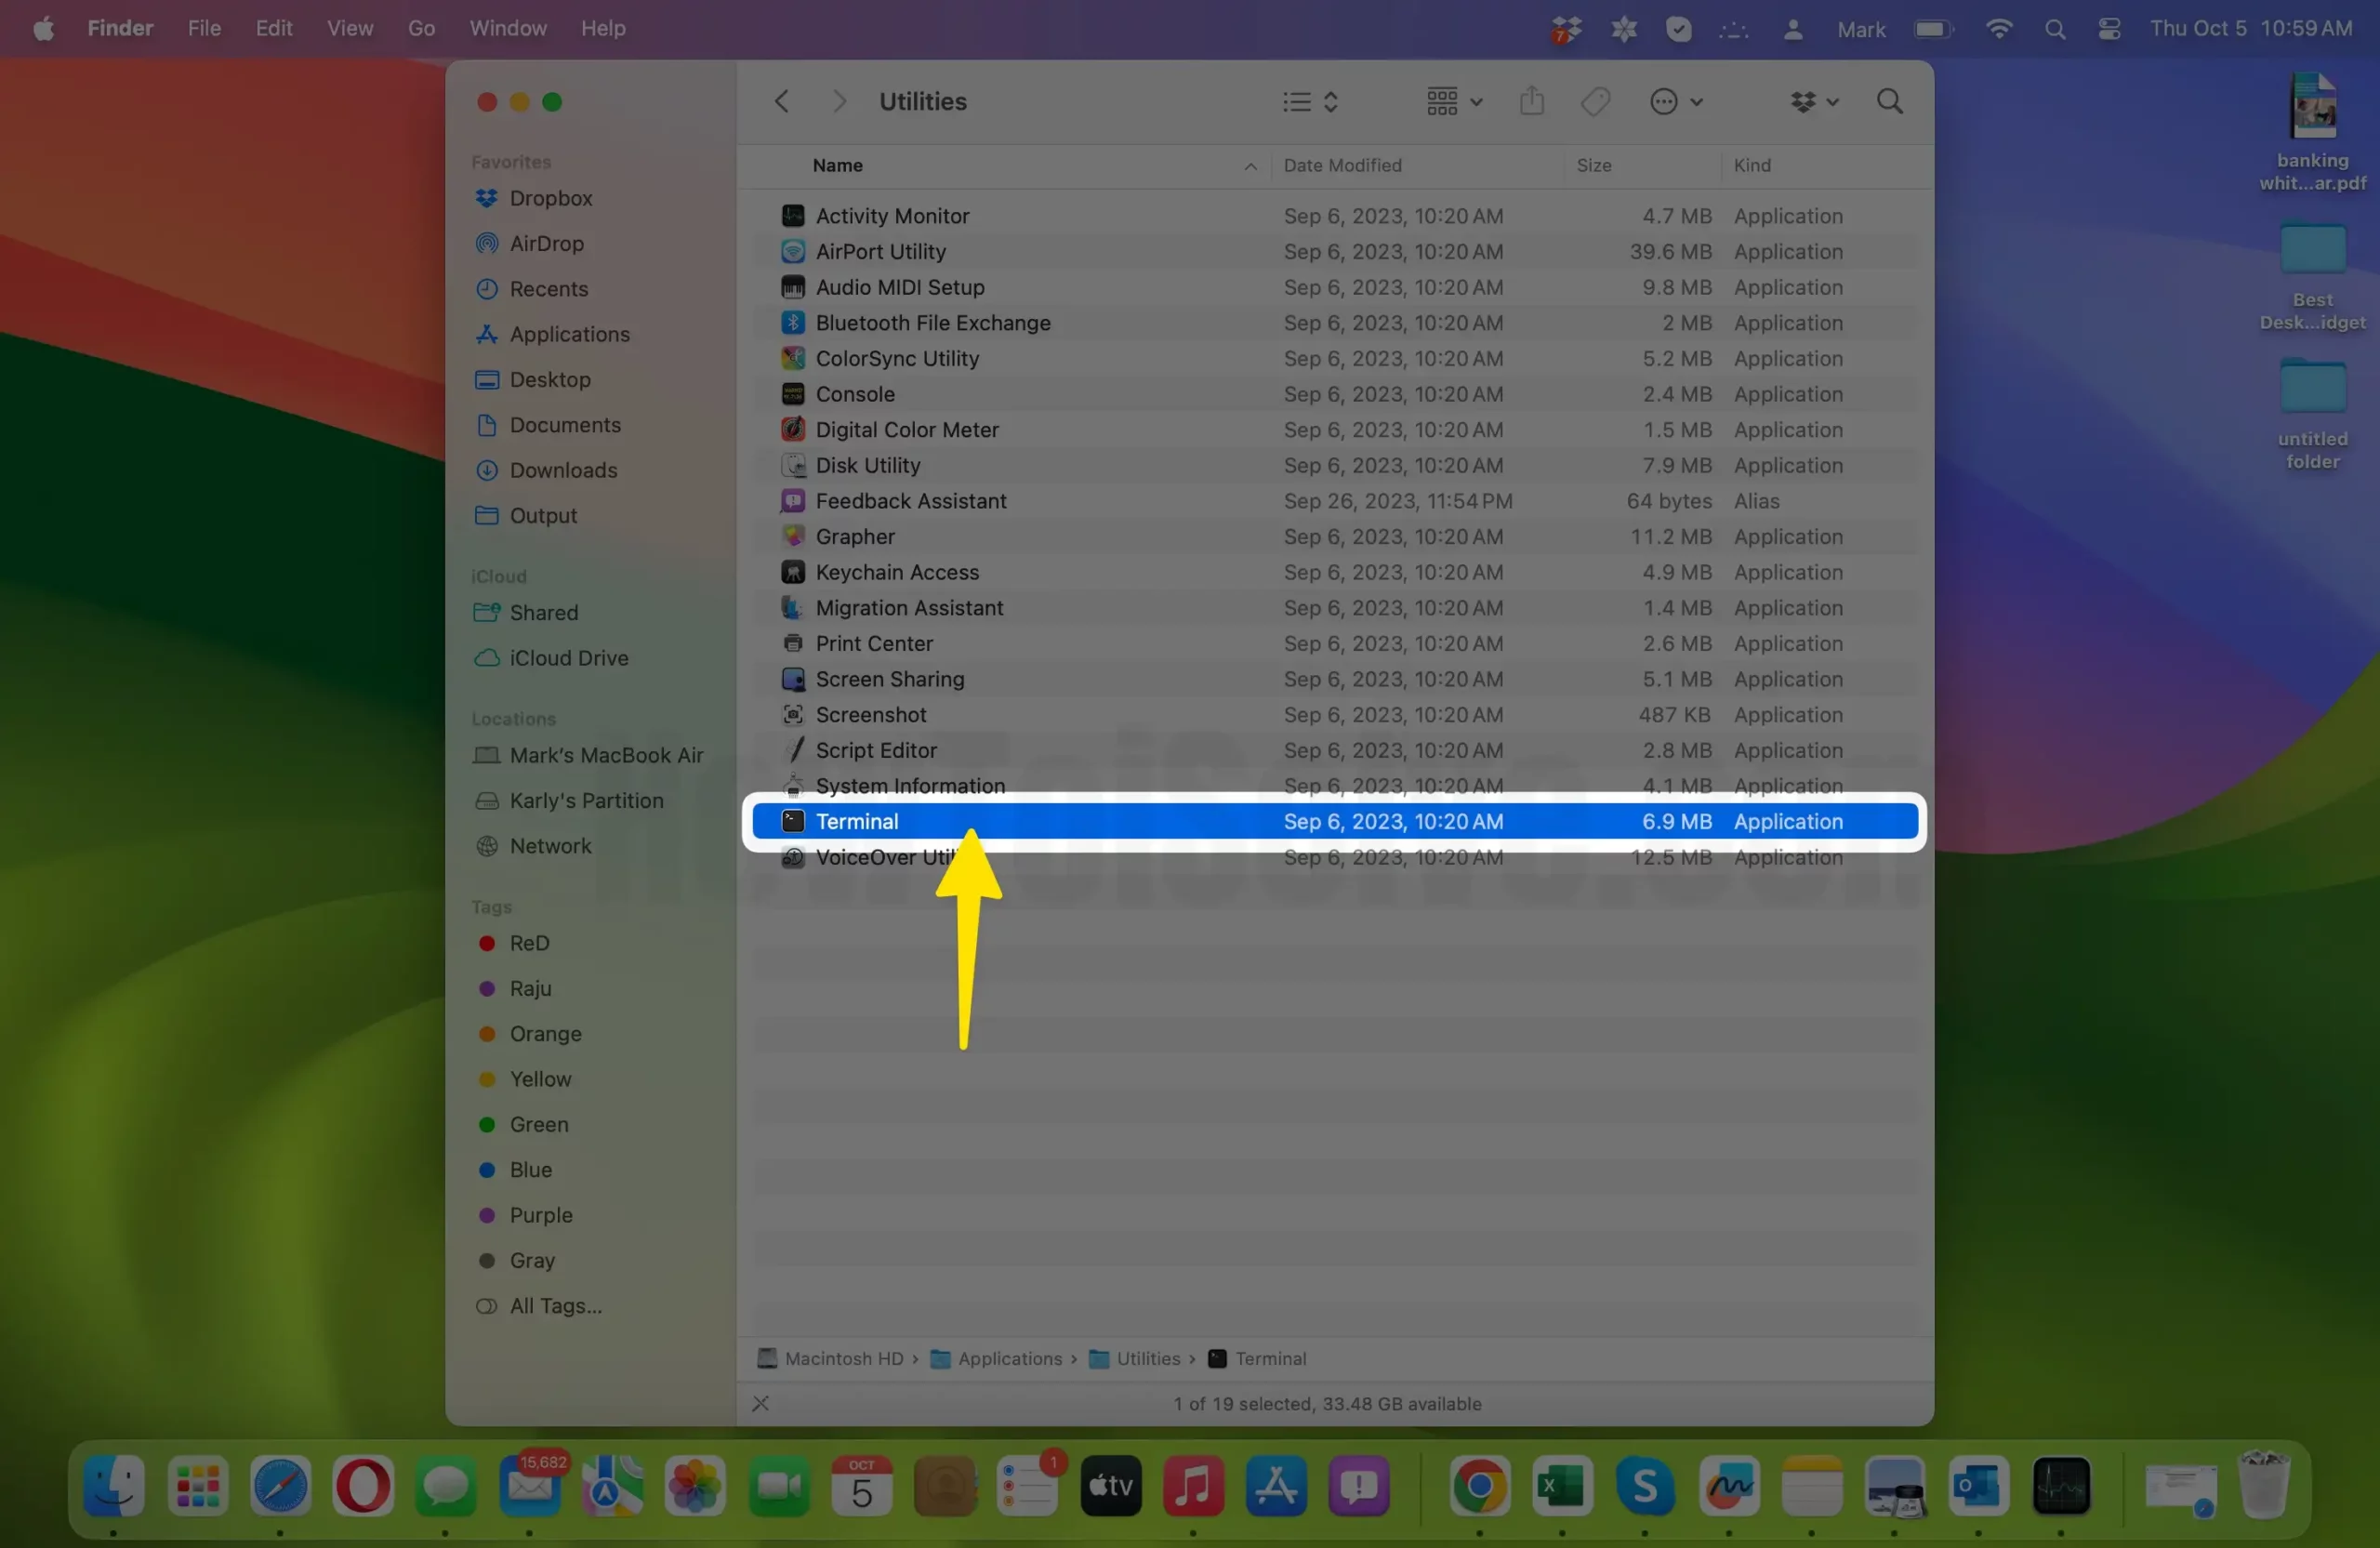
- Open Terminal: To begin, launch Terminal. You can find Terminal in the “Utilities” folder within the “Applications” folder.
- Identify the Process: Before shutting down a process, you need to identify it.
- To do this, you can list all the running processes. Type the following command and press Enter:
ps aux
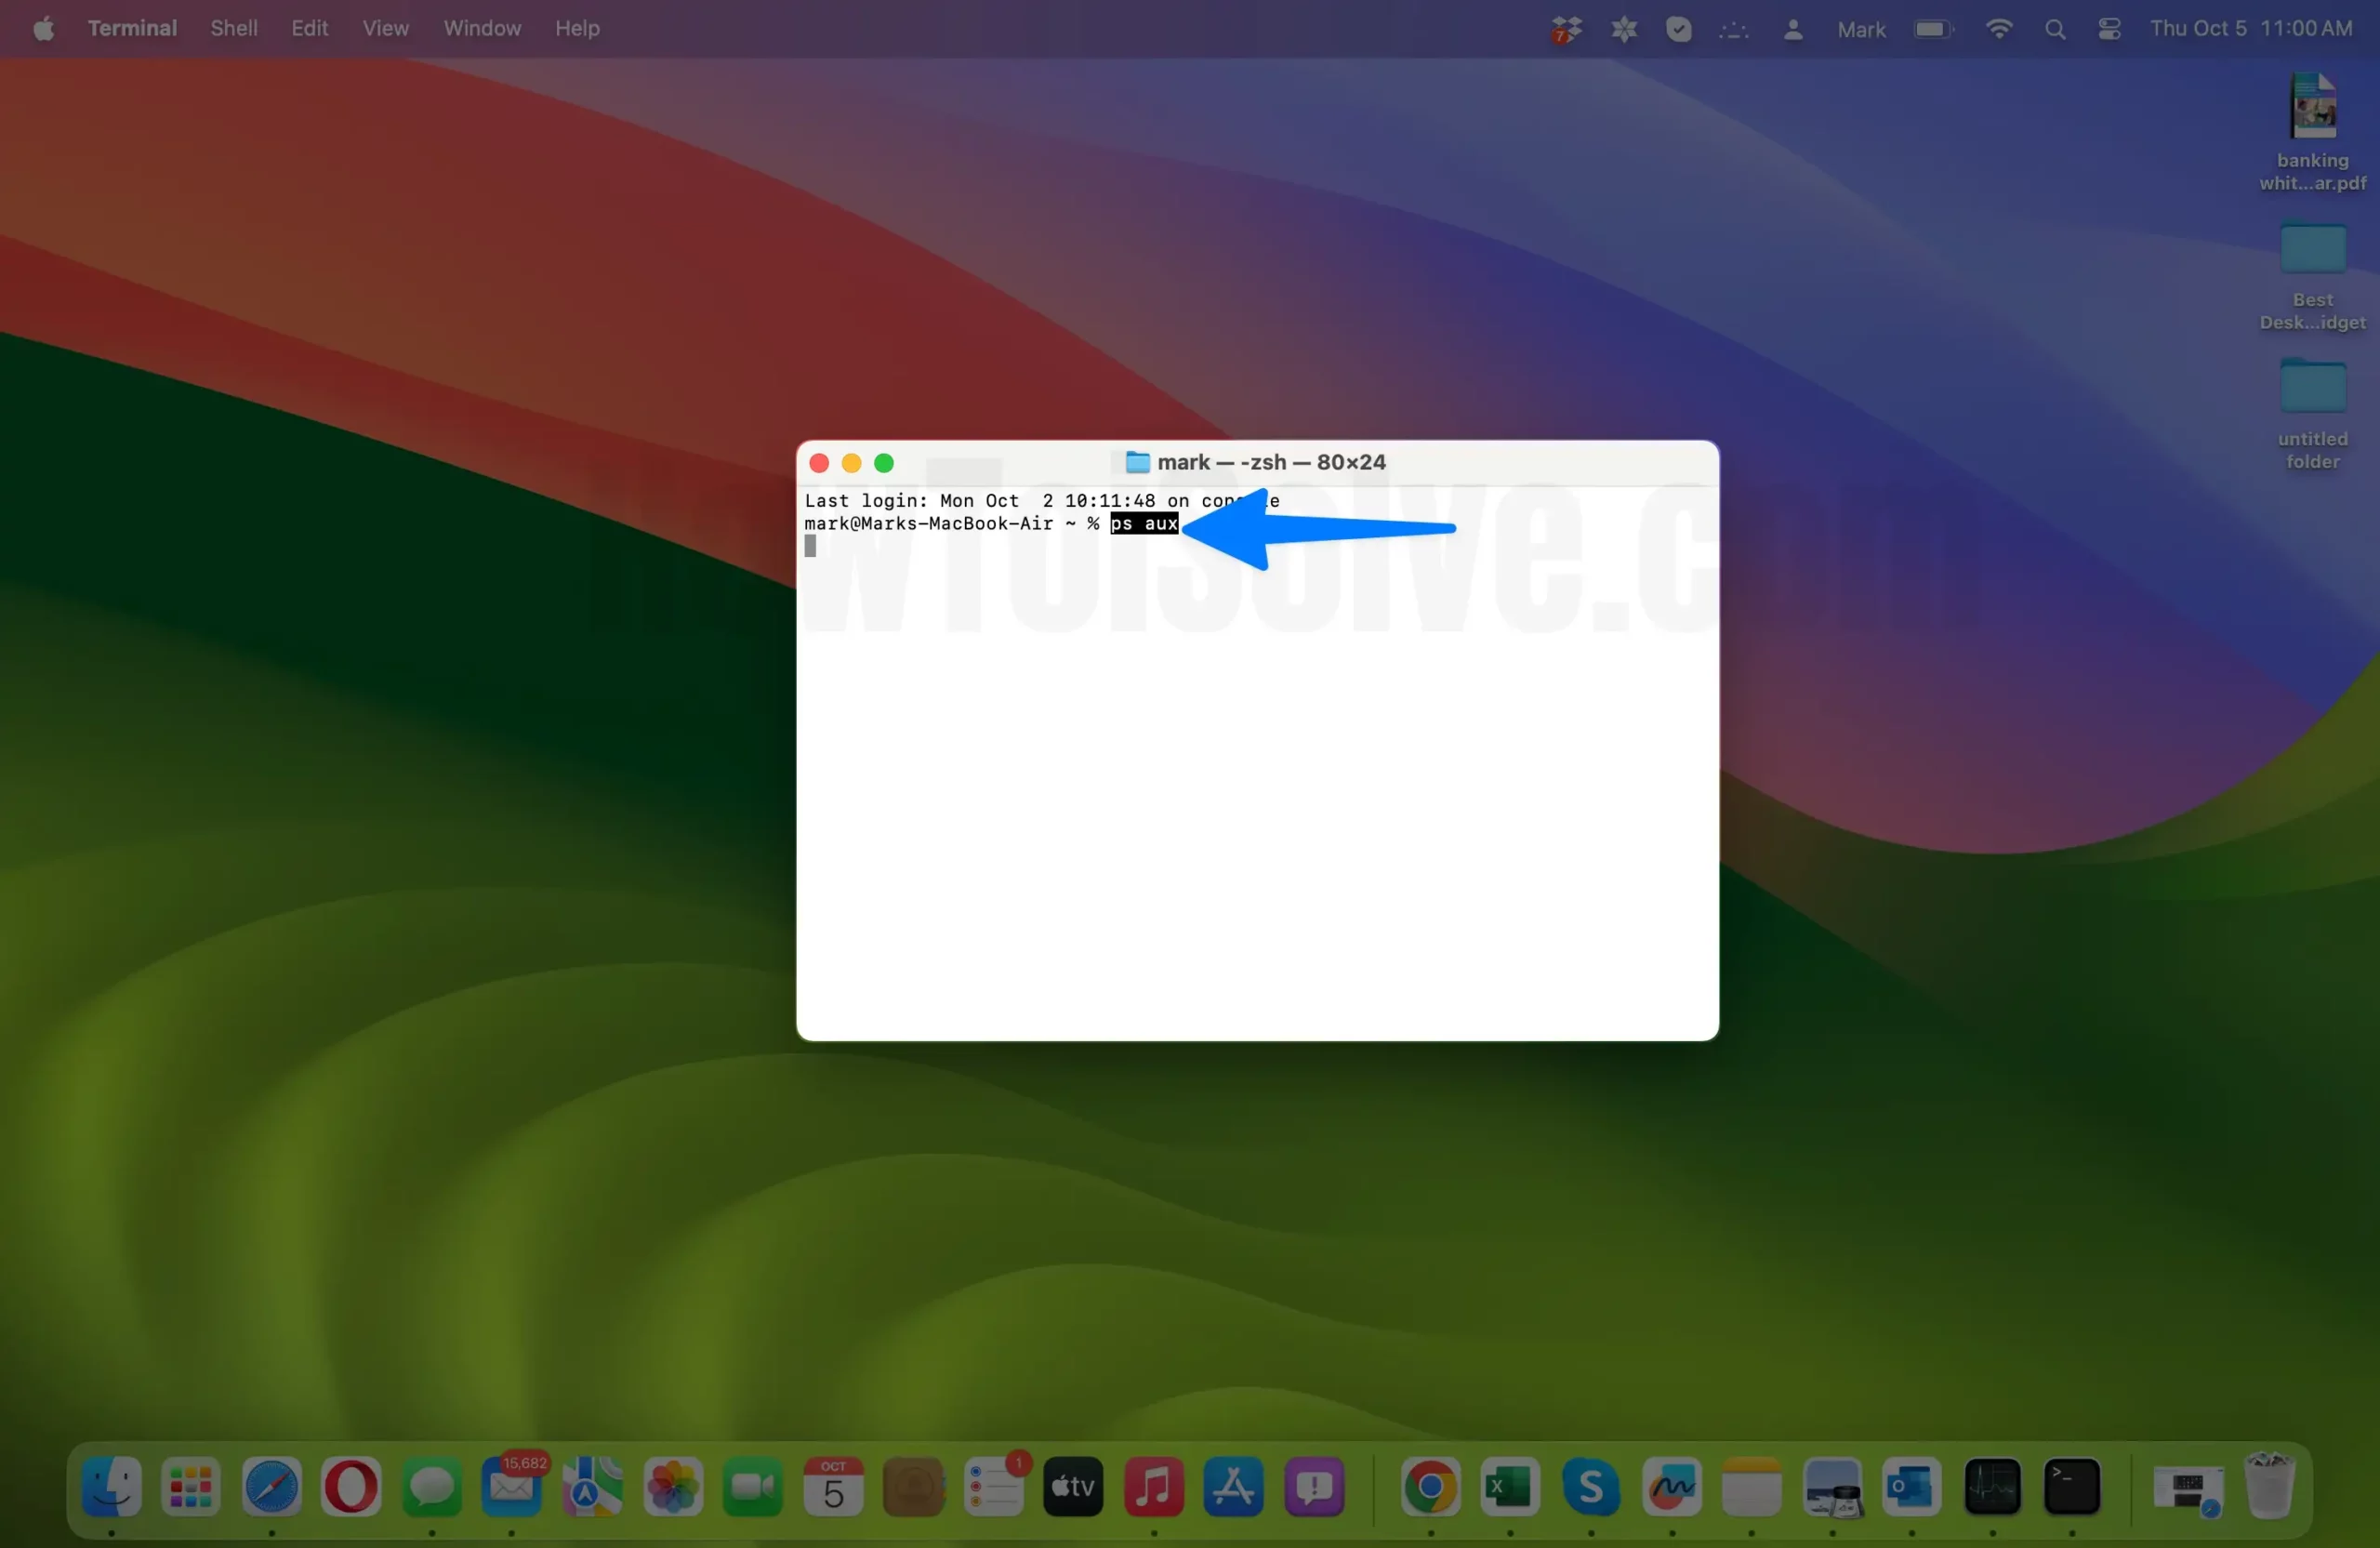
- This command lists all processes currently running on your Mac.
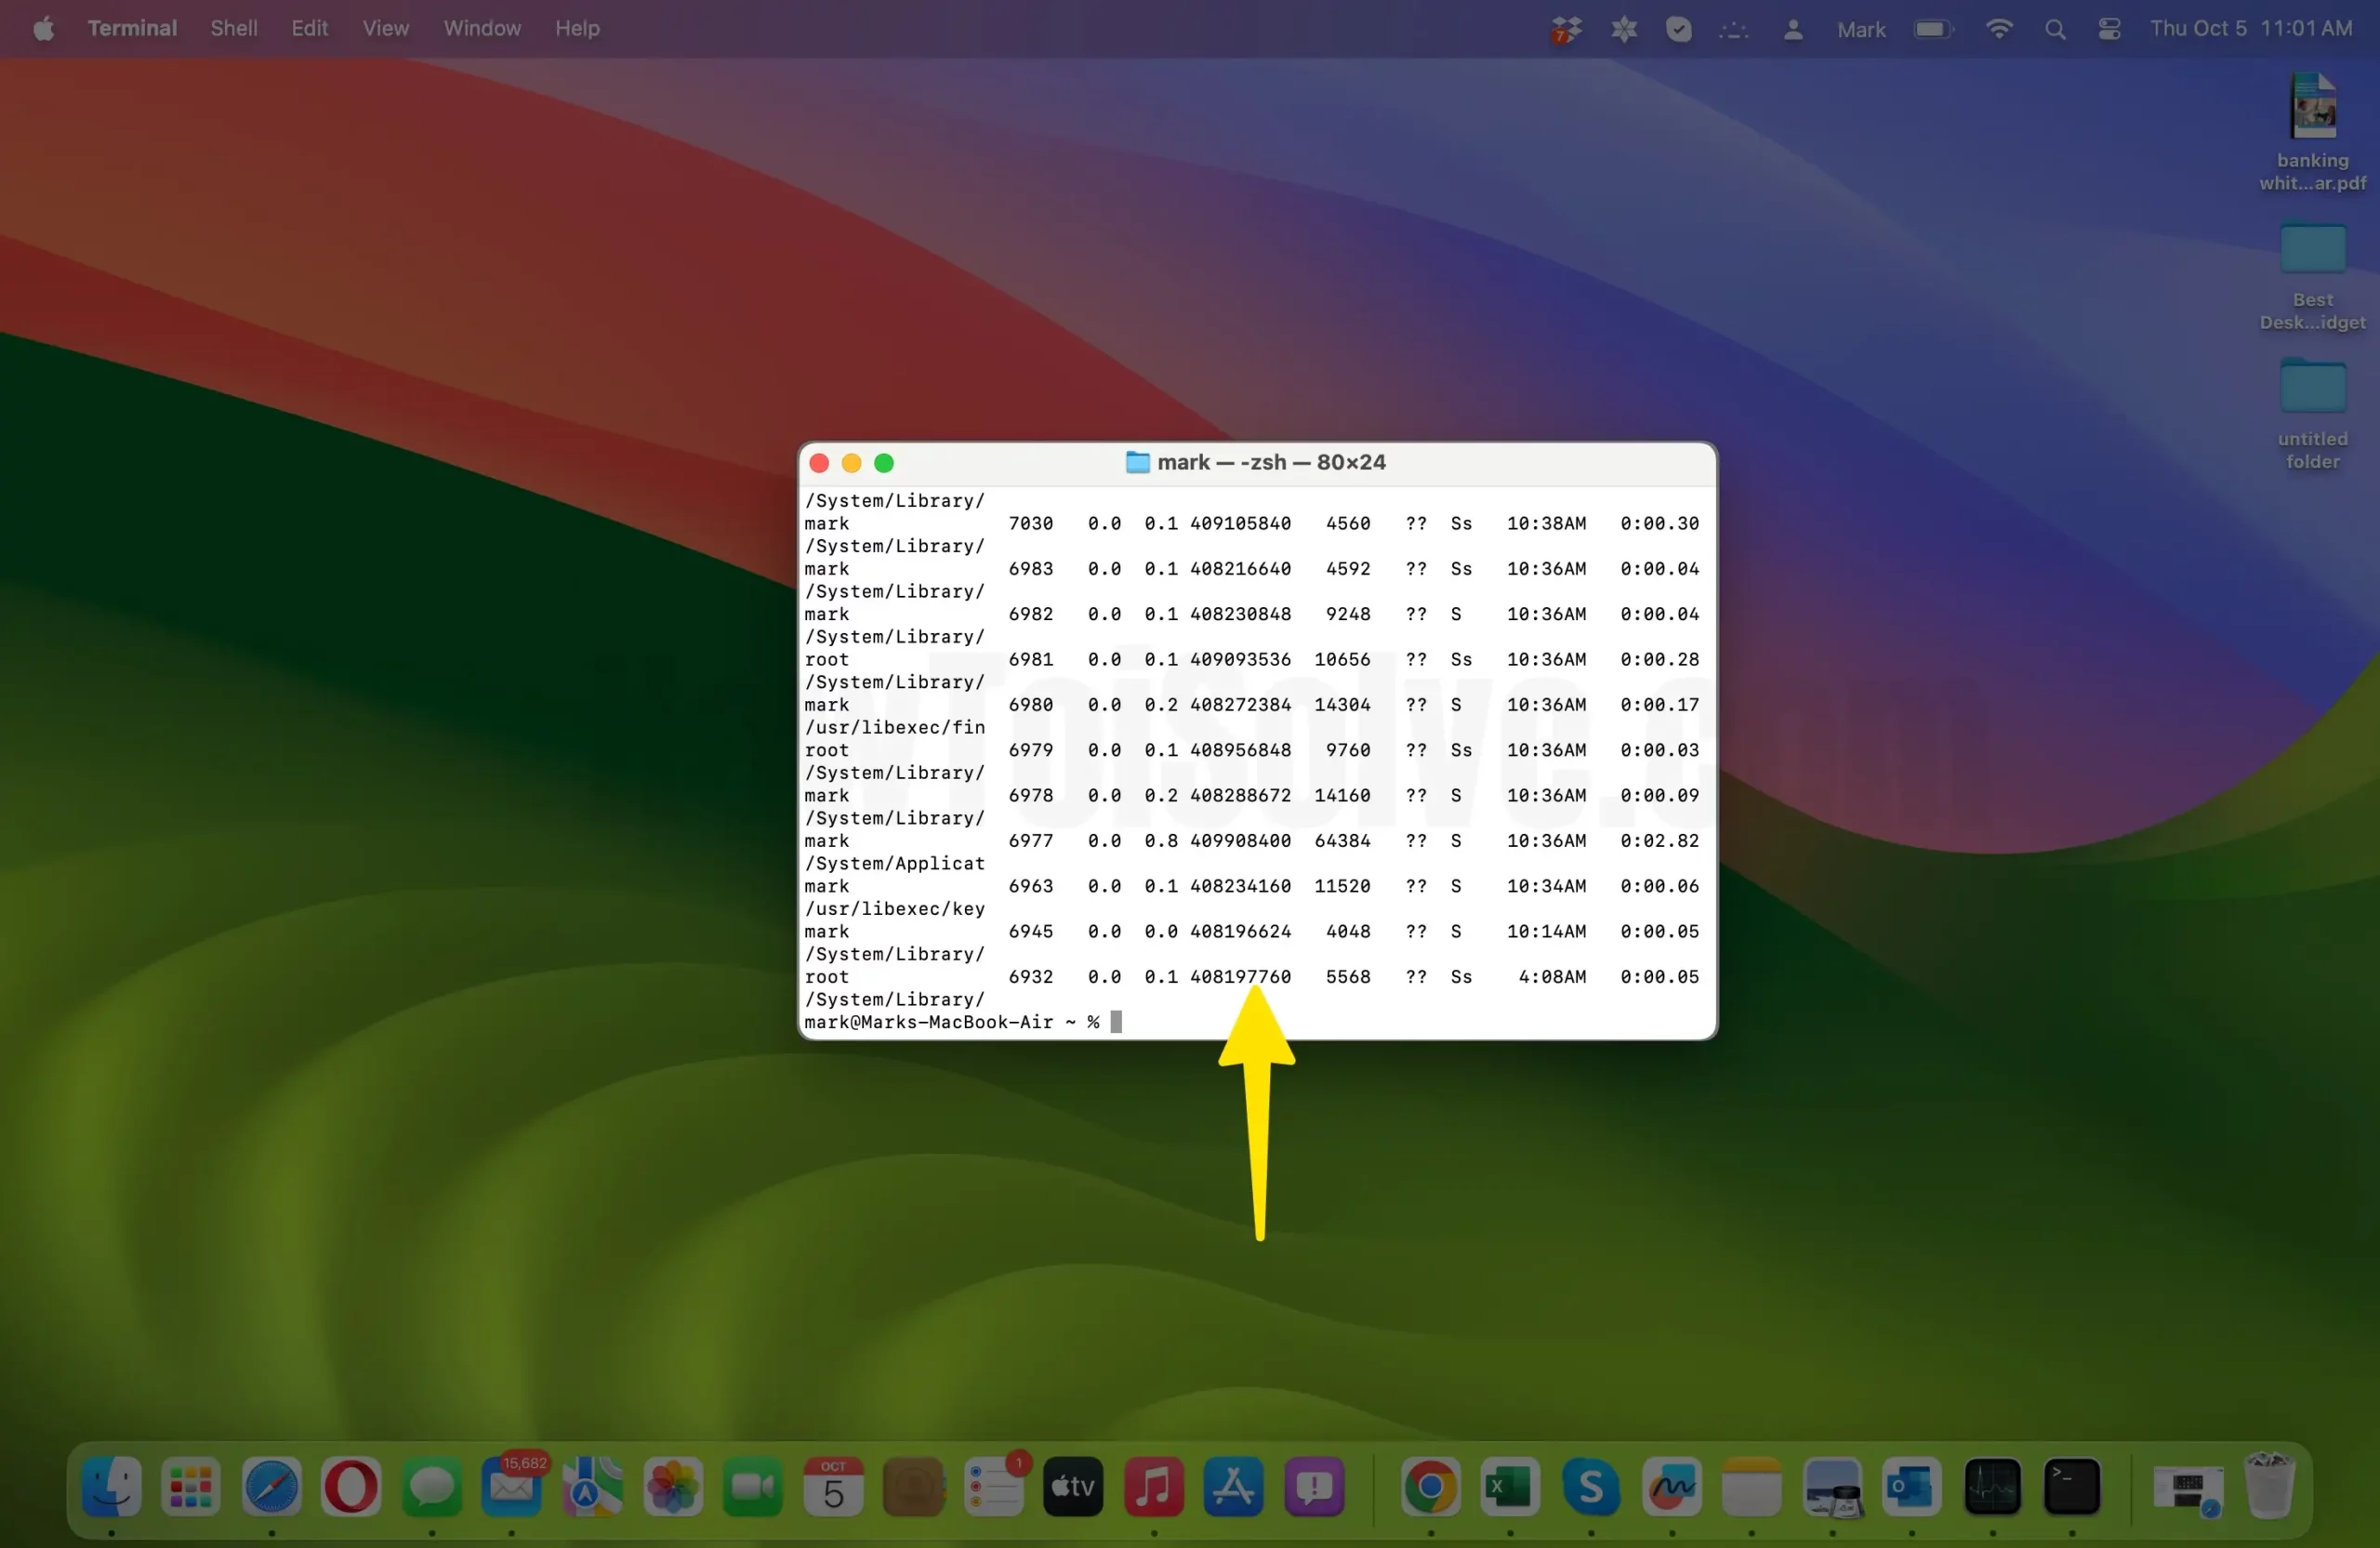
- Locate the Process to Shut Down: Scroll through the list of processes to find the one you want to terminate. Look for the name or description of the process to identify it.
- Find the Process ID (PID): Each process in the list is associated with a unique Process ID (PID). Note down the PID of the process you wish to shut down.
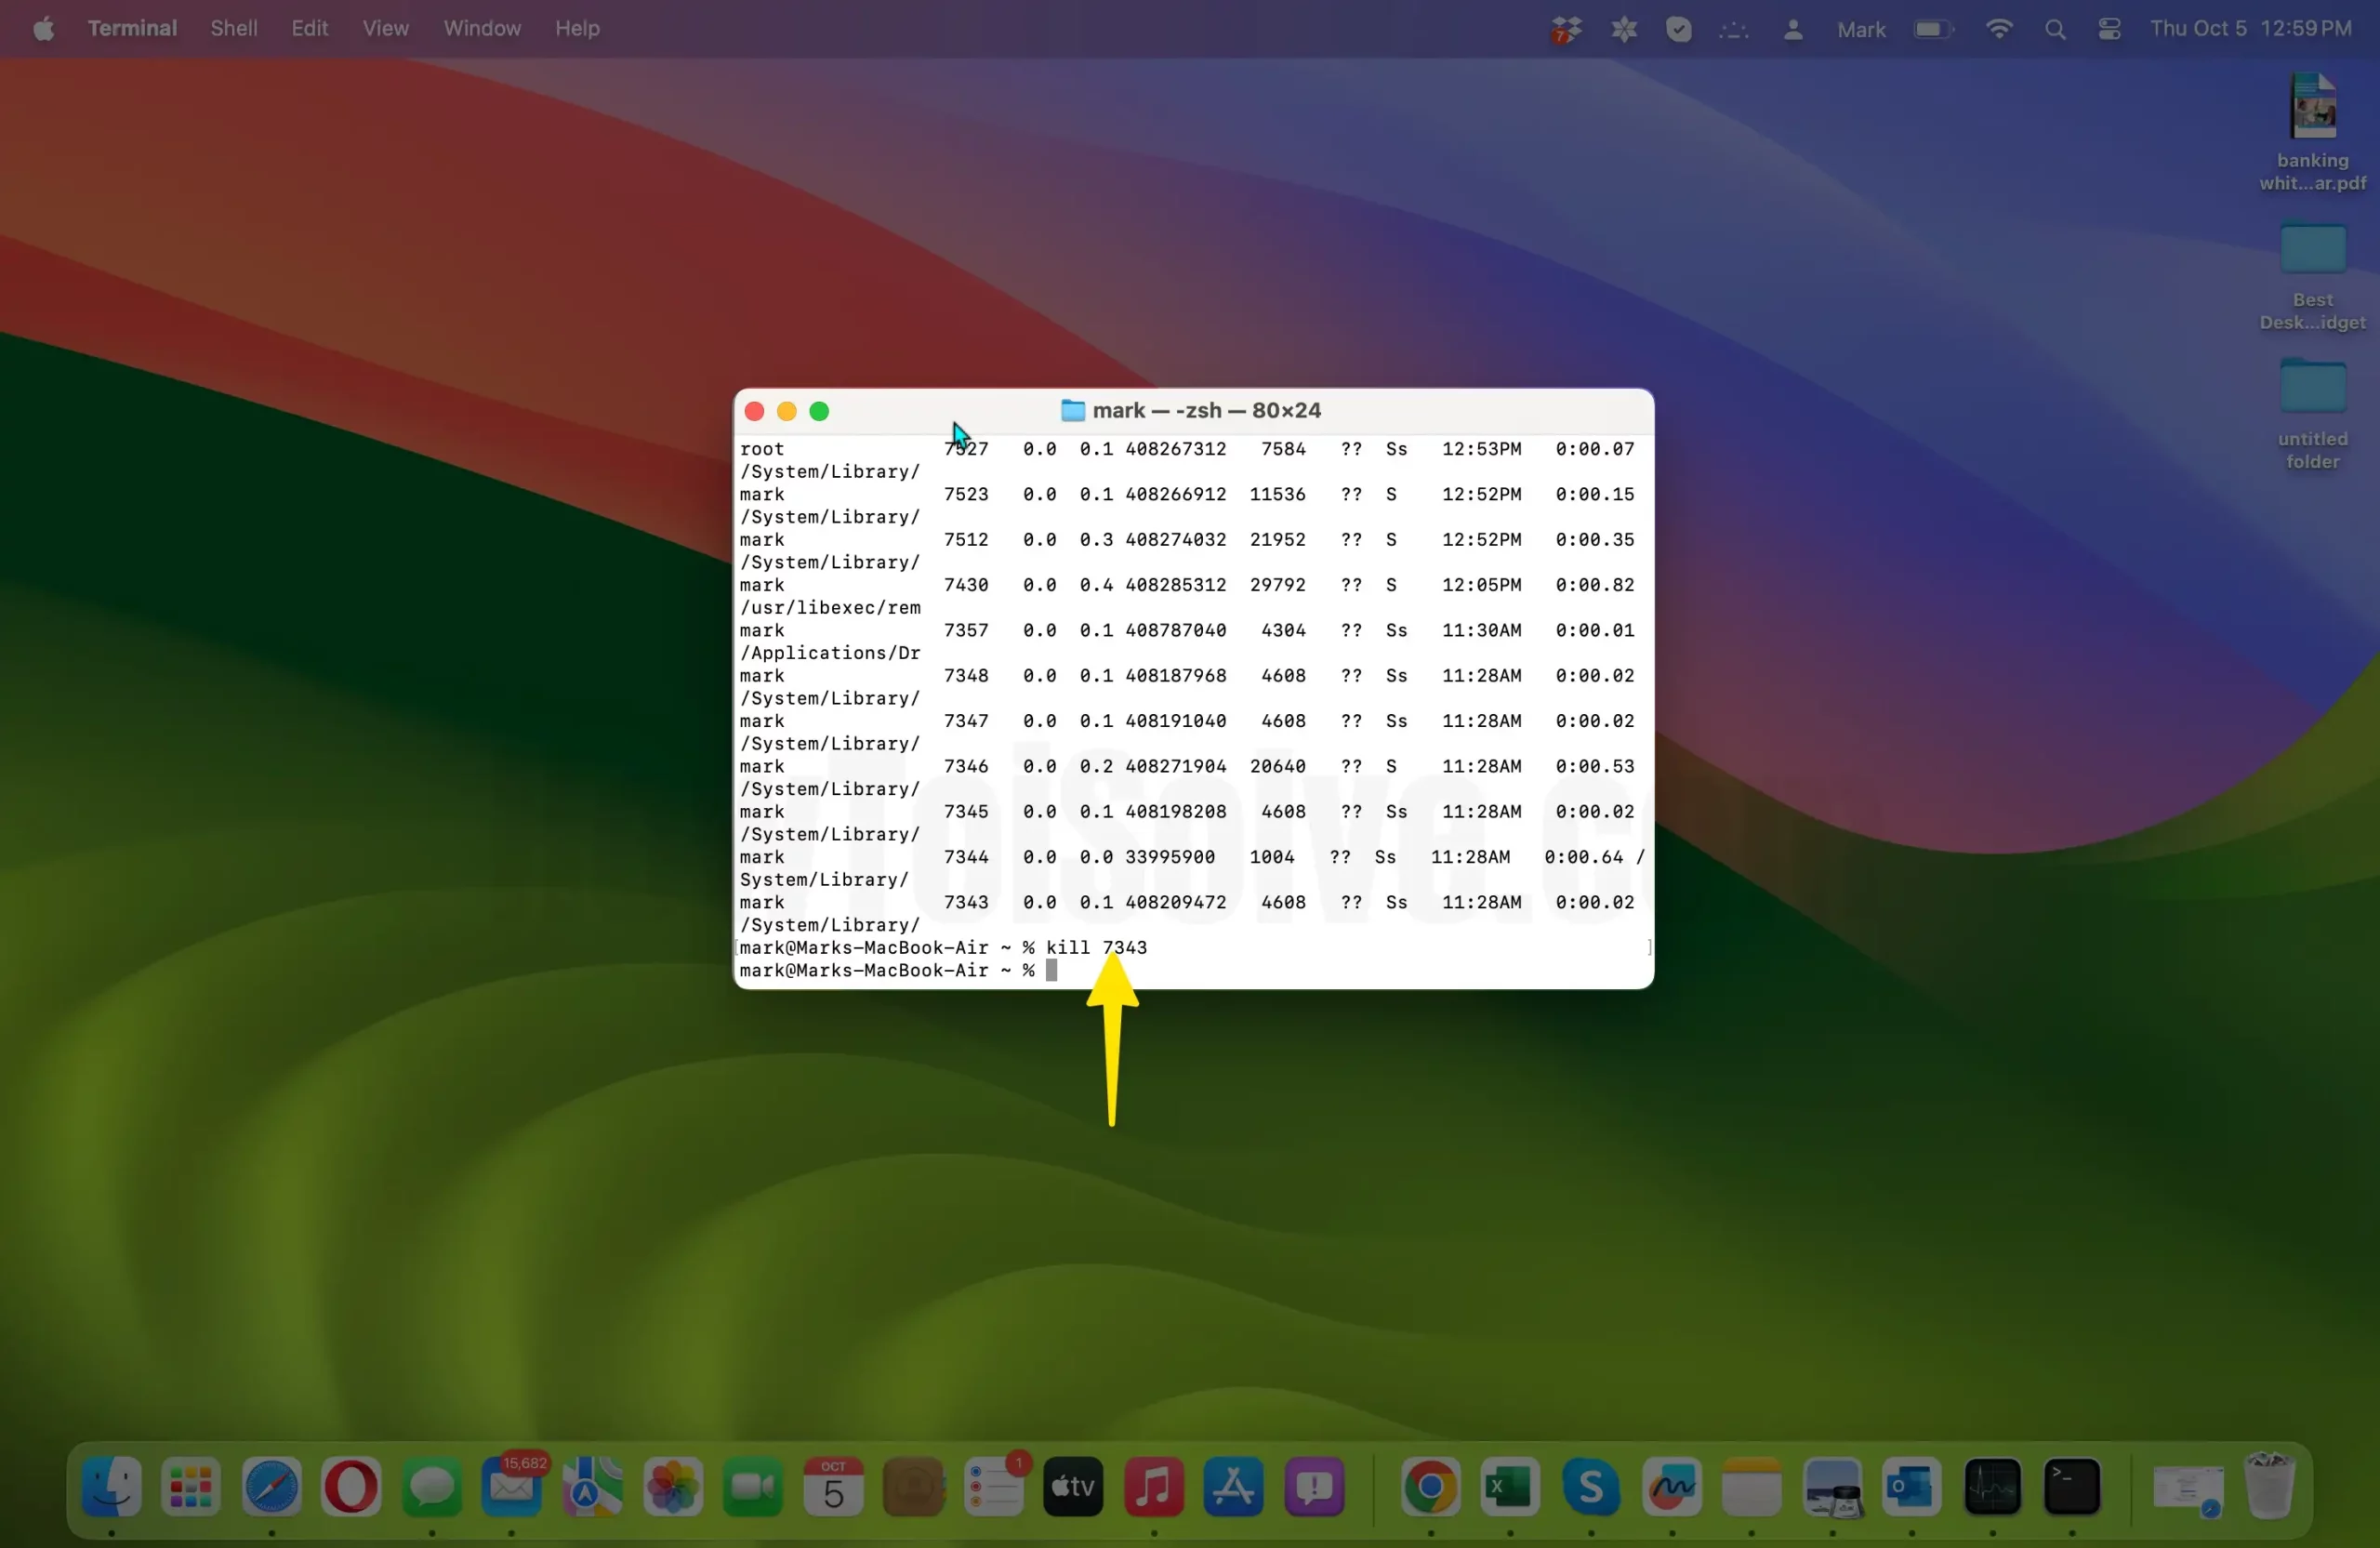
- Kill the Process: To terminate the process, use the kill command followed by the PID.
- For example, if the PID of the process is 7343, you would enter the following command:
kill 7343
Fix,
If you can’t kill the process, Mac says: failed: operation not permitted, because the Terminal has no permission to access Full Disk Access, then Allow Permission to Access “Full Disk Access”, Apple Logo > System Settings > Privacy & Security > Full Disk Access > Enable Terminal Toggle.
- This sends a termination signal to the specified process, instructing it to exit gracefully. If the process doesn’t respond, it will be forcibly terminated.
- Verify Process Termination: After executing the kill command, you can verify if the process has been successfully terminated. You can do this by running the ‘ps aux’ command again and checking if the process is no longer listed.
- Repeat if Necessary: If you have multiple processes to shut down, repeat steps 3 to 6 for each process.
How to Force Quit an Unresponsive Application
When an application becomes unresponsive on your Mac, it can be frustrating. However, you can quickly regain control by force quitting the problematic app. Here’s a step-by-step guide:
- Identify the Unresponsive Application: First, determine which application is causing the issue. Typically, you’ll notice that the app’s window is frozen, and it may not respond to clicks or inputs.
Option 1: Keyboard Shortcut
- Press and hold the following keys simultaneously: Command + Option + Esc. You can find these keys on your Mac’s keyboard.
- A “Force Quit Applications” window will appear, listing all currently running applications.

- Locate the unresponsive app in the list. It will likely have the label “Not Responding” next to it.
- Select the problematic app by clicking on its name.
- Click the “Force Quit” button in the bottom-right corner of the window.
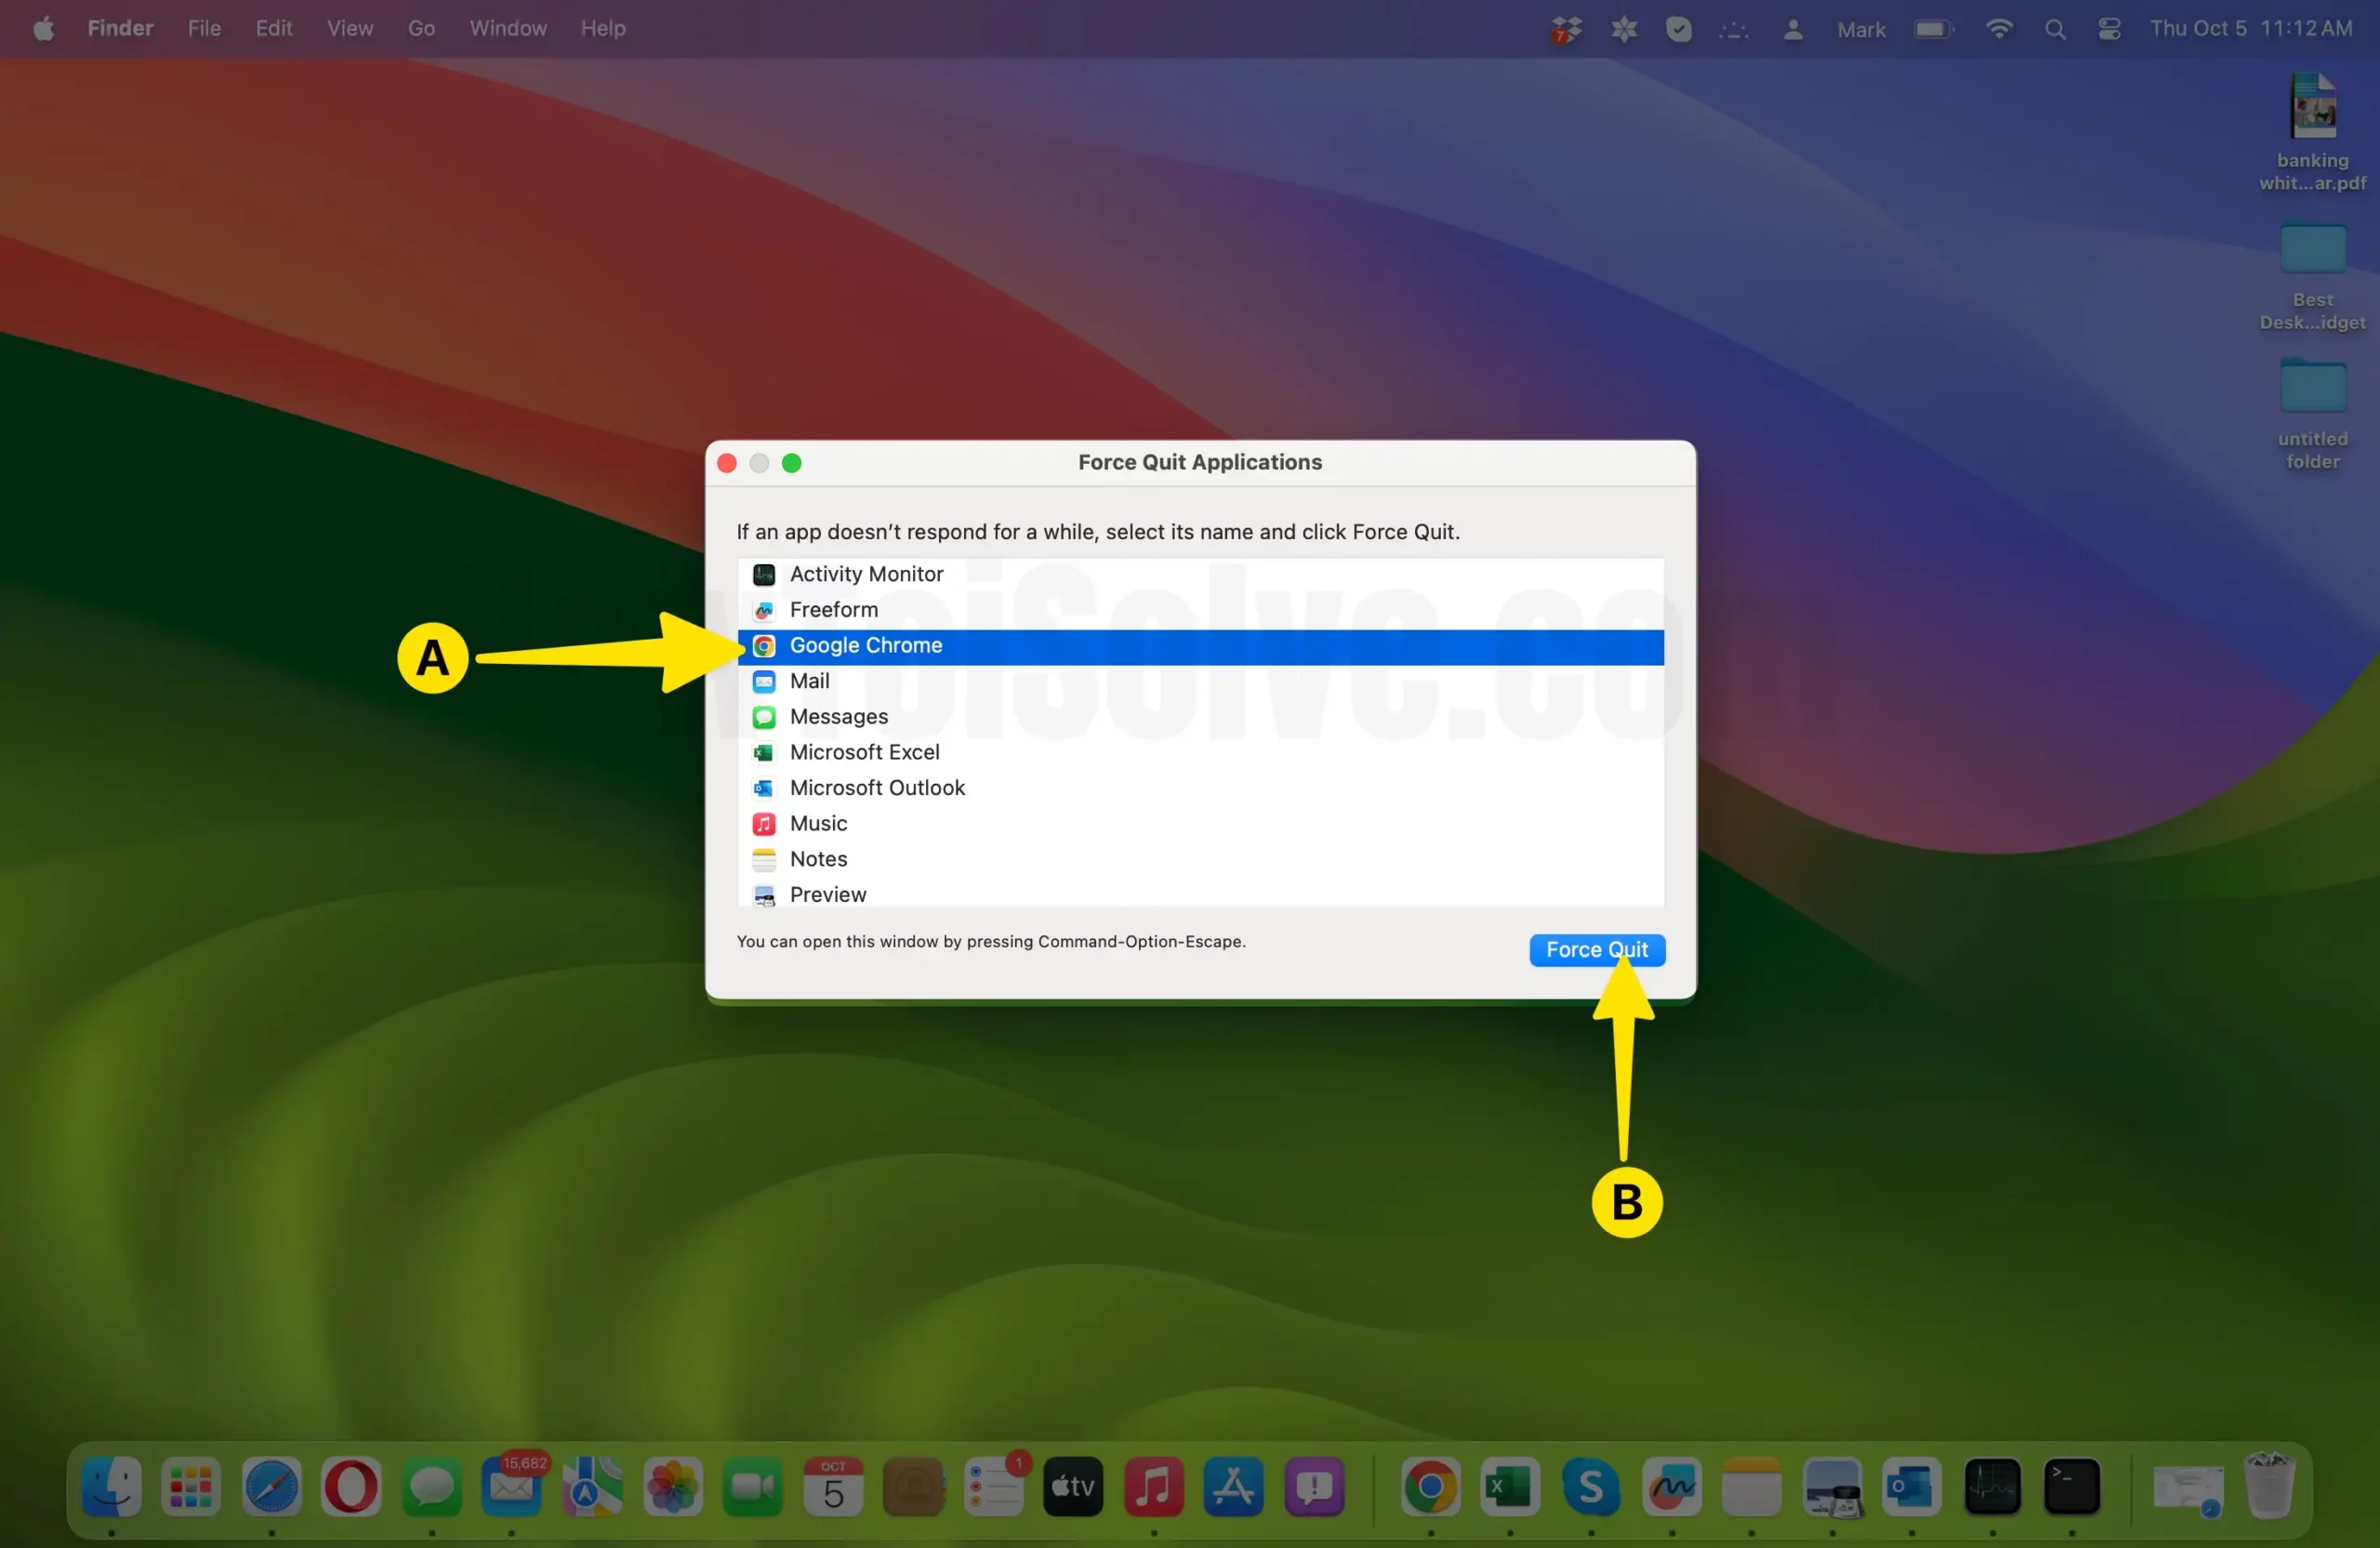
- Confirm the action in the pop-up dialog by clicking “Force Quit” again.
Option 2: Apple Menu
- Click on the Apple logo in the top-left corner of your screen.
- From the drop-down menu, select “Force Quit…“
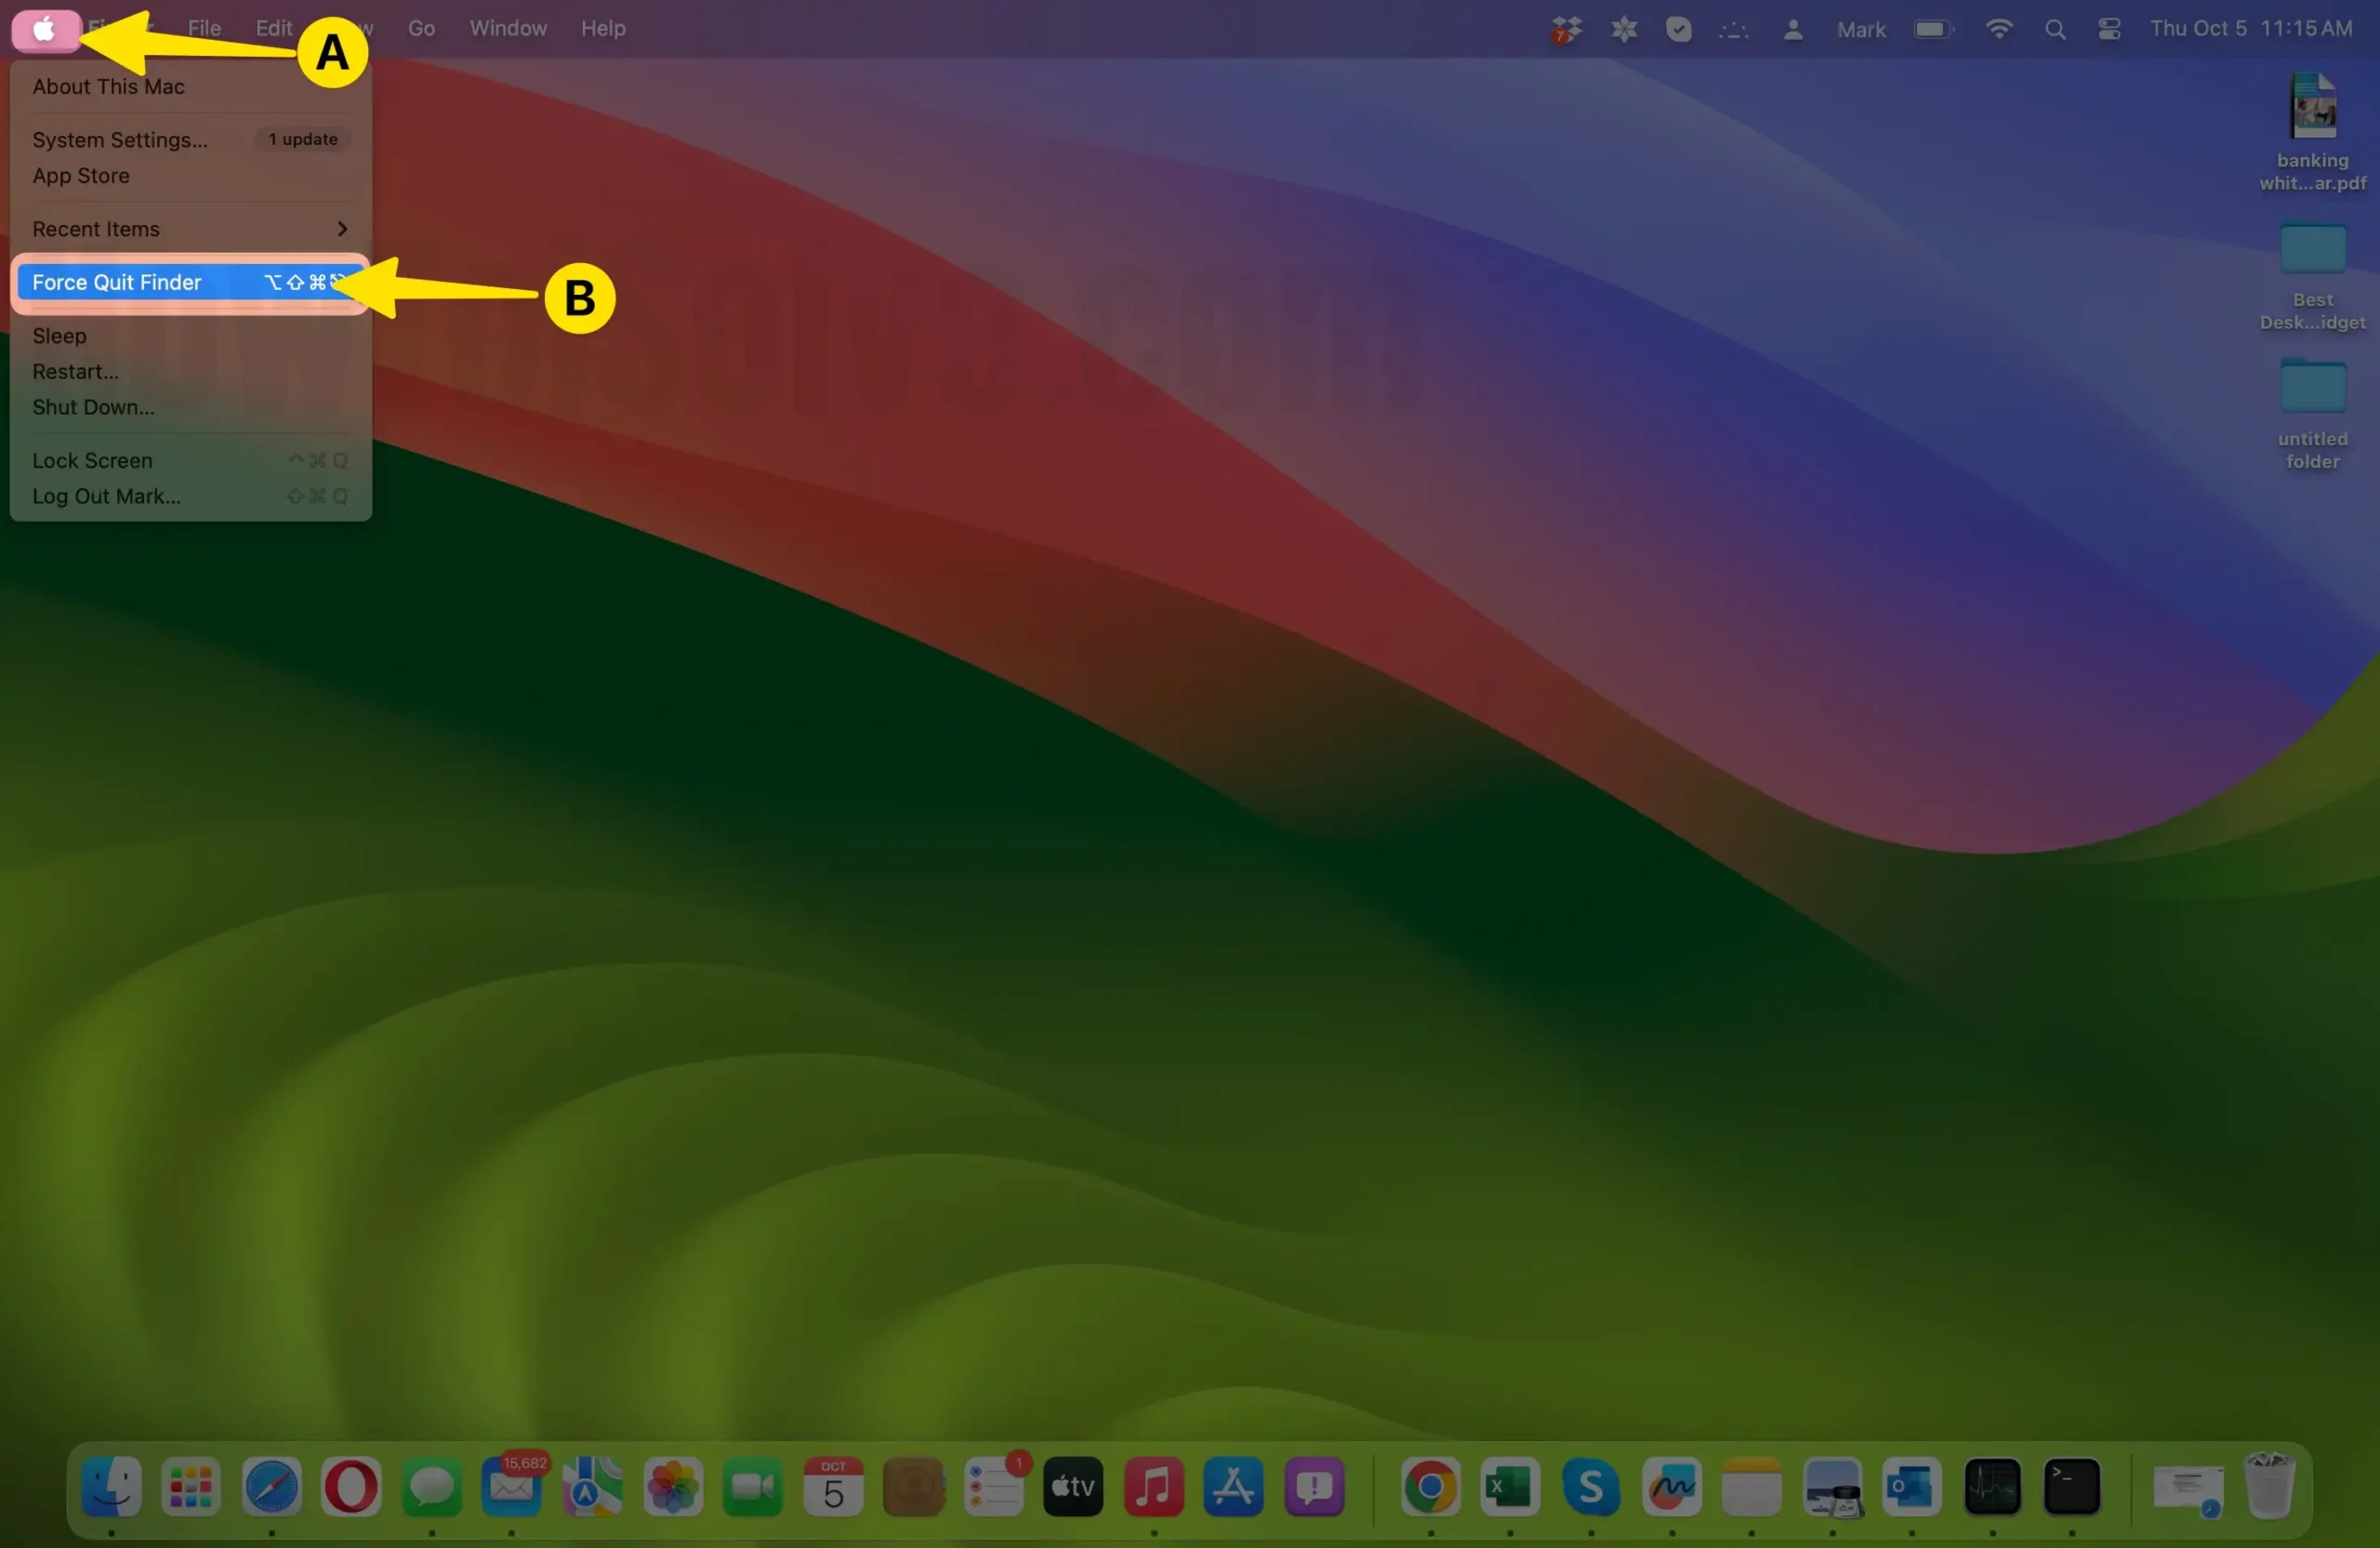
- A window similar to the one in the keyboard shortcut method will appear.
- Find the unresponsive application and select it.
- Click the “Force Quit” button and confirm when prompted.
- Wait for the Application to Quit: After initiating the force quit, give the application a moment to respond. In most cases, it should terminate within a few seconds. If it doesn’t, you may need to proceed with the next steps.
- Check for Application Recovery and Relaunch: If the application has unsaved work, macOS may offer to recover it when you restart the app.
- Choose the “Reopen” option if available to recover your work.
- Once the unresponsive app has been successfully force-quit, you can relaunch it from your Applications folder or Dock.
How to Easily Remove Startup Items
Having unnecessary applications launch at startup can slow down your Mac’s boot time and consume system resources. Removing these startup items is a straightforward process:
- Open System Preferences:
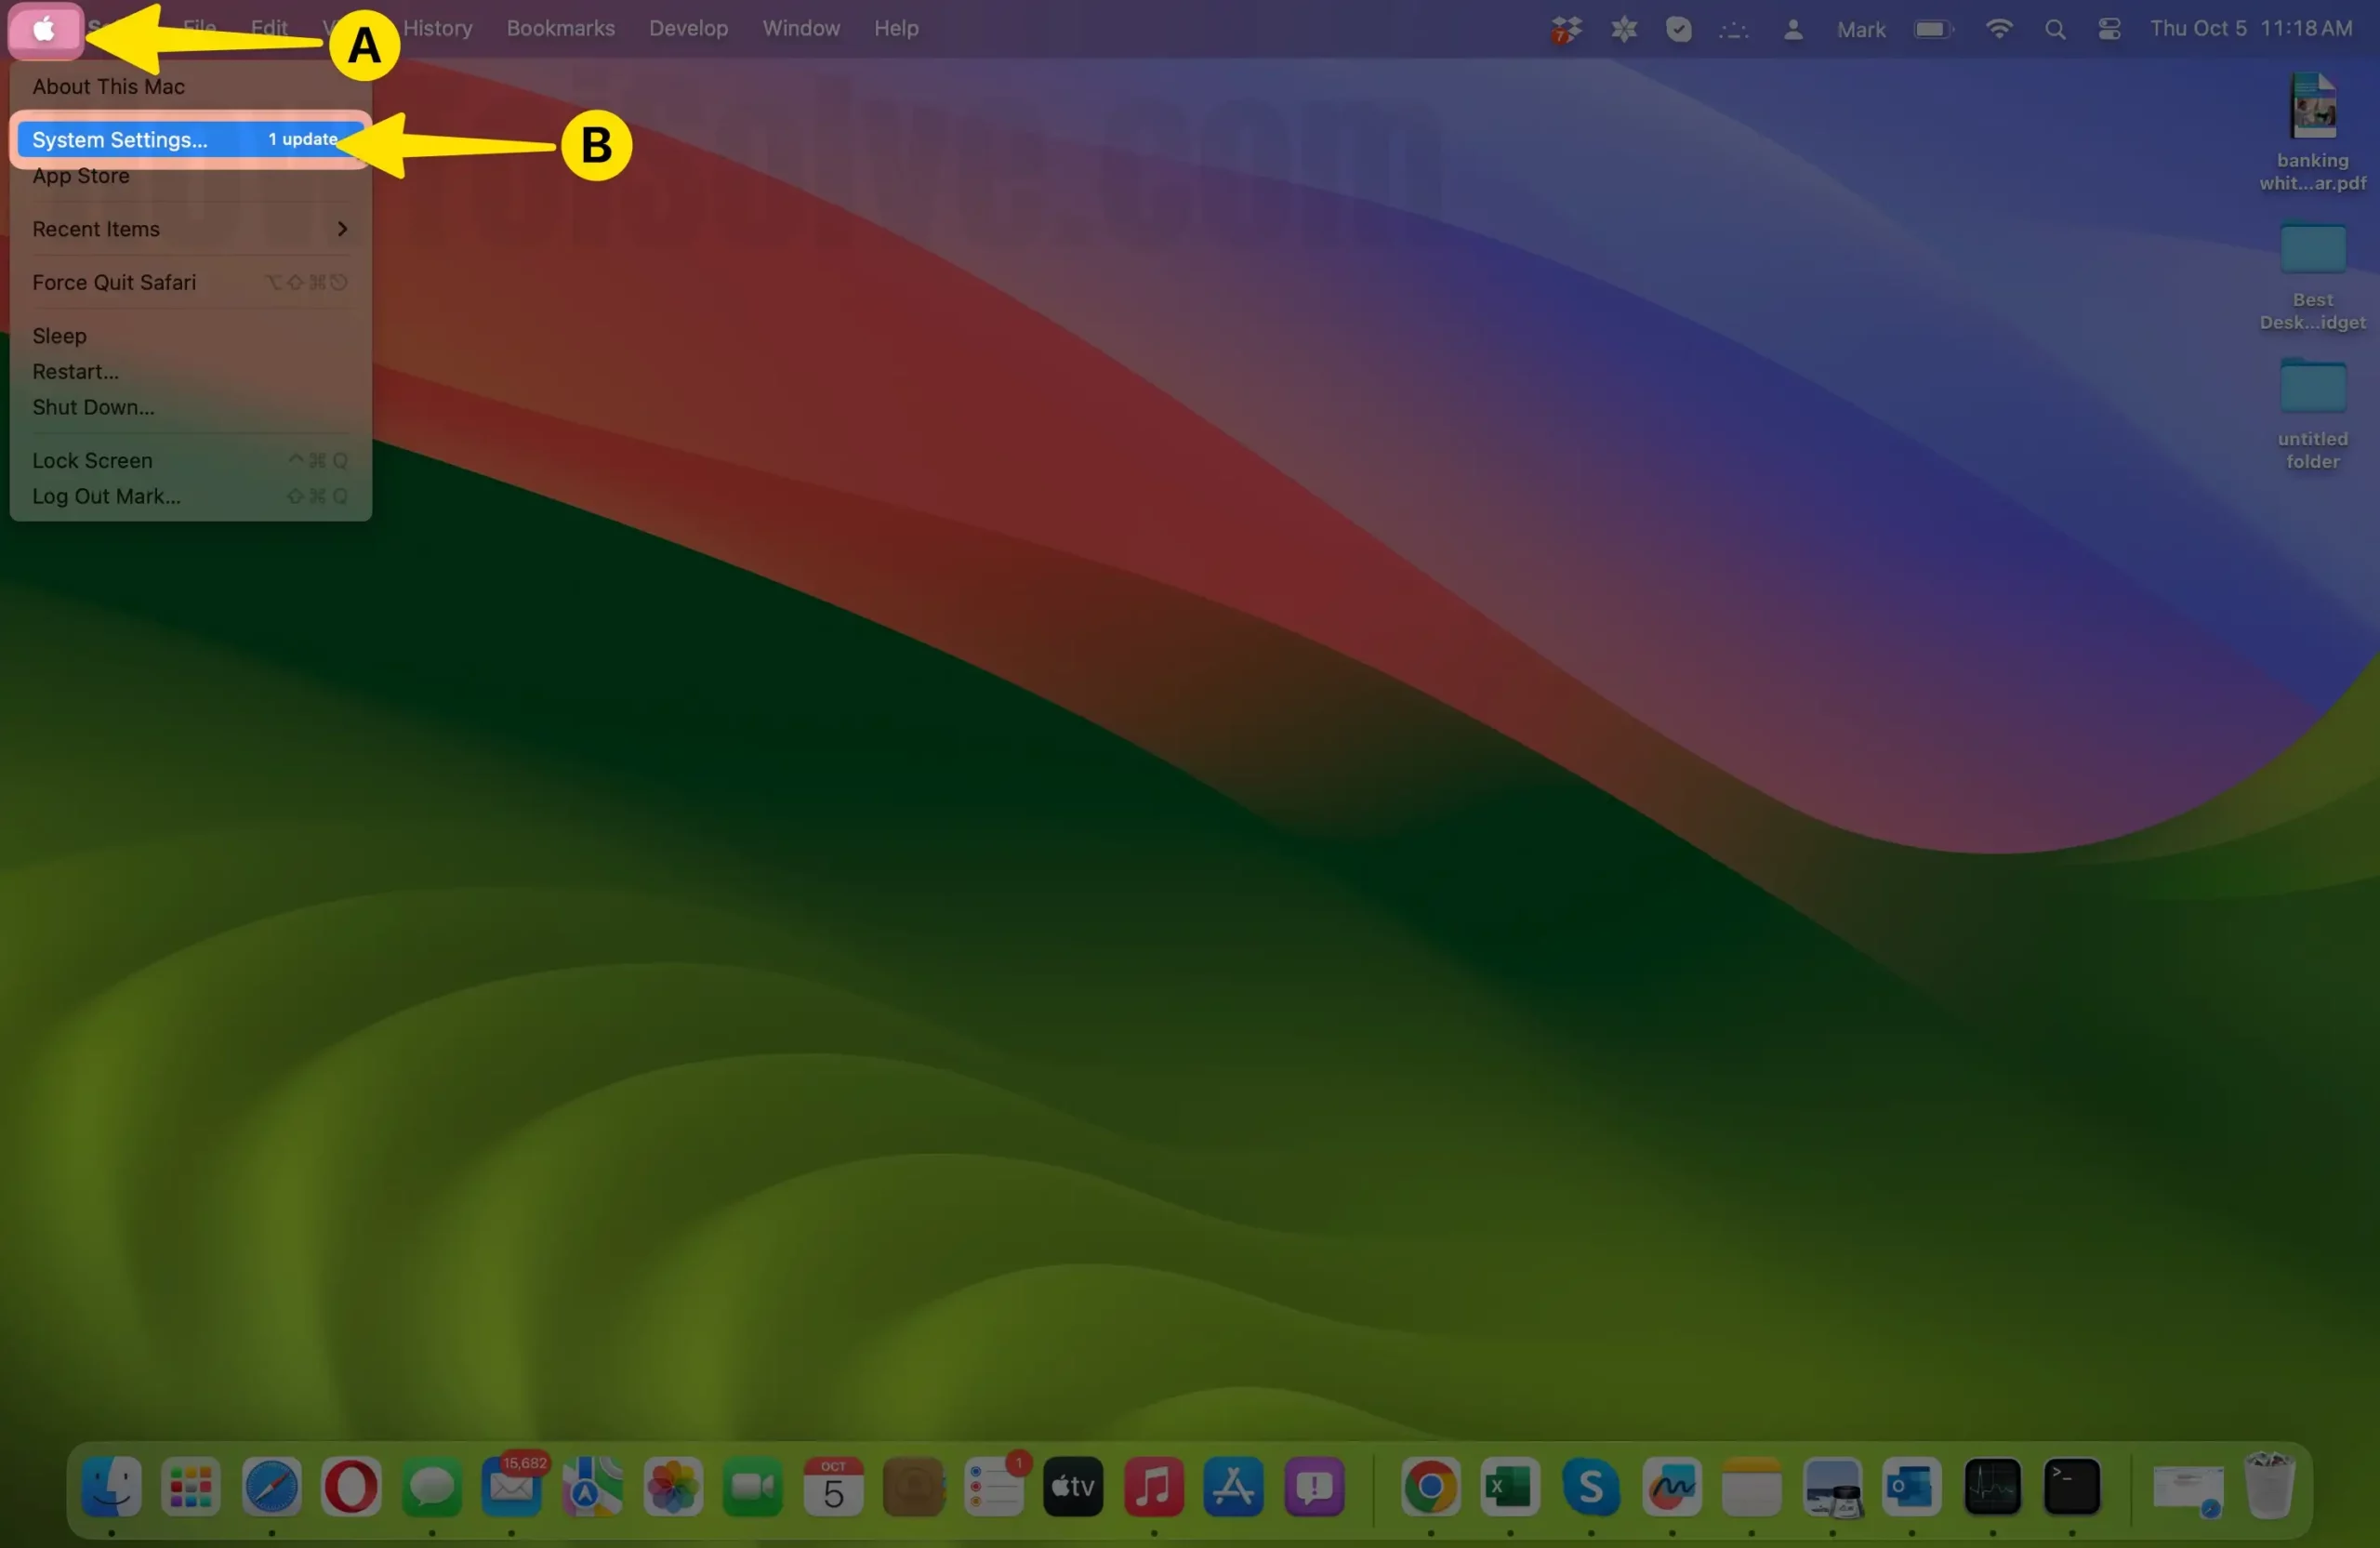
- Click on the Apple logo in the top-left corner of your screen.
- Select “System Settings/System Preferences” from the drop-down menu.
- Navigate to Users & Groups:
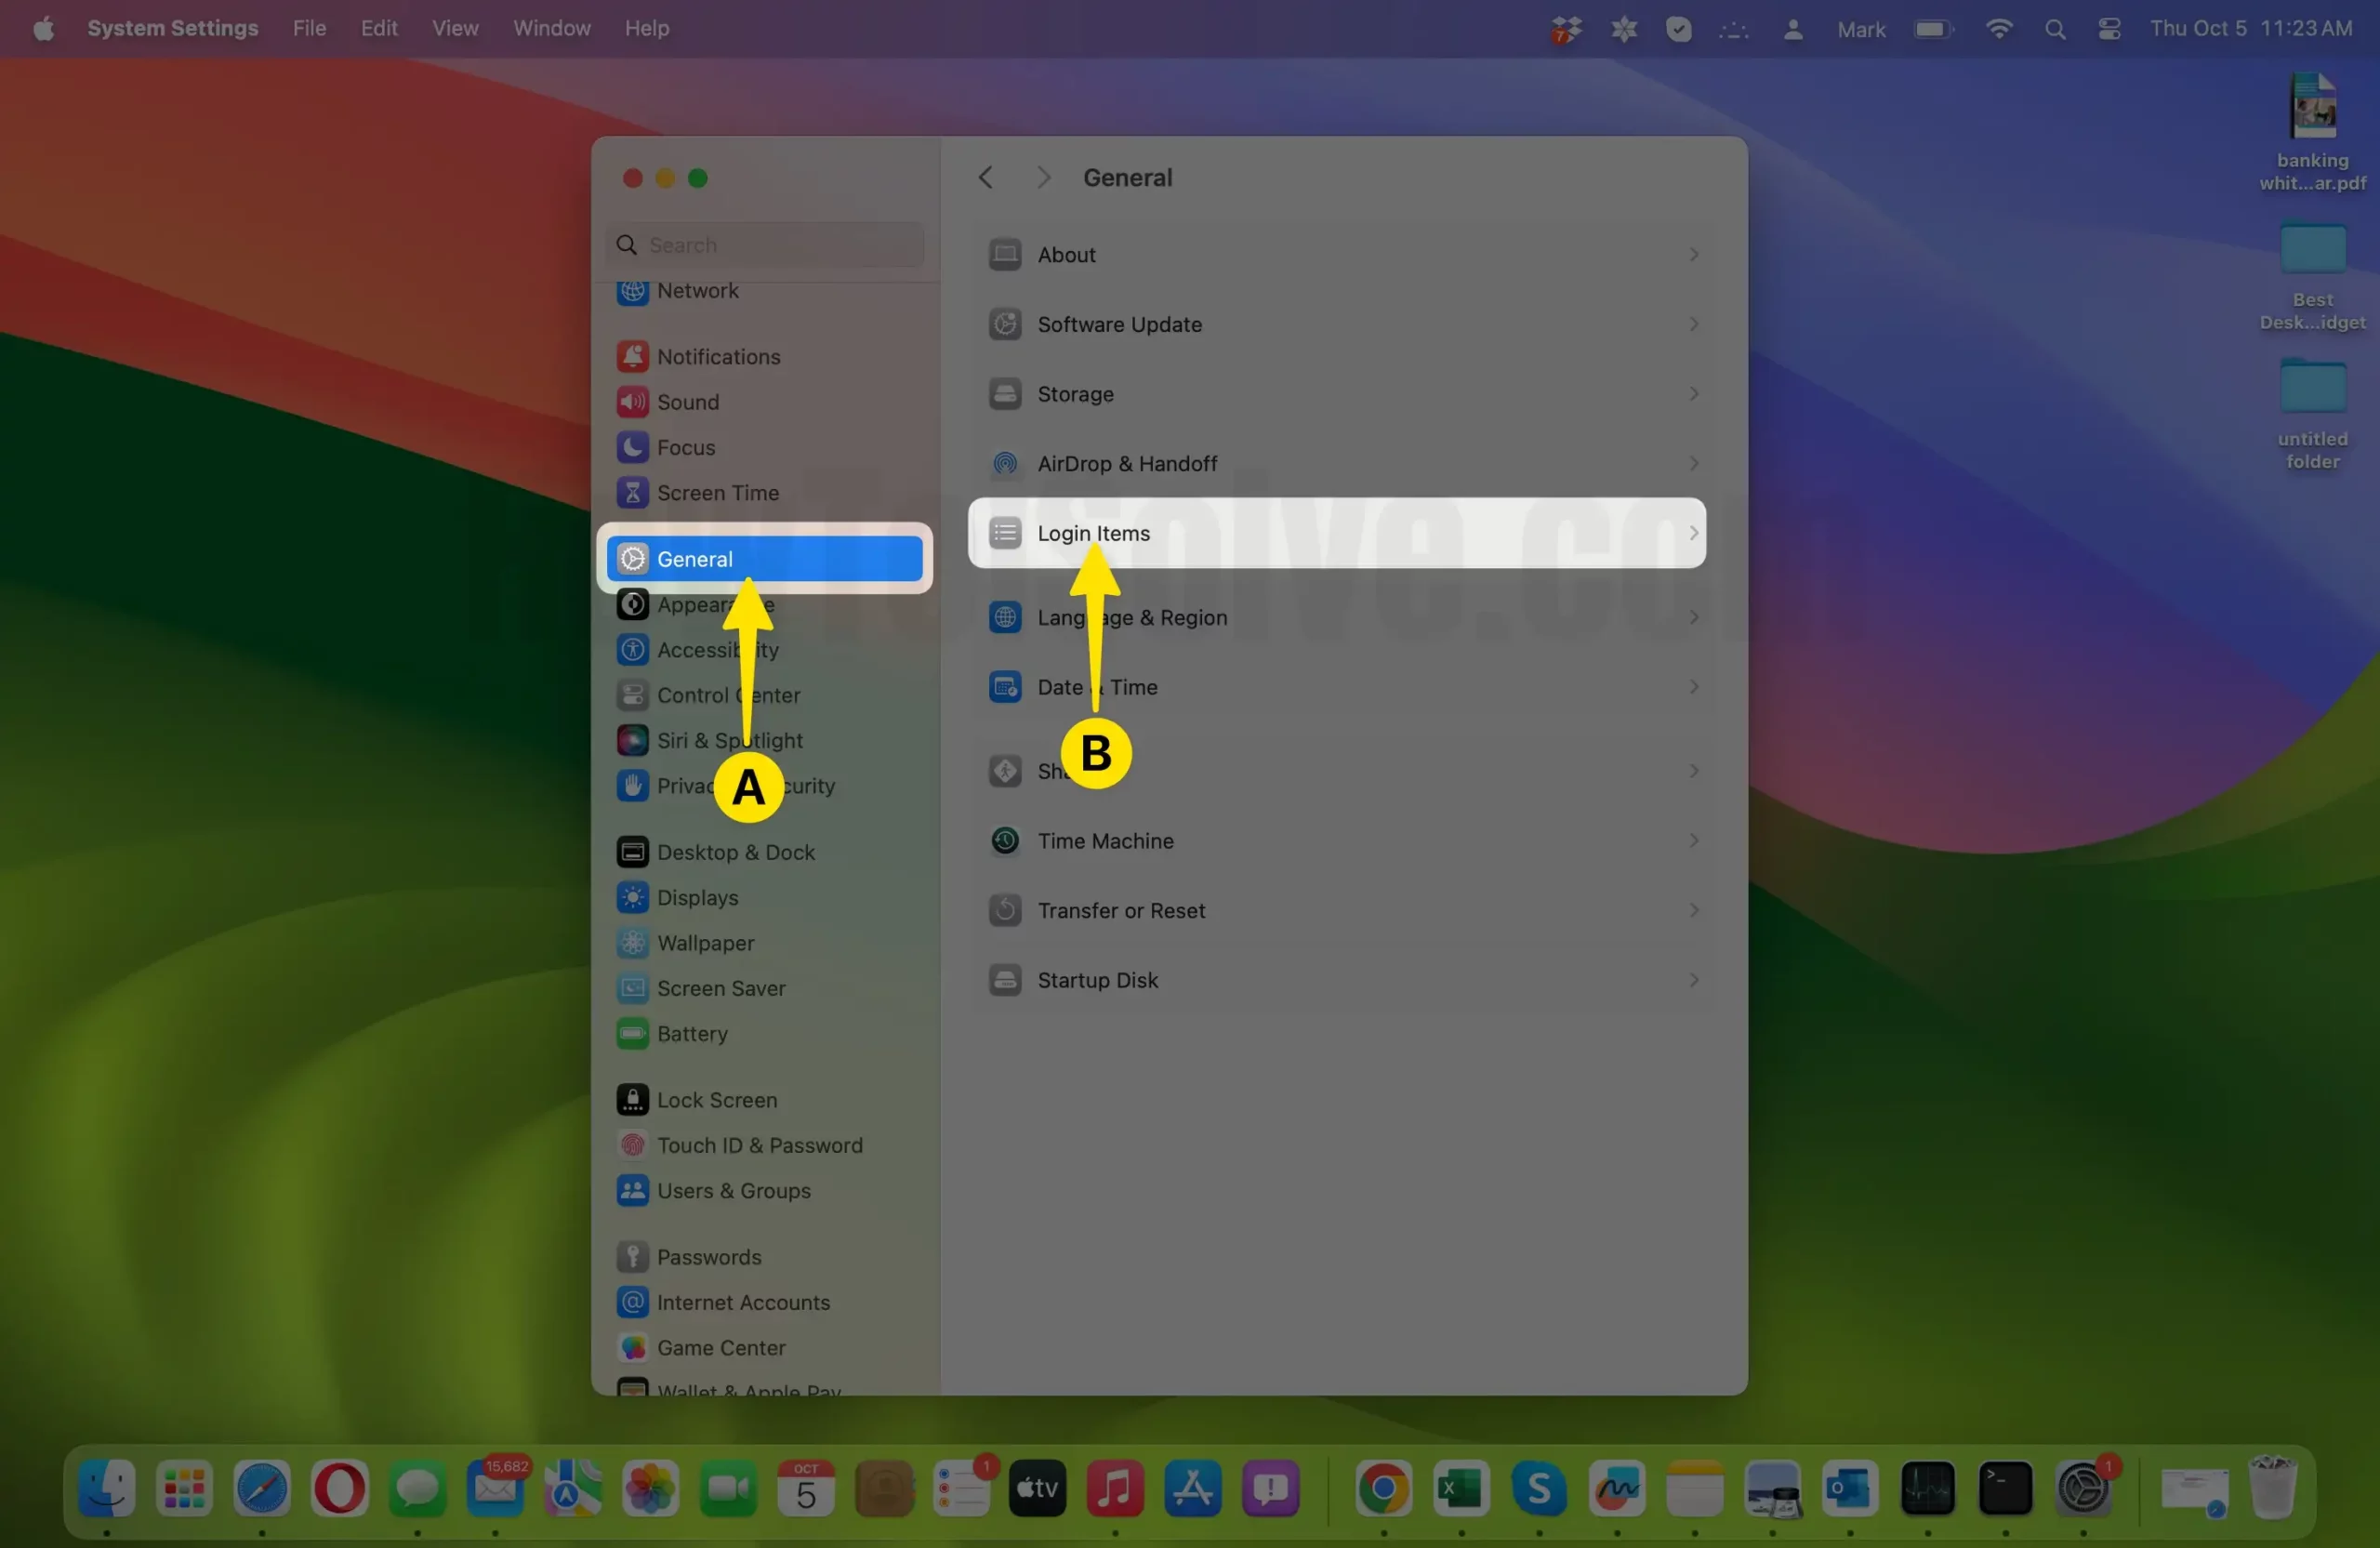
- On MacOS Ventura & Later:- In the System Settings Window, Click on General > Login items. Jump to Step 4.
- On macOS Monterey & Earlier:-In the System Preferences window, click on “Users & Groups.” You may need to enter your administrator password to make changes in this section.
- Choose Your User Account:
- In the Users & Groups window, you’ll see a list of user accounts on the left side.
- Select your user account by clicking on it.
- Access Login Items:
- After selecting your user account, click on the “Login Items” tab at the top of the window. This tab contains a list of applications and items that launch automatically at startup.
- Remove Unwanted Items:
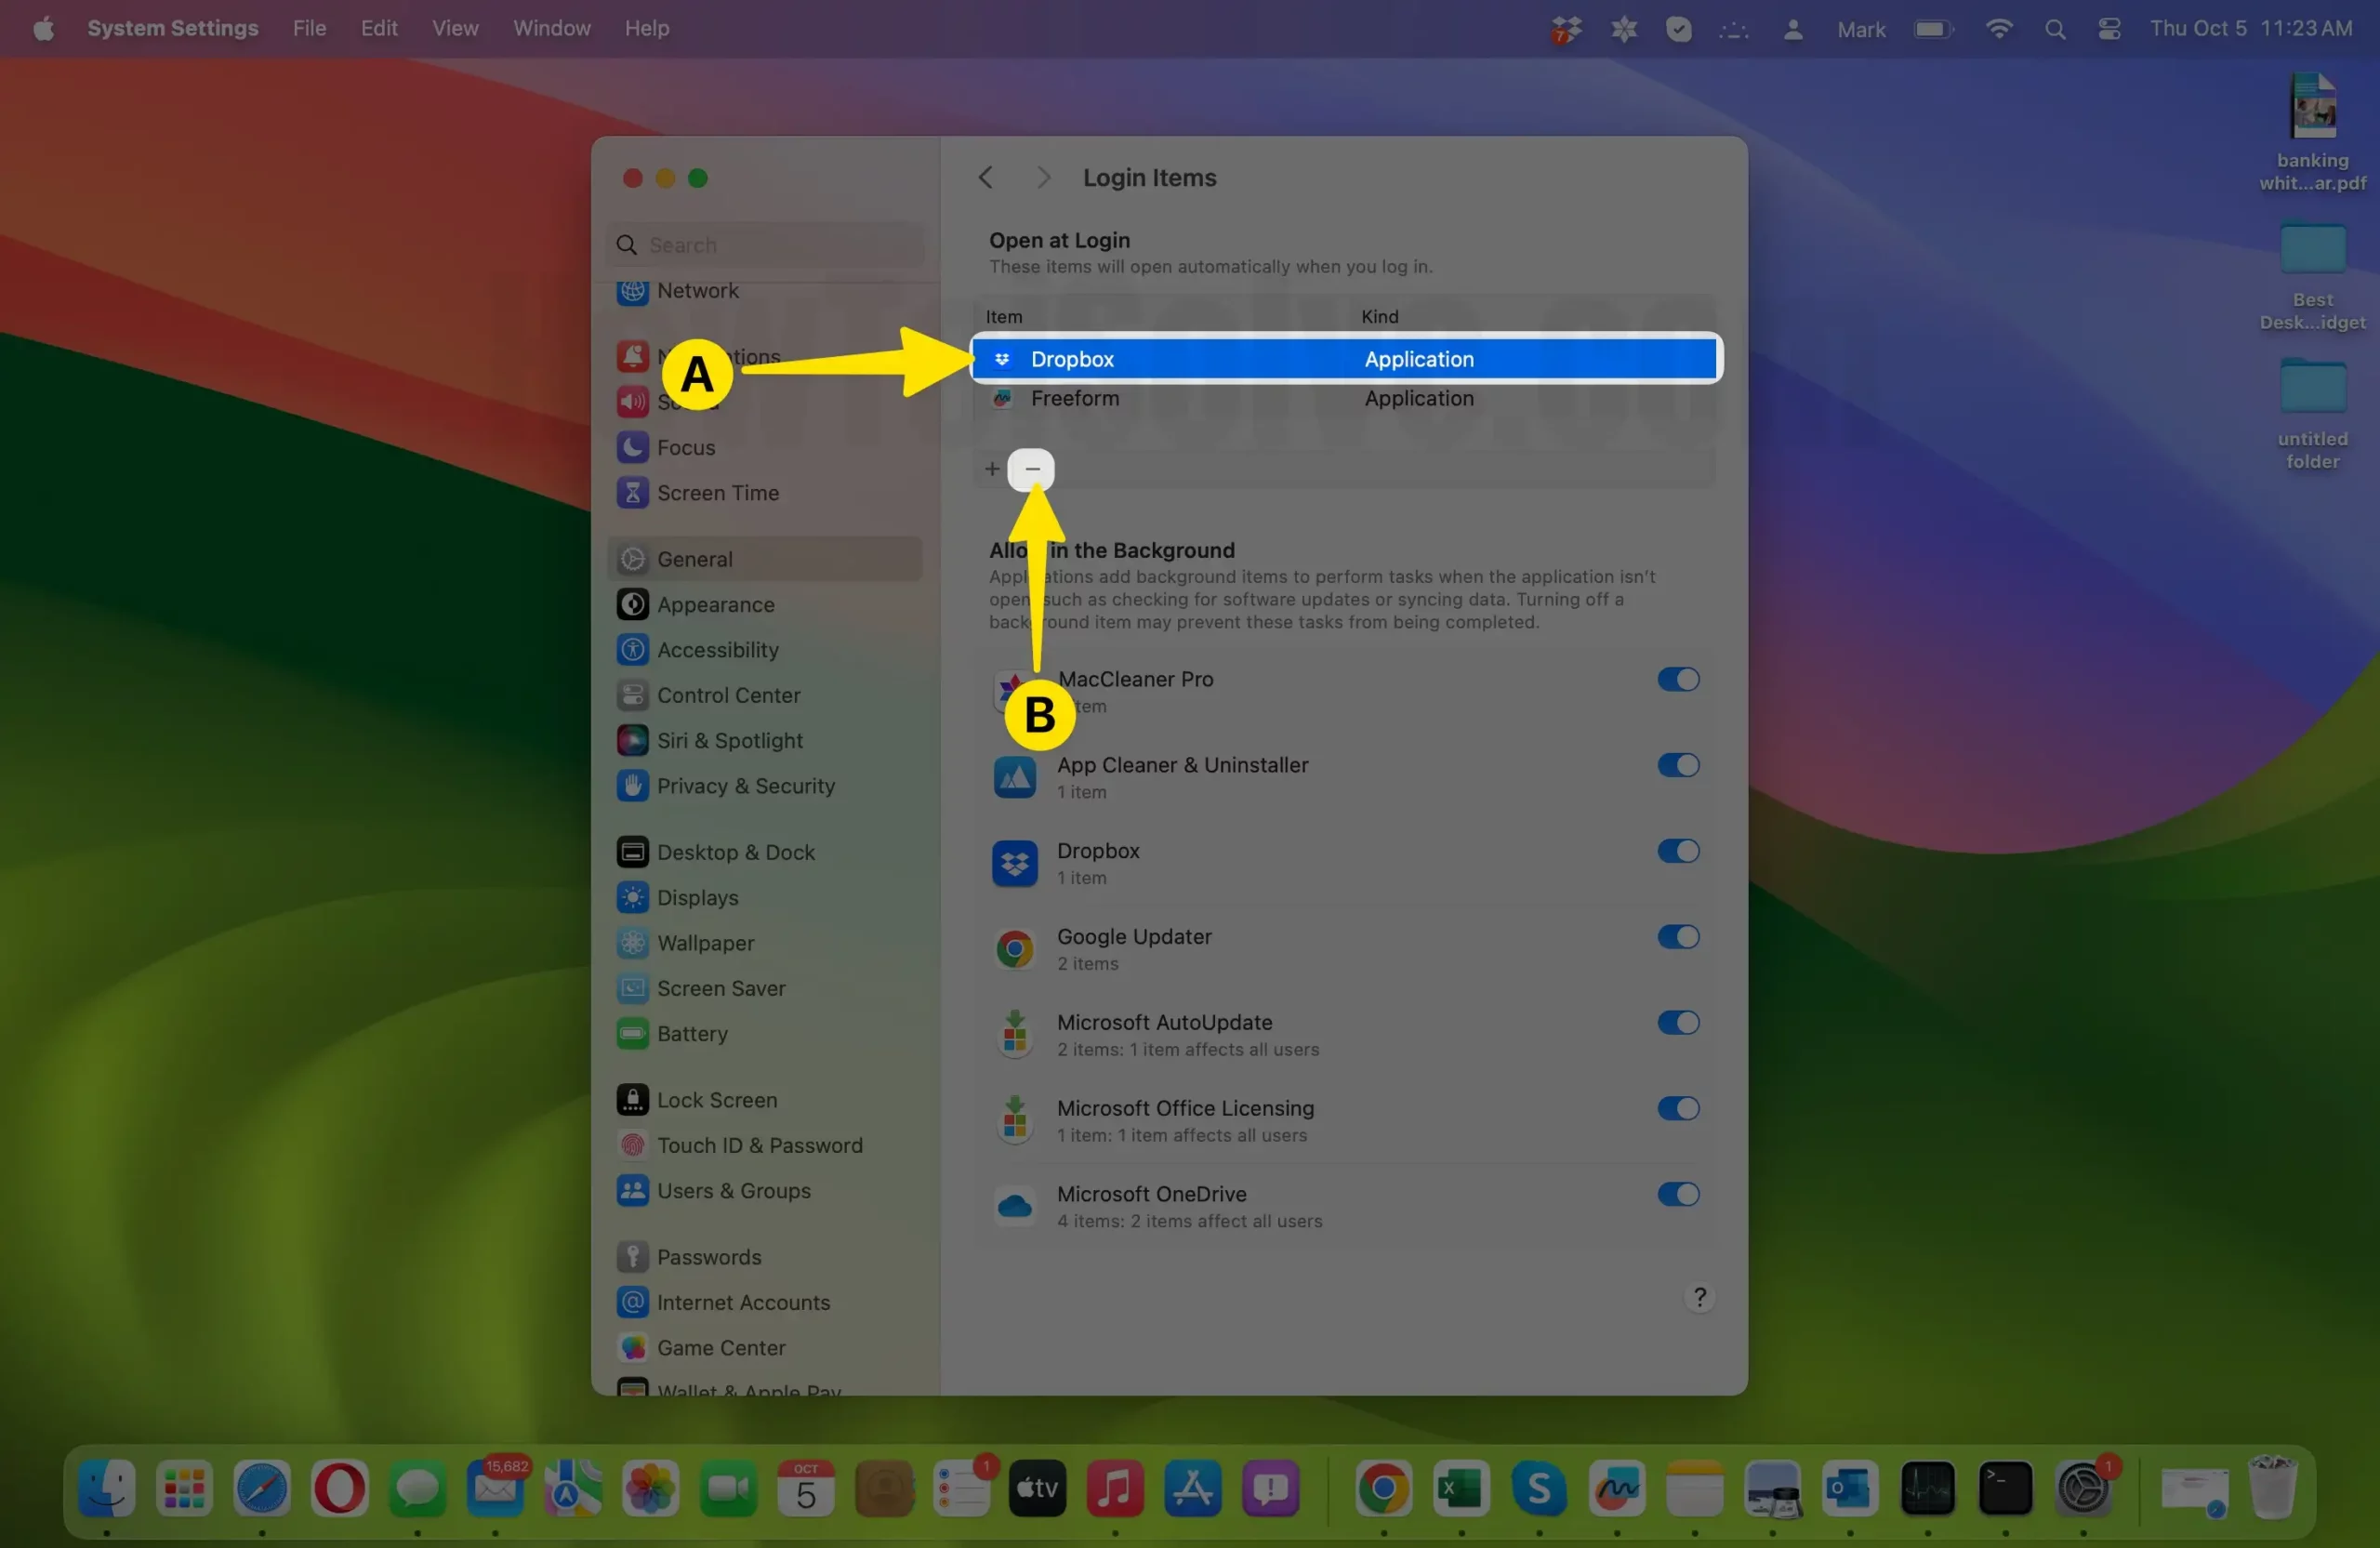
- You’ll see a list of startup items on the right side of the window. Select the one you want to remove to highlight it.
- With the unwanted item selected, click the minus (-) button located at the bottom of the list. This action will remove the selected item from the startup list.
- Confirm Removal:
- A confirmation dialog will appear, asking if you want to remove the selected item from the login items. Click “Remove” to confirm.
- Repeat as Needed:
- Repeat steps 5 to 6 for each additional item you want to remove from the startup list.
- Restart Your Mac:
- Once you’ve removed all the unwanted startup items, restart your Mac to apply the changes.
How to Prevent Problematic Processes
Preventing problematic processes on your Mac involves proactive management to maintain system stability and performance. Here’s a detailed process to help you achieve this:
- Disable Startup Items: To disable startup programs on a Mac, On macOS Ventura & later: Apple logo > System Settings > General > Login items. For macOS Monterey & Earlier: go to System Preferences, choose Users & Groups, and then remove startup items from the Login Items tab corresponding to your username. You can also right-click on an app you want to disable at startup in the Dock and uncheck “Open at Login” to prevent it from launching at startup.
- Use Activity Monitor for Monitoring: Regularly open Activity Monitor (located in the “Utilities” folder within “Applications“) to check for any resource-intensive or unresponsive processes. If you notice an application or process is faulty, consider quitting it using Activity Monitor. This can help prevent it from causing further issues.
- Keep Software Updated: Ensure that your macOS and all installed applications are up to date. Developers release updates to address bugs, improve performance, and enhance security. Outdated software can be a source of problematic processes. Update them regularly through the App Store or official websites.
- Practice Safe Browsing and Downloading: Be cautious when downloading files or applications from the internet. Only download software from trusted sources to reduce the risk of installing potentially problematic processes.
- Regular Backups: Maintain regular backups of your important data. This ensures that even if a problematic process causes data loss or corruption, you can easily recover your files.
Why Is It Important to Manage Processes on Mac?
Managing and occasionally terminating processes on a Mac is crucial for optimizing system performance, maintaining stability, saving battery resources, and ensuring a responsive user experience. You must see and kill unnecessary processes on Mac for these reasons:
- Resource Optimization: Background processes, even those related to unused applications or services, consume valuable system resources like CPU and RAM. Terminating unnecessary processes frees up these resources for tasks you’re actively working on, improving overall system performance and responsiveness.
- Preventing System Overload: Running too many processes simultaneously can overload your Mac’s hardware. It results in sluggish performance, unresponsive applications, and even system crashes. You can prevent your computer from reaching a critical point of resource exhaustion by terminating non-essential processes.
- Managing Troublesome Applications: Occasionally, applications may become unresponsive or exhibit unusual behavior. In such cases, force-quitting these applications is necessary to prevent potential system-wide issues.
- Energy Efficiency: Unnecessary background processes can also drain your Mac’s battery life, particularly on laptops. Kill the processes that aren’t currently needed to extend your device’s battery runtime.
- System Stability: Some processes can raise conflicts with other software, causing system instability. Terminating problematic processes can resolve these issues and ensure your Mac runs smoothly.
- Security: In rare instances, malicious processes or malware may run in the background without your knowledge. Identifying and terminating suspicious processes is important for maintaining your Mac’s security.
- Maintenance: Regularly reviewing and managing processes is a form of system maintenance. It helps you keep your Mac clean, efficient, and less prone to slowdowns or crashes.
Conclusion
Managing processes on your Mac is essential for optimal performance and stability. Whether you’re using Activity Monitor, Terminal, or the Force Quit option, knowing how to view and kill processes on macOS empowers you to keep your system running smoothly and efficiently. Depending on your requirements, follow the solutions mentioned above to get a responsive and reliable Mac experience.