From a live video call to a gamer playing Minecraft in their gaming room, YouTube live streaming lets the user share what’s presently happening in their life. You can easily live stream on your Apple device and share your experiences with your targeted audience. If it’s your first live-streaming on YouTube, this guide is for you. Here’s how to Live Stream on YouTube on iPhone & iPad. also, try these best Apps to live stream from iPhone To YouTube.
How to YouTube Live Streaming Video on iPhone, iPad
Below, we’ll show the complete procedure to Live Stream from YouTube on iPhone & iPad. But before that, you’ll need to checkmark the requirements, so kindly go through it.
Requirements to Live Stream on YouTube
- You must have at least 50 subscribers on your YouTube channel. However, your stream is restricted and only visible to a limited number of viewers. While it only takes 50 subscribers to make the Live stream feature accessible on your YouTube. Additionally, once you stop streaming, it will configure to private settings. Once you achieve 1000 subscribers, the above restriction will not be applied.
- Your YouTube channel must be verified. All you need to do is navigate to youtube.com/verify and cross-verify using your phone number and OTP. Once the verification procedure is finished, you can easily live-stream right from your mobile. Verifying also lets you upload a video for 15 minutes, appeal Content ID claims, and custom thumbnails.
- Your iPhone or iPad must be updated to at least iOS 8 or above.
- Your YouTube should not have had live streaming restrictions for at least 90 days.
- You must turn on live streaming on YouTube. And even after turning on Live Stream, you may need to wait for at least 24 to begin live streaming. However, don’t worry; future live streams will start with no waiting period.
- For Live Stream, your iPhone or iPad must be connected to a decent Wi-Fi network.
Way #1. Start Youtube Live
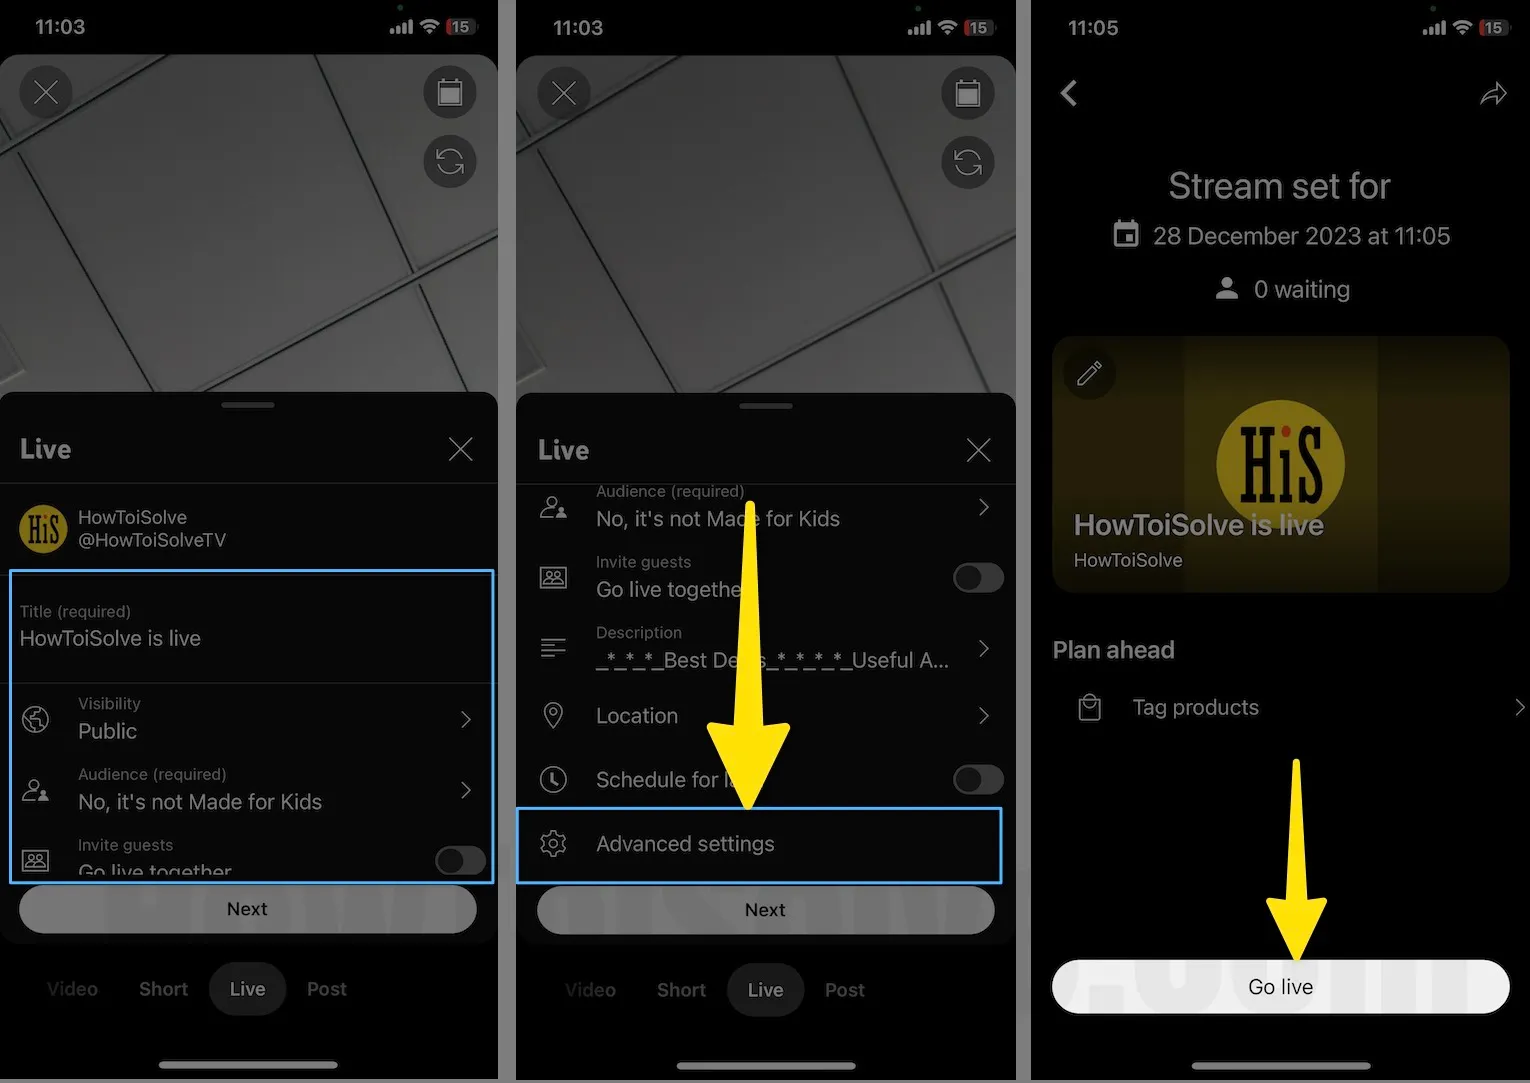
Step 1: Launch the YouTube app on your iPhone.
Step 2: Next, tap on + Icon from the bottom menu.
Step 3: Swipe right to left and tap on Live from the bottom menu.

Step 4: Enter your Video Title, Visibility, Restrictions, and all other settings In the resulting live menu, scroll down and tap Advanced Settings. – For Other Important settings.
Step 5: At last, tap on the Go Live option.
Step 6: In the New Timeout Lengths popup, select Got It.
Step 7: Once you are done with Youtube Live, tap on Close ❌ Icon at the top right corner of the screen. From Are you sure want to stop streaming? Pop-up, tap on End. At last, you will get insight information, such as Views, Peak concurrents, Total watch time, Chat rate, Average view duration, and duration of your Live Stream.

Way #2. Schedule Youtube Live
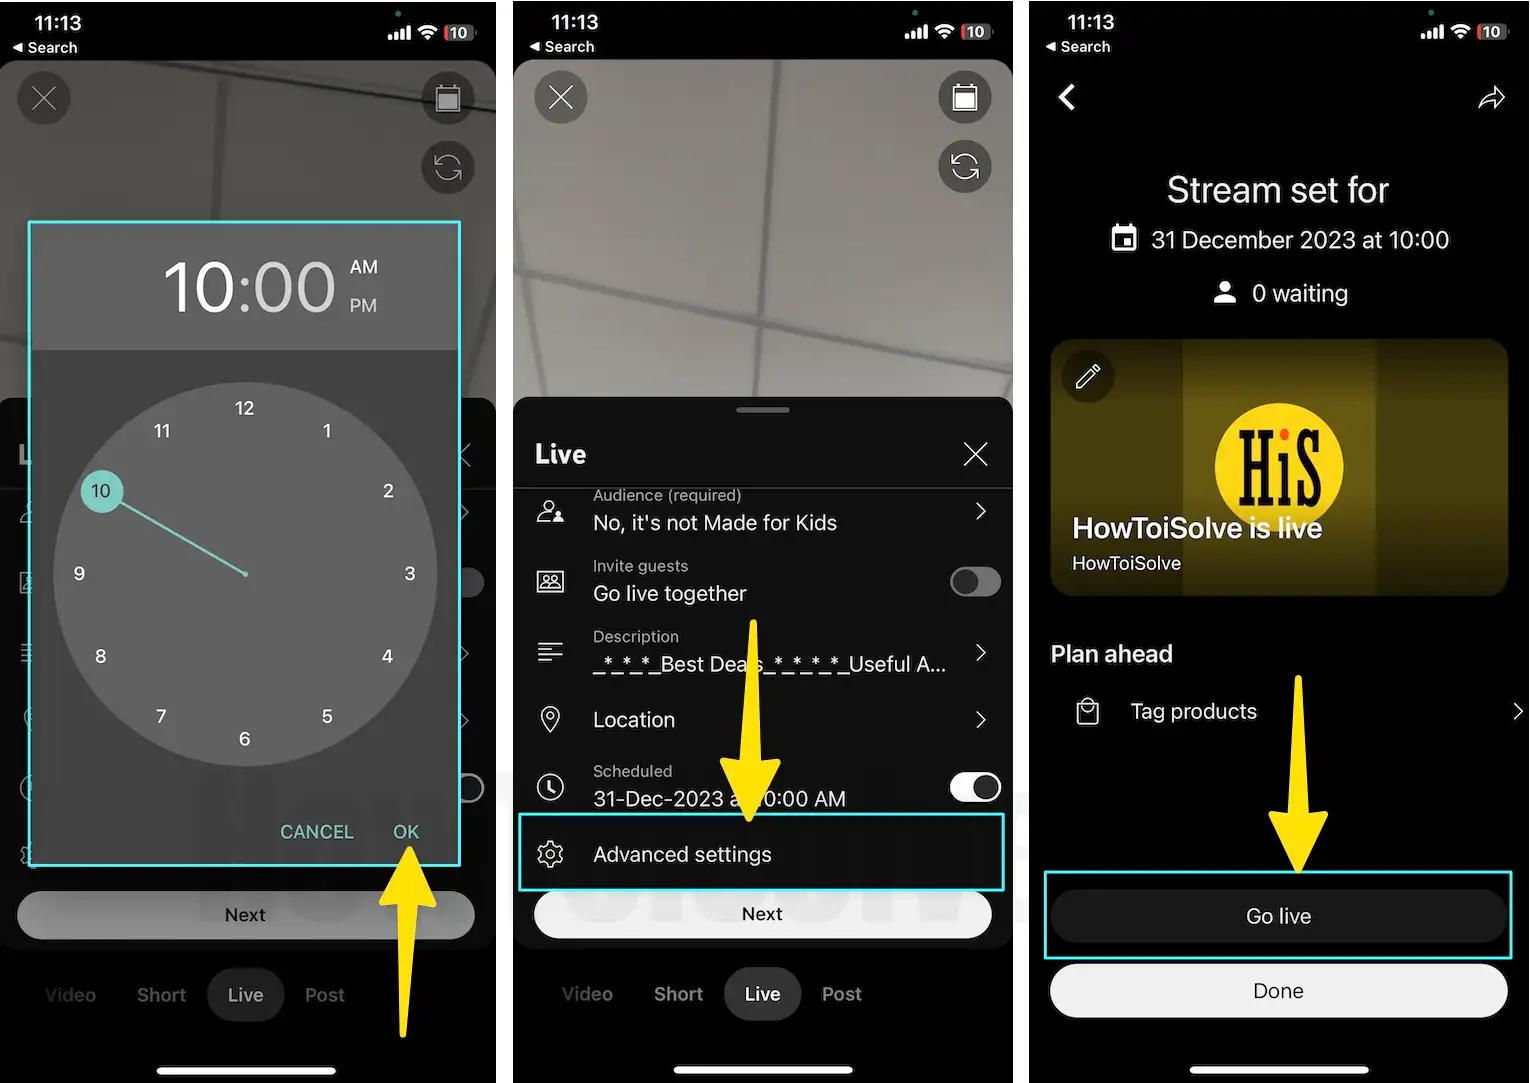
Step 1: Access the YouTube app on your iPhone.
Step 2: Next, tap on + Icon from the bottom menu.
Step 3: Swipe right to left and select Live from the bottom menu.

Step 4: After this, enable the toggle next to the Schedule for later. Now, tap on the date and timing in the Scheduled as mentioned in the below image. Select the date & year and tap OK. After this, configure the Time and select OK.

Step 5: Tap on Advanced Settings and tap on Go Live.
Way #3. For Mac (Start or Schedule YouTube Live)
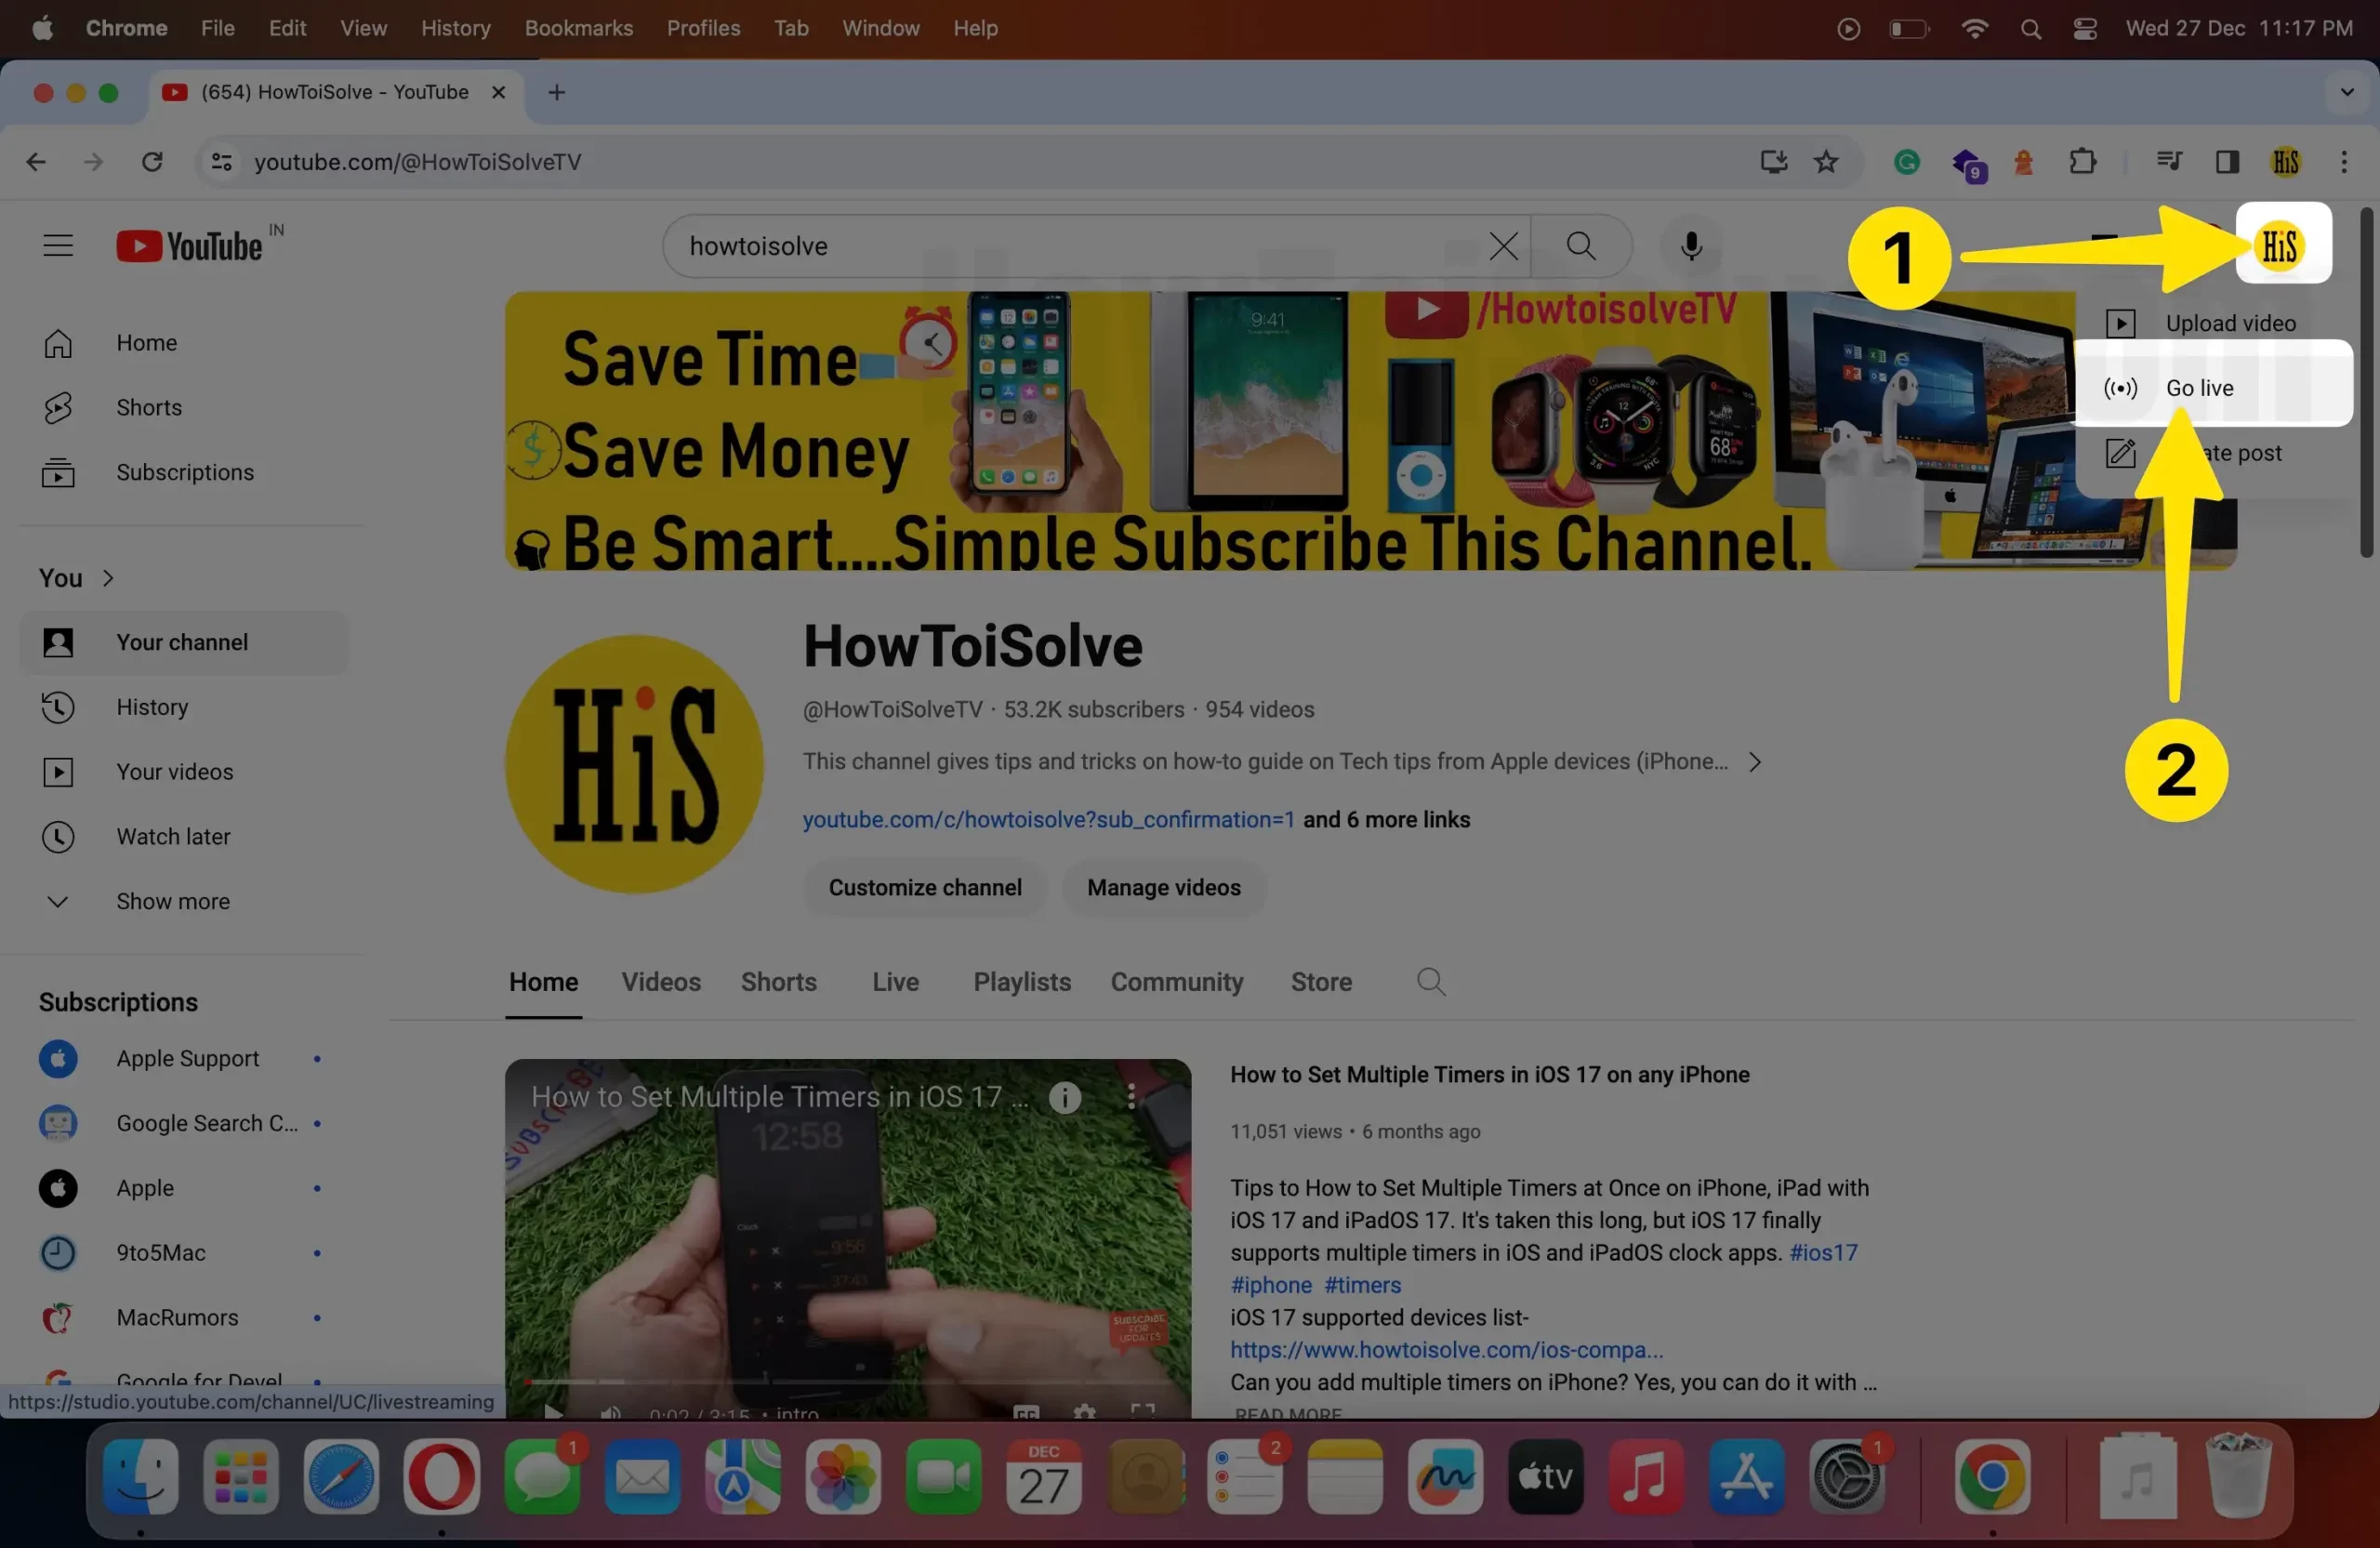
Step 1: Open the supported browser (Google Chrome) on your Mac and navigate to YouTube.com
Step 2: Click on the Profile Icon at the top right corner. Select Go Live from the menu.
Step 3: Welcome to the new YouTube Live Control Room, When do you want to go live? Window. Select Start next to the Right Now.
- Another Option is the later date (Schedule a stream for a later time. You can even set it up ahead of time.)

Step 4: Click on Go next to the Built-in Webcam.

Step 5: As soon as you do so, you’ll receive a pop-up. Studio.youtube.com wants to; tap on Allow.

Step 6: You’ll receive “Google Chrome” would like to access the microphone & Camera. Once Chrome has access, the website will be able to ask you for an access pop-up. Click on OK.

Step 7: Make sure to submit the necessary details to easily identify the video when it goes live, making it easier for viewers to find., Select Next from Create Stream. Click on Next.

Step 8: Check the box next to the Public or other option as you decide or Select Schedule to Select the date and time you want to go live and select Done.
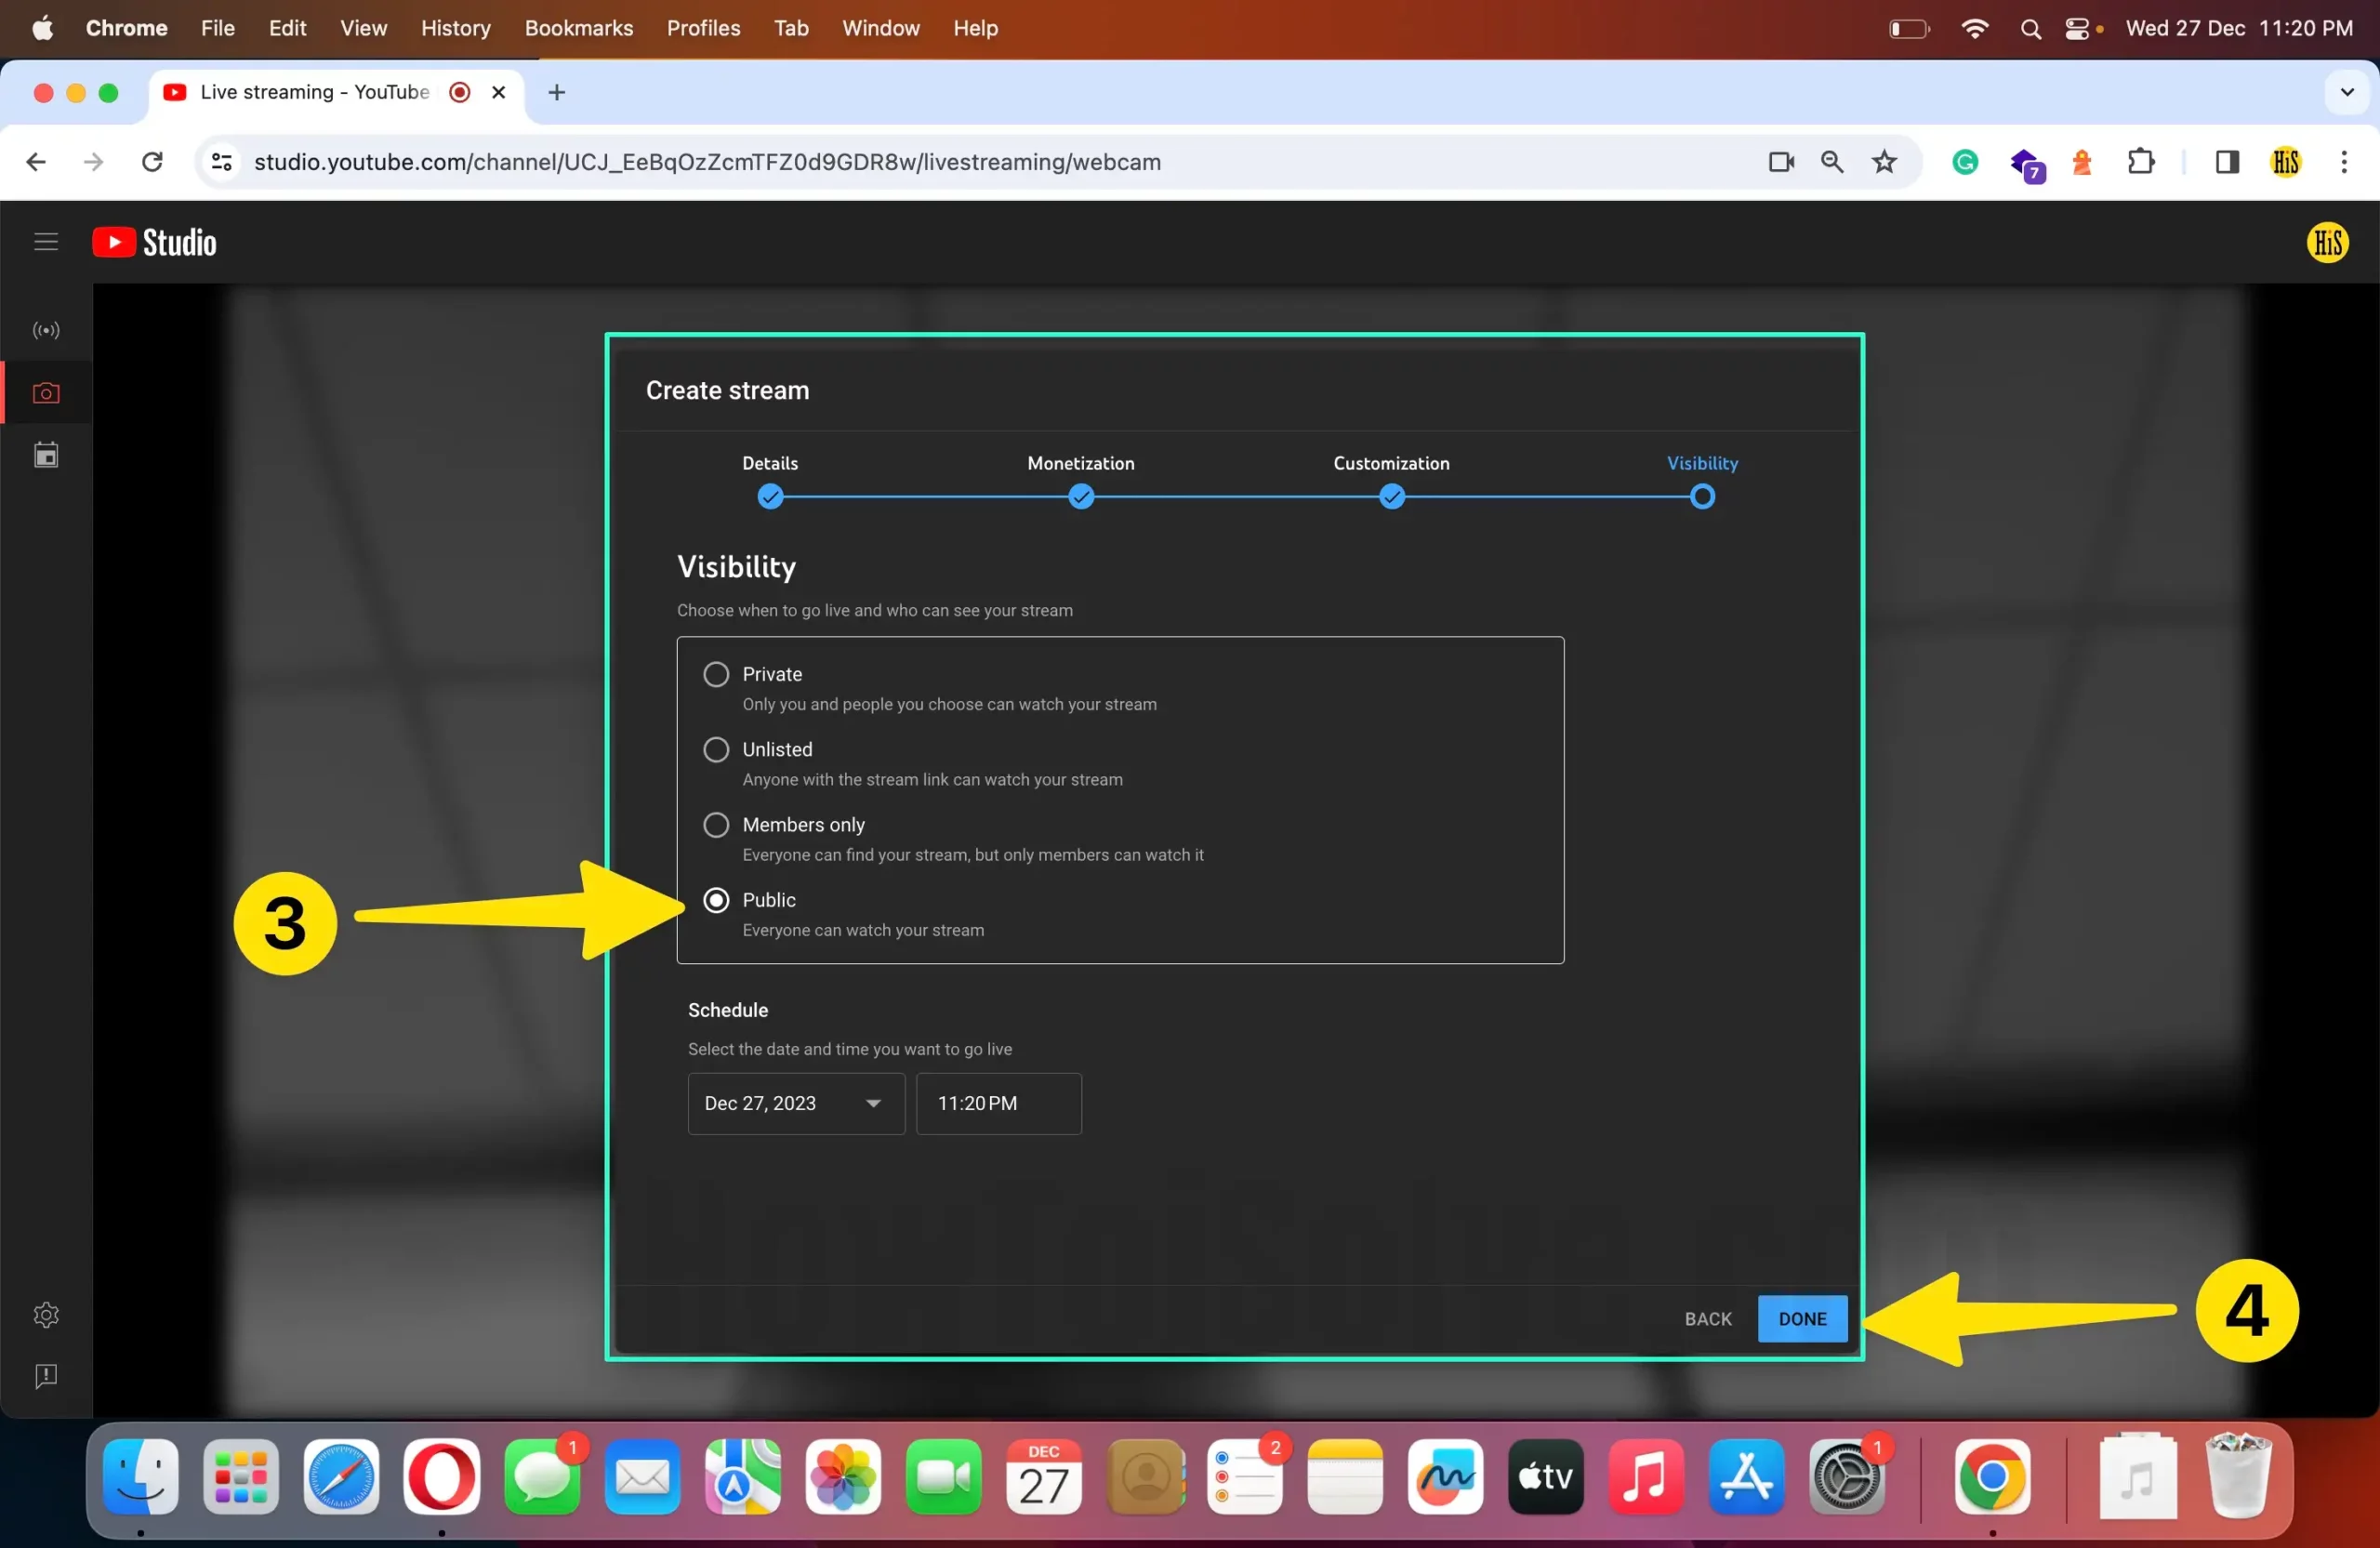
Step 9: Take Stream Preview and select Go Live, and you’re live now.

Step 10: Once you’re done with Live Stream, select End Stream.

Step 11: In the End Stream pop-up, select End.
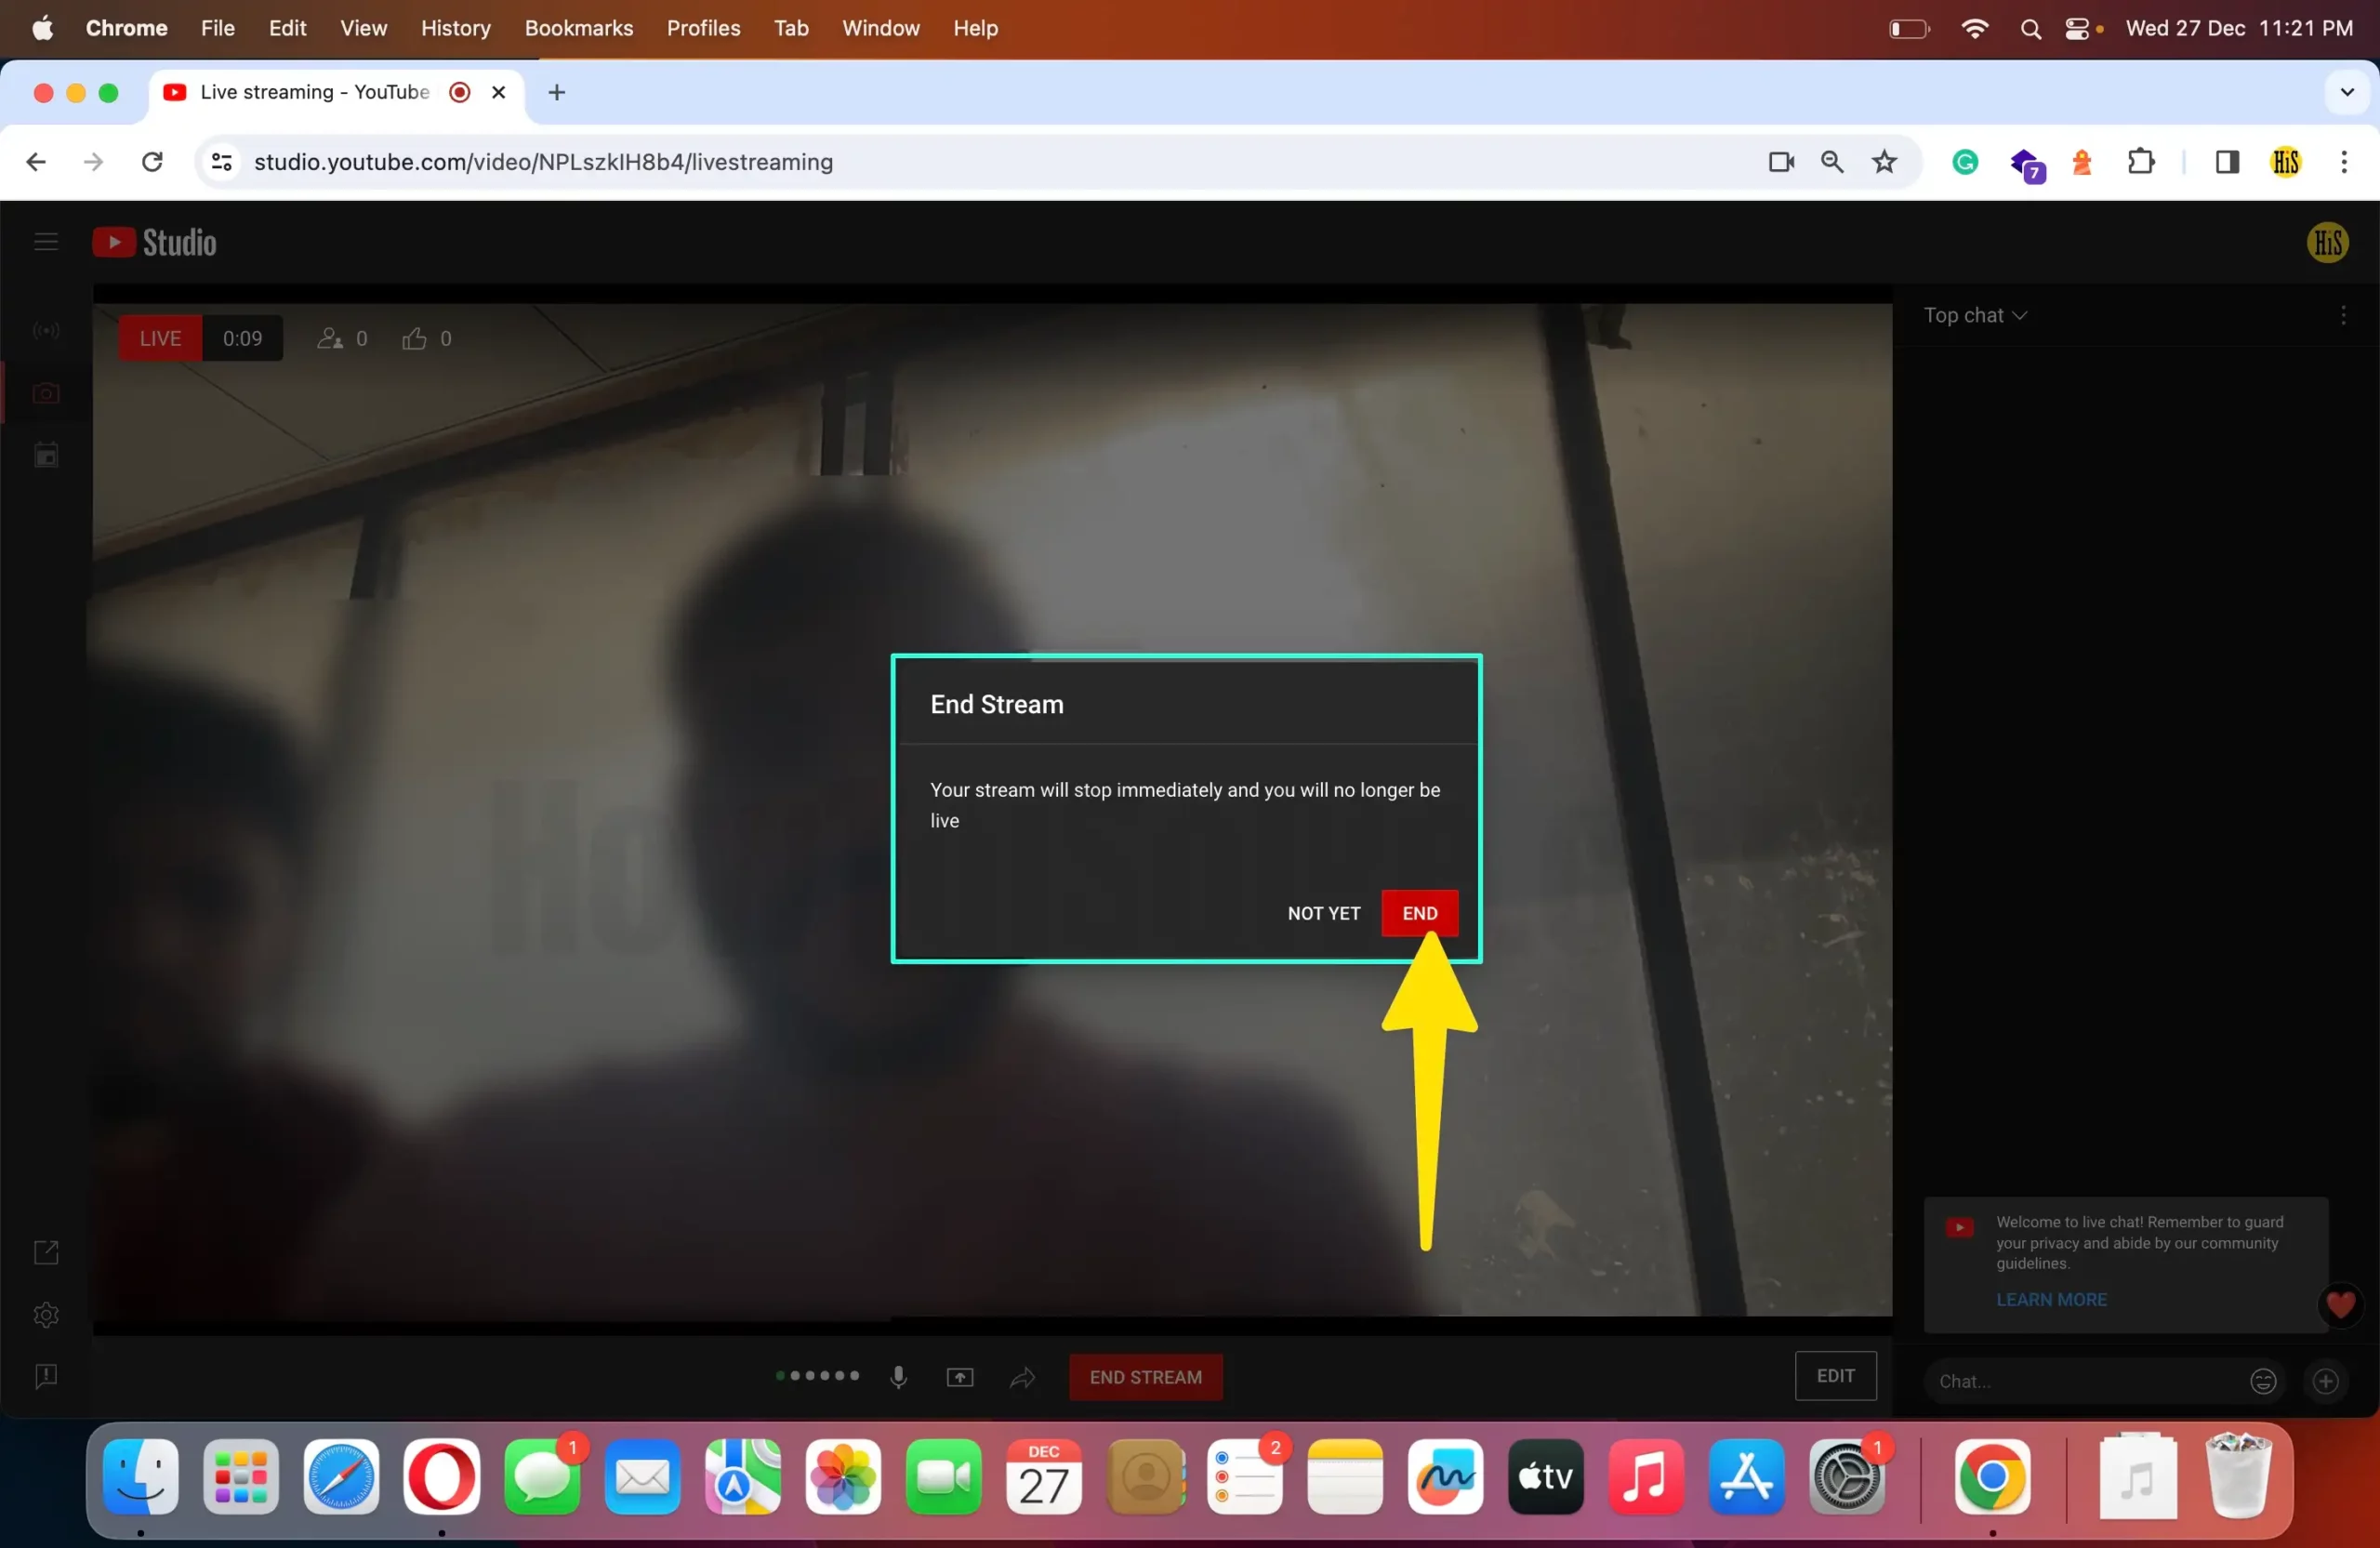
Step 12: At last, click on End In Studio options. After your live session is finished, you can use this option to make any necessary changes.

Note 1: If the screen shows “Live stream isn’t available right now,” select Enable; after this, it will show “Gain access to use this feature. To access YouTube Live Stream, all you need to do is cross-verify your phone number. For that, click on Verify and finish the verification procedure. After that, navigate back to the previous screen, and most of the time, you’ll receive “Ready in 24 hours. It will take around 24 hours to activate your account live streaming.
Note 2: If it shows, “How you’ll appear, upload a picture, create a channel,” it means that you have created your YouTube Channel. Follow the on-screen instructions and do that. Up next, you need to follow what you see in Note 1.
Final Verdict!
That’s It! This is how you can YouTube Live Stream on your iPhone & iPad. Besides this, we have also mentioned the steps to schedule a live stream. Further, if you have any relatable queries, feel free to ask in the comment box below.
