To know how and where the photos on your Mac are stored, you need to first understand what is Library, which is a pre-installed app on Mac & iOS.
A library is a place that contains pictures, videos and anything related to a project if you are using iMovie or final cut. And then, we have a photo library on Mac. So the very first time when your open up photos, it creates a library where automatically all of your clicked pictures are imported into the self-contained bucket called the library and all of your photos live there. When you first open up Photos on your Mac, it is going to open Library, and that Library is located in Finder, inside then go to the Pictures section, there you will find Photos Library.

So this is where all of your photos are physically stored, in any case, if you delete these photos then, it will be lost, and you won’t get them back.
The beautiful thing about having a photos library is that you get an option to transfer all of your photos from location to location. If your Mac’s storage is filled up because you have so many photos and videos, then you can take that whole library itself and move that into your external hard drive.
Where Are Photos Stored on My Mac?
Do you use Mac to safely transfer all of the photos that you have clicked using your iPhone?
To know how and where the photos on your Mac are stored, you must first understand what libraries are, a pre-installed app on macOS.
And then, we have the photo library on Mac. A library is a place that contains pictures, videos, and anything related to a project if you are using iMovie or Final Cut. So the first time you open up photos, it creates a library where all your clicked pictures are imported into the self-contained bucket called “library”, and all of your photos live there.
When you first open up Photos on your Mac, it will open the Library, and that Library is located in the Finder. Inside, go to the Pictures section, where you will find the Photos Library.
So this is where all of your photos are physically stored. If you delete these photos, they will be lost, and you won’t get them back.
The beautiful thing about having a photos library is that you get an option to transfer all of your photos from location to location. If your Mac’s storage is filled up because you have so many pictures and videos, then you can take that whole Library and move it into your external hard drive.
Where’s the Mac Photo Location?
It is essential to know where your important things are kept; the same goes for your photos. We are talking about the location of your stored images on your Mac.
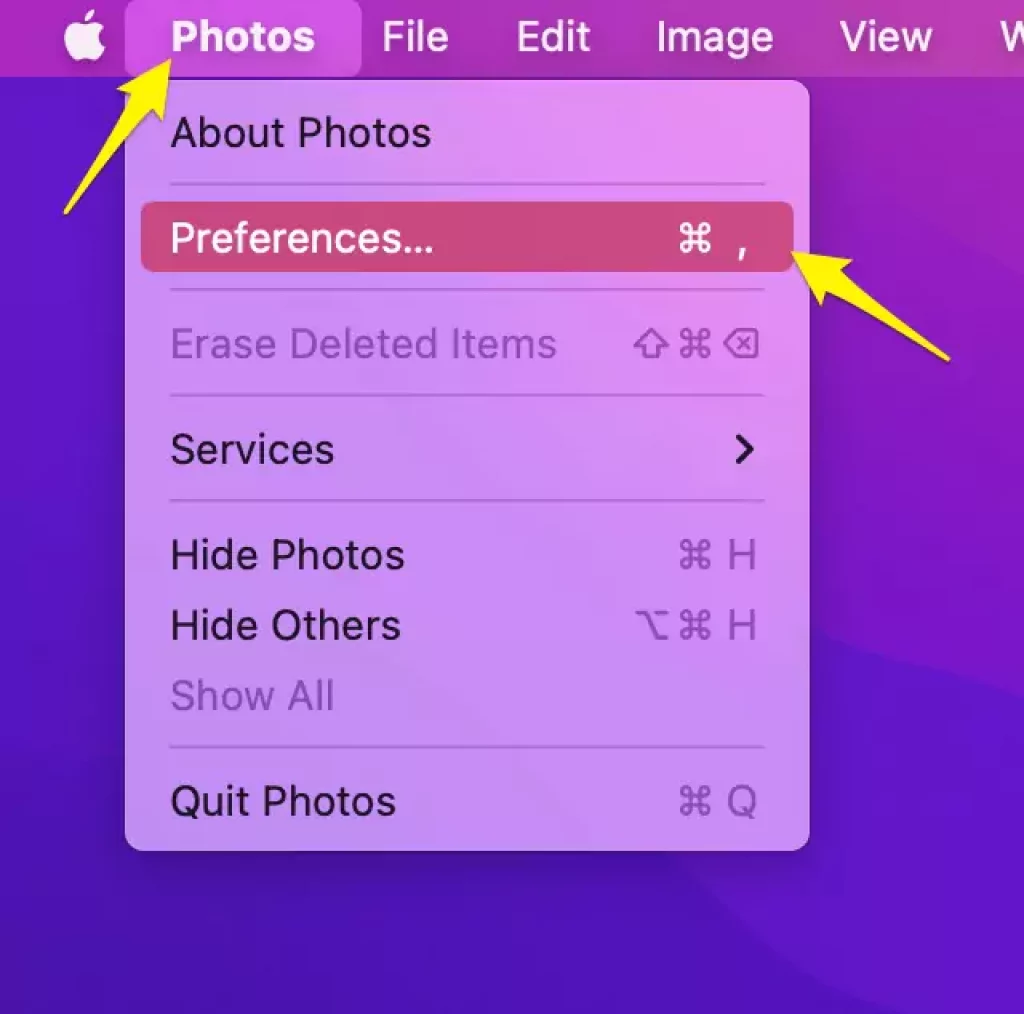
As you know, all of your photos are stored in Libarby, so to check the library’s location, you need to first click on the Photos icon just after the Apple logo while opening the Photos Application.
Step #1. Open the Photos App on your Mac,
Step #2. Choose the preferences (Choose Settings if you have macOS 13 venture & later) option.

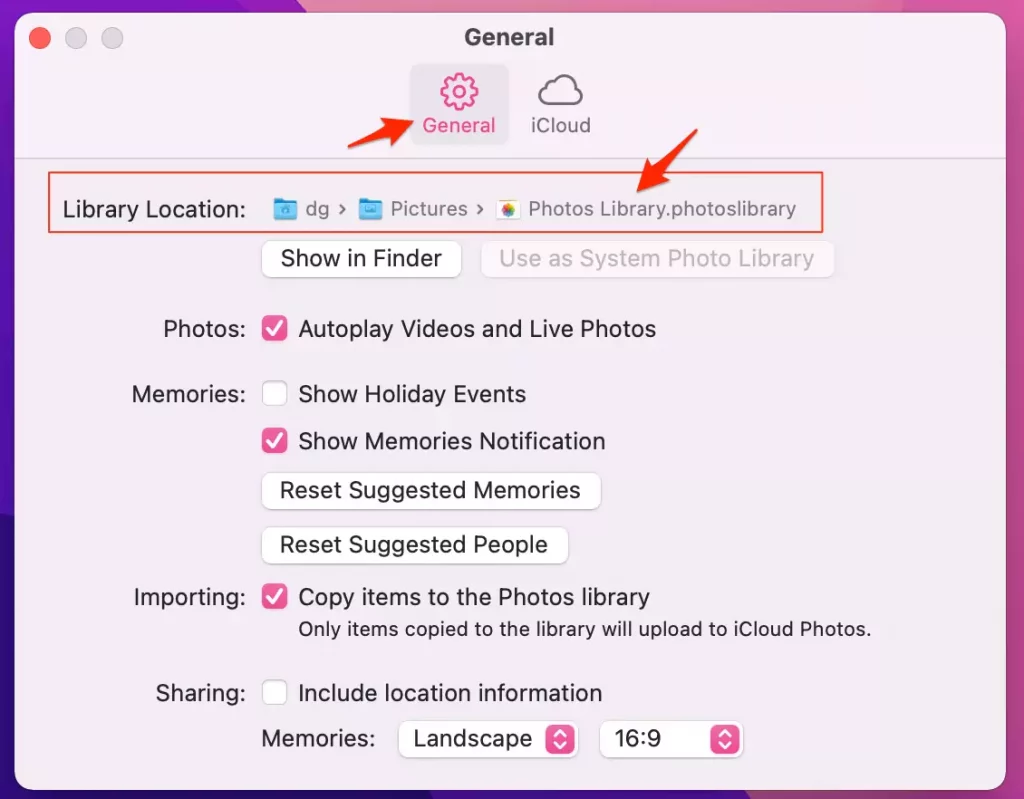
Step #3. It will open up a General tab
Step #4. And under Library Location,
Step #5. You will get to the pathway of Library Location.

Just after General, we have iCloud, where all your photos are uploaded to the whole iCloud library that you can access on iCloud.com, iPad, and iPhone. iCloud functions as a distribution system, allowing images to be accessed by all devices. You can easily access your pictures with any iOS device with the same Apple ID.
What’s more interesting is that you can even have multiple libraries on your Mac for numerous purposes.
For instance, let’s suppose you are a photographer and you like to click portraits and pictures of animals, and you do not want to mix them all and want separate folders for both of them. so that you can quickly move it to a different hard drive or computer at any time
Here are the step to create a New Library.
Step 1: The process starts with holding Option on the keyboard while you click on Photos on the dock.
Step 2: A new tab with the name Choose Libary will open up. That will give you the option to choose a library.
Step 3: You can now select an existing library or create a new one.
Step 4: If you wish to create a new one, click “New Library.”
Step 5: Write down the name of your new library, select the location where you want to keep it, and click “ok.”
A brand new library has been created where you can store your photos. And make sure to create a backup of it on your iCloud.
Where are Mac photo files stored?
Whenever you use photos on your Mac, it automatically creates a new library. And with each new image and video, you add to your photo library store. And it becomes your system photo library. When your iCloud transfers the photos, only your System Photos Library can receive them. But why are we talking about it so much?
It’s because the System Photos Library is only your default location where all of your Mac photos are saved. You can even create a new library if you need to, but you must ensure that you always use the Photos app to access the images stored on your Mac in the Photos Library.
Where do imported photos go?
All your imported photos and videos are copied to the Photos Library, which you can easily find in the Pictures folder. That is the only default location.
There is another alternative if you wish to store your photos other than in the Photo Library. You can do it on your Mac in another folder or on any external hard drive and still be able to see them in Photos. All the files you store outside the library are named “Reflections Files.”
But one thing to remember is that referenced files are not uploaded and stored on iCloud on their own and are not backed up. If you wish to have a backup of these files, you need to move them to the library.
Where Are My iPhone Pictures Located on My PC?
After clicking the pictures using your iPhone, you would like to store them on your Mac to make a backup of them.
Once your photos are on iCloud you can easily find them through the Photo Library Application; if you have transferred them by connecting your iPhone via cable, you will be given the option to choose your desired location while moving. If you cannot select any location while transferring them, drop them on your desktop so you can arrange them later.
If you want to know how to transfer your iPhone photos to your Mac, then here are the steps for you:
Step 1: Look for the settings option on your iPhone and scroll down, and click on photos. Go to the last option that says “Transfer to Mac to PC,” and make sure you tap on “Keep Originals.”
Use the cable to connect your iPhone to your Mac, making sure to unlock it and allow all connections.
Step 2: Using the native software called “Image Capture,” you can quickly transfer the photos. On your keyboard, hit Command + Space Bar. It will open up Spotlight Search. Type Image Capture over there and open it.
Step 3: This will open up a new tab where all of your iPhone’s photos and videos will be displayed.
Choose the photo that you wish to import. You can even import all the photos, but this will undoubtedly take a lot of time if you have many pictures.
Pick up a location where you want to import the photos and click Import.
Finally, all your selected photos are transferred to your Mac, and in the location, you have chosen, so you can quickly go to the folder and browse your files.
How to make sure photos are saved on the Mac?
Mac users should ensure that their photos are saved in the Photos app. It is a great way to keep all your photos organized and easy to access whenever you need them. But how to check that your photos are saved on your Mac? For this, you need to rely on the Photos Library.
Once your photos are shown in the Photos Library and transferred, they are safely saved on your Mac.
Always make sure that your back up is turned ON on your Mac Computer.
Conclusion:
There are two things that you probably want to do quickly. The first is to click a fantastic photo, and the second is to open it up from the folder easily.
We have tried to help you in the second process by explaining everything in reasonable detail, where exactly your photos are stored on your Mac, and how easily you can access it.
Keep your photos safe and secured for longer terms. Thank you for reading.


