Currently and forever, Domain Network Services is a critical part of your Internet. Changing DNS on Mac offers you a faster and more secure way to surf the Internet, Like DNS Settings on iPhone. And we will show you how to add dns to macOS.
The ISP will configure the default network settings when you set up the Internet connection for the first time. And this default setting includes DNS.
Most ISP don’t keep security and privacy as a priority. This can eventually lead to security issues, Cache poisoning, hijacking, etc.
ADD DNS Server on Mac
Learn the easiest way to change the DNS settings on Mac. Keep note the DNS settings are only available for macOS Ventura and later versions.
How To Change DNS On Mac?
As of now, there are certain reasons for changing DNS; to increase the speed, to hide the IP Address of Mac, or want to access the data not available in your country. Whatsoever the reason may be, changing DNS on the latest macOS has now been too easy. Willing to do the same? Follow the steps below.
Note: The steps below are only for the macOS Ventura And Later Version.
- Go to Apple Menu. Select System Settings…
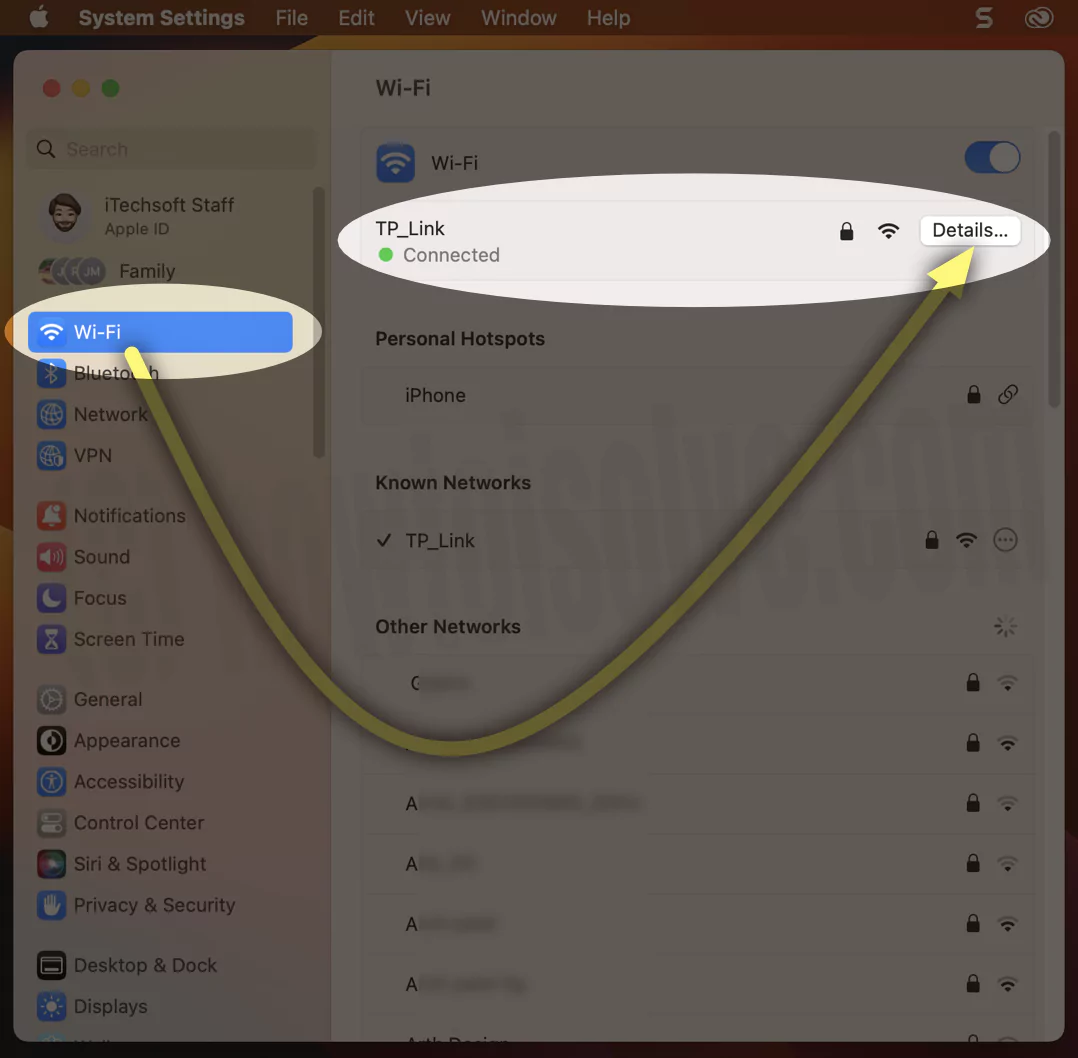
- Choose Wi-Fi. (See below screen…)
- Choose the connected WiFi network service and Details… next to WiFi Name.
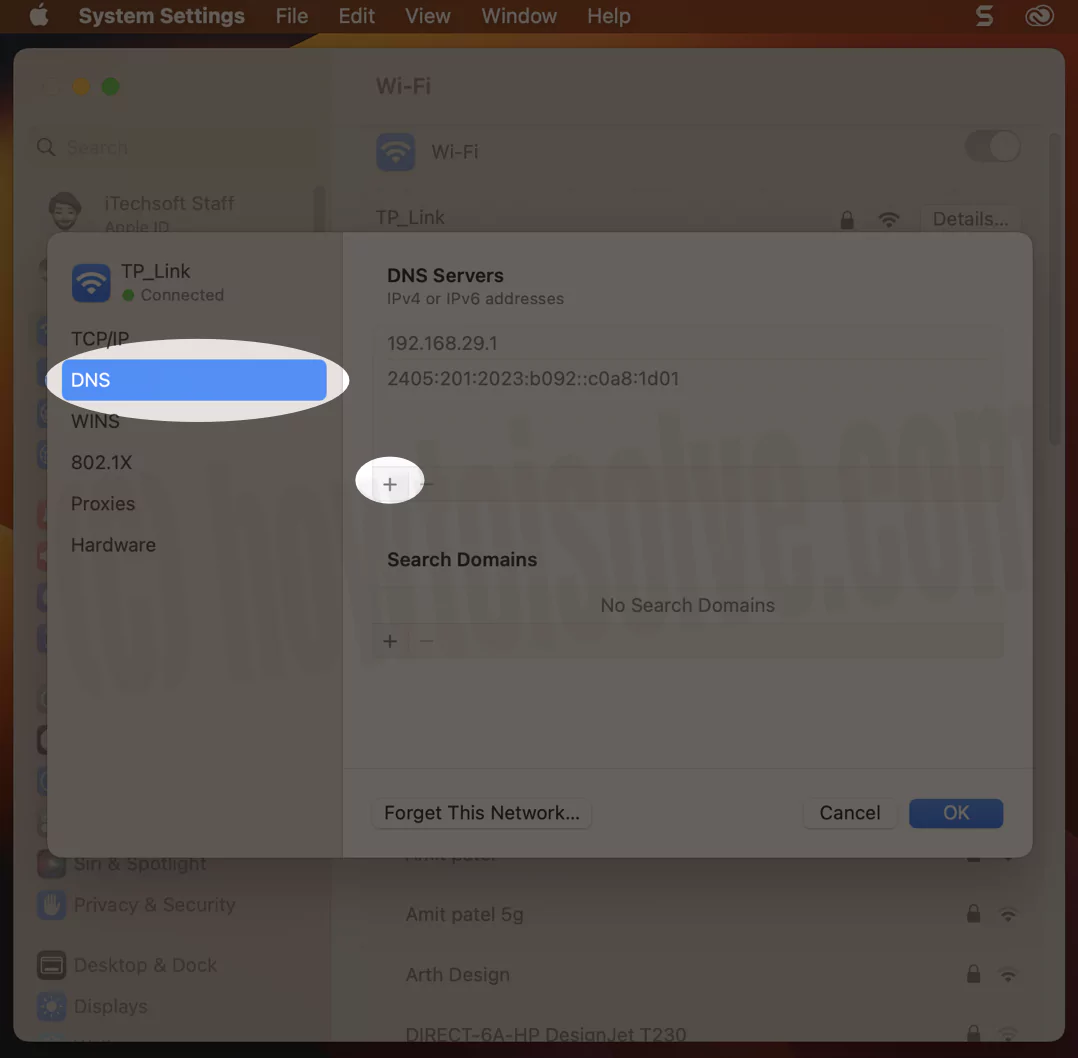
- Up next, click on DNS from the right side panel.
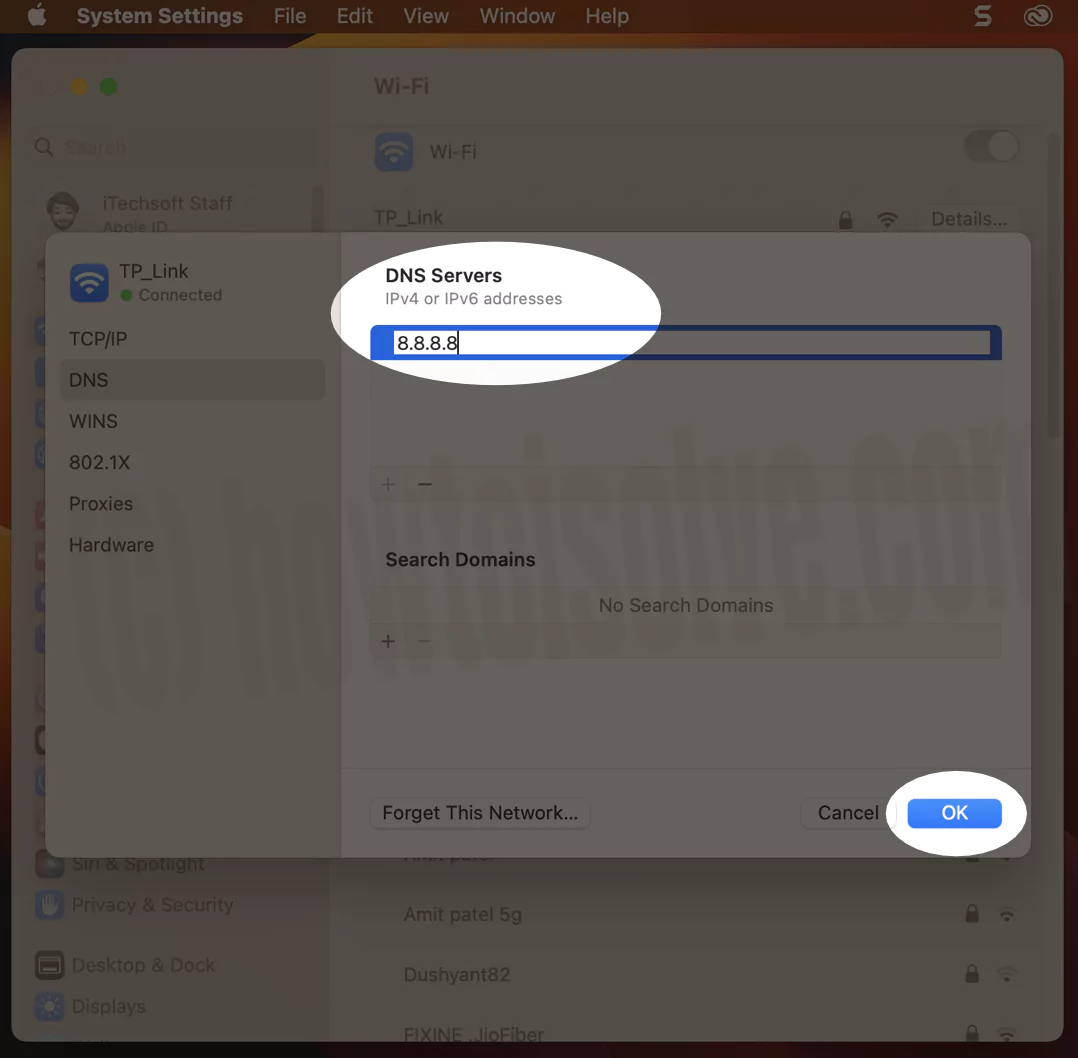
- Now click on the + Icon to add. Enter the DNS, for instance, Google DNS(8.8.8.8), or Check more Public DNS List given at the next point, and click the OK Button.


What Are The Best Public DNS Services For Mac, Right Now?
I hope you are now familiar with steps to change DNS settings on Mac. But since you aren’t familiar with the best private or public DNS service, the configuration isn’t yet finished. So here is the list of the best DNS services you must consider.
| DNS | DNS Addresses |
|---|---|
| Google Public DNS | 8.8.8.8 |
| Open DNS | 208.67.222.222 |
| Cloudflare | 1.1.1.1 |
| Comodo Secure DNS | 8.26.56.26 |
| Verisign Public DNS | 64.6.65.6 |
| UncensoredDNS | 91.239.100.100 |
| Yandex DNS | 77.88.8.7 |
| Alternate DNS | 198.101.242.72 |
| Google Public DNS | 8.8.8.8 |
| 1.1.1.1 with Warp | 1.1.1.1 |
| Quad9 | 9.9.9.9 |
| OpenNIC | 13.239.157.177 |
| CleanBrowsing | 185.228.168.168 |
| UltraRecursive DNS | 156.154.70.1 |
| AdGuard DNS | 176.103.130.130 |
What Is DNS?
When you enter URL in the search field, the URL needs to be converted into the IP Address to send and receive the data. And that’s where the DNS comes into the role, as it offers the IP Address for the mentioned URL.
For instance, when you enter howtoisolve.com into either Safari or Chrome Browser, the DNS server translates the URL into IP Address. However, since there are billions of domains, it’s tough to maintain the list. So instead, the DNS stores the cache of several websites to reach it out rapidly.
If you visit a website whose cache isn’t stored by the DNS, it will forward the request entry from a different server. Note that the ISP offers the default DNS, which isn’t reliable.
Why Should Change Your Mac DNS?
As I mentioned earlier, the DNS service provided by the ISP isn’t reliable. Due to this, you may sometimes encounter Slow Internet On Mac, Safari Can’t Load Website errors, etc. In all these scenarios, changing DNS on Mac works for you. Besides this, some DNS service providers give you the power to block inappropriate websites on your networks. That’s also one of the reasons, as it offers more control over the websites.
Bottom Line
There are no silver bullet points to enhance the security and internet speed on Mac; you have to compile some minor tweaks, unlike changing DNS Settings On Mac. However, it’s time to know Which One Is Better VPN Or DNS, as both aims work over the same entity.
Want to change Mac DNS, go to the Apple Menu, select System Settings… and then click on Network. From there, choose Wi-Fi, and click on the Details… next to the connected Wi-Fi. Next, select DNS from the left side panel. Next, click on the + Icon and enter DNS 1.1.1.1 in the field. For further confirmation, click OK.
Although DNS isn’t a direct part of the Internet, changing your DNS affects your WIFI. When connected, it doesn’t affect the downloading speed. But if you want to amend the router DNS, it can definitely improve overall performance.
If your ISP isn’t reliable, switching DNS service on Mac is an easy way to verify if that’s not the issue. If ISP isn’t keeping DNS in shape, you may go through slow uploads and downloads.
The DNSPerf ranks 1.1.1.1 is top in the list of fast DNS. That’s because everything you do on the internet begins with a DNS request; that’s why setting up the DNS across all the devices will accelerate everything. Besides this, DNS also makes Wi-Fi faster.
To reset DNS on Mac, go to Apple Logo, choose System Settings… click on Network and choose Wi-Fi. Now click on the Details… from the Wi-Fi to which your Mac computer is connected. Next, select DNS from the right sidebar and click on the DNS you want to reset. Lastly, click on the Minus Icon.
To fix DNS, try restarting the router, furthermore, disable the antivirus software or firewall. If this doesn’t work, follow our Clear DNS Cache, which will help eliminate it.
If you want to check DNS or manually change the DNS Settings, go to Apple Logo, choose System Settings… now select Network and click on the Details… next to the connected Wi-Fi. From there, click on DNS, and from there, you can check and manually change DNS.
The Fastest DNS is DNSPerf ranks 1.1.1.1 for Wi-FI. Do give it a try on the Mac computer.
