Nowadays, our iPhones store not only photos and videos but also important information such as contacts, messages, notes, documents, banking apps, and more. In case your phone gets damaged or you accidentally remove data, the backup on the computer may help you recover it.
In this guide, you’ll learn how to back up your entire iPhone using a Windows PC or laptop. So you can easily restore all your data whenever you need.
What you need:
- iPhone Device
- Windows 11 or laptop
- USB-C Cable
- iTunes App or Apple Devices App
- Enough free Storage Space on your PC
What is included in a full backup?
A full backup includes almost everything on your iPhone, including:
- Photos and videos
- messages (iMessage and SMS)
- Contacts
- Call history
- Notes
- Safari bookmarks
- Notes
- Device settings
- Home screen layout
- Offline files
- Voice memos
- Most Apple Wallet Settings
- Safari bookmarks
- App Data
Method 1: Using iTunes App
Many long-time Apple users trust the iTunes app for backups. It’s extremely reliable and works well. So, if you’re an iTunes user, follow the steps one by one to create a backup with iTunes.
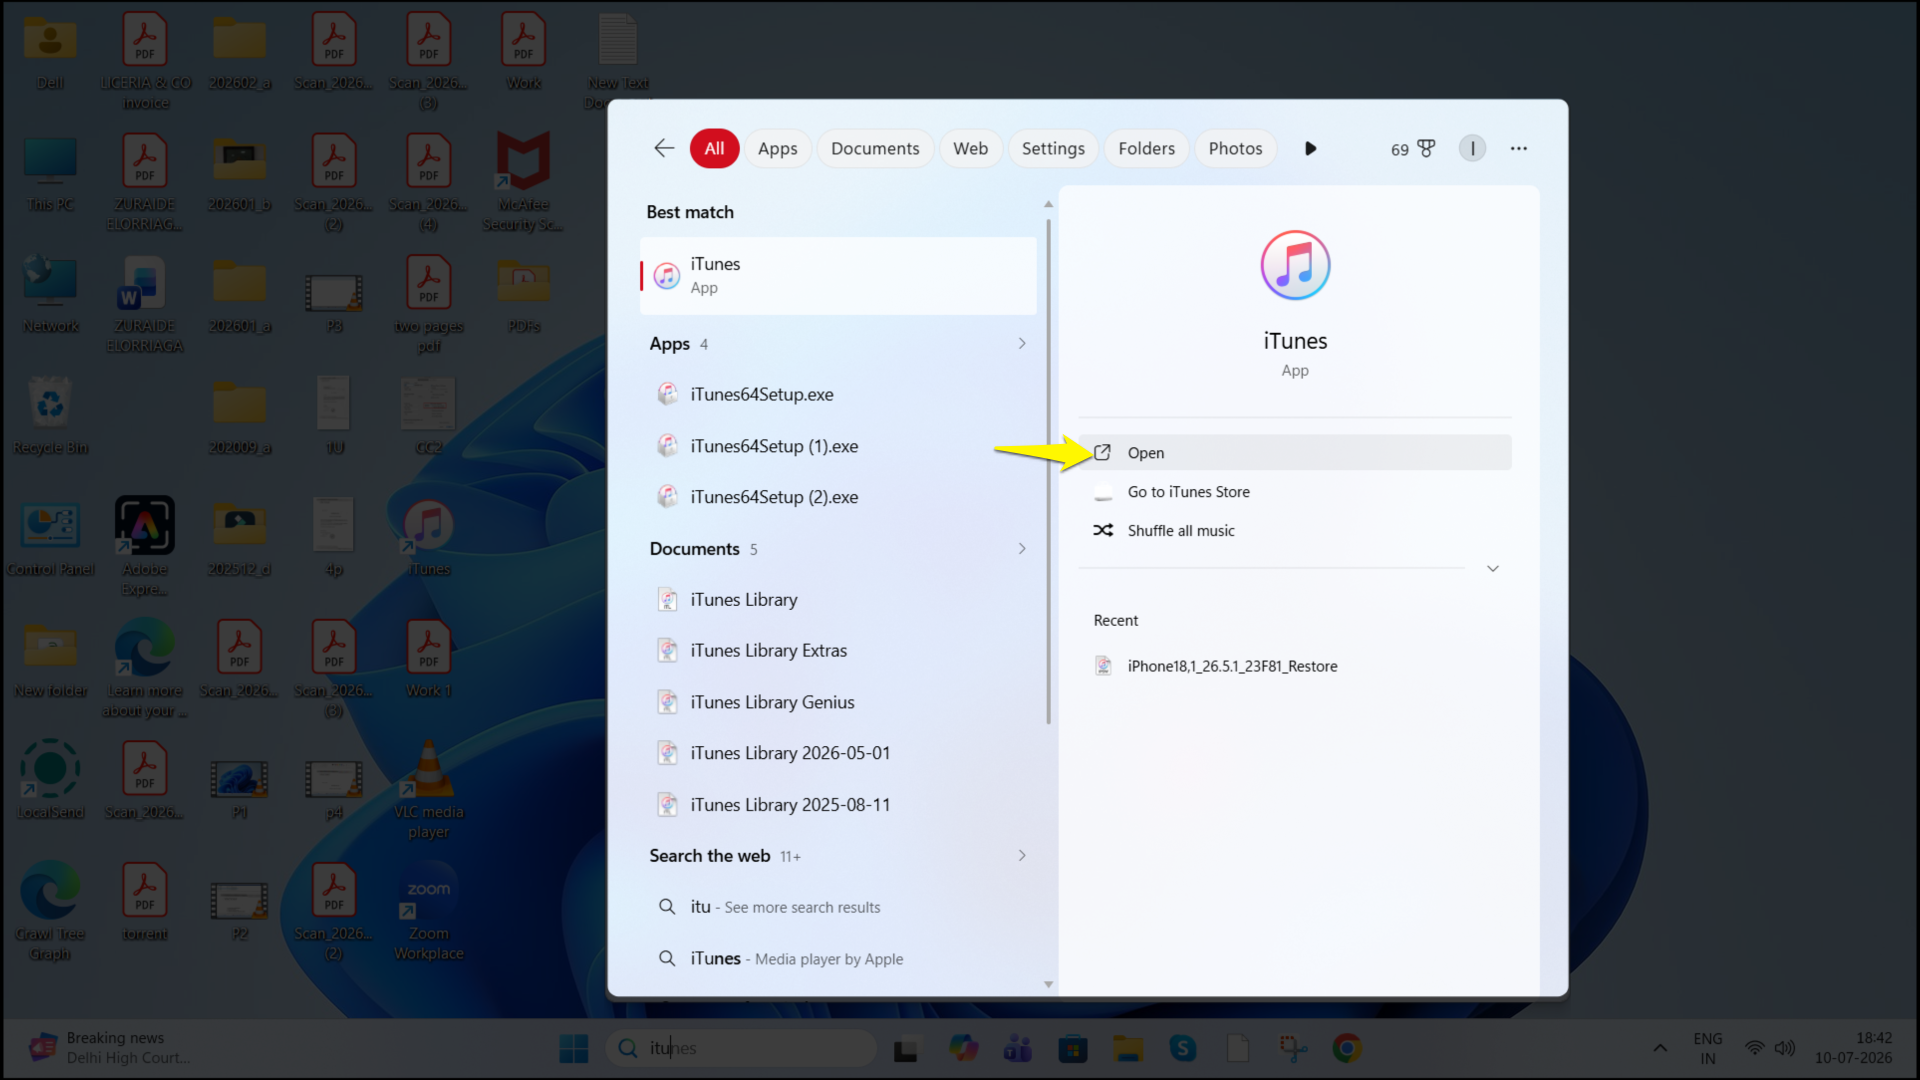
Step 1: Install the iTunes app.
First, launch the Windows Store to install the latest version of iTunes. Then, launch iTunes.
Step 2: Connect your iPhone
Use a USB-C cable and connect your iPhone to the computer. Then, unlock your iPhone. If you have not unlocked your iPhone, your PC may display a message that says, “iTunes could not connect to the iPhone because it is locked with a passcode.” Enter your passcode and unlock your iPhone to use iTunes.
If you’re connecting your iPhone for the first time or after a long time, you may see the “Trust This Computer” screen. Select the Trust option.
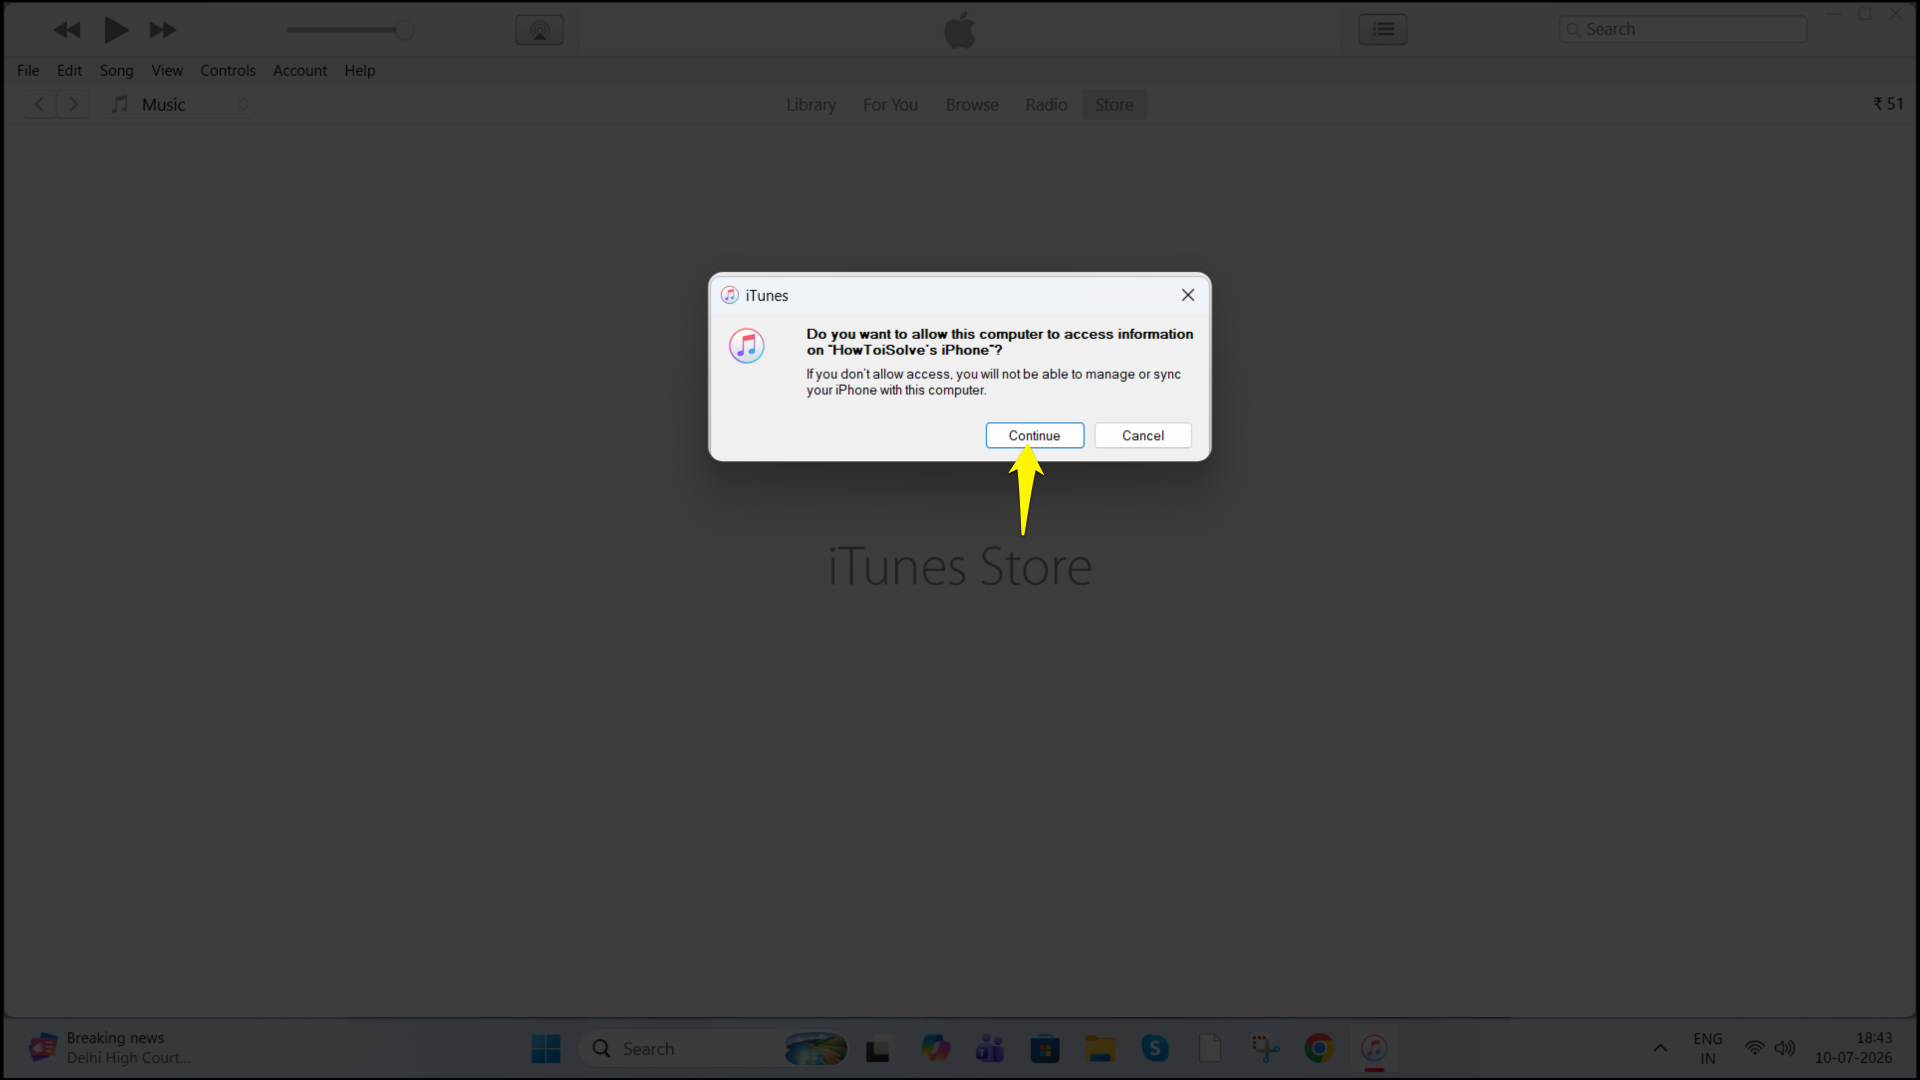
Step 3: Open iTunes
Launch the iTunes app on your Windows PC. Select the iPhone icon from the upper-left corner.
If your iPhone doesn’t appear,
- Try reconnecting.
- Make sure your iPhone is unlocked.
- Tap on the “Trust Again” option.
- Restart both devices.
Step 4: Choose Local Backup
In the summary section, under Backups, select “This computer” for a full backup of your iPhone. This will create a full local backup instead of storing it only in iCloud.
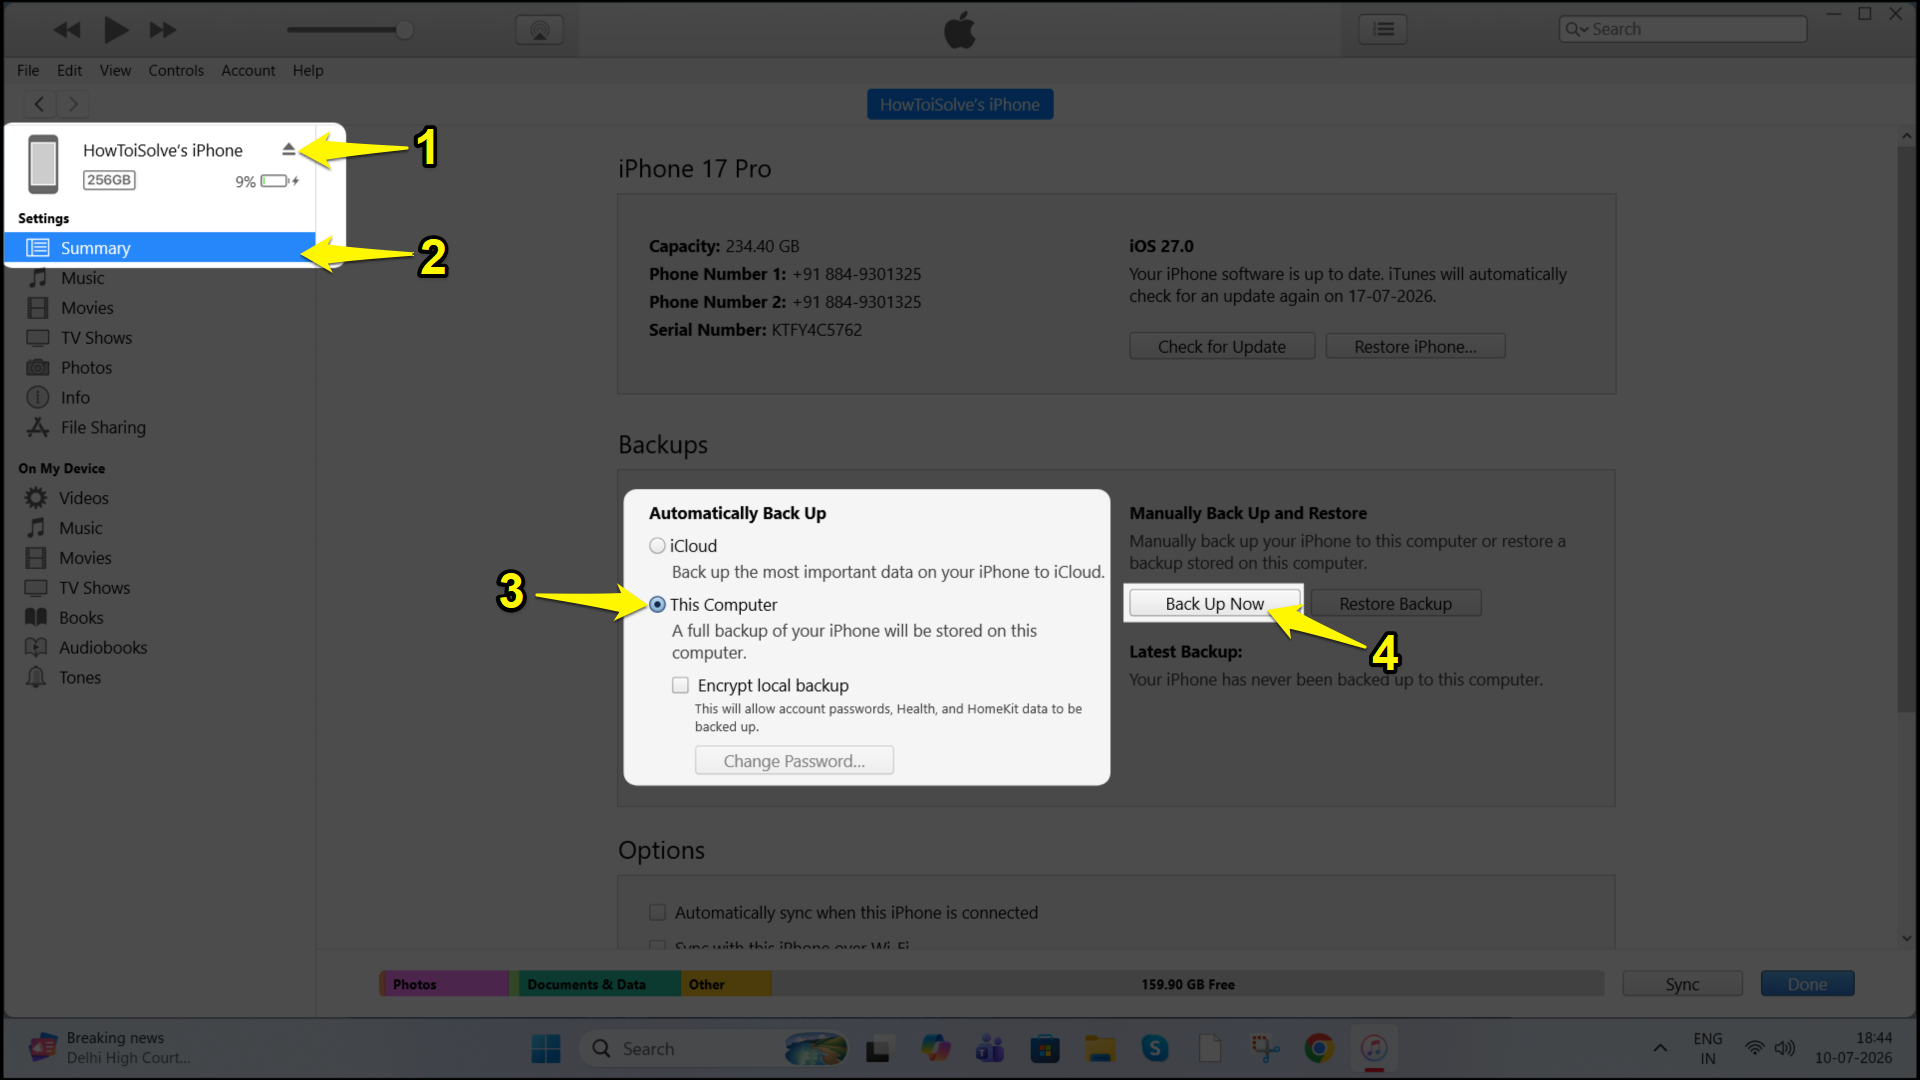
Alternatively, you can enable the option for an encrypted local backup. You can back up account passwords, health, and HomeKit data.
Step 5: Backup
Click on the “Backup now” button. Please don’t disconnect your iPhone during the backup process. Wait until the progress bar finishes.
Step 6: Verify the latest backup.
Once the backup process is complete, verify that the backup information is displayed in iTunes.

Method 2: Using Apple Devices App
Apple Devices is a new app for managing iPhones on Windows. If you’re using the latest versions like Windows 10 and Windows 11, Apple recommends using the Apple Devices app to manage, back up, restore, and update your Apple devices. This application is available on the Microsoft Store, and you can download it online.
Step 1: Install the Apple Devices app
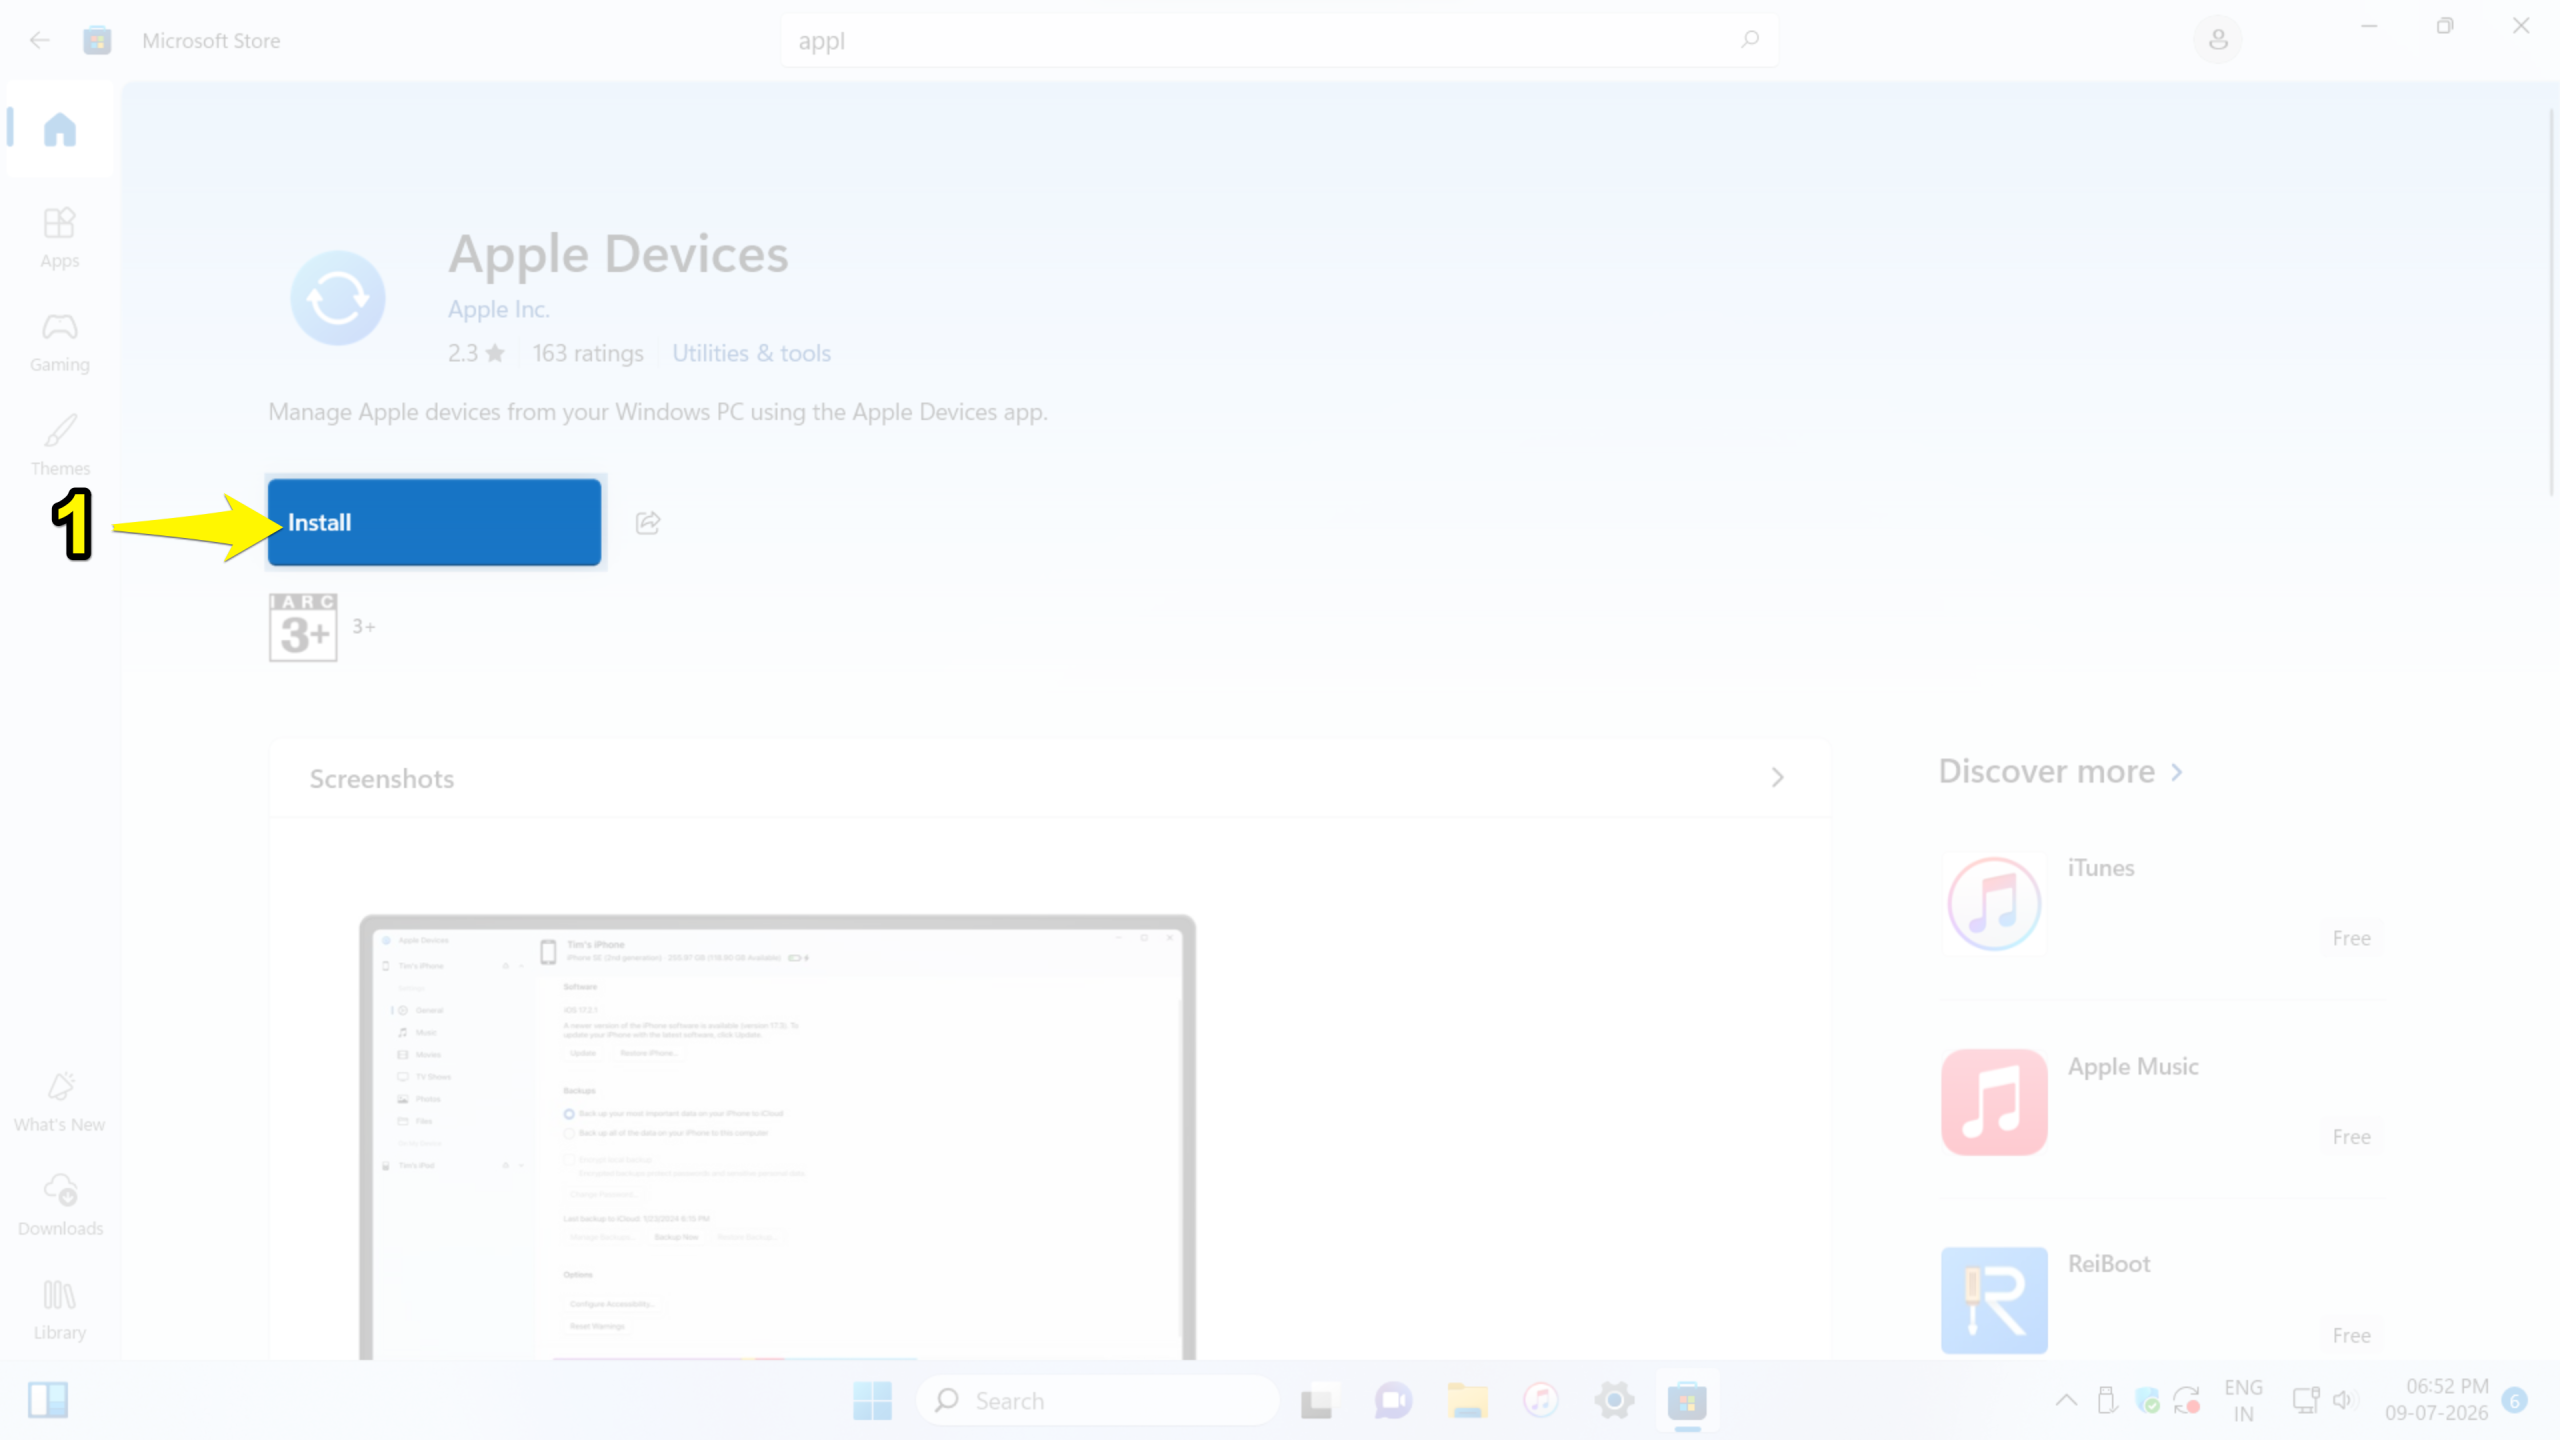
- Open the Microsoft Store or your browser and search for the Apple Devices app.
- Then hit the Install or Download button. Wait for the installation process to complete.
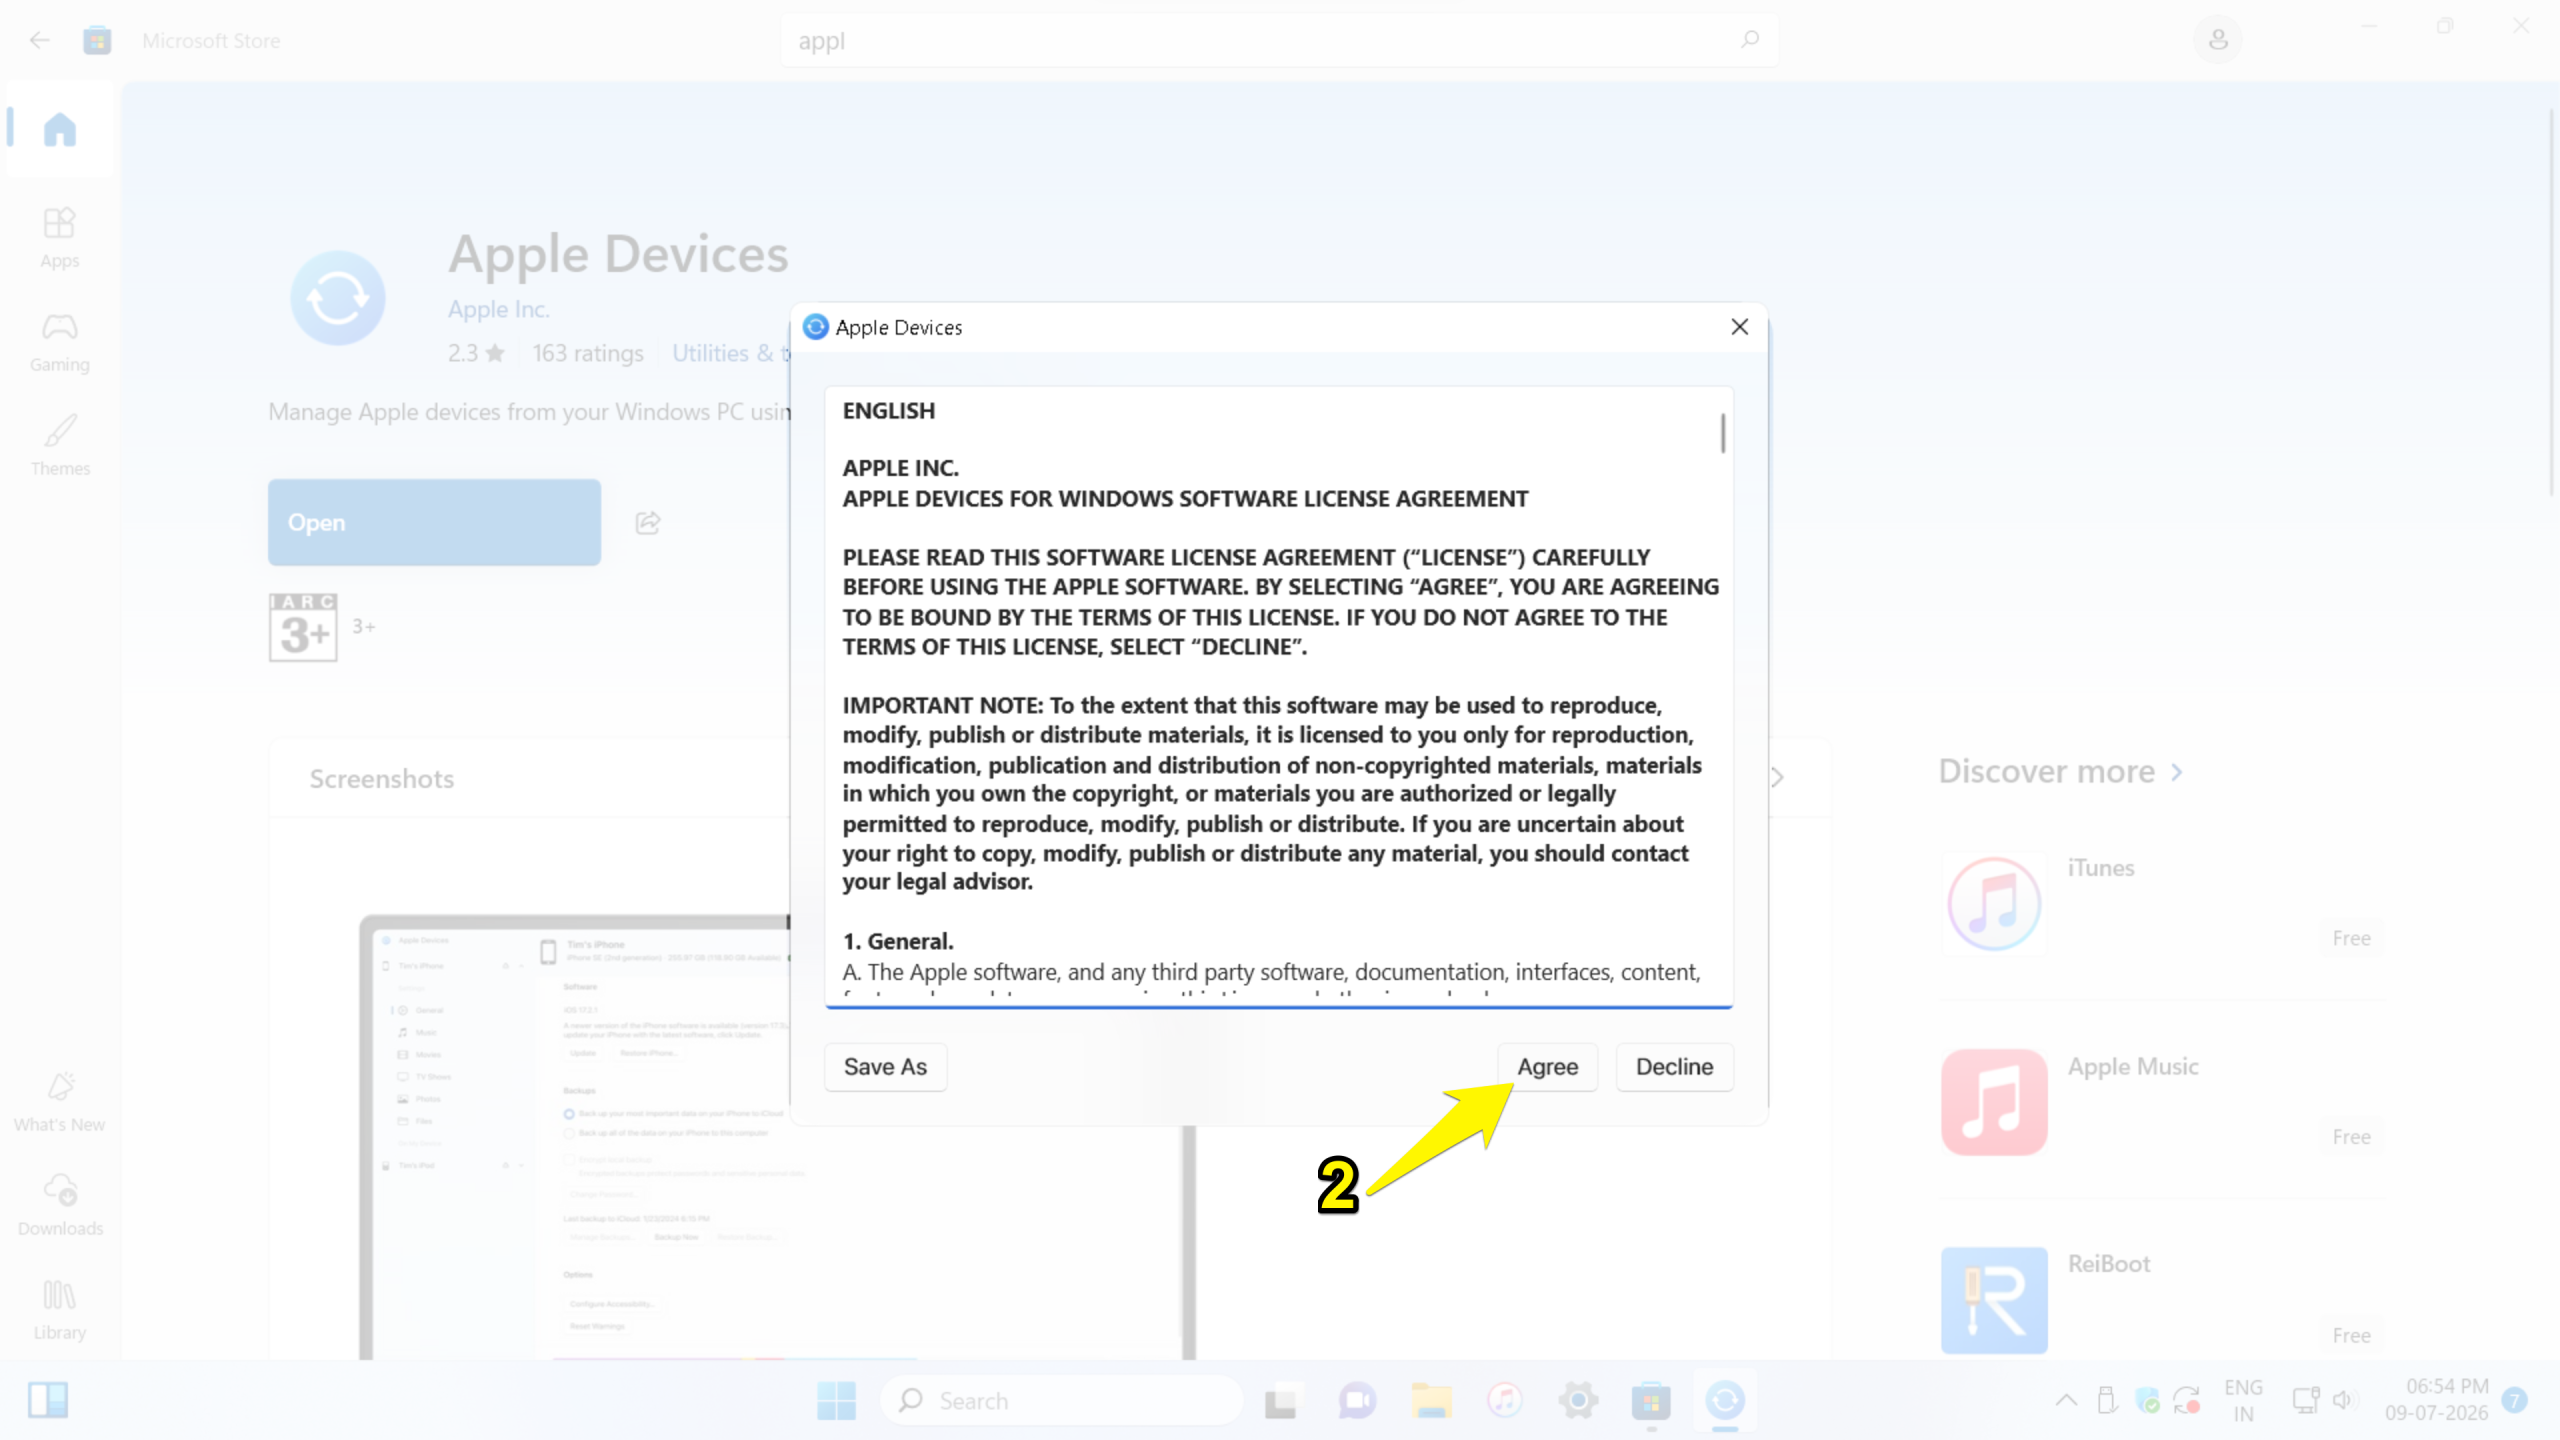
Step 2: Agree to Terms and Conditions
Click “open,” and then review the terms and conditions and click the agree button.
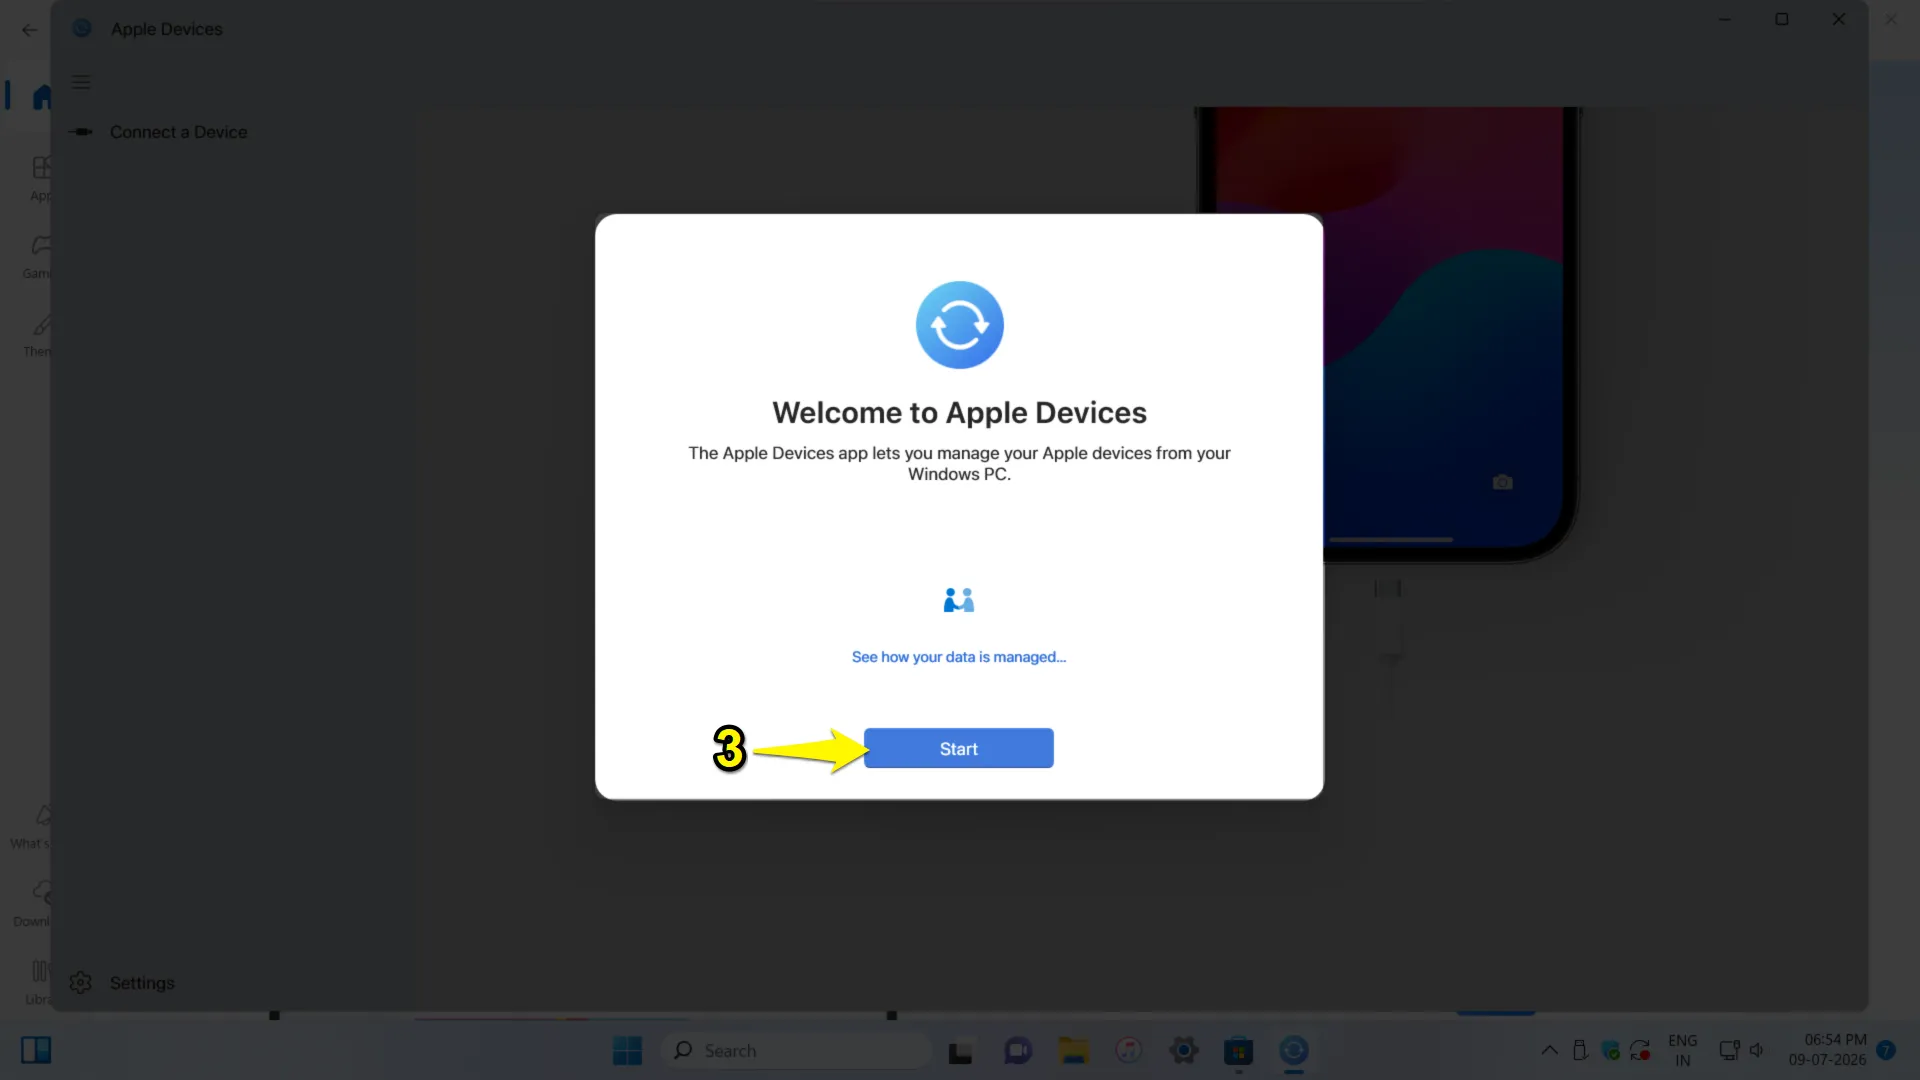
4. Click the Start button.
Step 3: Connect iPhone to the Windows PC
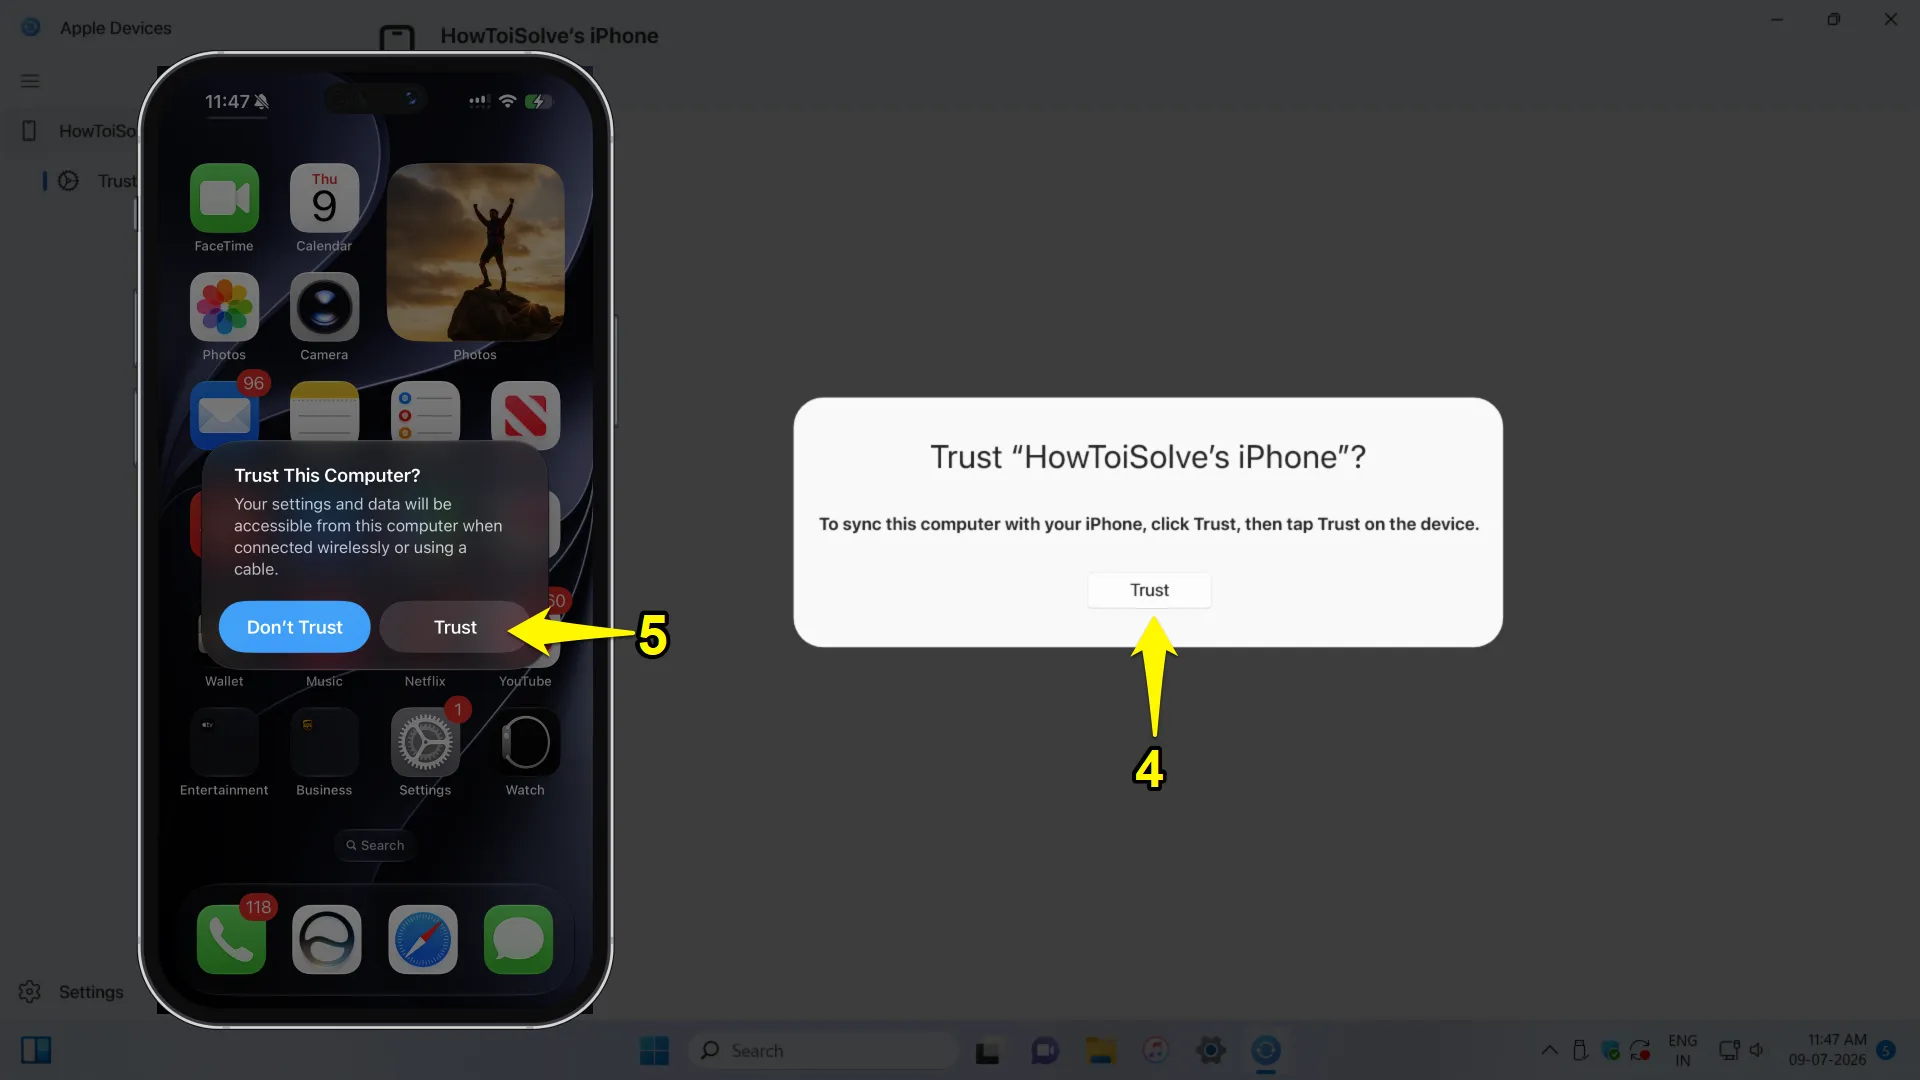
Connect your iPhone to the Windows PC using a USB cable. To sync your computer with your iPhone, click Trust. On your iPhone, you may see the “Trust This Computer” screen; tap “Trust.”
Step 4: Select Backup Type
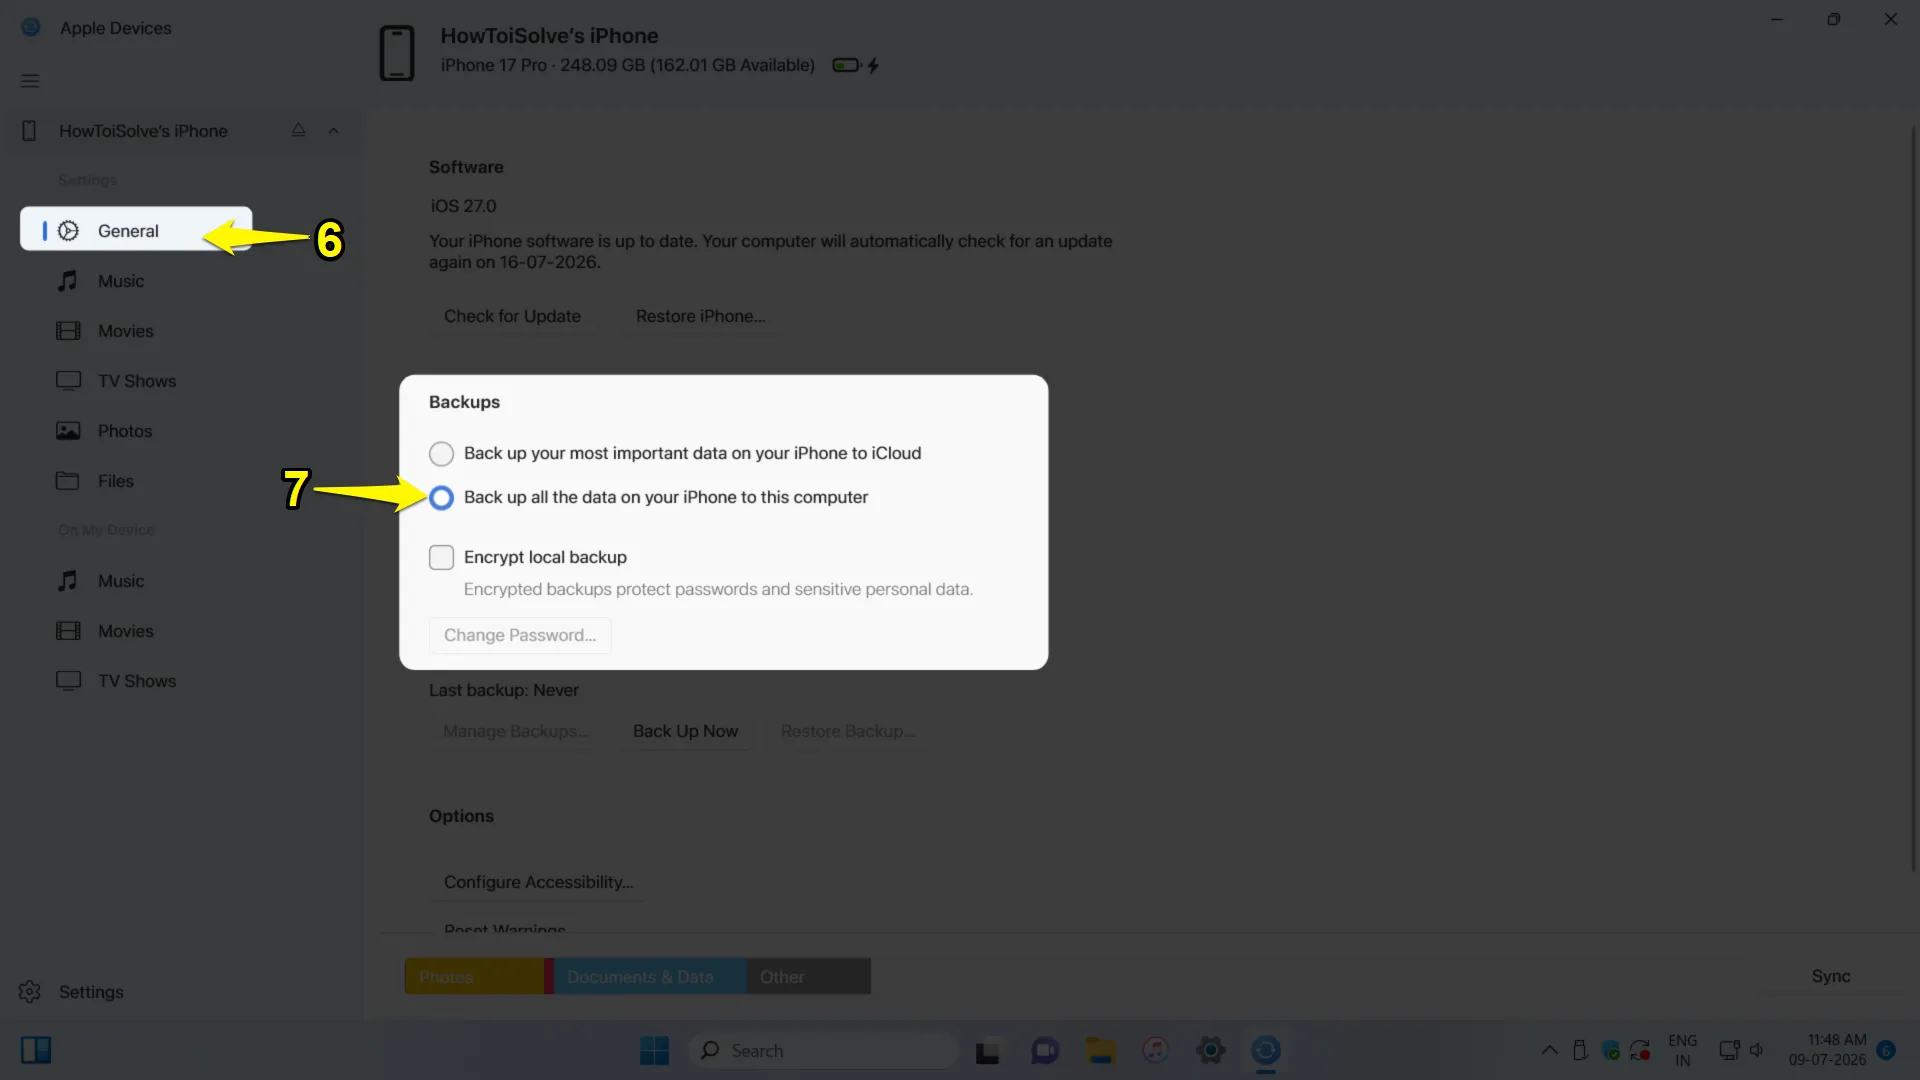
The iPhone name appears in the left sidebar. Under Settings, click the General tab and go to the Backups section. Select “Backup all the data on your iPhone to your computer.”
Step 5: Proceed with the backup
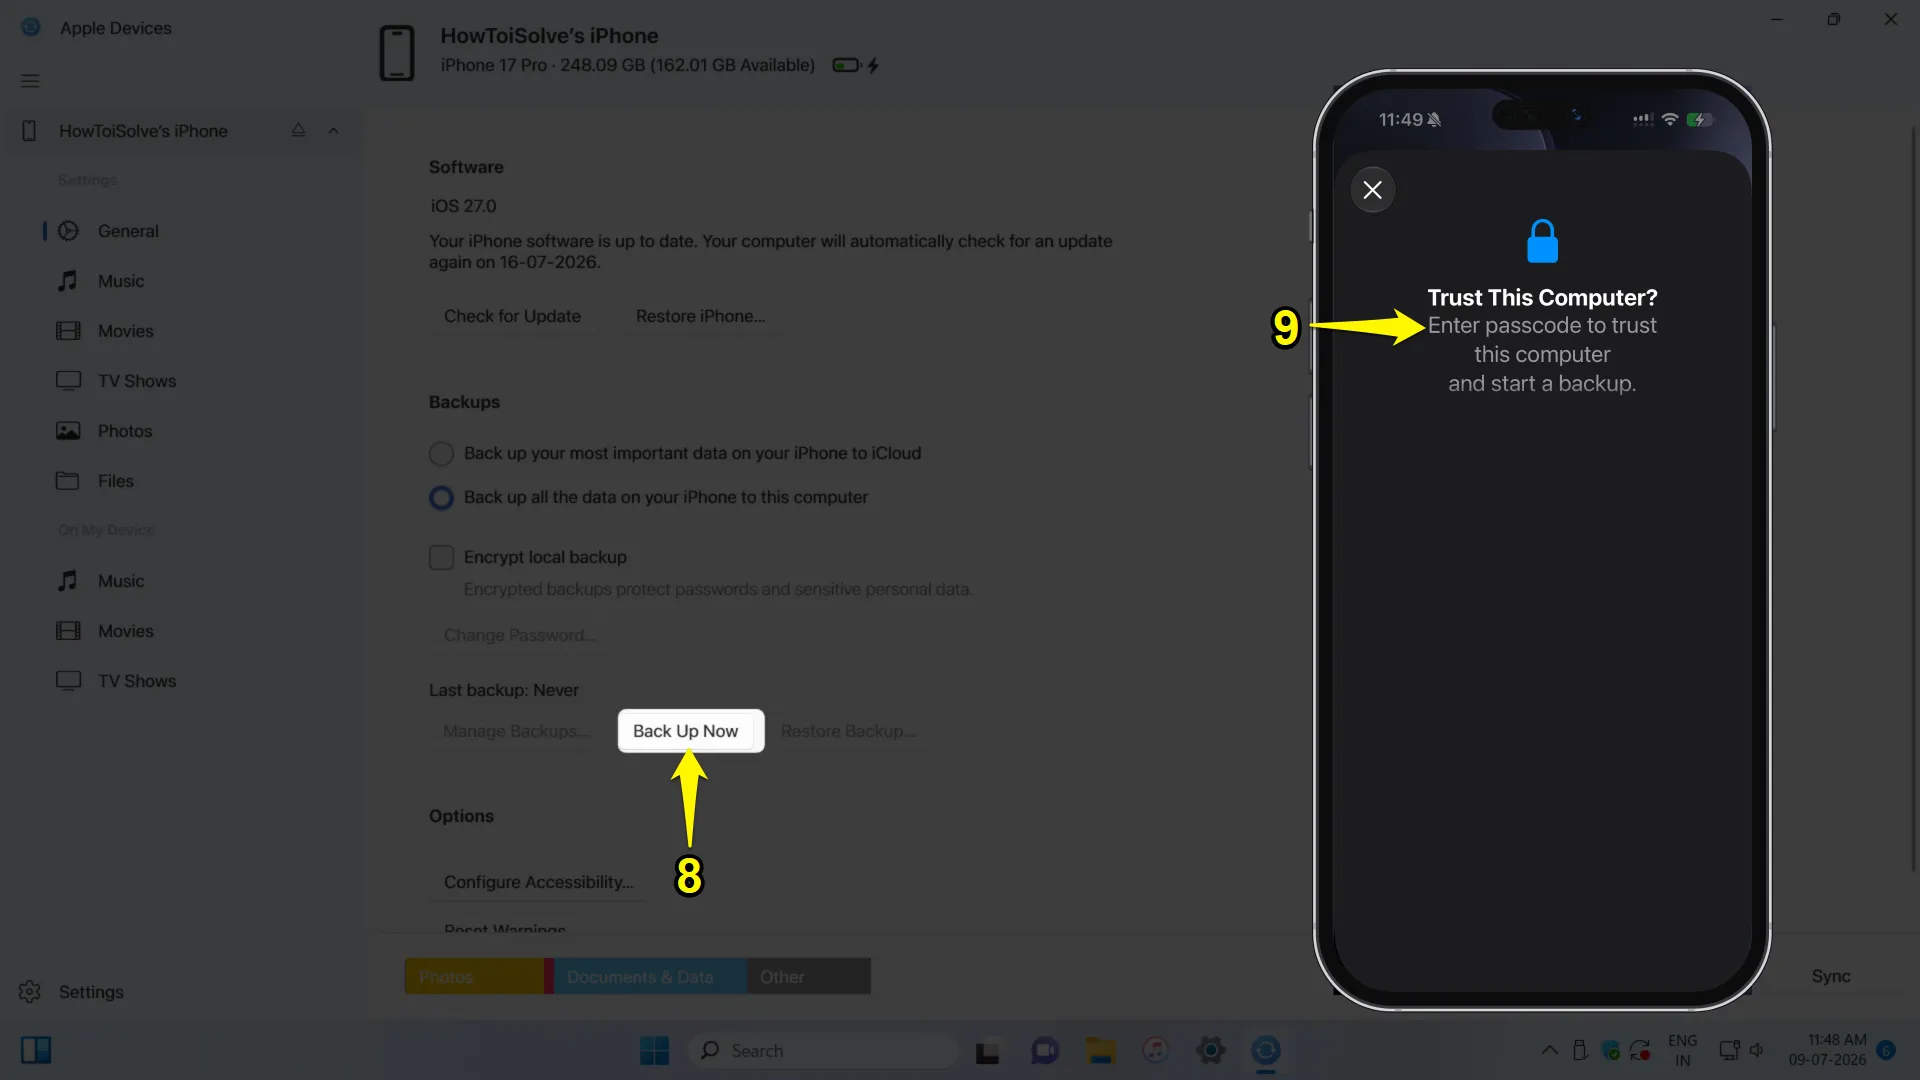
Hit the Back Up Now button on your PC. Your iPhone will ask you to enter the passcode on your iPhone to trust the computer and start the backup process.
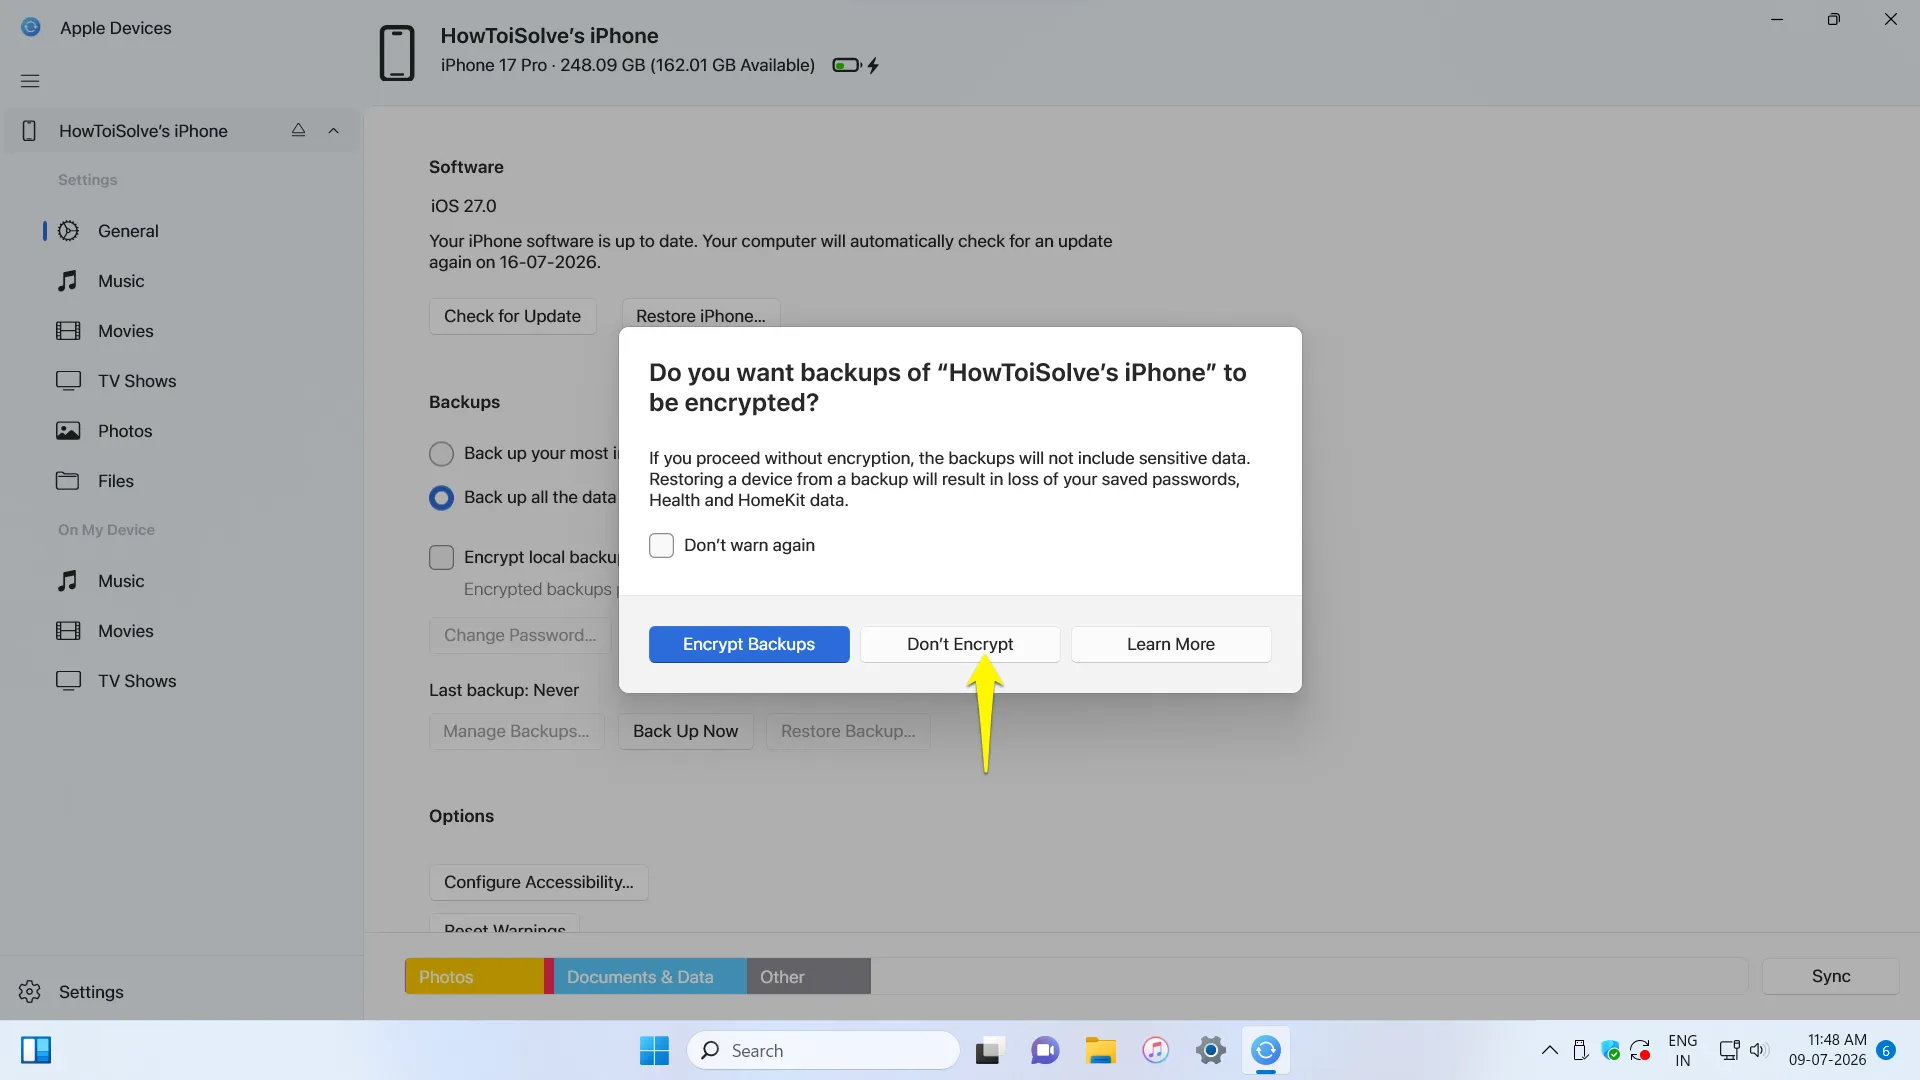
9. Your PC may ask for an encrypted backup. Select the “Don’t Encrypt” option.
Please wait until the backup process completes.
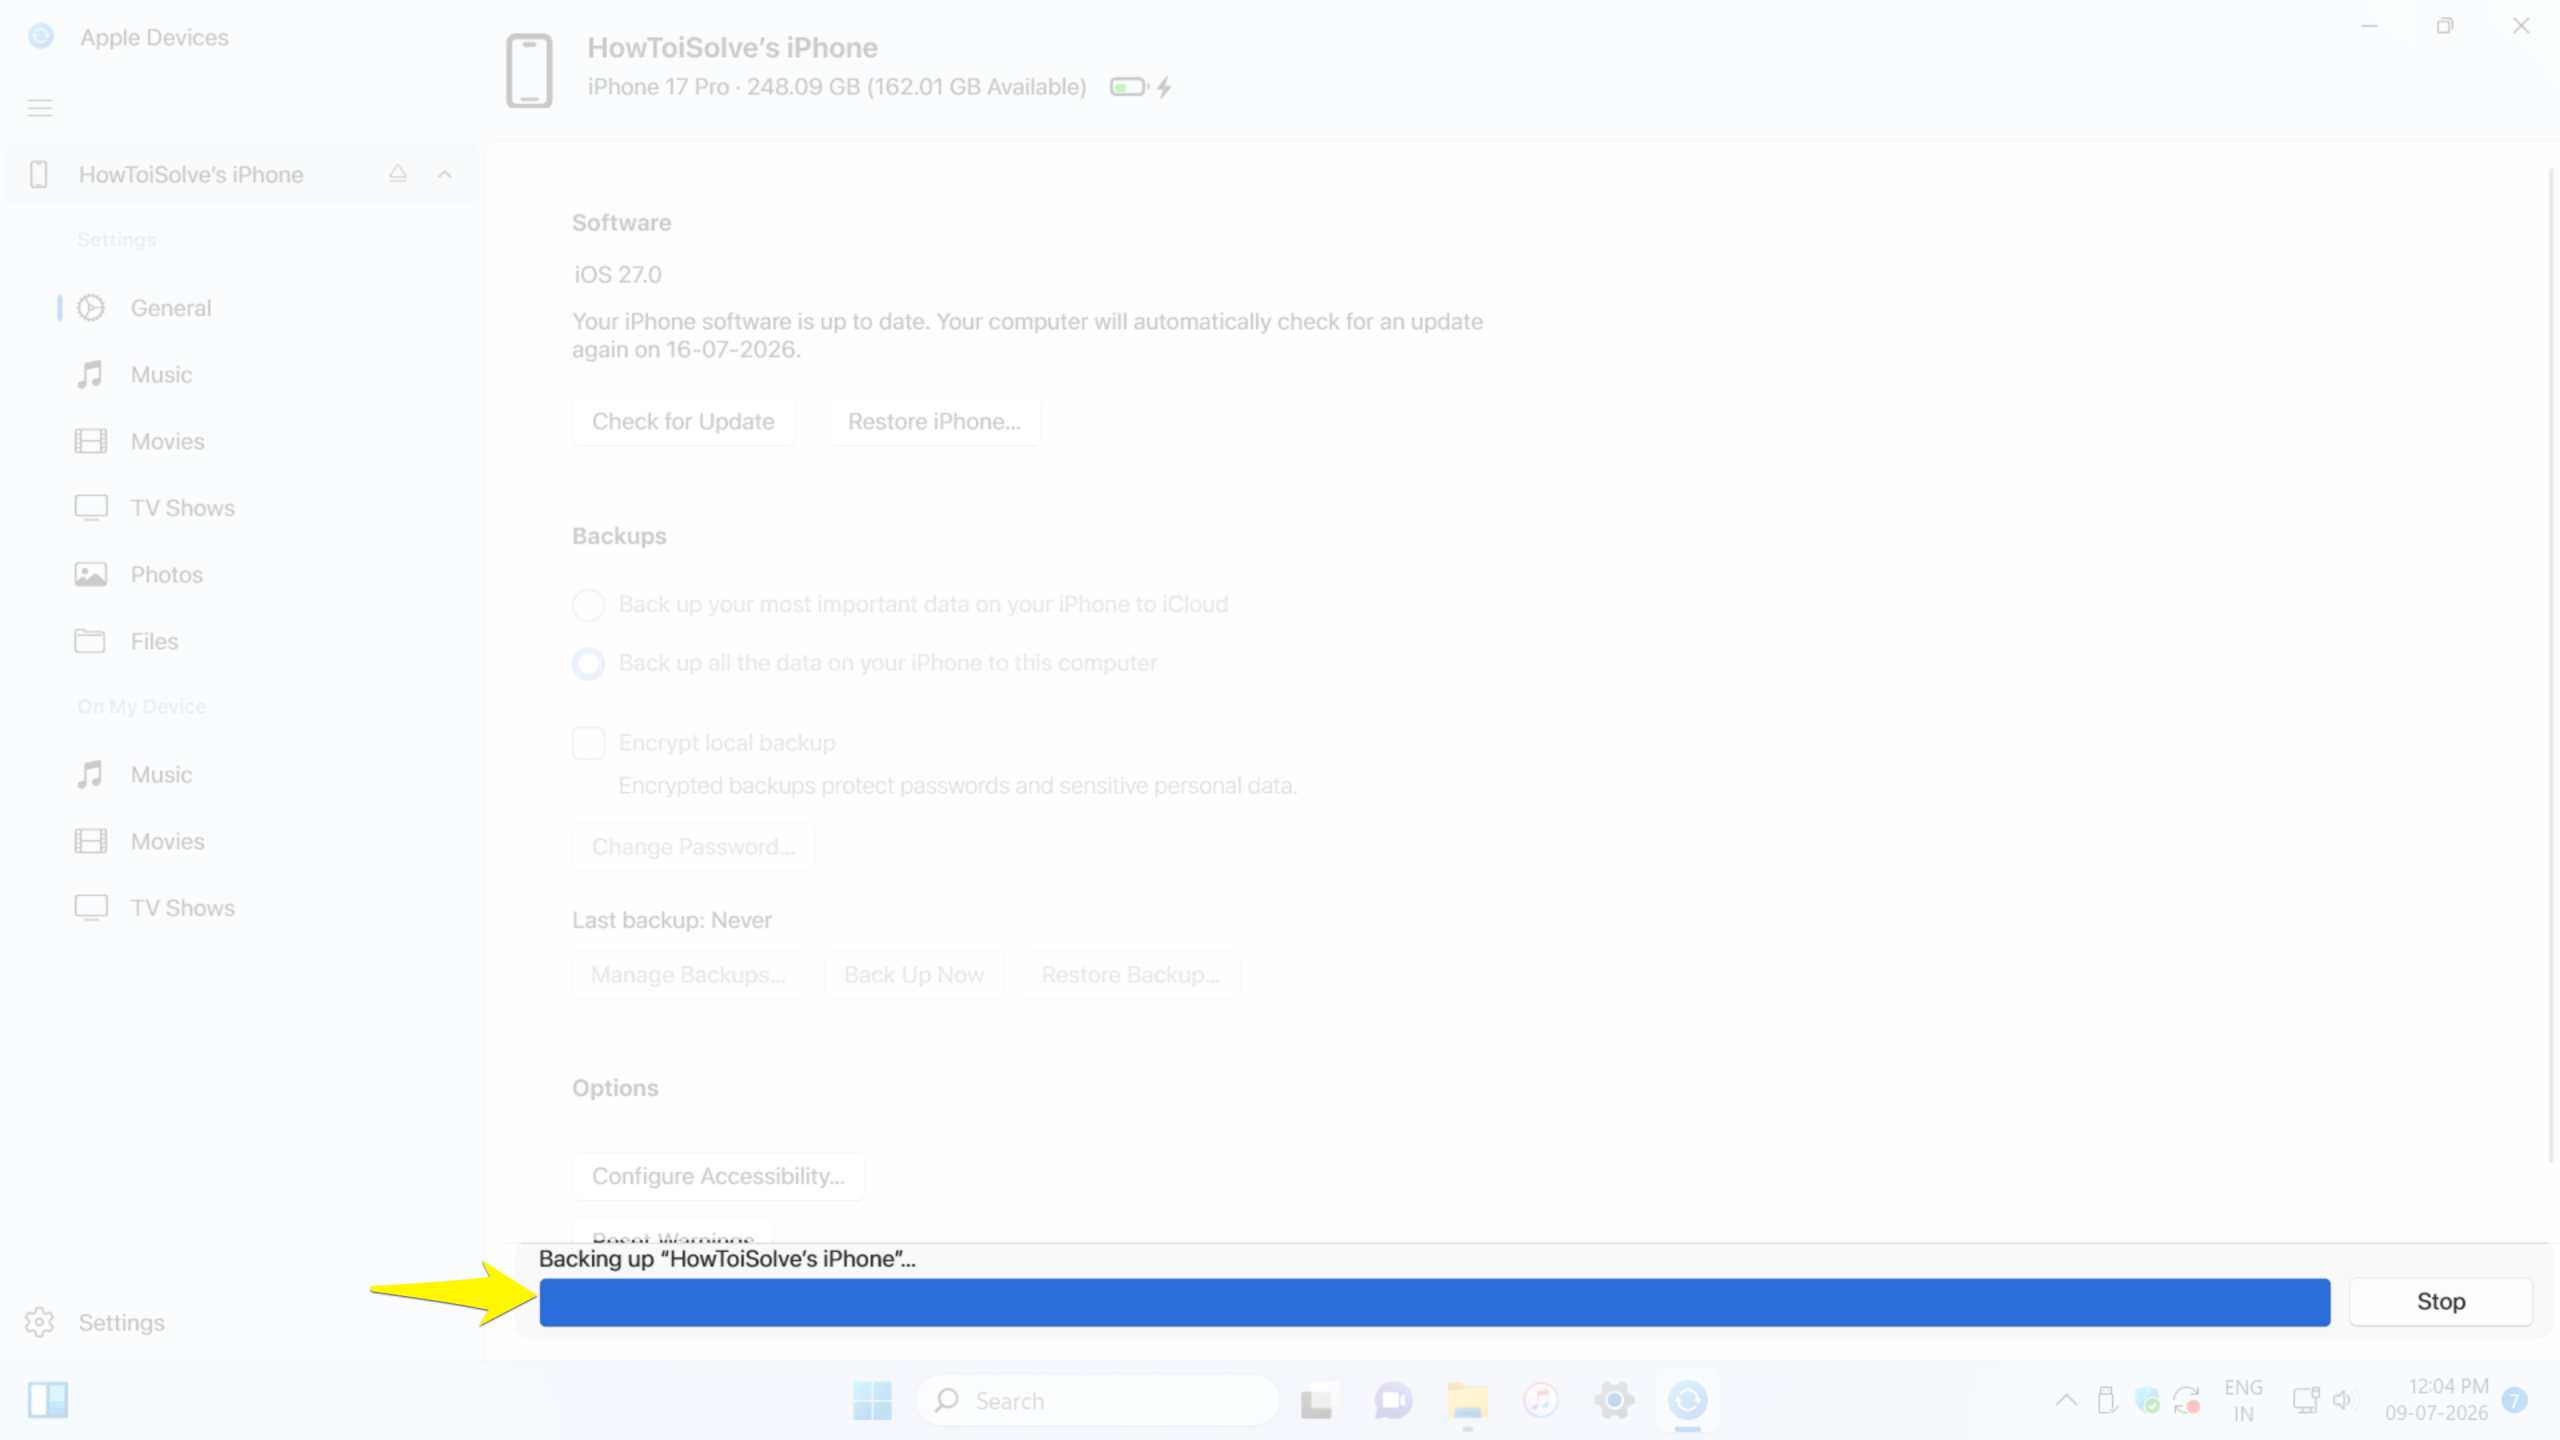
Step 6: Verify the last backup Date and Time
When finished, verify the latest backup date and time.

Tips for Faster Backups
- Use the original USB-C cable.
- Keep your iPhone unlocked when connected.
- Close the unnecessary apps and programs.
- Ensure your Windows PC has at least 20 GB of free storage available.
- Create a new backup before installing the new iOS beta version.
- If you’re using a laptop, make sure it doesn’t go into sleep mode.
Troubleshooting
iPhone Doesn’t Appear
- Enter the passcode to unlock your iPhone.
- Tap on the “Trust” button to “Trust this computer.”
- Try another USB port.
- Restart both devices.
- Update the Apple devices or iTunes in the Microsoft Store.
Backup Is Taking Too Long
- Disconnect unnecessary USB devices.
- Free up storage space.
- Don’t use your phone during the backup process.
- Disable battery saver mode on iPhone.
Could not back up the iPhone
- USB connection-related problem → Try an original MFi-certified USB cable.
- Not enough free space → Free up storage on the PC. Delete temporary files and empty the recycle bin.
- Encrypted backup failing → Uncheck “Encrypt Local Backup” & create a standard backup.
- Backup is corrupt → Delete the old backup and create a new one.
- Session could not be started → Restart both devices and reconnect.
- Backup could not be saved → Verify folder permissions and available disk space.
- Update Related → Update Apple devices or iTunes from the Microsoft Store.
- Not Responding → Restart both iPhone and computer and retry.
- An unknown error occurred (0xE…) → Usually related to the USB connection, drivers, or Apple services.
Forget Encrypted Backup Password
If you have proceeded with an encrypted backup and forgotten the password, you’ll need to reset the encrypted backup settings and create a new backup. Previous encrypted backups can’t restore without the original password.
Frequently Asked Questions
1. Which method should I use?
The Apple Devices app is a recommended option for Windows 11 users. If you prefer a classic interface or an older Windows configuration, use iTunes.
2. Can I use both Apple devices and iTunes on the same PC?
Absolutely, you can install both applications on the same Windows computer. However, it’s recommended to use one of them to avoid confusion.
3. Can I use my iPhone during the backup process?
Yes, but it’s not recommended to use it for heavy activities like video recording, transferring large files, or installing apps during the backup process.
4. Can I back up my iPhone without iCloud?
Yes. Apple devices and iTunes both support offline backups on your Windows PC without using iCloud.
5. Will my apps be backed up?
The backup process saves your app data and settings. When you restore your iPhone, your apps download again from the App Store.
Final Thoughts
Backing up your iPhone 17 Pro or 17 Pro Max to a Windows PC is one of the best ways to protect your important data. Whether you choose iTunes or the Apple Devices app, both create reliable backups. So, when you’re upgrading to a new iPhone, you can restore settings using these backups. An encrypted backup provides the highest level of protection by including passwords, Wi-Fi credentials, health data, and other sensitive information.
Creating regular backups may help you recover everything that matters if something goes wrong with your iPhone!