Here are several ways to crop a Screenshot on Mac. We can crop a certain part using freehand crop that’s really improved on the Mac Preview app (5th Method). We have the right option for Crop Screenshot On Mac before saving, after saving, and for multiple screenshots at once.
Keep in mind all the mentioned methods in this article uses a pre-installed and free tool to crop a screenshot on MacBook Pro or Air. So there are no chances of Storage Issues On Mac or paying extras for such a petty task.
Best Ways to Crop a Screenshot On Mac
Willing to take the snapshot on Mac, but don’t know how to cut out the Menu bar from it. Here is the complete guide on how to crop a screenshot on MacBook.
What Is Shortcut To Crop a Picture On Mac
You all will be familiar with it; you can take a Screenshot Of Any Portion On a Mac Computer. Using the essential keyboard shortcut for taking Mac Screenshot as mentioned below.
- To Take A Screenshot Of Whole Screen: Shift + Command + 3.
- To Take a Screenshot Of Select Portion: Shift + Command + 4
- To Capture Menu Or Window: Shift + Command + 4 + SpaceBar.
- To Capture Screenshot On MacBook With Touch Bar: Command + Shift + 6.
Pressing the combination of keys mentioned above, the Screenshot will capture and save to your Mac desktop. But are you familiar with how to crop a screenshot on Mac? Presumably, you might not, but you will need a tool for such tasks as crop and edit. So follow our guide and learn how to crop Screenshot on any Mac.
Method#1. How To Crop Screenshot On Mac After Saving
Most users want to crop a screenshot on Mac after saving it on Mac. But eventually, they ended up with unorganized methods and perhaps didn’t know how to do so.
Are you one such user looking for how to Crop Screenshot On Mac After Saving? In other terms, A trick to Crop Screenshot Using Selection Box. Here is what you need to follow.
1→ To crop selected areas on the Mac screen, open the Mac Window or Screenshot that you want to crop and make the Selection Box visible with a combination of keys Shift + Command + 5, Shift + Command + 3 OR Shift + Command + 4.
Doing so will highlight the thumbnail screen with five options: Capture Entire Screen, Capture Selected Screen, Capture Selected Portion, Record Entire Screen, and Record Selected Portion.
Next, click on Capture Selected Portion fourth position moving from left to right. Next, drag and resize the box at your convenience, and lastly, click on the Capture option. That’s It!

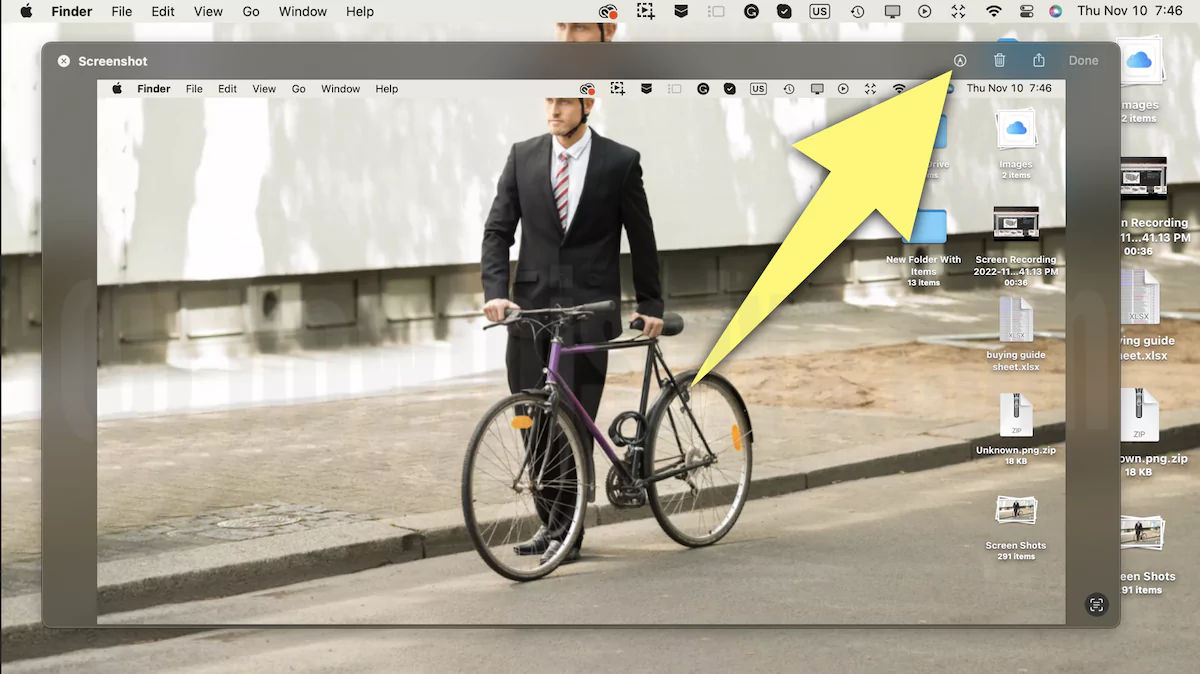
2→ Click on the Preview icon > Click on the markup icon to Edit the screenshot.
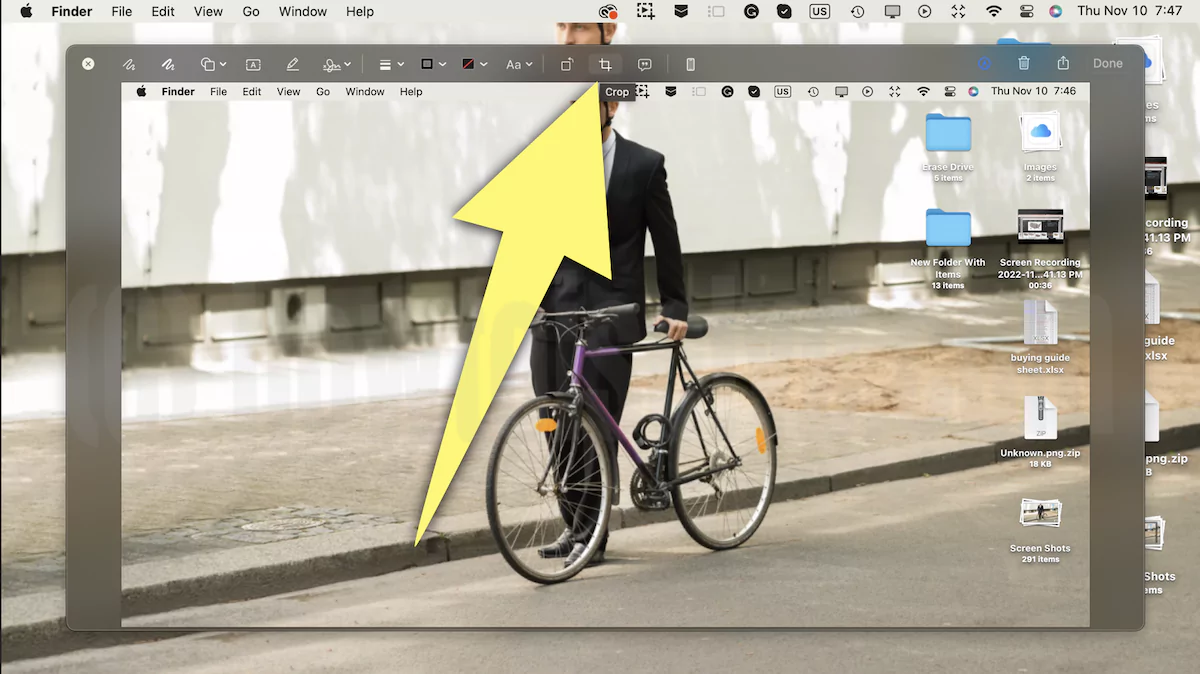
3→ Click on Crop icon to Crop the screenshot and Save.
4→ Move from the Croping border and Tap on Done to save the screenshot.

After Saving? To Crop Multiple Screenshots Using Preview
1→ Open all pictures in Preview (Select all pictures, Right-click > Open with Preview) or Other Third-Party image editing tools for Mac.

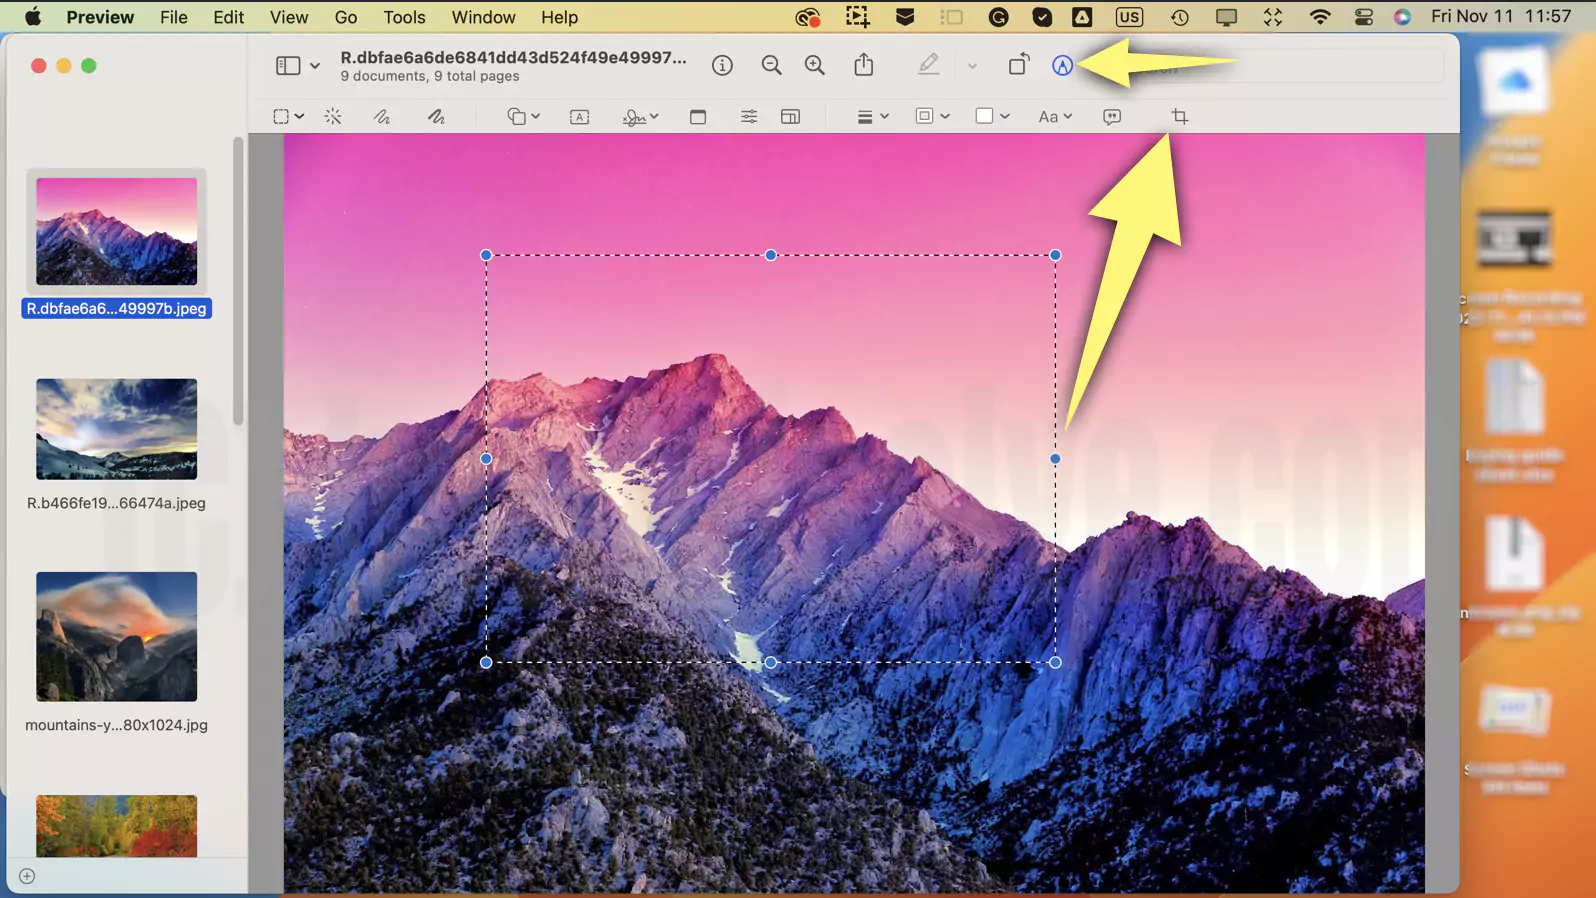
2→ Click on the Markup icon to start editing, Select the Part of the picture that you want to crop using the mouse or Trackpad. Now, Click on the Crop icon from the top tools bar or Use Command + K.

3→ Now, Selected a Portion of Pictures cropped with the Preview app. command + S to save the picture.

Important! Crop Multiple Screenshots at once
If you want to edit multiple Screenshots after saving them, you can use a tool like Skitch, Capto, or Greenshot Snipping Tools for Mac as a time-saving option.
Method#2. How To Crop A Mac Screenshot With Preview App
If you are familiar with the ability of Preview App, you know how it allows you to edit PDFs and Screenshot. If not, let us know how you can edit a screenshot on Mac for free using the Preview App. Keep in mind whenever you open an image in macOS, it will automatically launch the image in Preview, in case it is the default app.
If you have not kept Preview as the default app, open the image in Preview by following the below steps.
- Right Click on the image and select Open With. And next, choose the Preview App.

- After doing so, select Show Markup Toolbar, and with the help of Right-Click on a mouse, select the portion you want to edit.

- Choose Toolbar from the Preview Menu Bar.

- From the Toolbar dropdown, select Crop(Command +K).
With a preview app, you crop only a part of the picture. Nonetheless, we always suggest using the Preview App for such tasks because it offers a hassle-free way.
Method#3. How To Crop Screenshot Using Photos App
Another one in the array after the Preview App to crop Screenshot on Mac is Photos App. So in case you aren’t fond of using the Preview App, compile the task using the Photos App. Here is how you do it.
1→ Access the Photos App.

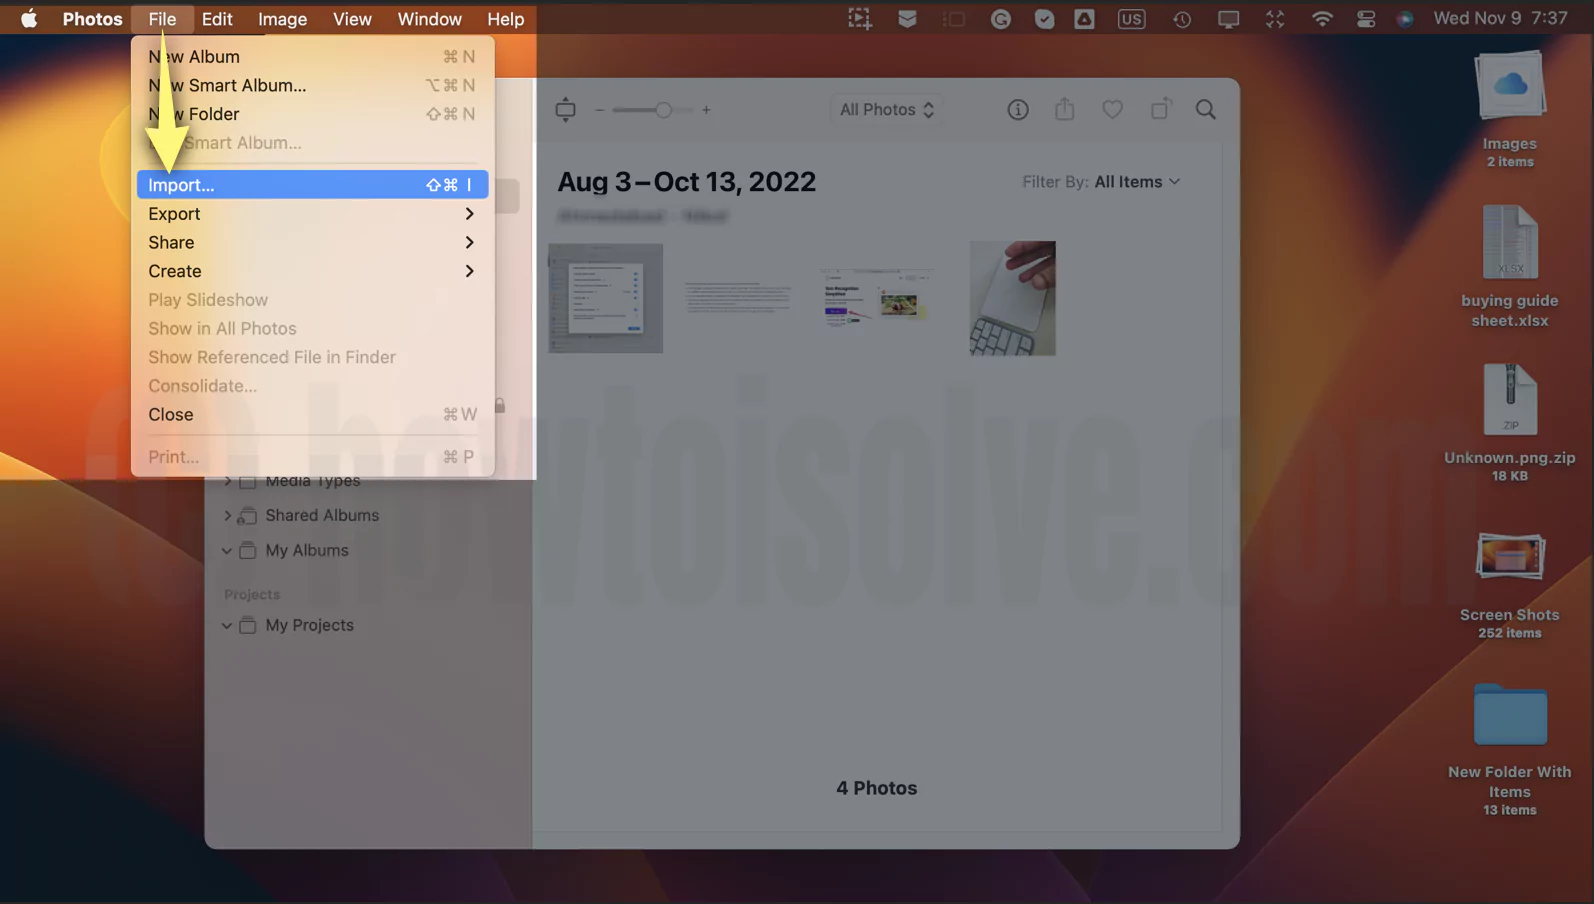
2→ From the Photos App Menu bar, choose File. Now select Import from the File dropdown.

3→ Select the image and choose Import.

4→ Next, select the imported Screenshot from Photos and choose Edit.

5→ Choose the Crop Button at the top. Crop the image as per your need, and click on Done.

With this convenient way to crop the image on Mac, you can crop Multiple screenshots with the same photos method.
Method#4. How To Crop Screenshot Using Cropping Tool
The cropping tool is one of the simplest and quickest ways to crop only part of the Screenshot or the complete portion. As of now, it is one of the best cropping on Mac computers.
When you capture the Screenshot, a floating thumbnail of Screenshot appears in the bottom right corner of the screen. It’s nothing but a thumbnail of the Screenshot you captured; clicking on it will open the Cropping Tool.
However, you have to click on it immediately, or else it will be invisible within a fraction of a second; ultimately, it means you won’t be able to use the Cropping Tool when the screenshot thumbnail goes away.
- To crop using this tool, take a screenshot immediately, and click on Image Thumbnail from the bottom right corner of the screen.

- Up next, choose Show Markup Tool Icon.

- From the toolbar, click on the Crop Icon(second position moving from right to left).

- Crop the image as per your need and click on Done.

The cropped Screenshot will save at the location you have configured on your Mac computer.
Method #5: How Do I Crop Only Part Of A Picture or Screenshot?
Using Smart lasso in Preview we can extract the Object that might be a Face, a Group photo, or a Natural object. Select the edge of the border using the tools as explained in the below steps, and Use Crop to Remove the Backgroud or Other parts of the screenshot or Picture.
1→ Open Screenshots or Picture Using the Preview app on Mac. Right-click on Screenshot/Picture > Open With Preview. To see the Editing tools, click on the Markup icon from the top menu, Now, click on the Selection icon from the toolbar > Select Smart Lasso.

2→ Select an Object using your mouse or Trackpad, by the continuous selection, we will see the thick border around the object that we are extracting. See the below 2 screens,


3→ Now, the Object or Part of the screenshot is selected, Click on the Crop icon from the top of the preview.

4→ Now, Backgroud is removed automatically. Command + S to save the cropped screenshot.

Note:- Moreover, you can also use Preview, Photos App, and Cropping Tool, as mentioned in this article.
Bottom Line
Now you are known to many ways to crop a screenshot on Mac. The best option from the above mentioned is one using the Cropping Tool. Which one is best for you? Let us know by dropping it in the below comment box.
Also Useful: How to Take a Screenshot Without Home and Power Button
Can A Screen Shot Be Cropped?
Yes, the Screenshot on Mac can be cropped using various methods such as Preview, Photos, Cropping Tool, and Selection Box (Command +Shift + 5). To know more about how this method works, go through the abovementioned article.
How Do I Edit My Screenshot?
To edit the Screenshot on the Mac computer, you can use multiple tools like Snipping Tool, Capto, Greenshot Snipping Tool; for more options.
What Is The Crop Command On Mac?
To crop with a snipping tool, press Shift + Command + 4 and next crop the selected area; that’s It!

