
Taking screenshots was quite typical before Apple launched Mojave and its unbelievable features. In macOS, you will get simplified tools to take screenshots, record video, edit screenshots, and more. No need to download third-party applications to do such editing and recording, now it is available on Apple Mac. Let’s see Mac Shortcuts Screenshot for the latest macOS.
Let’s check out how to take a Screenshot on Mac, how to screen record on Mac, and more.
Quick guide on how to screenshot on mac
- Step 1: To bring screenshot toolkit press “Command+Shift+5”.
- Step 2: Now mac will ask you to choose from three options: “Capture Entire Screen”, “Capture Selected Portion”, and “Capture Selected Windows”. So you have to decide what type of screenshot you want to take.
- Step 3: When you choose “Capture Entire Screen” a screenshot will be taken immediately.
- Step 4: If you go for “Capture Selected Portion or Capture Selected Window” then time will be allotted to select a portion and after selection of the portion the screenshot will be captured instantly.
- Step 5: Now use control-click, two-finger-click or right-click when you see a screenshot on the bottom of the screen.
- Step 6: To save the screenshot on the desired location you will need the help of the “contextual menu”.
How to edit screenshot on mac
- Step 1: After taking screenshots right-click, control-click, or two-finger-click on the taken screenshots to start editing.
- Step 2: Tap “Markup”.
- Step 3: Now, to draw or write, insert texts, rotate, insert signature use the toolbar which is located on the top of the window.
- Step 4: When you are done tap “Save”.
How to show the mouse cursor in a screenshot on mac
- Step 1: Click “Command+Shift+5” to open the toolbar.
- Step 2: Tap “Options”.
- Step 3: Now, Click on “Show Mouse Cursor”.
How to select save location for screenshot on mac

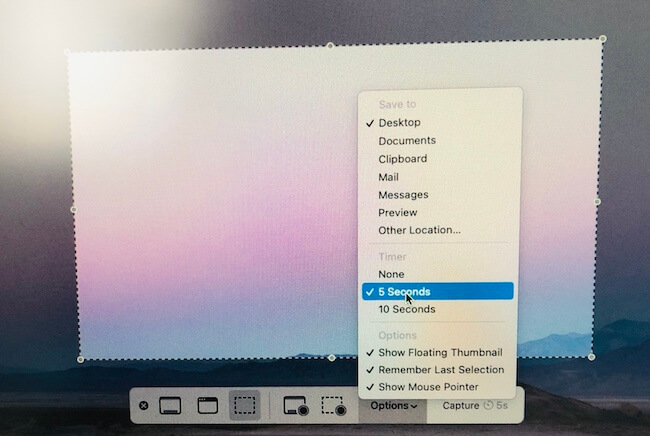
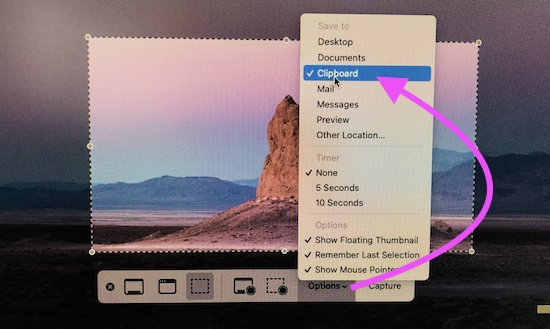
- Step 1: Tap “Command+Shift+5” together to raise the screenshot toolbar.
- Step 2: Tap “Options”.
- Step 3: There you will be given options such as Desktop, Messages, Preview, Clipboard, Documents, or Mail. Select any one of them to save screenshots.
Get more: Hidden way to take a screenshot on your Apple Tv
How to Set Timers for Screenshots on Mac, MacBook
- Step 1: Just like before press “Command+Shift+5” to the awake toolbar.
- Step 2: Click “Options”.
- Step 3: Tap “Timer” and select None or 10 seconds or 5 seconds and set the timer.
Get More: Fix Screenshot not working on Mac
Best Screenshot Tool Mac – Lightshot
As a screenshot capture tool on Mac, you can use Lightshot on mac. For that, you will have to download and install Lightshot on mac, from your Apple mac App store. And then learn here,

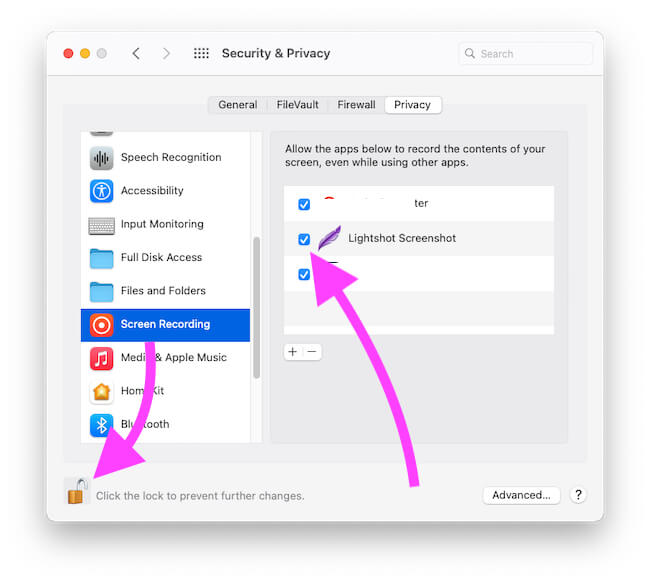
Click on Apple Logo– System Preferences– Security & privacy – Unlock to prevent further changes – then select Lightshot screenshot.
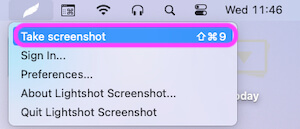
then re-open the program and then use a tool from the top menubar on your mac.

Note: Best Snipping tool for Mac
How to Take a screenshot on mac Using Lightshot tool
- Step #1. the open screen on your mac that you want to capture
- Step #2. now click on the Lightshot Screenshot icon that looks like a feather that appears on the top-right side of the menu bar.

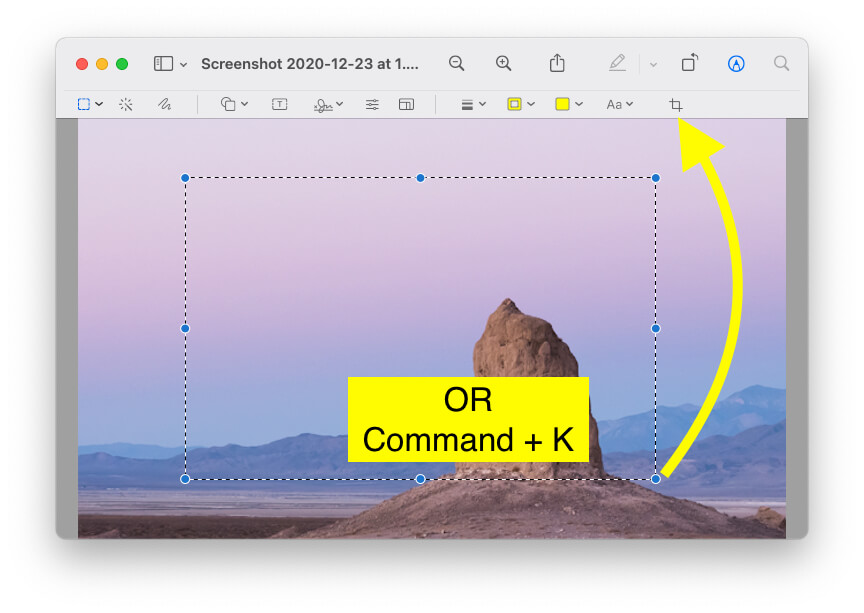
How to Crop Screenshot on Mac After Saved
If you forget to crop the screenshot after taking it on Mac, MacBook, there are plenty of ways to crop screenshot on Mac after saved. Here’s how.
Method 1: Using The Preview App
- Directly Double-Click on the Screenshot to open it.
- Click on the Show Markup Toolbar.


Method 2: From The Photos App
- Launch the Photos app on Mac.
- Locate and open the Screenshot that you want to crop.
- Select the Edit button on the top-right side.
- Click on the Crop button in the top menu bar.
- Manually crop the image or click on the Aspect and choose the desired option. From the Aspect option, you can choose different shapes too or go with Custom if you’ve any special requirements.
- Once you’re done, click Save.
Meanwhile, if you have third-party applications like Adobe Photoshop, they also support such operations and editing tools.
Also Read– 4 methods to take a screenshot on your Apple mobile
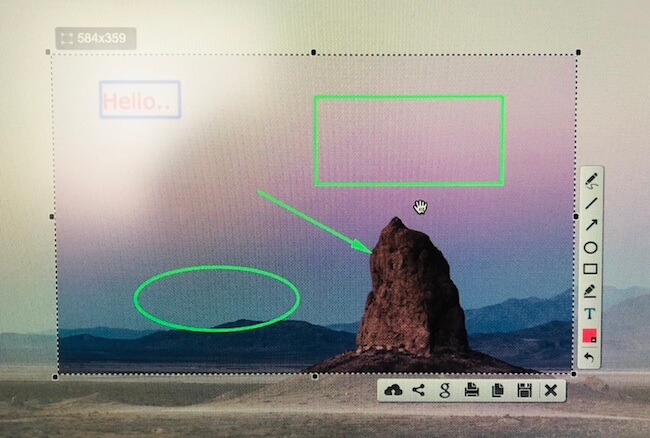
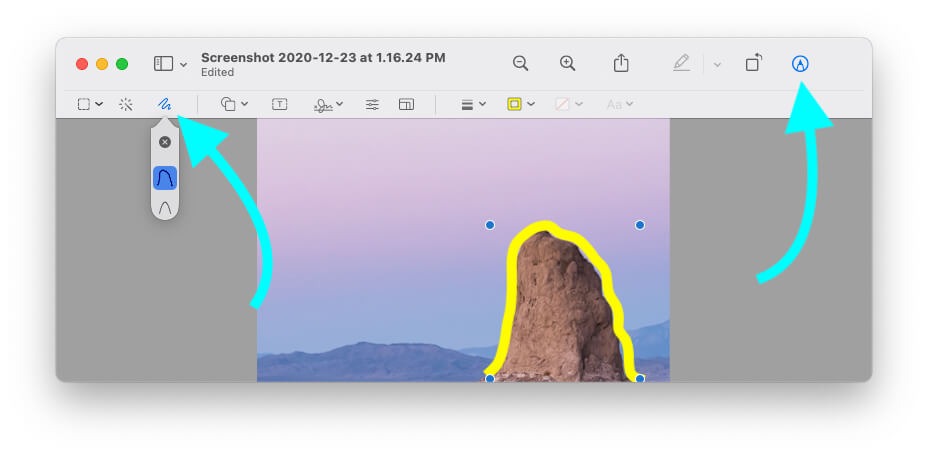
How to Draw on a Screenshot on Mac
The Markup toolbar contains various tools to edit the images and make them your own. After taking a screenshot, if you want to draw anything on Mac Screenshot, it can be done from the Markup Toolbar.
- Click on the screenshot to edit, it should be open in Preview.
- Select the Show Markup Toolbar button if you don’t see the Markup tools.
How to Highlight Text in Screenshot Mac
Do you want to highlight a certain part of the screenshot, Markup Toolbar offers the Highlighter tool too. It helps to rectify the text if you’re preparing for an examination or want to mark the point.
- Open the Screenshot in Preview, to do so, double-click on the screenshot.
- Click on the Shape button (the fifth icon from the left side), select the Highlight tool from the dropdown, and highlight the text.
How to Re-size a Screenshot on Mac/ How to Reduce Size on Screenshot Mac
How to Reduce Screenshot File Size on Mac Without Lossing Quality we have Separate options that we have to set before export from the Preview app. That’s easy but you might lose the quality of your Picture after Resize file size and Change the Resolution. Follow the below steps,
- Locate and open the Screenshot on Mac.
- Make sure to open in Preview
- If there are no tools available, click on Show Markup Toolbar.


How to Enlarge a Screenshot on Mac: Use Zoom Magnification Tool Mac
Sometimes it’s necessary to show the enlarged part of the screenshot, and it is possible with the Preview Markup Toolbar. If you haven’t done it yet, here’s how to do it.
- Locate and open the Screenshot on Mac.
- Make sure to open in Preview
- If there are no tools available, click on Show Markup Toolbar.


How to Markup a Screenshot on Mac
The best part of using Mac, MacBook is Apple offers almost all the tools as pre-installed, while on other desktops, we’ve to download or purchase the third-party tools. One of the greatest tools of Apple Mac is Markup Toolbar, which offers numerous tools and options to edit the pictures.
When you open any Picture or Screenshot in Preview Mode, just click on Show Markup Tool to enable all the tools. From Regular Selection to Drawing Freehand, or Highlighting the document, everything is present in the Markup toolbar.
How to Screenshot on Mac Without Keyboard
While the quickest way to take a screenshot on Mac is by using Keyboard, however, if your keyboard is not working or there’s a problem with keys, Mac lets you capture screenshots without using keys.
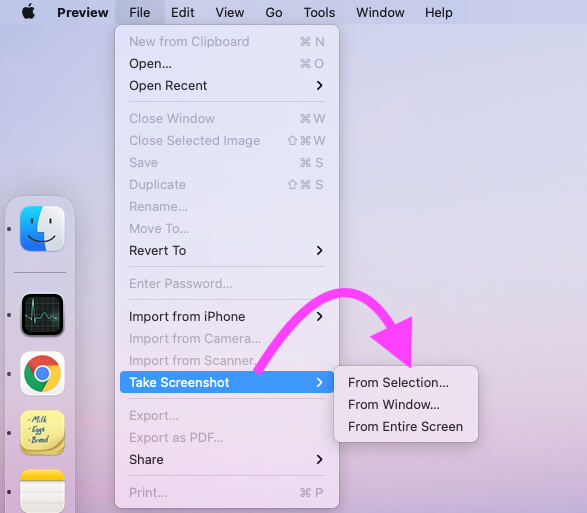
Method 1: Using the Preview App
- Press the Command+Space Bar to launch Spotlight Search and from there open the Preview.

Method 2: Using Grab App
- Launch the Spotlight Search and open Grab/Screenshot App on Mac
- Click Capture from the top menu bar.
How to Take a Screenshot on a Mac with a Windows Keyboard
There is not much difference in taking screenshots on MacBook, Mac using a Windows Keyboard, however, instead of using the Command key, with Windows Keyboard, you’ll have to press the Windows button, everything else is the same.
- Use “Windows + Shift + 5” Key
Mac Screenshot Resolution Settings
Unfortunately, there is no straight setting available that lets you change the screenshot resolution on MacBook, Mac.

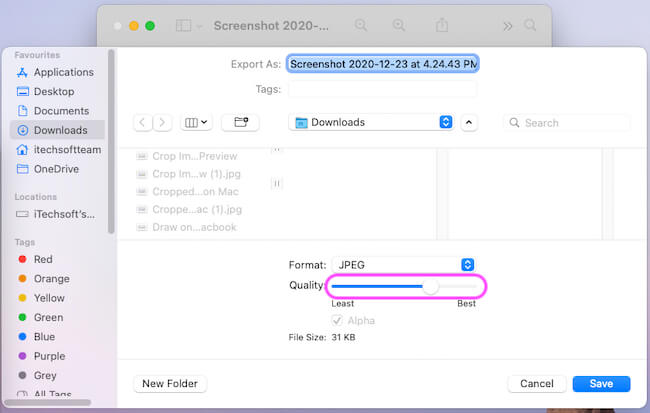
However, you can change the Screenshot File Format to JPG, PNG, GIF, PDF or TIFF, and get the desired results. Alternatively, using any third-party Photoshop app would allow you to increase or decrease the resolution.

- Use Preview App: Open Screenshot in Preview > File > Export > And Select File Type before saving on Mac.
How to Copy and Paste a Screenshot on Mac
Instead of saving and moving the screenshot to another tool, why not copy the Screenshot to Clipboard and paste it on the desired app or location. That might be Your Browser, Photo Editing tools or Share on Social using the Paste option.
The alternate way is, Hold the Control Key while taking screenshots and paste wherever you want. Alternatively, with Universal Clipboard, you can paste it on any other Apple device.
Where Do Screenshots Go On Mac?
By default all the screenshots stores on the Mac Desktop, like Screen Shot [date] at [time].png. But to keep the desktop tidy, you can manually change the location from the desktop to any other folder.
- Open the Screenshot App, and go to the Options menu, from here choose the location where you want to save the screenshot.

Where Do FaceTime Screenshots Go on Mac?
FaceTime Screenshots are called Live Photos. During FaceTime Video Calls, if anyone takes a Live Photo, everyone on the Call will receive a Notification that the Live Photo has been taken. However, the participants need to allow a Live Photo, without permission, no one can take a Live Photo. And most importantly, the FaceTime Screenshots go directly into Photos App.
Where Do Minecraft Screenshots Go On Mac?
You can locate Minecraft Screenshots on the following path in Mac, MacBook,
Open Finder on Mac, Click on Go > Go to Folder.. from top Menu. and Enter the Bellow folder path to locate Mincecraf Screenshot on Mac or MacBook.

- ~/Library/Application Support/minecraft/screenshots

Here’s all screenshot.
How to Change Mac Screenshot Save Location
If you don’t want to save the screenshot to Desktop, then create a folder and set it as Screenshot Save Default location on Mac.
For macOS Mojave or later, launch the Screenshot App and click on the Options. And change the default location from there.
How to Convert Mac Screenshot to JPG (Change Mac Screen Capture to JPG)
- Open the Terminal on Mac (press command+space bar and search Terminal).
- Enter the following command,
defaults write com.apple.screencapture type JPG
- Hit Enter.
- From now onwards the screenshots must be saved in JPG format. Restart the Mac if they don’t.
Read more: How to Print Screen on Mac
That’s all about new tips and tricks for Screenshot take on your Macbook, Mac running on any macOS Version.


