Create a random address for “@privaterelay.appleid.com” using Hide My Email on macOS and iOS, iPadOS. Hide My Email allows you to create a random email address on your iPhone or Mac to avoid revealing your personal Apple ID. You can create multiple random email addresses and remove them anytime you want. The iCloud+ subscription service includes privacy features such as HomeKit Secure Video support, iCloud Private Relay, and Hide My Email at no extra cost.
Tips! How to Use Hide my Email on Unsupported MacOS Mac, iOS, and Without iCloud+.
How to Create Random Email Address and Setup Hide My Email in iPhone, Mac
How much is iCloud+?
Before you go, I want to clarify that to use the Hide My Email on iPhone and Mac; you would need an iCloud+ subscription. iCloud+ subscription and its features come with the existing iCloud subscription plan. Though these are the points you should be aware of,
- $0.99/mo: One HomeKit Secure Video Camera and 50GB Storage
- $2.99/mo: Up to Five HomeKit Secure Video Camera and 200GB Storage
- $9.99/mo: Unlimited HomeKit Secure Video Camera and 2TB Storage
You can upgrade to iCloud+: Go to the Settings app > Tap on your name > iCloud > Private Relay and upgrade the iCloud plan.
For Latest macOS
Step 1: Click on the Apple Logo from the top Left Corner on your Mac > Select System Settings.

Step 2: Tap on Apple ID [Your Name] > Choose iCloud.

Step 3: Tap on Hide My Email.

Step 4: Read the Instructions in the Hide My Email pop-up and Click + Sign to Create a New Address.
Step 5: In the Hide My Email Window, Give a Label to your Email and Enter a Note accordingly > Select Continue.

Step 6: When you’re Finished, Click on Done.

Older macOS
For macOS Monterey & Older,
Step 1: Click on the Apple icon > Select System Preferences.
Step 2: Click on the Apple ID option > From the sidebar, select iCloud.
Step 3: Now, at the top, you should see Hide my email; click on Options.. next to Hide my email.
Step 4: Read Apple’s Instructions about the feature; it will appear if you’re setting up Hide My Email for the first time. Or You may enter your Apple ID login password to verify.
Now, when the Hide My Email screen appears, click on Set up under Keep your email safe and secure with ‘Hide my email.’ Click on the “+” Sign to Create a New one.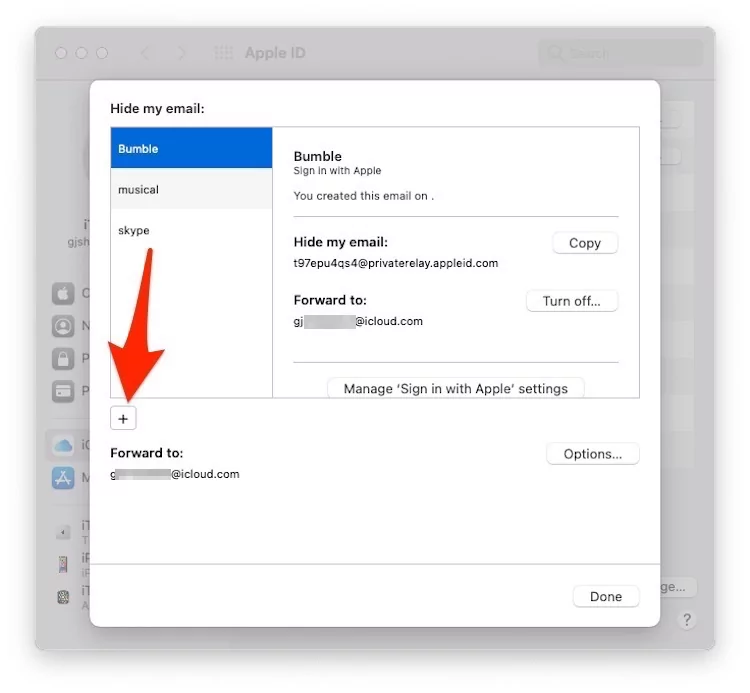
Step 5: Create New Address; Apple will auto-generate the email address; if you are satisfied with it, then Click Continue or Select Use Different Address.
Step 6: You can even add a Label to distinguish this address from others, like the purpose of using this address.
Plus, a Note can be added, which is optional.
Lastly, click Done.
How to Setup Hide My Email on iPhone
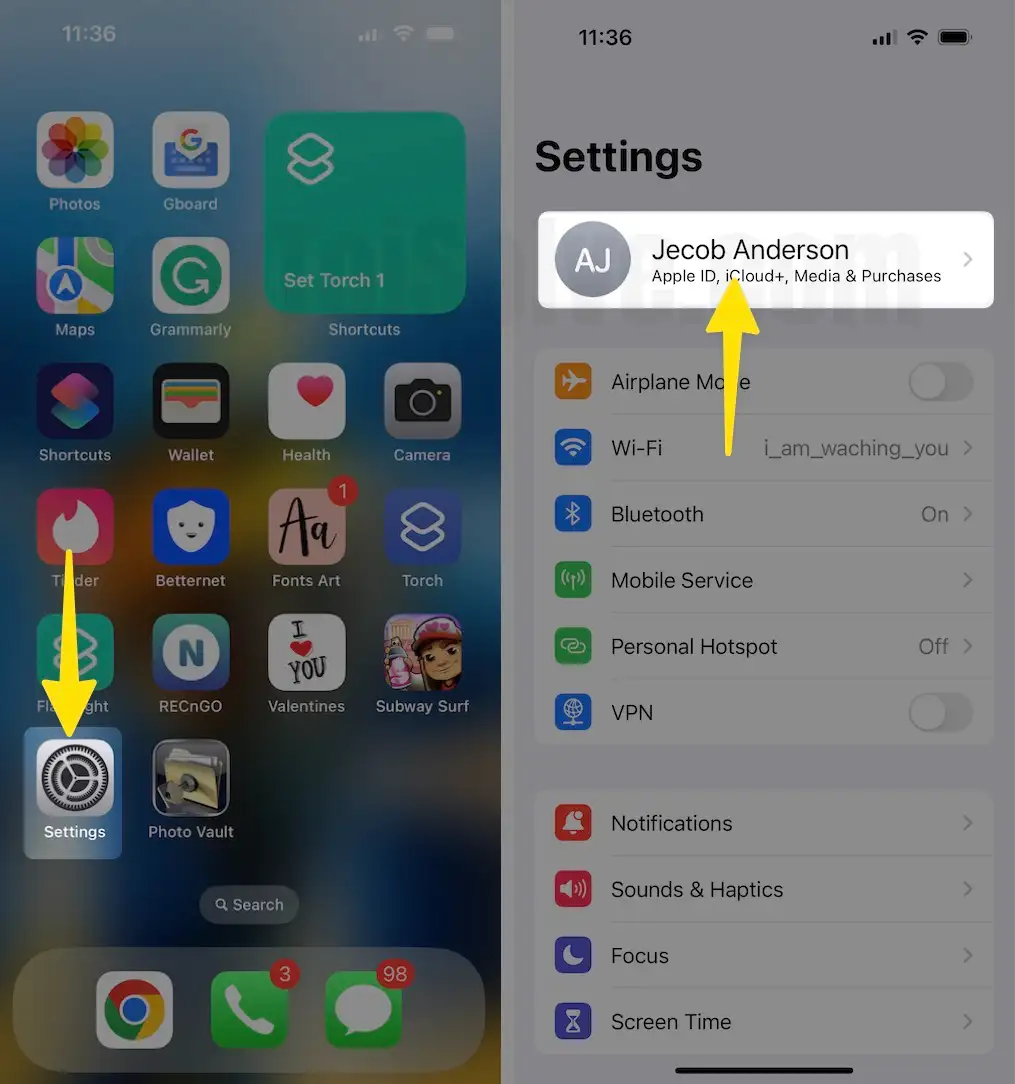
Step 1: Launch the Settings app on your iPhone > Tap on your Apple ID.

Step 2: Select iCloud > Tap on Hide My Email.

Step 3: Tap on Create New Address > Enter Label & Note (Option) > Select Next > When you’re finished, Click on Done.

How to Delete/Deactivate Hide my Email from iPhone and Mac?
How can I Deactivate or Delete Random Address on my iPhone:
Step 1: Launch the Settings app on your iPhone > Tap on your Apple ID.
Step 2: Select iCloud > Tap on Hide My Email.

Step 3: Select Random Email Address > Tap on Deactivate Email Address.

Step 4: To Delete a Random Email created under Hide My Email, See the Inactive Addresses option under Hide My Email > To See the List of all Inactive or Deactivated Addresses, Tap on it > See Reactivate Address or Delete Address option.

That’s it
How can I deactivate or Delete a Random Address on a Mac
For Latest macOS,
Step 1: Click on the Apple Logo from the top Left Corner on your Mac > Select System Settings.

Step 2: Tap on your Apple ID > Select iCloud.

Step 3: Click on Hide My Email.

Step 4: Select your Random iCloud ID from the left pane > Click on Deactivate Email Address.

Step 5: As soon as you do so, you’ll receive a Deactivate email address? Pop-up; from there, Tap on Deactivate.

For Older macOS,
Step 1: Click on the Apple icon > Go to System Preferences.
Step 2: Click on Apple ID > Select iCloud from the sidebar.
Step 3: Click the Options button next to Hide My Email.
Step 4: Click on the email address to deactivate and Turn it off.

That’s it. Now, you can deactivate this email address to stop receiving messages sent to it. Once you Deactivate the Email Address, the Reactivation option is available under the Inactive Address option Just under the Hide My Email options.
Step 5: Click on the Inactive Address: Options and see the list of all Deactivated Emails.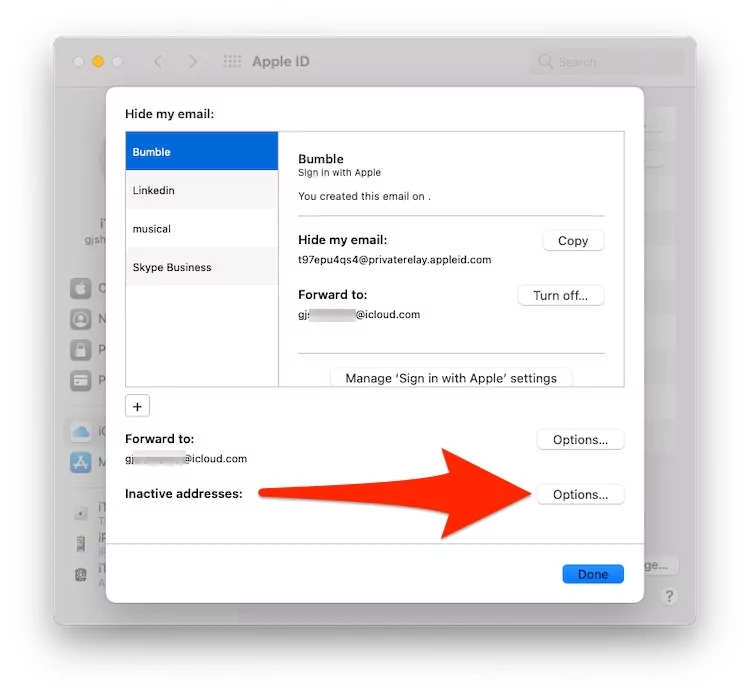
Step 6: Select the Email and Choose Reactivate Address or Delete Address completely. Delete Address is not Recoverable, or You have to Enter this custom Address when creating a new Random email based on availability.
That’s it.
Conclusion:-
Hope this article helps you to set up Hide My Email on Mac or iPhone. Also Shows an option to manage the Random Email created for Third-Party internet services and Webform. Also, this service is synced with your Apple ID account so that it can be accessible on all Apple devices that are signed in with the same Apple ID.


