Keep disabling or Turning off background app refresh on your iPhone if you’ve to feel your iPhone battery drain early or Slow speed to access the app from multitasking or the app switcher screen. Follow these excellent tips and improve the battery life of your Apple iPhone. Too many iPhone users shared quick battery drain problems, Even on Recently purchased iPhone. But you’re not one of them, this issue has occurred due to, background app refreshes on any iPhone model.
I recommend turning off the background app refresh feature during the unused device. Likely in sleeping duration, your cell phone has been away from your backgroud data sync actvity.
Many apps have been running in the background area, likely Facebook, WhatsApp, Authenticator, etc. learn how to stop or Turn off background app refresh on iPhone, iPad, or iPod Touch.
The users are also getting trouble with Backgroud app refresh option grayed out and the background app refresh greyed out or Won’t turn on/ Unable to make Change. and the real reasons are the restriction is applied to change,
in iOS 14 or later
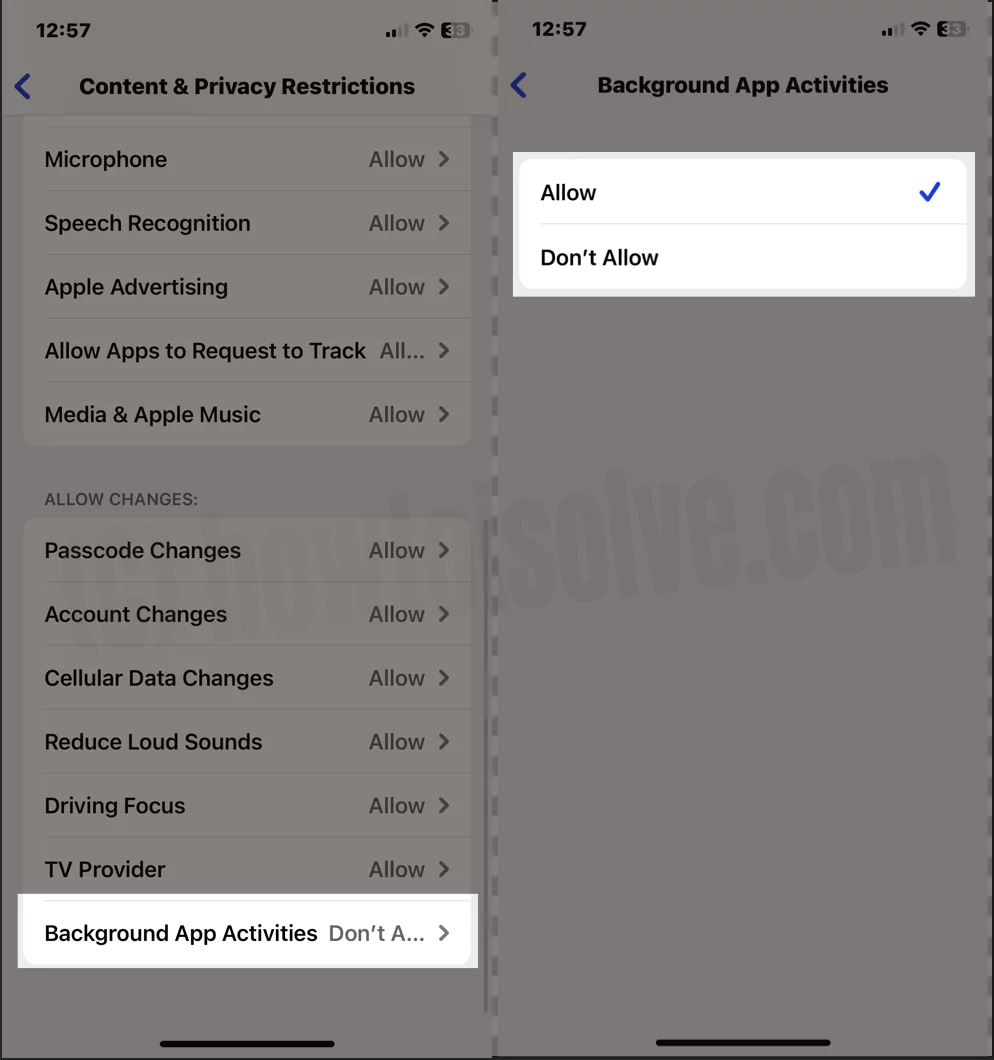
1→ Open Settings app on your iPhone > Click on Screen Time > Content & Privacy Restrictions.
2→ Next, Scroll the screen and Tap on “Background App Activities” > Change it to Allow.
That’s it. Now, we can make changes in the Backgroud settings under the iOS settings app. explained in the next step.
in iOS 13 & Earlier,
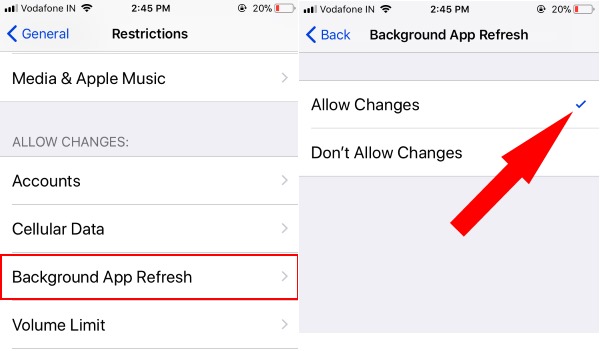
Check Go to the Settings app > General > Restrictions > [Enter passcode] Scroll down and See Background App Refresh > Allow Changes.
Now, Follow the below steps for using Background app refresh settings on iOS.
Know Steps how to Turn off background app refresh on iPhone and iPad
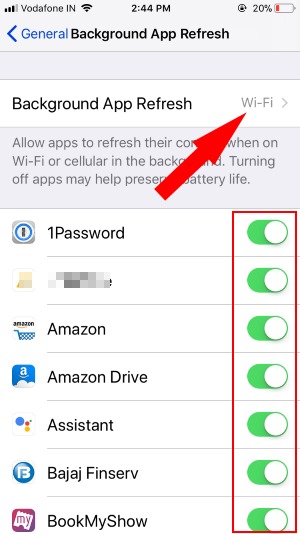
- Step 1. Open up the Settings app on iPhone or iPad
- Step 2. Navigate to General
- Step 3. Tap Background App Refresh under the Usage
- Step 4. See the Option, Backgroud App Refresh “turn off “all time, or Enable only when the iPhone is connected to “WiFi” or “WiFi & Cellular data“.
In addition, Disable the Background app refresh for the selected option. see the above screen.
Supposed to be if you can’t change settings for backgroud app refresh because the option is grayed out. See the Screen time restriction settings explained earlier in this article. if you selected to turn off, then you can not save for the selected app background refresh.
That’s it. Now, all apps become stop which auto-refresh in the background of your iPhone. Since now you got the main root of the battery drain Problem.
Get here: How to Force close Open Apps on iPhone
Bottom line:
Generally, many factors are responsible for the early battery drain of the expensive Apple iPhone. Such as enabling location services, live map app, Too many notifications, turning on Wi-Fi even not used, and more use of Live and 3d wallpaper on the iPhone home screen.
You can get long battery life if you keep the above factors disabled in unused time. Even though you can use the best external battery power bank for travel time and in your long journey. How does this tip on disabling/Turning off background app refresh on iPhone? don’t miss sharing the best ways to manage Background app refresh on iPhone and iPad with your Friends.


