
Outlook offers an array of customization features to personalize the experience and one of them is Auto Reply while you’re out of the office or on break from work. Out-of-office (ooo) replies come in handy to let the people know you’re unavailable and at the same time, you can leave a short message, whatever suits you. This will clear things for the people who need you and take a decision.
We’ve covered two different ways to set up an auto-reply on Outlook for IMAP or POP Email Accounts and for Microsoft Exchange accounts. Let’s see, how to do it.
Also Read: How To Set Out of Office in Outlook Calendar.
How to Set Up Automatic Reply on Outlook
Automatic Reply (000) in Outlook iPhone & Android:
Keep your Outlook app updated on your Phone from the iOS app store and Android Play Store. then follow the below steps for enabling Automatic Reply on Outlook when you are offline for a few days.
1→ Open Outlook App on your phone, Tap on the Profile icon at the top left corner of the screen.
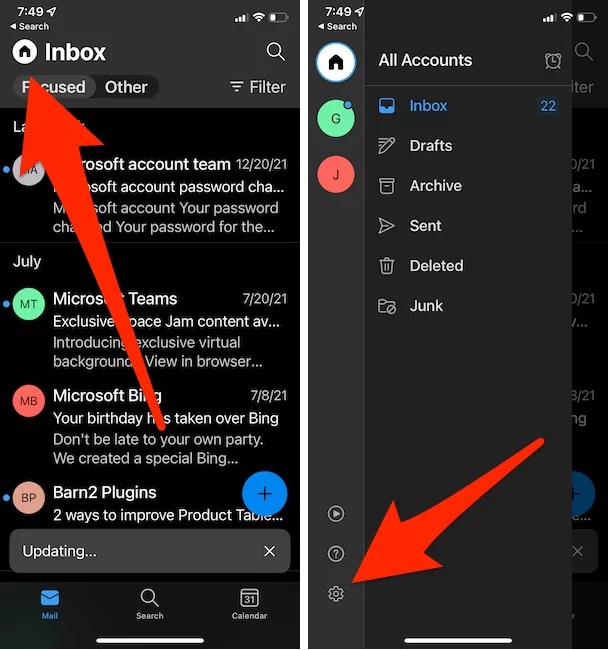
2→ Then, Tap on the Settings gear icon to see more settings of your mail account.
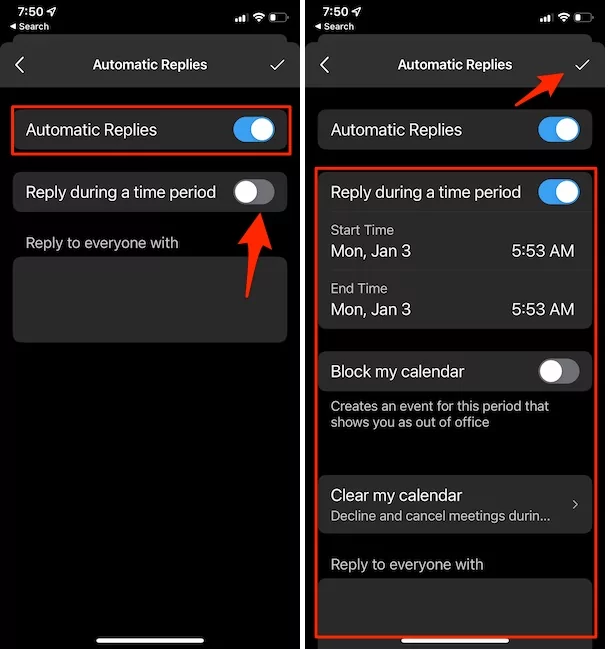
3→ Now, Tap on your Account that is signed in with. and see the Automatic Replies option.

4→ Enable Automatic Replies toggle and Type your message that you want to send while you are not in the office.
These settings are also manageable to Other Cross-platform OS and Devices like Mac or PC; follow the below steps.
Set Out of Office Outlook For Android
Outlook app user interface is the same for both iOS and Android mobile apps. Look at the below steps on the android outlook app and Turn on Automatic reply with Out of Office message from account settings.
1→ Open Outlook app on your android mobile. Go to Outlook Settings under the Outlook icon at top right corner of the app screen.

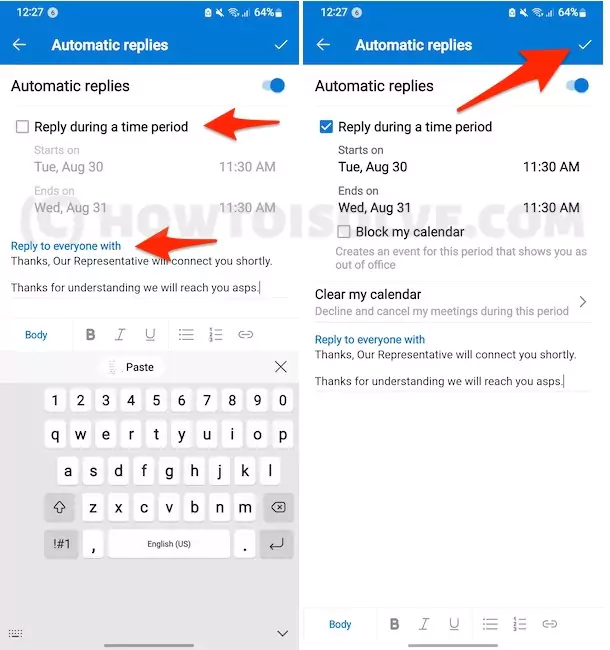
2→ Tap on Account name > and Tap on Automatic replies.

3→ Select “Reply during a time period“. Choose Start date & End Date. and Tap on done with True button at top right corner.
That’s it. Now on all devices (Web, Mac, Windows, iPhone app), Outlook will notify that Automatic Replies Turn on, and Turn off from the inbox directly with the Top notification ribbon.

Automatic Reply in Outlook Mac & PC:
Compatible Outlook Versions: Outlook 2007, Outlook 2010, Outlook 2013, Outlook 2016, Outlook 2019, Outlook for Microsoft 365, and Office for business.
Way to Set up Automatic Reply in Outlook for Mac
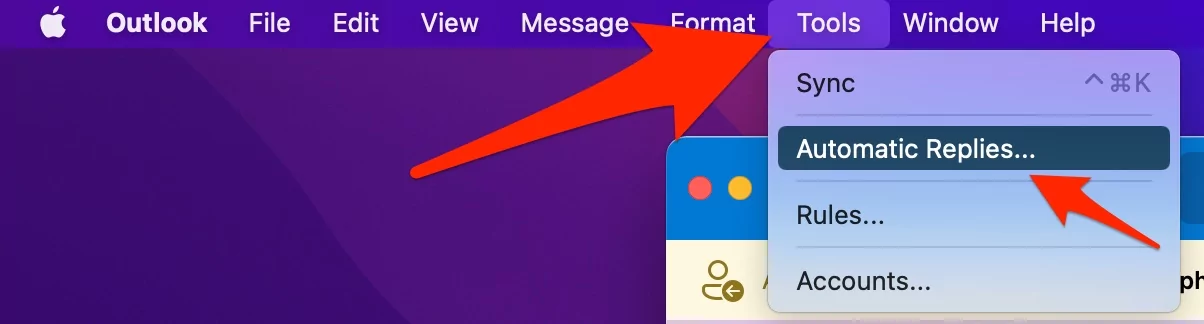
- Open the Outlook Mac app and Go to the Top menu, Tools > Automatic Replies.

- Select Account from the left side of the window for that Setup Automatic reply for a specific time, Select “Send automatic replies for account “emailaddress@outlook.com“
Now, Select “Reply once to senders within my organization” Type in the Message box what you Auto-reply in Automatic message.
- Now, Choose a specific time to Auto-Reply your email while you are not working, or Holiday or Out of the office.
- The next option is to, Send replies outside my organization from an Outlook account, there are another two choices, first is “Send only to my Contacts” and second is “Send to all external senders” then type the Message reply for the Outside organization or unknown that is not in your contact.

- Click on Ok to save the changes,

Now, Repaset the same process for Other added email accounts in the outlook app on Mac.
How do I know Auto-Reply is on? Turn off Auto-Reply on Outlook Mac
While we open the Outlook app on Mac, the Notification bar will see the alert message about auto-Reply is on for your account. Turn off or Manage Auto-Reply settings with Option “Automatic replies are on for emailaddress@outlook.com.”.
Turn off or Change Settings when we want.
For Windows
- Go to the Outlook App on your PC.
- Click on the File located on the top menu bar on PC Windows.
- Select Automatic Replies.
- Outlook 2007: Choose Tools and then Out of Office Assistant.
- Note: If you can’t find the Automatic Replies option, then jump to the next section and use Rules and Alerts to set up and enable out of office message replies.
- Choose Send automatic replies.
- If you’re sure to use the Automatic Reply for a certain time then, set the Start time and End time. Or else, manually you can turn this off.
- While selecting the Inside My Organization, compose the message to send it as an auto-reply. And if you select Outside My Organization, then the auto-reply will be sent to all the Emails such as Newsletters, Promotions, and more. That’s why always select My Contacts.
- Click OK.
Method 2: Using Rules and Alerts (For IMAP or POP (i.e. Gmail, Yahoo Mail))
Step 1: Create a Template
- Open Outlook.
- Click on New Email.
- Enter the Subject and compose the Message to tell the recipient that you’re currently unavailable. In the same message, you can also tell them about the time when you’re going to reply to them.
- Once you’re done with composing the message, click on File.
- Choose Save As.
- In the Save as type menu, select Outlook Template (*.oft).
- Rename the template indicating that it is an automatic reply or out-of-office template, so the next time you want to update the message it will be easy to locate on PC.
- Click Save and close the windows.
Step 2: Set Up Rules and Alerts for Automatic Reply
- Click on File and select Info.
- Click on Manage Rules & Alerts.
- Make sure to choose Email Rules
- And in the Apply changes to this folder option, select the Email ID for which you’re setting up automatic replies.
- Click New Rule.
- The Rules Wizard dialog box will appear, from there select Apply rule on messages I receive under the Start from blank rule header.
- Click Next.
- Select Where my name is in the To box option in Step 1: Select condition(s).
- Click Next.
- Again in Step 1: Select action(s) section, choose reply using a specific template.
- Now it’s time to choose the template that you’ve composed earlier, to do so, click on a specific template link in the same dialog box but under Step 2: Edit the rule description (click an underlined value).
- Click on the Look In menu and choose User Template in File System.
- Click on the template that you’ve created and then click Open.
- Select Next.
- Now you should see the Rules Wizard box with Are there any exceptions? message, click except if it is an automatic reply, and click Next.
- When Step 1: Specify a name for this rule, provide the name to this auto-reply rule.
- And in Step 2: Setup rule options, click on Turn on this rule option to activate this rule immediately or leave it unchecked.
- Plus select the Create this rule on all accounts option, if you want to use the same rule for other Email accounts.
- Click Finish.
- Click OK to close the dialog box.
Note: Outlook will use this auto-reply rule once for each Email address, and the second auto-reply will work when the next session of Outlook becomes active meaning when it is closed and re-opened.


