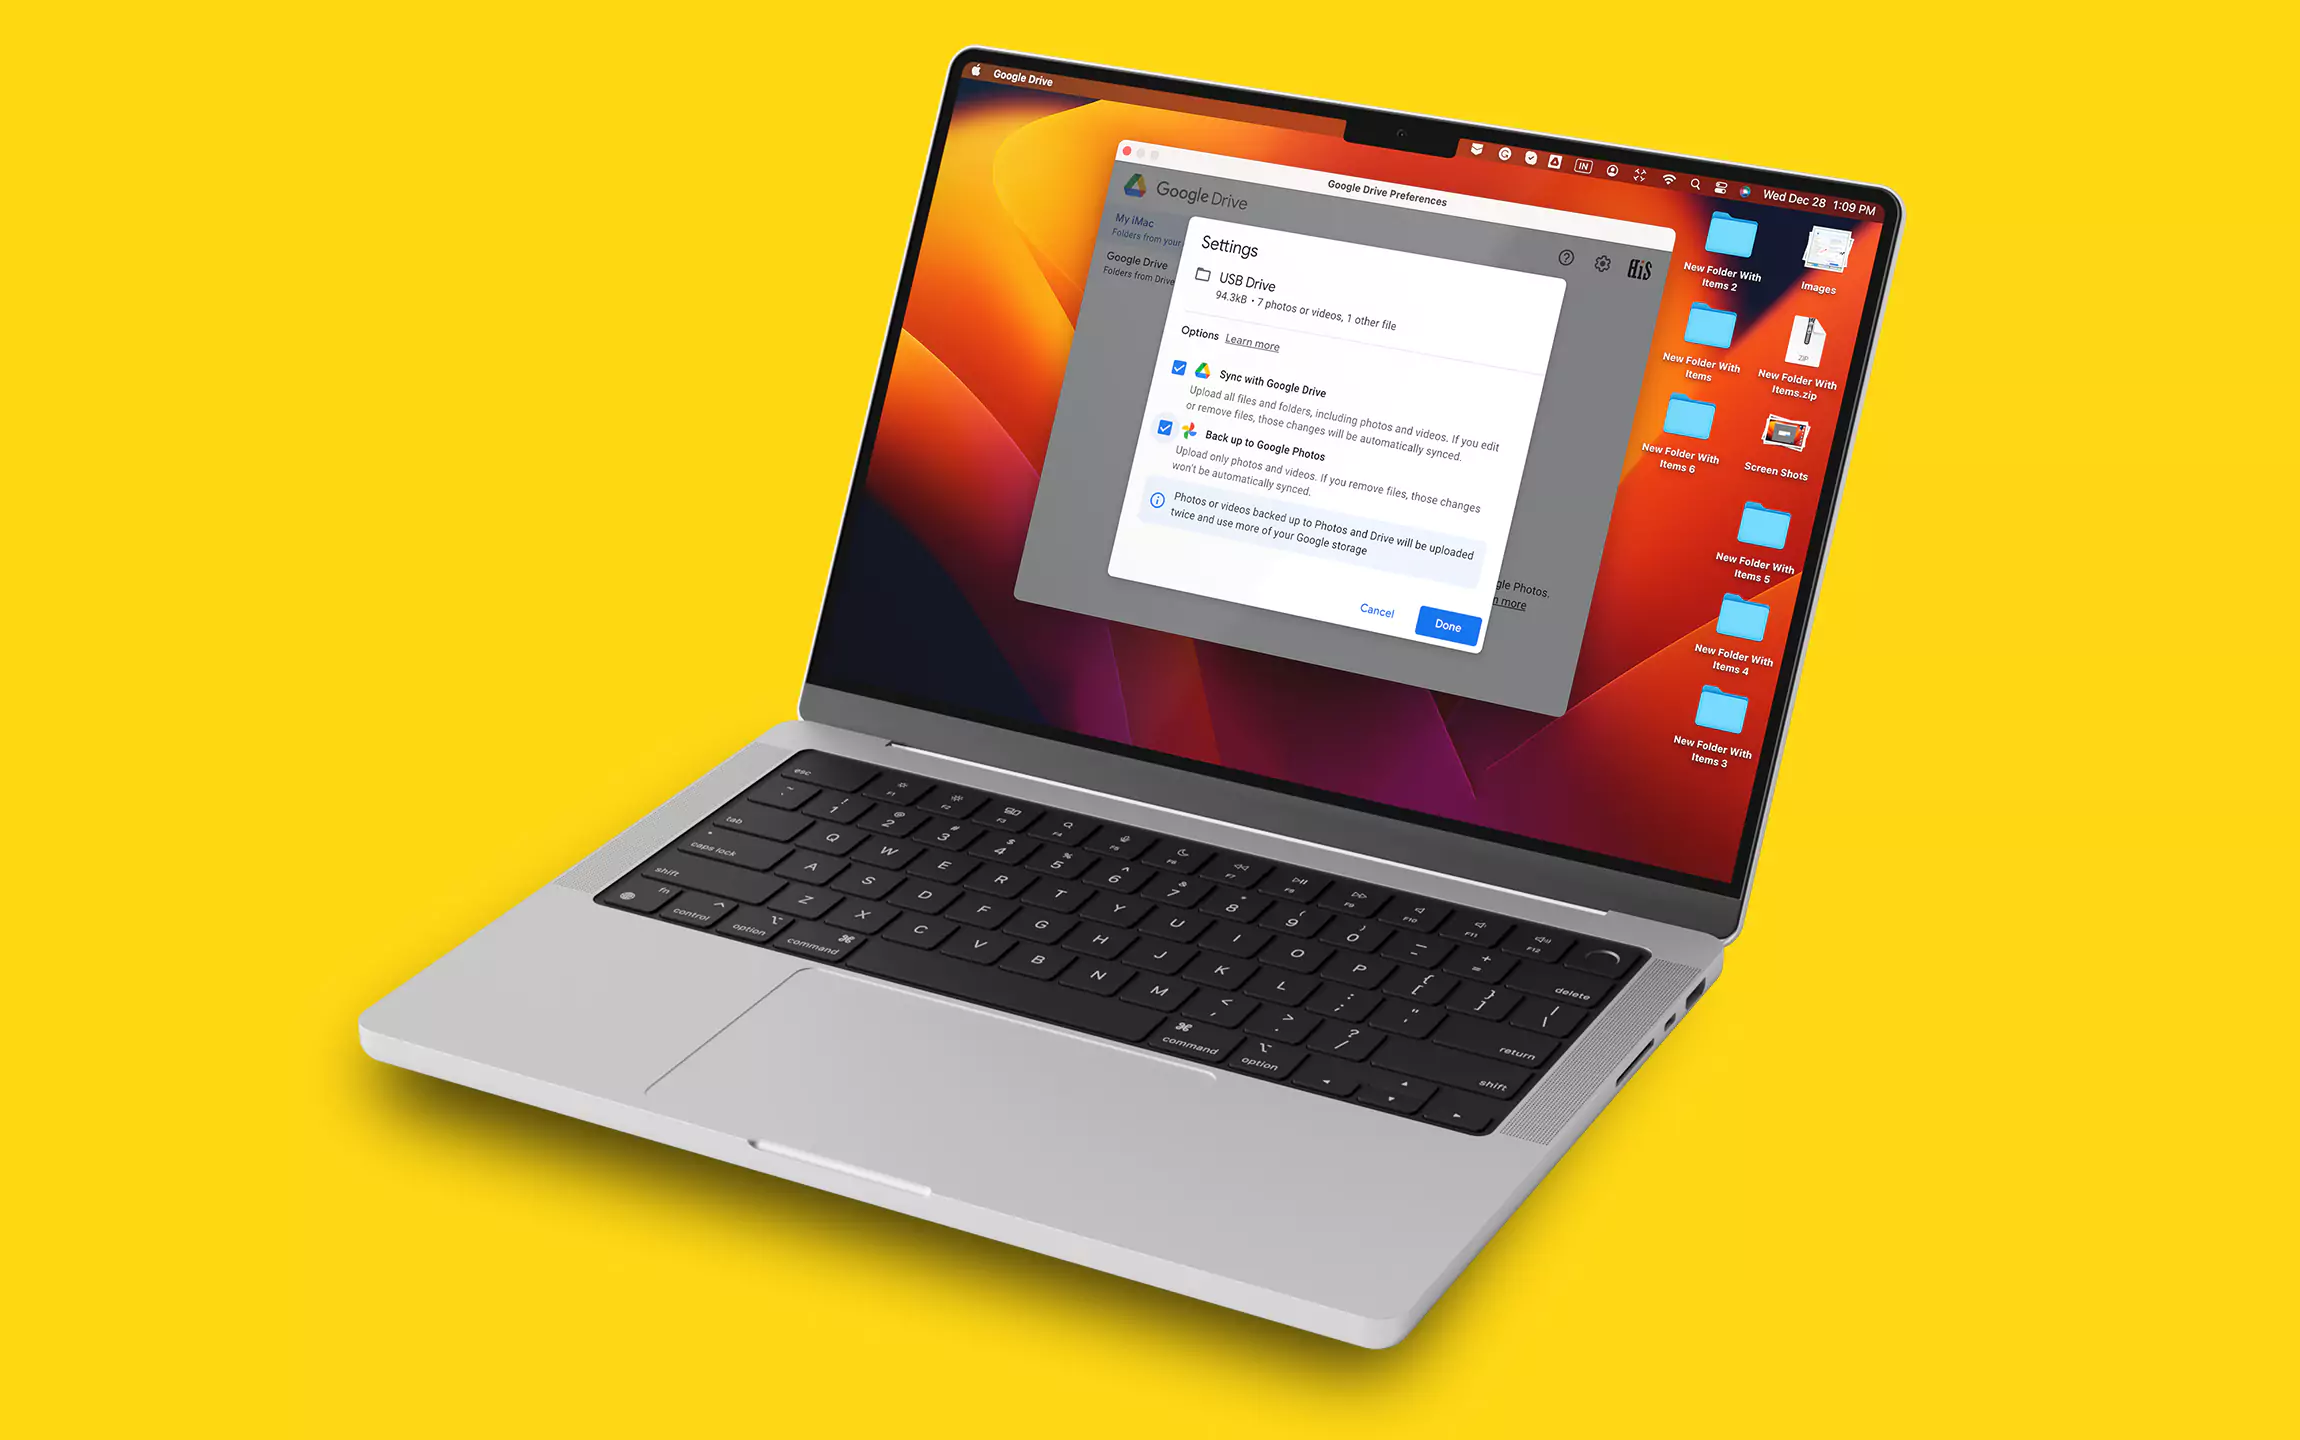
You may be using Google Drive for Desktop app on your Mac. And when you insert a USB device into your Mac, a notification appears with options to add that device to Google Drive. So here, we’ll show you everything you can do with that device. It includes adding that device to Google Drive, removing it from backing up and syncing, accessing it, and other options. We will take a look at each of them with screenshots.
Helpful Tips: How to Automatically Backup iPhone Photos to Google Drive
Understand Google Drive Notification for a USB Device
A notification will pop up near the Drive icon in the Menu Bar when you plug in a USB device to your Mac. The pop-up shows a message titled Add’ Untitled’. And says that Choose to upload files in ‘Untitled’ to Google Drive or Google Photos. It gives you two options, either Add a device or Not now. Here, ‘Untitled’ is the name of the USB device you connect to your Mac. It could be different for another USB device.

Additionally, when this notification appears near the Drive icon, it will disappear within a few seconds. So if you’ve missed selecting an option, you can get back to it by clicking the Drive icon and selecting the Notifications tab.
You can select the ‘Add device’ option to back up and sync the content to your USB drive. It will add this USB device to Google Drive, back it up, and sync. If you don’t want to add this USB device to Google Drive, you can select the ‘Not now’ option. It will add this device to the ignored USB devices list in Google Drive preferences.
Additionally, by default, there is a checkbox above these options saying, ‘Remember my choice for this device’. If you keep it checked, it will remember the option you selected for that device every time you connect it to your Mac. You can uncheck this box If you want to choose a different option the next time you connect that USB device.
Remove a Device from Ignored USB Devices List
Want to Prevent Google’s Backup and Sync Prompt? Here’s the solution,
If you forgot to uncheck the box and selected the ‘Not now’ option, you can see this device in the Drive preferences. Click on the Drive icon in the Menu bar to see this device in preferences. Then click on the Gear icon at the upper right corner and select preferences.

So now the Google Drive Preferences window will open on your screen. Here, click on the Gear icon at the upper right corner, and a Settings page will appear in this window.

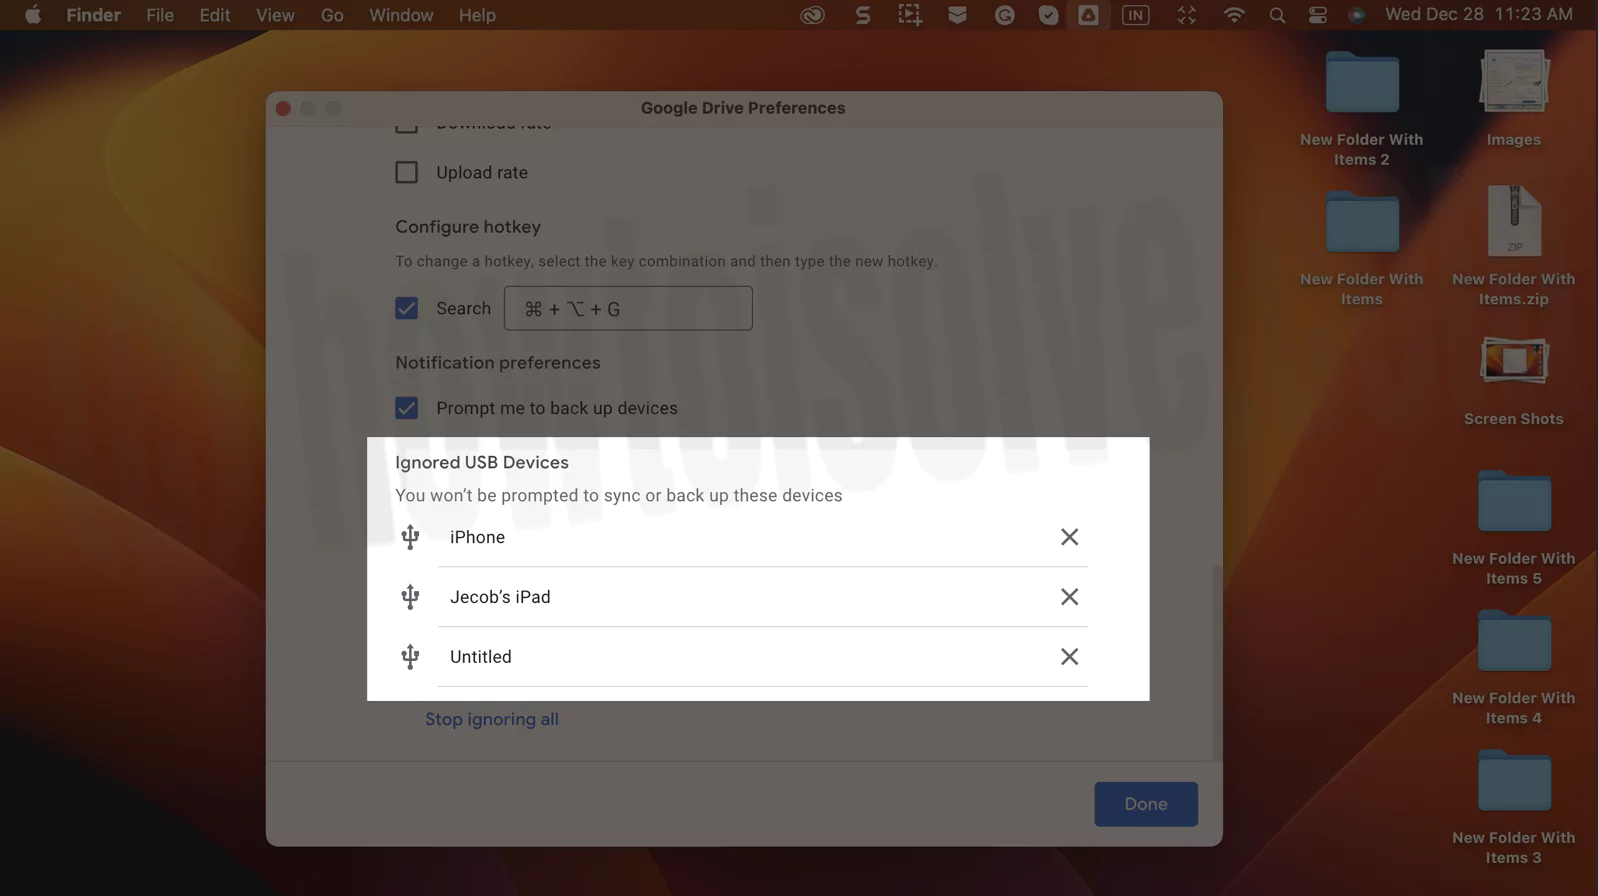
You need to scroll down to the bottom of this Settings page. Next, you will see the ‘Ignored USB devices’ list. Here, you can find the devices to which you have selected the ‘Not now’ option. If you’ve kept the ‘Remember my choice for this device’ box checked and want to choose a different option for a device the next time you connect it, you can click on the cross symbol on the right side of that device name. The device will appear in notifications the next time you connect it.
If you’ve applied ‘Not now’ to more than one device, you can click on the ‘Stop ignoring all’ option at the bottom. It will remove all devices from the list for the next time to appear in notifications when you connect them.
Stop Google Drive Desktop Notifications
Here’s how to stop google drive popups for adding a Device as Backup Drive.
You may want to avoid seeing a notification from Google Drive when you connect any device to your Mac. So you can stop Google Drive from notifying you to back up the device you connect to your Mac. For that, you can go to the Google Drive Preferences from the Drive icon in the Menu bar.

Then Go to Settings from Preferences, as shown in the first section.

Here, you will find an option to uncheck the box for ‘Prompt me to back up devices’, as shown below.
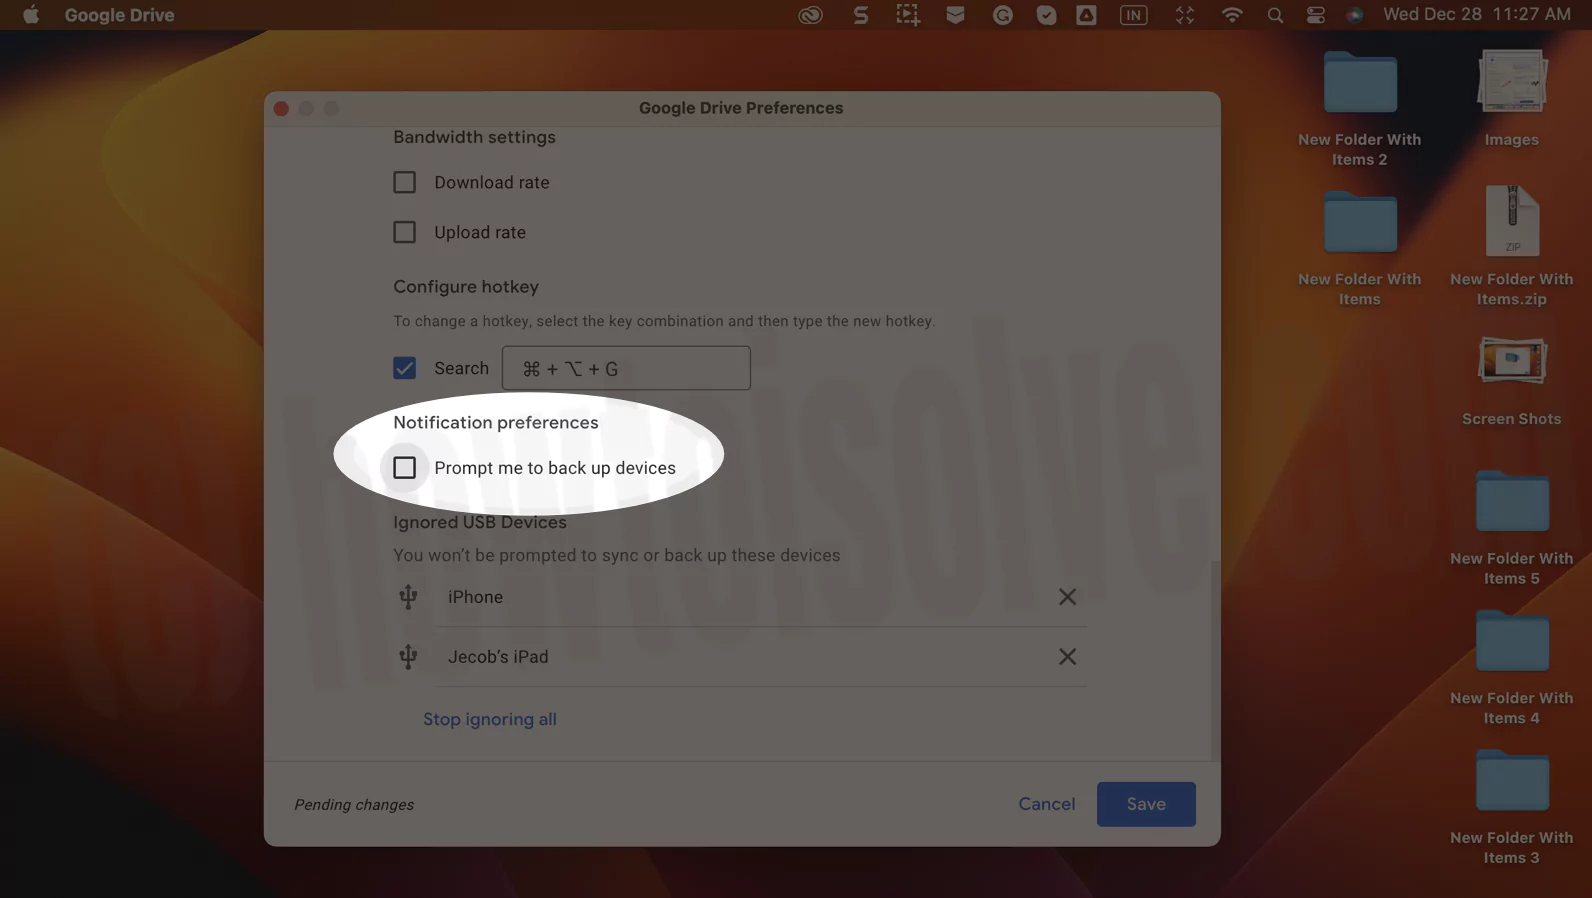
After unchecking it, click on the Save button. So a pop-up will appear saying Some changes require Google Drive to restart. Here, select ‘Restart now’ or click on ‘Later’ if you want to restart it later.

So after Google Drive restarts itself, it will stop notifying you to back up the device you connect to your Mac.
Add a USB device to Google Drive for Backup & Sync
If you select the ‘Add device’ option in the notification when you connect a USB device to your Mac, a new pop-up window will appear, as shown below.

There are two checkboxes, one to back up the device content to Google Drive and another to backup photos and videos to Google Photos. You can select Google Drive if your device contains mixed files such as documents, photos, and videos. But if it contains only photos and videos, you can select Google Photos.

This way, the files are stored on either of them. But if you check both boxes, the device files other than photos and videos are stored on Google Drive, but the photos and videos are stored on both of them. After you check the boxes at your convenience, click on the Save option. So a pop-up may appear to grant permission to the Drive app to access the content of the USB device.
After you allow access, the content of the USB device is uploaded to Google Drive. And you will see a Dive notification titled ‘Untitled uploaded’ saying, Files in Untitled have been successfully uploaded to Google Drive. Now, you can access the device files from the Google Drive folder in the Finder app.
You can open Finder and select Google Drive in the Sidebar. After you click on it, you can go to your USB device folder by opening ‘Other computers’> ‘USB and external devices’> ‘Untitled’. You can learn to manage your USB device folder from our’ How to Sync Google Drive on Your Mac’ article.

If you want Back-Up & Sync a USB Device to another Google Drive account on Mac, add a new Google Account to Google Drive and use it for Backup.
Stop Backing Up a USB Device to Google Drive
Do you wont to stop Google Drive Backup & Sync from asking to upload?
After you add a USB device to Google Drive for backup and sync, it will appear in the Google Drive Preferences window in the My Mac tab. You can see it by opening the preferences from the Drive icon in the Menu bar.

From here, you can stop backing up the selected USB device to Google Drive. For that, you need to click on the USB device name shown in the window, and a pop-up will appear with the same window as when you selected the Add device option after connecting.
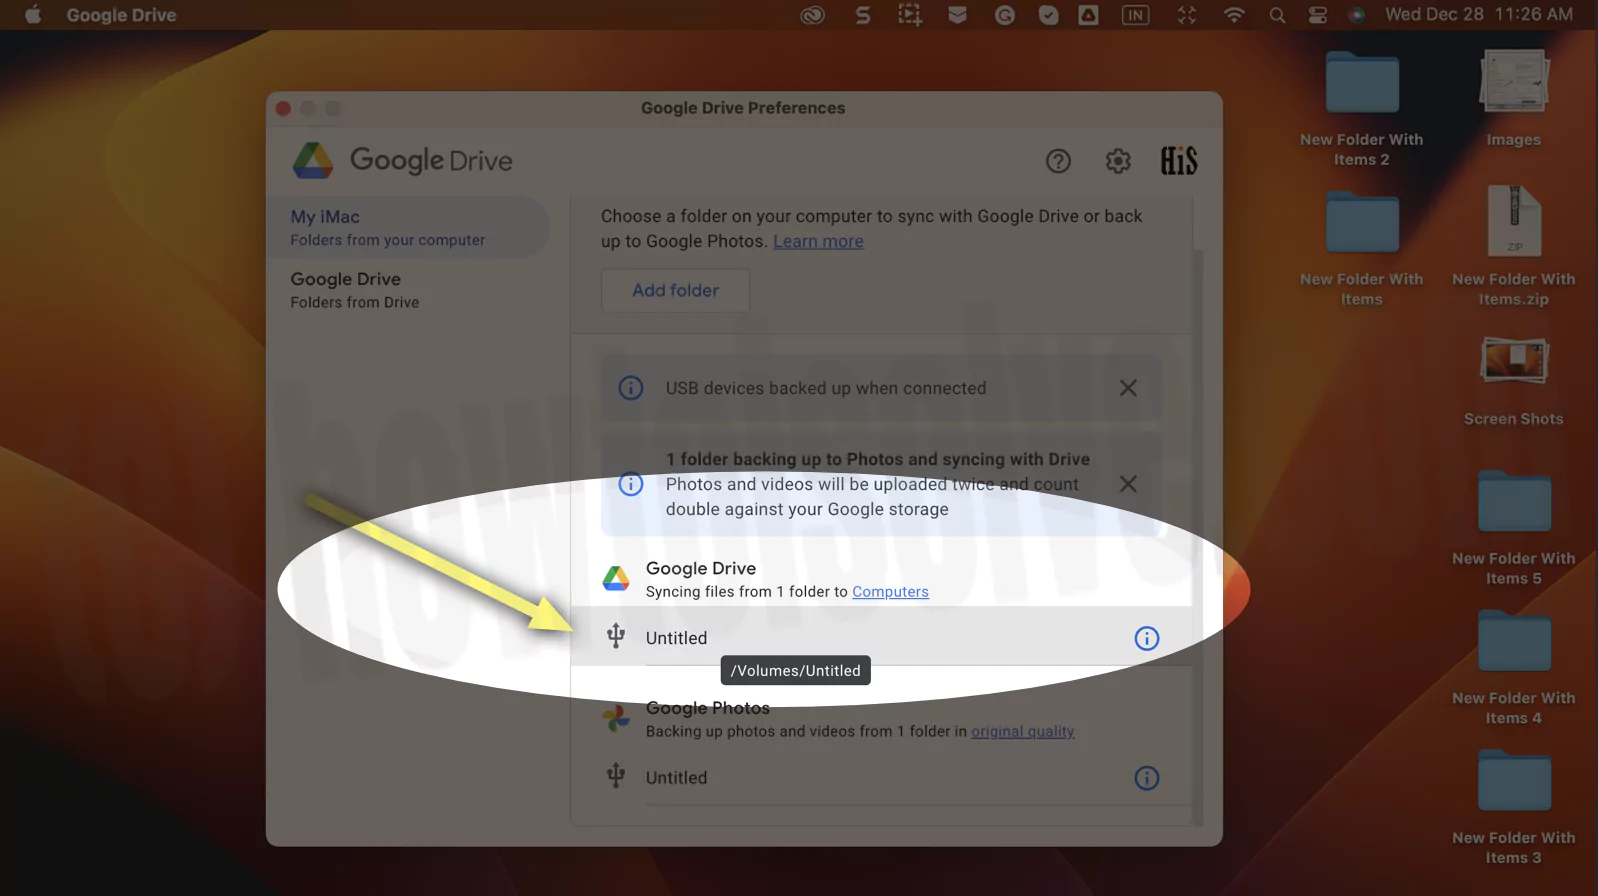
Now, you need to uncheck the boxes you checked while adding that device to Google Drive and click on Done.

So a confirmation pop-up will appear titled ‘Stop backing up’. It says that new files you add to that USB device will not sync to Drive, but the existing files will stay on our Mac. After you confirm, Stop backing up your USB device, you need to click on the Save option. It will stop syncing that USB device to Google Drive and remove it from that list.

See Google Drive Back Up and Sync Errors
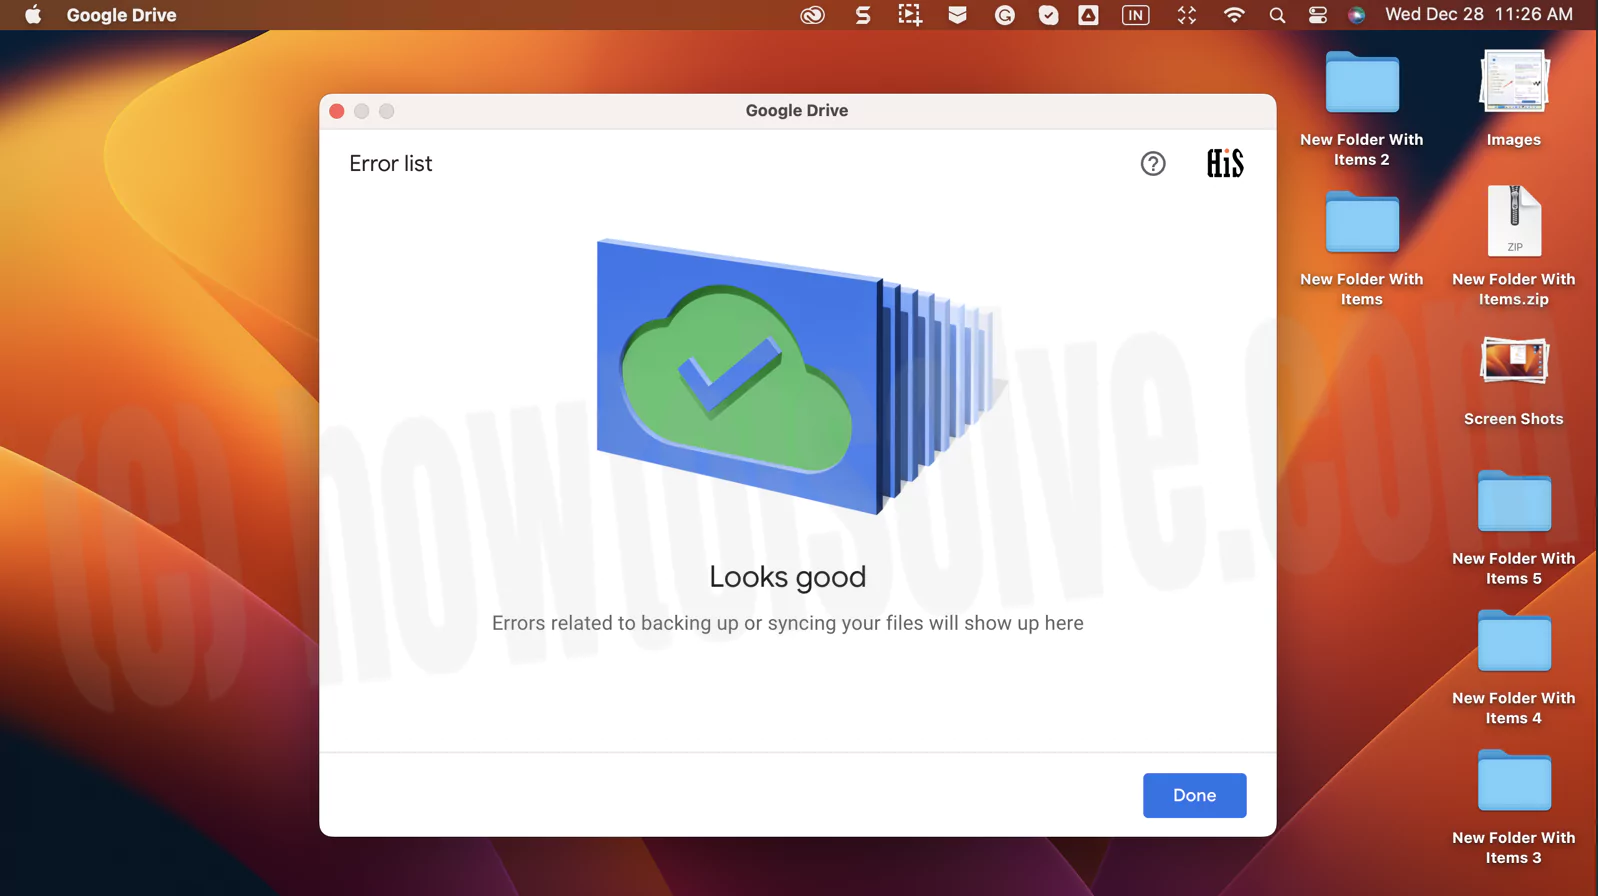
In doing the above processes for adding your USB device, backing up and syncing, and stopping, if there are any errors, they will appear in the Error list. You can access it from the Drive icon in the Menu bar.
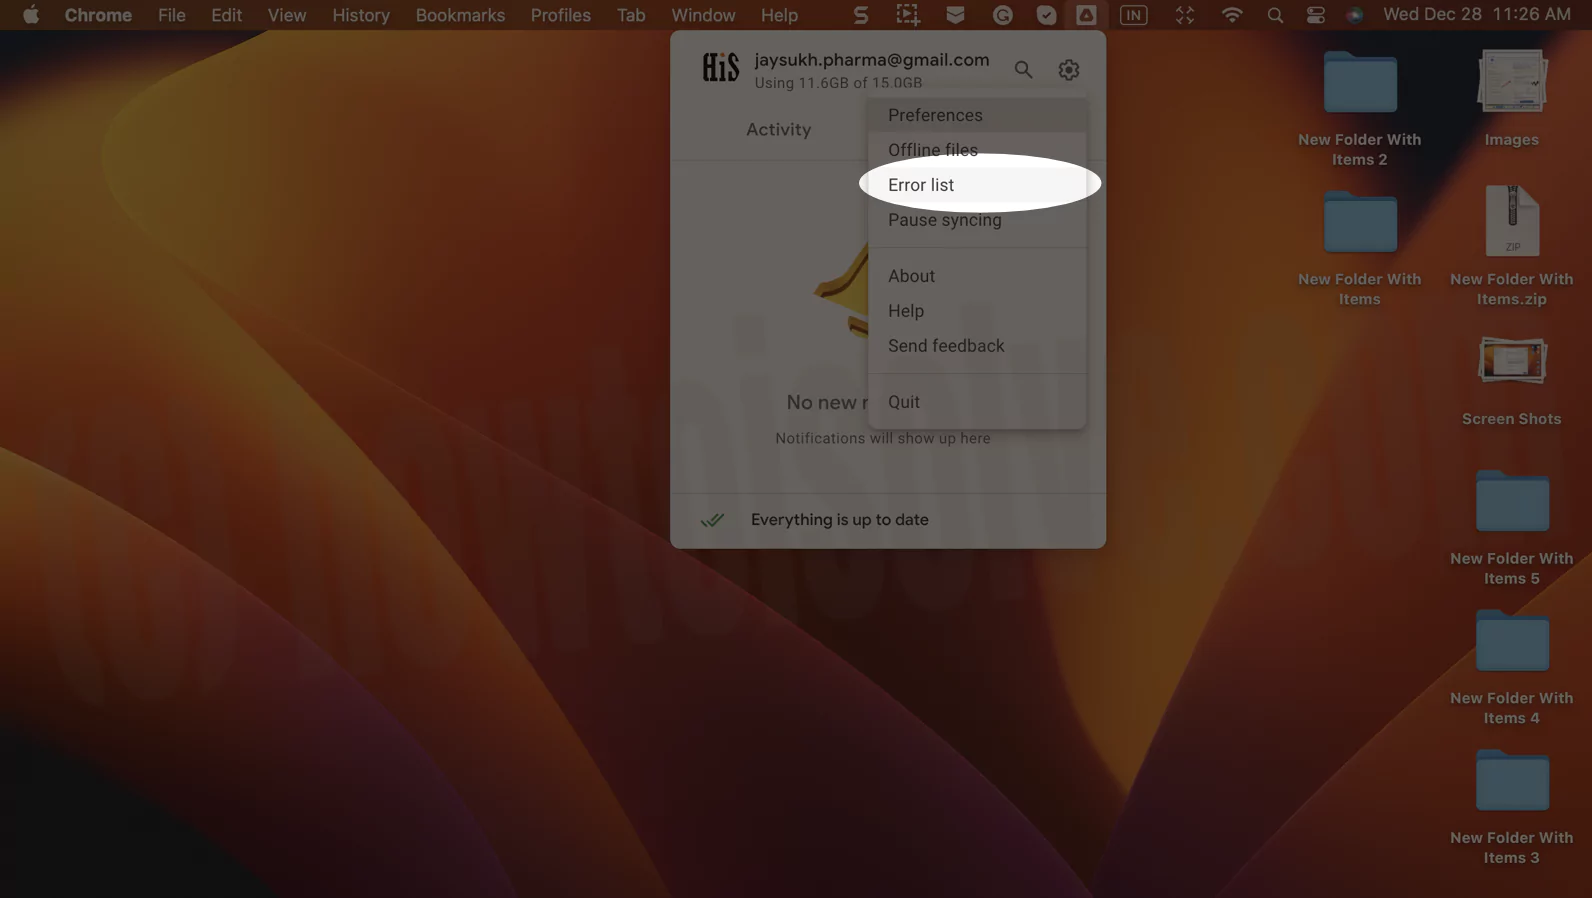
You will find the ‘Error list’ option in the Drive icon menu. If there are any errors, they will show up in this list. Otherwise, it will show a message saying, ‘Looks fine’.
Right Now! Google Drive is syncing with your Mac and connected External device on Mac, are you facing issues with Google Drive Not Syncing on iPhone Google Drive app? You should follow the troubleshooting given on this link.
If you want Back-Up & Sync a USB Device to another Google Drive account on Mac,
You can stop Gogle backup and sync popup from the Settings page in Google Drive Preferences. You can do it from the Drive icon in the Menu bar as shown in the last section of this article. Click on the Google Drive icon from top menu > Settings icon > Pause syncing.
You can change Google Drive backup settings from Google Drive Preferences from the Drive icon in the Menu bar.
Google backup and sync helps you to save your data on cloud to keep it safe and accessible from any device. It is not compulsory, but it can prevent you from data lost if your device or drive fails.
Yes, you can disable Google Drive on Startup from Settings in Google Drive Preferences. You must uncheck the box for ‘Launch Google Drive on system start-up’ in Settings. Go to the Apple Logo > System Settings > General > Login items > Remove Google Drive. or From Google Drive Settings, Click on Google Drive on Top Menu > Settings Gear > Preferences > Uncheck “Launch Google Drive on system startup”. under “Launch on system startup” > Done to apply changes. That’s it.
