Are you showing an AirPods Pro connection Error while you set up with your iPhone or iPad? Worried Message in popup says and looks like the AirPods is not yours. Behaving like lost mode it turned out even AirPods is mine.
Don’t worry because several AirPods Owner receiving the same problem because of common reasons explained in this troubleshooting tutorial.
Fix the Not Your AirPods Pro
Solution 1: It’s a Software Bug
Sometimes internal software issues and bugs in iOS version updates create problems like this and asking to re-verify the airPods is your own after the update.
First, check your iPhone is updated to the latest version.
Go to the Settings app > General > Software Update > Download and install.
If it’s updated to the latest iOS 15.4.1 then Reset your AirPods Pro and Try to connect with your iPhone, Resting the AirPods pro won’t create a serious problem so don’t worry. it just Disconnects from the Old iPhone or iPad. and Start a New Setup on your Device. as you know, AirPods has no activation lock like other iOS devices so no problem with the setup of your AirPods for account level.
Solution 2: Just Reset AirPods and Connect will fix the issue
To Reset AirPods Pro, Put Both the Left and Right AirPods into the charging case, and Make sure your AirPods charging case has enough charge if not then connect it to the Power supply and follow the next step after 10 minutes.
Keep the charging case Lid Open, Now, Press and Hold on the Back button of the charging case. until the amber light on charging cash flashes White or Red.

Once the AirPods Pro is Reset, Forgot and Remove the AirPods from the iPhone Bluetooth settings of your iPhone.
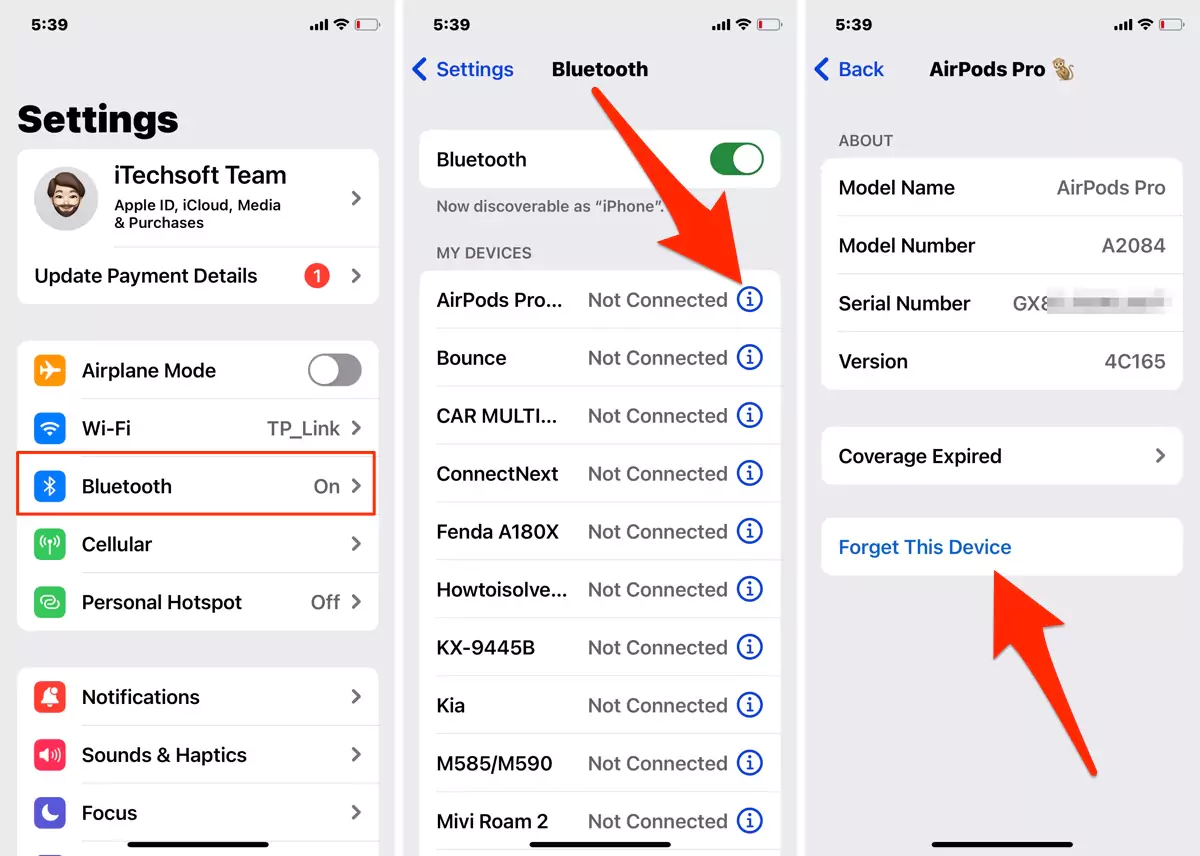
Go to the Settings app > Bluetooth > Tap on (i) button next to the AirPods Pro name > Forgot this device > Forgot. that’s it.

Now, Keep the AirPods pro near to your iPhone with the Open Lid of the charging case.
the Popup will appear to be set up like earlier.
Still, if the issue is not fixed then try on another iPhone [Your friends or family’s iPhone or iPad].
Solution 3: Wait for the New AirPods Firmware update
In the AirPods pro firmware update procedure, we can do it forcefully like other devices – iPhone, iPad, and Mac. Firmware update in AirPods pro is automatic, and it’s done in backgroud while the AirPods is connected to your iPhone and your AirPods has enough sharing.
To do software updates as soon as possible, Connect your AirPods to your iPhone. and also connect AirPods to the Power supply with Both left and right airpods inside the case. and the Charging case lid should be closed.
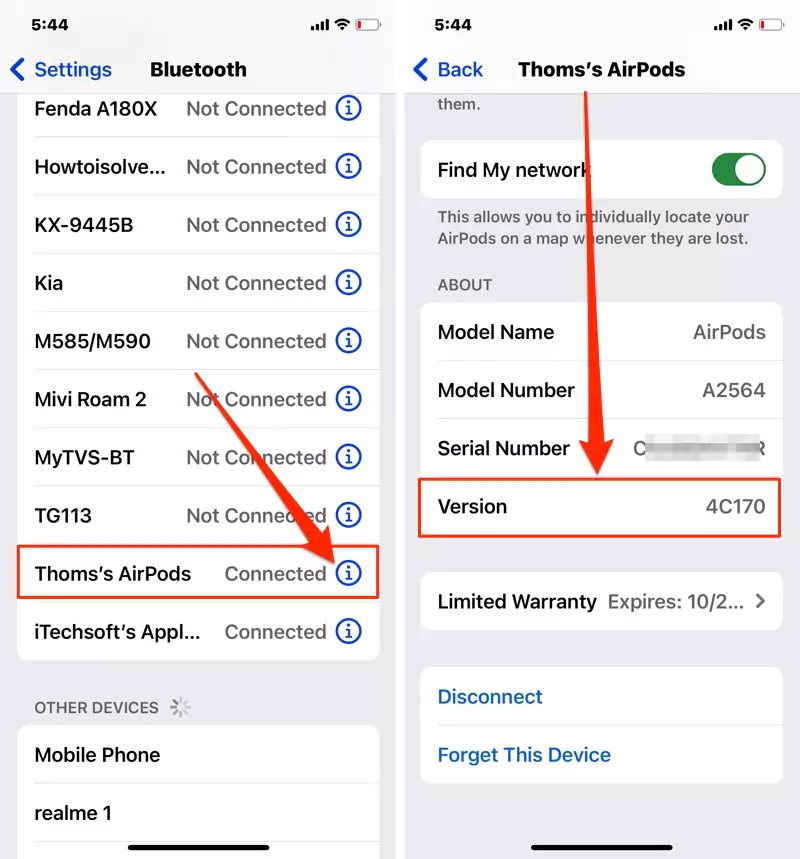
To check the Current AirPods Pro firmware version, Connect your AirPods to your iPhone, and Go to the Settings > Bluetooth > Tap on (i) button next to the connected airpods name. Scroll to the About section and see Version.

That’s it.
To see the Lateset Version of your AirPods Pro, Go to This link and see the Current firmware.

To see the Lateset Version of your AirPods 3, AirPods 2 or AirPods, Go to This link and see the Current firmware.

More Help!
If nothing worked and Want to fix it on an urgent basis, then I recommend taking a backup of your iPhone first and Downgrading to an Earlier iOS version of your iPhone.
Or

Amazing guide. this is very helpful keep sharing more like this