Are you receiving an error, rules keep loading, or showing rules not supported for this account in Outlook 365 on Mac? Fret not, you’re not alone! Keep reading this troubleshooting guide, as we have mentioned a proven trick to fix it. Using this Outlook rule, we can do like auto-forward iCloud Email to Gmail on iPhone.
New Outlook For Mac Rules Not Supported? 2 Ways to Fix It!
There are different ways to fix it, one is switching Outlook to an older version and another via Outlook Web. So do follow any of them at your convenience.
Method: 1 Use Outlook Old Version
Unfortunately, Outlook won’t imply the ability to set the rules from the New Outlook. It means that if you are on the New Outlook version, you need to revert to the older version and then check for the problem.
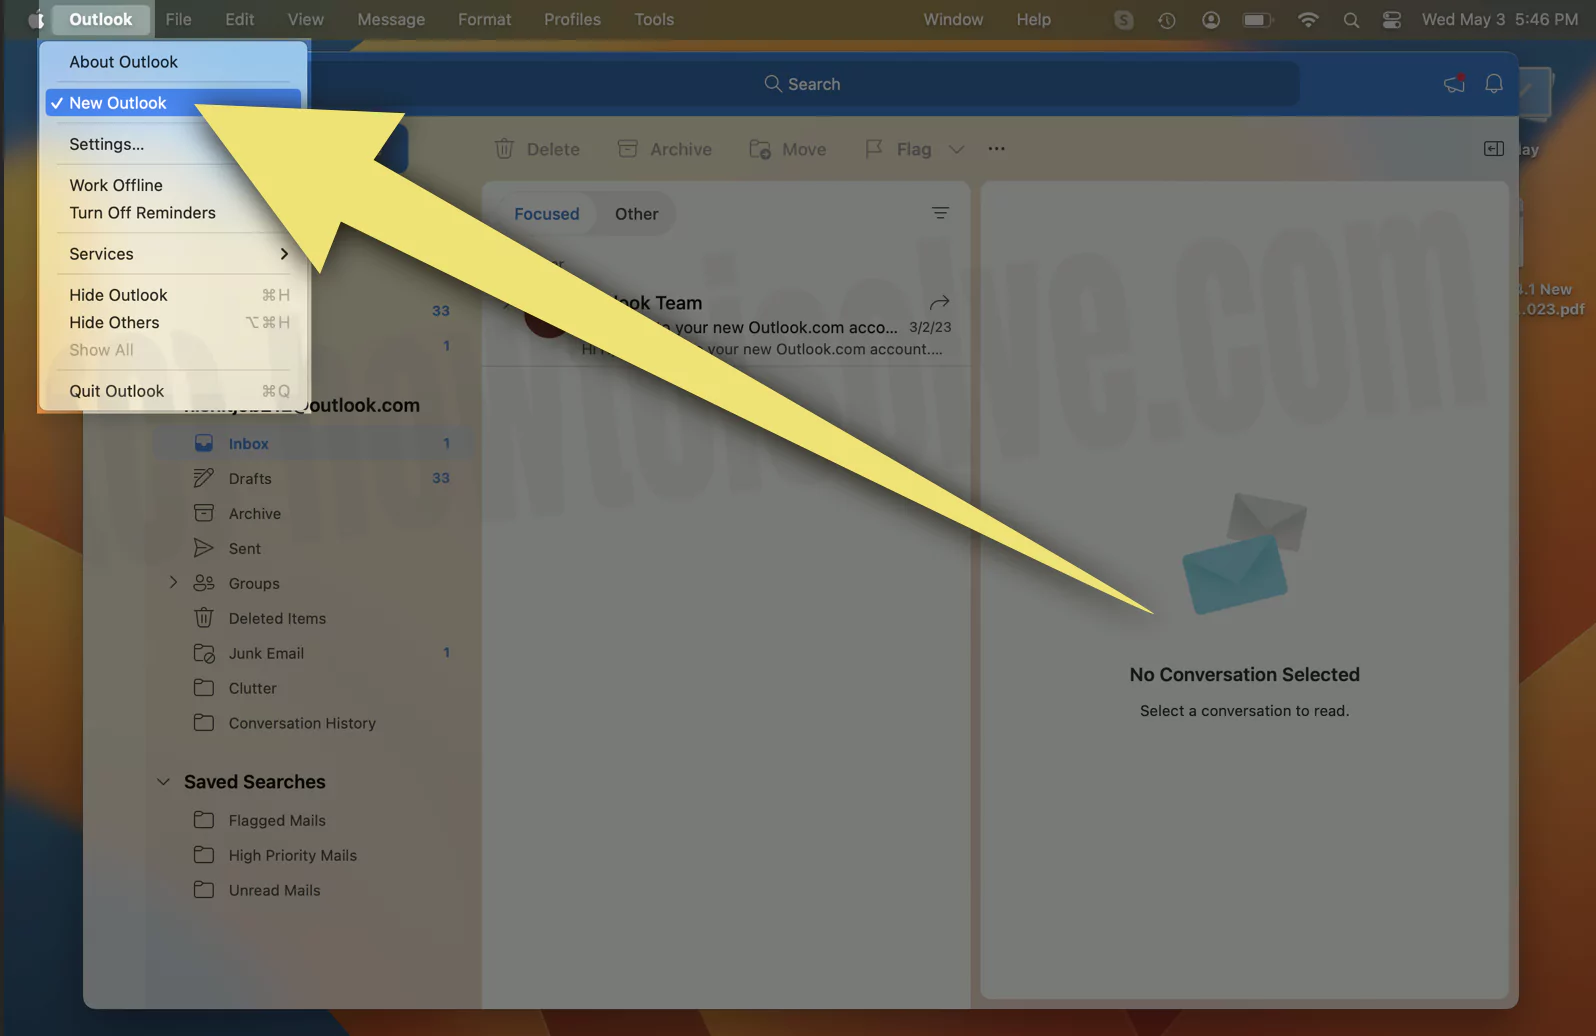
1→ On the new Outlook version, click on Outlook from the menu bar.

2→ Click on New Outlook.
3→ And from the prompt, select Revert. After this, you will be navigated to the older outlook.

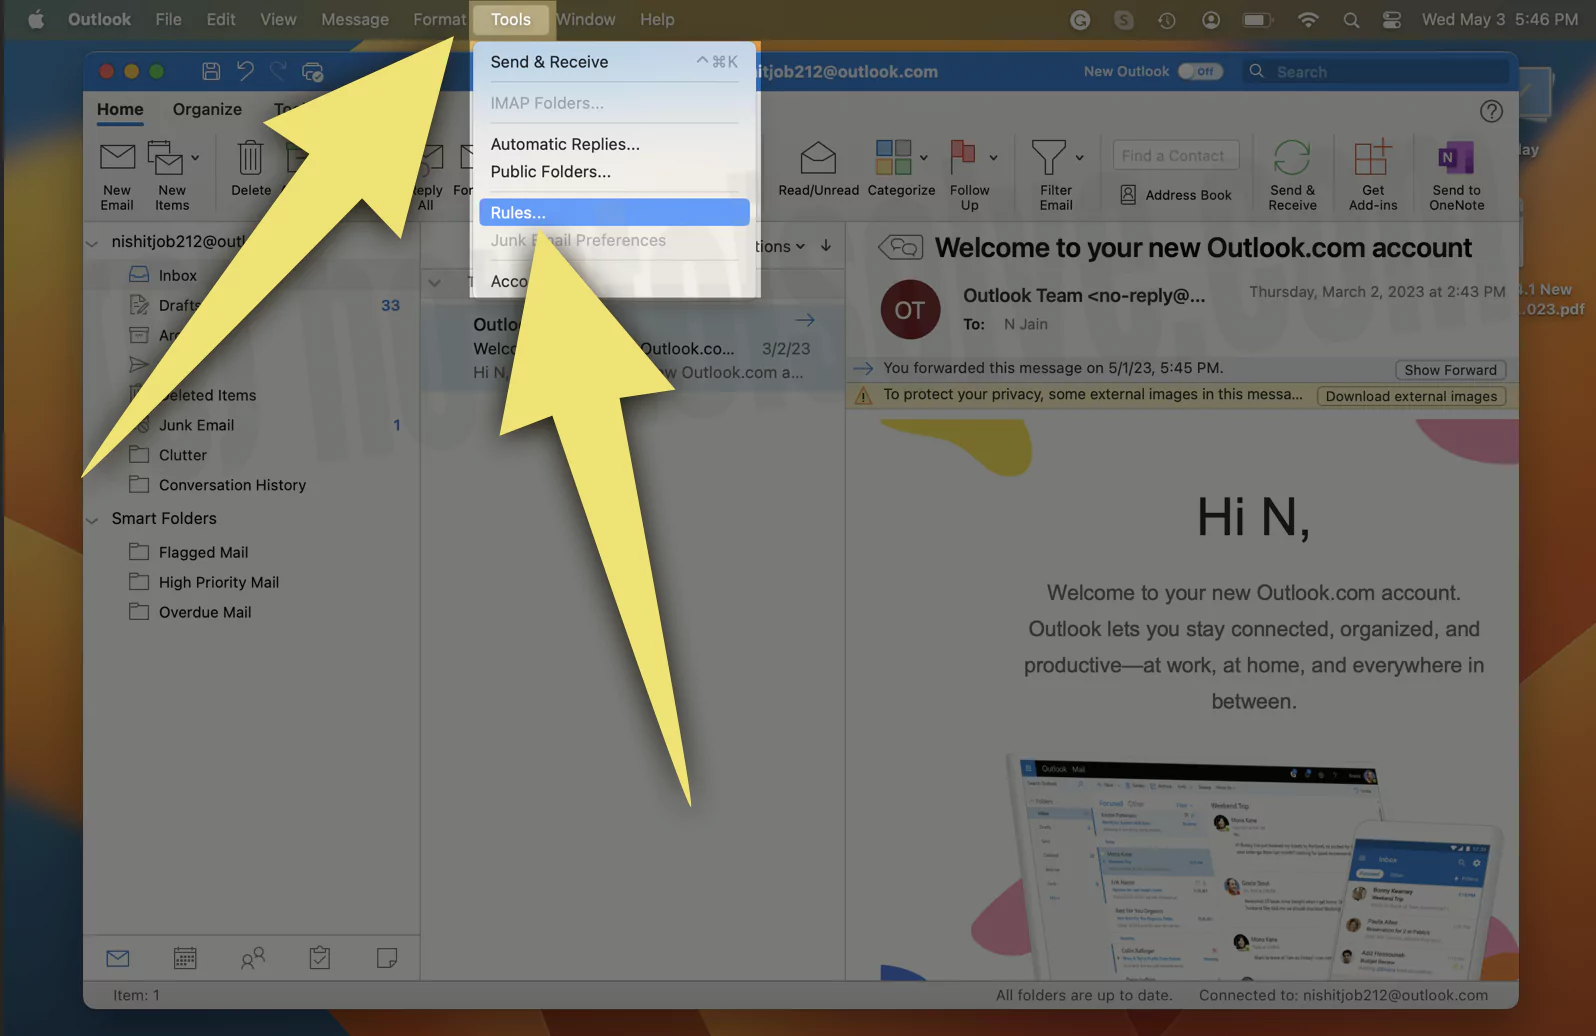
4→ From there, select Tools. Choose Rules…

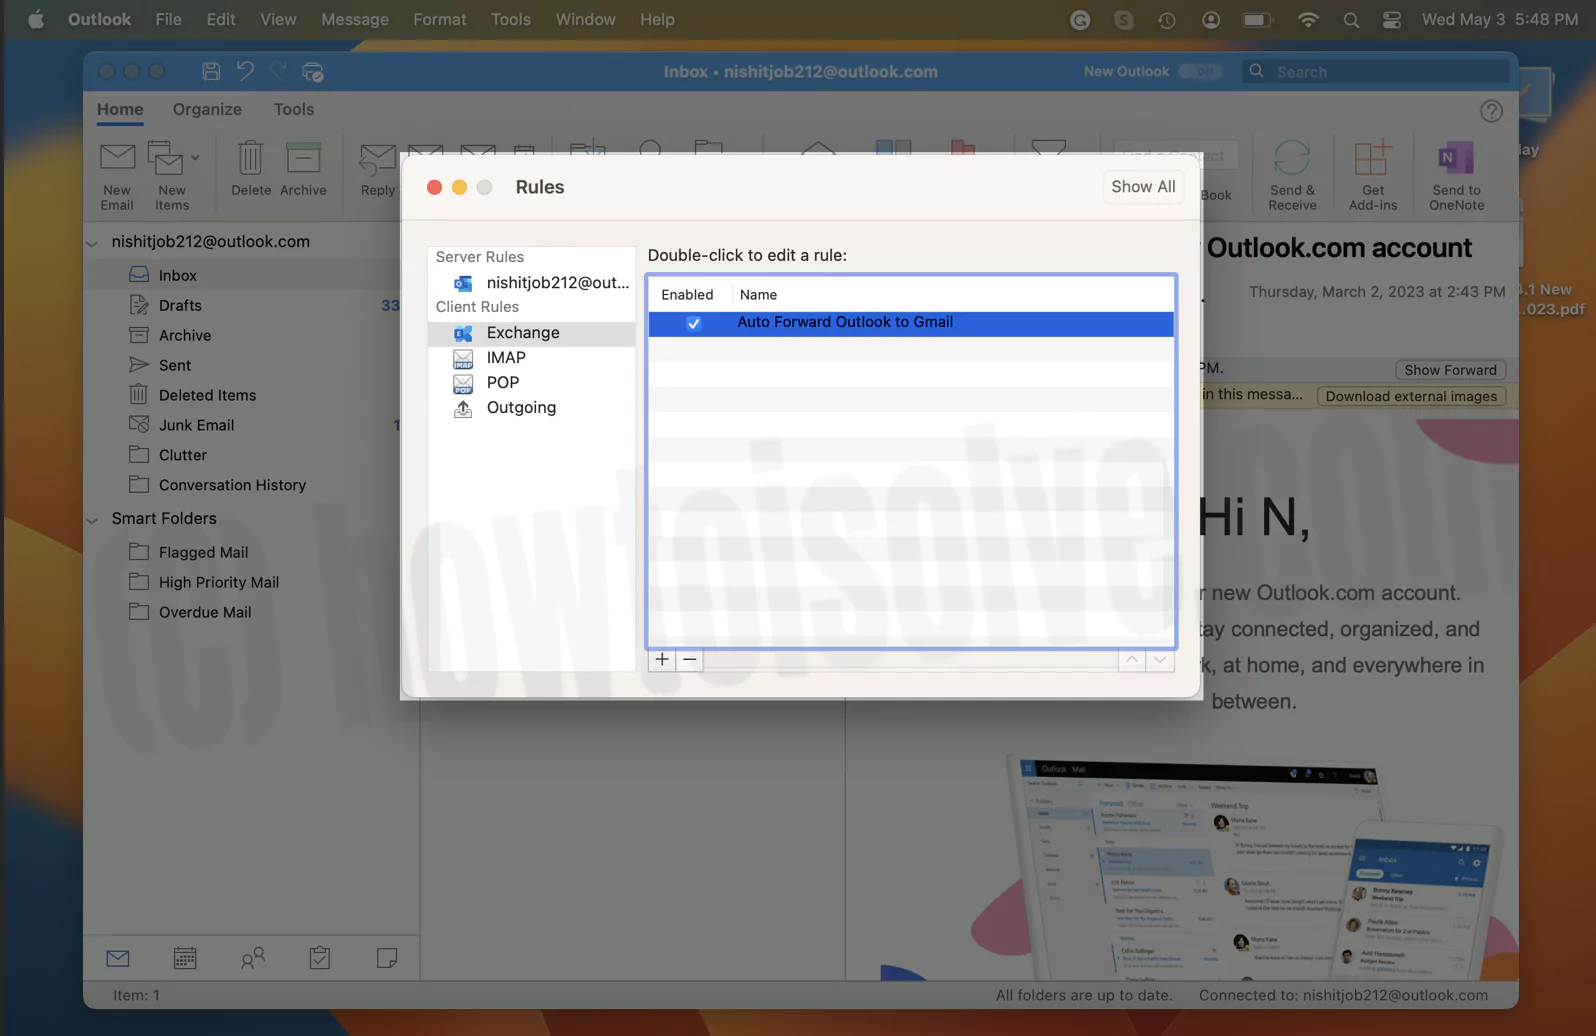
5→ Select the “+” Button to add New Rules.

6→ And from the next screen, configure the desired rules for your Outlook Mail.

That’s It! Rules are Created for the Exchange account in Outlook 365 Mac app.

Method: 2 Using Outlook Web App
Another way to configure the Outlook 365 rules is via Outlook web version. To get it done, follow the steps below.
1→ Navigate to Outlook.com and sign in using the preferable ID.

2→ And select the Settings Gear Icon from the top right corner.
3→ Click View All Outlook Settings.

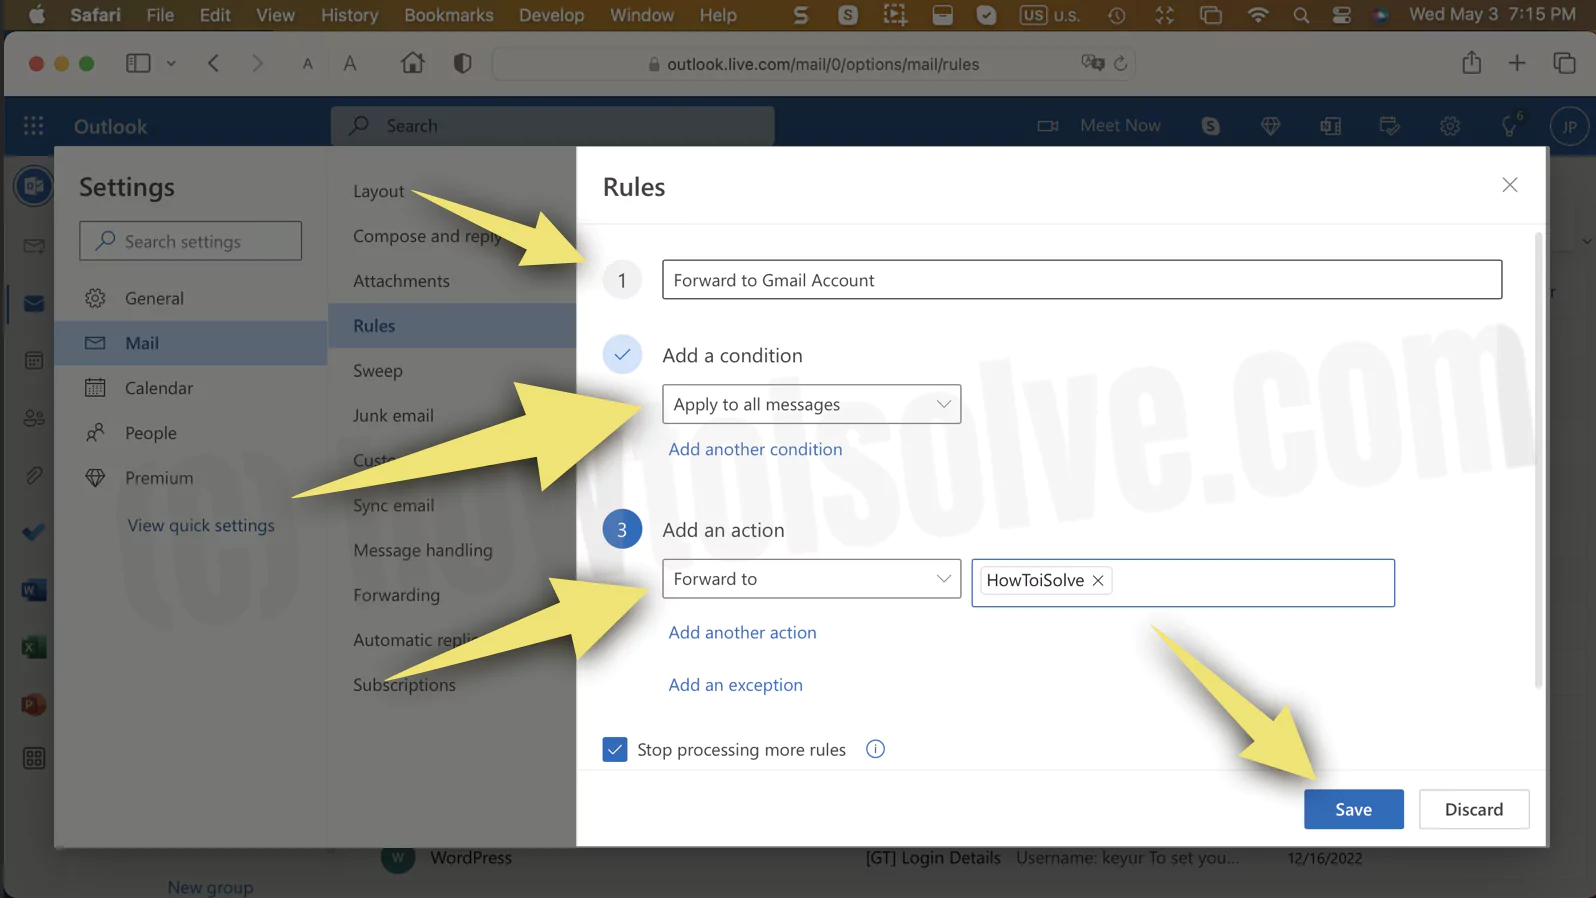
4→ Select Rules from the next window.

5→ Click on Add New Rules.

6→ And now, go through each setting individually, and set up the rules as per your convenience and need.
Just like that, we can set Out Of Offline outlook account on any device.
How to Fix It When Outlook Rules Are Not Working
Configuring the Outlook rules can streamline your mailboxes and helps to work more efficiently. But what if the Outlook rules stop working on Mac. Fuss not; below troubleshooting steps will let out the broken rules. So do follow it!
Causes For Why Outlook Rules Not Working On Mac
Usually, various glitches within Outlook can prevent Outlook Rules from running automatically. And in some cases, no rules are implied at all. However, there are various possible reasons.
Note: Size matters in Outlook rules. For many instances, the size of Outlook rules will be limited to 64KB or less. It’s multiple simple Outlook rules to run automatically; the size doesn’t matter. Conversely, the size can affect dominantly if you have an array of complicated Outlook rules. Some of the below workarounds can help to resolve the size-related issue.
1→ Check Outlook Server Status: The primary step is to ensure that Outlook Server isn’t facing an outage. If so, your Outlook rules may not work automatically. The solution is to wait until it gets fixed on its own.
2→ Delete Older Rules: Yes, if there are an array of older rules which you are no longer using, simply delete them.
3→ Try changing the rule name: It isn’t proven why it works, but many users found it working well. For this, navigate to the older Outlook version. Click on Tools from the menu bar. And then select Rules. From the next window, click the specific type Mail Address. Now double-click on the problematic rule from the right side. Up next, change the name in the name field. After this, force quit the Outlook Mail App and check for the problem.
4→ Delete And Recreate Outlook Rule: There are instances where you might have misconfigured the Outlook rule. Therefore deleting and recreating the outlook rule is a better option to go with. Head to the Old Outlook Version. Click on the Tool from the menu bar, and further, click on Rules. Now select the type of Mail Address. Next, double-click on the problematic rules and click on the – Minus Icon at the bottom. After this, recreate the Outlook Rule as you have done before.
5→ Remove and re-add the Account: The issue might be at the Account level. And to fix it, the best solution is to remove and read the account. For this, access Outlook. Select Outlook from the menu bar. And click on Settings… > Accounts. Choose the problematic Account from the left sidebar, and lastly, click on – Minus Icon at the bottom.
Final Thought!
While I have explained how to fix rules not supported for the new outlook on Mac. In addition, I introduce you to solutions to fix Outlook not working on Mac. If you have any queries about the Outlook Rules on Mac, please ask in the comment box below.
