People using the Mac app don’t have automatic spam and junk email detection. Users must manually block email addresses from the settings. If you have multiple email accounts, the Mac app can’t auto-block spam; it depends on your mail provider.
The native email app on Mac allows users to manage incoming emails through different settings. In this article, I’ll learn all three methods.
Like the iOS mail app, Block and Unblock email address on iPhone, iPad is easy but more precious on the Mac mail app. In Accurate ways, we can add a particular Email address to the blacklist or Create a Rule for the email that you receive in your Inbox.
3 Ways to Block & Unblock Email Addresses in Mac Mail App
These all are the techniques that work to block an email address permanently.
1. Block and Unblock Emails on Mac Mail App
For beginners, that’s a great way to stop unwanted emails from coming to your Inbox. This Option will mute the Notifications, which won’t appear in your Mail inbox. If you cannot activate the addition of an email address to the blocking list, then try blocking using rules that show alternate methods of stopping email on your Mac Mail app inbox.
- Open the Mail app on Mac.

- Go to the Mail Menu and click the Settings (Preferences) option.

- Click on the Junk Mail tab and see the Blocked section using Tab.
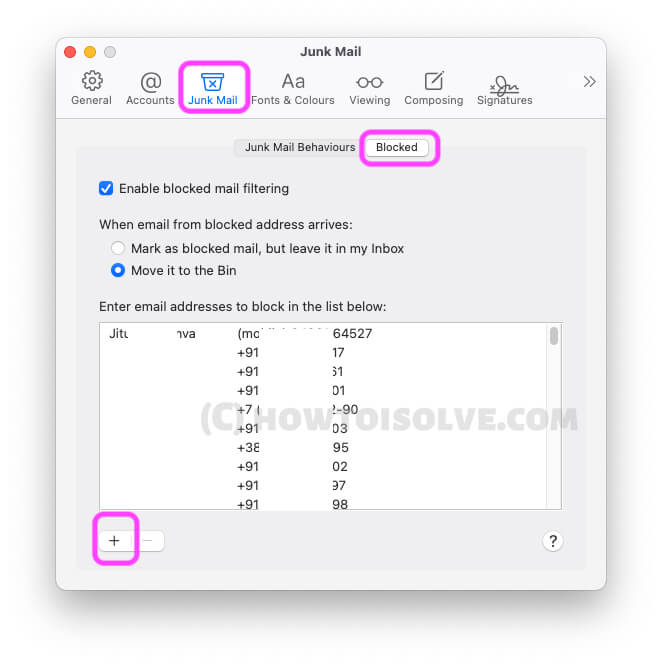
- Click on the Plus button to add a Blocking Email address, or you can type from saved contacts.
- Once you do it and add it to the email booking list, a New email with a blocked address will move to Bin directly, so it doesn’t appear in the Inbox.
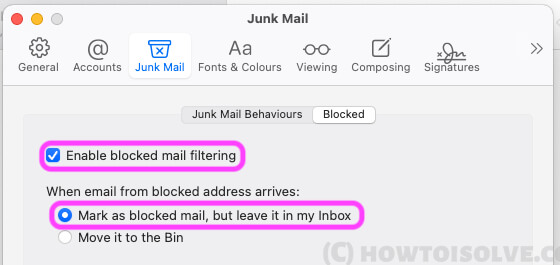
- If you wish to Allow Blocked emails to appear in your inbox, select Mark as Blocked Mail, but leave it in my inbox.
Blocked Email Notification will not appear on your Mac Notification widget.
- Click on (-) to Remove the Email Address from the blocked list.
That’s it. Sometimes, Mac users want advanced blocking rules and more customization. Follow the next method for Creating Email rules on the Mac mail app.
2. Block Unwanted Email Addresses Using Rules: Bocking, SPAM, or Junk
Mac mail app users can also manage Spam and Junk email using the rules. These rules apply to your Mac mail app only. Other accounts and the system don’t affect the rule if you require the same rules on another Mac or company Mac that follows the same steps.
- Open the Mail app on Mac.
- From the Top menu, Mail > Settings (Preferences).
- Last, click on More Option > And Select Rules.

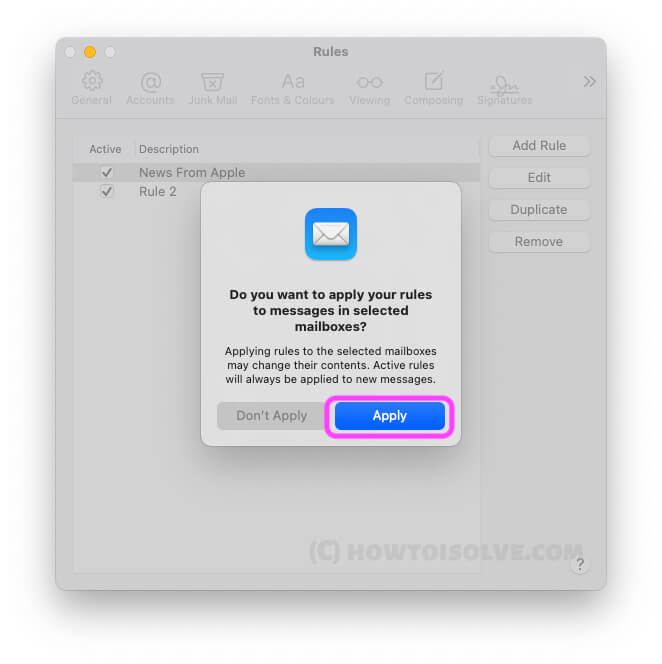
- Now, click on “Add Rule” > Give Rules name under Description > Select From > Type Email Address that you want to block or Move to the bin.

- Add an action that runs if Act by query match,

- Select Move Messages then Select Junk [to Move Blacklisted emails into junk directly].
- If you don’t want a Blacklisted email, then Select Delete Message. These rules delete emails from that sender.

- Click on ‘Ok’ to apply the rule for new emails that you will receive in your Mail mac app.
if you are receiving frequently unwanted emails from the same sender then make it a junk email and move all those emails into junk or Bin. Follow the next method to do.
3. Block Email Using Option: Mark as a Junk Email
Without add selected contacts or email addresses to a blacklist, or Create a rule auto move junk or delete it. Directly pick up the repetitive email that’s annoying, So, we can mark this email or email address as Junk.
In your Mail inbox, Right Click on the Email that you mark as junk or spam. and Select, Move to Junk option.
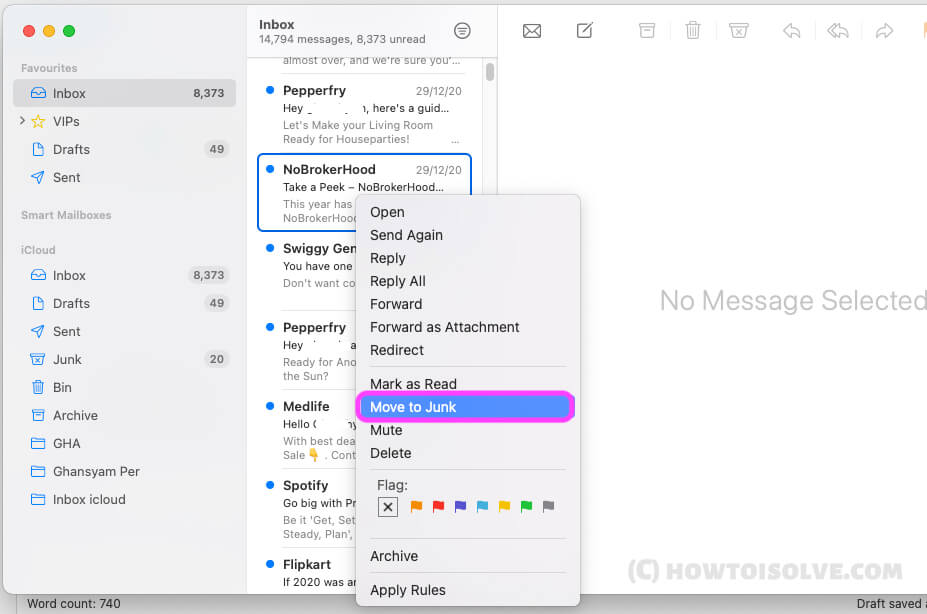
Also, you can check junk email behaviour settings from mail system preferences.
- Open Mail app on Mac.
- From the top Mac menu, Mail > Settings.
- Select Junk Mail Tab > junk Mail Behaviour > Enable Junk Mail filtering.

Select the action type when junk mail Arrives. “Move it to Junk Mailbox or mark it as Junk Mail, But leave it in my Inbox“.
That’s it.
To remove and unblock email on the Mac Mail app, follow the above steps to remove blocked contacts and blocking rules.