Unlike iOS, macOS includes the Accessibility features, which makes it easier for everyone – especially users with the visually impaired – to navigate the macOS conveniently and easily.
VoiceOver changes the way Mac keyboard works and will also give audible screen descriptions. This way, you get to know what option is there before selecting it, so you can confidently use the Mac even when Mac’s screen is invisible.
How to enable your Mac’s VoiceOver screen reader
It’s handy to activate the VoiceOver on the Mac, including the latest macOS. So if you have a family member or a friend who is visually impaired, enabling the VoiceOver on Mac will let them make the best out of it. Here’s how.
macOS Ventura & later
Step 1: Go to Apple Menu. Select System Settings…

Step 2: Choose Accessibility > VoiceOver.

Step 3: Enable toggle next to the VoiceOver.

macOS Monterey & earlier
- Open Apple Menu.
- Select System Preferences…
- Go to Accessibility.
- Click on VoiceOver in the left sidebar.
- Finally, check the box next to Enable VoiceOver.
If it’s your first time using VoiceOver on Mac, the narrator will welcome you to VoiceOver and tell you to press the V from your Keyboard if you have used it before or Space Button if it’s your first time.
Tip: Use the Keyboard shortcut Command + F5 to enable and disable your Mac’s VoiceOver screen reader.
How to use VoiceOver Training
The VoiceOver works differently on Mac. For beginners, it will be a bit confusing; but fuss not; macOS includes a feature that makes you learn how to use VoiceOver on Mac. Now let’s see how to use VoiceOver Training.
macOS Ventura & Later
- Go to Apple Menu.
- Select System Settings…
- Choose Accessibility > VoiceOver.
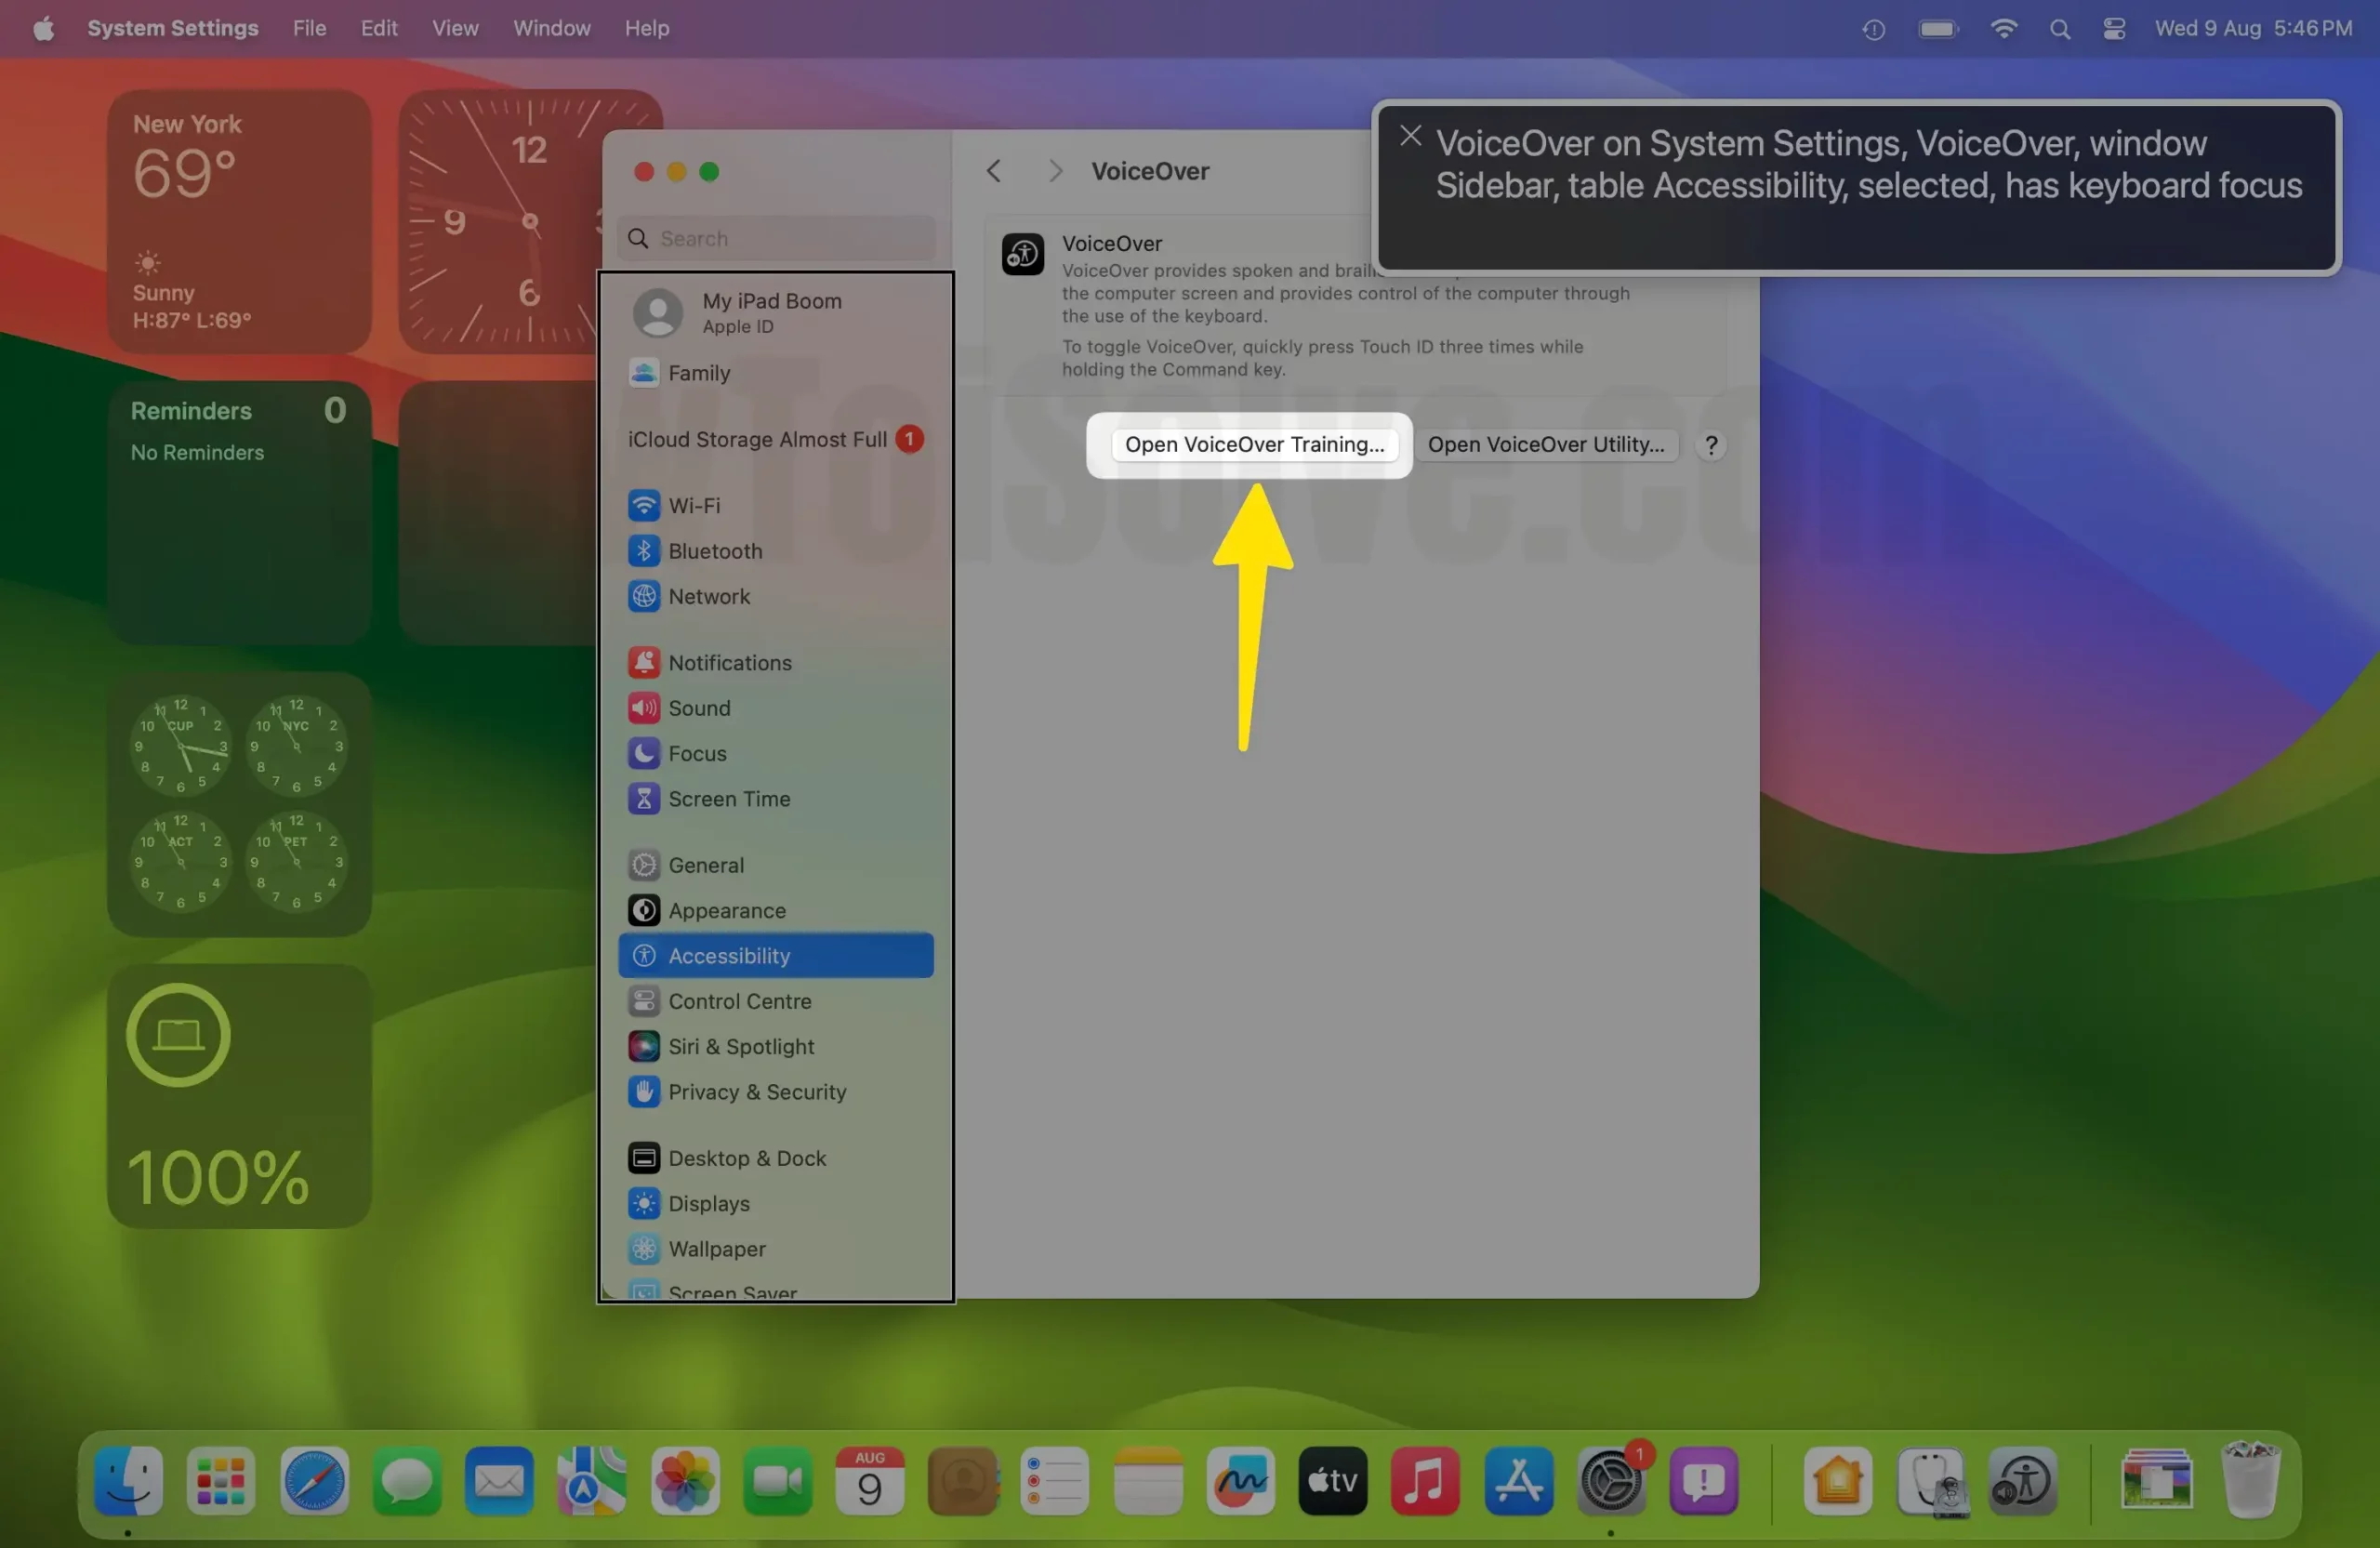
- Click on Open VoiceOver Training.

- After this, press the right arrow button to follow instructions and practice various VoiceOver control.

Final Step is Done.

macOS Monterey & earlier
- Open Apple Menu.
- Select System Preferences…
- Go to Accessibility.
- Click on VoiceOver in the left sidebar.
Click Open VoiceOver Training…After this, press the right arrow button to go through VoiceOver instructions and practice it.
VoiceOver General Commands on Mac
| Action | Command |
| Turn VoiceOver on or off | Command – F5 |
| Unlock lock VoiceOver Modifier | VO-; |
| Open VoiceOver Utility | VO-F8 |
| Start Keyboard Help | VO-K |
| Open the VoiceOver Help Menu | VO-H |
| Open the VoiceOver Quick Start | VO-Command-F8 |
| Open the VoiceOver User Guide | VO-? |
| Read the help Tag for the current item | VO-Shift-H |
| Read the VoiceOver Hint for the current item | VO-Shift-N |
| Open the Commands menu | VO-H-H |
| Open the Finds Command Menu | VO-Shift-F |
| Open the Notifications Menu | VO-N |
| Read the current date and time | VO-F7 |
| Read the battery status of your Mac | VO-F7-F7 |
| Read the network status of your Mac | VO-F7-F7-F7 |
| Color a menu or rotor, stop an action or exit a mode | Escape or Fn-Tab |
| Tell VoiceOver to ignore the next key or key combination you press | VO-Tab |
| Open Verbosity rotor | VO-V |
| Increase Magnification of the item in the VoiceOver Cursor | VO-} |
| Decrease Magnification of the item in the VoiceOver Cursor | VO-{ |
| Temporary show or hide the VoiceOver cursor and the caption or braille panel | VO-Command-F11 |
| Show or Hide the caption panel only | VO-Command-F10 |
| Move or resize the caption panel only | VO-Shift-F10 |
| Show or hide the braille panel only | VO-Command-F9 |
| Move or resize the braille panel | VO-Shift-F9 |
| Tile Visuals | VO-F10 |
| Enable or disable Numpad Commandar | VO-ClearThis option is only available if you keyboard has standalone Clear Key |
| Enable or disable Keyboard Commander | VO-Shift-K |
| Enable or disable Trackpad Commander | Long-press VoiceOver Modifier Key or Keys |
| Enable or disable screen curtain | VO-Shift-F11 |
| Cycle through settings in the rotor | VO-Command-Shift-Right or Left Arrow |
| Hinder the current setting for voice, pitch, rate, volume, language, and braille table in the rotor | VO-Command-Shift-Up Arrow or Down Arrow |
How to change VoiceOver Voice
Another handy customization is changing the Voice of VoiceOver on your Mac. So if you find it difficult to understand, you can change it by following the steps below.
macOS Ventura and later
- Head to Apple Menu.
- Select System Settings…
- Choose Accessibility.
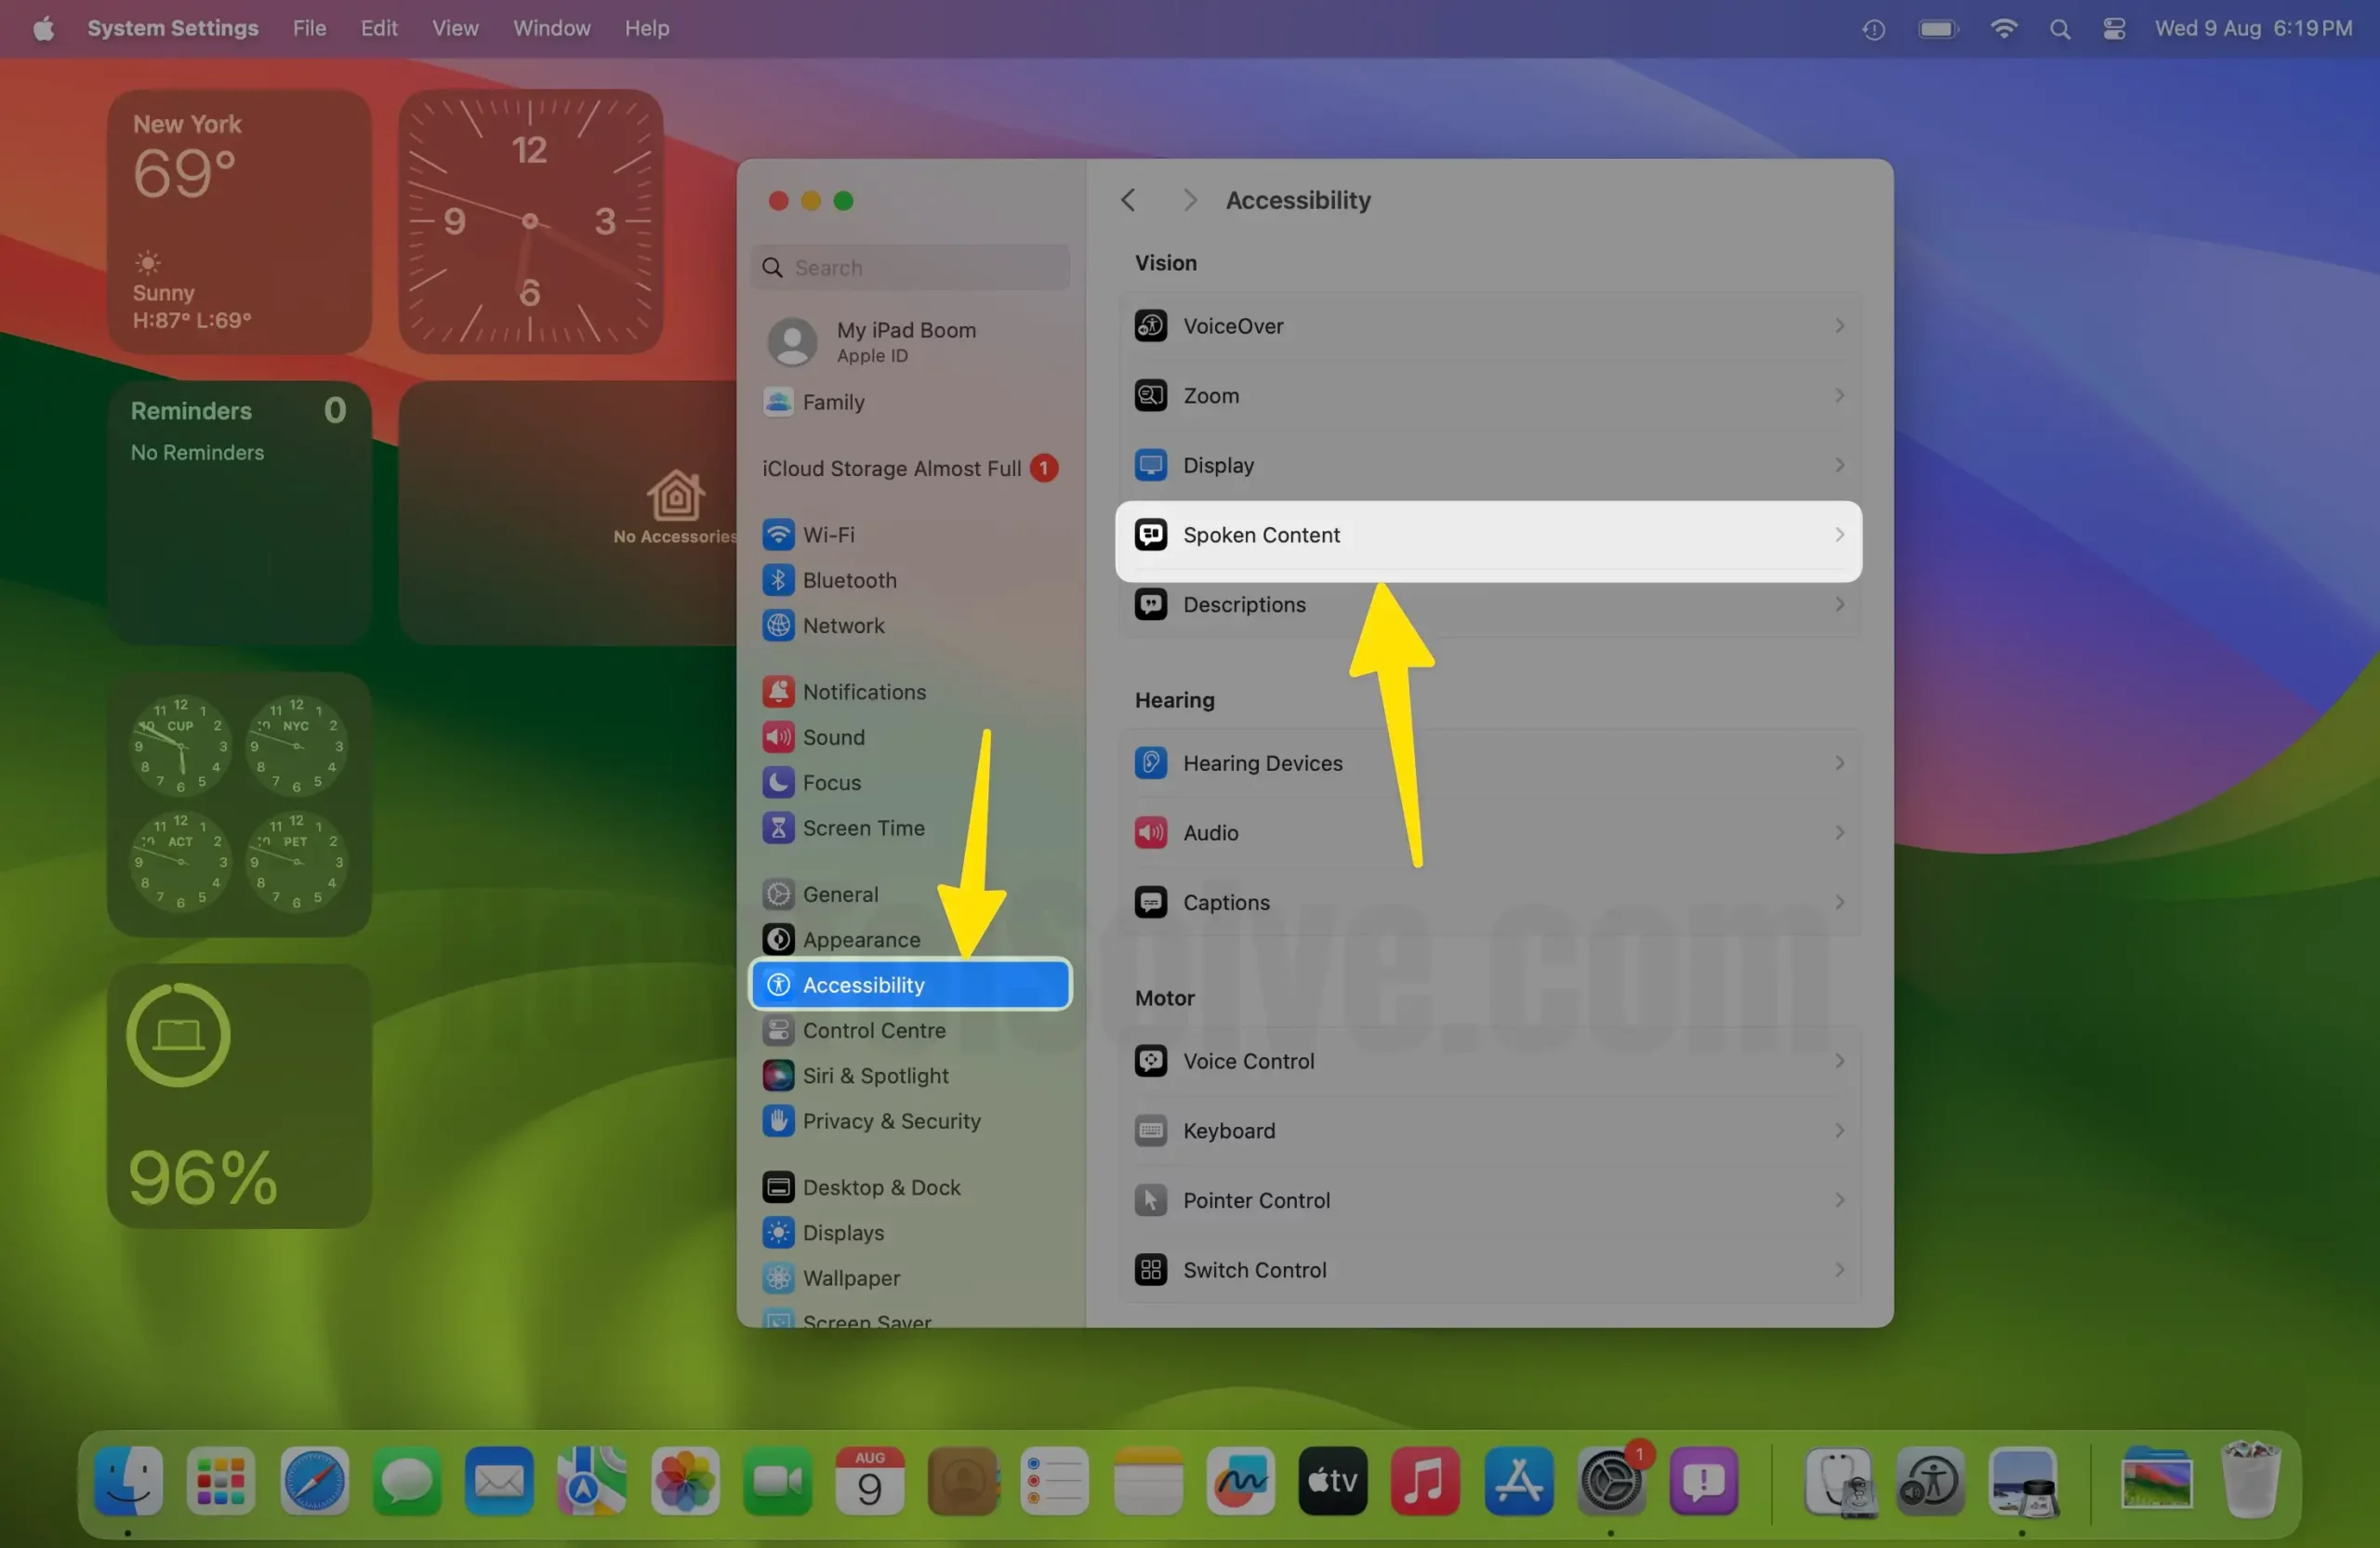
- Click on Spoken Content.

- Select System Voice drop-down and change it to the one you found comfortable to hear.

macOS Monterey and earlier
- Go to Apple Logo.
- Select System Preferences…
- Click Accessibility.
- Choose Speech.
- Select System Voice drop-down.
- Click Voice.
- Select the Play Button to hear the preview.
- Drag the Speaking Rate slider to slow down or speed VoiceOver.
How to use VoiceOver Utility
The VoiceOver utility is the insights settings of VoiceOver on your Mac. From there, you can control settings like greetings when you turn on your Mac, VoiceOver Modifier, and more.
macOS Ventura & later
- Go to Apple Logo.
- Select System Settings…
- Click on Accessibility from the left sidebar.
- Choose VoiceOver from the right side.

- Select Open VoiceOver Utility… button.

macOS Monterey & earlier
- Go to Apple Logo.
- Select System Preferences…
- Choose Accessibility > VoiceOver.
- Click Open VoiceOver Utility…
- Now, click on the dialog box and type your personalized greeting.
- Select the box next to the Display Welcome Dialog When VoiceOver Start if you want to enable greetings.
- After this, select Keys to use VoiceOver Modifiers drop-down if you want to change the default VoiceOver Modifier keys.
- Check the box next to the Allow VoiceOver to be controlled with AppleScript if you want to enable the feature.
How to Set up VoiceOver Portable Preferences
You can configure the Voice Preferences of your choice and then take it with you wherever you go using a removal drive. Here’s how.
macOS Ventura & later
- Go to the Apple Logo.
- Select System Settings…
- Click on Accessibility.
- Choose VoiceOver.
- Select Open VoiceOver Utility.
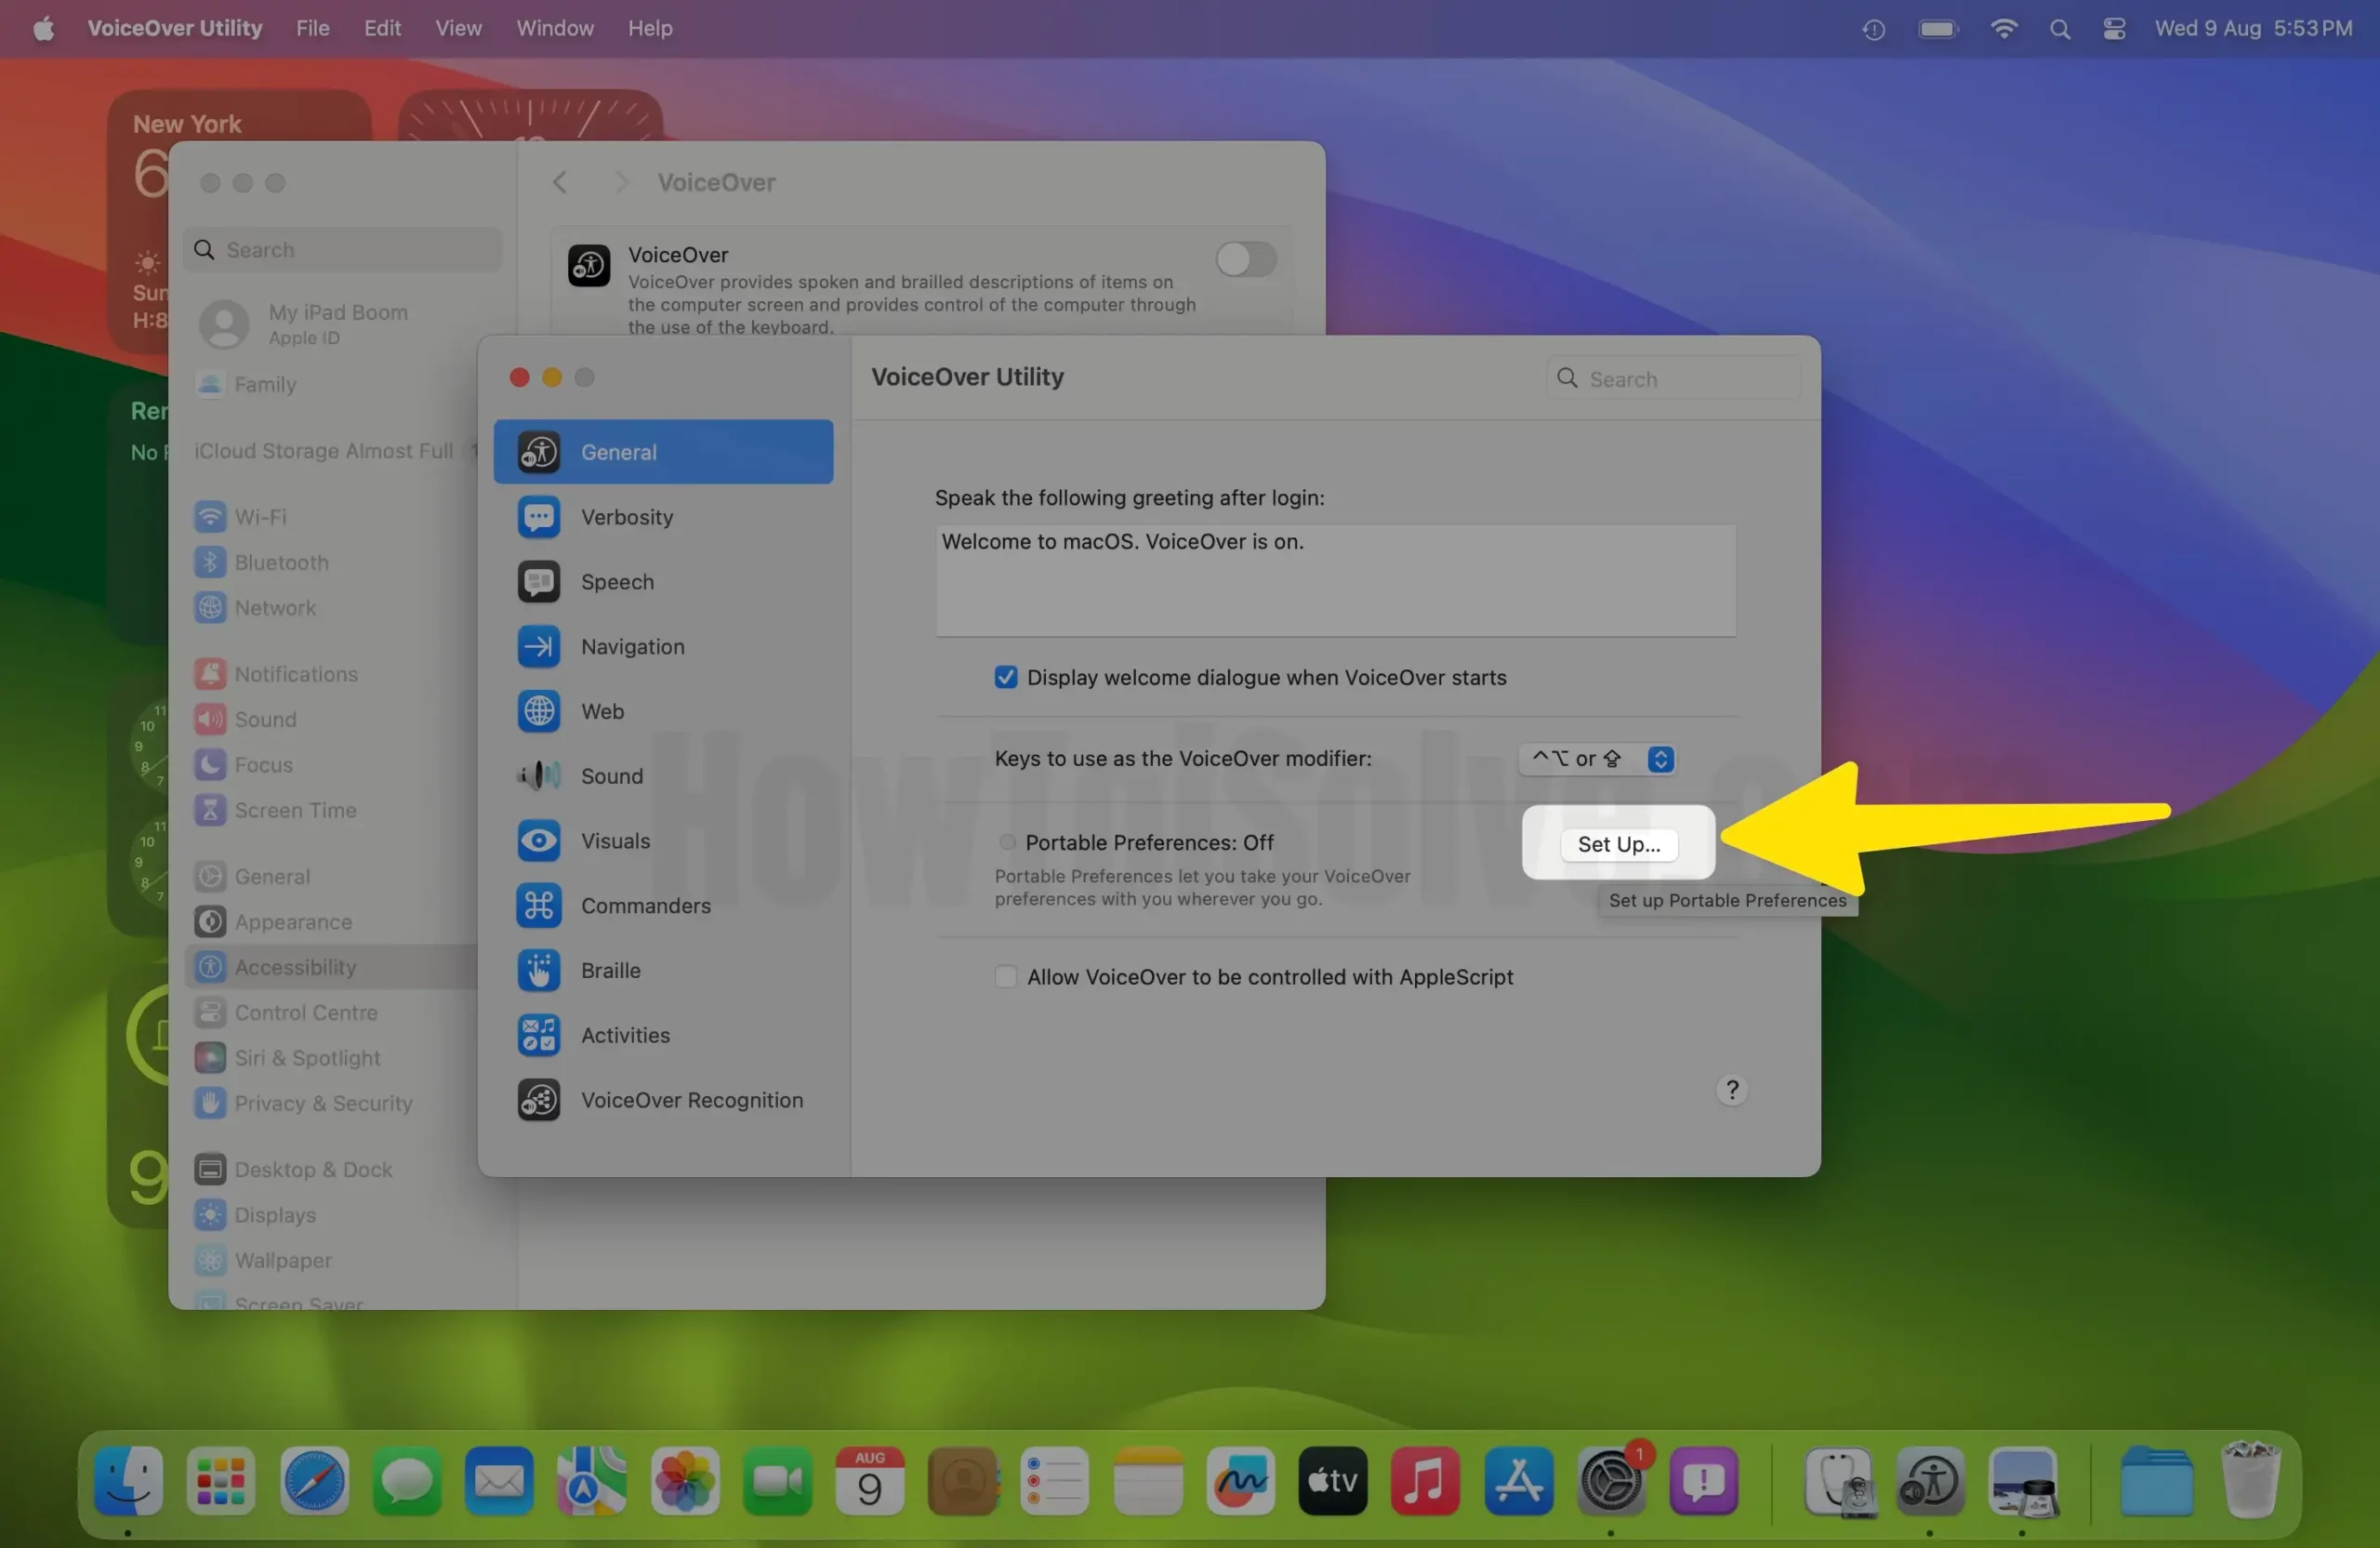
- Click Setup next to the Portable Preferences.

- Select OK.
macOS Monterey & earlier
- Choose Apple Logo.
- Select System Preferences…
- Select Accessibility.
- Choose VoiceOver.
- Click Open VoiceOver Utility.
- Select Setup beside the Portable Preferences.
- Finally, click OK.
That’s It!
How to change VoiceOver Verbosity
The VoiceOver verbosity is the setting that determines how many details will be read back. By default, it’s configured to High, so in case you want to change it to medium or low. Here’s how.
For macOS Ventura and later
- Go to Apple Logo.
- Select System Settings…
- Click on Accessibility.
- Choose VoiceOver.
- Select Open VoiceOver Verbosity.
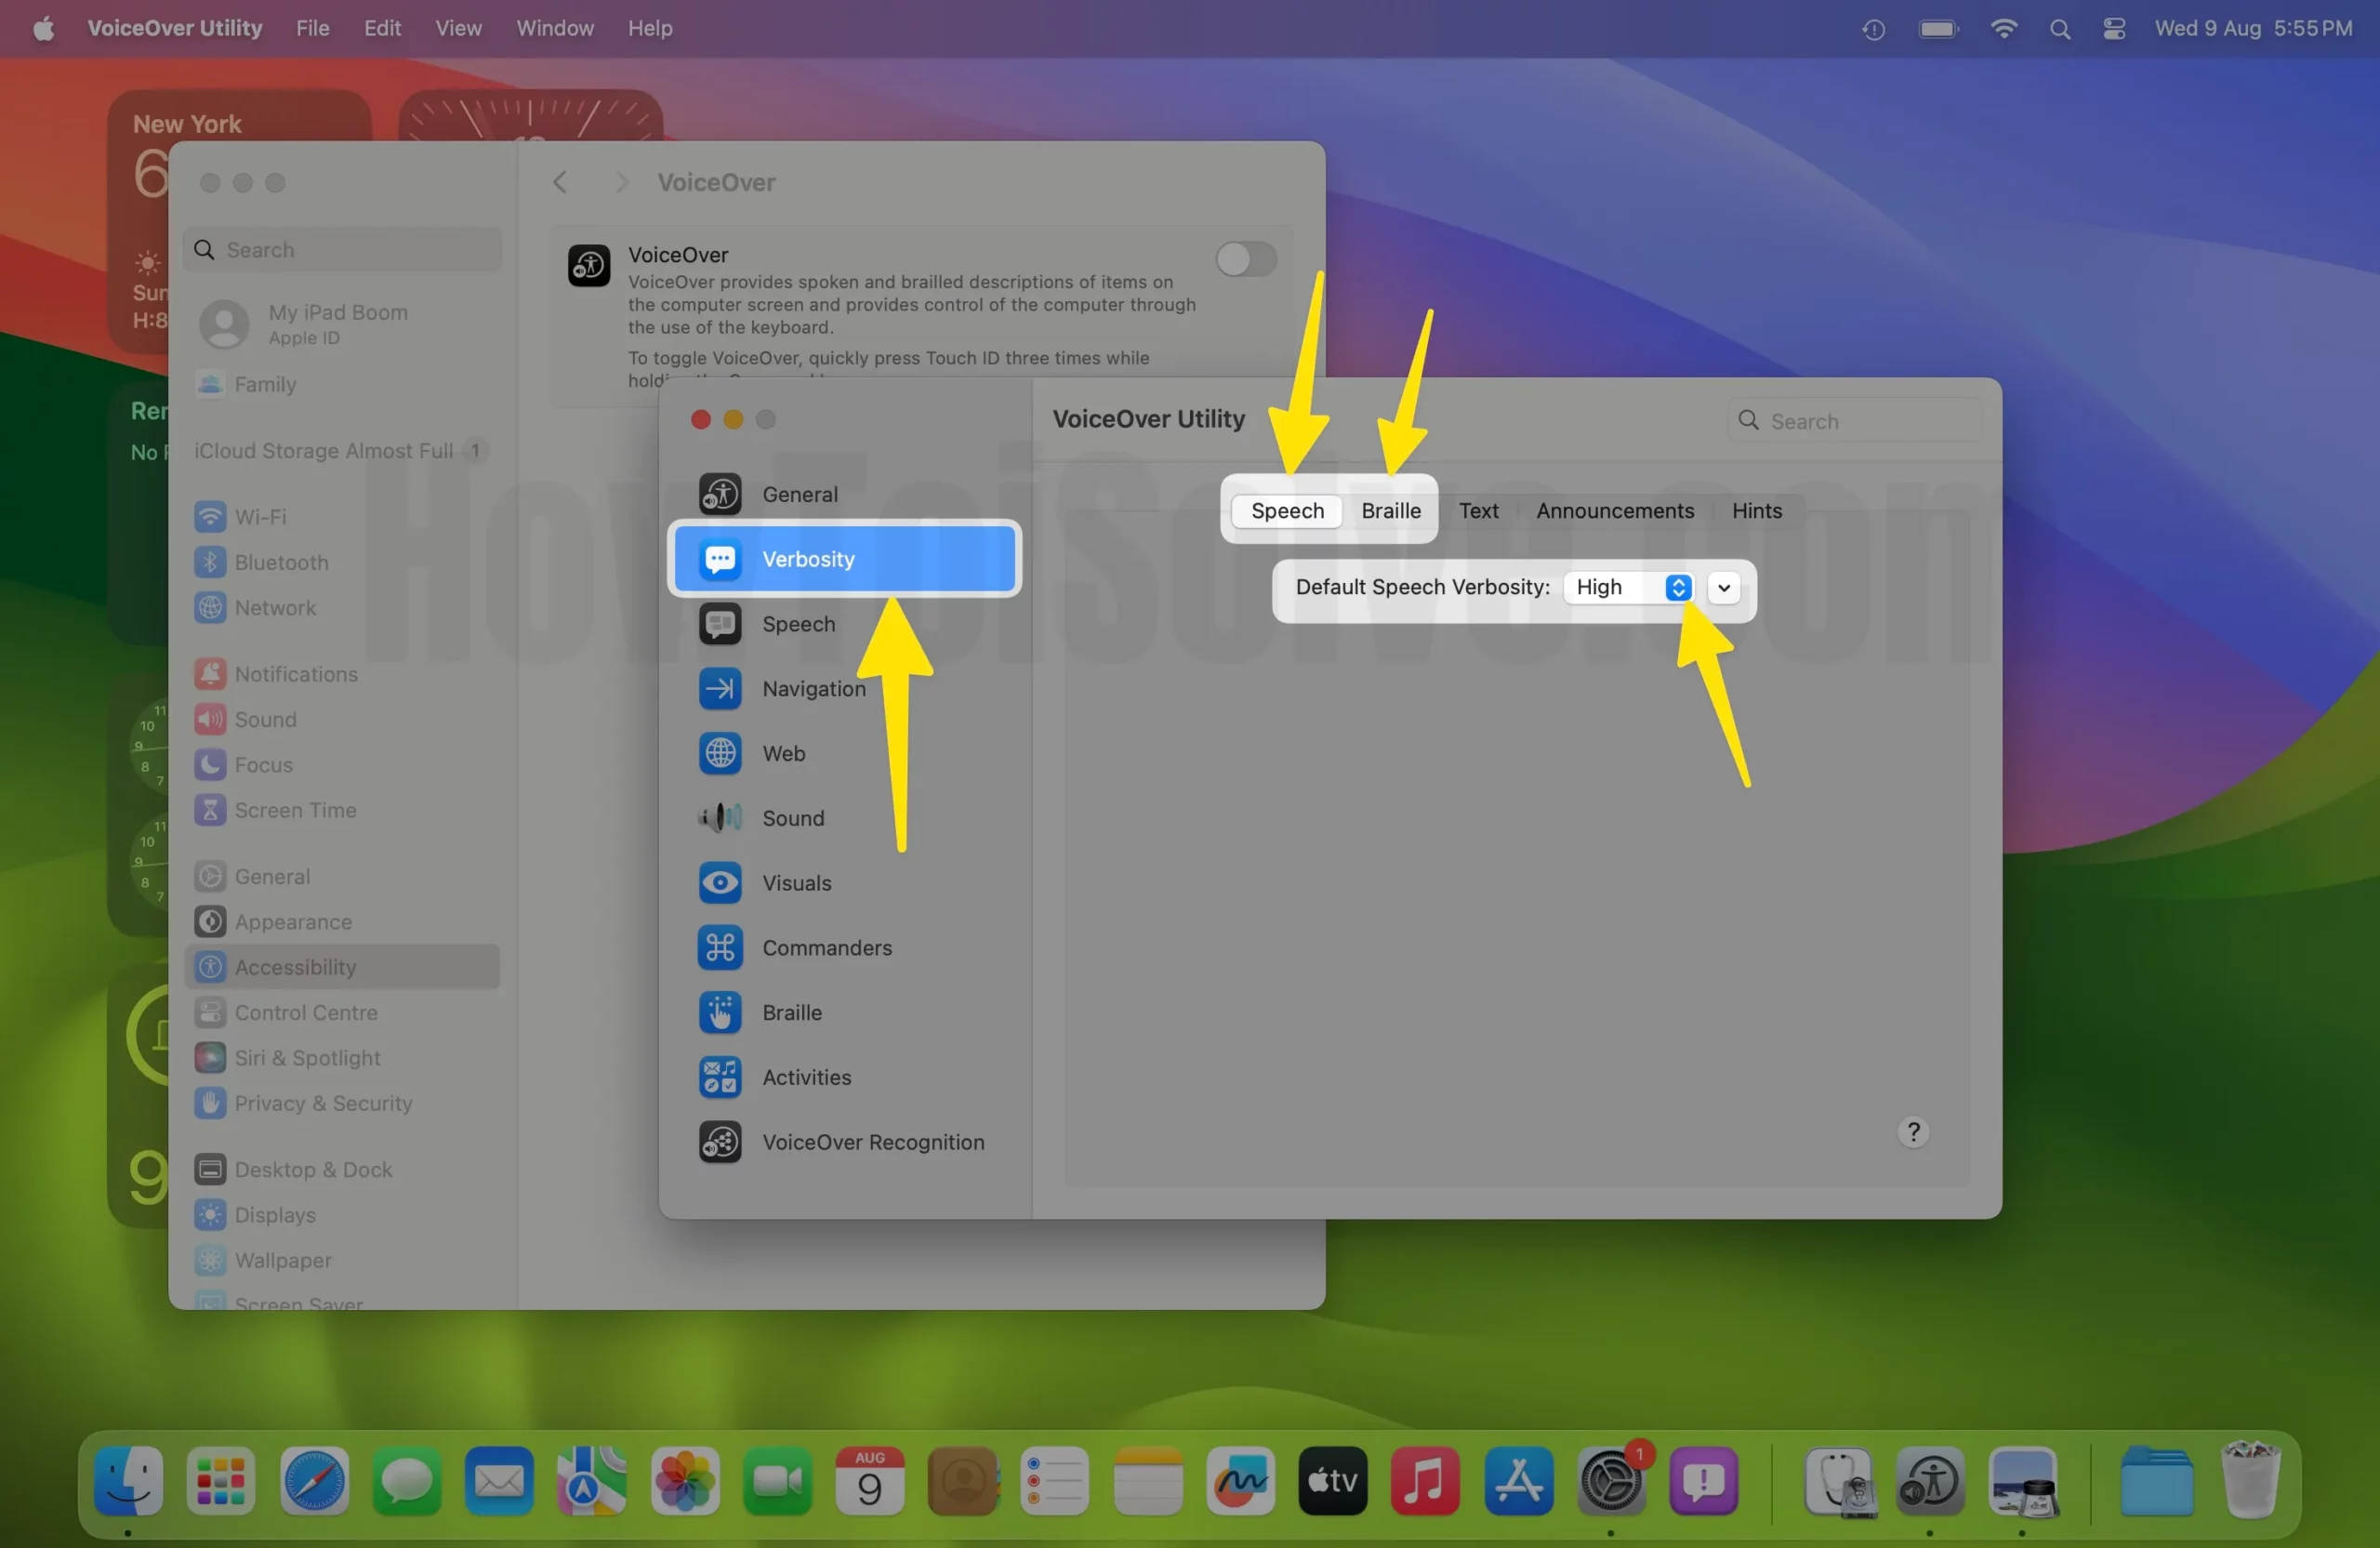
- Go to Verbosity from the left sidebar.

- Select Speech or Braille if you are connected to an external display.
- Click on Default Speech Verbosity or Default Braille Speech and set it to High, Medium, or Low.

For macOS Monterey and earlier
- Go to Apple Logo.
- Select System Preferences…
- Choose Accessibility > VoiceOver.
- Click Open VoiceOver Utility… > Verbosity Category > Speech or Braille.
- Select the default setting, and configure it to High, Low, or Medium.
How to enable Descriptions
If you want to hear the voice of Visual content on your Mac, here is how to enable Video descriptions.
- Go to Apple Logo.
- Choose System Settings…(System Preferences…for macOS Monterey & Earlier.
- Click on Accessibility.
- Select Descriptions.

- Finally, toggle to enable Play audio description when available (check the box next to the Play audio description when available for macOS Monterey & earlier).

Final Thought!
That’s how you can turn on and off the VoiceOver on Mac. One thing is confirmed even when the Mac screen is invisible; you can access every functionality and feature on your Mac using VoiceOver. I hope this guide is helpful. In case you have further queries, feel free to contact us.
