Want to password protect files or folder on Mac in Zip? Unfortunately, password protecting a Zip File on Mac is not as straightforward as you think; however, once you get to know the procedure, it will take few seconds to compress, and password protects a zip file on Mac. We’ll explain how to password protect a zip file on Mac using Terminal App or Without Terminal, as there is no native option available to zip and password protect file on MacBook, Mac.
Whether it’s your private files, photos or videos, or some confidential data of your business that you couldn’t be leaked in any case, this password is protecting a zip file on Mac.
How to Password Protect a Zip File on Mac, MacBook
i hope this will work with all Apple’s Silicon M1-series, M1 Pro (MacBook Pro), M1 Max (MacBook Pro & Mac Studio), M1 ultra (Mac Studio), M2 chip of 2022 (MacBook Pro & MacBook Air) Or Intel chip Mac computer.
Step 1: Organize Files [Prepare Zip Folder]
We’ll be using the Terminal App of your macOS to password protect a Zip File. The process gets even simpler when the Files that you want to compress and password-protect are in array and in a single folder with a clear folder name. All you need to do is create a New Folder and store all the files in that folder, and then we’ll proceed with the Terminal command to password protect the zip file on Mac.
Go to the Finder and Control+click in the Finder window. Select New Folder. or Right Click in Finder window > New Folder.
Give a folder a single string name without space that will make it reliable for you to execute the Terminal command.
And lastly, drop all the files and folders that you want to password-protect.
Step 2: Execute Terminal Command
Till now, you might be aware that Finder not having any native option to password protect the folder; the only way is to use the terminal and certain commands.
Open Terminal. Press Command + Space Bar to launch Spotlight and search Terminal App.
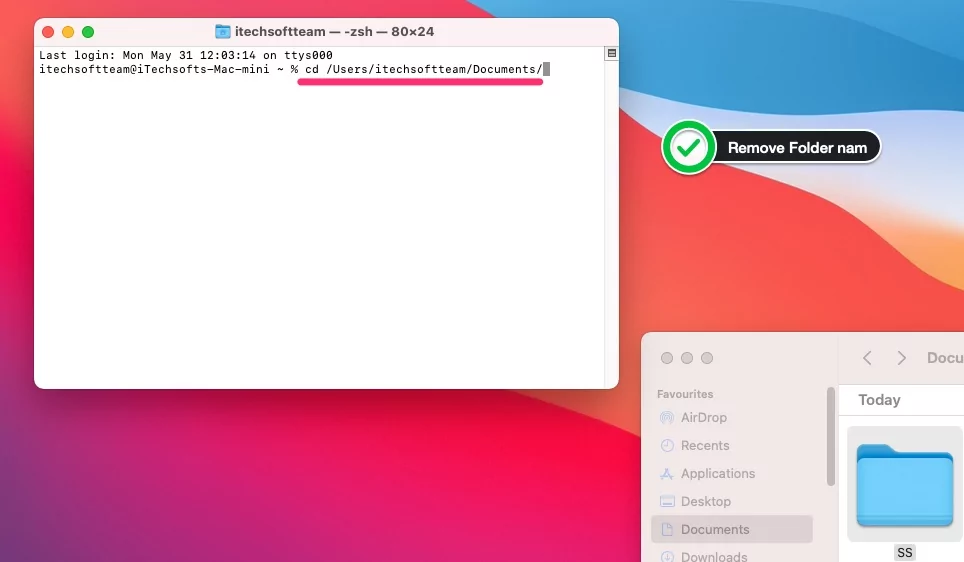
You need to change the directory where the Folder is located. Drag the folder to Terminal to copy the folder/Directory path.Don’t miss removing the folder name [SS folder on my screen] from the path. Enter the drive name followed by cd. Here’s an example of how you can change the directory. This is my directory: cd /Users/itechsoftteam/Documents/
Enter ls and hit the return key; this will bring the folders list in the Terminal window located in that directory.
Type the following command to compress, and password protect the files and folder,
Zip -er [foldername.zip] [foldername]
So I run, Zip -er SS.zip SS
Here’s how my command will look like:
Press the return key.
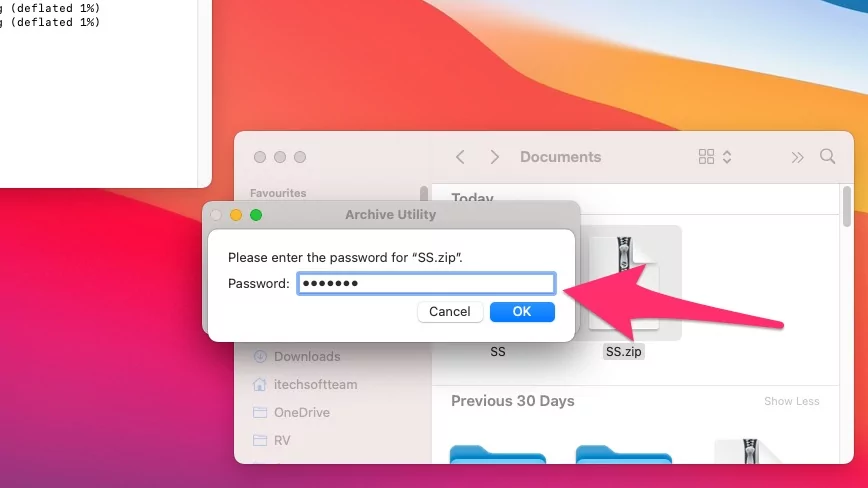
It’s time to enter the new password that you want to use with Folders or Files to protect.
Enter the password and then again enter the password to confirm.
That’s It!
Step 3: Verify Files or Folders [How to Unzip folder on Mac]
If you’ve followed the process correctly, then by now, the File or Folder that you’ve password protected using the above steps will be locked and compressed. Also, you can use Pro Zip software that allows you to remove or unzip the password-protected zip file.
Navigate to that location where the file/folder is stored, double-click on that file/folder. The next pop-up should ask you to enter a password; after entering the password, click OK.
By entering the correct password, the file or folder will uncompress in the same location.
How to Password Protect a Zip File on Mac Without Terminal
Are you not comfortable with terminal command? Generally, None Tech people ignoring this way to remember the procedure and Terminal command. So, here’s the easy method to make Password protected zip file on Mac.
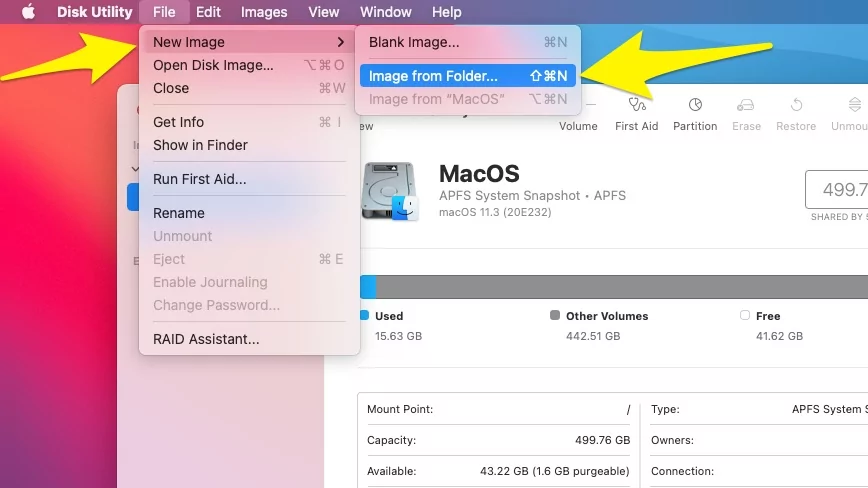
Use Disk Utility to Make Password Protect Folders in MacOS
Open Disk Utility on Mac using Spotlight Search or From Launchpad.
Now, From the top menu, File > New Image > Image From Folder.
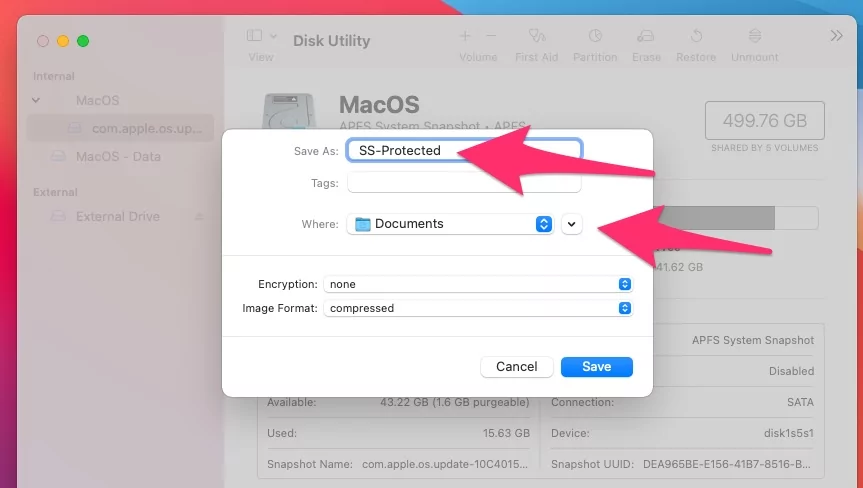
Browse the folder saved on your Mac or External Drive.
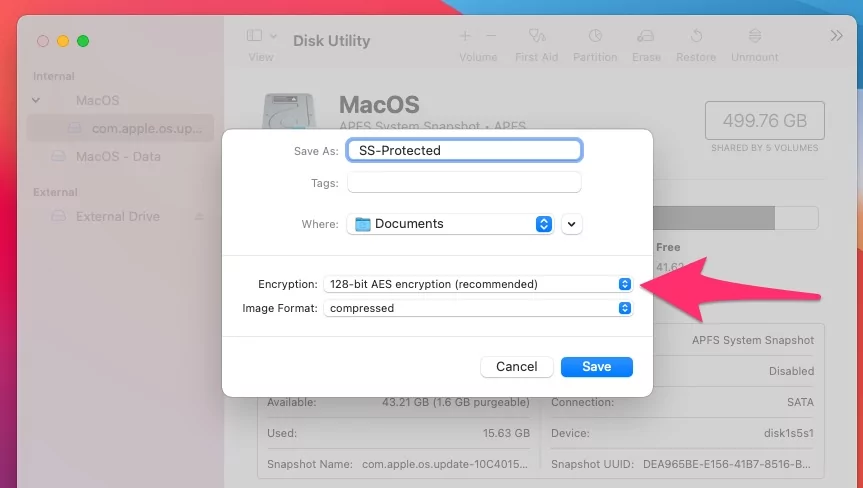
Give Desired Secure folder name or dmg file name. Select Target saves location under where.
Choose Password Protected or Encryption techniques. 128 Bit AES Recommended, That’s much faster than 256 Bit. if you want more security then go with 256 Bit AES Encryption.
Enter New Password for lock folder.
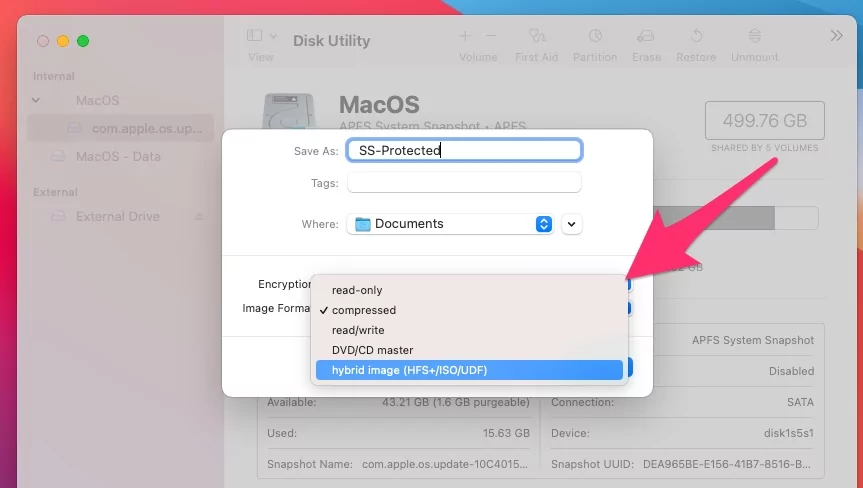
Next, Select image format, Read/Write, Read Only, Compressed, Hybride or CD/DVD Master.
Click on Save to Start Encryption folder and Locate the .dmg file.
Double click on the .dmg file name and Your Mac will ask to enter a Mac login password to access it.
That’s it. Once you use the Protected folder, Right-click on the folder and select the Eject option to hide.
Comment me for more help! On Zip and Unzip password-removing tips and tricks.
Karly Wood is a journalist based in Ohio who specializes in covering Apple and technology trends. With a varied experience in reporting on public safety, government, and education, her insights bridge multiple disciplines, providing readers with a well-rounded perspective on today's technological advancements. If you need to contact me, you can reach me at karlywood.ohio@gmail.com or through (Facebook)