In the list of Must Have Applications for Mac, the Bartender is considered at the top. As of now and forever, the Bartender offers complete power to handle the Menu bar Items on the Mac. It ultimately helps you to work effectively and efficiently on Mac due to the instant reveals, search, and a lot more things.
Moving forward, the recent version of Bartender 4 is new for some of the users, it might be unknown to them on how it works and what advanced features are carved in it. No worries! Here is the complete guide regarding the Bartender menu bar app to install the second macOS Menu bar.
Is Bartender Worth using On my Mac?
As per many users’ opinions, the Bartender is worth Menu bar organizer for the latest macOS. As the latest version of Menu Bar Application consumes varieties of aspects such as Quick Reveal, and Quick Search, and at last, it makes the menu bar clutter free which ultimately causes many other bunch aspects that enhance productivity while working on the multiple menu bar entities. For more convenience, the developer offers a 4-Week Free Trial to declutter your Mac’s menu bar, and let us know!
Tips And Tricks To Use Bartender 4 in macOS
Tips and tricks to use applications like Bartender are one of the important aspects to learn as it allows you to get the most out of it. So just let’s go through the features and learn about them specifically.
What Does a General setting mean?
The General settings of Bartender consume the most important aspect of an application. From here you can play with multiple settings to get your menu bar work more effectively and efficiently. So let’s explore each and every feature one by one.
Start Menu Bar At Login
If you are fond of using the Bartender and always want to launch when the Mac Startup. There is an option known as Launch Bartender At Login, click on the check box present to it to do so. But in some cases it might result in Slow Mac Boot Up, however, some of the users of Bartender 4 noted that the it consumes out of CPU and Battery on Mac Apple Silicone M1. so it’s better to keep it disabled if you want to prevent such situations.
Bartender 4 Activation
Under this Activation section of Bartender there are two choices:
Click On The Menu Bar Will Show/Hide Menu Bar Items: Checking on the box present next to it, will allow you to show/hide the menu bar icon only when you drag the cursor over the Menu Bar and click on it.
Moving The Mouse Into The Menu Bar Will Show Hidden Menu Bar Items: Ticking on this, highlight the menu bar item by simply moving the cursor on the Menu Bar. And what makes it different from the first settings is there is no need to press the mouse button. Below this aspect, there is a slider highlighted as Delay Before Activating with the help of this you can customize the response time to appear menu bar items when the cursor is over the Menu Bar. If you want to customize the response time, simply drag the slider as per your convenience.
Bartender Bar
The name itself says that you can create a separate bar for Bartender. Turning On this feature will appear the hidden menu bar item right under the Apple menu bar when clicking on the Bartender Bar Icon. At the same point, the hidden menu item will be invisible after 30 seconds.
Auto Hide
Enabling Automatically Hide Menu Bar Items again After Showing Them will command the Bartender to auto-hide the hidden items while using the different application or clicking anywhere else on the screen.
Bartender Menu Bar Icon
For more convenience or else to make your Menu Bar personalize the Bartender allows its users to switch over the different Icon styles. In this part, there are 7 Choices: Waistcoat, Bartender, Bowtie, Glasses, Star, Box, Dot, and Arrow. And at-last for more flexibility you can set the Personal Image as a Bartender Icon in the menu bar.
Bartender Menu Bar Item
In the configuration settings, there are two preferences available.
Visible: Selecting this one will completely hide the Bartender Icon. It will be helpful in case where you want to hide some application from surrounding suspicious eyes. But no need to worry, as you can re-visible the hidden Bartender Icon with the help of Hotkeys or re-adding it to the menu bar through system preferences.
Show Hidden Item Divider: For more convenience using this feature allows the Divider Icon in the menu bar to right-clicking on the Bartender Icon.
Menu Bar Item Spacing
Spacing plays an important role in the Menu Bar. Because sometimes you want more space as you have installed multiple applications and features in your Mac that you want to access instantly. In this case, the Bartender comes with a built-in option of spacing modes Default Spacing, Small Spacing, and No Spacing, so select accordingly. But remember to restart the device right after selecting anyone.
With Multiple Screens
Here you will receive two conditions to handle the Menu Bar.
Hide All Menu Bar Items On Inactive Menu Bars: Suppose you are using 2 Portable Monitor along with your Mac, and from which 2nd portable is inactive, in such a scenario using this feature will disable all the menu items in the inactive monitor.
Show All Hidden Item If Active Screen Is Bigger Than: Using this condition will visible all the hidden items if your Mac’s active screen is bigger than desired resolution. To customize the resolution, drag the slider either to right or left according to your need.
Bartender 3 Style
If you want to continue with the same Bartender 3 version style, choosing the Check Box present next to the Hide Item To The Left Of Bartender Menu Item When Showing Hidden Item will work similarly. Also enabling this will ultimately increase the space to visible Show Menu bar Icon by keeping the normally shown item behind the bars which are present on the left side of Bartender.
Menu Bar layout

In this settings of Bartender application, you are allowed to add, and hide the Bartender Menu Bar items by simple drag and drop method. The Menu Bar layout consumes four additional settings which are briefly explained below.
Show Menu Bar Items: In this section of menu bar layout you can add the item by a simple drag and drop to appear in the Main Menu Bar for instant access without activating the Bartender Icon. Moreover, if you want to add some space between the Items Icon simply dray the Green Space Button mentioned below the Menu Bar Items Palette.
Hidden Menu Bar Items: In this part, you can add those icons which you want to use, at the same point, hide the items from the surrounding suspicious eyes. The items in this section will only be visible when you activate Bartender.
Always Hidden Menu Bar Items: Moving forward and exploring more about the Bartender, in this feature of Menu Bar Layout you can add those items in the menu bar which remain hidden even after activating the Bartender.
Menu Bar Items Palette, Drag From Here To The 3 Locations Above: To make your Menu bar clutter free you can simply drag the Green Add A Spacer Icon in between any menu bar items to above Three Menu Bar Layout. Moreover, for convenience click on the Spacer to customize its Width and Label it.
Common Point: For quick arranging of the menu item you can use Command + Buttons along with Left Mouse Button and then drag the time icon as per your need.
Show For Updates
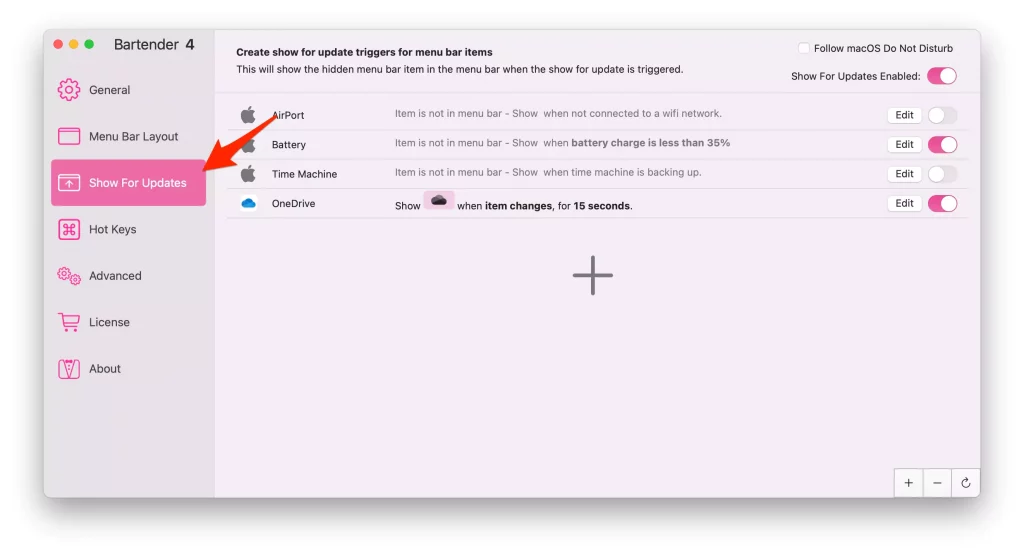
As of now and forever, there are many features that you need to keep eye on, to make your work never disturbed. Consider MacBook Battery Keeps Draining Faster, in such a situation while reaching to low battery level you want your device to give an alert and plug it into the socket sooner until it gets completely turned off. That’s where you can go with the feature of Bartender known as Show For Updates. In this part, you can create a show for updates for selected menu bar items. Default there are three features added to it: Battery, Time Machine, and WiFi.
Side Note: To keep updated for all selected items tap on the Toggle present next to the Show For Updates Enabled.
For example Battery
Step. 1→ In this case, click on the Edit present next to the Battery.
Step. 2→ On the next screen there will be the pop-up along with four settings:
- Using Battery Power
- Battery Reaches Low Level (Less Than 20 Minutes Remaining)
- Battery Reaches Very Low Level (Less Than 10 Minutes Remaining)
- Battery Charge Is Less Than: Desired Level (There will be a slider below this option, dragging it will feature the battery percentage at which you need to update)
Step. 3→ Click on the Check Box present next to anyone as per your need.
Step. 4→ Now click on the Check Box present beside If Menu Bar Is Hidden When Triggered, Show The Menu Bar. Doing so will highlight the Battery Menu Item no matter if it’s hidden or not as the per condition you have selected above. Lastly, select Done
The same procedure you have to perform for the other items present on this page. To add more menu bar items that are not mentioned in the list, select the Big + Icon.
Hot Keys

The HotKeys in the Bartender are the combination keys that offer instant access menu bar items compared to the mouse, for easy understanding we can also say it as Shortcuts Keys On Macbook. But you can add a maximum of 5 Hotkeys in the Bartender.
Note: Shift, Control, Option/ALT, Command can only use this command to set up the HotKeys on the Bartender.
Show Hidden Items: Configuring this aspect will instantly activate hidden menu bar items.
Show Full Width Of Menu Bar: Setting up the hotkeys for this preference will allow you to reach out the utmost every menu item by decreasing the left side menu.
Show All Menu Bar items: Creating the Hotkey for this will visible all the Menu Bar items, including the hidden ones.
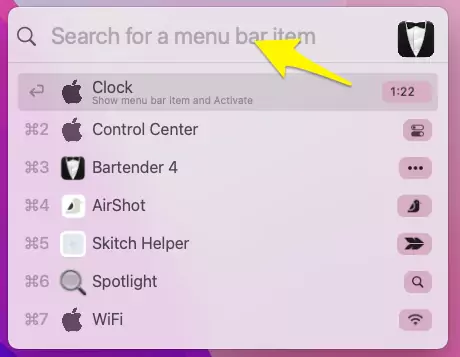
Quick Search Menu bar Items: Constructing this feature with the HotKeys allows you to reach the Menu Bar item using the “Text Search Name” or else Application Name.
Keyboard Navigate: With the help of Keyboard Navigate you can go to the menu bar item without using the mouse. So in case you have broken up Best Mouse For MacBook, it will be quite useful.
Advanced
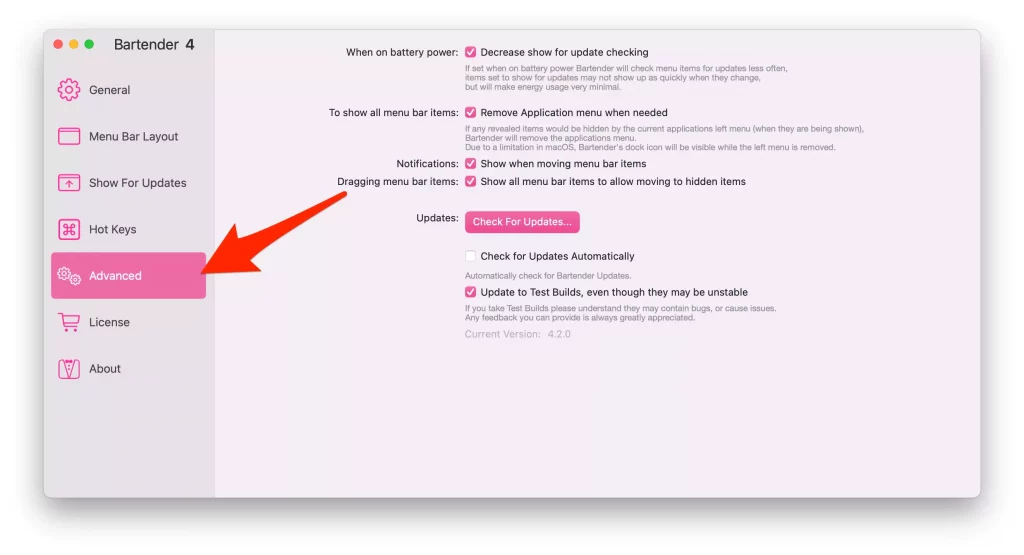
To handle the bartender application more advancely, you can compile it by configuring the settings present in this section.
When On Battery Power: Clicking on the Check Box present beside the Decrease Show For Update Checking will command the Bartender to check the Battery items updates comparatively less than often, moreover, the items that are setted to show update will appear less, and ultimately results into less energy usage by Bartender.
To Show All menu Bar Items: Enabling this feature will automatically remove the hidden items from the menu bar when there is no space in the Bartender Menu Bar. And there is a limitation in macOS, Bartender Icon will appear even when the left menu is vanished.
Notification: When we implement this condition, the bartender will encounter the notification whenever you move menu bar items.
Dragging Menu Bar Item: Turning the Check Box present next to it will feature both hidden and always hidden items section right in the menu bar, what great is, it allows you to drag or rearrange all the items in the above section by using the Command and Left Mouse Buttons.
Updates: In this part, you handily update the version of bartender by simply clicking on the Check For Updates… For more convenience and flexibility there are aspects available.
Check For Update Automatically: Choosing this one, will automatically check the version of bartender whenever it is available.
Update To Builds, Even Though They May Be Unstable: Going with this, will allow you to use the version which has not been publicly launched yet. But there are chances that it might consume bugs or glitches which can ultimately degrade the performance of both bartender and Mac.
Bartender 4 License key

Here you have to enter the license key which you received on the registered mail ID and then choose Licence Bartender present at the right bottom of the screen. If you have entered the wrong License Key you will receive a pop-up saying Incorrect License Name Or Key Enter. Moreover, for more flexibility there are two options: Visit Website and Buy Now. Tap on it to do further tasks.
Still, there isn’t an available bartender 4 product key activation code free. but you can bookmark this article on your browser to get updates related to Bartender 4 discount or promo code.
Bartender 4 Crack for macOS
Sometimes users get Bartender 4 Crack version at a third-party online website but we can’t trust its download service due to privacy matters for us.
About
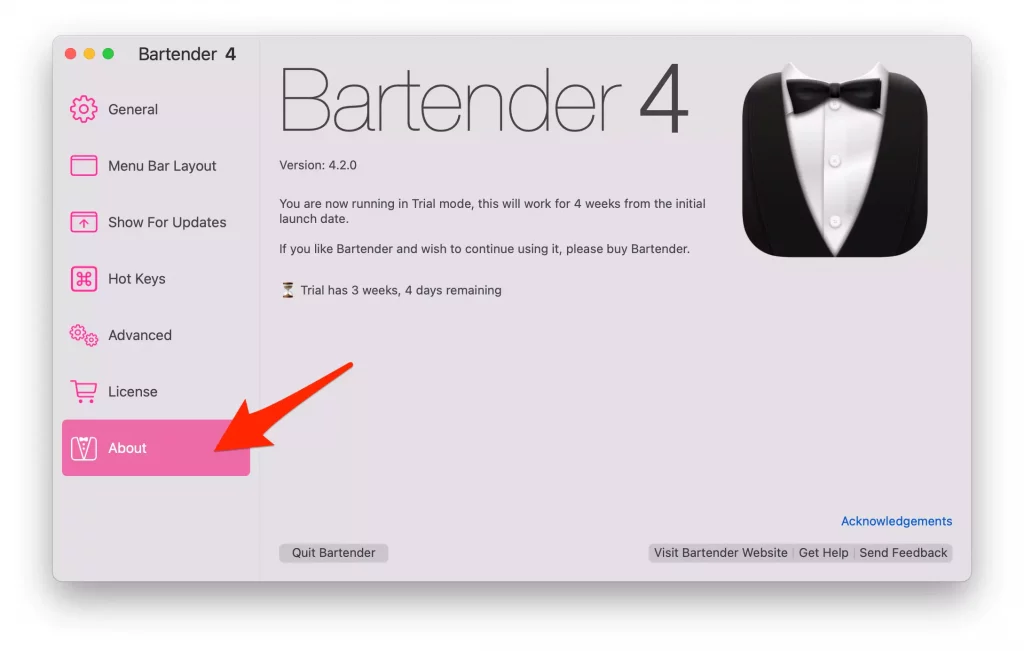
How to check the version of bartender on mac? Is that the question? Well in the about section you will have the complete information regarding the version of bartender currently running on your macOS. If you are using the Trail of Bartender there will be information regarding it on the screen such as when will be the end of the trail version.
From the same page you can perform several tasks, such as Quit, Send, Visit Bartender Website and lastly Get help.
Bartender 4 notch – Solution of Notch on the new Macbook Pro notebooks
How To Restart Bartender?
In case the Bartender becomes unresponsive on macS, restarting the application is an effective solution to go with. Here are the steps to restart Bartender.
Step. 1→ Navigate Activity Monitor using Spotlight.
Step. 2→ From the Activity Monitor Screen search for the Bartender and click on it to turn it blue.
Step. 3→ Now click on the X Icon present at the top center of the screen. Doing so will feature the pop-up saying Do You Want Quit This Process, choose Force Quit.
That’s how you can easily restart the Bartender and get your app to work normally.
How To Quick Search Bartender Menu Bar Items?
Searching for the best alternative to Spotlight On Mac to get quick access to the application and aspects, no worries! If you have installed the Bartender on your device as the application is carved with a feature known as Quick Search. Don’t know how to use it! Here are the steps.
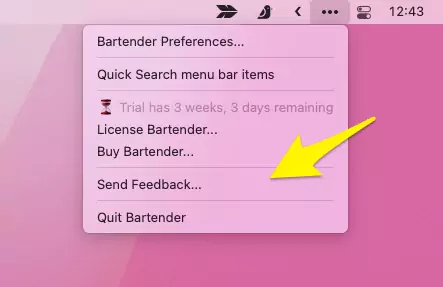
Step. 1→ Hover the cursor to the Bartender Icon present at the right top corner of the screen and Right-Click on it.
On the next screen, you receive the Quick Search Option Menu Bar Items followed by Bartender Preferences…
How To Send Feedback To Bartender?
If something went wrong with the Bartender features or want to add features in the future, there is a feedback section that allows you to blow out the point to the Bartender officials. Here are steps to reach the options.
Step. 1→ Right-Click on the Bartender Icon present in the upper right corner of the screen. Now click on the Send Feedback Option.
Now you head to the feedback page and write down needs and cons that can help the Bartender to work in the present or future upgradation and after completion select Send.
How To Contact Bartender Support Center?
If you want a suggestion for a feature of Bartender or else want to get support while facing the issue with Licence Key, or else bartender not working there is dedicated support team, to reach out them write down the mail on [email protected]
Best Alternatives Of Bartender
Hidden Bars
The hidden bar is one the best if going to bar something rather than the Bartender. This application is equipped with varieties of features like Launch when login, Full menu bar Mode, Hide/Show with Global Shortcut, and Full Menu Bar Mode. Moreover, if you want to prevent your menu items there is a feature that automatically hides them within 5, 10, 15, 30, and 60 seconds. What makes the Hidden Bar different for a bartender is it compatible with various languages like English, Arabic, French, German, Japanese, Simplified Chinese, Traditional Chinese, and Vietnamese
Bartender 4 student discount
We will inform you whenever the bartender 4 student discount declares by the developer.
Conclusion
That’s how the Bartender rules the app market as it offers complete control over the Menu Bar items effortlessly on the Mac! Clean up Your Mac Menu bar residual apps icons and a truly cures app to turbocharge Mac’s Menu bar.
FAQs
Unluckily the Bartender is not available in free version. To get the users used to it, the application is available for free for up to 4 weeks
If you have subscribed to Bartender 3 right after April 2020, you will have to pay no extra for upgradation to Bartender 4, the application will itself accept the license of Bartender 3.
Well, your device should consume macOS Monterey or Big Sur only then you can update to the latest Bartender 4 from the official website, in this case access the Disk and copy-paste the Bartender 4 to the Application Folder.
Navigate to the official bartender website, Choose Buy Now in the next screen select Upgrade To Bartender 4, now you will ask to enter the Licence Key once you have finished out you immediately get verified. After this, you will be able to purchase Bartender 4 with a 50% discount offer.
Fortunately, you can use the License Key on multiple Mac devices.
Try restarting the Bartender 4 if it works for you good luck! If not, simply write down the mail to the [email protected]
Well, using the Bartender on Mac is safe, doesn’t capture any important information from the device at the same never records your screen.
The Application is completely game changer as it is compatible with both the Apple Silicon MacBook Pro with Notch and notchless MacBook Pro. But the only drawback is that having multiple items in the Menu Bar will hide them behind the Notch present on the screen, and there is no solution available for it. But accept this, it’s a true answer to, is it worth purchasing Bartender!
There are several users going through same kind of problem while using the multiple menu bar items on the MacBook with Notch, unluckily there is no official solution described by the Apple Itself, but as a Bartender user, you can fix the issue, as it allows to create separate Bartender Menu Bar. To know more about it go through the above guide.


