Getting webpage error “Your Connection is not Private on iPhone/iPad” while using Safari on iPhone/iPad. Also, in the past article, we saw how to block popups on Safari iOS devices. And here I am going one more step ahead that make you safe and secure from security warnings. But you know your website that trying to open on the iOS device is safe to work or trust, then you can do it without any more headache and trouble.
This Trick is working for All iPhones and iPad models. Or your connection is not private on Mac (Chrome) or Android.
Steps for fixing and troubleshooting tips on ‘Your Connection is not private’ on iPhone/iPad
Solution 1: Restart the iPhone, Router, and Mac
On what device are you receiving the Connection is not private error message? iPhone, Mac, or iPad? No matter, what the device is, we will begin this troubleshooting by simply force restarting your iPhone, including the Restart Wi-Fi modem.
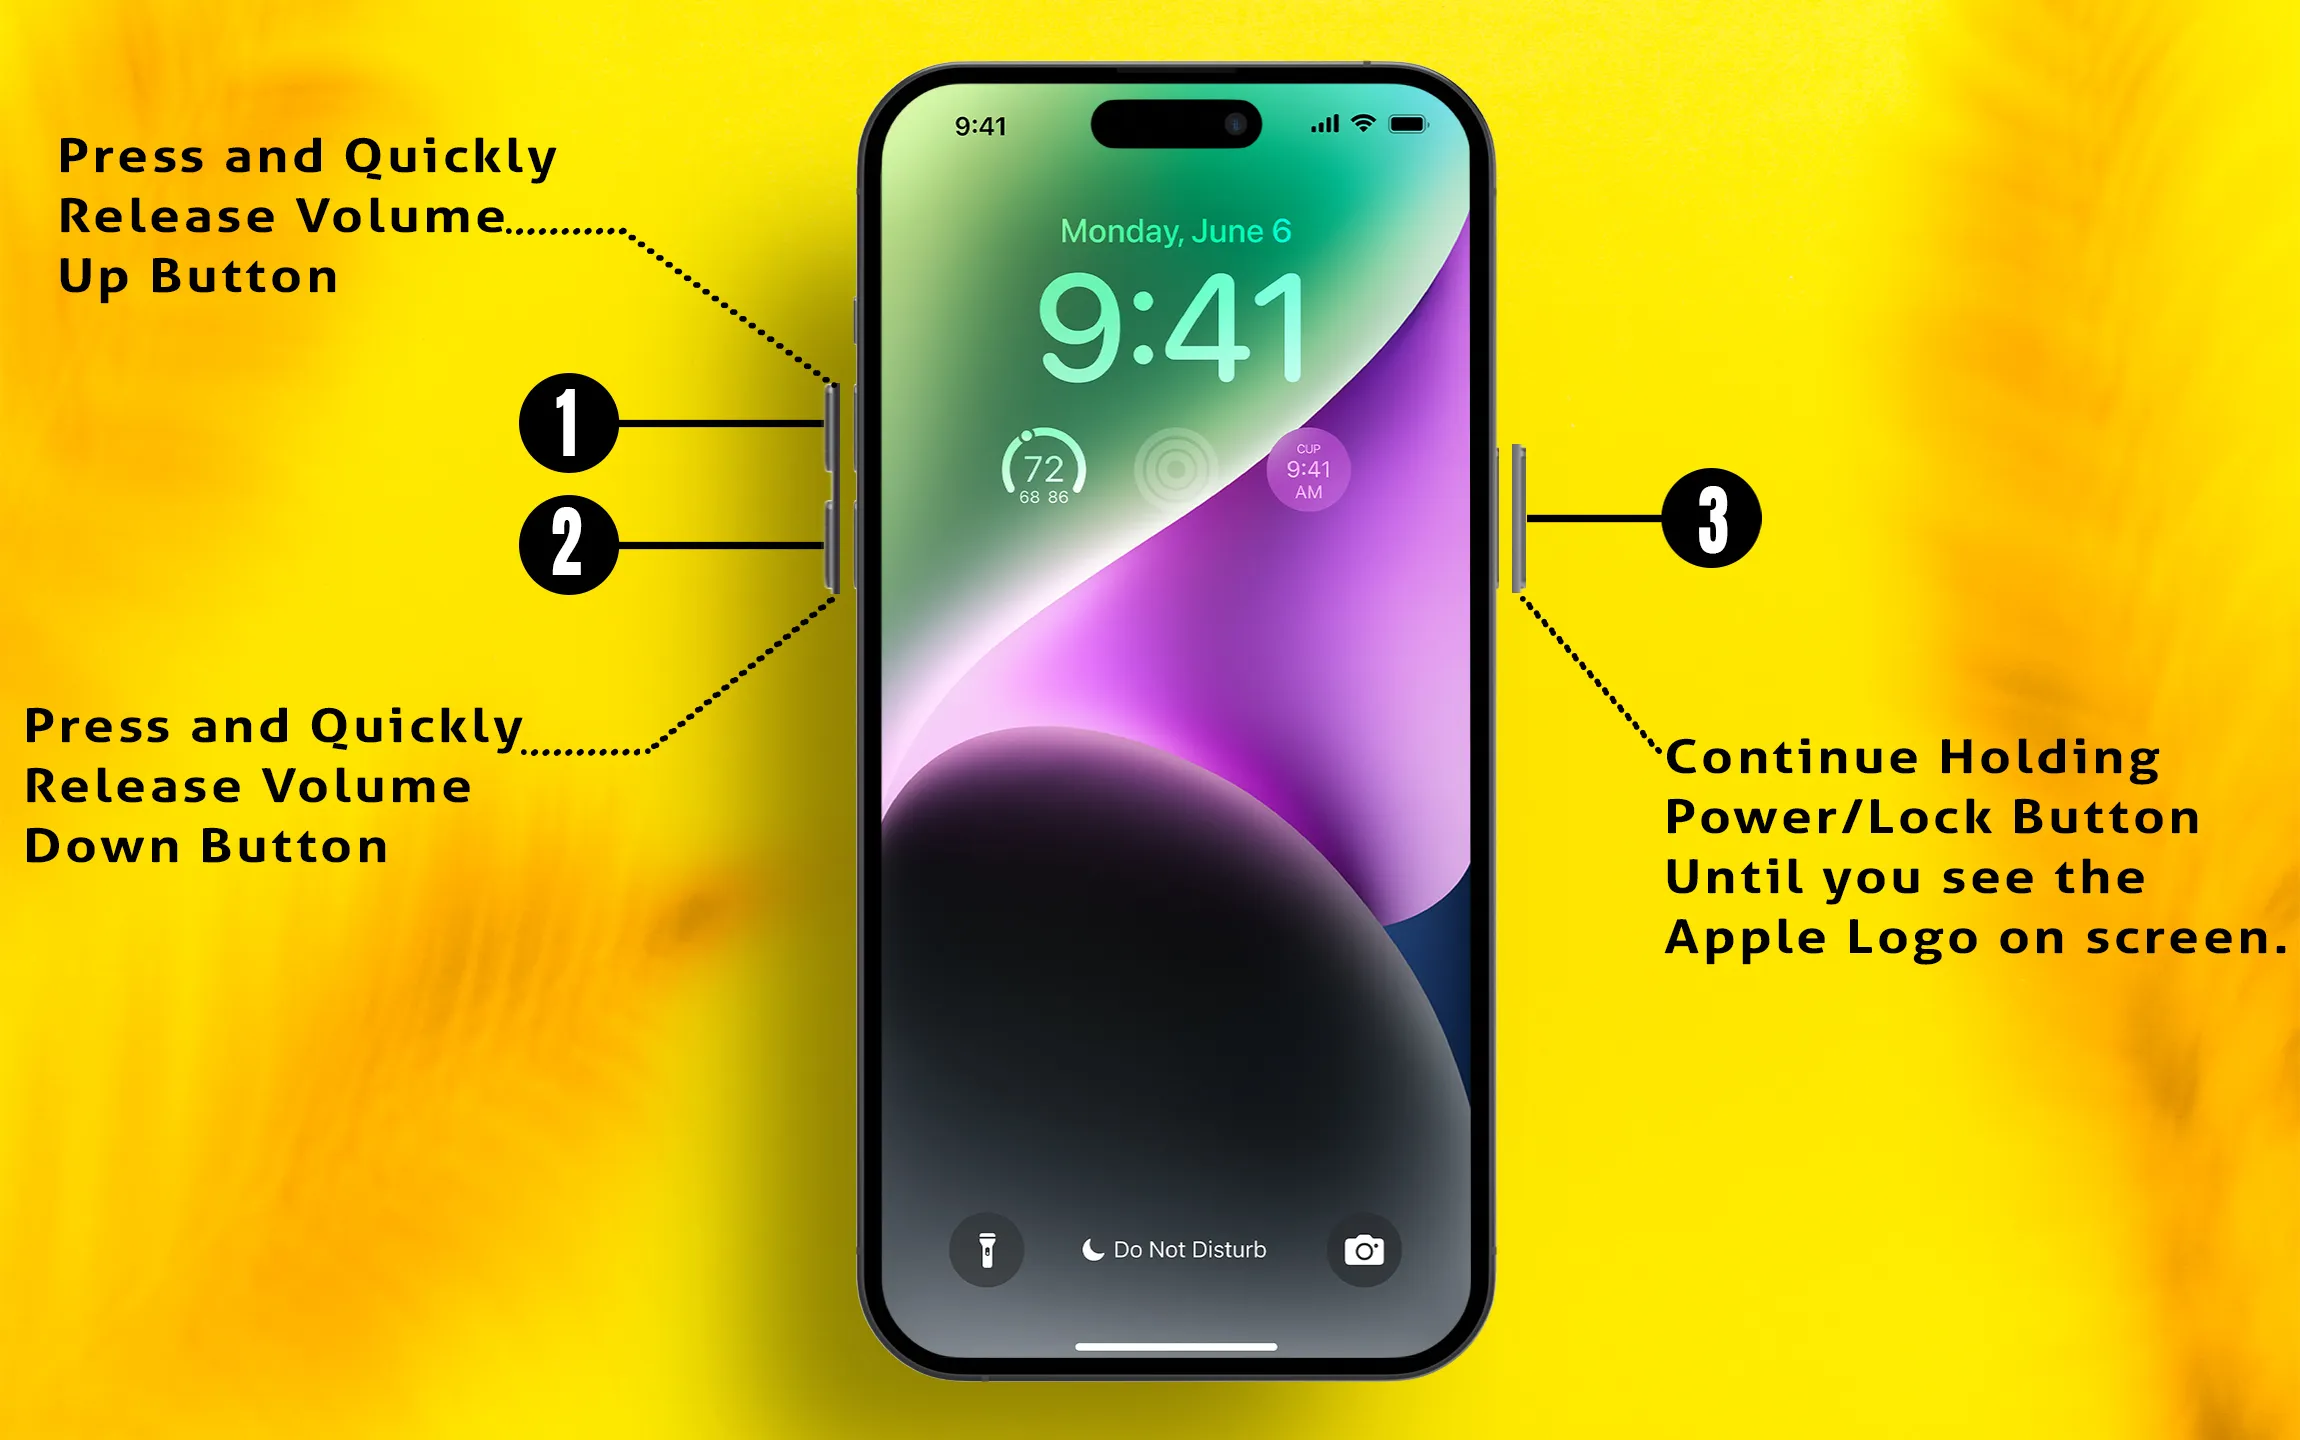
For iPhone 8 or later:
- Press and quickly release the Volume Up button.
- Press and quickly release the Volume Down button.
- Press and hold the Power button and let it go when the Apple logo appears.

For iPhone 7 and 7 Plus:
- Press and hold the Volume Down button and Home button until the Apple logo appears.
For iPhone 6S, 6S Plus, or earlier:
- Press and hold the Home button and Sleep/Wake button until the Apple logo appears.
For Mac Users,
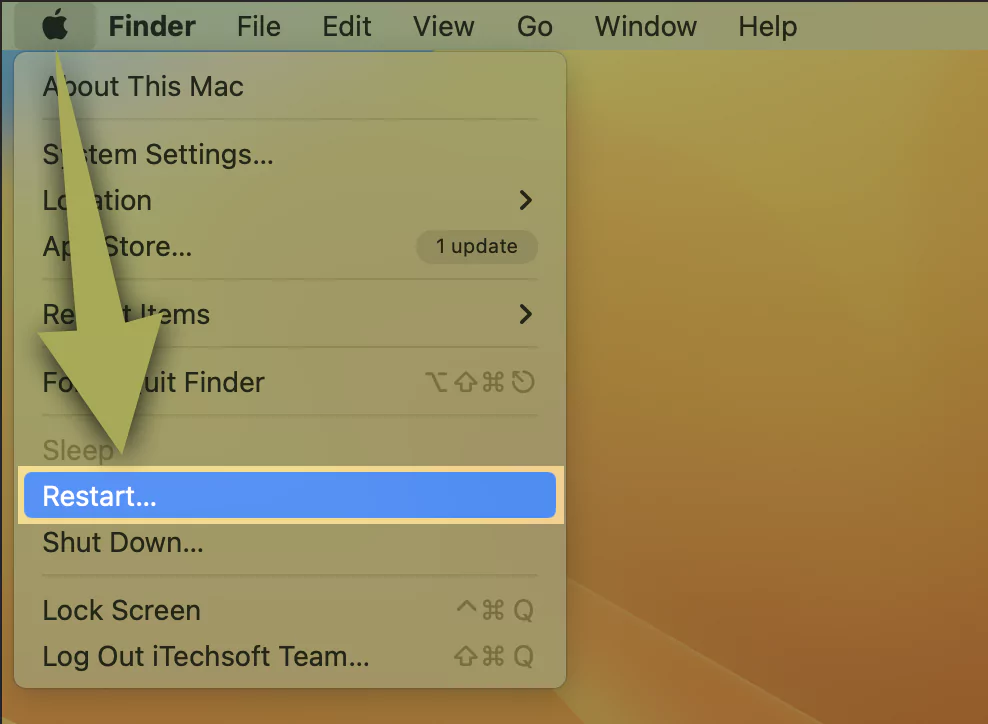
- Click on the Apple logo and select Restart.

For Wi-Fi Router,
- Unplug the power adapter of the Wi-Fi Router and plug it back in after 2-3 minutes.
Also read, Best Safari Alternative browsers
Solution 2: Disable VPN in iOS and macOS
In some cases, your connection is not private. MacBook Pro appears due to faulty VPN service. Remember, we always enable VPN when the website isn’t accessible. In today’s case, you have to do the opposite: disable the VPN on Mac and disable the VPN on iPhone so that the website loads.
Turn off VPN on iPhone:-
Launch the Settings app on your iPhone > Select VPN > Disable VPN Toggle.

Steps to turn off VPN On Mac:-
Step 1: Go to the Apple Logo from the top Menu on Mac > Click on System Settings.

Step 2: Choose VPN > Turn toggle to the left side to turn the VPN Off.

Whether you’re using the VPN app, related extension, or software, for once, turn it off and try to reload the website.
Solution 3: Set the Correct Date and Time
Both date and time must be set correctly to avoid random errors on the iPhone and Mac. Set the date and time to automatically, the device will detect your location, and according to region, the date and time will be allotted to your device.
For iOS,
Step 1: Launch the Settings app on your iPhone > Scroll down to Select General.

Step 2: Tap Date & Time and turn the toggle on next to the Set Automatically.
For macOS,
Step 1: Launch the Settings app on your Mac > Choose General option > Select Date & Time.

Step 2: Select the Set date and time automatically option and Enable it.

Solution 4: Turn Off Security Software/App
Are you using any Antivirus software on Mac, or installed an Antivirus app on your iPhone? If yes, then turn it off. Also, disable security software.
Solution 5: Try These
Step 1: Open Safari on iPhone/iPad.
Step 2: Type the correct URL in the browser web address > You agree with showing guidelines “This website may be impersonating “www.abc.com” to steal your personal or financial information. You should go back to the previous page > But you want to open anyway on your risk. Before opening the website, please read the details under Show Details > Now Click on Visit this website > Click on Visit Website.
That’s it.
Solution 6: Use Safari in Private Mode
Use Safari private browsing; Private browsing makes your data safe and saved in Safari settings. Also, private browsing never saves cache data or history and causes issues with other website data and Devices as well.
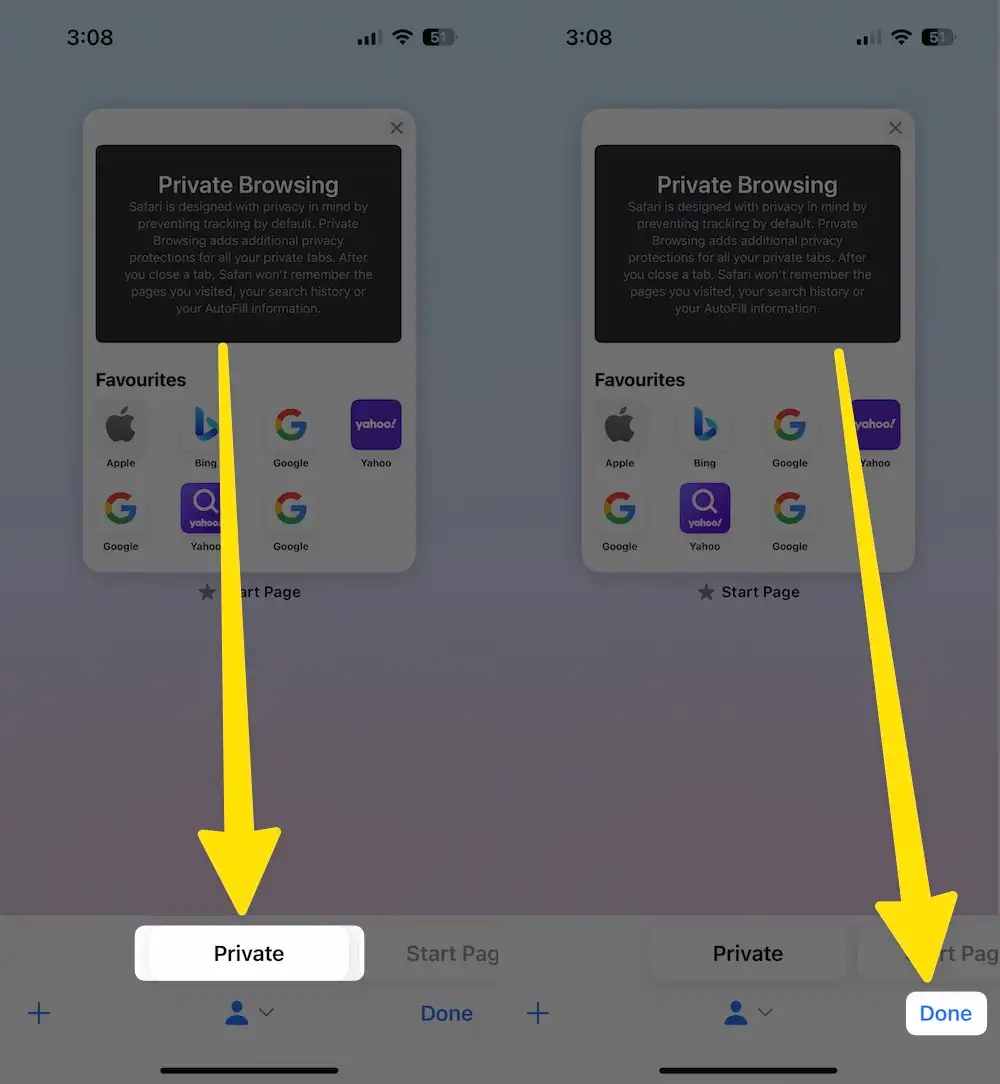
Step 1: Launch Safari Browser on your iPhone > Tap on All Tabs viewer screen.
Step 2: Tap on the Private button icon > Click on Done.
Step 3: Now, are you in private mode? Or Long Press and Hold on the Safari icon from the iPhone Home screen > New Private Tab.
To get out of the private browser, repeat the step and again tap on a private button.
Solution 7: Clear Safari Cache
For iPhone, iPad:
Step 1: Launch the Settings app on your iPhone > Swipe Down to Select Safari.

Step 2: Enable Prevent Cross-Site Tracking > Click on Clear History and Website Data > Select Camera.

Step 3: Disable Camera > Select Microphone to Disable it.

For Mac:
Step 1: Launch Safari on your Mac > Click on Safari at the top of the Mac Menu > Select Settings.

Step 2: Choose Privacy Tab > Select Manage Website Data under the Website Data Section.

Step 3: Select the website > Tap on Remove.

Likewise, Launch Safari on your Mac > Click on Safari from the top of the Mac Menu > Tap on Clear History.

Still, a webpage is in a loop or redirecting after forcing an open URL in the browser. Contact your web developer, don’t open it until you fix it.
Solution 8: Only for Apple MacBook, Mac Computer
Step 1: Press the command+space bar to open Spotlight and Search the Keychain Access using Spotlight.

Step 2: To find the related certificate, Select the Certificate Tab > Choose the Certificate.

Step 3: Click on Always Trust when using the Keychain Access Certificate.

That’s it.
Enjoy your day and happy browsing. Suggestions and your essential tips are welcome in the comment for “Your Connection is Not Private”.


