
Several Mac users have too many questions in their mind, Like how to Disable VPN on Mac to get precious search results or Some secure website and app not working with VPN. Some Mac users have a problem with the VPN Configuration file, So they must delete the VPN Profile from Mac system preferences. Or Try to Uninstall VPN from Mac completely or Switch to another VPN Service. These are the best VPN For Mac, That’s Easy to manage from the Top Mac menu.
This tutorial tests and works for Most of the VPN Mac Apps like Norton VPN, ExpressVPN, NordVPN, CyberGhost VPN, PureVPN, IPVanish, and Hotspot Shield.
Guide on VPN Settings on Mac, MacBook [M1 & Intel]
1: Disable VPN On Mac
As of need, Disabling and Re-enable VPN on Mac is the best practice for all users. Disable VPN from your computer. You can use your own IP and location that might be shared with the internet service provider, and That could be used by the online service you are accessing.
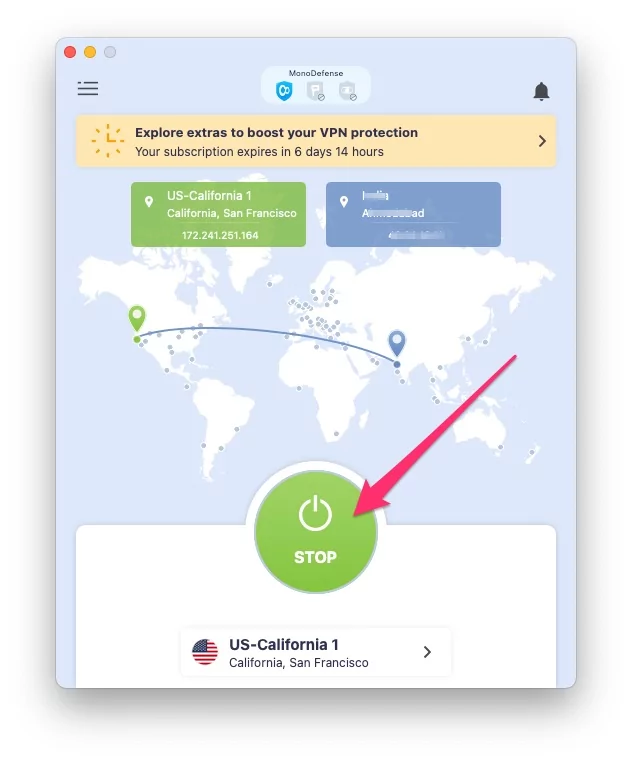
Mac users can quickly Enable or Disable VPN from the Top Mac menu, VPN App Shortcut icon.
Step 1: Click on VPN icon > Start/Stop the VPN on Mac.

Step 2: If the Option is not correctly working, open the VPN app on your Mac from the launchpad and Turn off the VPN.
Step 3: Don’t pass your internet traffic through a VPN IP address.
Sometimes VPN users are having issues with VPN Profiles installed on the Mac system. That’s blocking the internet connection even if the VPN is turned off. Follow the next solution on Uninstall VPN from Mac.
2: Uninstall VPN profile from Mac
Uninstall VPN profile, which means we can reconfigure it when we launch the VPN app again on a Mac or Reinstall VPN App on a Mac computer. Follow the below steps to Remove VPN Profiles only.
On MacOS Ventura
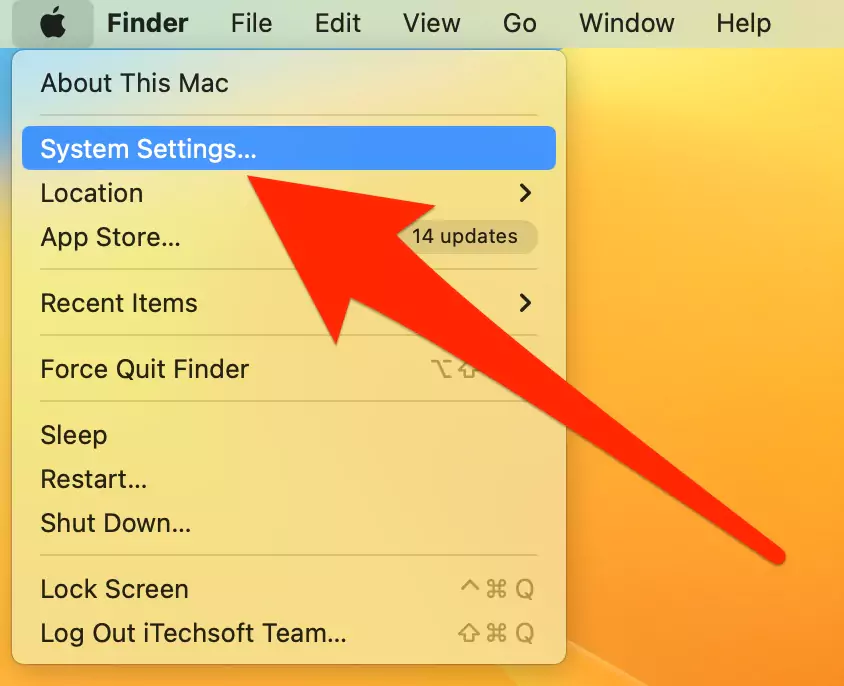
Step 1: Go to the Apple Logo from the top menu > System Settings.
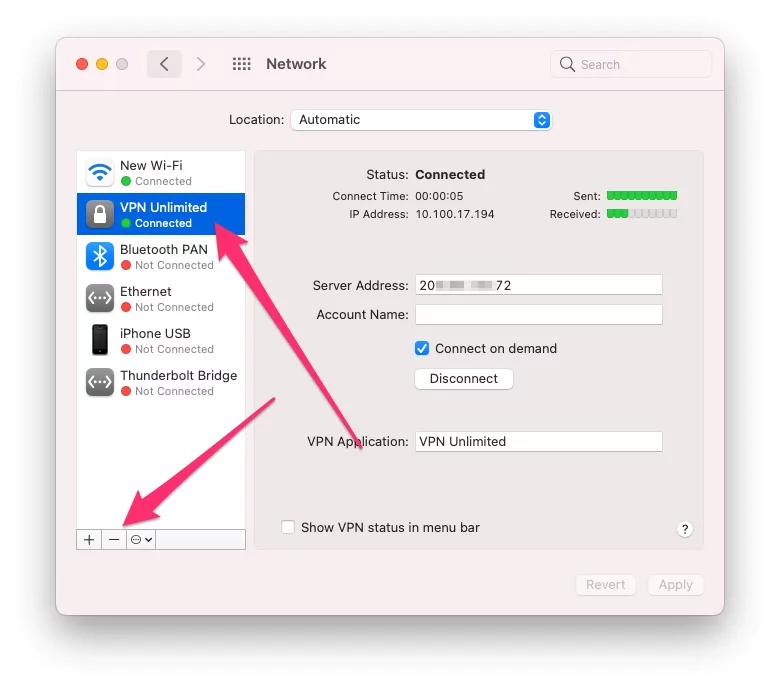
Step 2: Next, Click on Network > See the VPN.

Step 3: Click on (i) button next to the installed profile.

Step 4: Now, Click on “Remove Configuration”. That’s it. A profile will be removed from Mac system settings.

On MacOS Monterey
1. Go to the Apple logo from the top of the Mac Menu. And Click on System Preferences.

2. Click on the Network option, See Active or inactive VPN Profile > And Click on Minus sign.
3. Click on Apply Button. That’s it.
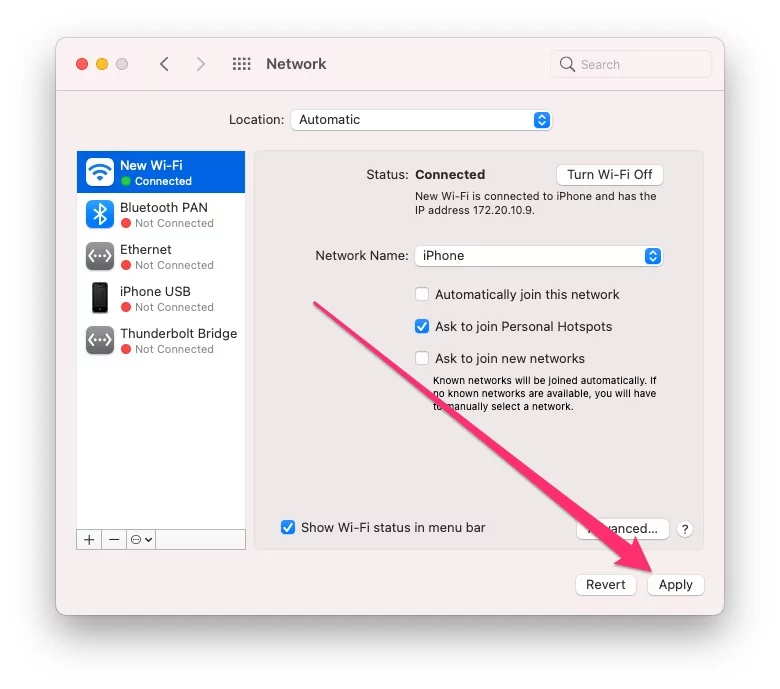
VPN profile will be removed from Mac settings.
3: Delete VPN from Mac Completely
Delete VPN app from your Mac will remove the VPN profile, VPN folders, and App Settings from your Mac, That can’t be undone. Follow the below steps,
Way 1: From the Applications folder, Open the Finder on Mac > From the top Mac Menu, Go > Application.
Find the VPN app you want to delete, Right-click on the app icon, and Select Move to Bin.

And your app will uninstall and Delete from your Mac.
The app is Running in the Background, Won’t Delete from the application folder.
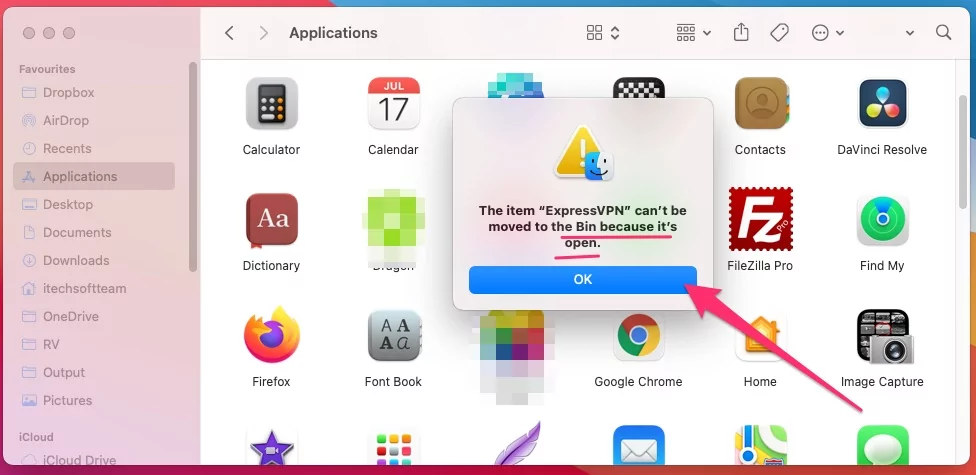
But still, you are getting errors on the Delete app like “The item can’t be moved to the bin because it’s Open“, For this solution, Close app’s background process on Mac using Activity Monitor.
Step 1: Open Activity Monitor on Mac From Spotlight Search or Launchpad > Search your VPN name that’s open in the background.
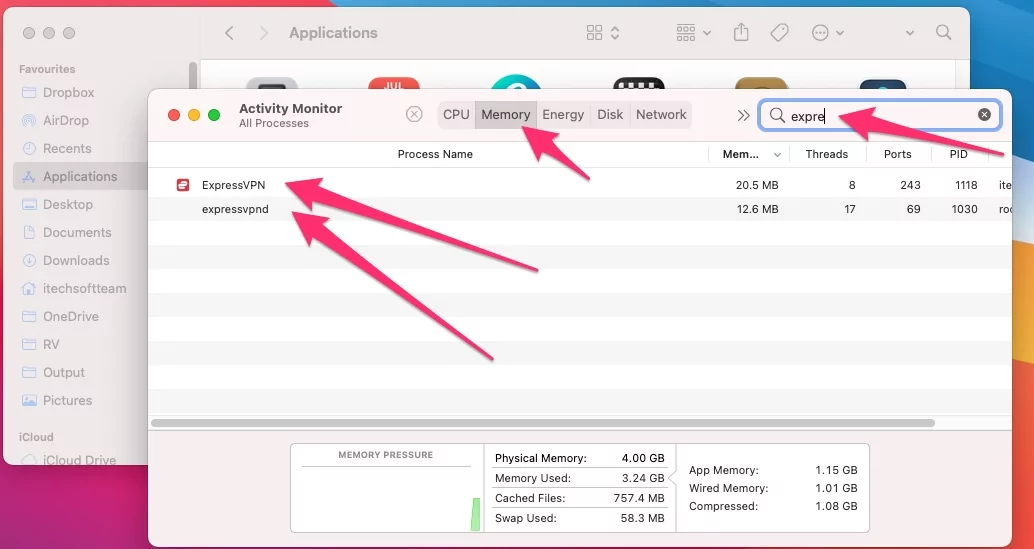
Step 2: Select the Close button to stop all services and Force Quit.
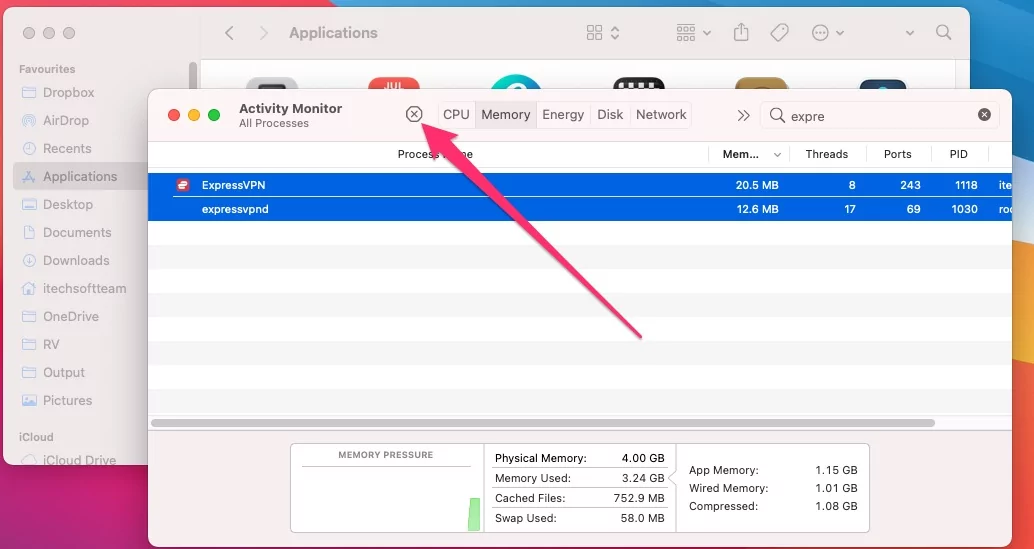
Again, please Move to the Applications folder and Right-click on the VPN app name > Move to bin > That’s it.
Way 2: We can directly uninstall the App from the launchpad if the app is downloaded from the Mac app store. Select the app using your Mouse or Trackpad, Click and Hold it until all the app icons jiggle on-screen and Will shows the Close button to delete the app from Mac.
4: Remove VPN from the Mac Menu Bar
Mac allows users to Show VPN status in the Top Mac Menu Bar With Connected Time. This custom setting can be managed from Mac system preferences.
On MacOS Ventura: how to remove VPN from Mac menu bar
Step 1: Go to the Apple Logo from the top menu > System Settings.
Step 2: Next, Open Control Center > VPN -> “Show in Menu Bar” or “Don’t Show in Menu Bar“.
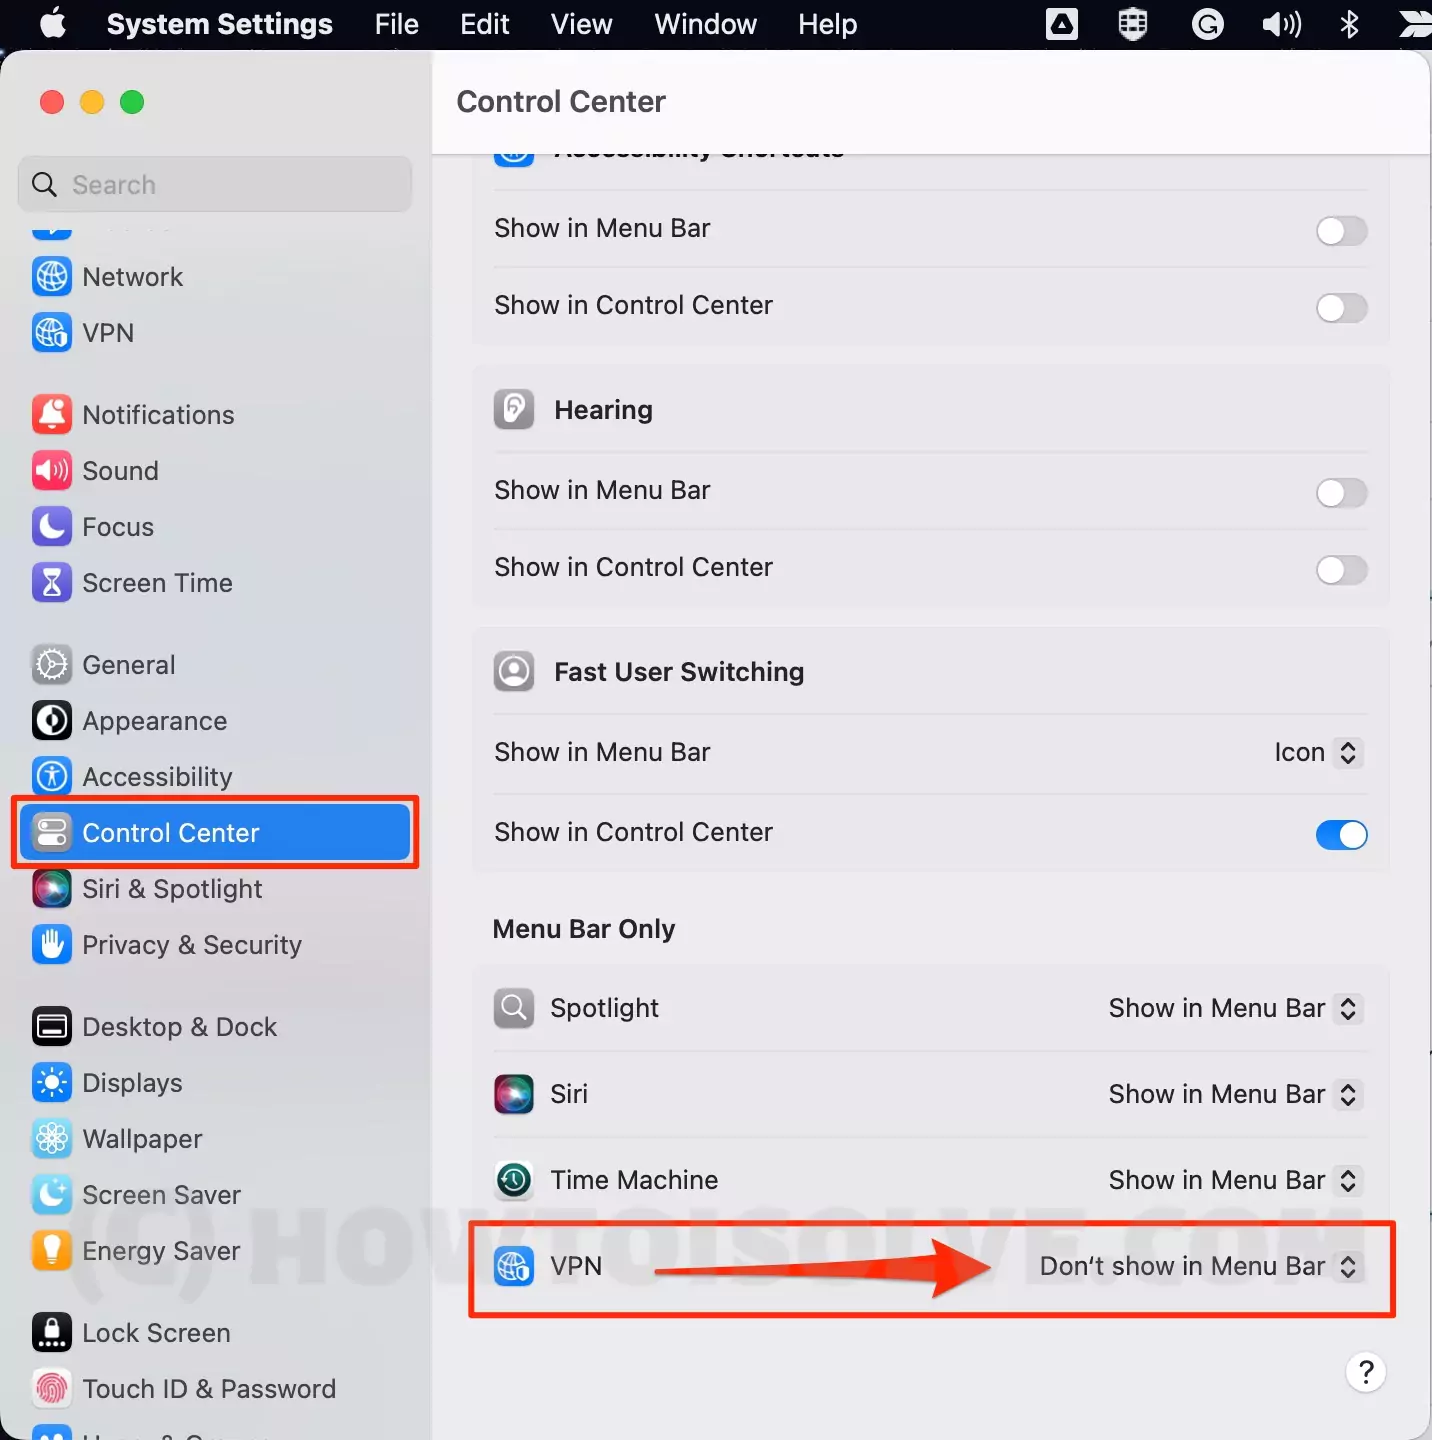
Select your Option and Easily Remove VPN from the Mac menu bar without the Terminal command.
On MacOS Monterey & Earlier: how to remove VPN from Mac menu bar
Step 1: Click on the Apple logo from the top Mac menu > System Preferences.
Step 2: Next, Click on Networks > Select VPN profile from the left side of the window and Uncheck “Show VPN status in the Top Mac Menu Bar“.

That’s it.
Also, there is an app setting to manage VPN show or Hide from the Menu bar on mac.
5: Remove VPN Shortcut from Top Mac Menu
This VPN is Shortcut is for own app, As we open the VPN app, Run on Startup Mac or Start VPN, Mac will see the VPN icon on the top Mac menu bar.
Some Mac VPN apps allow settings in-app for Hiding and Show VPN app shortcuts for the Mac menu.
Stop VPN Run on Mac Startup
are you Mac launch VPN on Startup and Showing VPN icon on top Mac menu bar? Let’s stop keeps opening VPN app on Mac in Two Ways.
- From VPN App Settings.
- Open VPN app on Mac Using Launchpad or Spotlight Search.
- Go to App Settings, Menu > Disable Run on Startup Option.

That’s it.
Also, check into Mac’s login items on Startup Mac settings. Given in the next step.
From Mac System Preferences login items
On MacOS Ventura:- Go to the Apple Logo from the top Mac menu > System Settings > General > Login Items > Remove VPN from the list under the Login items, Select the item and click on the minus button to remove it.

On MacOS Monterey:- Go to the Apple logo from the top Mac menu > System Preferences > Users & Groups > Login items tab > Select VPN app is it’s there and click on the minus icon to Remove from Startup Programme list.

If none of the solutions are working for you then connect the App developer from the website or App’s Details page on the Mac app store.
6: Cancel VPN Subscription on Mac or Restore Purchase
We can manage Your active VPN subscription from your Apple ID account if purchased from the Mac app store. Otherwise, Subscription can be managed from VPN’s company website or a VPN account in-app.
Manage Subscription from Apple’s Account
For your Mac’s In-App purchase, Follow the below steps,
1. Open Mac App Store > Click on the Profile name icon at the bottom left side of the window.

2. Click on View Information (or Account Settings).
3. Scroll until you see Subscriptions and Click on manage Option,

4. Cancel Active Subscription.
5. That’s it.
Another Way,
Restore VPN Subscription from VPN app on Mac: Open VPN app on Mac, Go to App Settings > Find Restore Purchase or Cancel Subscription from mac app.

Shutdown FortiClient Mac
According to Different VPN service settings and customization, we can log out or shut down your Mac’s VPN service. Here’s How to Shutdown Forticlient VPN on Mac to stop background Processes on your Mac startup.
Step 1: Right-click on the FortiClient VPN Shortcut icon in the Top Mac menu.
Step 2: Shutdown FortiClient,

That’s it.
There are three different ways to remove betternet VPN from Mac altogether.
The first and Easy Way is to Delete from the Launchpad, Open Launchpad on Mac > Click and Hold on betternet VPN until the icon jiggle and Show (X) Close button to delete or Uninstall from your Mac.
The second method is Open Applications under the finder. Find the betternet VPN > Righ click on it, Move to Trash/Bin.
The Third way is, Remove betternet VPN Profile, from the Mac System settings. Go to the Apple Logo from the top menu > System Settings > Network > VPN > Click on (i) button next to the toggle. Remove configuration.
That’s it.
We can Manage VPN Configuration Profile from VPN network Preference only. Here are different ways to find it on macOS Ventura and MacOS Monterey & Earlier, have a look.
MacOS Ventura: Apple Logo > System Settings > network > VPN > CLick on i button next to VPN name > Remove or find options for Connect on demand, IP Address and more.
On macOS Monterey & Earlier: Apple Logo > System Preferences > network > Select VPN from left side panel > Click on [-] Button to remove or delete from Mac.
Conclusion:-
There are too many VPN services available for Mac users. In some cases, some VPN app settings might be changed, So you have to go through a different workaround. Share your problem with us if any VPN app is not working on Mac or MacBook Pro/Air [M1 or Intel], Apple’s Silicon M1-series, M1 Pro (MacBook Pro), M1 Max (MacBook Pro & Mac Studio), M1 ultra (Mac Studio), M2 chip of 2022 (MacBook Pro & MacBook Air) Or Intel chip Mac computer.


