If you’re wondering how to improve your Mac’s speed or why your MacBook has slowed down after the macOS Tahoe update, you’re not alone. Over time, your Mac accumulates hidden files that can hinder performance, and deleting important files could affect functionality.While upgrading RAM and SSD can help, some models, like the late 2014 Mac mini, don’t allow for these upgrades due to hardware limitations. I found that reinstalling the OS after erasing the drive can significantly improve performance. If you’re tech-savvy, you can also find tutorials on YouTube for replacing hardware in your iMac, MacBook Pro, or MacBook Air.
Problems aside, let’s focus on the article. We have mentioned a few easy tricks to speed up macOS Tahoe without loss. Starting from the basics, the tutorial moves on to tricky solutions, but they can be done with fundamental knowledge of macOS.
Ways to Speed Up any MacOS on MacBook, Mac
Fix 1: Remove or Move unused files and Folder from the desktop.
We are habituated to putting every file and folder on the desktop to access quickly. Delete unnecessary files and move the data which you need.
- Step 1: Press and hold Control and tap on the files that you want to group together.
- Step 2: Now, right-click on the selected files and select New Folder with Selection.
Alternatively, you can use the all-new feature Stacks in latest macOS. Stacks are used to Group and Sort the files on your desktop to remove clutter.
- Step 1: On the menu bar, click on “View.”
- Step 2: There, you will find “Use Stacks,” mark on it.
Get Here: How to use Stacks on Desktop mac
Fix 2: Optimize Storage on your Mac
Optimizing the storage of Mac will speed up your macOS Tahoe 26. The big files, such as email attachments and iTunes films are removed if they are old. The email attachments removed from the Mac but it will remain safe in the primary server, so whenever you need them you can download from there.
- Step 1: Tap on “Apple” icon and Open “About This Mac.”
- Step 2: Now, tap on “Storage” and then on “Manage.”
- Step 3: Click on “Optimize” and after reading the dialogue box tap “Optimize.”
You can re-download the videos or movies from iTunes again.
If you want to download Mail attachments, then go with the following step,
- Step 1: Go to “Mail.”
- Step 2: Tap “Preferences” and then click on “Accounts.”
- Step 3: Select “Account name” and tap “Account Information.”
- Step 4: Click “Download Attachments” and select all.
Fix 3: Remove Background apps
macOS Big Sur is running slow the possible reason behind this is more applications are running on the background. Remember whenever you use Mac remove available background applications to boost up the processor. Here’s how to check memory usage by each application.
- Step 1: Tap “Finder” and then open “Applications.”
- Step 2: Click “Utilities” and open “Activity Monitor.”
- Step 3: Now tap on the “Memory” panel.

From there, you can check how much memory is used by each memory, so from now, you make sure they are closed while not in use.
Here’s Multiple Ways to Force Quit An App on Mac
Fix 4: Turn off Motion effects
Of course, additional motion effects give a luxurious look to your Mac, but in the same way, they consume much memory and occupy the processor’s memory all the time.
- Step 1: In “Settings,” open “Accessibility.”
- Step 2: On the left side click on “Display.”
- Step 3: Enable “Reduce motion” and “Reduce transparency.”

Now you will experience a simple Mac without any effects or motion.
Fix 5: Enable Low Power Mode
By quitting the programs and system features that are not necessary at all, and what’s best than enabling the Low Power mode to achieve this in a single click. Like iPhone, you can activate the Low Power Mode on Mac, MacBook. Optimizing the Mac with Low Power Mode is recommended, here’s how to do it.
- Open the System Preferences, to do so, click on the Apple
- Then, select Battery.
- Click on Battery from the sidebar.
- Turn On Low Power Mode
Fix 6: Clean Mac Hard Drive
Suppose your Mac consist or a 500GB hard drive and only 5GB is left then naturally it will slow down the processes. I would suggest you free up some space and see if Mac boosts ups or not. If this doesn’t work for you, then take it back up and clean the entire hard drive.
Fix 7: Reset SMC
SMC can fix the extreme level of problems and speed up the Mac. Issues like battery draining, Mac computer getting slow, and some other hardware issues can be adjusted by resetting SMC.
How to Reset SMC in MacBook:
Step 1: Shut down the MacBook.
Step 2: Plug the charger into MacBook.
Step 3: Now, press and hold the “Power” button along with the “shift+control+option” button.
Step 4: Mac will reboot normally.
How to Reset SMC on Mac:
Here I will show you video as well as Steps to Reset SMC on your Apple Mac.
Step 1: Turn off your Mac.
Step 2: Unplug the cable from the power.
Step 3: Wait at least for 10 minutes and restart as usual.
Fix 8: Reset NVRAM/PRAM
Resetting the PRAM/NVRAM is recommended when your Mac behaves oddly. This action is harmless and may potentially speed up your Apple Mac.
- Step 1: Turn off the Mac.
Step 2: Press the “Power button” and “Command+Option+P+R” before the gray screen appears.

Step 3: Keep pressing the keys until the Mac reboots.
Step 4: Release all the buttons and restart the Mac again.
Fix 9: Speed Up macOS in Start-up
If your Mac is taking too long to start up, the reason behind this is that many different applications are launching with it. However, this is wasting our time. Instead, we can turn off the applications we don’t need to launch during startup. Complete Guide to Remove Mac Startup Program.
Step 1: Click the “Apple” icon and go to “System Preferences.”
Step 2: Tap “User & Groups.”
Step 3: Click “Login” items.
Step 4: Check the Applications that you don’t want to launch while starting up.
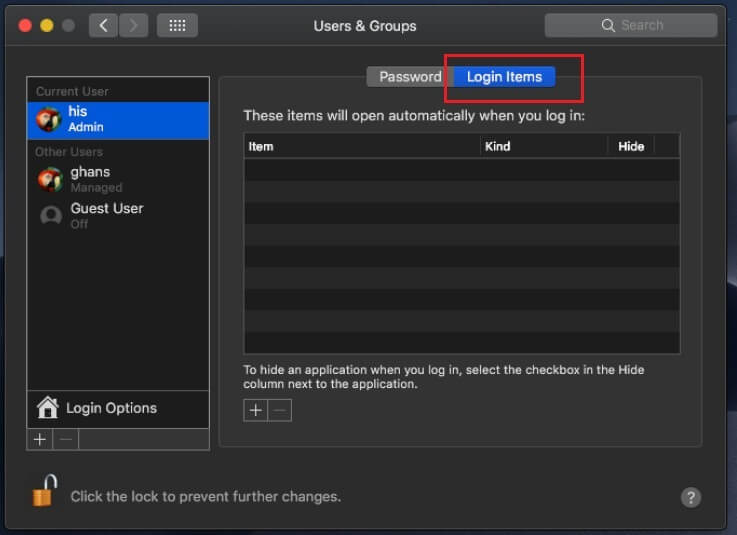
Step 5: Now, click (-) on the bottom of the screen to remove selected apps.
Fix 10: Upgrade HDD to SSD
Nowadays, you will find SSD in every high-performance laptop or computer. If you have newly purchased the Mac, then it might be possible that it is already in there. If not then you must buy SSD with the capacity you need.
SSDs are much faster than HDD, and significantly it will boost up the macOS. While purchasing SSD confirm that it is Mac compatible otherwise it won’t work on Mac.