How to roll back macOS update? Using Apple recommended macOS Downgrade option. Most people are required to undo a recent macOS update for any reason, like incompatible software, App crashes, and lack of Features. To fix issues like that Mac OS users have to downgrade the version using the Bootable USB Drive. so let’s follow the steps to Downgrade macOS Ventura to earlier stable Public MacOS Monterey or Big sure. Are looking to Downgrade macOS Sonoma to Ventura Here’s step by step guide.
Be Ready
- You have at least 16 or 16+ Gigabytes of USB Drive
- Good Intenet connection to download macOS Monterey [Earlier public macOS]
- If you have a USB 3 pen drive, and your Mac has a USB-C port, then connect the USB Drive using the Converter. [Required on M1 or M2 Mac and MacBook]
Important!
**The downgrading process will erase your Mac volume or Partition when you choose the downgrade volume or Partition. So Make sure you have Taken macOS Monterey backup earlier for that Partition or Volume using Time Machine.
Otherwise, I recommend installing any Unstable macOS on a different partition.
Three Steps to Downgrade from macOS Ventura to Monterey
Step 1: Download macOS Monterey on your Mac
Step 1: Open this MacOS Monterey download link on Safari Browser. [if you won’t able to Download the macOS Monterey setup file, then Use Other mac running macOS Monterey]. Click on “View in Mac App Store“
Step 2: Wait for a few seconds, App Store will appear macOS Monterey Page with “Get” button.

Step 3: Click on the Get button and Start Downloading process automatically. Once Downloading process is finished,
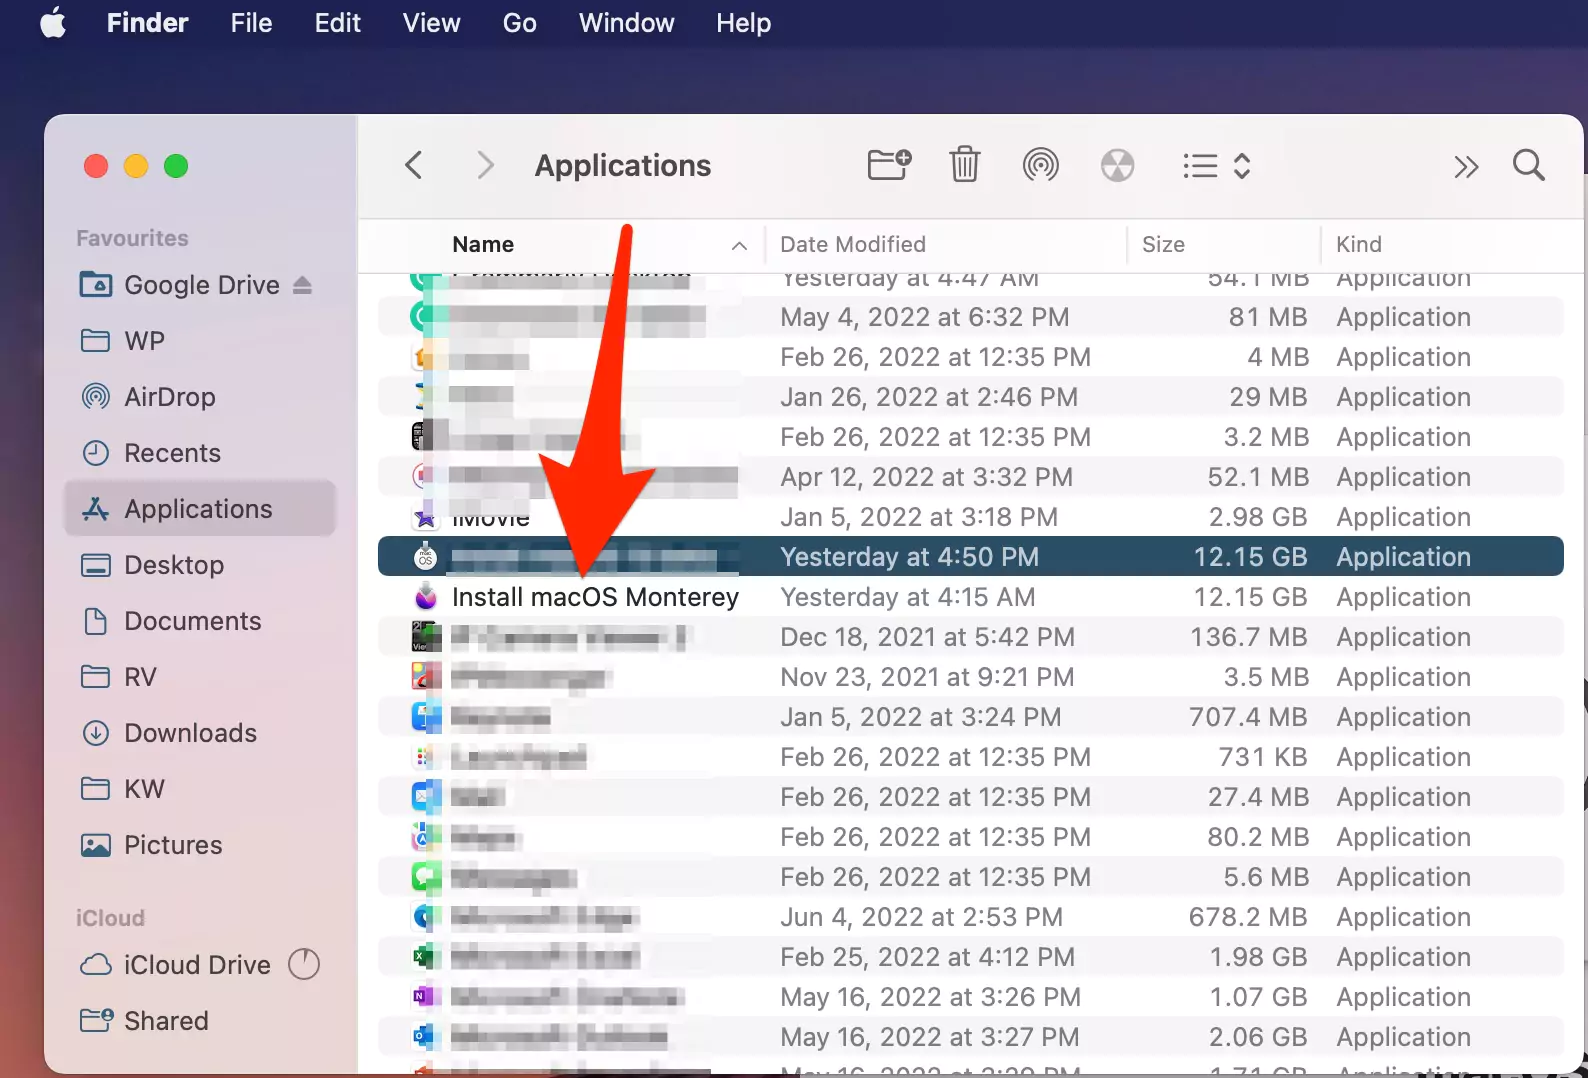
Open Finder > Choose Go on top menu bar > select Applications Section > Navigate Install macOS Monterey, DMG setup file saved on your Mac. For example, you can see below-given image.

Now, that the setup file is ready for creating a bootable drive, follow the below steps.
Step 2: Create a macOS Monterey Bootable Drive Using the Terminal command
Step 1: Prepare your USB Drive, if the Drive format is different, Connect your USB Drive to Mac, open Disk Utility > Select USB Drive > Erase option from top > Give File name “USB” and Select Format type “Mac OS Extended (Journaled)” and Scheme: “GUID Partition Map“. Click on Erase. once the Successfully erased follow the next step.


Step 2: Now, Open Terminal and type the below command, make sure your USB Drive name is: “USB” otherwise, Change the command as well.
sudo /Applications/Install\ macOS\ Monterey.app/Contents/Resources/createinstallmedia --volume /Volumes/USB --nointeraction
Step 3: it will take a few minutes depending on the Writing capacity of your USB drive.
Step 4: Once your Bootable Drive is ready, you will get a message in Terminal like “Install media now available at”.
That’s it. follow the next installation step.
Step 3: Install macOS Monterey on your Mac using Bootable Drive
Erase Your Drive Before start Installation,
- Start your Mac in Recovery mode to Open Disk Utility and Erase macOS Ventura Volume as per your Mac system configuration, M1 or Intel.
- For M1 Mac: Shut down your Mac, and after 10 seconds, press and hold the power button until you see the Startup volume with Options on screen. Select “options“.
- For Intel Mac: After restarting your Mac, Immediately press and hold the Command + R key until your mac sees the macOS Recovery mode screen.
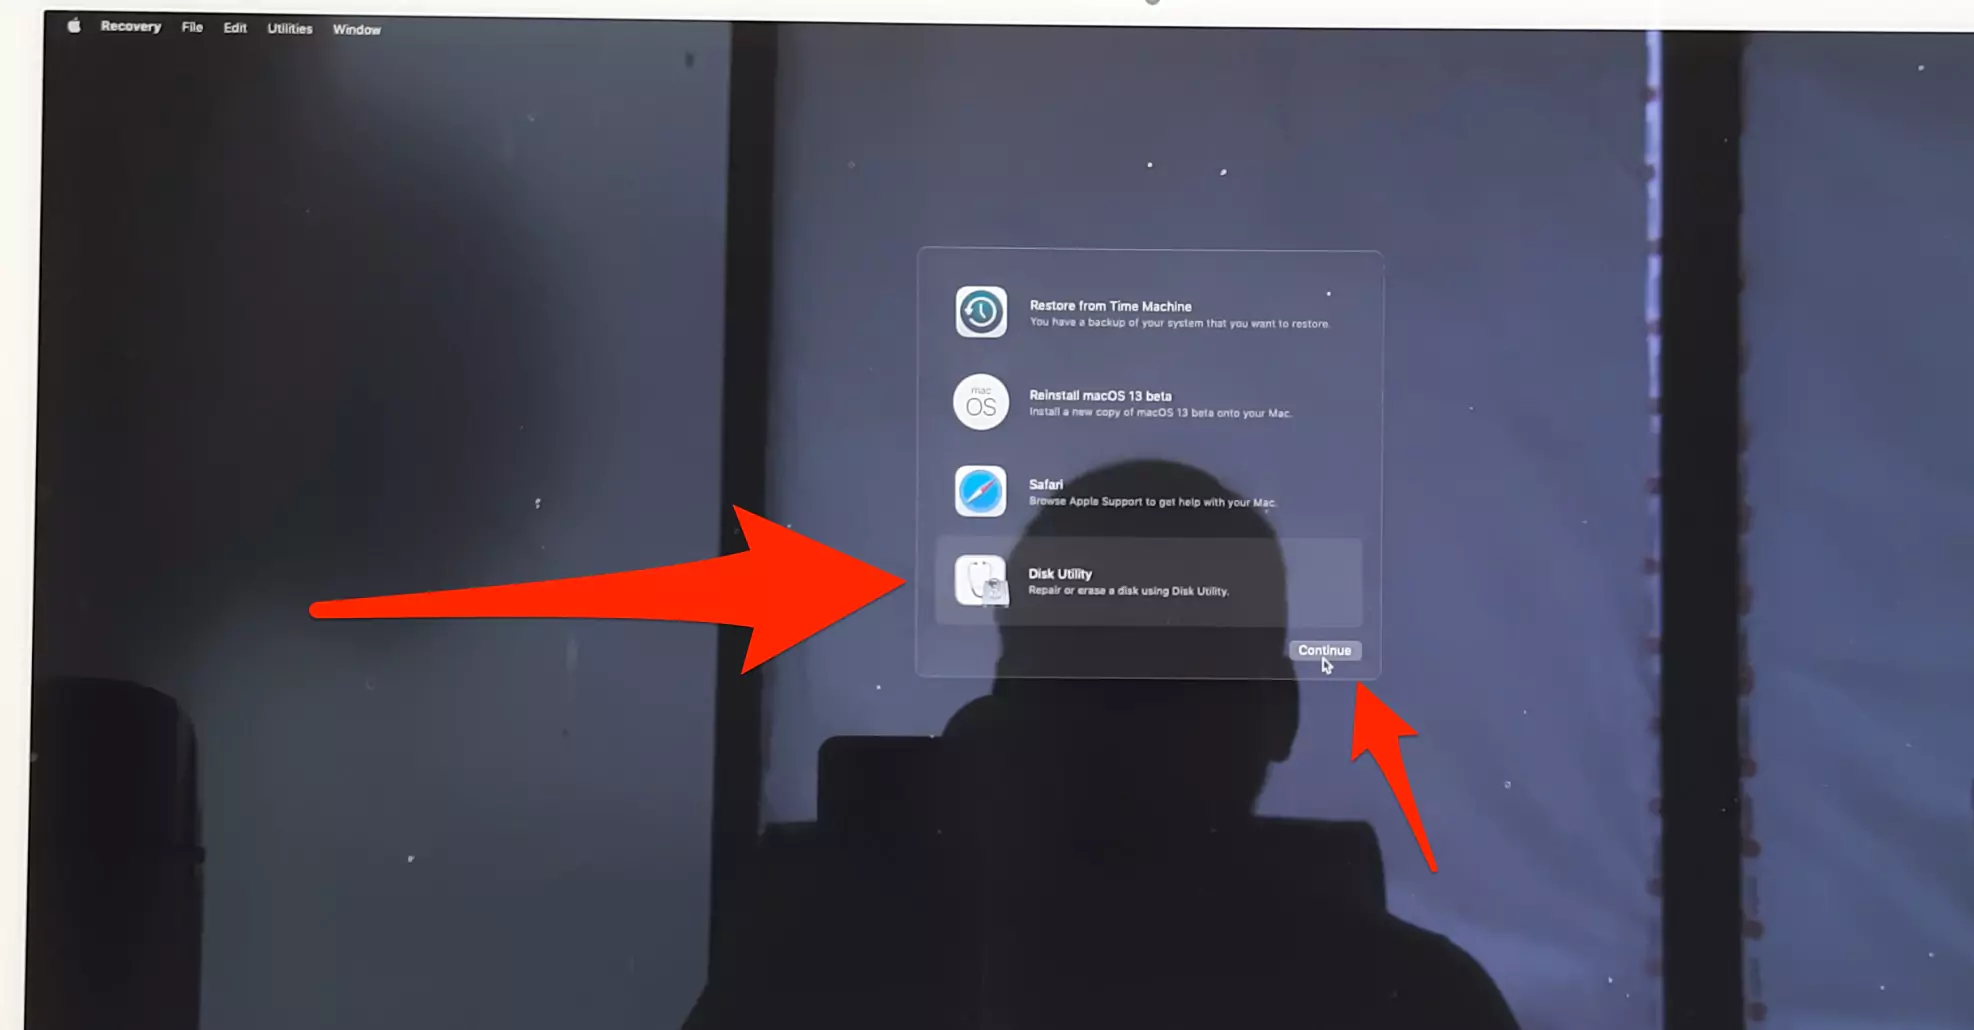
- Now in the Recovery mode window, select Disk Utility from the Options > Continue.

- Select the macOS Ventura Drive that’s installed in partition or Volume from the left side of the window.

- Click on Erase from the top options. and This will erase All data and be ready to install your MacOS Monterey.
- Select the right option during the format of the drive, Select APFS’s most popular file format OR Select Mac OS Extended Journaled (HFS+) for Older Macs or No SSD Mac. Next click on Erase.

- Select the right option during the format of the drive, Select APFS’s most popular file format OR Select Mac OS Extended Journaled (HFS+) for Older Macs or No SSD Mac. Next click on Erase.
- Now, Close the Disk Utility Window, and Shutdown your Mac, from Top Apple Logo > Shut Down Exit from the Recovery screen. and Start the installation step.

Now, Detect Plugged bootable USB drive in Recovery mode, For intel Mac and M1 Mac.
- For M1 Mac: Shut Down your Mac and Wait for 10 seconds. Next, Press and Hold the Power button until you see the Continue Holding for Startup options… then, Loading Startup Options… Until you see the screen with Install macOS Monterey Bootable Drive.
- For Intel Mac: Shut Down your Mac and Wait for 10 seconds. Then turn on your Mac and quickly press and hold the Option(Alt) key until you see the Startup Volume with Install macOS Monterey USB Drive.

From the macOS Resocvey screen, select the Volume where you want to downgrade or install macOS Monterey. [if you are getting an error: The Volume cannot be Downgraded, Solution is given in the last of the steps]
Now, Select your Profile if ask, and enter your Mac login password to verify. click on continue.
Follow the on-screen instruction to complate the installation of macOS Monterey on MacOS Ventura. Hope you downgraded macOS Ventura to macOS Monterey.
If you are getting any errors then comment to me. or Submit your Problem via this forum.
Can’t Downgrade from Mac OS Ventura to Monterey
All Macs running macOS Ventura must be able to install macOS Monterey, But there is some bug or installation issue due to File formate is not compatible with the installation drive. Make sure and check the file format as explained in this article. But if you are getting the error “The Volume cannot be Downgraded“, then Erase your MacOS Ventura Volume first then install MacOS Monterey using Bootable Drive as explained in the next troubleshooting.
The Volume cannot be Downgraded For macOS Ventura
In such a case, Apple doesn’t allow us to the installation of MacOS Monterey to the Upgraded version of macOS Becuase of incompatibility or For any technical reasons.
To Fix that you have to Erase that Volume and install MacOS Monterey Using Bootable Drive, Follow the below steps,
Put your Mac in Recovery mode and Under the Disk utility > Select the Drive and Erase.
To Erase Volume:-
- For M1 Mac:- Shut down your Mac, after 10 seconds press and hold the power button until you see the “Continue holding to startup options…” > “Loading Startup Options…” > Options > Disk Utility > Select the MacOS Venture installed Volume > Erase from top Menu > Erase That’s it.
- For Intel Mac: After restarting your Mac, Immediately press and hold the Command + R key until your mac sees the macOS Recovery mode screen.
Now, Again put your Mac in Recovery mode and Install using Bootable Drive on MacOS Venture installed Volume or Partition as Explained in Step 3. I successfully installed MacOS Monterey on macOS Venture Partition on My M1 iMac. Hope this will help you too.
Downgrade macOS Ventura to Monterey without USB
For Now, there is no way to Downgrade macOS Ventura to Monterey without USB Drive or External SSD or HDD.
Downgrade macOS Ventura to Monterey Without Losing Data
Yes, you can restore all the Data like Earlier but you have a Time Machine backup or Backup your Data on External Hard Drive. During the Downgrading process, your Mac will ask to copy data from Time Machine backup. Select that option and Restore old Data back to your Mac without Loading Data [Apps, Files, settings]. But you must have a Time Machine backup for MacOS Monterey.
Can you downgrade a Mac that shipped with Ventura?
Yes, we can downgrade any MacOS Ventura Supported Mac to MacOS Monterey using the same steps. But the Installation process is different for M1 and Intel Mac [Recovery mode]. that’s explained in this article. and the Rest of the steps is the same. like download macOS Monterey Setup file, Create a bootable drive, and so on.
Is macOS Monterey better than macOS Ventura?
Ventura is the Best macOS that’s much improved for the latest generation desktop OS. Easy to Switch between the windows using the Stage Manager on Mac. is the Best Productivity feature. Other highlighted features are mail, messages, Live text in video and Clock app, and so on.
Can you uninstall Ventura on Mac?
Yes, We can uninstall Ventura on Mac but will lose all the Data if you are choosing options like Downgrade, Delete partition, or Volume. So Take a Backup of your Data before uninstalling Ventura from your Mac Using Time Machine.
Can you revert back to previous macOs?
Yes, we can revert back up to the signed version of MacOS. But earlier Version of MacOS is a safe option to use it. Becuase too old macOS might be not supporting to your Latest Software. As explained in this article.
How much time was spent during the Downgrading MacOS Ventura
it will take around 1 hour depending on the Data, Mac Models, USB Drive type, and What is your requirement? Like restoring from Time Machine backup while installing macOS Monterey.


It show circle with cross sign & (support.apple.com/Mac/startup) half way after press option & boot to install Monterey. Try & not able boot to recovery to access disk utility. Could be deleted all drives issue make it all drives are gone? Please help. Thanks.