
The users can easily switch between apps by clicking on the tab of whichever application they want to open. Once you click on the application from the tab on the left, that app or software takes the place of the center window while moving the previously opened app to the sidebar. This impressive feature comes in handy for all of us at some point in time. For music producers, digital artists, graphic designers, etc., this new feature will help in saving a lot of time by conveniently opening the apps of their choice with just a single click.
In this publish, we will cover all the different methods by which iPad users and MacBook customers with the macOS operating system can easily enable or disable Stage Manager on their devices.
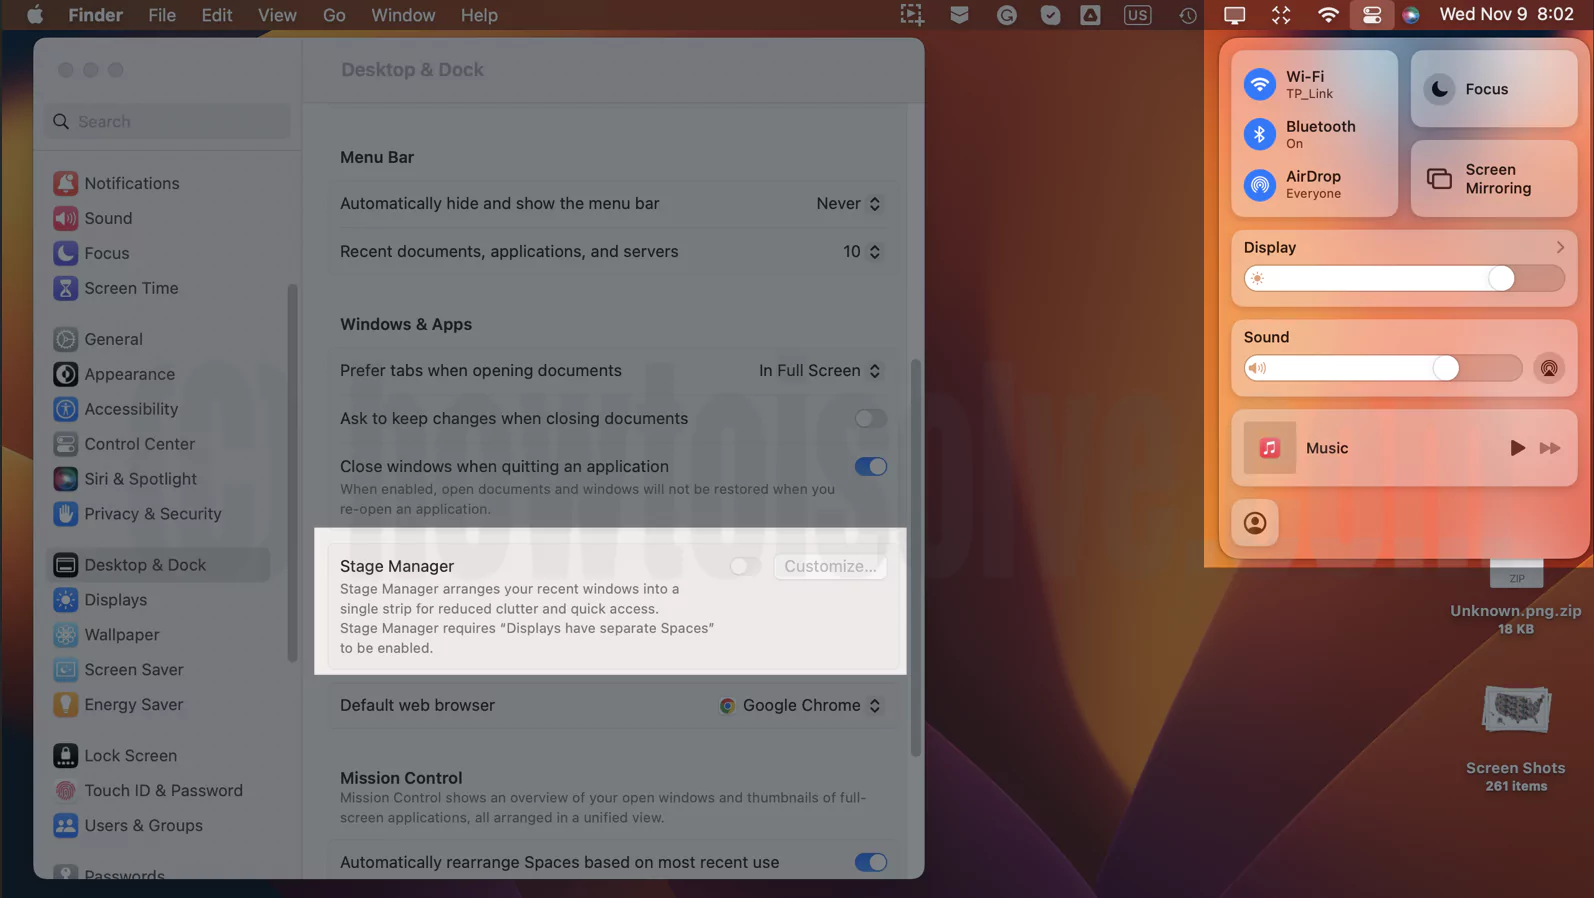
Fix: Enable Displays have separate Spaces
On your Mac, Stage Manager is missing in the control center or Can’t be enabled from System settings. Becuase it’s Greyed Out (See below screen), Let’s fix it on supported & macOS Ventura installed Mac or MacBook.
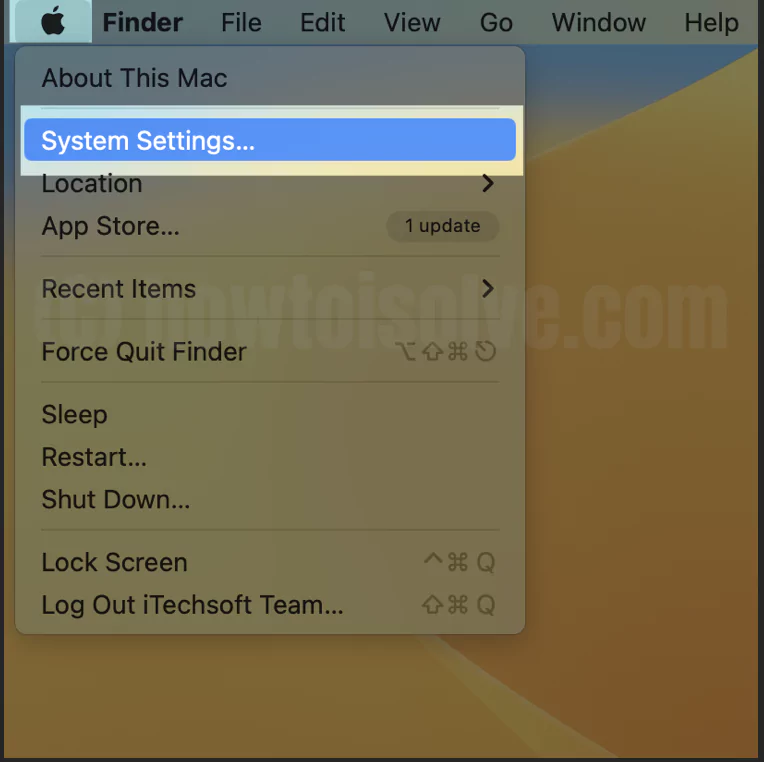
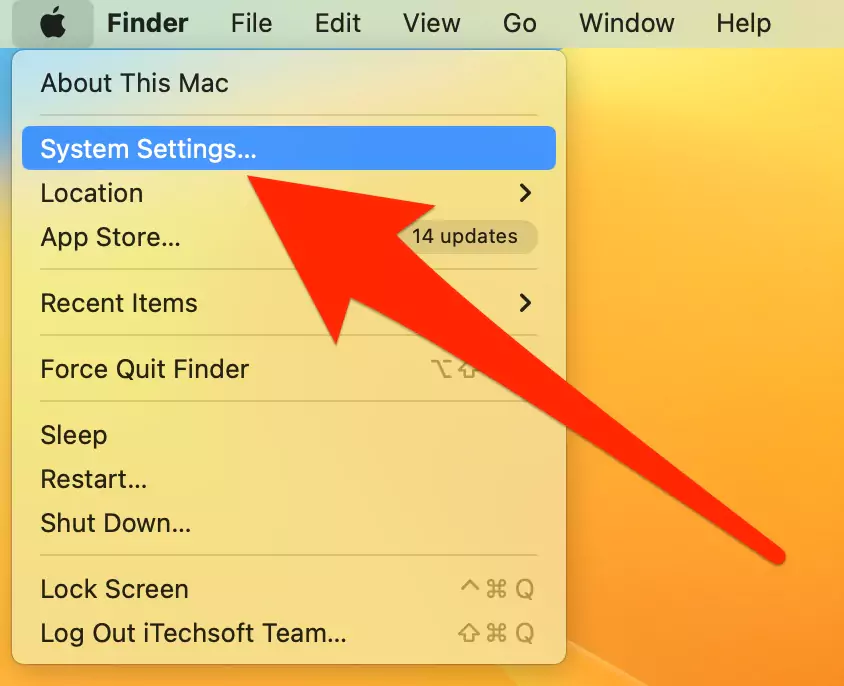
1→ Go to the Apple Logo > System Settings.
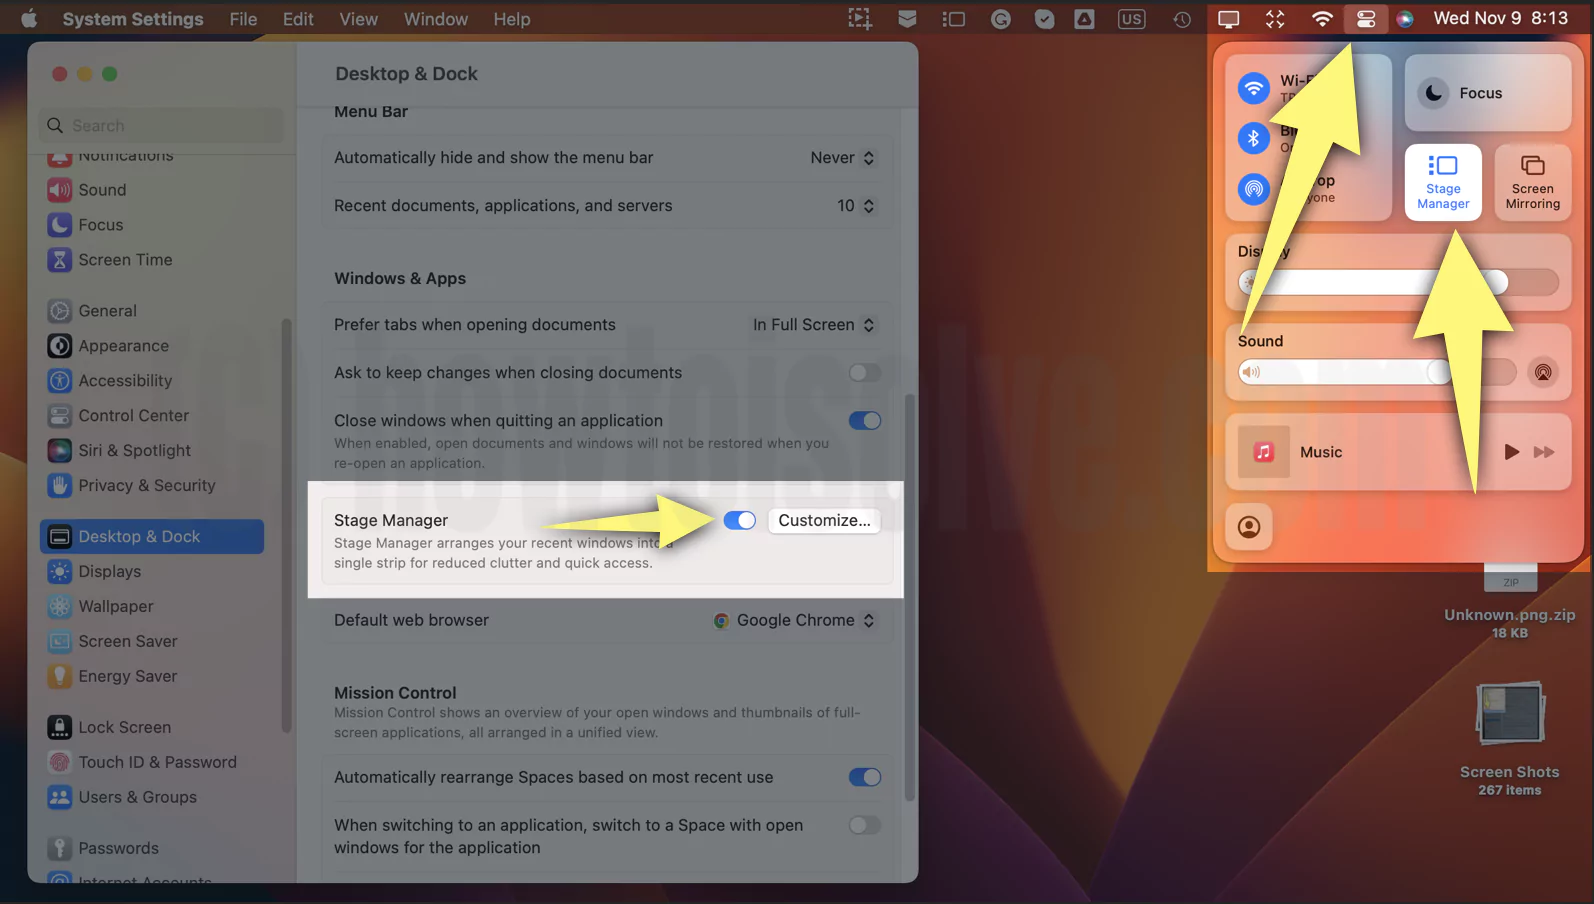
2→ Select “Desktop & Dock.” > Scroll to the right space and See the option, “Displays have separate Spaces” enable the toggle. Now, to apply the changes log out of your Mac system is required.

3→ Now, Go to the Apple logo > Log out. All the applications will close automatically. Make sure and saved unsaved documents and work before you log out.

Login your Mac again and follow the Same, You will find the Option for Stage manager in control center and System settings as well.
Also, check other Quick Fixes,
- Stage Manager Control Will not work in Show Desktop on Mac (F11) or (Fn + F11) view or Mode.
- Try after Restart your Mac
- Try in Safe Mode Mac
- Reinstall macOS
- Your iPad is Not Compatible – M1 Chip & Some Intel iPad Only, Stage Manage Compatible iPads are,
- 12.9 – inch iPad Pro (third generation and later)
- 11- inch iPad Pro (first generation and later)
- Also for 2018 and 2020 models that use the A12X and A12Z chips
- Your Mac is Not Compatible – Your Mac should compatible with MacOS Ventura – How to Check Which Version of macOS You’re Using on Mac.
How to Enable/Disable Stage Manager on macOS Ventura
Fix 1: How to Enable Stage Manager on Mac
Suppose you are working on multiple applications simultaneously and want to view the contents of each app. In that case, you should enable the Stage Manager to manage the display space and time effectively. To enable the Stage Manager on your Mac, take account of the instructions discussed in this section.
Step. 1→ First, keep the multiple applications open on your MacBook.
Step. 2→ Then, go to the top right corner of the screen and click on “Control Centre,” denoted by two toggling keys.
Step. 3→ In the drop-down menu, click on “Stage Manager.”


After completing this process, one main tab will be visible on the screen. The other tabs of various applications will appear on the left sidebar of the Mac. You can also put the main application on full screen by sticking to the process explained here.

Step. 1→ After enabling the Stage Manager, click “Control Centre” again.
Step. 2→ Now click on “Stage Manager” and select “Hide Recent Apps” to hide the background apps from your screen.
After hiding the recent apps, you can see them by dragging your cursor to the left side of the screen and switching between the apps you want.
Recent Applications window will appear on the opposite side of the Dock position.
To customize the Stagemanager settings, Go head to Apple Logo from the top menu > System Settings > Desktop & Dock > Customize > Enable or Disable the below settings,
- Recent applications
- Desktop items
- Show windows from an application > “All at Once” or “One at a Time“

Tips!
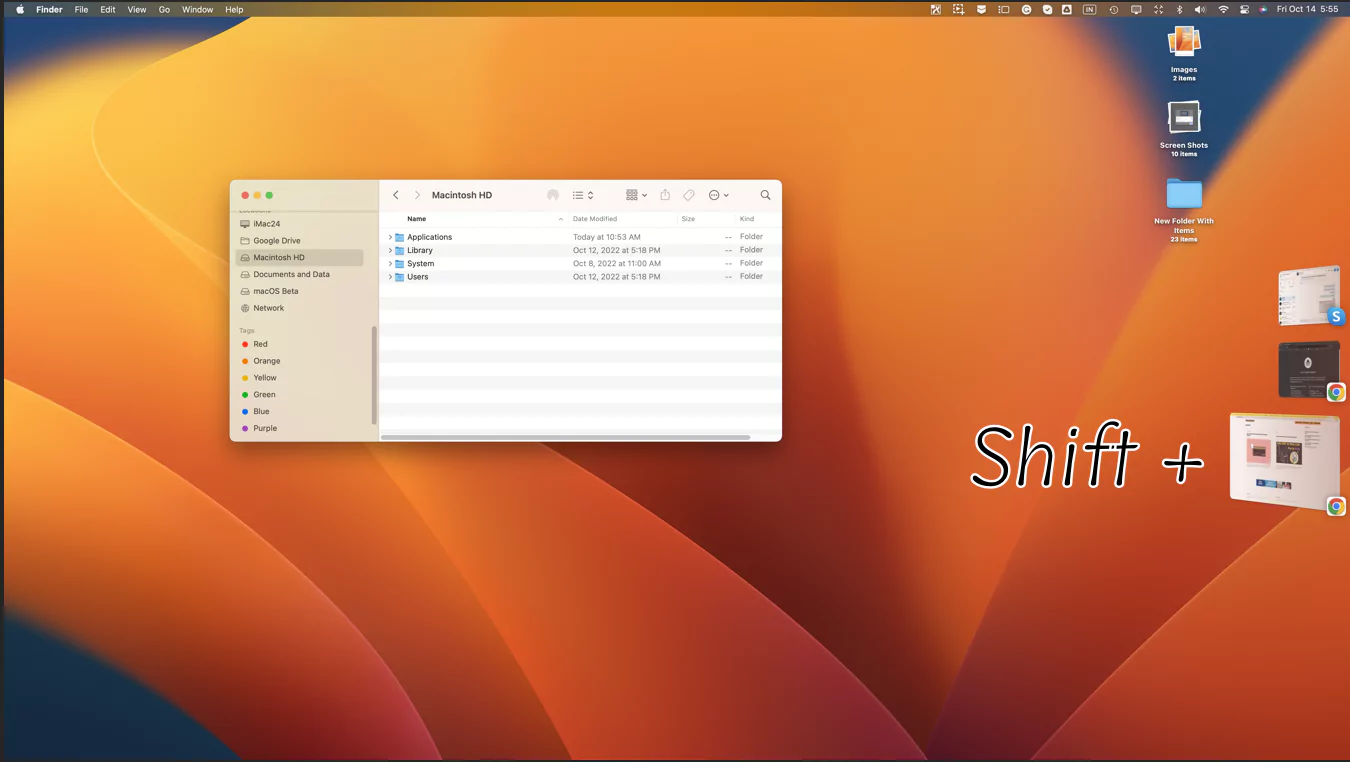
To Open any app window alongside app on the desktop, press the shift key + Click on Window on Stage manager Recent app. or Drag Window using the mouse from the Recent app preview.
That’s it.
Fix 2: Stage Manager Shortcut on Mac Top Menu Bar
Quickly and Easily access the Stage Manager shortcut from the top Mac menu, without opening the control center. Enable and Disable the stage manager on any screen.
Step #1:- Go to the Apple logo from the top menu > System Settings.
Step #2:- Select Control Center > And For Stage manager “Show in Menu Bar“.
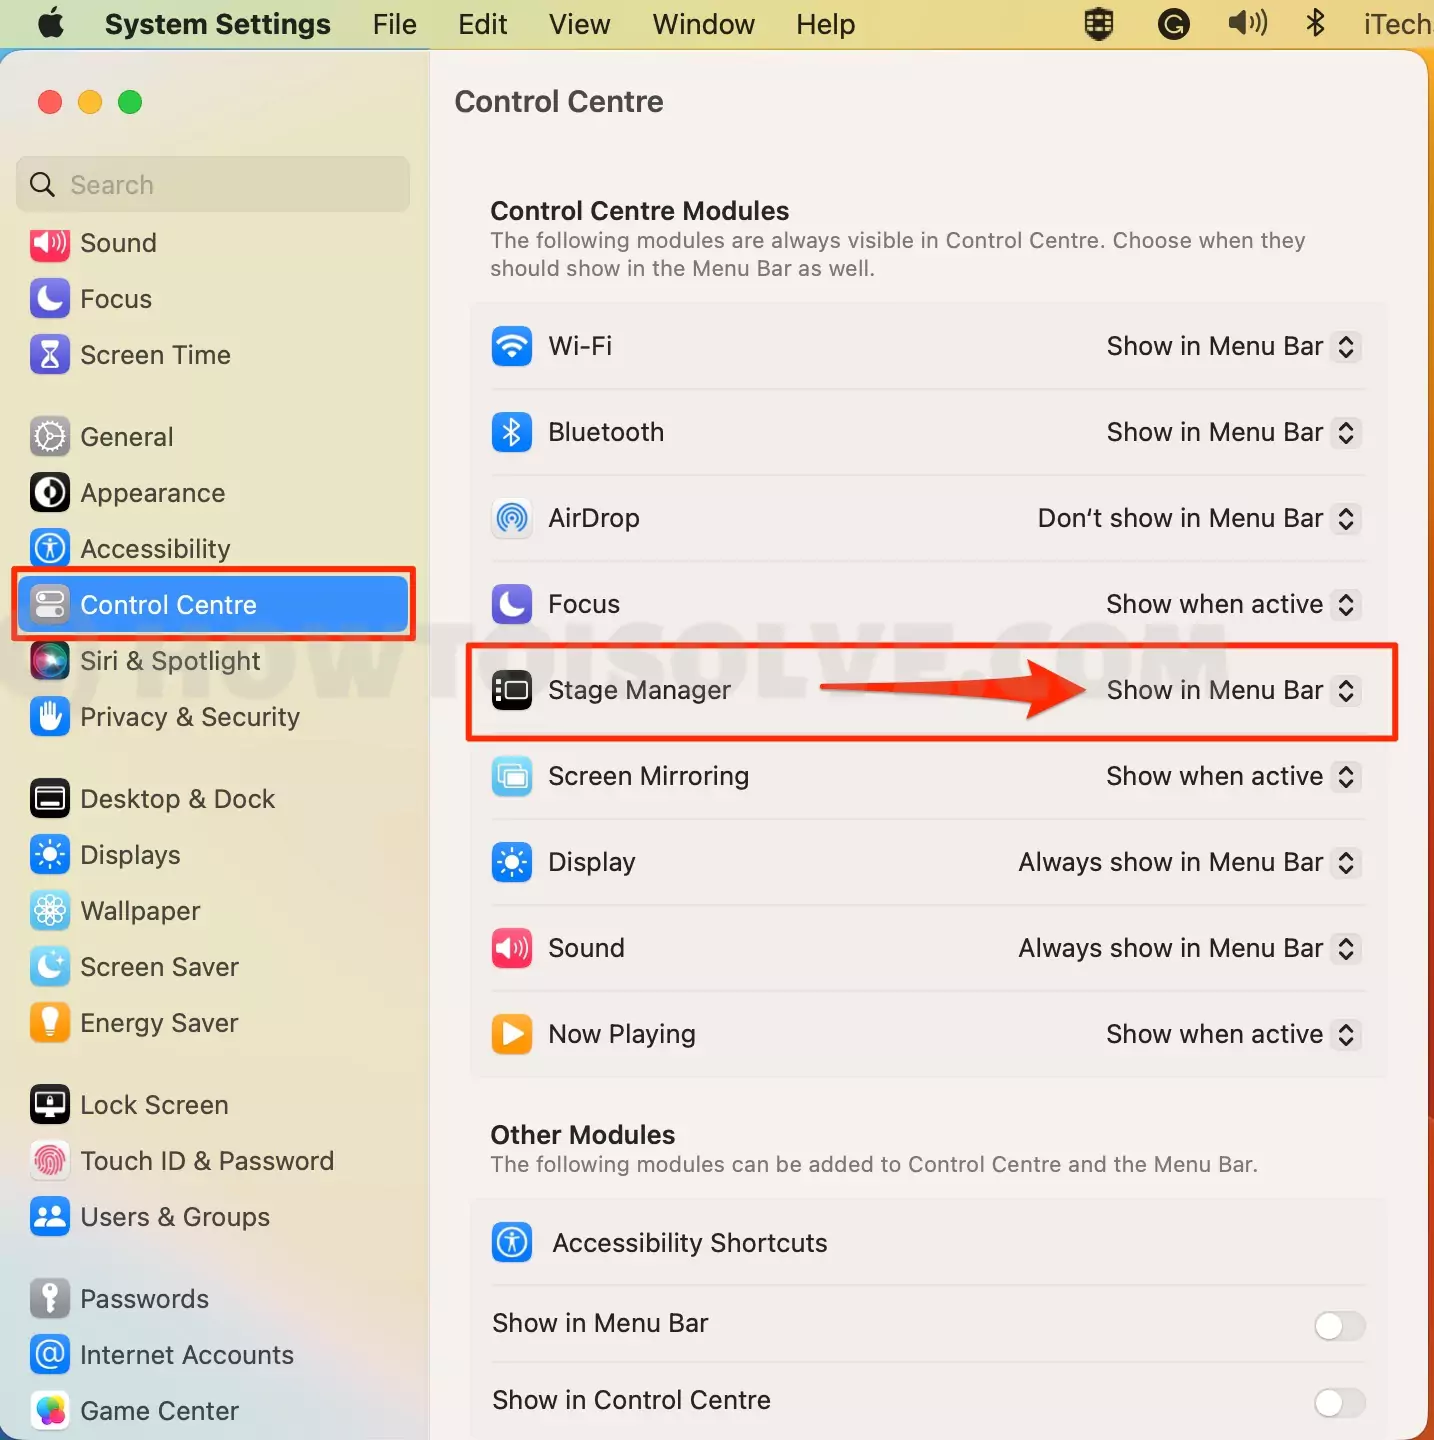
Step #3:- Now, the Stage Manager icon will appear on the Top mac menu Bar.
Step #4:- Enable the toggle for the Stage manager to turn on. Another Stage manager setting is for Show Recent Window preview on the sidebar.
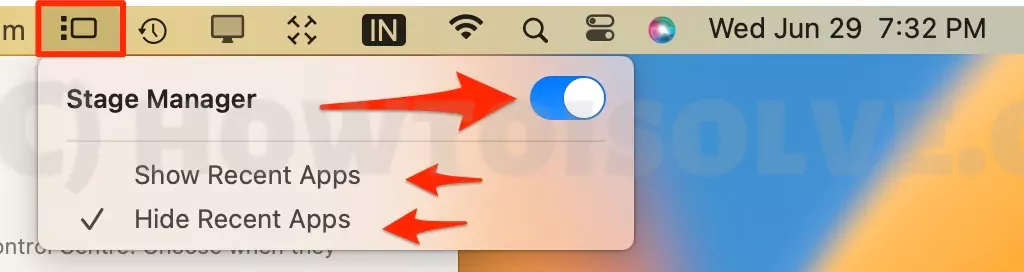
- Show Recent Apps
- Hide Recent Apps
Step #5:- To Disable Stage manager, Again click on the icon > Disable Toggle “Stage Manager“
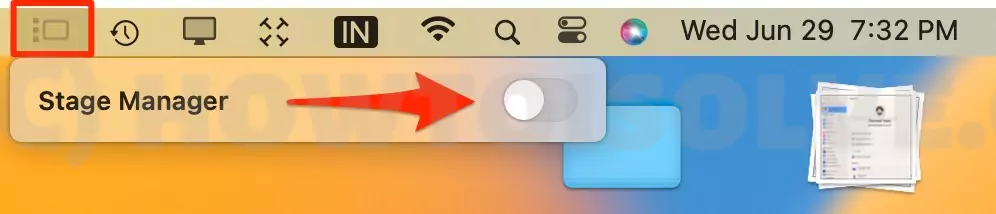
Step #6:- That’s it.
Fix 3: How to Enable & Disable Stage Manager using Keyboard Shortcuts on Mac
Use keyboard shortcuts for stage manager on Mac to turn on and off. With the below steps. Follow the below steps and apply your keyboard shortcut to use it.
1. Go to the Apple Logo from top menu > System settings > Keyboard > Keyboard Shortcuts > Mission Control.

2. Select Stage Manager turn on/Off. double click on to give customer keyboard shortcuts from none option.

3. Click on done to save the changes. and start using. Get more in details how to enable & Disable stage manager on Mac.

How to Turn off Stage Manager on Mac
Once you are finished with your work, you might want to turn off or disable the Stage Manager feature on your MacBook. You can disable the Stage Manager feature on your Mac by sticking to the below steps.
Step. 1→ Tap on the “Control Centre” icon represented by two toggle buttons at the top right side of the screen.
Step. 2→ Then, hit the Stage Manager button to open the pop-up menu.
Step. 3→ Finally, toggle the button in the pop-up menu towards the left side to disable the Stage Manager option.

How to Enable/Disable Stage Manager on iPad
Stage Manager is available on iPad Air (5th generation), iPad Pro 12.9-inch (5th generation) and iPad Pro 11-inch (3
How to Enable Stage Manager on iPad
The process of enabling Stage Manager on your iPad is similar to that of a MacBook. You can also use an external monitor to project the screen of your iPad on a larger screen for added convenience. So, this is how to enable Stage Manager on iPad.
Step. 1→ Go to the “Control Centre” of your iPad while having multiple tabs or apps open on your iPad.
Step. 2→ Then, scroll down, look for the icon with three dots and a square, and tap on it. This is the symbol of the Stage Manager.
Step. 3→ An app will open on the main window, and the remaining apps will be available in the sidebar. Click on the application you want to open and work on for easy access.
The iPad users can also adjust the size of the main application window. Even on the iPad, you can hide the background apps. The process of hiding the background apps on an iPad is the same as that of a MacBook, so refer to the first section for this.
How to Turn off Stage Manager on iPad
Disabling or turning off Stage Manager on an iPad is quick and simple. Follow the straightforward method in this section to turn off Stage Manager on the iPad.
Step. 1→ On the top right corner of your iPad, click on “Control Centre.”
Step. 2→ Look for Stage Manager and click on its icon.
Step. 3→ Finally, disable the Stage Manager feature on your iPad by toggling the button to make it grey.
Advantages of Stage Manager on Mac & iPad
There are numerous advantages of using Stage Manager on your MacBook and iPad. Some of the most relevant advantages are listed here.
- Easy access to multiple apps.
- It saves a lot of time required for switching between applications.
- Convenient to use
- Hide recent apps feature to enable fullscreen
- One-click navigation to different apps
- User-friendly and intuitive
How to Hide Stage Manager on Mac & iPad
You might want to customize the Stage Manager feature and hide the recent apps and the dock of your MacBook and iPad. Luckily, iPad and Mac users can personalize the Stage Manager feature according to their convenience by the following methods.
Hiding Stage Manager on MacBook
Step. 1→ First, click on the “Control Centre” icon at the top of the screen.
Step. 2→ After that, click on the Stage Manager icon.
Step. 3→ In the pop-up menu, click on the “Hide Recent Apps” option.
Hiding Stage Manager on iPad
Step. 1→ Open the “Control Centre” on your iPad.
Step. 2→ Scroll down and long-press on the Stage Manager icon.
Step. 3→ In the menu that appears tap on “Hide Recent Apps” to hide the background apps and the dock present at the bottom of the screen.
Stage Manager is an amusing and helpful feature, and Apple has done a great job by bringing this feature to the MacBooks and iPads in the latest update. It saves time and effort and is a simple, intuitive, and easy-to-use feature. Enabling and disabling this feature is a child’s play and can be done by following a couple of simple steps in this article. You can even hide the recent apps and dock from the Stage to dedicate your entire display to the apps you are using. So don’t hesitate to make the most of this feature to increase work efficiency and save time.


