
Actions You Can Take Quickly:
- Empty the Trash
- Delete Large Files
- Clear Cache Files
- Move Files to External Storage
- Uninstall Unused Apps
- Use Storage Management
- Optimize Storage
- Remove Old iOS Backups
- Clear Downloaded Files
- Clear Safari Cache and History
If your Mac startup disk is almost full, it can slow down your system and cause performance issues. A nearly full disk can prevent you from saving files, installing updates, or running apps smoothly. This article will guide you through effective steps to free up space, manage storage, and optimize your Mac’s performance, ensuring a smoother experience.
You might get the following Symptoms:
- The Mac Startup Disk is full won’t boot or won’t start or can’t delete files because the disk is full on Mac.
- Mac’s startup disk is full with a white screen
- Sometimes your Mac says startup disk is full but it’s not overloaded
- The operation can’t be completed because the disk is full.
These types of issues can be resolved through my free troubleshooting. Hope this may help you achieve success.
How to Fix the Mac Startup Disk is Full on MacBook
Fix 1: Get an overview of Storage
First off, we will check out what are those files eating up the storage of your Mac. Analyzing the used storage and remaining storage helps us to take action against what to delete and what not to and get rid of Mac startup disk is full. To do so,
- Go to the Apple Logo from the top menu
- Choose System settings.
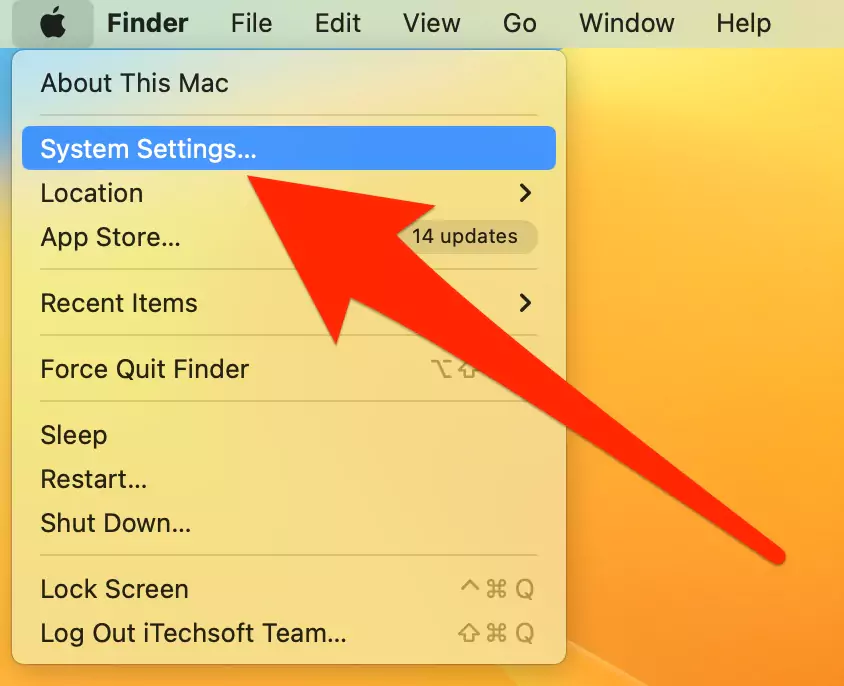
- Click on General
- Choose Storage.

- Please manage storage on the recommended option.
Take a closer look at categories such as Photos, Others, Apps, Movies, Audio, and Backups.
Fix 2: Track down large files and remove them
The first fix will only provide a review of how much space is occupied by each category. In this troubleshooting, we will directly look for the large files consuming the space. From there, if you don’t need those large-sized files, you can immediately delete them and free up some space.
- Launch “Finder.”
- Now, open any folder and bring up a finder search by pressing Command+F.
- From there, you have to select “This Mac” and then go for “File Size.”
- Also select “is greater than” option along with choosing the size like 1GB or 2GB or 500GB.
If you find any garbage file or a file that is no longer useful, then you can delete it right from that window by dragging it to the Trash or pressing Command+Delete.
Fix 3: Clear the Downloads folder
Mostly, we have a habit of downloading files, and often, after using it, we don’t delete it from Mac, and so it occupies one crucial part of our storage. Get rid of archives files and zip files and images and videos, which are not necessary for you. Go and look at your Download folder and delete the files.
Fix 4: Empty Trash on Your Mac
I permanently delete the unnecessary when I receive any message, like your Mac storage is complete, or your Mac startup disk is entire. Deleting those files isn’t enough if you want to make some space on your device. When you delete any data from the Mac, it gets stored in the Trash folder of your PC. So you must also clear the Trash and then only you will get some free storage, or we can say more space.
Fix 5: Clean Cache files on Mac
Cache files are the ones that help your Mac to run smoothly, without cache files, it might be challenging to run applications. On the other hand, it consumes a lot of storage.
However, if you periodically delete these files, then it will make some space-free. Are you thinking about what after deleting these cache files? Will your Mac function properly? Of course, when you restart Mac, the new cache files will be created in the Mac.
- Open “Finder” and click on the “Go” menu.
- Then click on “Go to folder.”
- Enter the following path,
~/Library/Caches
- Delete the cache files that are taking more space.
- Go back to “Go to folder” and again enter the following path,
/Library/Caches
- Similarly, delete the files that are consuming the most space.
Fix 6: Remove old Backups on Mac Finder or iTunes [2 Ways]
macOS Catalina or Later macOS Users can Use Finder to Manage Backup Files without Terminal command. But MacOS Mojave and Earlier macOS on Mac and Windows PC users can use iTunes instead of Finder. First is to use iTunes or Finder, Connect your iPhone/iPad to Your Mac or PC, According to MacOS Version use iTunes/Finder on Mac/PC. Once you connect the iOS/iPadOS device, Check the Device on iTunes/Finder window. and click on a device name from Sidebar of the Finder and for the iTunes window available at the top.
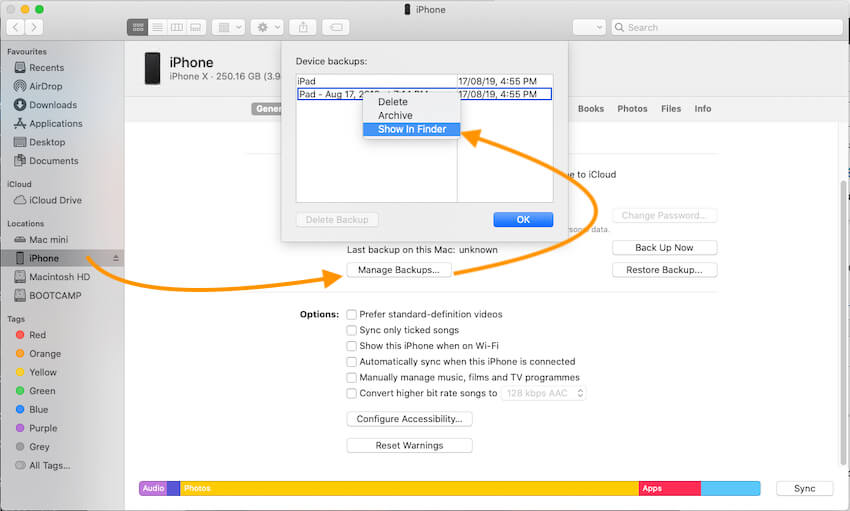
Under the Backup section, Click on Manage Backups… and See a list of all previous backup. to Delete it, Select the Backup name and Tap on the Delete button to remove data from Mac.
2nd Way to Find Backup Folders and Delete it
If you regularly take backups of iOS devices and also of Mac then remove the old files and only keep the recent backup file, in case if you need later. This will helps to clear up to 100+ GBs Space at once.
To remove iTunes backup,
- Step #1: Launch “Finder”
- Step #2: Click on the “Go” menu.
- Step #3: From the drop-down menu select “Go to folder.”
- Step #4: Type the path,
~/Music/iTunes/Previous iTunes Libraries

- Step #5: You will see the backups with dates. Delete the old ones.
To remove All iOS/iPadOS Old backups Files,
- Step #1: Follow the same steps up to step 3.
- Step #2: Now enter the path,
~/Library/Application Support/MobileSync/Backup/
- Step #3: Remove all the old backups from there too.
So, I guess that this cover story solved your Mac Storage issues.
Delete Other Volumes and Free Up Space on Mac
Disk Utility Window will show finalize space available on your mac, that we can see in any account if your Mac has multiple accounts. Also, Some users are worried about Other Volumes on Disk utility showing big space that can’t delete. Because, we can delete data from another account in the same device using Disk utility, So Backup won’t delete if you are taken through the other account on the same make. To delete these types of secondary account data, You can delete the whole account under the Mac System Preferences.
Conclusively, Remove unused account if you are not using from Mac. Below the steps for Delete Account from an Administrator account on Mac.

- Go to the Apple logo on Mac.
- Next, select the System Preferences option.
- Now, Click on the Users & Group option.
- Select Admin account and Tap on (-) sign to delete account and Data completely from Mac System.
- That’s it. [Make sure, before deleting the process, Keep a backup of your important data to another device]
MacBook Won’t Start and Boot: Startup Disk Full Mac Won’t Start
Go to the Disk utility window during the booting process of your Mac. in such case, your mac won’t login, so you have to manage Disk in the recovery mode using the below steps for Intel and M1 Mac.
For M1 Mac
Turn off and shut down your Mac. Now, press and hold on to the Power button until your Mac see the Startup volume and Options on the screen. Click on Options > Next you will see the macOS Recovery window, then continue, and see the Option for Disk Utility. Delete or Manage Partition on Mac using the option, Erase and Partition at top of the window.
For Intel Mac
Turn off and Turn Mac, Quickly Press and Hold on Command + R. Until your See the macOS Utility window on your Mac screen. Now, the Last option is Disk Utility, Click on it and Analyse which Drive and Volume used your Mac’ local storage. Delete unused Volume, And Drive Partition easily from the Disk Utility window. That’s it. [Showing in above solution]
- Secondly, Still not fixed and Showing the same problem, then we can reinstall Latest MacOS On Mac from the macOS utility window screen.
Get More:


