Hence, it is incredibly crucial for all working professionals as well as students to fix this issue and access the files on the hard drive. We have put together this article to provide you with practical and functional solutions related to the problem of specific hard drives not being visible on the MacBook.
Solution 1. Use Original Apple USB – C Converter

The first and foremost solution for fixing the problem of hard drives not being visible on Mac is to use the original Apple USB cable since the MacBook supports many third-party cables. For the people using MacBooks with M1 chipset, it is advised to use the original Apple USB C converter as these devices only have the support of USB C type connectivity. Therefore, to avoid any problems related to the connectivity and support, use the authentic USB cable designed by Apple.
Solution 2. Enable Hard Drive in Finder Sidebar
If you have macOS High Sierra installed on your Mac, then it is possible that the hard disks may not be visible in the Macintosh HD folder by default. In order to enable or show the hard disk in the Finder Sidebar, follow the instructions given in this section.
Step. 1→ Launch the Finder app on your Mac.
Step. 2→ Now, on the Menu bar situated at the top of the screen, click on the Finder option and select Preferences/Settings [on macOS Ventura].

Step. 3→ Then, click on the Sidebar tab in the Finder Preferences window.
Step. 4→ Finally, select “Hard Disks” under the “Show these items in the sidebar” option in the devices pane.
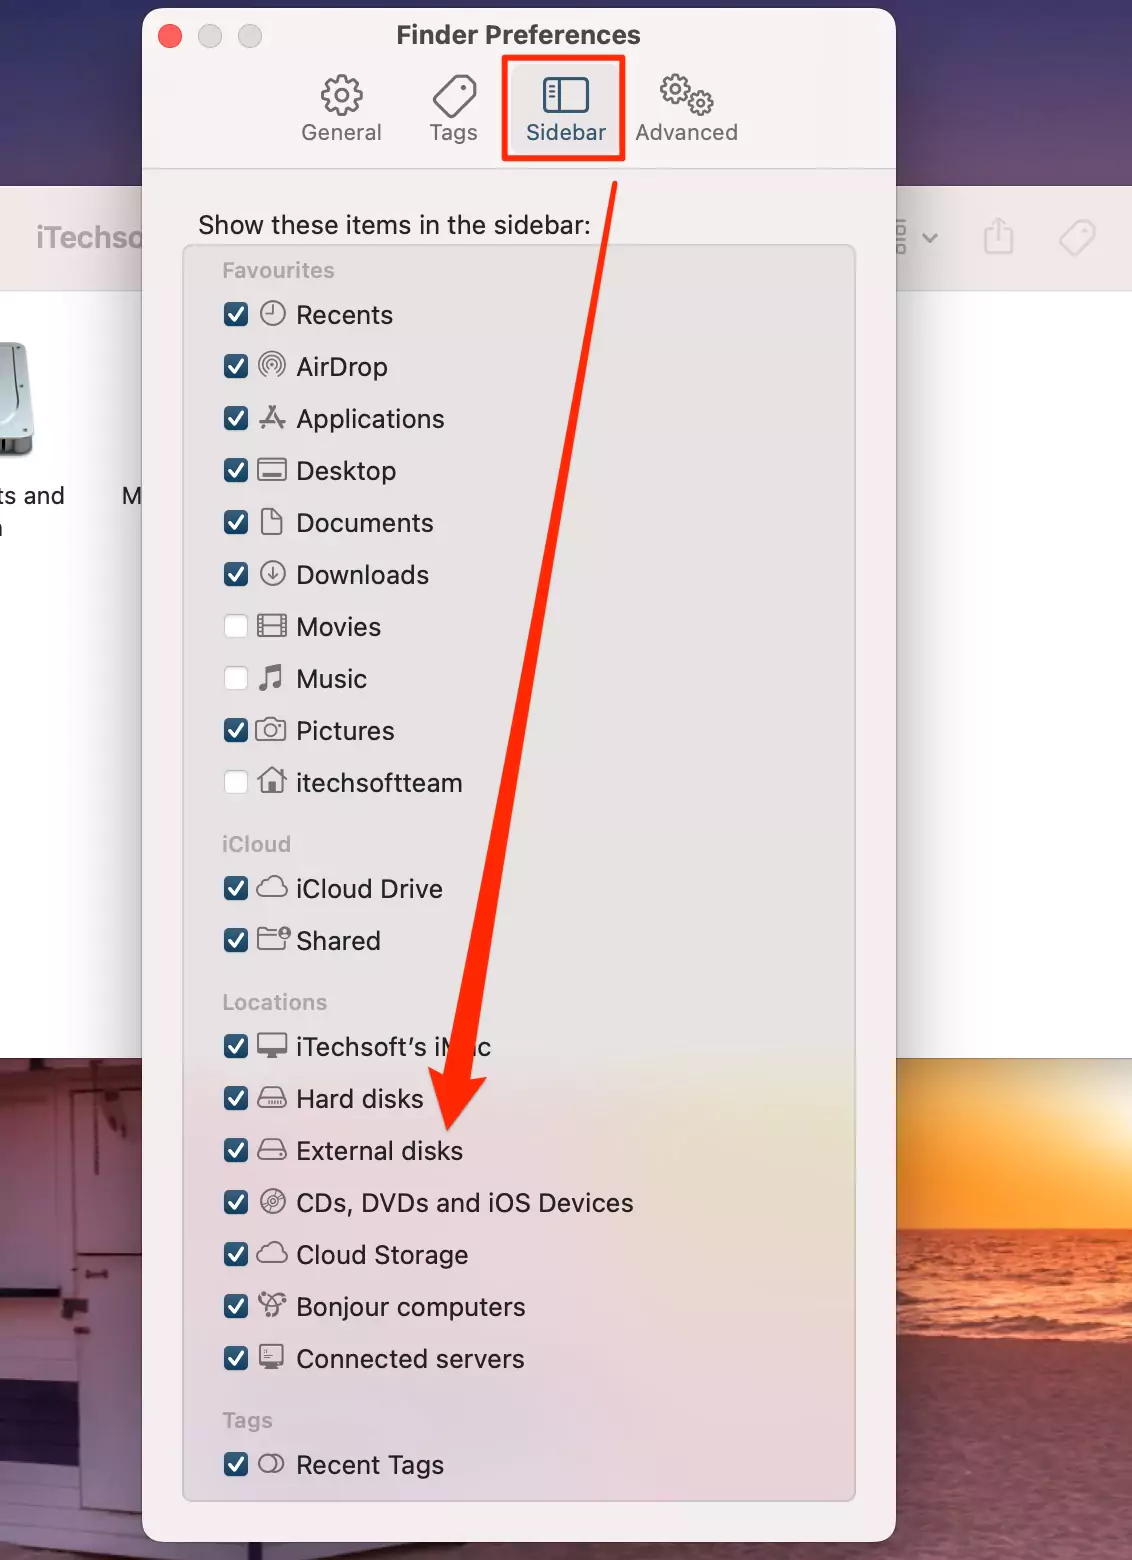
Once this is done, all the connected hard disks will be visible on the Finder sidebar for easy access.
Solution 3. Check cable Link
Another reason for the hard disks not showing up on your Mac is that the USB connector cable is faulty. A faulty USB cable can also sometimes damage your Mac and hard disk, so the best thing you can do to check whether the USB connector cable is defective is to try out a different USB cable to connect the hard disk with your Mac. If the hard disk appears on your Mac when connected using a new cable, it indicates that your previous USB was defective, so it’s time you get rid of it and buy a new one.
Solution 4. Remove all HUB & Connected Device, Restart Mac, and Check
However, theoretically, it may sound irrelevant, but removing all the HUBs and connected devices like tablets, smartphones, pen drives, etc., from the Mac, has proven to fix the hard disk problem not showing up on the MacBook. Once you have disconnected all the HUBs and connected devices, you need to simply restart your MacBook (Apple Logo from top menu > Restart) and try connecting your hard drive again to the Mac. This method should fix all the glitches or interference caused by the connected devices that prevent the desired hard disk from appearing on the MacBook.
Solution 5. Run First Aid – Repair your Mac
Running a repair on your Mac can resolve many problems like a file being corrupted, multiple apps quitting unexpectedly, and external devices like hard disks not working correctly. You can repair the disks on your MacBook with the help of the disk utility app that scans and repairs the disk in case of errors. To run First Aid on your Mac, pay close attention to the procedure explained below.
Step. 1→ First, tap on the Launchpad in the Dock, search for the Disk Utility app, and open it.
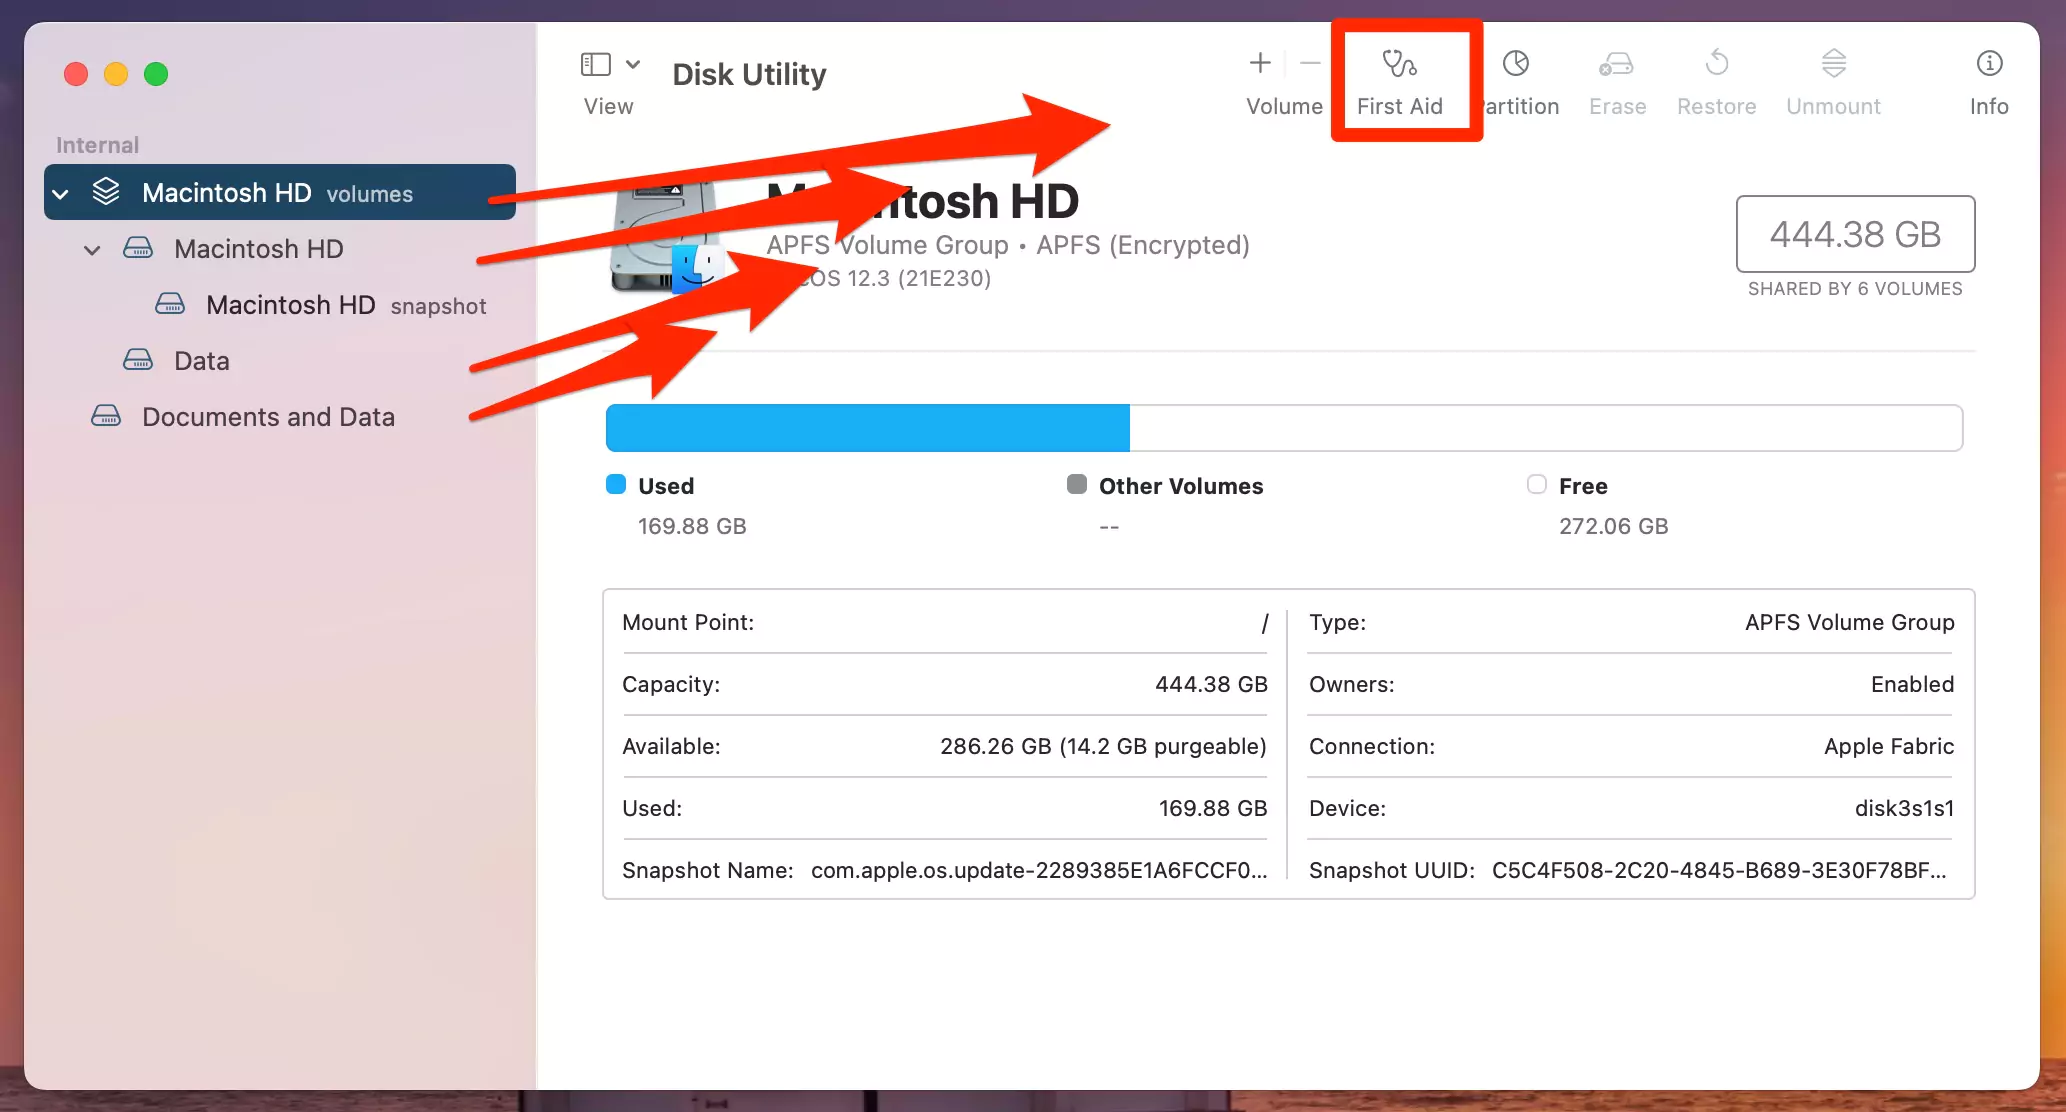
Step. 2→ Then, choose the hard disk you want to run first aid on in the sidebar.
Step. 3→ Now, tap on the first aid option, press run and follow the instructions on the screen.
Step. 4→ Finally, press the done button when the first aid process is complete.
This method will force your MacBook to scan the hard disk for errors and try to fix them if the problem encountered was software-related.
Solution 6. Check on another Mac
In some cases where a hard disk does not show up on a specific MacBook, connecting the same hard disk to a different Mac has been noted to work properly. Hence, if you need the data or files stored on the hard disk, the best thing you can do is try connecting to a different computer or MacBook and see if you can access the hard disk.
Solution 7. Change the disk Format if there is an issue with it
Since Windows devices support NTFS format and Apple devices support HFS+ and APFS formats, it is likely that you will face difficulty in accessing the files stored on the hard disk. Hence, if you use your hard disk on both Mac and Windows devices, the most suitable solution for this problem is to change the disk format to FAT32 or exFAT, as both of these formats are well supported by Apple as well as Windows computers. The users can change the format of their hard drives by following the process described in this section.
Mac is Showing Hard Drive but Not showing on Windows, then Plug in to Mac and Correct the Format. follow the steps below,
Changing the disk format on a MacBook
Step. 1→ Slowly and carefully insert the connector of the hard disk into your Mac’s port for proper initiation.
Step. 2→ Then, head over to Applications > Utilities > Disk Utility.
Step. 3→ Now, look for the external hard disk under the External tab in the sidebar on the left. Tap on it to see the disk’s details.
Step. 4→ After that, click on erase at the top menu bar and select the disk format as FAT32 or exFAT.
Step. 5→ At last, start the reformatting process.
Windows is Showing Hard Drive but Not showing on Mac, then Plug in to Windows and Correct the Format. Follow the steps below,
Changing the disk format on a Windows computer
Step. 1→ Initially, connect the hard disk to your Windows computer.
Step. 2→ Search for the external hard drive in the sidebar of the file explorer.
Step. 3→ Now, right-click on the hard disk’s icon using the mouse and select the Format option from the list of options.
Step. 4→ Then select FAT32 or exFAT as the disk format and enter the name for your hard disk in the Volume Label tab.
Step. 5→ The final step is to click on the start button and allow the hard disk to reformat itself.
Note that reformatting the hard disk will lead to all the data stored in it getting deleted, so make sure to create and save a backup of all the essential files prior to this process.
Solution 8. Try in Safe Mode
Running the MacBook in safe mode can resolve a lot of issues, like the external hard disk not being visible on the Mac. Hence, the next most relevant solution for taking care of your hard disk visibility issues is to boot up your MacBook in safe mode. You can use the safe mode on the Mac by sticking to the instruction given below.
Safe mode in MacBooks with M1 chipset
Step. 1→ Turn off your MacBook if it is already booted up.
Step. 2→ Then turn on the Mac by pressing the power button and keep holding the power button until the startup options window appears on the screen.
Step. 3→ Now, choose the startup disk and long-press the shift key on your keyboard while tapping on the “Continue in safe mode” option.
Step. 4→ Finally, log in to your MacBook. You may be asked to log in twice.
Safe mode in MacBooks with Intel chipset
Step. 1→ First, restart your Mac and immediately press and hold the shift key as the Mac boots up.
Step. 2→ Then, release the shift when the login window appears on the screen.
Step. 3→ Now, normally log in to your MacBook. You might need to log in twice if asked.
Once you have booted up your MacBook in safe mode, try connecting the hard disk again to see if it is recognized by your device or not.
Solution 9. Reset PRAM Or SMC [T2 Mac]
Skip this solution for M1 Mac user,
Since PRAM and SMC both contain information regarding the power, battery, connected devices, and other settings stored in them, resetting them might fix the problem of the MacBook not recognizing a particular hard disk when connected. To reset PRAM and SMC, take note of the processes explained below.
- Reset PRAM
Step. 1→ Shut down the MacBook if it’s up and running.
Step. 2→ Now restart or power up the Mac and hold the Option + Command + P + R immediately after pressing the power button.
Step. 3→ Finally, release the keys after about 20 seconds.
(The users can release the keys once they hear the second startup sound on Macs that play a startup sound.
For the MacBooks that embody the Apple T2 security chip, the users can release the keys after the Apple symbol appears and disappears for the second time. )
- Reset SMC for T2 Macs
Step. 1→ First, power off the MacBook.
Step. 2→ On your MacBook’s keyboard, press and hold the option + control + shift keys for about 7 seconds, and then long-press the power button as well.
Step. 3→ Then, keep holding the keys stated above along with the power button for another 7 seconds.
Step. 4→ At last, wait for a few seconds and press the power button again to start up the MacBook.
Solution 10. Contact Hard Drive Manufacturer
The last resort for fixing the problem related to the Mac not recognizing the hard drive is to contact the hard drive manufacturer. You should put this solution into action only and only if all the other solutions explained in this article fail to resolve your problem. The support center of the hard disk’s manufacturer will help you diagnose the problem and provide you with a replacement if the hard disk is faulty and meets all the warranty-related criteria of the company.
With these fantastic and resourceful solutions, you can be stress-free and continue your work without worrying about Mac’s hard disk not being visible. Hence, go through each one of the fixes and let us know what worked for you.
![Can’t See Certain Hard Drives on Mac [M1 or Intel] after Sequoia/Sonoma Update](https://www.howtoisolve.com/wp-content/uploads/thumbs_dir/should-location-services-be-turned-on-in-a-mac-pmy8qsqmhcg2lwzhtl8w4lv5sbqbo4kk54xvwuuat8.webp)
![Can’t See Certain Hard Drives on Mac [M1 or Intel] after Sequoia/Sonoma Update](https://www.howtoisolve.com/wp-content/uploads/thumbs_dir/best-chihuahua-wallpaper-for-iphone-android-ipad-tab-pmytwbnffax0outt1rhr7ft3ge9ps9ruuc5ix5pxrw.webp)


