Have a printer? Well done! You will no longer be irritated when airlines ask you to print the boarding card at home. Printer prices have declined considerably in recent years as paper use has decreased. However, more things being done digitally does not diminish the need for printers; tangible papers must still be mailed, Users must print images, and many businesses prefer genuine copies of invoices. There’s also the necessity to print concert tickets, mailing labels, and boarding cards. Printers won’t be extinct any time soon.
Apple’s wireless AirPrint technology or a USB cord can connect local printers to a Mac. Purchasing an AirPrint-compatible printer is the simplest method to add a printer to the Mac. It requires little to no setup. If the printer’s paperwork or packaging indicates AirPrint compatible, it will operate with the Mac.
Macs do not support all USB printers. Examine the documentation to ensure that the printer is compatible. If it is, it instantly connects to the Mac; however, the setup needs a few more steps.
This guide will get you working step-by-step on how to install a printer.
Description
You need to follow this instruction to add the printer to your Mac, regardless of whether you’re a new Mac user or have never installed a printer before. Adding an unknown printer to a Mac might be simple or a bit complicated.
There are several methods for adding a printer to a Mac. Printers are usually classified into two types: wired printers and network printers. Adding a printer to a Mac depends on the type of printer. Whatever printer brand you have, such as an HP printer, Epson printer, Canon printer, or Brother printer.
Using Printers & Scanners options, you must add a printer to the list of printers before you can use it. (Using Printers & Scanners settings is analogous to using the Printing control panel in Windows if you transferred from a Windows system to a Mac.)
macOS often connects to new printers using AirPrint or immediately downloads their software when installing one (also called a printer driver). Install the software from the printer’s manufacturer’s website or the package it came with; instead, follow the steps in one of the tasks below, and macOS will prompt you to get the most recent software if required.
Note: Avoid installing any drivers that come with the printer because most of the driver’s Mac users require are already included in the operating system. The majority of printer manufacturers have this in their installation instructions. On the other hand, if you are accustomed to installing drivers for peripherals, you can unintentionally install outdated drivers.
How to Add a Wireless Printer to a Mac
Attempt a Wi-Fi connection if you have a wireless network-supported printer. Connecting the printer to Wi-Fi is the most challenging part of setting a wireless printer on a Mac. You can sometimes achieve that by pressing simply two buttons. Depending on the printer and router, it takes a little more work. Here’s a quick fix:
- On the printer, press the “Wi-Fi” button.
- On the router, press the WPS button.
- If it doesn’t work, see the printer and router manual.
Depending on the Printer Company and model, the User can install the Printer driver setup to Mac from the Company website. and Add the Printer to your WiFi Network. Once the printer is connected to your WiFi network through Setup. A printer can accessible on Each Device connected to the same WiFi network. Just find it using the given below steps and Add it to MacOS System to start Printing.
Troubleshooting:- Sometimes the printer is not detecting while setup the Printer to add a WiFi network Using Mac or PC. Then Use Alternate Methods like iOS and Android apps. Once the Printer is added to a network, we can use the printer over WiFi from Mac in the same network.
Make sure the Printer is Powered on. Check that the printer is linked to the Wi-Fi network on the Mac. Add the printer on Mac after they are both [Mac & Printer] connected:
On macOS Ventura, Sonoma – Add Printer on Mac
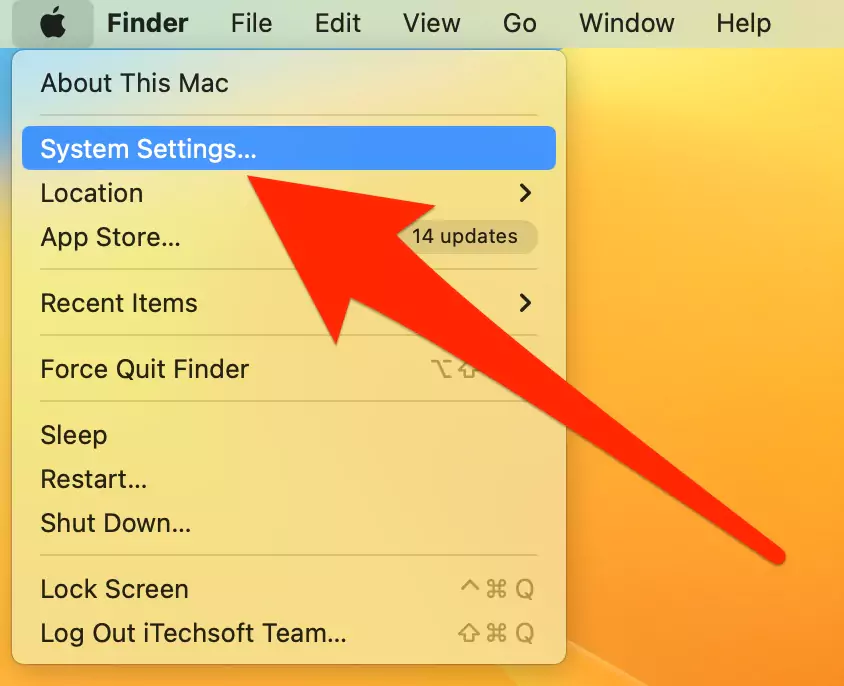
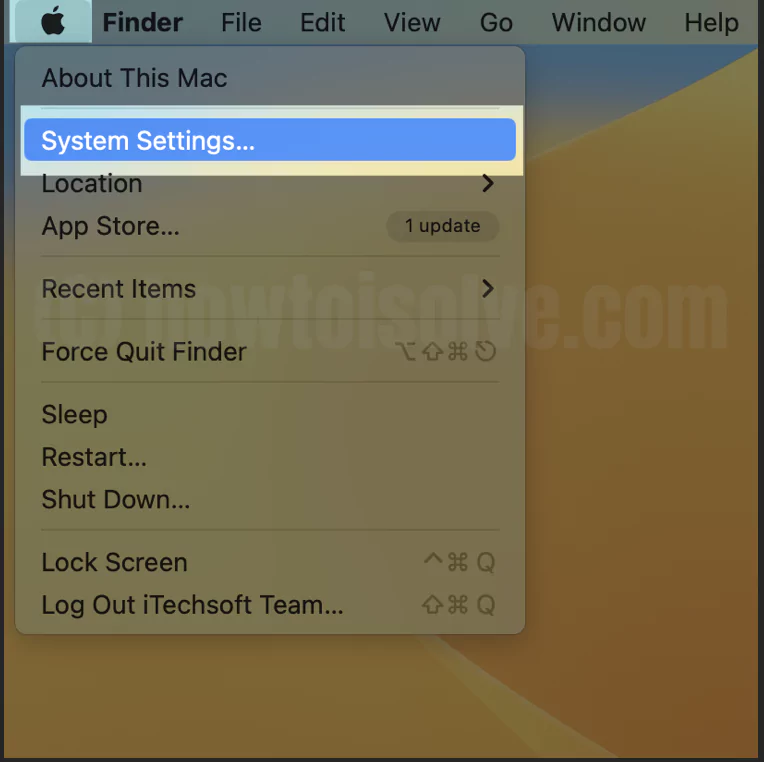
1→ Go to the Apple Logo from the top menu > System Settings.

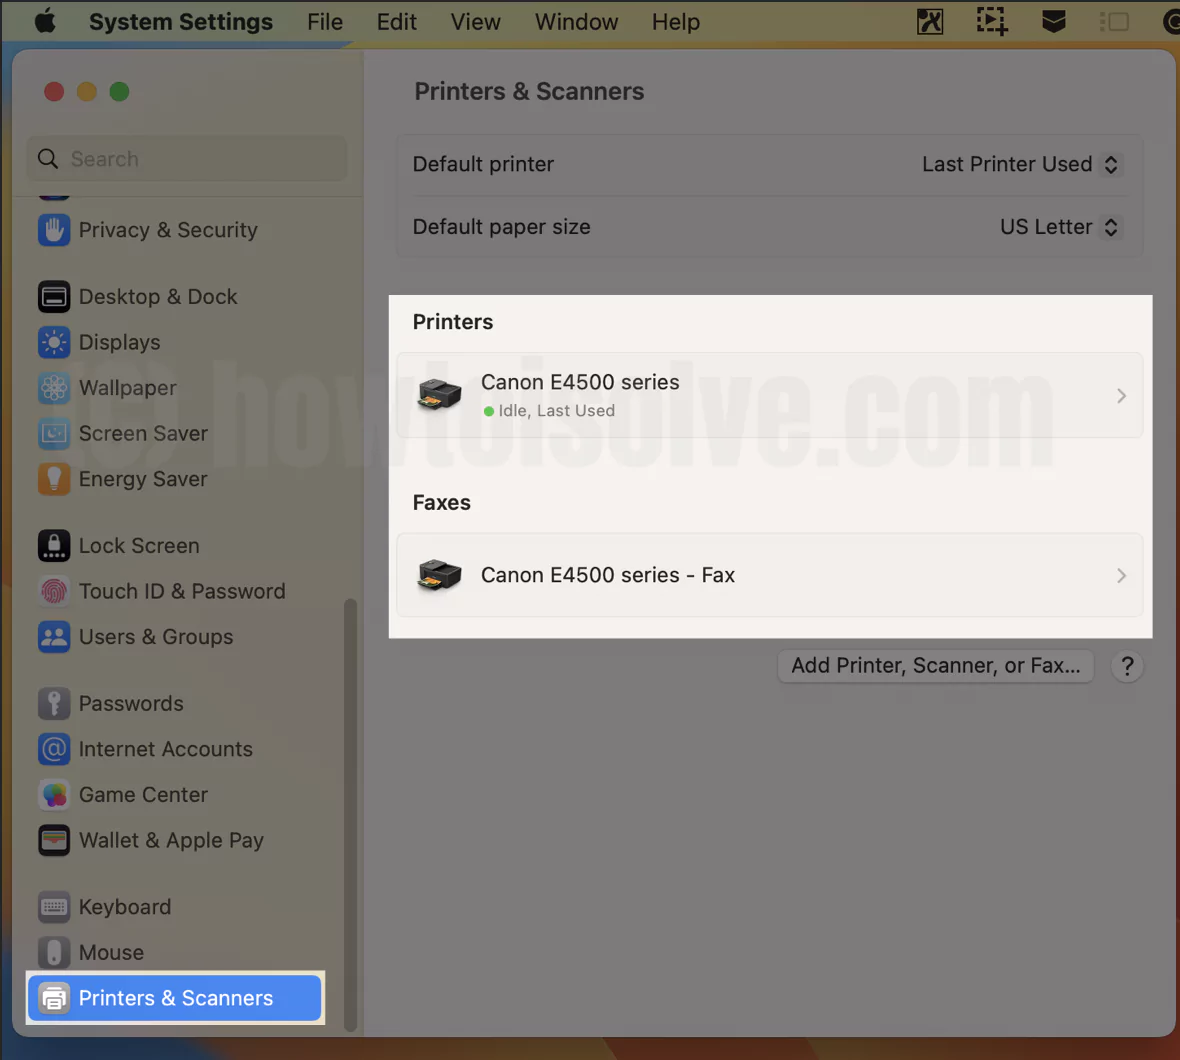
2→ Next, Scroll to Option “Printers & Scanners” > Click on “Add Printer, Scanner, or Fax…“.

3→ Now, Choose a Printer from the list and click on Add. [Here’s Best AirPrint Supported Printer].
4→ Wait for a minute to Setting up the device.
5→ Now, the Requested printer will be added to the Printers list. and showing Idle while ready to print and connected. Otherwise, will see offline.
That’s it.
Now, MacOS System App and Third-party App are ready to Print any document using File > Print or Command + P Option. Choose Printer and Print on the selected printer.
On MacOS Monterey & Earlier – Add Printer on Mac
- Navigate to System Preferences on Mac > Printers & Scanners.
- To add the printer, click the + button.
- Choose a your printer from the list.
- If you see AirPrint option next to Use, that implies the printer supports AirPrint [Best AirPrint Supported Printer], and you may connect it right away by clicking on Add option.
- If the printer does not support AirPrint, go to File > Add > Printer Drivers to download printer drivers from Apple servers. The drivers should be automatically downloaded.
Also Helpful: How to Print Double-Sided on Mac Computer.
How to Connect a Printer to a Mac Using WPS
It was common practice to press the “Wireless” or “Wi-Fi” button on the printer before clicking the WPS button on the network to establish a connection using WPS. Check the printer and router user manuals for detailed instructions since the process will differ based on your printer and router. After you’ve configured WPS, you may proceed to the instructions below.
- Click the Apple logo icon in the upper-left corner of the screen.
- Navigate to System Preferences/Settings on macOS Ventura.
- Select Printers and Scanners. Print & Scan will display under Hardware on earlier Mac models.
- On MacOS Ventura: Click on the Button “Add Printer, Scanner, or Fax…“.

- On MacOS Monterey & Earlier:- To the right of the printer list, click the + sign. After clicking the plus symbol, you may need to click Add Printer or Scanner on earlier Mac models. In the Add Printer or Scanner submenu, the Mac may also appear under Nearby Printers.
- On MacOS Ventura: Click on the Button “Add Printer, Scanner, or Fax…“.
- Choose the printer that you want to add. The Mac displays a list of network-discoverable printers on the Default Printer tab.

- In the Use option, select the printer’s software or driver. You have the following options:
- AirPrint is Apple’s native printing technology that allows you to print wirelessly from AirPrint-compatible printers. If the printer isn’t AirPrint-compatible, you must download the driver from Apple’s servers or the manufacturer’s website.
- If you have the printer’s print driver installed, use it.
- When updating the computer, choose Auto Select if you don’t have the print driver but want it to get the right one. or Download the Printer Driver from the manufacturer’s website.
- Finally, press the Add button.

- The list of printers will now include the new printer. This will be displayed on the Print & Scan window’s left side.
How to Connect a Printer through USB to a Mac
Users may only install printers without networking capability through a USB or cable connection. Although capable of wireless printing, some printers require a USB connection during the setup procedure. Here’s how to connect a USB printer.
- Connect the printer’s USB cable to the Mac laptop or desktop.
- Choose the Apple Logo.
- Navigate to System Preferences/System Settings [macOS Ventura].
- Printers and Scanners option will be shown. Print & Scan will display under Hardware on earlier Mac models.
- Select “Add Printer, Scanner, or Fax…“.

- To the right of the printer list, click the + sign.
- Select “Add Printer, Scanner, or Fax…“.
- Choose a printer to add. The Mac will auto-populate a list of network printers under the Default tab. Look for a printer name that has a USB in the Kind column.
- Select Add. At this point, the printer will be included in the printer list. This is visible on the left side of the Print & Scan window.
Note: If the printer does not support AirPrint, you must install the driver from the printer manufacturer’s website.
Adding a Printer Using an IP Address
How do you add a printer by IP address on a Mac?
You must know the printer’s IP address if you use this method to install a printer. Here’s how to determine the IP address of the printer. Go to System Preferences and add the printer from the Printers & Scanners section. Here’s a step-by-step guide on how to do it.
- Choose the Apple Logo icon.
- Navigate to System Preferences/Settings on MacOS Ventura.
- Select Printers and Scanners.
- On MacOS Ventura:- Click on “Add Printer, Scanner, or Fax…“.
- On MacOS Monterey:- Then, beneath the list of printers, click the Plus sign.
- Select the IP icon. This will resemble a blue globe symbol.
- In the Address area, enter Your Mac Hostname or IP address of the printer. The Mac will attempt to obtain printer information.
- Find Host Name: Go to the Apple Logo > System Settings > General > Sharing > Scroll to Local hostname. Or Read the full tutorial on Find and Change Hostname on Mac.
- Find Your IP Address: Go to the Apple Logo > System Settings > WiFi > Click on Details next to the connected WiFi name > Copy IP Address. Know your Latest IP Address on Mac.


See the above screen, used Hostname and IP Address to find the printer…
- Some Printer details are auto-filled, Like Protocol, Printer Name, and Use…
- If you like, rename the printer. Valid and complete host name or address.
- Select the print driver you want to use in the Use section.
- Select Add.
Note: Some printers with IP addresses may only have a few features available.
How to Choose the default printer on Mac
When the Print dialogue opens, the default printer is selected.
Add a new printer if you see “No printer selected” in the Print window. The first printer added becomes the default, but you can change it anytime. Open the shortcut menu by selecting “Set default printer” from the shortcut menu by control-clicking a printer in the Printers list in the Printers & Scanners pane.
Alter the default printer.
- Choose Apple Logo menu > System Preferences/System Settings on macOS Ventura, then Printers & Scanners on the Mac.
- From the “Default printer” pop-up menu, choose a printer.

- Choose that printer if you always want the same printer to be the default. The default printer remains unchanged even if you print to a different printer.
- Select Last Printer Used if you wish; the most recent printer you used to print becomes the default printer. the Mac recalls the last printer you used at the current network location. For example, the printer you last used may change depending on whether you’re at home or work.
How to use a Mac to connect to a shared printer
You may connect the printer to another Mac or a UNIX machine. The PCs must be on the same local network as the Mac and run OS X v10.4 or later.
Printer sharing is intended for non-network or non-wireless printers that are usually hooked into the computer directly. Network, wireless, and AirPrint compatible printers do not need to be shared because they are already shared on the network.
- Choose Apple Logo menu > System Preferences/System Settings, then choose Sharing and tick the Printer Sharing button.
- Select the printer you wish to share from the Printers section.
- All network users (“Everyone”) have default access to a shared printer. Follow steps 3 and 4 if you wish to restrict access to particular users.
- Then, at the bottom of the Users list, click the Add button, and then perform one of the following:
- Choose a user from Users & Groups, including all of Mac’s users.
- Choose a user from Network Groups or Network Users, which lists all the network users.
- Choose someone from the contact list. Make a password for the individual, then click Create Account.
- Users on the network that are added to the Users list have access to the shared printer set to No Access (or “Everyone”). Choose Print from the Everyone pop-up option.
- Click the Remove button after choosing the User’s name. You can’t get rid of Everyone.
How to Avoid Printer Issues on a Mac
After adding a printer or scanner to the Mac, you may print and scan documents. Taking attention to minor details may make operating the printer a breeze. Follow the steps below to avoid printer and scanner issues on the Mac.
- Maintain the printer’s cleanliness both inside and out.
- To avoid cartridge ink drying up, use the printer frequently.
- Once a month, properly align the printer’s head and use high-quality ink.
- Don’t give too many printing instructions at once, and avoid printing for hours.
- On the top of the printer, avoid placing large loads.
- Avoid exposing the printer to excessive heat.
- Place the printer away from coolers, table fans, or air conditioners.
Conclusion
Printers may be installed on Mac systems using a variety of techniques. They may be installed via a USB connection, IP address, WPS button, Bluetooth, and other methods. All of these approaches are trustworthy. It would be good if Users followed the processes appropriately. When the technique is followed correctly, the printer will be successfully installed. And it will be ready for usage in a short time.
Installing a printer on a Mac may be tricky for inexperienced users. Due to technological problems, even seasoned users occasionally encounter difficulties. In this post, we addressed all elements of how to add a printer to a Mac while keeping it basic and easy to comprehend.
When using wireless printers, use NetSpot will help you to locate the printer for best connectivity. Toothfairy will come in useful as a connection toggle for Bluetooth printers. And, of course, if you remove an old printer, we recommend looking for one that supports AirPrint. AirPrint saves you the effort of manually downloading printer drivers and a lot of time throughout the setup process.


How do I remove printer (non AirPrint) from Add Printer list?
Removing a printer is easy. Right-click or Control + Click on Printer name and select Remove Printer.