The dock on the Mac computer is a panel that lets you quickly access applications and folders you frequently use.
But in case you don’t like the dock way it is. Don’t worry; playing around with Mac customization Settings; lets you change the lock, size, automatic hide & show, and many more things. If you didn’t know the steps to customize the dock on the latest macOS, read this guide to make it truly yours.
Tips: Show Top Menu Bar on Mac in Full-Screen Mode
What Is The Dock On A Mac? How To Customize It? How To Change
Customizing The Dock
Do you want to personalize your Mac’s Dock? Perhaps you’d like to add or remove specific applications from the Dock, or alter the appearance of the Dock by making it larger or smaller, or even moving it? In any case, you can personalize the Dock on your macOS system to your satisfaction in a matter of minutes.
Post-release of Mac OS X in 2000, the Dock has been a fundamental element of macOS. As a result, no matter what version of Mac it is running on, the steps to customize your Mac Dock are the same.
On MacOS Ventura, Sonoma
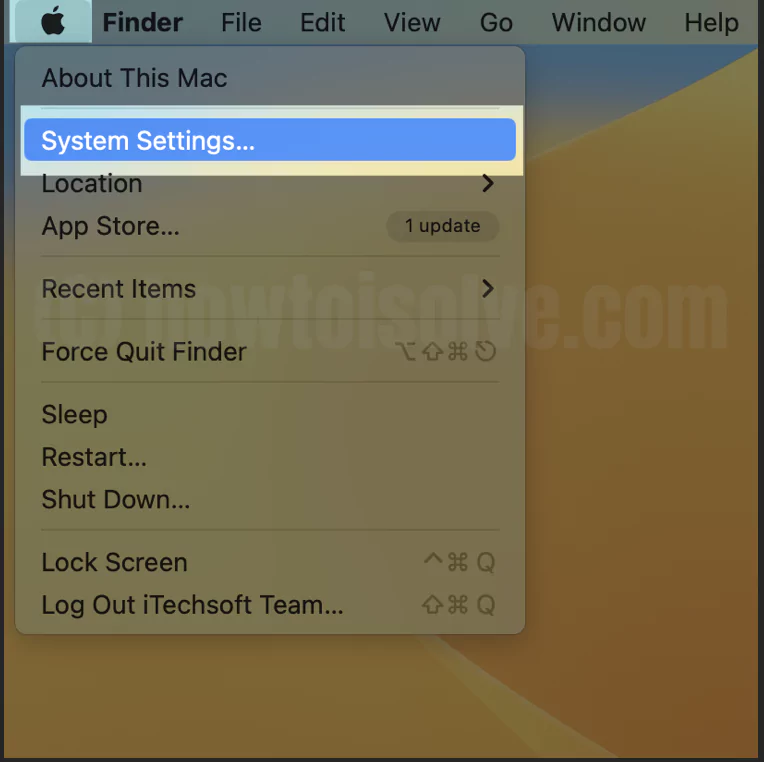
1→ Go to the Apple Logo from the top menu > System Settings.
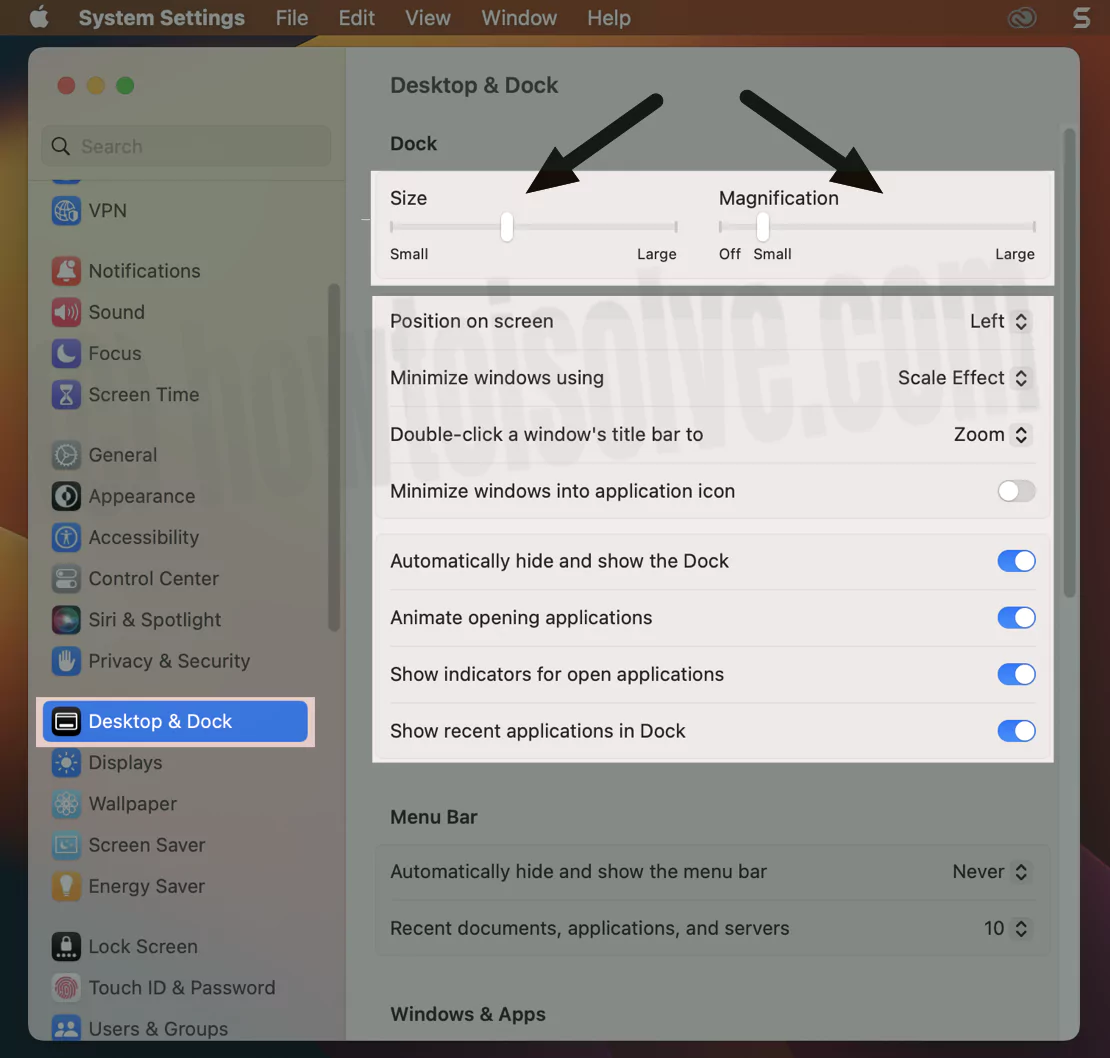
2→ Next, Click on Desktop & Dock > see all Dock settings like, Size Magnification, and more…Given below
- Position on screen
- Minimize windows using
- Double-click a window’s title bar to
- Minimize windows into application icon
- Automatically hide and show the Dock
- Animate opening applications
- Show indicators for open applications
- Show recent applications in Dock
That’s it. Don’t miss to see Alternate Dock settings and additional customization tips explained next.
On MacOS Monterey & Earlier
Step 1: Go to your Apple Logo from the top Mac menu and select “System Preferences.”
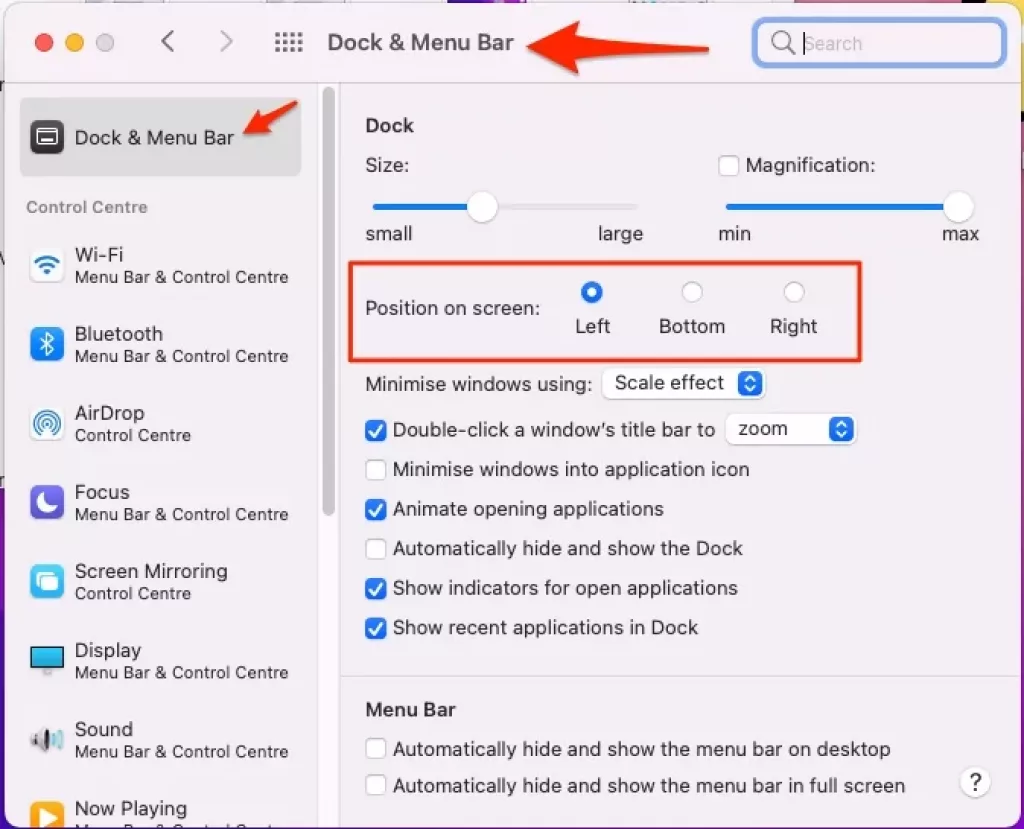
Step 2: To change your Dock preferences, click “Dock & Menu Bar” in the new window that appears.
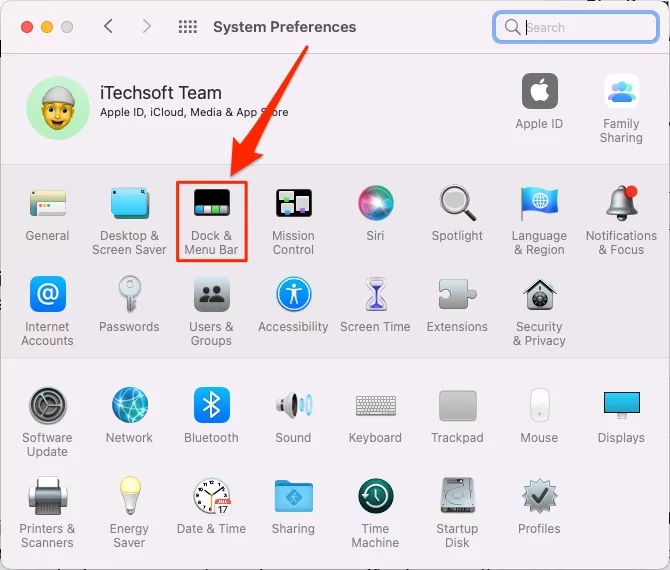
Step 3: Users can adjust the Dock size here by sliding the slider left or right. You can also turn on or off “Magnification,” a function that enlarges app icons featuring in the Dock when hovering the cursor over them. Adjust the magnification’s intensity with the slider.

Step 4: You can relocate your Dock to the left or right if you wish. Other animation options for opening and reducing windows for apps on your Dock are also available. Adjust them to your desire.
Step 5: If you wish to remove an app or folder from the Dock, right-click on it and select Options -> Remove from Dock.
![]()
Step 6: To add new app to the Dock, go to Launchpad and drag it to the Dock.
Step 7: There are several customizations one can make to the Dock to ensure that it meets your requirements. For example, you can hide recent apps from showing up in the Dock or remove apps that you rarely use for a more minimalistic design. Alternatively, enable auto-hide Dock to free up more screen space for what you’re working on and current windows.
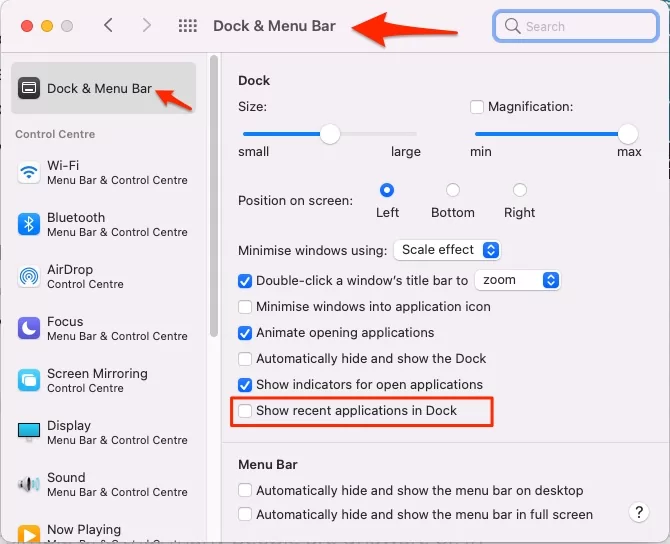
Step 8: Some more advanced Dock customizations are also available, such as making hidden app icons transparent and inserting spacing between Dock icons, and many other advanced techniques using default commands.
How to change dock size on Apple Mac?
The Dock is helpful as a Mac application launcher, but it can be too big or too small at times. Fortunately, there are two ways to resize the Dock on your Mac, one of which is a simple one that many people are unaware of. In macOS, here’s how to easily resize your Dock.
Here’s how to resize your Dock quickly and easily. First, hover your mouse pointer over the vertical divider in your Dock, placed between the app icons area and the file shortcuts and Trash area while seeing your desktop. Your mouse pointer will change to an up-and-down “Resize” arrow when you’re in the right spot.

To modify the Dock size, hold the primary mouse or trackpad button and drag the cursor away from or towards the screen until the pointer looks like the up-and-down sign. The Dock will become more prominent as you move your pointer away from the screen edge until it reaches the maximum size allowed. Likewise, the Dock will reduce till it reaches its smallest size if you move your pointer toward the advantage.
You can also modify the Dock size between the two extremes. Release the mouse or trackpad button when you’re finished, and the Dock will stay at the size you choose.
To change the size of your Dock the old school way, go to Apple Logo from Top Mac Menu > System Preferences (System Settings on MacOS Vetnrua or later) and right-click or Control-click on an empty section of the Dock near the divider line, then choose “Dock Preferences” from the menu that appears. To modify the size of the Dock on your screen, go to Dock Preferences and utilize the “Size” slider.
Exit System Preferences, and your Dock size will stay the same until you alter it again.
Don’t miss – How to Adjust Screen Resolution on Mac [Easy to Look icon].
Magnify Dock icon With Shift + Control
Hover the icon on the Dock Mac menu. We can see the app name only but not the icon clearly if the dock size is small and Too many app icons stay on the dock.
Press and Hold: Shift + Control key from Keyboard and Hover your Mouse cursor to Enlarge the icon on the dock. See more in the video below,
Customize Dock on Mac – Change Size, Magnification, Position on Screen, Effect
- Step 1. Click Apple logo,
- Step 2. Click on System Settings/(System Preferences)
- Step 3. Click on “Desktop & Dock” Or “Dock & Menu Bar“.

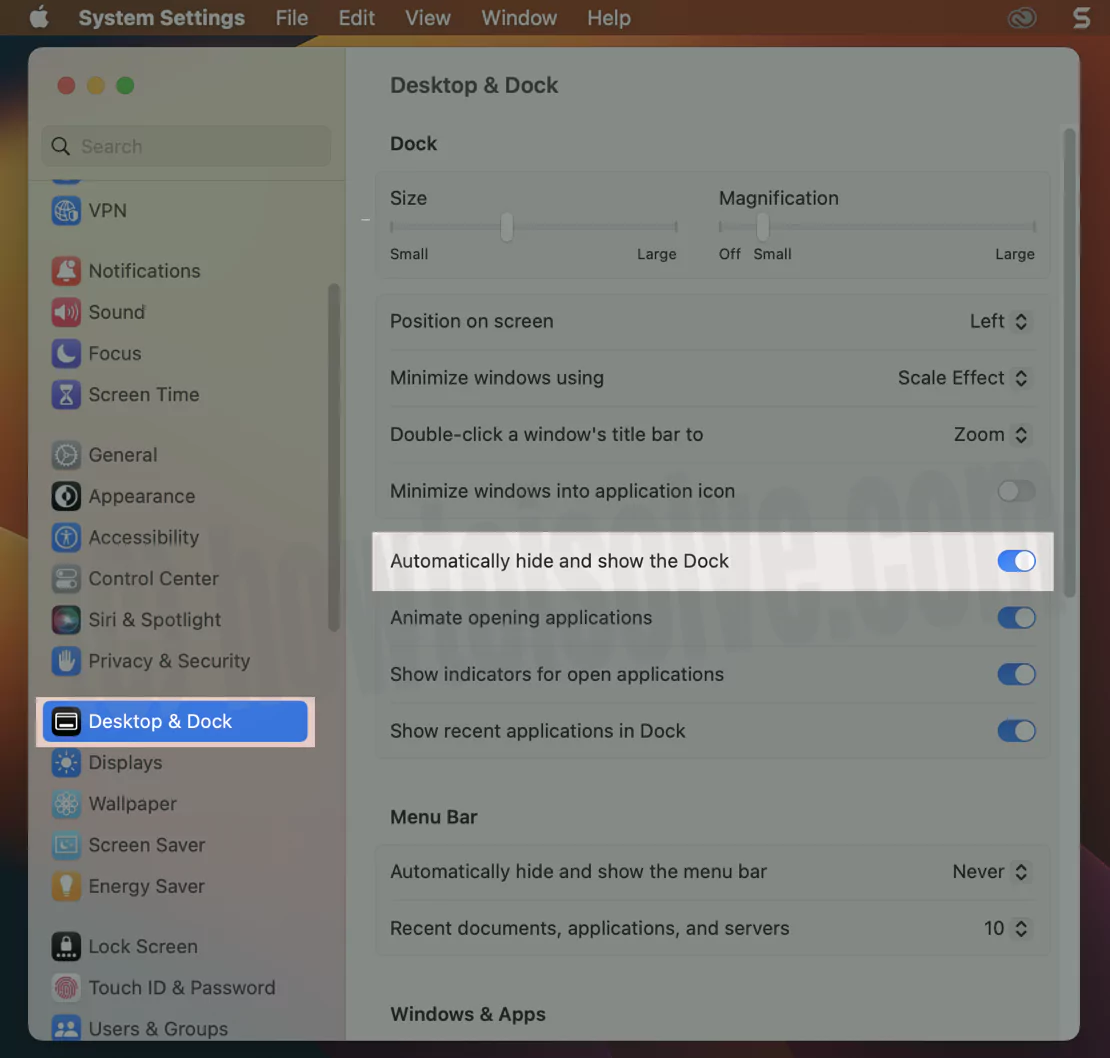
- Step 4. As per the below-given picture, Enable the toggle “Automatically hide and show the Dock“
Tick marks the check box to hide and show the dock on your Mac automatically.
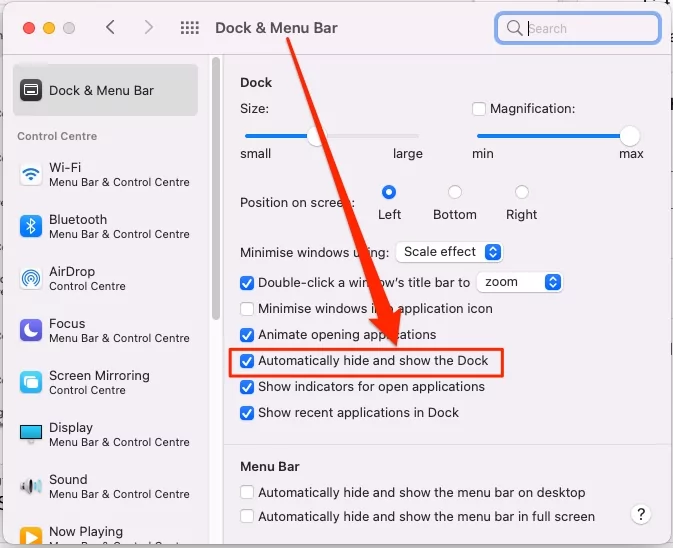
Or Right-click on Dock from the desktop, to see Turn on Auto-hide or Turn off Auto-hide.

That’s it. Using this option, your Mac Screen Dock will hide when you did not use it, If you want to see the dock, then move the pointer on the dock where it is located on your Mac screens Such as Left, right, or bottom side. Truly, this is an awesome setting for Customize Dock on Mac. Show recent Applications in Dock is a new feature that is included on Latest MacOS.
How to Change the Dock Size on Mac
In the Dock System presences pan, you can see a slider to change Dock size; if you want to big size Dock then, drag the slider from small to large side and get large Size dock on your Mac screen.
That’s it. Besides the size feature, you can see Magnification – it’s that, whenever you move your pointer on the dock for a particular app icon, that time icon will magnify. So, the magnification size slider is customizable, according to your choice. You can keep the icon magnify size small or large using the magnification slider.
How to Re-position or Move Dock on Mac Screen
Best way to Customize Dock on Mac – the default Dock potion is at the bottom of the screen, but, apart from that, there are two options for location, Left and Right, to choose a location or move dock on Mac Screen.

On the Dock Preferences pane, you can see an option position on the screen, Left, Bottom, and Right. You can keep Dock on your Mac’s left side vertically. Similarly, the right side is in a vertical position, and the Bottom is in a horizontal manner, bottom side is on the Mac Screen.
Go to the Apple Logo from the Top Mac Menu > System Preferences > Dock & Menu Bar > Select Option from Position on Screen.
That’s it.
How to Show Indicator on Dock for Open Application – Mac
A great feature of Customize Dock on Mac,
On MacOS Ventrua: Go to the Apple Logo > System Settings > Desktop & Dock > Enable toggle “Show indicators for open applications”.
On MacOS Montterey & Earlier: Click on, Apple logo >> System Preferences >> Click on Dock or “Dock & Menu Bar“

To, show the indicator Just check the checkbox, Show indicator for an open application. After that, you have got a small dot that appears below the icons for Open apps.
Dock Size On Apple Mac?
The Dock is the large bar at the bottom of your Mac’s screen, existing by default. There will be several icons on your Mac when you initially get it. The majority of them are application icons, although there are others as well. Apple updates the Dock with stuff that they believe you’ll use, but you can tailor it to your specific needs. The Dock is customizable to add applications, documents, and folders. The Dock can be a little complicated at first, but this guide can help you understand it better.
A thin, vertical line separates the two portions of the Dock. Each section has a distinct purpose.
The Application Section
Application icons appear on the left side of the screen. Some applications that you may find are Finder and Dashboard. Users can click on these icons to launch the applications they represent. A black triangle will appear beneath an application’s icon if it is already running. The application will be brought to the front in this scenario by clicking the icon. If you open an app that doesn’t already have an icon in the Dock, a temporary icon will appear towards the bottom as long as the app is active. The icon will disappear when you close the application.
The Document/Window Section
File and folder links and minimized windows are utilized in the section to the right of the dividing line. From the Finder, you can drag files and folders into this section. It creates an icon that you may use to open the file or folder easily. Drag the icon from the Dock to delete it. The Dock can also be used to store windows. By clicking the “-“, you can minimize an open window.
Trash Clean
The Trash icon appears on the Dock’s far-right. This icon behaves differently from the others. Users can drag and drop the files/folders into Trash. Ctrl+Clicking on the Trash icon and selecting “Empty Trash” will empty the Trash and erase the files.
Leave you to replay for, which is the way for you, that’s you never know for the dock. We ardor, by publishing this post for you on how to customize Dock on Mac. Keep in touch with us to know more, How to Tips for new Upgrade OS X.
Don’t miss – important Tips for New Mac

